You might have frequently heard this term “Serverless Computing”, Serverless computing, a cloud computing execution model through which the cloud provider manages the allocation of machine resources. You pay for what you use. The idea of not having to manage a server for computing in fact sounds appealing. With AWS Lambda, you can run code without managing servers then why should we build a serverless application? That’s for a reason to avail from flexible scaling to no idle capacity.
The first and primary thing you do is to install python and its dependencies.
Make sure to install the latest version 3.6 of python & here are few steps to be followed to install version 3.6 in your system. For that, you can follow the link the below to get the python’s newest version 3.6.
https://docs.python-guide.org/starting/install3/linux/
AWS Lambda supports Python 2.7, 3.6 and 3.7. Here is an example on how to set your environment to python 3.6:
Example:
$ python --version
Python 2.7.6
$ python3 --version
Python 3.4.3
$ python3.6 --version
$ alias python=python3.6
$ python --version
Python 3.6.2
How To Install PIP On Python3
- Update the package list using the command sudo apt update
- Use the command sudo apt install python3-pip to install pip for python.
- The final step is to verify the installation by checking the pip version.
Create IAM User In AWS
You need not to worry about the servers when you have this AWS Lambda application with you & it’s just like that simple to set up server less framework with AWS:
- Login into AWS console and go to the IAM page.
- Click on Users to add user.
- Enable programmatic access check box.
- You need to set permissions by clicking Next and select Attach existing policies directly.
- Look for and select AdministratorAccess and then click Next:Review to proceed further.
- Click Create user and ensure to download the CSV credentials file.
Create Working Directory For Python
Create working directory in python.
mkdir python
cd python
Clone Your Git project Into Current Directory
Use the below code to clone your project into current working directory.
git clone " Project Link URL Here"
It will ask for username & password so give the details then it will automatically clone the project.
How To Install AWS CLI On Linux
Use the below command to install AWS CLI
sudo apt-get install aws-cli
If you’re not sure about the installation then you can also check whether you have installed it or not.
aws --version
Also Read: How To Deploy a Golang Web Application with Docker
Prerequisites To Install Python :
- Pip
- Supported version of python
We also have two more way to install it, Just use the command $ pip3 install awscli –upgrade –user to install AWS CLI.
If you run into issues while attempting to install the AWS CLI with pip3, you can install the AWS CLI in a virtual environment to isolate the tool and its dependencies.
Steps To Configure AWS
Follow the below command to configure AWS,
aws configure
As soon as you give the command it will ask you for the below details. Now remember the CSV file we have downloaded while creating IAM user.
There you can find all the details that are required to fill the below credentials.
AWS Access Key ID [None]:
AWS Secret Access Key [None]:
Default region name [None]:
Default output format [None]: json
Then you can create virtual Environment for your project using below command.
virtualenv venv
Also don’t forget to activate the virtual environment using this,
source venv/bin/activate
After creating Virtual environment we have to install the zappa and application dependencies using pip
pip install flask pdfminer3k pdfminer.six
sudo apt-get install -y python python-dev python-pip build-essential swig git libpulse-dev && sudo apt-get install python3 python-dev python3-dev build-essential libssl-dev libffi-dev   libxml2-dev libxslt1-dev zlib1g-dev python-pip
pip install textract pdfminer striprtf python-dateutil date-extractor dicttoxml
pip install textract
pip install  pdfminer
pip install  striprtf
pip install  python-dateutil
pip install date-extractor
pip install  dicttoxml
After installing, you can use python file_name.py to make sure that your application is running or not.
Now it is time to deploy our application in aws lambda.
pip install zappa
pip install flask
Building Serverless Python Web Service Using Zappa
Zappa automatically configures your deployment settings using the init command:
Zappa init
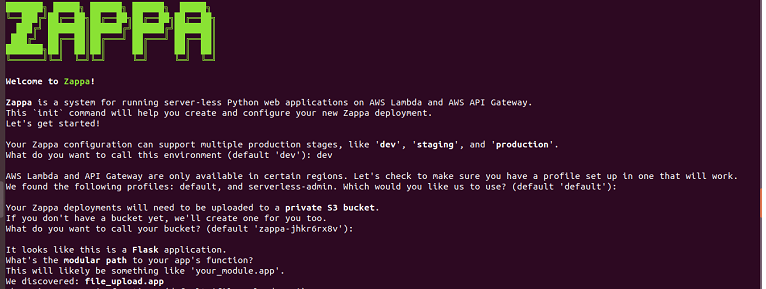
Also Zappa automatically detects the application type you use and you will asked to fill details like s3 bucket name, deployment state, region, user name, role name etc. Here you can give the required details as requested or you can proceed with default settings.
Finally, a file will be created with the name zappa_settings.json in your application folder.
And the zappa_settings.json file looks like
{
   "production": {
       "app_function": "file_upload.app",
       "aws_region": "us-east-1",
       "profile_name": "default",
       "project_name": "prorank-resume-",
       "runtime": "python3.6",
       "s3_bucket": "zappa-ugzgaelck",
       "manage_roles": false,

"slim_handler": true,
       "role_arn": "arn:aws:iam::711317688399:role/MyLambdaRole_zappa",
       "RuleArn": "arn:aws:events:us-east-1:711317688399:rule/DailyLambdaFunction"
   }
}
Then you can deploy your application in AWS Lambda by using this command that includes the name of deployment state as we mentioned earlier.
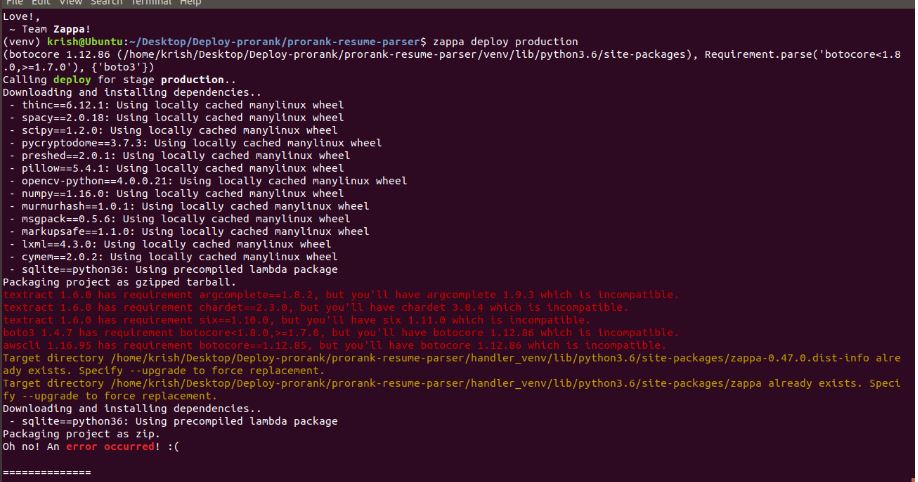
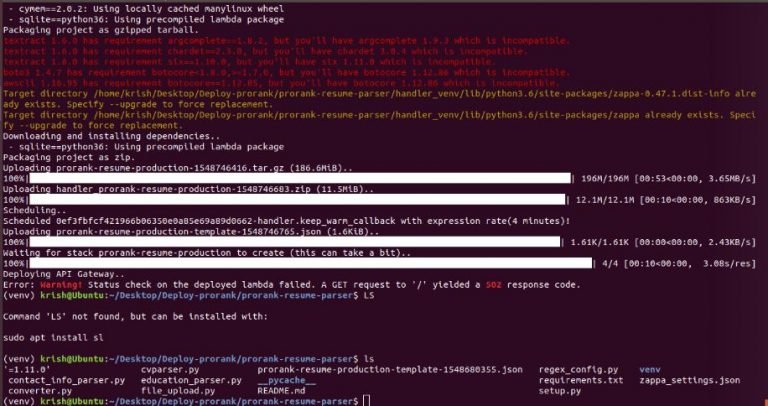
zappa deploy production
This will create an s3 bucket, API gateway & it will deploy our application in AWS lambda automatically.
Once your application is deployed you will get an API Gateway URL like this https://gdp2zdbc39.execute-api.us-east-1.amazonaws.com/pro
You can update your application using zappa update production.
If you want to undeploy your application then use the below command.
Zappa undeploy production
To view the status of zappa
zappa status production
You can rollback your application version using the command.
Zappa rollback Environment name
For instance, to rollback to the version deployed 3 versions ago:
zappa rollback production -n 3
Also for your reference I have listed the errors i faced during the deployment of the application.
Project Size Error
To reduce the project size
"slim_handler": true, in zappa_settings.json
AWS Put Rule
https://docs.aws.amazon.com/cli/latest/reference/events/put-rule.html
To Create CloudWatch Events rules
This example creates a rule that triggers every day at 9:00 am (UTC). If you use put-targets to add a Lambda function as a target of this rule, you could run the Lambda function every day at the specified time:
aws events put-rule --name "DailyLambdaFunction" --schedule-expression "cron(0 9 * * ? *)"
CloudFormation stack missing, re-deploy to enable updates ERROR: Could not get API ID.
https://github.com/Miserlou/Zappa/issues/570
The permission you need is cloudformation:DescribeStackResource. Add this rule to the user in AWS.

Scheduling problem
https://silvaneves.org/provided-role-cannot-be-assumed-by-principal-events-amazonaws-com/
Minimum AWS policies Required For Deployment
https://github.com/Miserlou/Zappa/issues/244
https://github.com/Miserlou/Zappa/blob/master/example/policy/deploy.json
These are some of the major errors which got me stuck while deploying an application. Other than this, you might also face some minor errors so in case if you get any errors then let me know in the comments below. Would like to strengthen my knowledge with you all.