Tutorial: Introduction to Git and Github
If you’re interested in a career in data science or software development, a working knowledge of version control is absolutely necessary. But what is version control, and how can it help us with day-to-day data science tasks?
Version control is the process of integrating and recording changes to code and other files from multiple collaborators. It’s important that you’re comfortable with version control for a few reasons:
- Qualification: Employers are looking for candidates that understand version control and have experience using it to collaborate. When you’re programming professionally, it’s unlikely that you’ll be working on the code alone.
- Experience: By acquiring basic version control skills, you make yourself capable of contributing to any of the millions of open source projects out there. This is a fantastic way to get programming experience.
- Community: Popular data science tools such as TensorFlow, scikit-learn, Hadoop, Spark, and many others are open source. If you can use Git and GitHub, you can become an active participant in the open source data science community.
In this article, we’ll cover the fundamentals of Git and GitHub, the most popular version control solutions.
Git is a version control tool that provides all of the basic functionality.
GitHub is a platform that is built on top of Git to give teams another level of project organization, which includes issue tracking, code reviewing, and much more.
Workflow
Version control might seem like funky command line magic, but it’s really just a way to integrate changes to a project. Keep that simple goal in mind, and you’ll have no trouble at all. Before we dive in to the nuts and bolts, we should discuss the collaborative workflow at an abstract level. Let’s assume we’re developers joining an established project.
Issues
Often times, the devlopment workflow begins at a project’s issue tracker. The issue tracker is a list of all the work that needs to be done on the project. Issues can be bugs that need to be fixed, features that need to be implemented, or any other sort of change that needs to be made. As a contributor to a project, you will likely either choose an issue or be assigned to one. When you start working on an issue, you’ll create a new branch associated with that issue. All of your work will take place on this branch.
Branches
Branches are parallel versions of a project. By compartmentalizing development tasks into branches, we make a much more organized project. Normally, there is a special branch called the “master” that holds the “live” version of the project. Branching allows developers to independently test their changes before they are combined, or “merged,” with the master branch.
If we want to see what's happening with other fixes before they're finished, we can “check out” different branches to observe the progress of different tasks.
Commits
A commit is simply a record of an “atomic” change - that is, a change which does not consist of multiple smaller changes. Commits live on branches, and they break up the timeline of changes associated with that branch.
For example, let’s say we’re working on implementing a rather complex feature. The idea behind making commits is to document individual changes that make up the implementation of the feature. Each time we make a change, we make a commit. That way, when someone reviews our code, that person can see a series of commits that detail our process for implementing the feature.
Pull requests
Pull requests are an important part of the development workflow. A pull request is a request to have our branch merged with the master branch. In other words, it’s a request to make our work, which has until now been happening on its isolated branch, become a part of the live project.
When we submit a pull request, we should provide a detailed description of the changes we made and the reasons we made those changes. If our changes are fixing an issue on the issue tracker, we'll want to include that information as well. For each pull request, GitHub provides a window that highlights all the differences between our branch and the master branch. Usually, another member of the project will review all of our changes. Almost always, there will be feedback that we will have to take action on. After everything looks good to a reviewer or two, our changes will be merged.
Operation
We understand the workflow, and now it’s time to work. Start by installing Git.
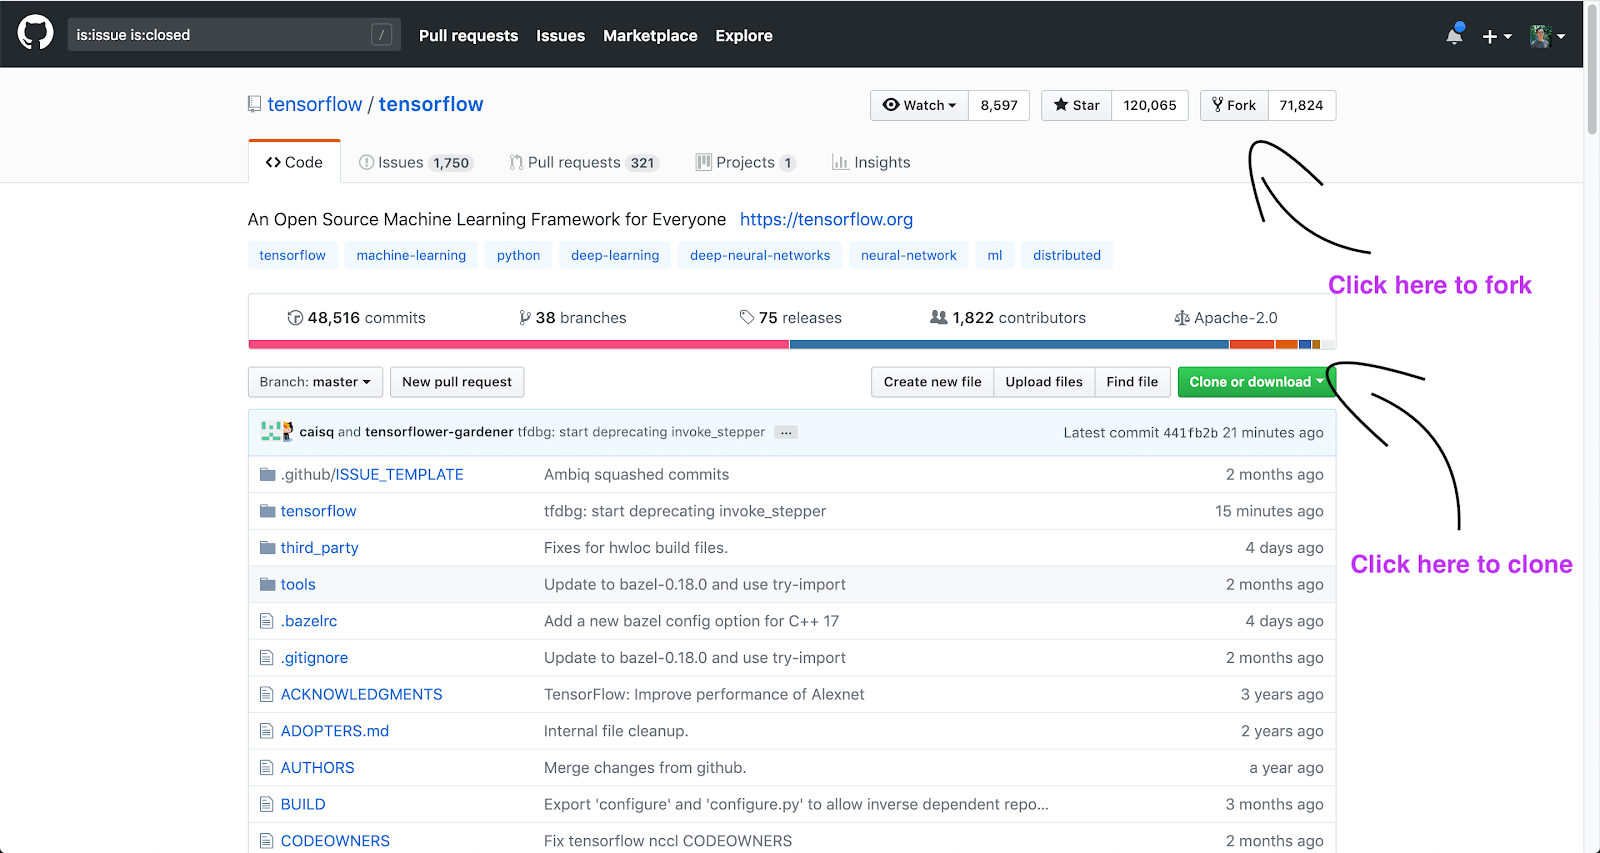
Let’s pretend we’re working on TensorFlow. The first thing we have to do is download the codebase to our machine so we can work with it.
From the repository’s page on GitHub, click on Fork in the top right. Forking a repository mirrors the repository on our account - so it lives at tensorflow/tensorflow, and it also lives at ourusername/tensorflow.
But we still haven’t downloaded anything, so let's get back to that. Click on Clone or download and then click on the clipboard icon to copy the URL to the clipboard. Now, open a command prompt, and navigate to a directory for the project with cd filepath. Then type git clone and paste the URL, and hit enter. This will download the repository and make it available in a subfolder of the current directory.

The next thing to do is tell Git where the project comes from. Go back to the tensorflow/tensorflow repository, click Clone or download, and click on the clipboard. Then, in the command prompt, type git remote add upstream, paste the URL, and hit enter. This tells Git that the directory is a project and it needs to talk to the repository specified by the URL we just gave it.
Generally, we should use git pull to retrieve the latest changes from the upstream before we start working. However, since we just cloned the repository a few minutes ago, this isn’t necessary right now.
At this point, we’re ready to start making changes. Let’s pretend that we were assigned the issue #0001: Really Really Bad Bug. We should start by creating a new branch to develop on. Type git checkout -b fix-really-really-bad-bug. The checkout command is actually the command to switch to a different branch, but by using the flag -b, we’re telling Git that the branch we are switching to needs to be created.
(If we wanted to create a new branch or switch to an existing branch separately, we could use git branch {new-branch-name} to create a new branch, or git checkout {branch-name} to switch to an existing branch.)
Now that we’re set up on our own branch, we’re ready to code.
As we’re working, we should make a commit each time we perform a basic change. If the issue is relatively small, we might only need one commit. For this Really Really Bad Bug, we’ll probably have to make a few commits. The way we break up commits is mostly up to the developer. One approach would be to make a commit each time we’re about to test our changes.
All commits contain a commit message that describes the changes associated with that commit. To make a commit, we must first stage the changes that we want to commit. If we’ve only changed one file, we can simply enter git add {filepath} in the command prompt. This step is necessary because sometimes we will have modified several files but we only want to commit the changes in one or two files. Next, enter git commit -m “commit message”. The commit message should be a few words that describe the changes associated with this commit. Note that the quotes are necessary. Alternatively, if there are no modified files that we don’t want committed, we can skip the staging step and just use git commit -a -m “{commit message}” to stage and commit all files.
When we’ve fixed the Really Really Bad Bug, tested it thoroughly, and made our final commit, we’re ready to send our changes in. We can type git push origin master fix-really-really-bad-bug in the command prompt and hit enter. This command tells git to send the changes on our local branch to the origin repository master branch.
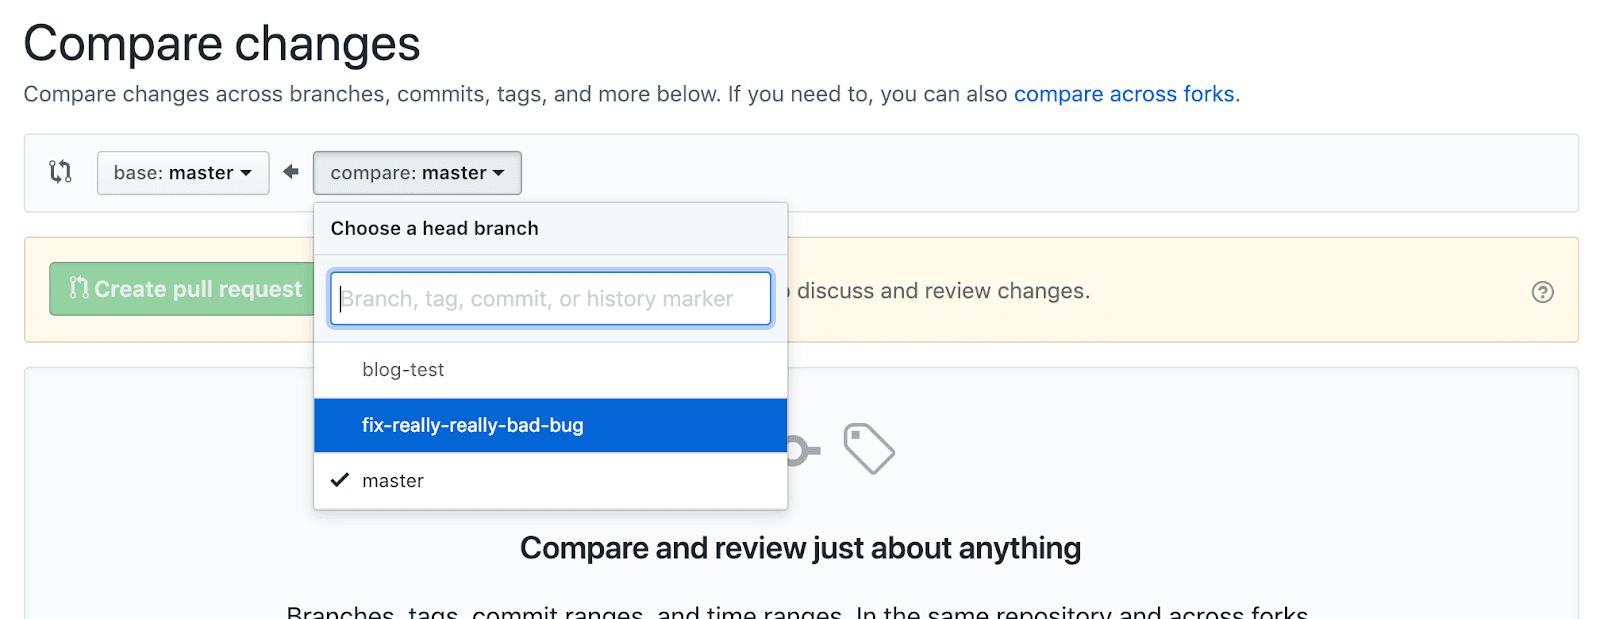
If we go to the repository on GitHub after doing this, we should see a yellow notification, which means that the repository received our push. Click ‘Compare and pull request’. If you don’t see this notification, just click ‘New pull request’, then select the development branch on the pull request screen. Here we can fill out our pull request description and submit it for review.
We should also click on the Files changed tab to verify that everything that we changed was intentional.
We’re not perfect, so a reviewer will almost certainly request some changes to our implementation. No problem - simply make the changes, commit again, and push again. The new commit(s) will automatically be visible on the same pull request.


Conclusion
There we have it. That’s Git at a fundamental level. We should have everything we need to start contributing to some open source projects, or participate in a development team.
There’s a lot more to version control than just the fundamentals though, so be sure to check out the Dataquest course for a more in-depth and hands-on version control lesson.

