When creating Embedded Software, system complexity that grows over lifetime makes it increasingly harder to reason about certain behaviors of the program.
As always in engineering, it helps to divide one big problem into several smaller problems in order to be able to eventually solve it. This is what this article is all about.
Note: This post has originally been published on deardevices.com.
In his book Working Effectively with Legacy Code, Michael Feathers introduces the idea of a seam as:
a place where you can alter behavior in your program without editing in that place.
Although originally intended as a means for getting legacy code under test, we will use this idea as a guide for designing software in the first place. This is a key aspect of loose coupling, after all: the ability to make changes in units of production code without changing the units themselves.
Before diving into the details, let's talk about units first.
Units and their Dependencies
Let's say you are about to start a new embedded project.
You may not even think about designing a system separated into different units at all -- and that's perfectly fine. When building prototypes, we want to see whether something is working, especially whether our software plays well together with the hardware.
In that phase of a project, it's probably not that important to make a distinction between different units at all. Everything may be coupled very tightly, maybe even within just a single unit or module (Forgive me that I use the terms unit and module interchangeably in here).
As the project grows, it becomes more and more complex, and we usually want to do something about that to stay in control. What we can do is split up the code and put it into different compilation units (i.e. .c/.cpp files) to reach some kind of logical separation.
These logically separated pieces of code we will call unit for the rest of this article.
Let's imagine a project about:
- Measuring a voltage level using an ADC,
- Averaging that number over time and
- Showing the result on an LCD.
Additionally, via the serial port, the user should be able to:
- See the averaged number every few seconds and
- Start and stop the sampling process by issuing a command.
From that description, we can divide the system into four units: ADC, AverageFilter, Display, and Serial. The following diagram shows some dependencies between these units based on how they would probably communicate with each other. Does this make sense?

You can see from the diagram that all of these units are coupled somehow. An arrow here reads as depends on or includes a header file. AverageFilter depends on Serial because it calls its print() function.
Loosen the Coupling
At some point, we might want to replace one or more units by a different implementation -- without any impact on the rest of the system.
And without any impact here even means: without changing any of the other unit's code. There are various reasons you might want to do that. For example:
- Switch averaging filters at runtime, depending on user configuration
- Swap the serial interface between RS232 and USB, depending on build parameters
- Replace the display unit by some stub in the test build
And here comes the tricky part: you cannot simply remove or replace units that are pointed to by a dependency. To make this possible, we need to decouple units from each other.
As the post title suggests, there are (at least) three ways to realize this in C and C++. We are going to take a look at each of them in the sections below.
Best Practice #1: Decoupling At the Object Level
This method is the most flexible one. At runtime, you pass a dependency into a unit. In C++, you would create an interface (an abstract base class) and let the unit implement it. Something similar can be done in C, by letting the unit depend on a set of function pointers.
The following snippet shows a C++ example for breaking up the tight coupling of the AverageFilter to the ADC unit:
class FilterInterface {
public:
  virtual ~FilterInterface() {}
  virtual void reset() = 0;
  virtual void update(uint8_t) = 0;
};

class AverageFilter : public FilterInterface {
public:
  void reset() override {
  }

  void update(uint8_t) override {
  }
};

class ADC {
public:
  ADC(FilterInterface& interface) : interface(interface) {
    interface.reset();
  }

  void process(void) {
    interface.update(42);
  }

private:
  FilterInterface& interface;
};

[...]

int main(void) {
  AverageFilter filter;
  ADC adc(filter);

  while(1) {
    adc.process();
  }
}
The class ADC depends on the interface of type FilterInterface and stores a reference to it. Thereby it is agnostic to the concrete implementation passed in.
In C, we don't have the concept of polymorphism (which is the mechanism that makes it possible to use concrete implementations transparently through base class pointers). You can always emulate it using function pointers, though:
typedef struct {
  void (*reset)(void);
  void (*update)(uint8_t);
} FilterInterface;

static FilterInterface interface_;

void ADC_init(FilterInterface interface) {
  interface_ = interface;
  interface.reset();
}

void ADC_process(void) {
  interface_.update(42);
}
This tends to be a bit less explicit and more error-prone than the C++ implementation. It might still be worth it (and people actually do it: systemd, Linux drivers).
This solution, no matter if implemented in C or C++, comes with a runtime cost while giving you the freedom of modifying dependencies at runtime as well.
Best Practice #2: Decoupling At the Link Level
In the next step we are going to explore another method. This will be based on yet another stage of the software build process -- the linking.
Let's see what Michael Feathers has to say about Link seams:
In many language systems, compilation isn’t the last step of the build process. The compiler produces an intermediate representation of the code, and that representation contains calls to code in other files. Linkers combine these representations. They resolve each of the calls so that you can have a complete program at runtime.
Linking Overview
Here, Feathers does a great job describing how the linking works. For C and C++, this is enough to know for now.
You can see a flowchart of the process below. Each .c file is compiled individually as a compilation unit. This means the compiler outputs a .o object file for each of them:

All object files are then passed on to the linker whose job is to put everything together -- in order to get an executable program:
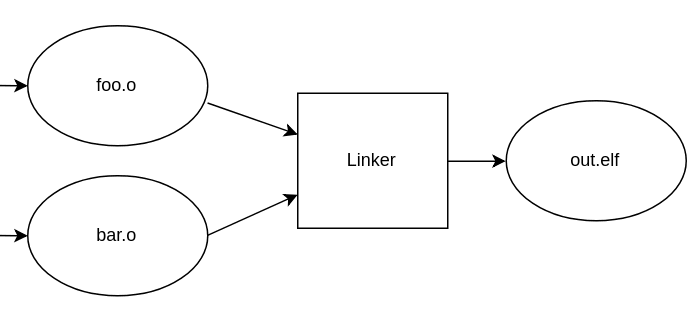
One important part of linking is to look for unresolved symbols needed by objects (function names, for example) and to try to satisfy those using symbols exported by other objects.
Exploiting the Linking Process
As described by Feathers, we may exploit this process by offering different sets of symbols, based on what our build configuration looks like.
Let's take a look at this Makefile snippet to get the idea:
release.elf:
  gcc driver_release.o production.o -o release.elf

test.elf
  gcc driver_test.o production.o -o test.elf
There are two different targets, one for each build configuration we wish to maintain:
-
release: results in a shippable executable. -
test: contains debug code for testing that should never go out to the customer.
As shown in the diagram below, to build each of the two ELF executables we pass the exact same object file production.o to the linker in either case.

The linker now strives to find matches for symbols demanded by production.o. For that, it happily considers any object file it is offered. Assuming driver_release.o and driver_test.o adhere to the same API convention, the linker doesn't see the difference and builds two different configurations for us.
The fact that we were able to switch implementations, depending on the build configuration suggests some level of decoupling between the units used in the example above.
This decoupling method has no runtime cost at all, which comes at the price of decreased flexibility compared to the previous approach. To switch over to a different configuration, you will at least need to re-run the linker. You do not need to recompile your objects though -- This may improve build time significantly, depending on the size of your project.
Speaking about runtime cost: there might be some kind of indirect runtime cost for this solution. Because functions are implemented within different compile units, the compiler doesn't have the big picture that would be useful for optimization. This might be compensated by Link Time Optimization (LTO) though.
Best Practice #3: Decoupling At the Preprocessing Level
After talking about decoupling units at the linker level, this section is going to be about achieving the same goal, but at the preprocessing stage of the build process. At the end of the article, you will find a comparison of all three methods.
Let's start with another quote from Michael Feathers. In Working Effectively with Legacy Code, he tells us about yet another type of seams:
Only a couple of languages have a build stage before compilation. C and C++ are the most common of them. [...] I’m actually glad that C and C++ have a preprocessor because the preprocessor gives us more seams.
That stage before compilation, the preprocessing, is what we interested in during the course of this article.
How to get from .c to .o
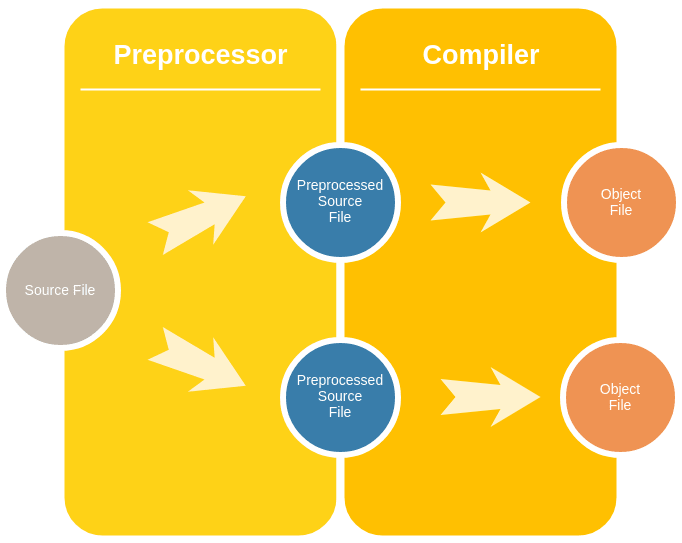
So, before passing source code on to the compiler, C and C++ employ a preprocessing stage. During this phase, the preprocessor fulfills some basic tasks -- with its output still being valid C or C++ code. This output is called preprocessed source code, according to the preprocessor docs of the GNU project.
The diagram below shows the two steps involved in converting a C source file into an object file: preprocessing and compiling.

Tip: To inspect the preprocessed source file, you can use gcc -E foo.c. This will skip the compile step and print the preprocessor result right to the terminal.
The Preprocessor Produces Units
For the matter of decoupling units, we may utilize the preprocessed source file.
In fact, there's another way to look at it: The preprocessor generates different instances of the same source file for each configuration we wish to have, before they are passed on to the compiler:
Having several instances is a great achievement already. To make each instance somewhat unique, we will now introduce parameters.
We may even, in Object-Oriented terms, think of source files as classes.
Each preprocessed file can then be modeled as an instance of that class, i.e. as an object.
Let's say we define a class SourceFile that has a config attribute. Then, the preprocessed files can be modeled as objects of that type, parameterized by the specific value of the config attribute:
| Object | Type | Value of config |
| Preprocessed Production File | SourceFile | PRODUCTION |
| Preprocessed Test File | SourceFile | TEST |
A Practical Example
In practice, there are no such classes of course. So let's see how you would do that in a Makefile:
CONFIG_PRODUCTION = 0
CONFIG_TEST = 1

driver.o: driver.c driver.h
  gcc -c driver.c -o driver.o

foo_production: foo.c driver.o
  gcc -DCONFIG=$(CONFIG_PRODUCTION) foo.c driver.o -o foo_production

foo_test: foo.c driver.o
  gcc -DCONFIG=$(CONFIG_TEST) foo.c driver.o -o foo_test
The first thing being built is the driver. It is the same for both configurations. For each of the build configurations, there is a corresponding foo_ target. You will notice that the same source file (foo.c) is used for both of these. This is intentional, as we
want the preprocessor to modify them right before compilation.
Here, the value of the config attribute (now the CONFIG macro) is determined by the -D flag passed to the compiler. You would then put some extra preprocessor statements into the code:
// foo.c

#include "driver.h"

#define CONFIG_PRODUCTION 0
#define CONFIG_TEST 1

int main(void) {
#if CONFIG == CONFIG_PRODUCTION
  driver_doA();
#elif CONFIG == CONFIG_TEST
  driver_doB();
#else
#error "Invalid CONFIG!"
#endif
}
That way, the preprocessor effectively switches between two code blocks, depending on how it is called by the Makefile.
Tip: Inspect the preprocessed files to watch how the code is actually swapped!
That's probably all we need in order to accomplish our goal: software units, decoupled from each other using the preprocessor.
This approach has the obvious drawback that your code gets cluttered with ifdefs. Compared to link time decoupling though, the compiler can probably do a better job optimizing, as you don't need to separate code into different compile units (c files) for this to work.
Tool Support
In my experience, tool support for both the link and preprocessor approach is somewhat better than for decoupling on the object level. Jumping to function definition as well as single stepping in the debugger works seamlessly without an indirection through function pointers. Also, code sections disabled by preprocessor macros are usually highlighted accordingly by IDEs.
Now that I'm thinking about it: Do you know of an IDE that supports following function pointers the way you want it? Do not hesitate to get in touch with me via Twitter!
No need to Re-build
Before doing a comparison of all three approaches, I would like to highlight one aspect of the link level method I think is really important:
This is the only approach that allows you to leave your object files untouched. That's really a great feature if you think about it: no need to re-compile anything when switching from testing to production. There is a perfectly clear separation of internal debugging code and code that's going to be shipped with the actual product.
Summary
To sum it up, here's a table of all pros and cons, at a glance.
| Object | Link | Preprocessor | |
|---|---|---|---|
| Runtime Performance | - - | - | + |
| Tool Support | - | ++ | ++ |
| Runtime Flexibility | + | - | - |
| UML Modelling | ++ | + | - |
| Testability | ++ | ++ | ++ |
| Compile-Time Checking | + | ++ | ++ |
| Readability | + | ++ | - |
These are mostly subjective metrics, of course. It depends on your project's requirements which method suits you best -- it may even be a combination of all three of them.


Top comments (3)
Wow a great perspective on the entire shebang! Thanks for the article
By the way, I am a budding embedded systems developer. Have a fair bit of experience on plain/ANSI C (POSIX/Win32) but having a hard time transitioning to the world of low level embedded development. Too many boards (and blogs) out there, with quite a few of them deprecated (versatilePB for instance)
Could you suggest a well supported SBC (rpi/bbone-black etc??) with a vibrant dev community to get me started??
Thanks for your comment!
I would suggest trying one of ST's STM32 Discovery boards if you want to go low level and already are familiar with C programming.
I've been using 8-bit AVR for quite a while now. Here's one of the blog posts that links to a Makefile project you may use as a reference: deardevices.com/2017/11/26/avr-sle...
Cleanly written. Thanks Steffen.