

TL;DR: In this article, you will learn about developing and securing Django web applications. You will go through the whole process: from scaffolding a new Django project, to adding an identity provider (Auth0 in this case), to using Django admin feature to facilitate entity (e.g., products, contacts, etc.) management. If you need, you can check the code developed throughout the article at this GitHub repository.
"Learn how to build secure web applications with Django and Auth0."
Tweet This

Prerequisites
To follow along, you will need to have Python and pip installed locally. More specifically, you will need a Python version equal or greater than 3.5 to use Django 2.2 (which is the one used in this article). If you downloaded Python from https://www.python.org/, then you are good to go. Otherwise, please, check the instructions here.
If you are on Windows, there is a chance you have problems with the bash commands shown throughout the article. If you do, please, try seeking help here.
What You Will Build
In this article, you will use Django to build a simple web application that shows a list of products to visitors. Then, you will use Auth0 to handle user authentication and authorization for you. In the end, you will use Django Admin to allow administrators to manage the products available in your web app.
Django Tutorial: Hello World!
In this section, you will learn how to start building Django web applications and how a Django project is structured. For starters, you will have to define how you will manage your project dependencies. After that, you will use django-admin to scaffold your app.
Managing dependencies in a Django project
Python does not have a de-facto standard to manage dependencies. Some developers use pip (which often comes bundled into Python), some use venv, and some use pipenv. The difference between them is not the focus of this article (you can read about this topic here) but, basically speaking, venv and pipenv help you manage the dependencies on a per-project basis. pip, on the other hand, installs dependencies globally (i.e., in your machine as a whole).
Throughout this article, you are going to use pipenv to manage your project's dependencies. However, to get access to this tool, you will have to use pip to install it globally:
pip install pipenvNote: On some systems, instead of
pipyou will have to usepip3.
After installing pipenv, create a new directory for your new web application and move into it:
# create the directory
mkdir django-webapp

# move into it
cd django-webapp
Then, use pipenv to register a new virtual environment:
# create the virtual environment
pipenv --three

# activate it
pipenv shell
Note: The
--threeparameter passed topipenvinstructs it to start a project that uses Pythonv3. You could also use--twoto starting a Pythonv2project, but this might lead to some incompatibility issues.
After running these commands, you will notice that pipenv created a file called Pipfile. The goal of this file is to hold metadata about your project. For example, inside Pipfile, you will find the python_version property (which indicates the Python version you are using) and the [packages] section (which contains a list of packages that your project depends on). Right now, your project doesn't have any dependencies, so the [packages] section will be empty.
Next, you can add Django as a dependency to your project by running the following command:
pipenv install djangoScaffolding a Django web application
After installing Django, you can use django-admin (a tool that comes bundled into django) to scaffold your app:
django-admin startproject storeThis command will create the following structure in your project root:
store/
    manage.py
    store/
        __init__.py
        settings.py
        urls.py
        wsgi.py
As described on the official documentation, the outer store directory is not a Python package, it's just a container for your source code. As such, you can rename it to whatever you want. So, to avoid confusion, change its name from store to src:
mv store srcThe list below gives a brief explanation about the other files created by django-admin:
./src/manage.py: A command-line utility that lets you, among other things, start your Django project and manage its database../src/store/: The actual Python package for your project's source code. You will use the name of this directory while referencing its entities (e.g.store.urls)../src/store/__init__.py: An empty file that tells Python that thestoredirectory is a Python package../src/store/settings.py: Settings and configuration for your Django project../src/store/urls.py: The file where you will declare the routes (URLs) of your Django project../src/store/wsgi.py: A file that facilitates deploying your project in WSGI-compatible web servers.
With that in place, you move into the src directory and use the manage.py file to start your new Django project:
# move into the src directory
cd src

# start your django project
python manage.py runserver
Note: Don't worry about the warning regarding unapplied migrations. You will fix that soon.
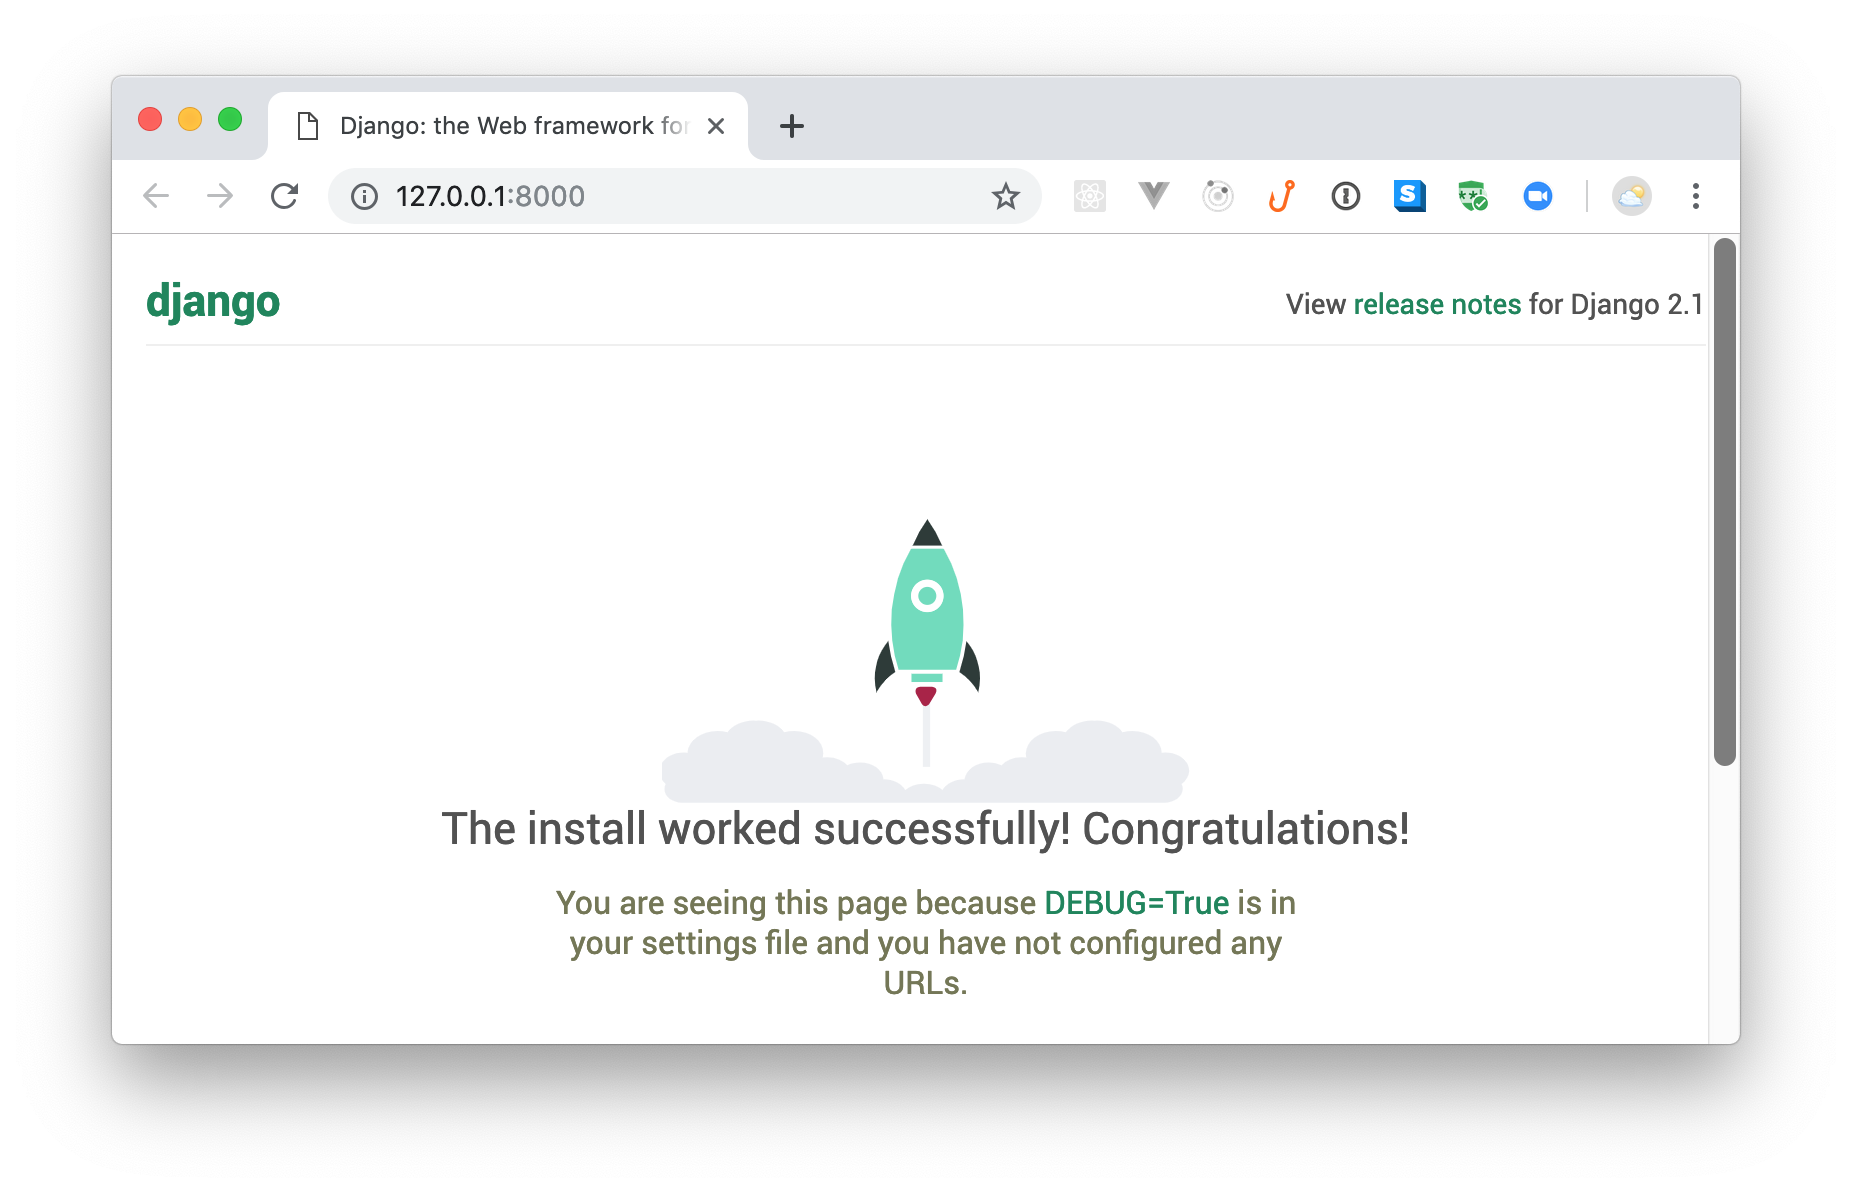
In a second or two, Django will finish bootstrapping your app, and you will be able to access it in the following URL: http://localhost:8000. If you open this URL in your browser, you will see a screen similar to the one below: Deploying Django RESTful APIs as Serverless Applications with Zappa
Note: The
runserveroption starts a development server that comes bundled with live reloading. This server is an excellent tool for development environments (please, make sure you don't use this in production) but it has some limitations like the fact that it does not reload your app when you create new files. For more information about this tool, check the official docs.
Django Tutorial: Building Your First Django Application
Now that you have scaffolded a Django "Hello, world!" project, you can start building your own Django application. In this section, you will build a simple store web app that will allow visitors to browse products and administrators to manage these products.
For starters, you will have to use the manage.py tool to create a Django app. Since on the previous section you used this same file to create a Django project, you might be wondering: "Why do I need an app and what is the difference between app and project?"
Django is a general-purpose framework that supports different scenarios and solves different problems. As such, the Django developers decided that having a project capable of encapsulating multiple apps would benefit the community. Enabling this type of nesting allows developers to create and share common features (and settings) among different apps. This facilitates the development process when you are using Django to solve complex applications, but can be a bit awkward for smaller projects.
Nevertheless, in this article, you will use the canonical approach and will create an app inside the Django project you created before. To do so, back on the terminal, stop the running process (control + C), make sure your are in the directory where the manage.py file resides (i.e., the ./src/ directory), and issue the following command:
# from the ./src/ directory, create an app
python manage.py startapp webapp
Note: Using
webappas the name of your app makes sense because you will put, inside this app, the source code needed to run the store web application.
After running the command above, you will notice that a directory called webapp is created alongside the manage.py file. If you inspect this directory, you will see the following structure:
src/
    manage.py
    store/
        ...
    webapp/
        __init__.py
        admin.py
        apps.py
        migrations/
        models.py
        tests.py
        views.py
The list below explains what the purpose of each new element is:
__init__.py: Just like before, this is an empty file that indicates to Python that this directory is a package.admin.py: This is where you will define models (entities backed by a database) available on the admin interface.apps.py: This file helps developers configure their app. By using this, you can configure some of the attributes of the application.migrations/: A directory where you can put a set of files that will control the structure of your database.models.py: Similar to theadmin.pyfile, you will use this one to define models. The difference is that these models will be publicly available.tests.py: This is where you would write automated tests for your application (out of scope on this article).views.py: This is where you will define the views available in your app.
Note: Defining views (which is done on the
views.pyfile) is not the same of mapping views to URLs. You will learn about it next.
Defining your first Django view
Now that you defined your Django application, you can create your first Django view. In this case, you will use Django's built-in template engine to create a view that will list the products available in your store. As you will see in this section, the engine provided by Django is a mature and robust one that facilitates generating HTML dynamically.
To use this engine, first, you will have to open the ./src/store/settings.py file and add your app to the INSTALLED_APPS array:
INSTALLED_APPS = [
    # ...
    'webapp.apps.WebappConfig',
]
Note: The string you are adding here is referencing the
WebappConfigclass. This class is defined on theappsmodule (orapps.pyfile) available on thewebapppackage (the Django app you just created). That's how thewebapp.apps.WebappConfigstring is assembled (package name+.+module name+.+class name).
After registering your app on the settings.py file, you can open ./src/webapp/views.py and define the function that Django will trigger when users open your homepage:
from django.shortcuts import render


def index(request):
    products = [
        {'title': 'PlayStation', 'price': 300, 'image': 'https://cdn.auth0.com/blog/django-webapp/playstation.png'},
        {'title': 'iPhone', 'price': 900, 'image': 'https://cdn.auth0.com/blog/django-webapp/iphone.png'},
        {'title': 'Yummy Pizza', 'price': 10, 'image': 'https://cdn.auth0.com/blog/django-webapp/pizza.png'},
    ]

    context = {
        'products': products,
    }
    return render(request, 'webapp/index.html', context)
On the index function above, you are:
- Defining a static array called
products. For now, these are the products that you will show on your homepage. - Defining a variable called
contextwith a property pointing to theproductsarray. - Calling the
renderfunction with thecontextvariable, a string that points towebapp/index.html, and a reference to therequestobject.
Django provides the render function to facilitate rendering context objects on some template. In this case, you are telling Django to render your context (which includes the products array) on a template called webapp/index.html. You will define this template soon.
Next, you will have to create a file called urls.py inside the ./src/webapp/ directory and add the following code to it:
from django.urls import path

from . import views

urlpatterns = [
    path('', views.index, name='index'),
]
Here, you are defining a constant array called urlpatterns that contains a single element: an object created by path that indicates that the views.index function (the one you defined previously) will handle calls to the root path ('').
After creating the new urls.py file, you will have to use it on the other urls.py file. To do so, open it (the latter resides inside the ./src/store/ directory), and replace its code with this:
from django.contrib import admin
from django.urls import include, path

urlpatterns = [
    path('', include('webapp.urls')),
    path('admin/', admin.site.urls),
]
The difference on the new version of this file is that you are using the include function to reference the urls module provided by the webapp package (hence, webapp.urls). Note that you are using the path function again here. This is useful because you could combine both to nest routes (paths) inside prefixes.
To make things more clear, imagine that on the previous
urls.pyfile you were usingproducts/(instead of'') to trigger theviews.indexfunction, and that here you were usingstore/to reference thewebapp.urlsmodule. In this case, instead of making your view available on the root path (combining the two empty strings defined on bothurls.pyfiles would result on that), Django would make theviews.indexfunction available under thestore/products/path.
With these changes in place, you will have to create two directories: one called templates and one called webapp. You will add the first directory (templates) to ./src/webapp. The second one, webapp, you will add to the directory you just created (templates). That is, in the end, you will have the following structure: ./src/webapp/templates/webapp/.
Note: As explained on Django's docs, putting templates directly inside
./src/webapp/templates(rather than creating anotherwebappsubdirectory) would be a bad idea. This is so because Django will choose the first template it finds whose name matches. As such, if you had a template with the same name in a different application, Django would be unable to distinguish between them.
After creating this directory structure, the next thing you will do is to create a file called base.html inside it with the following code:
<!doctype html>
<html lang="en">
<head>
    <!-- Required meta tags -->
    <meta charset="utf-8">
    <meta name="viewport" content="width=device-width, initial-scale=1, shrink-to-fit=no">
    <!-- Bootstrap CSS -->
    <link rel="stylesheet" href="https://bootswatch.com/4/darkly/bootstrap.min.css">
    <title>My Store Web App</title>
</head>
<body>
<nav class="navbar navbar-expand-lg navbar-light bg-light mb-3">
    <div class="container">
        <a class="navbar-brand" href="/">My Store Web App</a>
        <button class="navbar-toggler" type="button" data-toggle="collapse" data-target="#navbarSupportedContent"
                aria-controls="navbarSupportedContent" aria-expanded="false" aria-label="Toggle navigation">
            <span class="navbar-toggler-icon"></span>
        </button>
        <div class="collapse navbar-collapse" id="navbarSupportedContent">
            <ul class="navbar-nav mr-auto">
                <li class="nav-item active">
                    <a class="nav-link" href="/">Home</a>
                </li>
            </ul>
        </div>
    </div>
</nav>
<div class="container px-2">
    {{ "{% block content " }}{{ "%" }}}{{ "{% endblock " }}{{ "%" }}}
</div>
</body>
</html>
This file will serve as the base template for everything else. As you can see on its code, this file is using a Bootstrap theme to define a view with a nagivation bar that contains the title of your web application ("My Store Web App") and a link to "Home" (the root path). Also, this file is using some Django's syntax to define where the specialised content will go:
{{"{% block content "}}{{ "%" }}}{{ "{% endblock " }}{{ "%" }}}After defining this file, you will create another one called index.html (inside the ./src/webapp/templates/webapp directory) and add the following code to it:
{{"{% extends 'webapp/base.html' "}}{{ "%" }}}
{{"{% block content "}}{{ "%" }}}
    {{"{% if products "}}{{ "%" }}}
    <div class="row mx-2">
        {{"{% for product in products "}}{{ "%" }}}
        <div class="col-12 col-sm-6 col-md-4 px-2 mb-3">
            <div class="card">
                <img src="{{product.image}}" class="img-fluid" style="padding: 30px" alt="{%raw%}{{product.title}}{%endraw%}"/>
                <div class="card-body">
                    <h5 class="card-title">{%raw%}{{product.title}}{%endraw%}</h5>
                    <p class="card-text">
                        A beautiful {%raw%}{{product.title}} for ${{product.price}}{%endraw%}.
                    </p>
                    <a href="/" class="btn btn-primary">Buy Now</a>
                </div>
            </div>
        </div>
        {{"{% endfor "}}{{ "%" }}}
    </div>
    {{"{% else "}}{{ "%" }}}
    <p>No products available.</p>
    {{"{% endif "}}{{ "%" }}}
{{ "{% endblock " }}{{ "%" }}}
In this case, you are stipulating that the index.html template will extend webapp/base.html (to use its structure, like the navigation bar) and that, if there are products available ({{"{% if products "}}{{ "%" }}}), you want Django to iterate over it to produce Bootstrap cards with the details of the products.
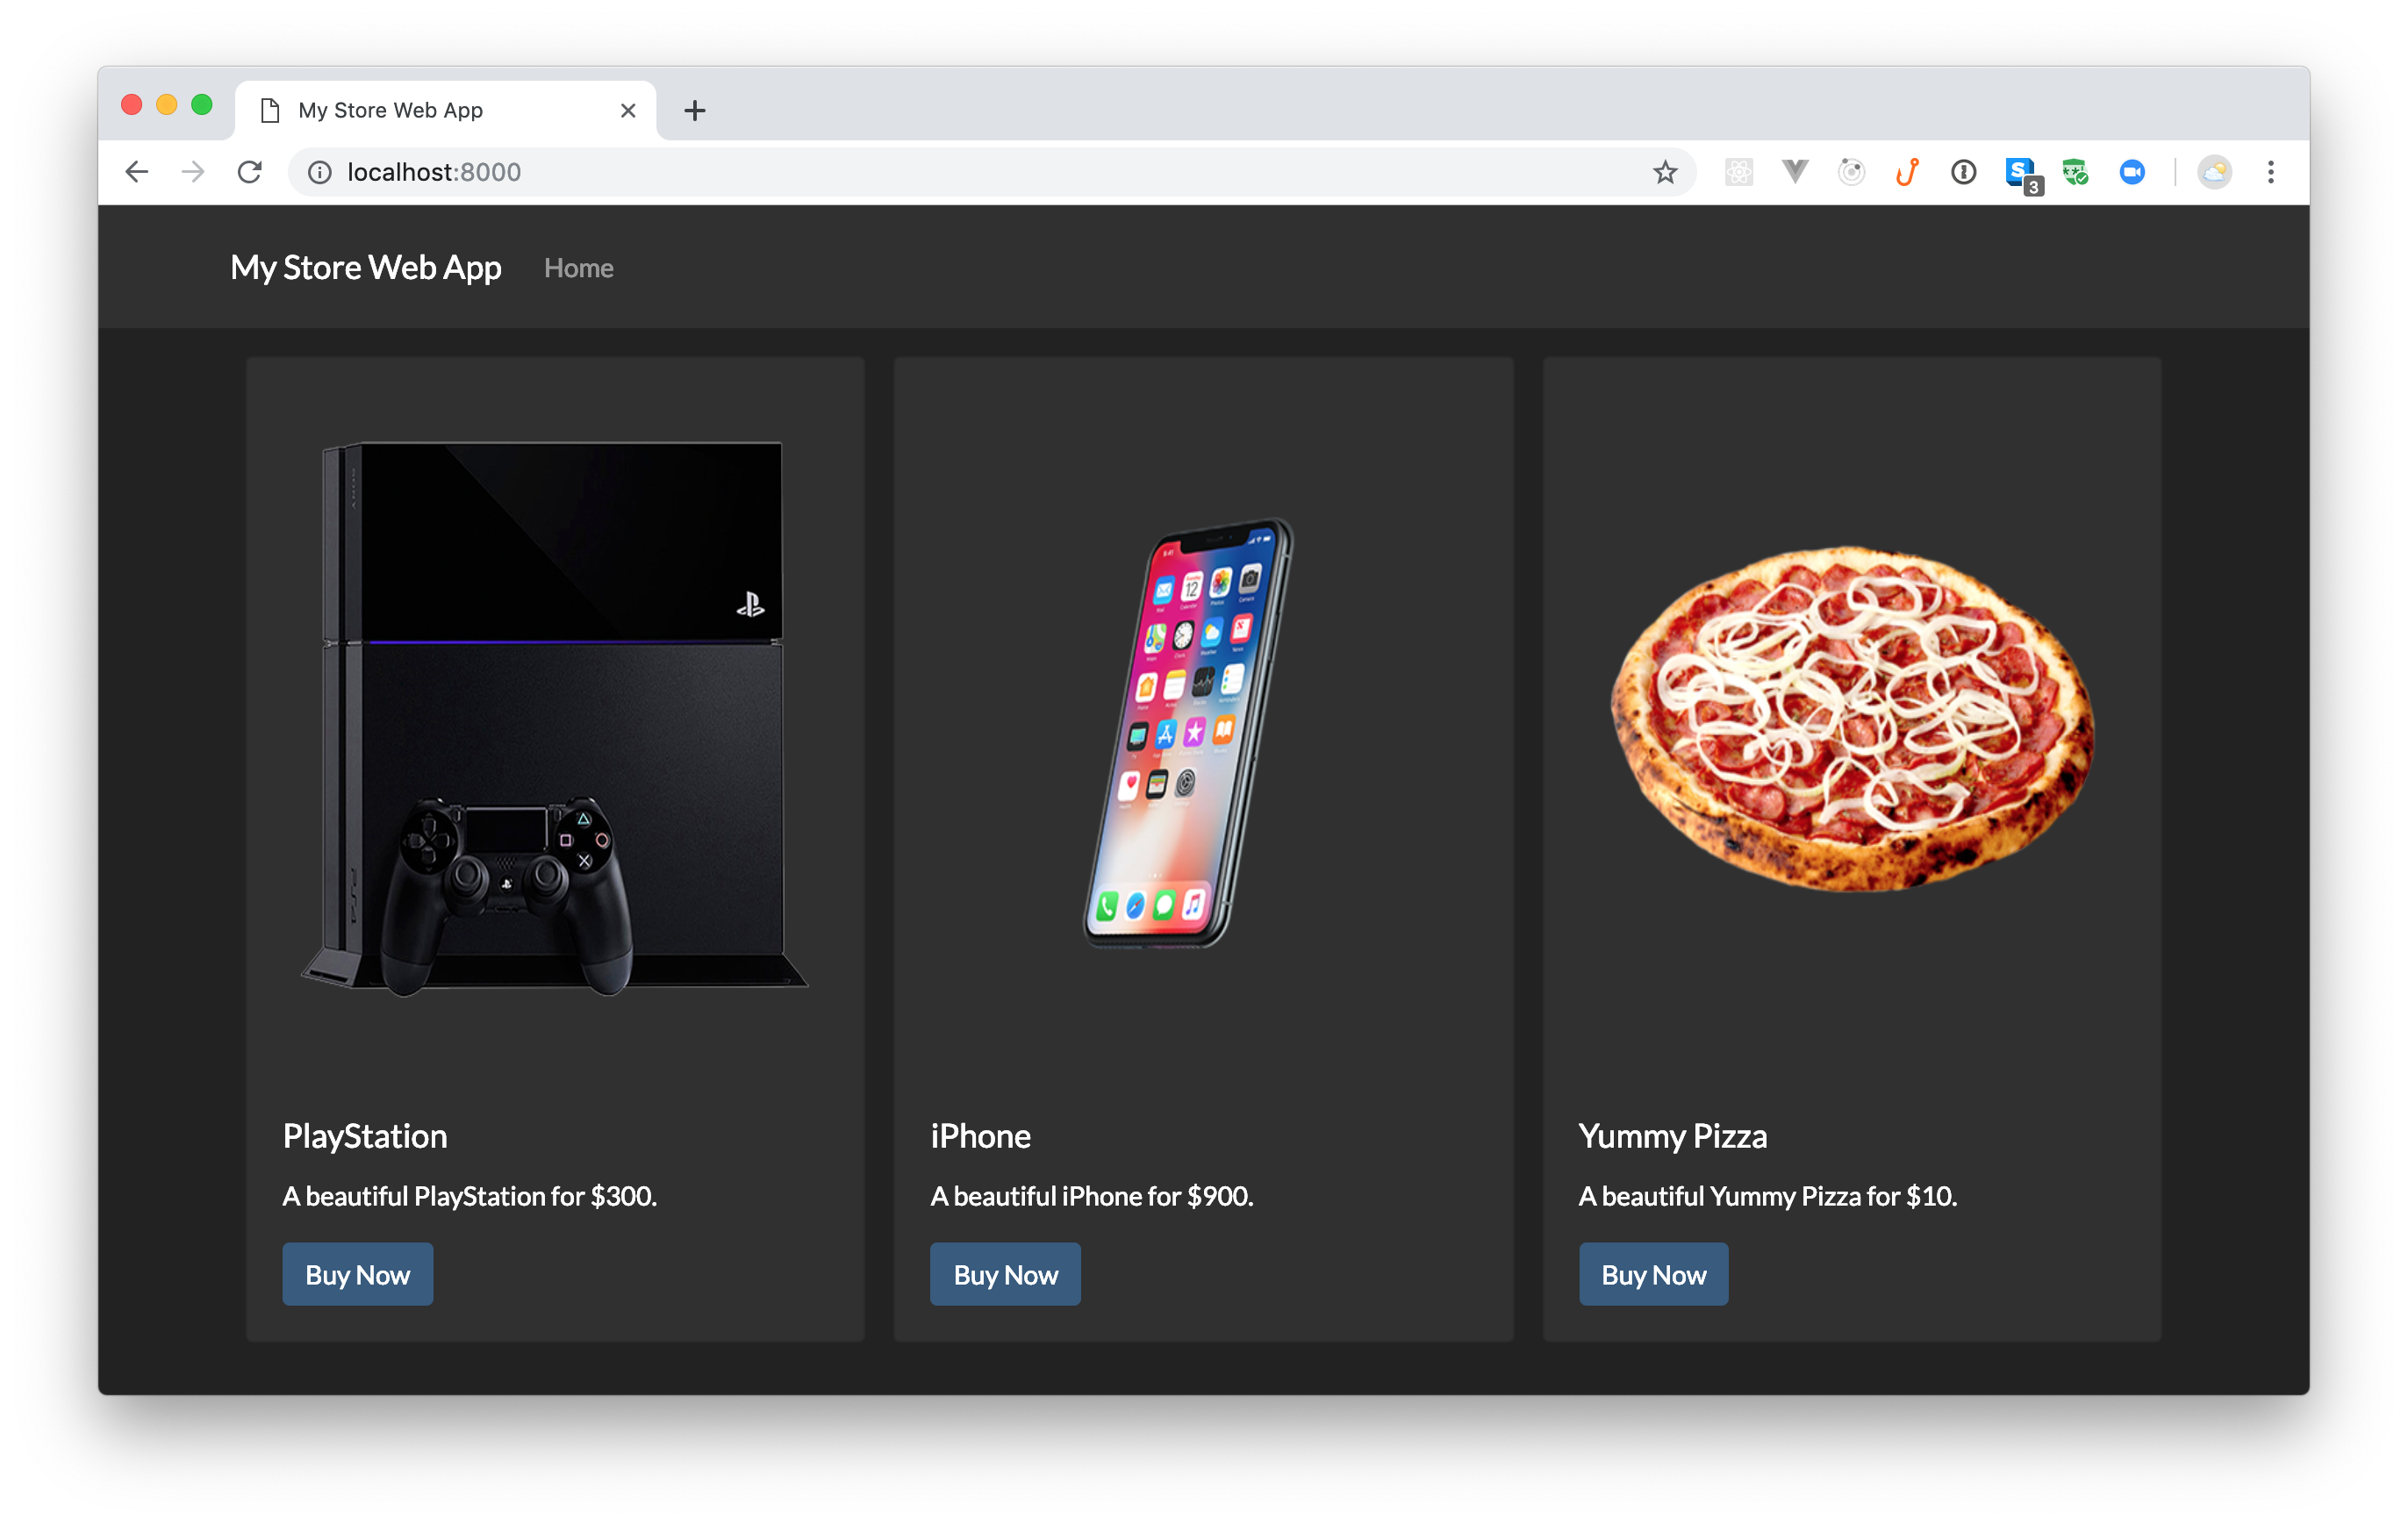
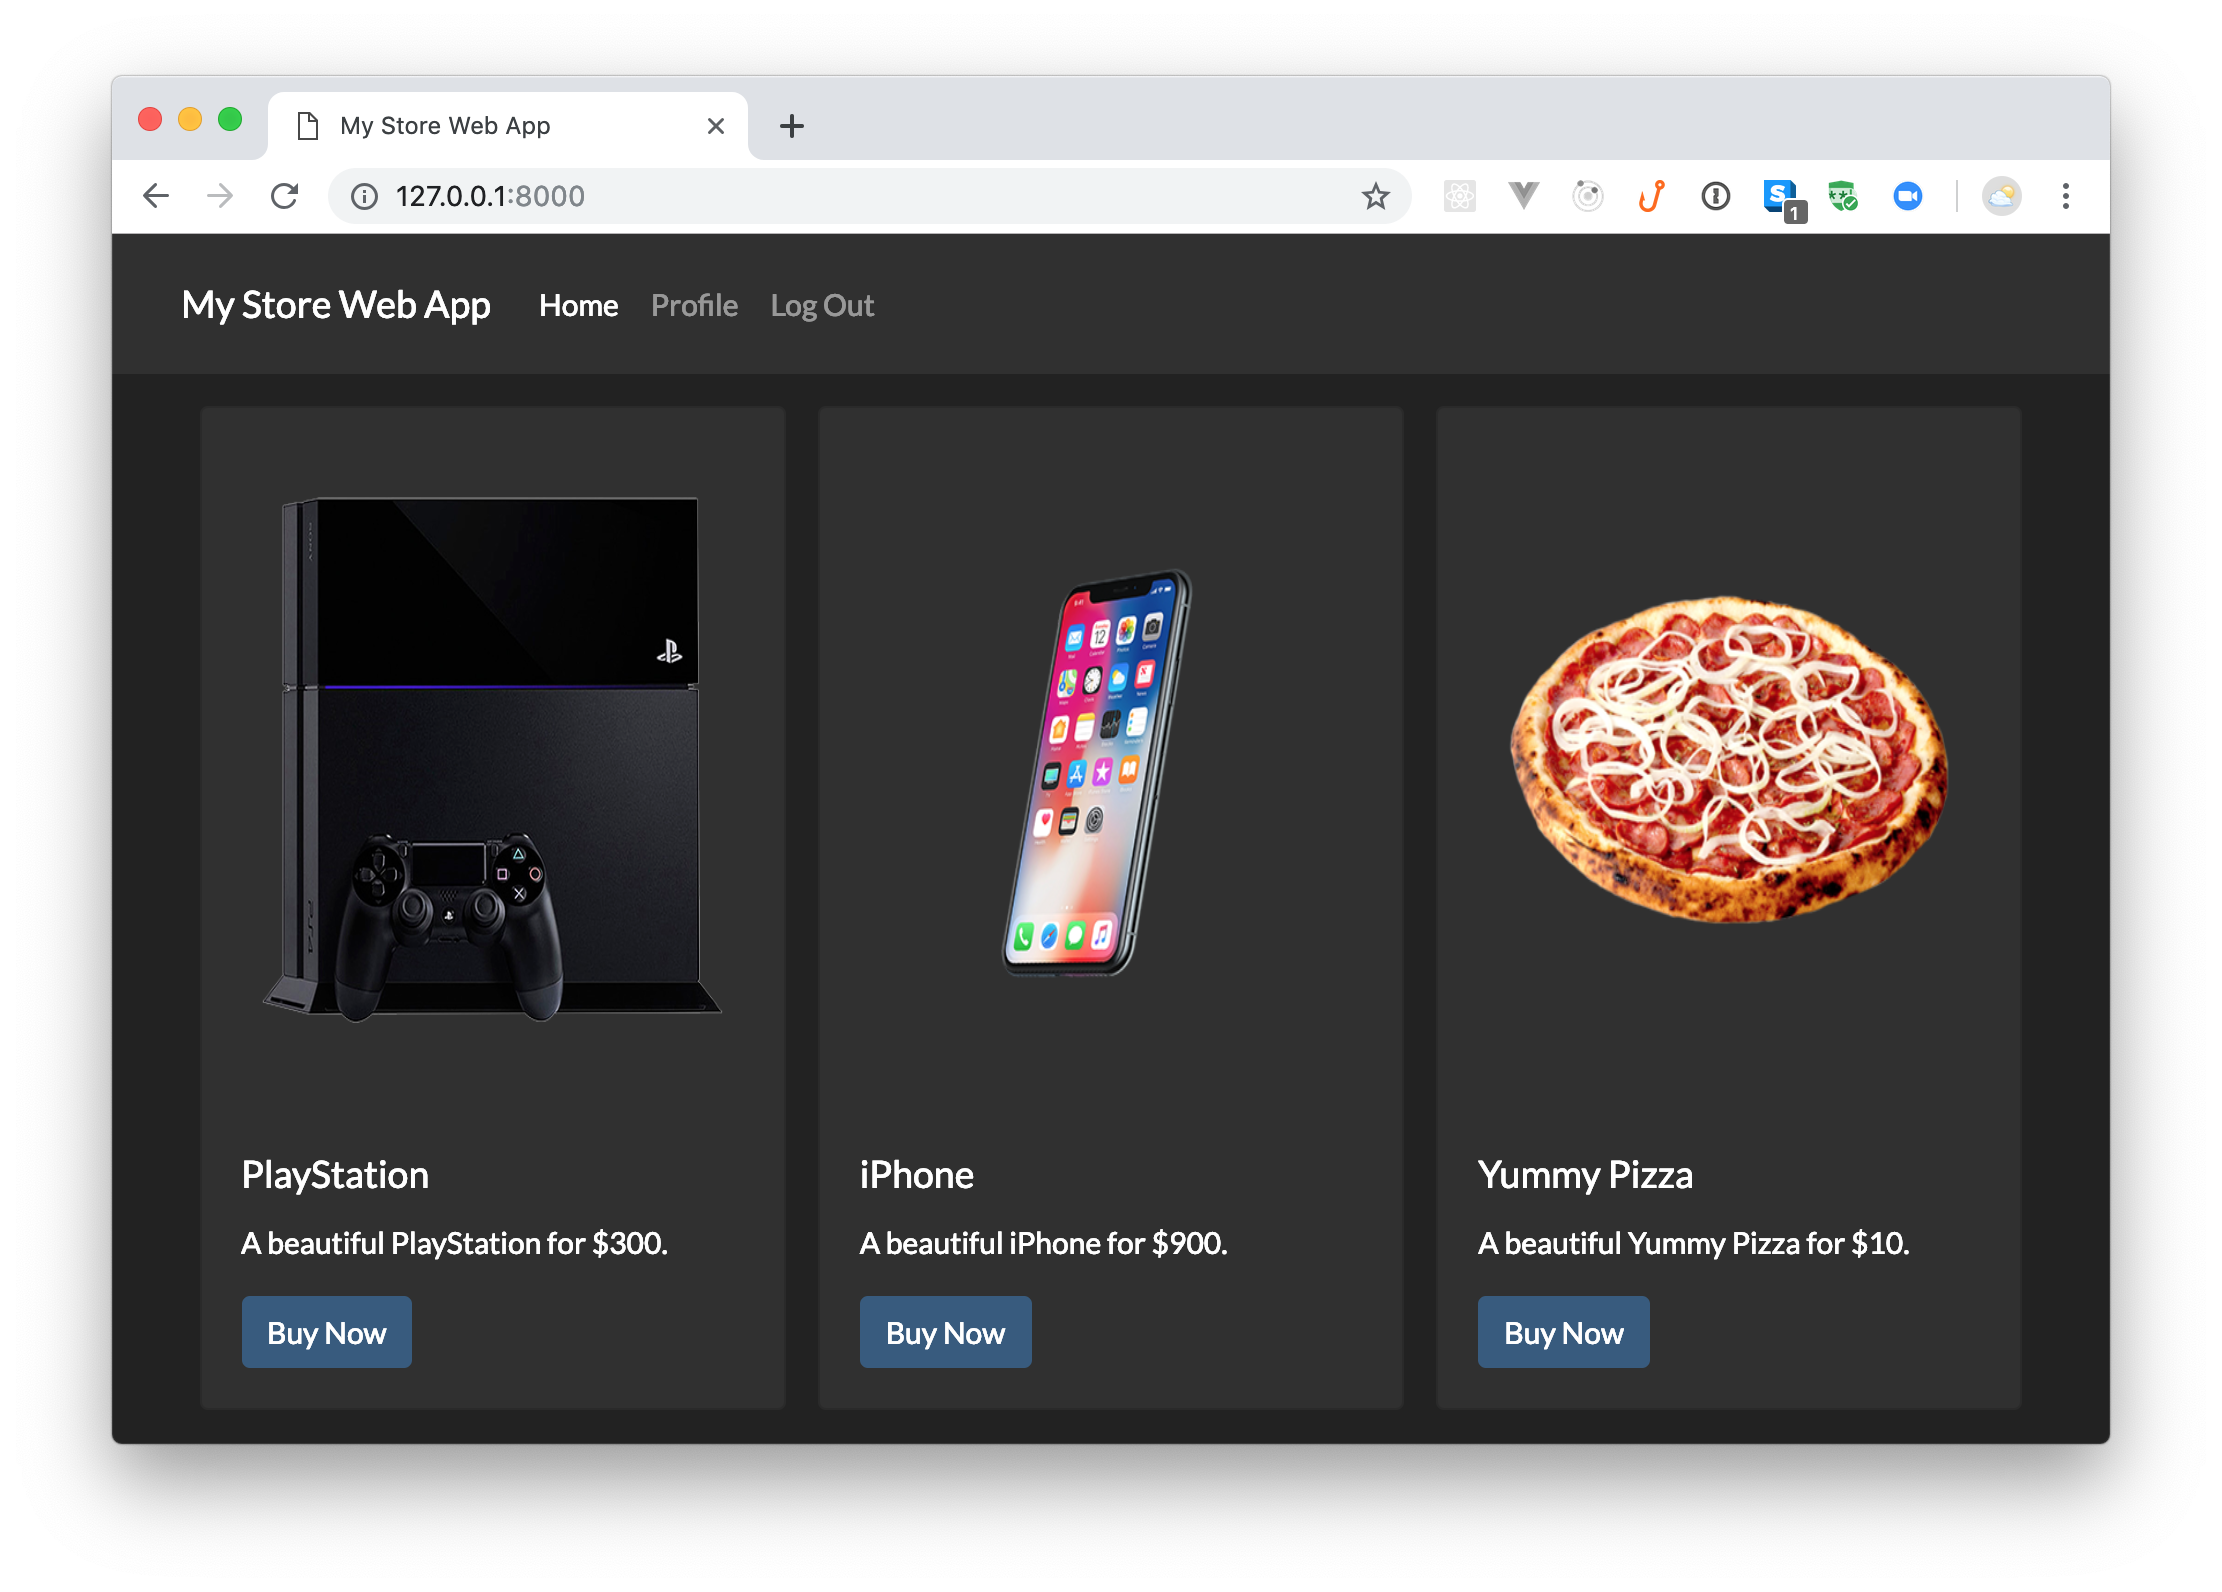
Now, if you restart your server (by running python manage.py runserver from the ./src directory) and refresh your homepage (http://localhost:8000), you will see a page with the navigation bar and your products below it.
Securing Django Web Apps
Your Django web app is starting to look good. You already scaffolded your project, and you defined your first Django view on it. Now, it is time to start thinking about security or, more specifically, about how your app will handle identity and access management.
In this section, you will learn how easy it is to enable users to authenticate into your app with the help of Auth0. You will also learn how to secure some parts of your application to restrict access based on roles. What is cool about the process is that, in no time, you will have a production-ready application that handles authentication and authorization in a secure and battle-tested way.
To follow along the subsections here, you will need an Auth0 account. If you don't have an account yet, now is a good time to create a free one.
Creating an Auth0 Application
After creating your Auth0 account (or signing into an existing one), you will need to create an Auth0 Application to represent your Django web app. So, from your Auth0 Dashboard, head to the Applications section and click on Create Application. When Auth0 shows the dialog, fill the form like so:
- Name: "Django Web App"
- Application Type: "Regular Web Applications"
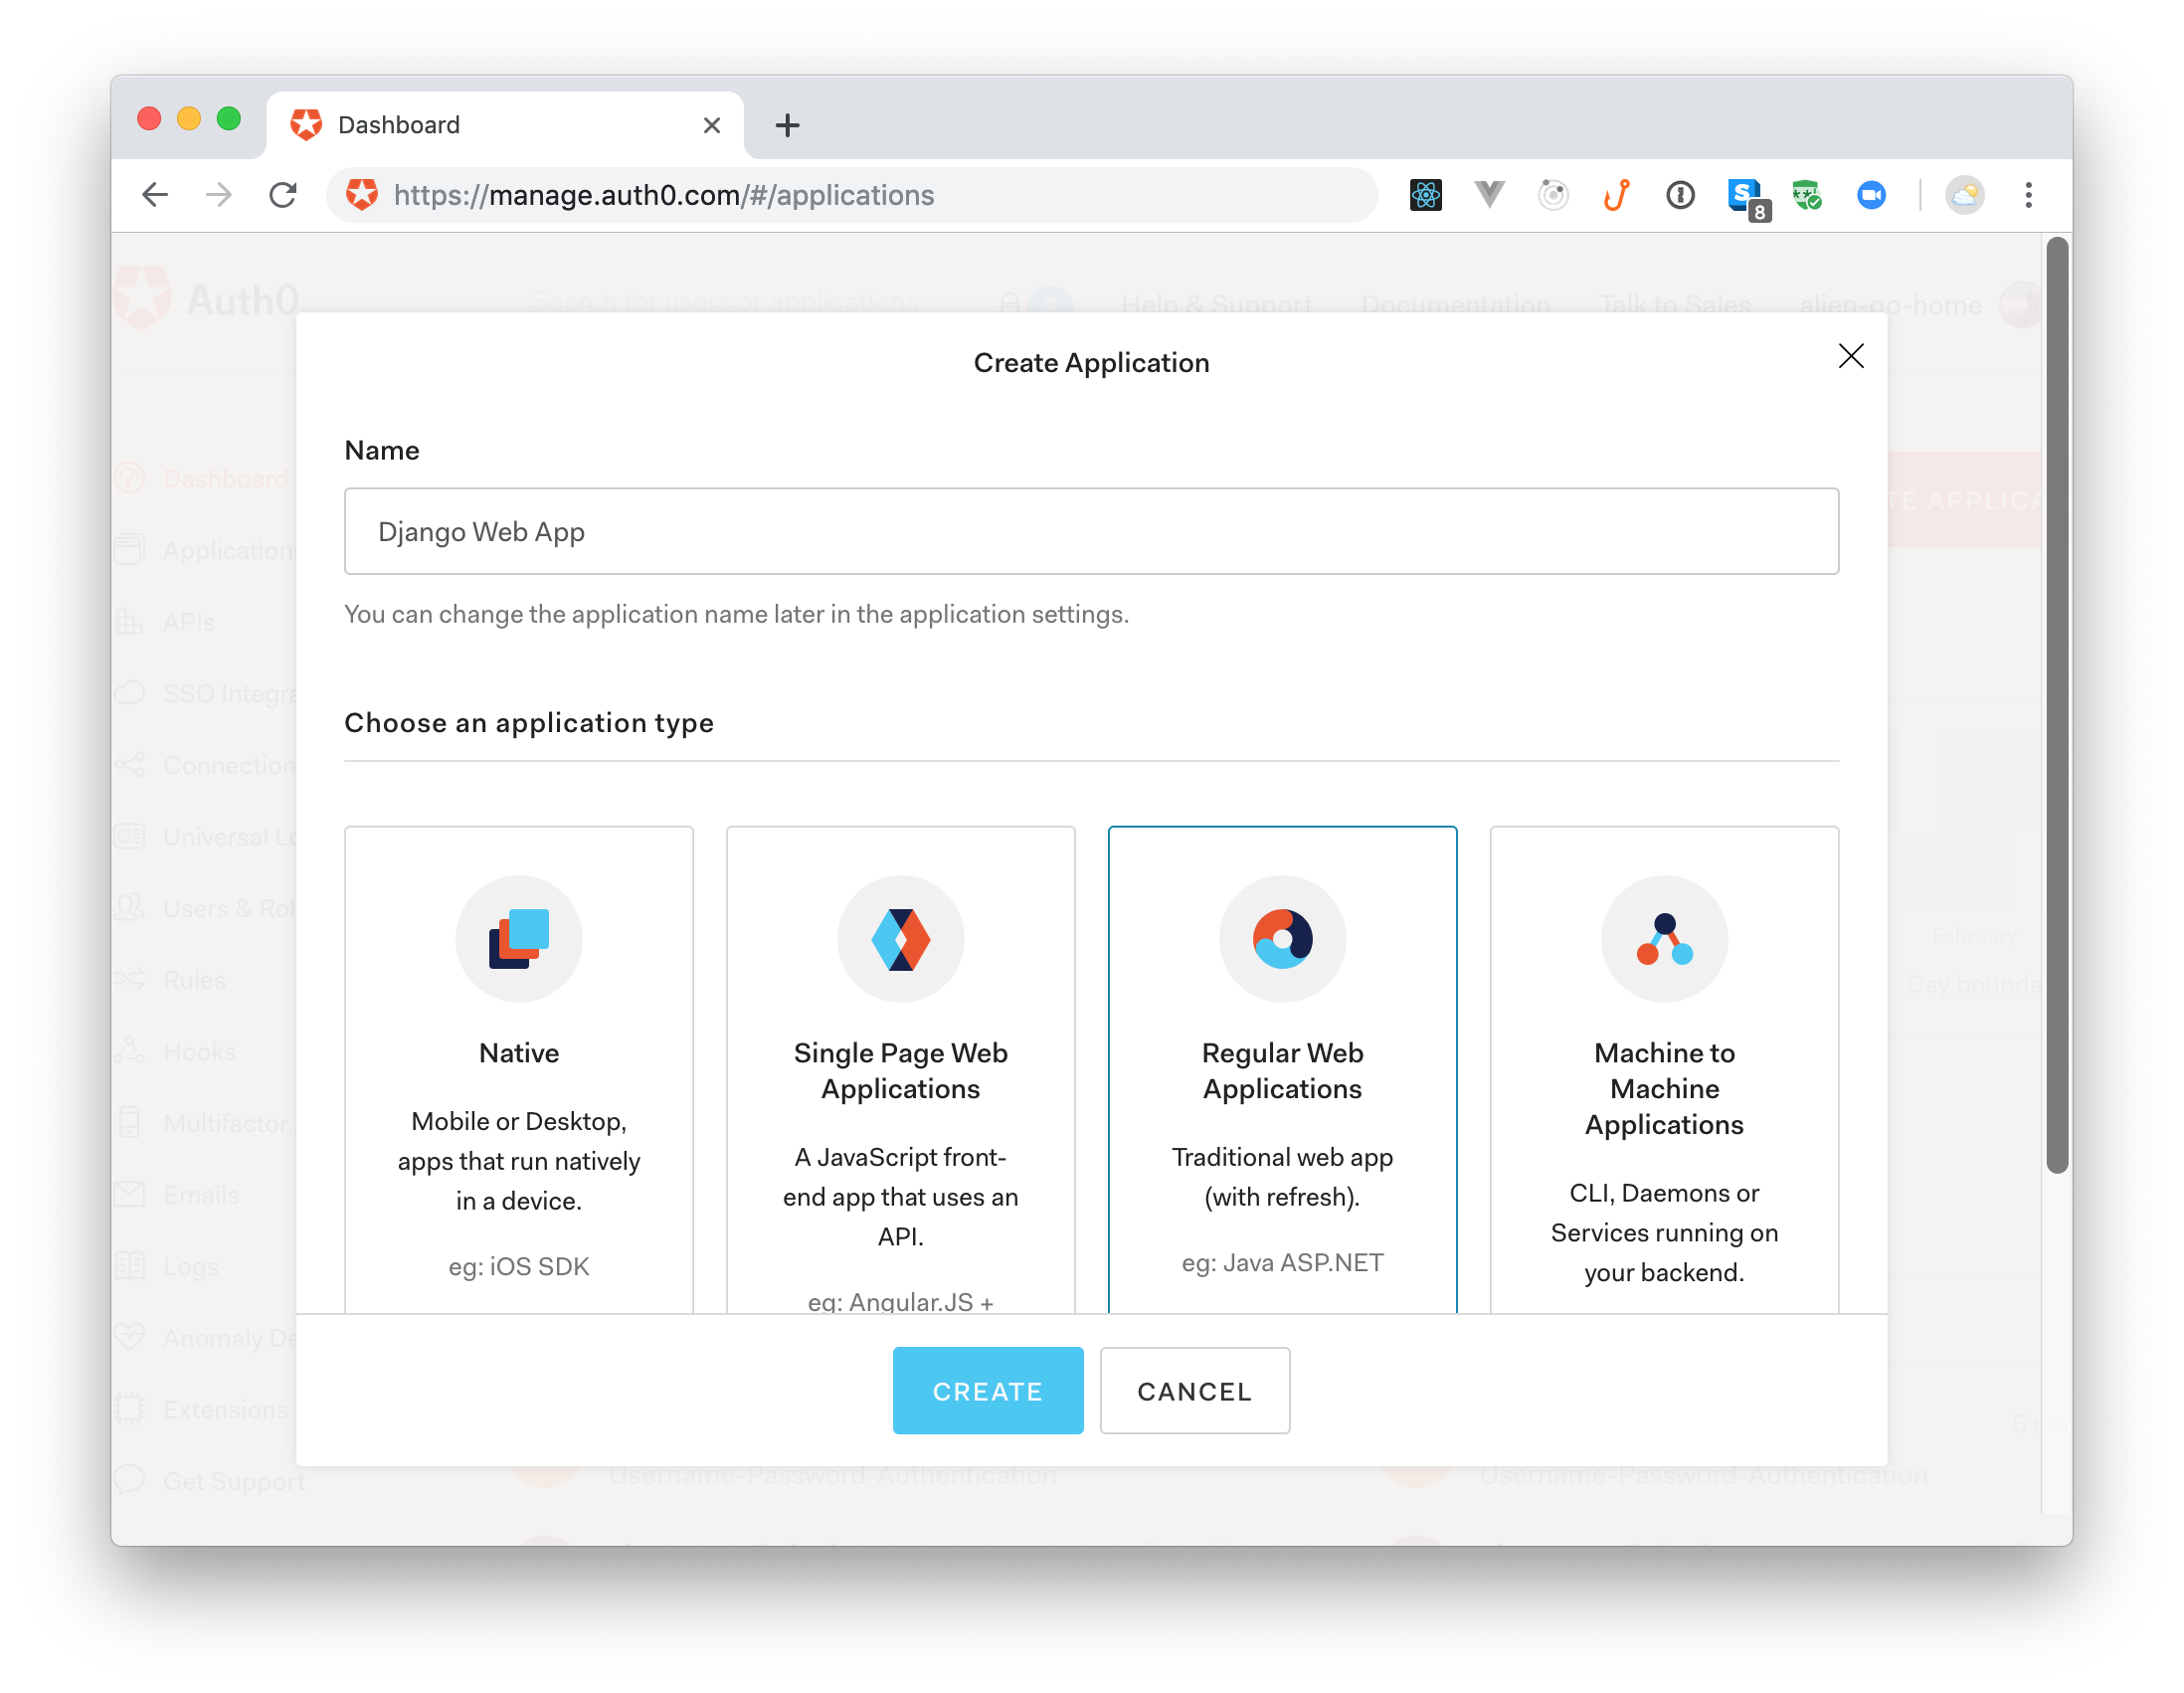
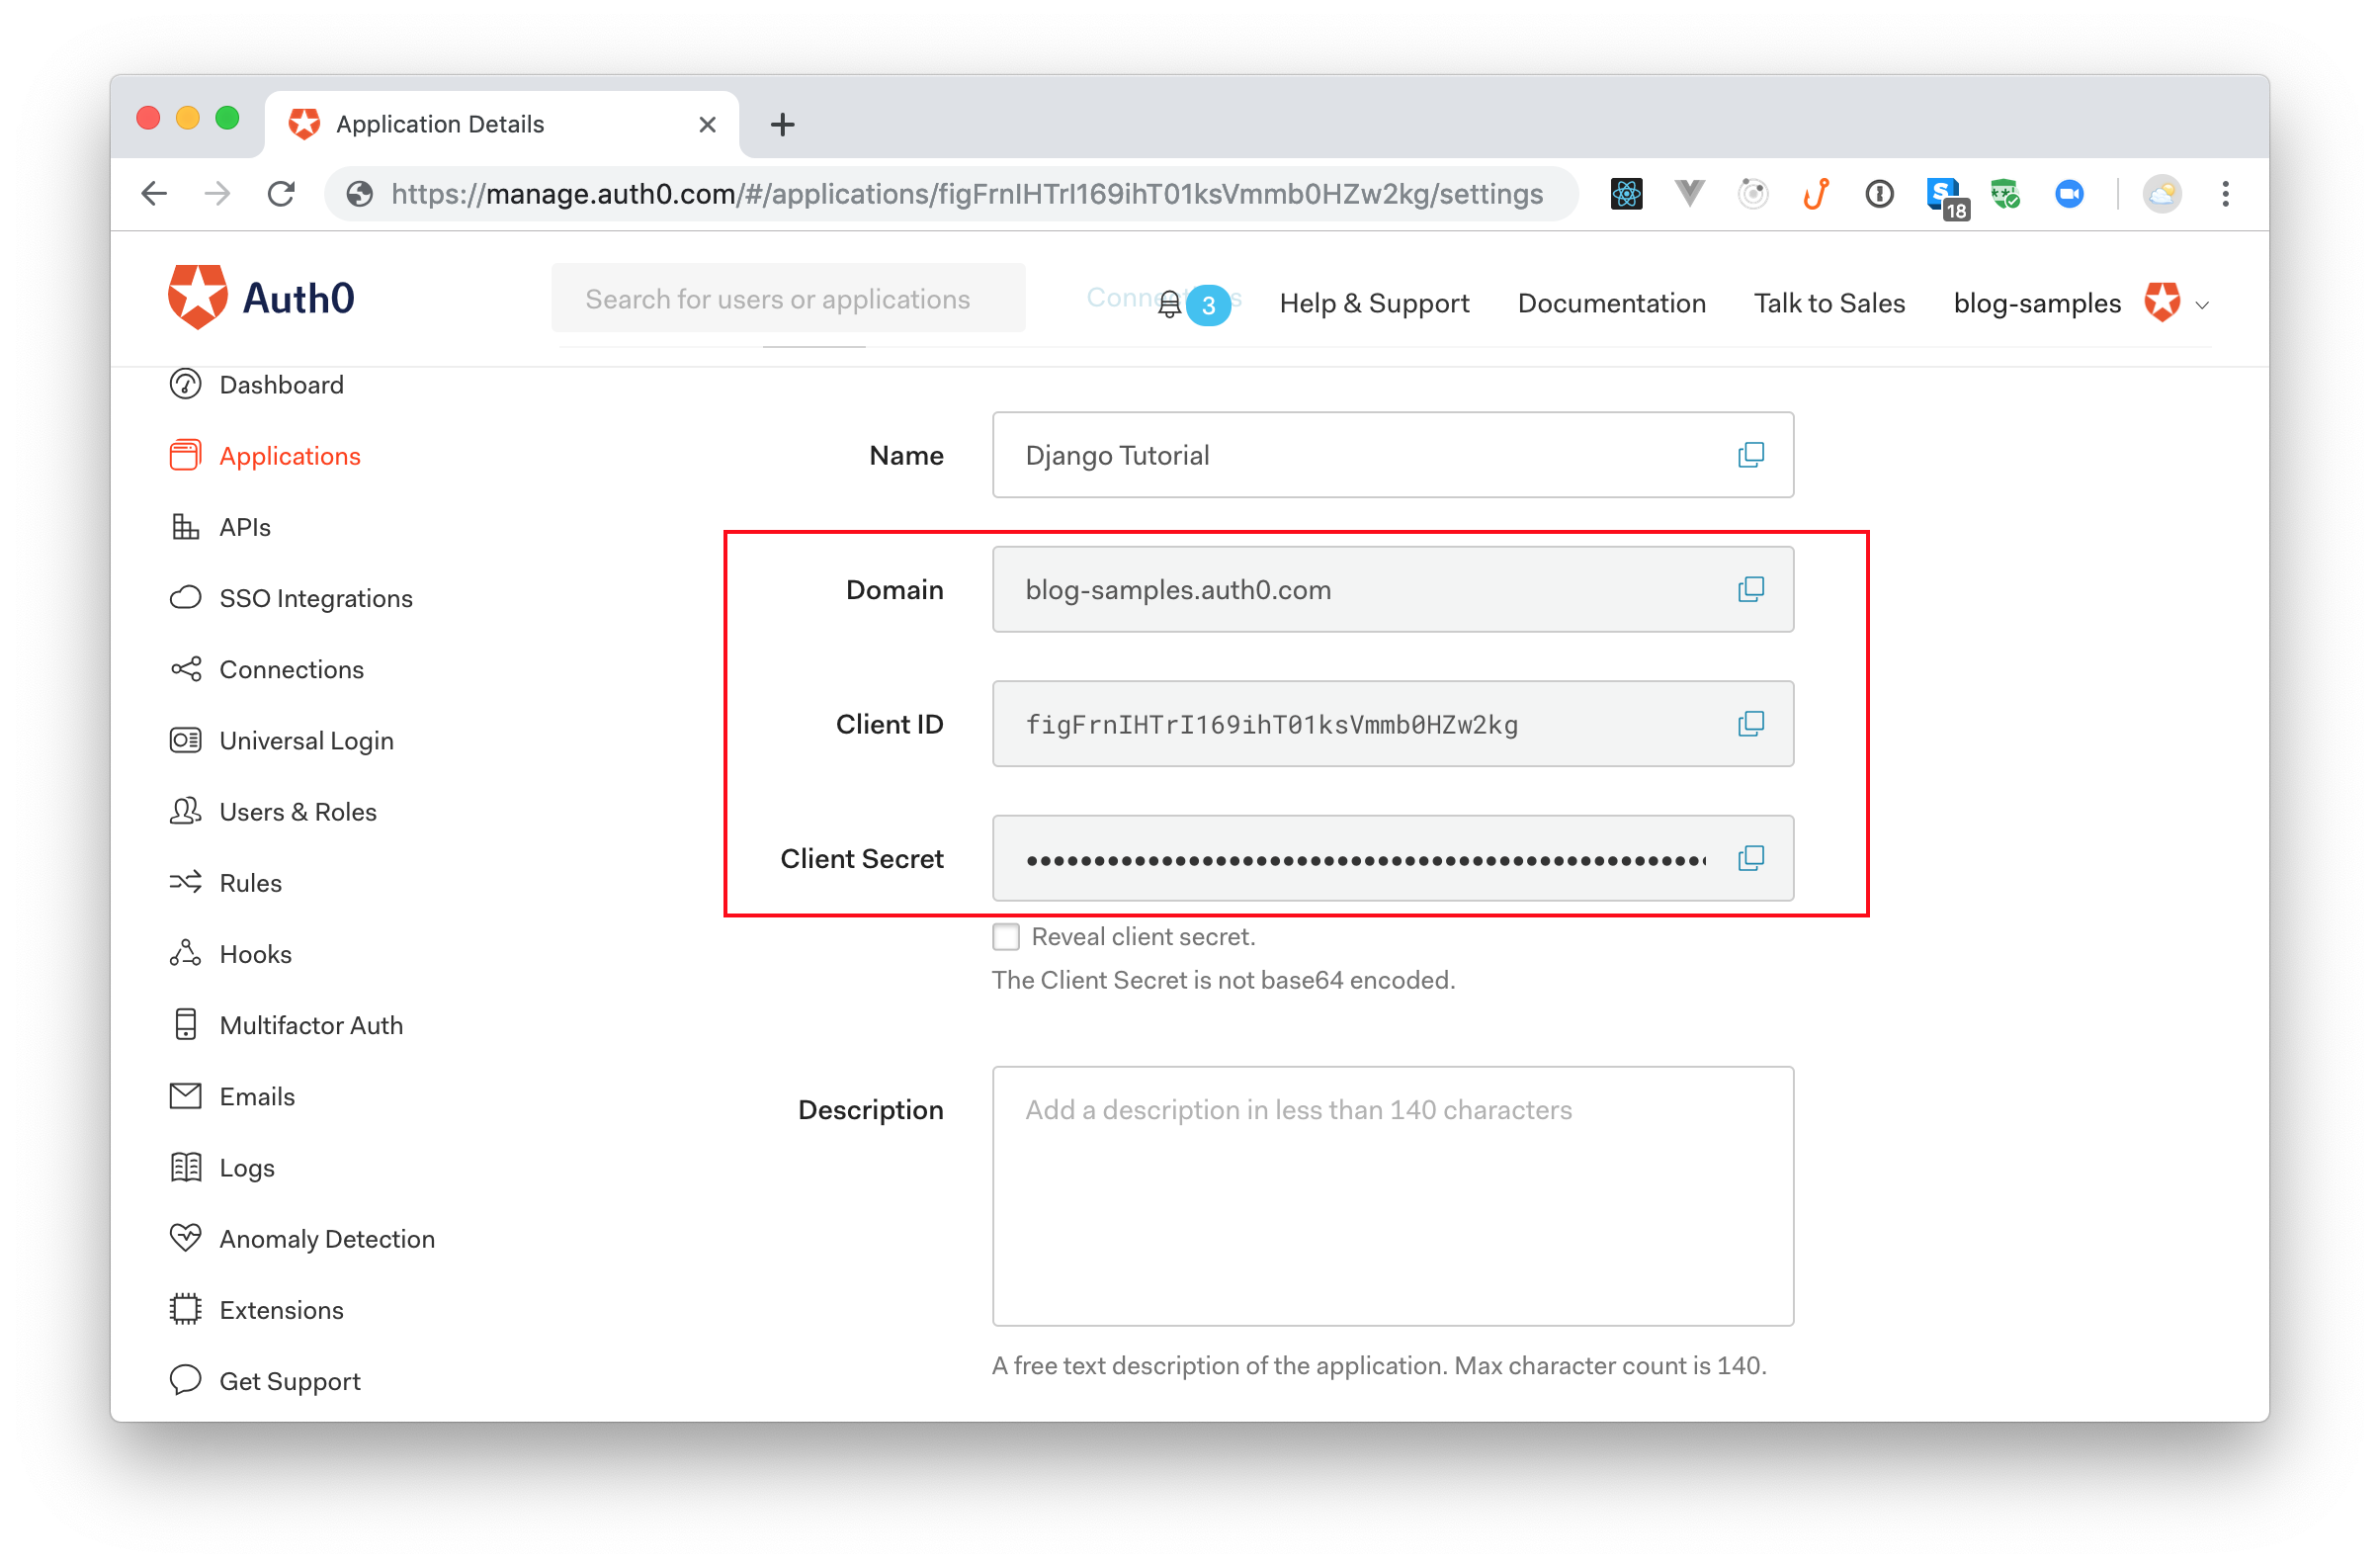
With that in place, when you click on the Create button, Auth0 will redirect you to the Quick Start tab of your new application. From there, navigate to the Settings tab. This tab will show you some important properties that you will need to copy soon. However, right now, you will have to search for and update two fields:
- Allowed Callback URLs: Add
http://127.0.0.1:8000/complete/auth0,http://localhost:8000/complete/auth0to this field to whitelist these URLs. Without this, as a security measure, Auth0 won't be able to call your app after users authenticate. - Allowed Logout URLs: Add
http://localhost:8000to this field to whitelist this URL. Just like the field above, for a security reason, you need to whitelist what URLs Auth0 can call after a logout.
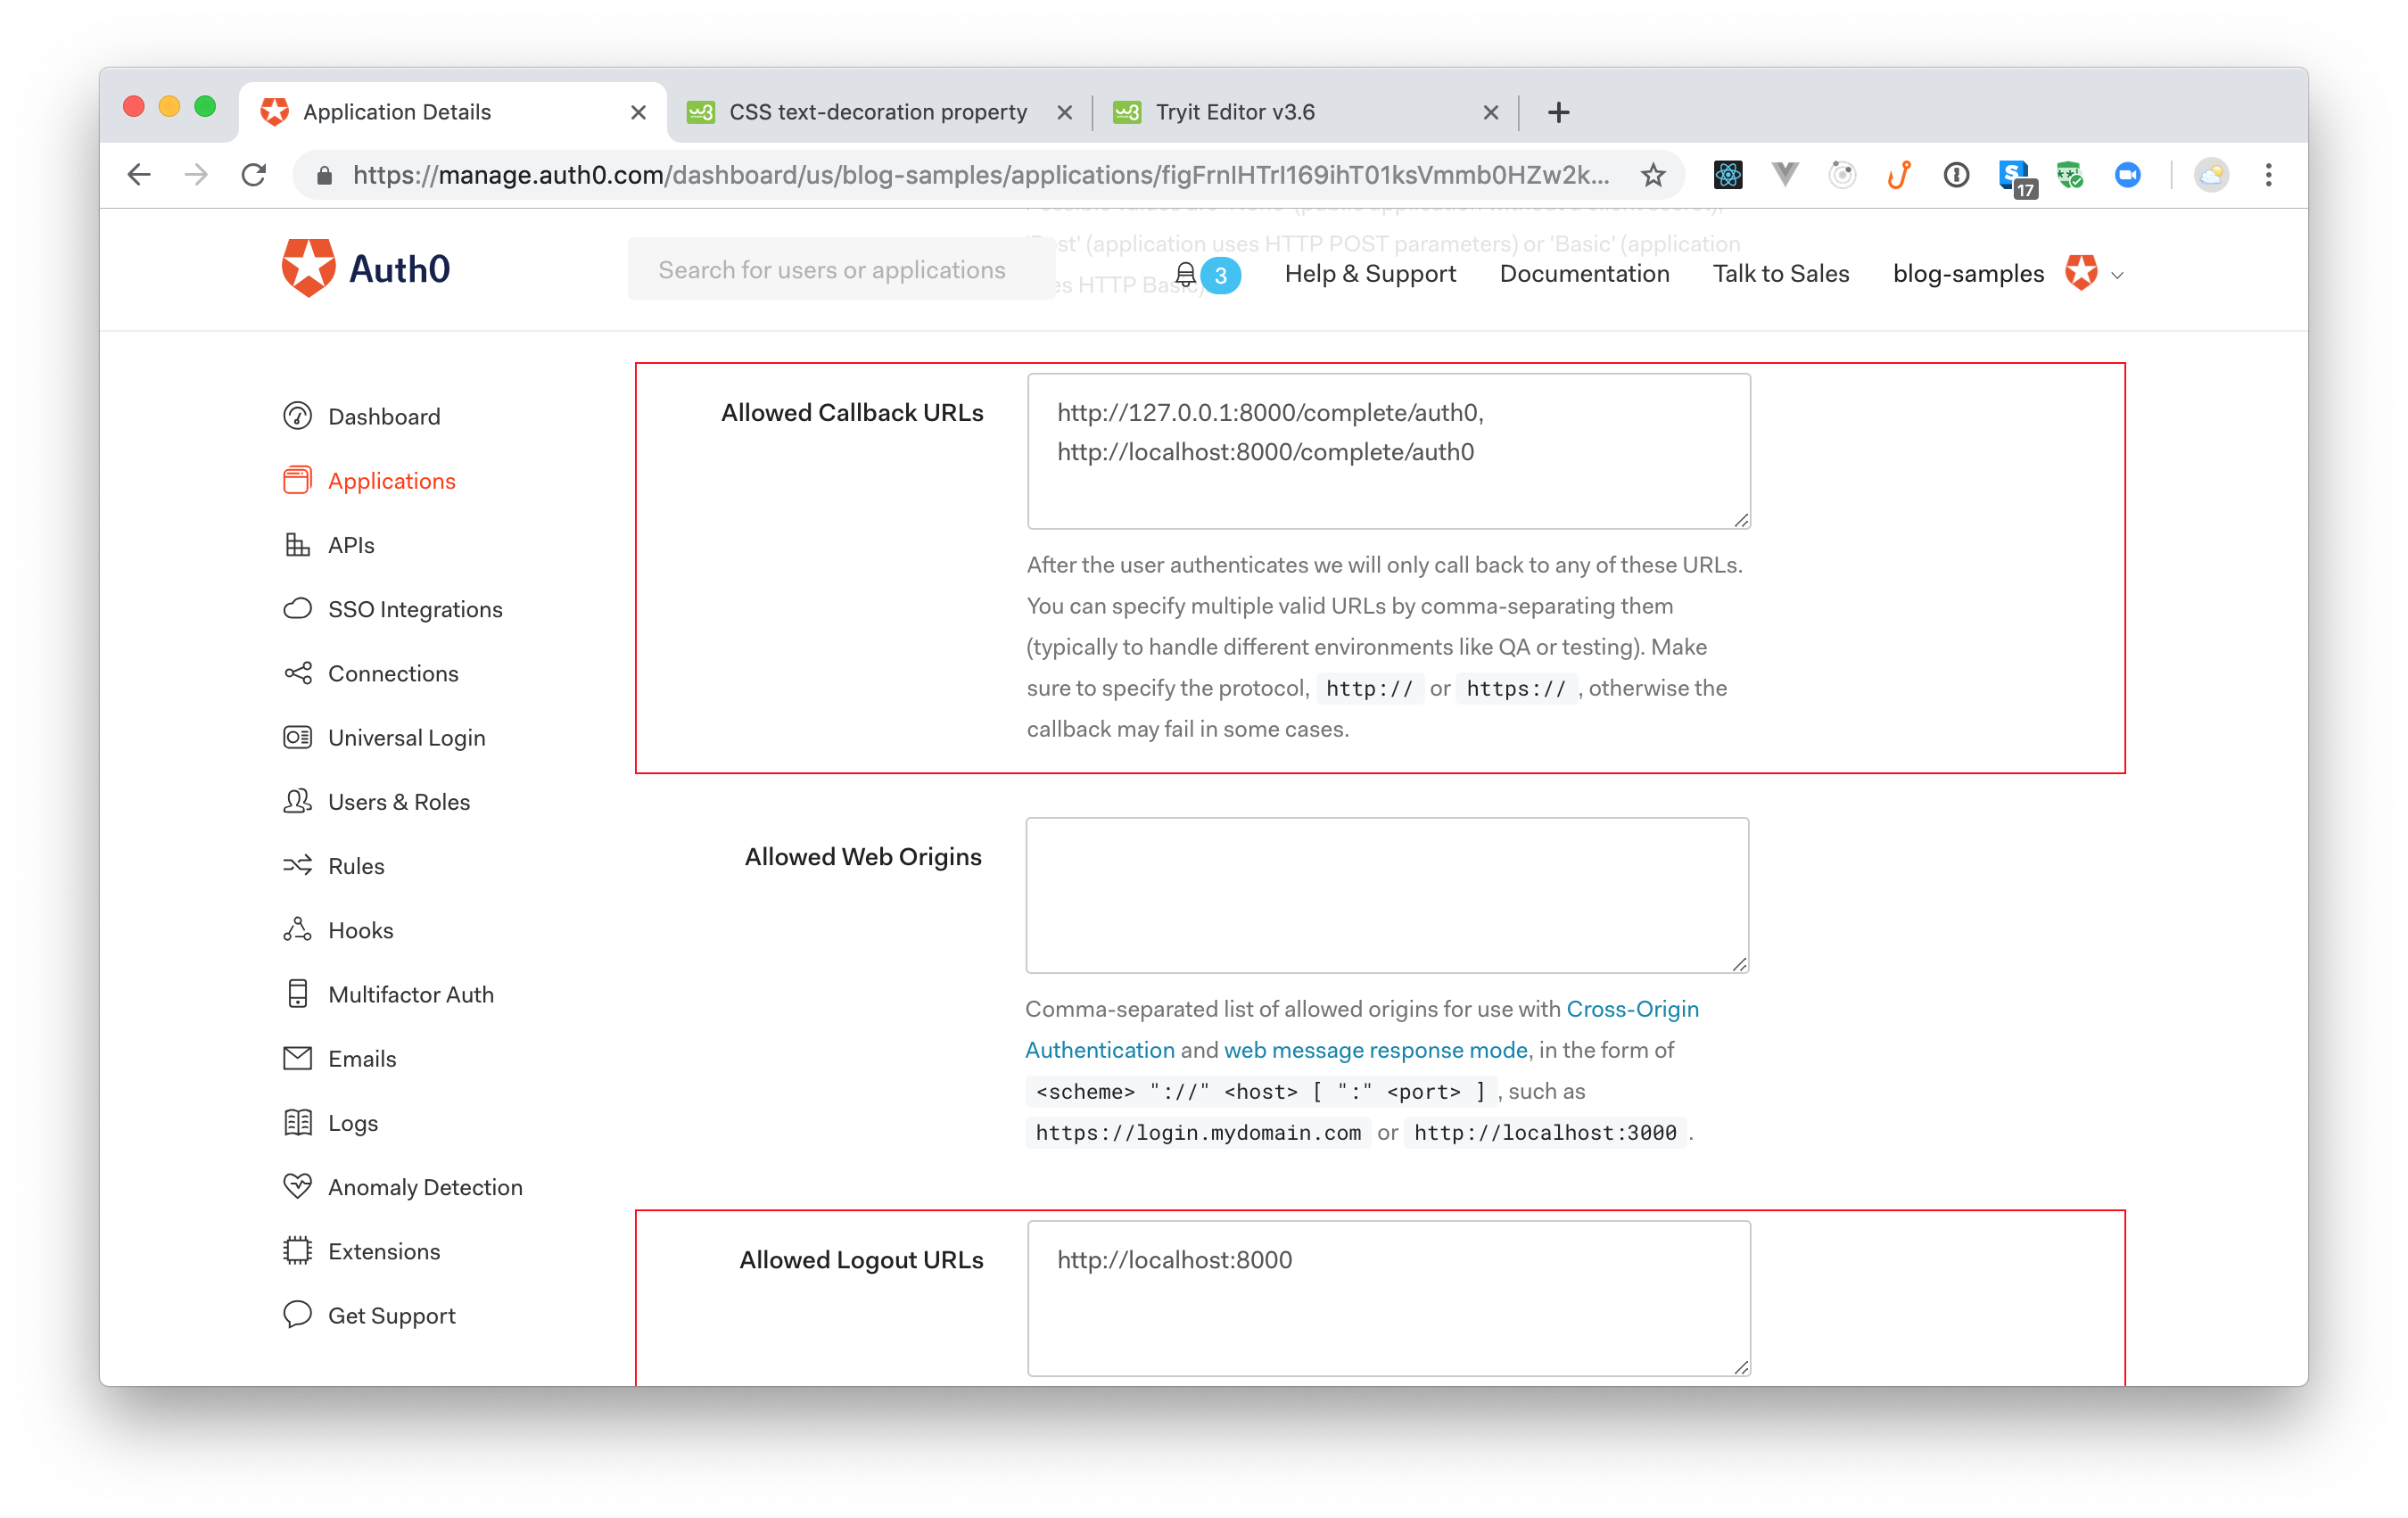
After filling this form, scroll to the bottom of the dashboard and click on the Save Changes button.
Integrating Django and Auth0
Now that you have created and configured your Auth0 Application, you can head back to your project. There, the first thing you will need to do is to install some dependencies. So, back in your terminal, shut down the development server (Control + C) and issue the following command:
pipenv install python-jose social-auth-app-djangoThis command will install two dependencies in your Django application:
python-jose: A library that helps your app support JavaScript Object Signing and Encryption (hence, JOSE).social-auth-app-django: A library that helps your app set up social authentication and authorization mechanisms.
After installing these libraries, you will need to open the ./src/store/settings.py file and update it as follows:
# ... import os, BASE_DIR, ALLOWED_HOSTS, etc ...

INSTALLED_APPS = [
    # ... leave other apps untouched #
    'social_django',
]

# ... MIDDLEWARE, ..., STATIC_URL ...

# Auth0 settings
SOCIAL_AUTH_TRAILING_SLASH = False  # Remove trailing slash from routes
SOCIAL_AUTH_AUTH0_DOMAIN = '<YOUR-AUTH0-DOMAIN>'
SOCIAL_AUTH_AUTH0_KEY = '<YOUR-AUTH0-CLIENT-ID>'
SOCIAL_AUTH_AUTH0_SECRET = '<YOUR-AUTH0-CLIENT-SECRET>'
SOCIAL_AUTH_AUTH0_SCOPE = [
    'openid',
    'profile',
    'email'
]

AUTHENTICATION_BACKENDS = {
    'social_core.backends.auth0.Auth0OAuth2',
    'django.contrib.auth.backends.ModelBackend'
}

LOGIN_URL = '/login/auth0'
LOGIN_REDIRECT_URL = '/'
LOGOUT_REDIRECT_URL = '/'
The first thing you are doing here is to update the INSTALLED_APPS array to include the social_django app (this one is provided by social-auth-app-django). Then, you are defining a bunch of settings to make this library work with Auth0. Make sure you define these settings at the bottom of the settings.py file.
Note: You will have to replace
<YOUR-AUTH0-DOMAIN>,<YOUR-AUTH0-CLIENT-ID>, and<YOUR-AUTH0-CLIENT-SECRET>with your own settings. You can find these values on the Settings tab of the Auth0 Application you created before. The values to replace these placeholders are Domain, Client ID, and Client Secret respectively.
With these changes in place, the next thing you will do is to open the ./src/webapp/templates/webapp/base.html file and search for the <div class="collapse navbar-collapse" /> element. Inside this element, you will see a li element that includes a link to Home and, right after it, you will add the following code:
{{"{% if request.user.is_authenticated == False "}}{{ "%" }}}
    <li class="nav-item">
        <a class="nav-link" href="/login/auth0">Log In</a>
    </li>
{{"{% endif "}}{{ "%" }}}
{{"{% if request.user.is_authenticated == True "}}{{ "%" }}}
    <li class="nav-item">
        <a class="nav-link" href="/profile">Profile</a>
    </li>
    <li class="nav-item">
        <a class="nav-link" href="/logout">Log Out</a>
    </li>
{{"{% endif "}}{{ "%" }}}
This will make your app show a Log In link to unauthenticated users, and a Profile and a Log Out link to the authenticated ones.
Then, you will have to open the ./src/webapp/urls.py file, and replace its content with this:
from django.urls import include, path

from . import views

urlpatterns = [
    path('', views.index, name='index'),
    path('', include('social_django.urls')),
]
Here, these changes are making social-auth-app-django responsible for the callback URL that Auth0 calls after the authentication process. With that, this library will be able to intercept the callback request and process the authentication result.
After applying the changes described above, your app will be ready to start supporting authentication. To see this in action, issue the following commands:
# create the authentication tables Django requires
python manage.py migrate

# start the app
python manage.py runserver
Note: The
migratecommand you ran above will set up an in-memory database to support your app. Some Django features (like authentication) require a database to run. To avoid adding complexity to this article, rather than using a production-ready database (e.g., PostgreSQL or MySQL), you will rely on SQLite, an in-memory database that Django supports out of the box.
Now, if you refresh the http://localhost:8000 page in your browser, you will see the Log In link on the navigation bar. Clicking on it will make your Django application redirect you to the Universal Login Page at Auth0, so you can authenticate. Then, if you authenticate, Auth0 will redirect you back to your app, where you will see the homepage again.
Back on the homepage, you will see the two new links at the top: Profile and Log Out. However, these won't work yet. You will fix that soon.
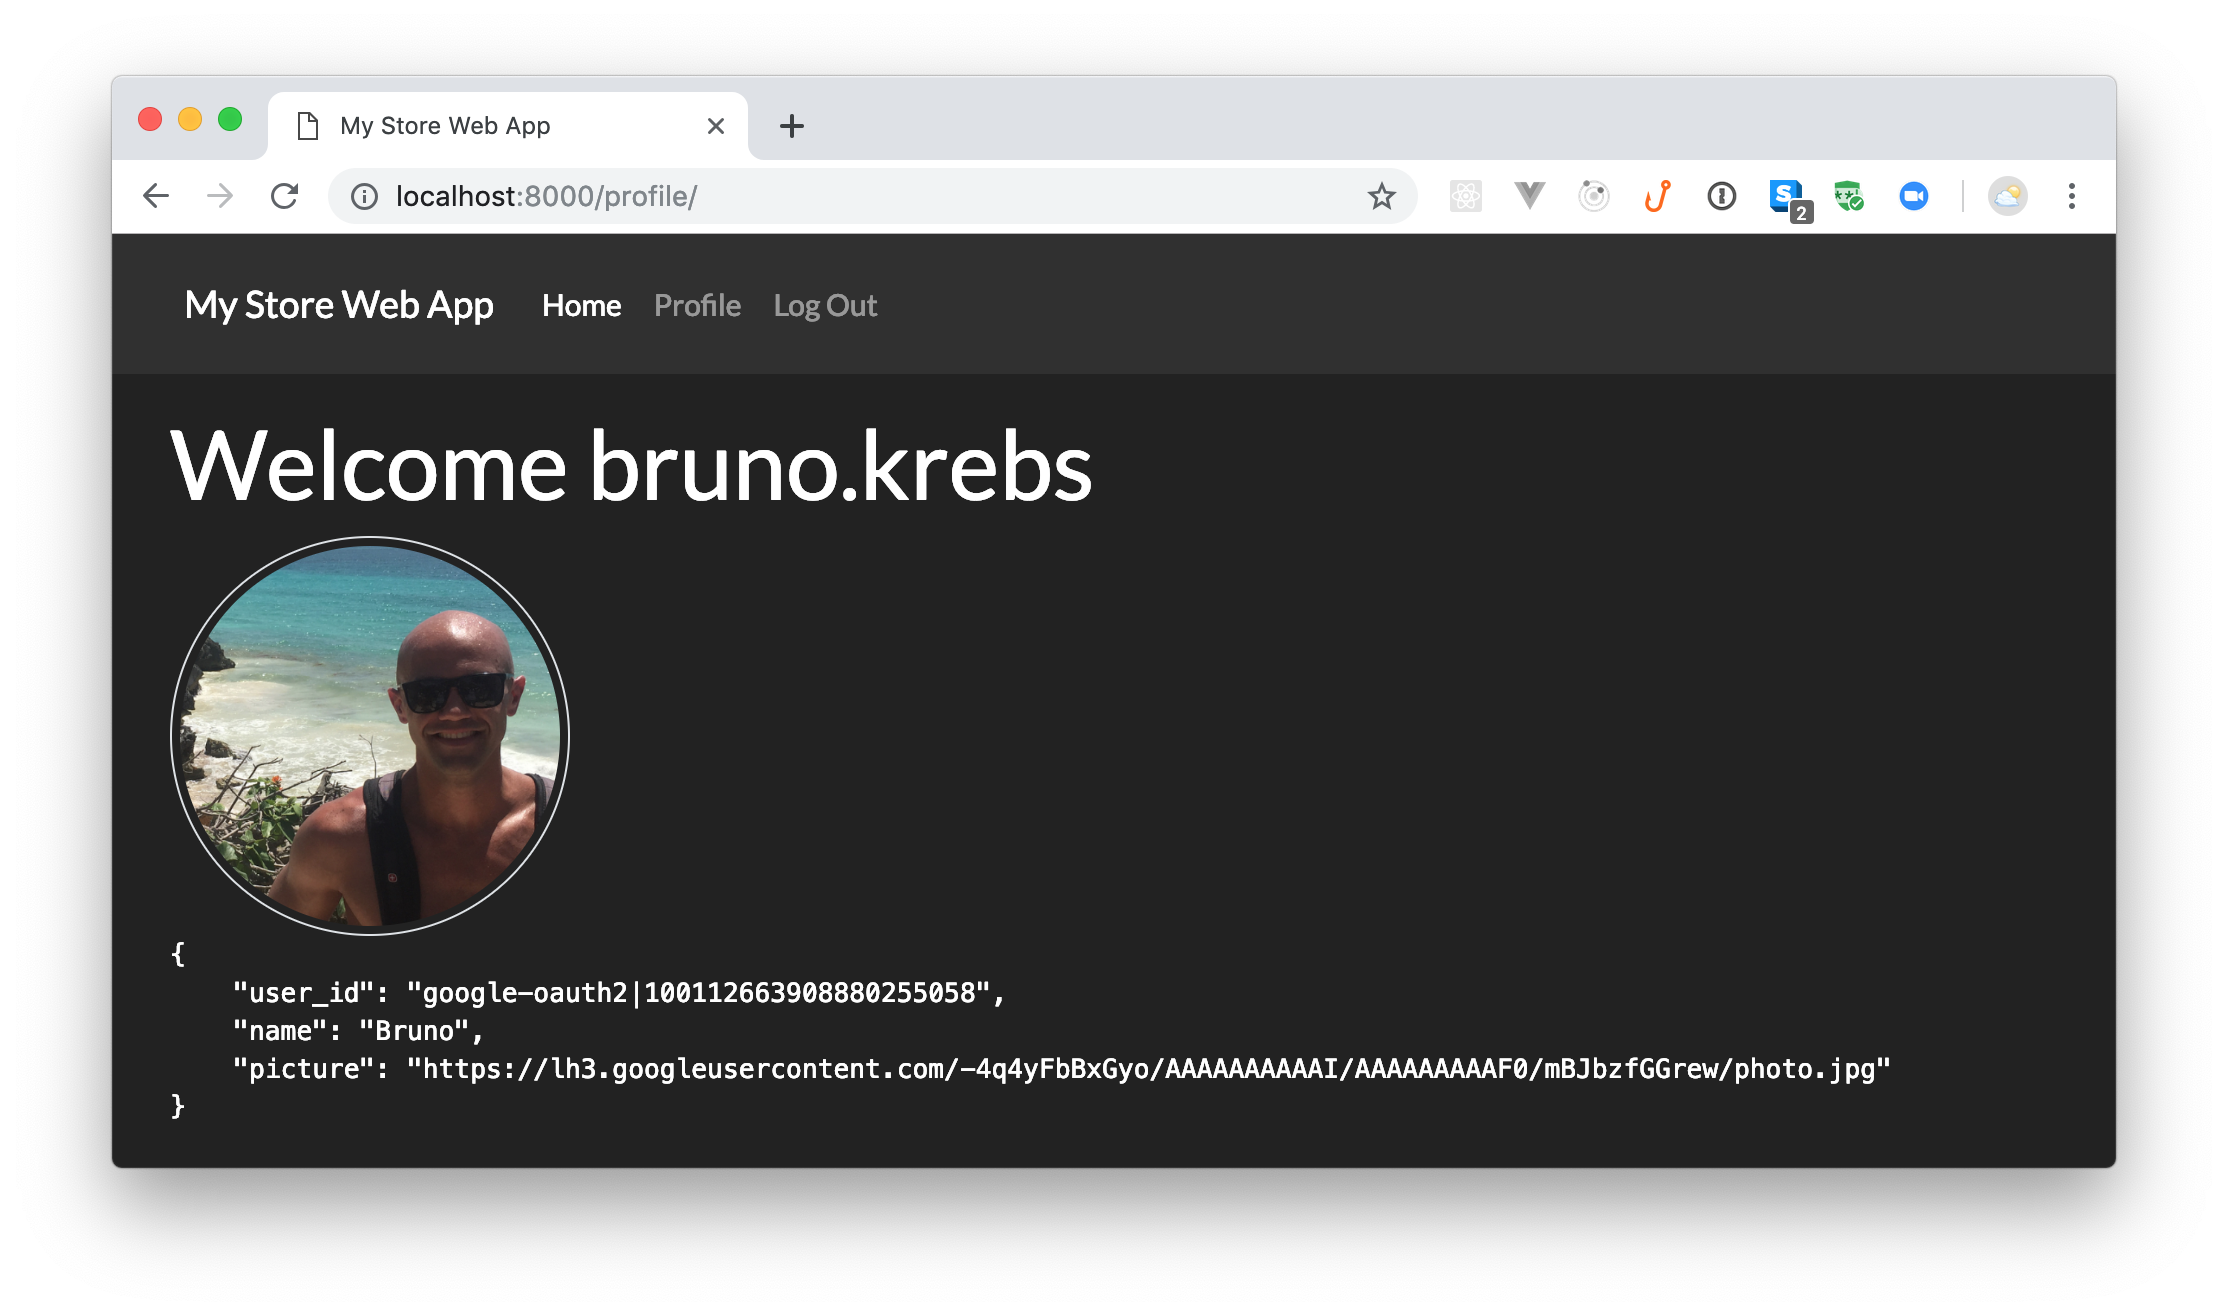
Showing users' profile
As your Django web application now supports authentication, the next thing you can do is to create a view where your users will be able to see their profile. This view won't allow them to update their data, but it is a good starting point to do so.
To start the development process, you will create a new file called profile.html inside the ./src/webapp/templates/webapp directory. Inside this file, you will add the following code:
{{"{% extends 'webapp/base.html' "}}{{ "%" }}}

{{"{% block content "}}{{ "%" }}}
    <div>
        <h1>Welcome {{ user.username }}</h1>
        <img class="img-thumbnail" style="border-radius: 50%; max-width: 200px;" src="{{ auth0User.extra_data.picture }}"/>
        <pre>{{ userdata }}</pre>
    </div>
{{"{% endblock "}}{{ "%" }}}
As you can see, this page is quite simple. The first thing it does is to add a welcome message with the user name ({{ user.username }}). After that it shows users' profile picture ({{ auth0User.extra_data.picture }}). Then, the page shows the rest of their data ({{ userdata }}).
With that in place, you will open the ./src/webapp/views.py file and update it as follows:
# ... other imports ...

import json
from django.contrib.auth.decorators import login_required


# ... index definition ...


@login_required
def profile(request):
    user = request.user
    auth0user = user.social_auth.get(provider='auth0')
    userdata = {
        'user_id': auth0user.uid,
        'name': user.first_name,
        'picture': auth0user.extra_data['picture']
    }

    return render(request, 'webapp/profile.html', {
        'auth0User': auth0user,
        'userdata': json.dumps(userdata, indent=4)
    })
On the new version of this file, you are creating a new function called profile that is protected by the @login_required decorator. This decorator will make sure that, if any unauthenticated user tries to load the profile page, they will have to authenticate through Auth0 first. If the user is properly authenticated, this function assembles their profile data into two variables (auth0user and userdata) and passes them to the profile.html page so Django can render these data.
After defining the profile function, you will have to open the ./src/webapp/urls.py file and associate a path to the function:
# ... import statements ...

urlpatterns = [
    # ... other paths ...
    path('profile/', views.profile),
]
Now, if you restart your Django app (by hitting Control + C then issuing python manage.py runserver), you will be able to navigate to your new profile page: http://localhost:8000/profile/.
Enabling users to log out
Since your app already enables users to authenticate and also shows their profile on a page, the next thing you might be interested in is to enable users to log out. To implement this feature, you actually have two options. The first one is to enable users to log out only from your Django web application. The second one is to enable users to log out also from the identity provider (Auth0 in this case).
If you are not sure which one you would like to implement, imagine that, instead of Auth0, your identity provider would be Facebook. In this case, if your users click on the log out button, would you want them to log out from Facebook as well? The answer to this question is: it depends.
Sometimes you might be interested to enable users to log out from the identity provider, sometimes you just don't want that to happen. If you are using the identity provider to Single-Sign On on multiple apps (like you usually do when you use Facebook), then you don't want to log out users from it when they click on the logout button in your application. However, if you are using the identity provider to support just one application, then you might want to enable users to log out from both your application and the identity provider.
Note: If you are using a new Auth0 tenant and you sign into your application through a social identity provider (e.g., Google or Facebook), then your user will never be kept logged in. To see this behaviour in action, you will need to configure the social provider with your own keys.
To get a better view of the difference, you will start by enabling users to log out from your application only. To achieve this, you will open the ./src/webapp/urls.py file and update it as follows:
# ... import statements ...

urlpatterns = [
    # ... other paths ...
    path('', include('django.contrib.auth.urls')),
]
Now, if you head back to the browser and click on the Log Out button, you will see that Django redirects you to the homepage and that the Log In link is available again. If you click on this link, two things may happen:
- Instead of seeing the Universal Login Page, Django and Auth0 will automatically log you in your app (this will happen only if you are using your own social provider keys).
- You will see that the Universal Login Page asks you if you want to keep using the same account.
This happens because your implementation is not logging you out from the identity provider.
Note: On this step, you won't have to restart the development server because the one Django ships is capable of restarting when you change existing files. However, if you are installing dependencies or even creating new files, the hot reload feature won't help.
To log out from the identity provider (i.e., from Auth0) as well, you will have to make some adjustments to your code. First, you will have to open the ./src/webapp/views.py file and update it as follows:
# ... other import statements ...
from django.contrib.auth import logout as django_logout
from django.http import HttpResponseRedirect

# ... index, profile ...

def logout(request):
    django_logout(request)
    domain = '<YOUR-AUTH0-DOMAIN>'
    client_id = '<YOUR-AUTH0-CLIENT-ID>'
    return_to = 'http://localhost:8000'
    return HttpResponseRedirect(f'https://{domain}/v2/logout?client_id={client_id}&returnTo={return_to}')
Here, you are defining a new function called logout that does two things. First, it uses the django_logout function provided by Django to log out from your application. Then, it redirects your user to the logout URL provided by Auth0 to log out from the identity provider.
Note: Just like before, you will have to replace both the
<YOUR-AUTH0-DOMAIN>and<YOUR-AUTH0-CLIENT-ID>placeholders with your own Auth0 properties. You will have the same values you used on thesettings.pyfile.
With this in place, open the ./src/webapp/urls.py file once more and remove the line you added before (the one that contains include('django.contrib.auth.urls')) and update the file as follows:
from django.urls import include, path

from . import views

urlpatterns = [
    path('', views.index, name='index'),
    path('', include('social_django.urls')),
    path('profile/', views.profile),
    path('logout/', views.logout),
]
That's it. If log out from your Django application once more and then click on the login button, you will see that, this time, Auth0 will present the login form to you. This means that you successfully made your Django application log user out from the app itself and from the identity provider.
Using Django Models
Now that you have your Django application properly secured, the next thing you can do is to use a Django Model to persist products in your database. Doing this will allow you to replace the hard-coded list of products and will allow you to take advantage of the Django Admin Site. The latter is a feature provided by Django that, when configured properly, automatically creates an interface where admins can manage (create, update, retrieve, and delete) models (e.g., products).
To see this in action, you will open the ./src/webapp/models.py file and add the following class into it:
# ... import models ...

class Product(models.Model):
    title = models.CharField(max_length=50)
    price = models.DecimalField(max_digits=7, decimal_places=2)
    image = models.CharField(max_length=255)
As you can see, the Product class you are defining is:
- extending the
models.Modelclass provided by Django; - defining a property called
titlethat is aCharFieldwith amax_lengthof 50. - defining a property called
pricethat is aDecimalFieldwith amax_digitsof 7 and 2decimal_places. - defining a property called
imagethat is aCharFieldwith amax_lengthof 255.
This model will be enough to replace the hard-coded list you used before. So, after creating it, you will open the ./src/webapp/views.py file and update it as follows:
# ... other import statements ...

from .models import Product

def index(request):
    products = Product.objects.all()

    context = {
        'products': products,
    }
    return render(request, 'webapp/index.html', context)


# ... profile and logout definitions ...
Note that you are replacing the hard-coded array of products with a call to Product.objects.all. This call will retrieve all products recorded in your database. This is everything you need to do to consume the Product model from the database.
To confirm that this is working, stop the running server (Control + C), and run the following commands:
python manage.py makemigrations webapp

python manage.py migrate

python manage.py runserver
The first two commands (makemigrations and migrate) will make Django create the table needed to persist products. The last one will start your server again. After running this, open the homepage in your browser once more.
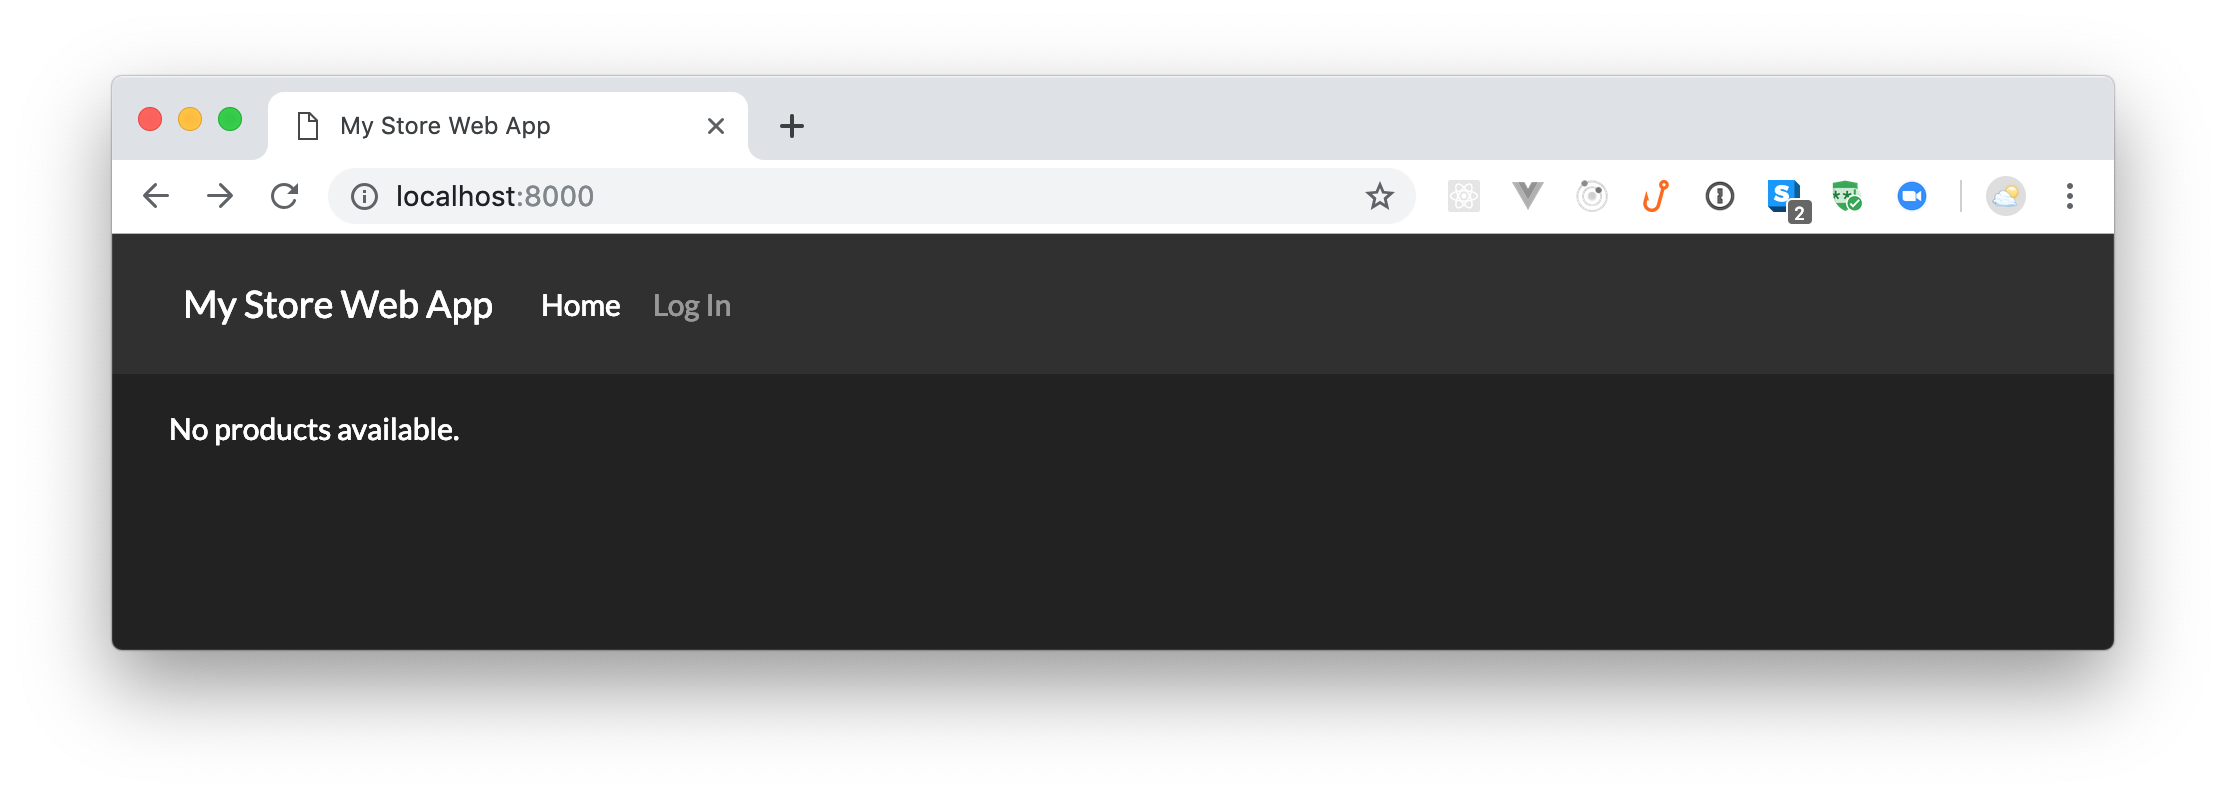
There, you will see that your homepage is showing a message saying that "no items are available." To add products and solve this problem, you will need to make a few more modifications.
First, you will need to open the ./src/webapp/admin.py file and update it as follows:
# ... other import statements ...

from .models import Product

admin.site.register(Product)
By adding these two lines into this file, you are making Django auto-create the form you need to manage products. The problem now is that, to be able to access the administrative interface, you need an admin user. Since you are using Auth0 as your identity provider, you will need to use an Auth0 Rule to define which users are part of the administrative staff.
Rules are JavaScript functions that execute when a user authenticates to your application. They run once the authentication process is complete, and you can use them to customize and extend Auth0's capabilities.
Note: Try opening
http://localhost:8000/admin/in your browser. You will see that Django redirects you to a screen where it asks for a username and a password. This screen is not integrated with Auth0, and there are no credentials that will work there.
So, back in your Auth0 Dashboard, you will navigate to the Rules section and click on the Create Rule button. Then, you will see a list of predefined rules that you can use, but you will choose the empty rule option. When you click on this option, Auth0 will redirect you to a view where it will ask you to define a name for the rule (you can use something like "Set Roles"). Right below this field, you will see a code editor where you will be able to define how your rule works.
On this code editor, replace everything with this:
function (user, context, callback) {
  // role should only be set to verified users.
  if (!user.email || !user.email_verified) {
    return callback(null, user, context);
  }

  user.app_metadata = user.app_metadata || {};

  // set the 'admin' role to the following user
  const adminEmail = '<YOUR-OWN-EMAIL-ADDRESS>';
  user.app_metadata.role = user.email === adminEmail ? 'admin' : 'user';

  auth0.users.updateAppMetadata(user.user_id, user.app_metadata).then(() => {
    context.idToken['https://django-webapp/role'] = user.app_metadata.role;
    callback(null, user, context);
  }).catch((err) => {
    callback(err);
  });
}
The rule you are defining here is checking the email address (user.email) of the user that is authenticating and, if it is equals to the email you are passing to adminEmail, it will set admin as the user role (app_metadata.role). If the email is something different, the rule will set user as their role.
Note: You will have to replace
<YOUR-OWN-EMAIL-ADDRESS>with an email address that you own. Keep in mind that, at the beginning of the rule, you are using!user.email_verifiedto guarantee that this rule runs only to users who have verified their email address. If the user in question is using some identity provider (like Google or Facebook), the email will be verified automatically. If they signed up manually using an email and a password, they will need to open their email and confirm they own the email address they used.
After pasting the new code of the rule and after replacing <YOUR-OWN-EMAIL-ADDRESS> with your own email address, you can hit the Save button and head back to your code.
Back in your project, you will create a new directory called authentication inside ./src/webapp/. Then, you will create a file called auth0.py inside the authentication directory. Inside this new file, you will add the following code:
from urllib import request

from jose import jwt
from social_core.backends.auth0 import Auth0OAuth2


class Auth0(Auth0OAuth2):
    def get_user_details(self, response):
        # Obtain JWT and the keys to validate the signature
        id_token = response.get('id_token')
        jwks = request.urlopen('https://' + self.setting('DOMAIN') + '/.well-known/jwks.json')
        issuer = 'https://' + self.setting('DOMAIN') + '/'
        audience = self.setting('KEY')  # CLIENT_ID
        payload = jwt.decode(id_token, jwks.read(), algorithms=['RS256'], audience=audience, issuer=issuer)

        return {
            'username': payload['nickname'],
            'first_name': payload['name'],
            'picture': payload['picture'],
            'user_id': payload['sub'],
            'role': payload['https://django-webapp/role'],
        }
Here, you are defining a class called Auth0 that extends the Auth0OAuth2 one provided by social-auth-app-django. You need this extension to override the way this class gets user details (get_user_details). In this case, you need to fetch the role of the user authenticating. The rest of the code on the get_user_details function is just a copy of what is provided on the original Auth0OAuth2 class, and it is there to be able to read the id token returned by Auth0.
The ID Token is a JSON Web Token (JWT) that contains user profile information (like the user's name, email, and so forth), represented in the form of claims. These claims are statements about the user, which can be trusted if the consumer of the token can verify its signature.
As you are creating your own extension of the Auth0OAuth2 class, you will need to inform social-auth-app-django that you want to use this extension. To do this, open the ./src/store/settings.py file, search for the AUTHENTICATION_BACKENDS object and replace this line:
'social_core.backends.auth0.Auth0OAuth2',With the path to your own extension:
'webapp.authentication.auth0.Auth0',This change will make the social-auth-app-django library aware of your new class, but it is not enough to make the User model provided by Django aware of the role set during the authentication process (i.e., the role set by your Auth0 Rule).
To fill this gap, you will need to modify the authentication pipeline in your Django app. More specifically, you will need to create a file called authorization.py inside the authentication directory, and add the following code to it:
def process_roles(details, user, **kwargs):
    if details['role'] == 'admin':
        user.is_staff = True
        user.is_superuser = True
        user.save()
Then, you will need to open the ./src/store/settings.py file once more and add the following code at the bottom:
SOCIAL_AUTH_PIPELINE = (
    'social_core.pipeline.social_auth.social_details',
    'social_core.pipeline.social_auth.social_uid',
    'social_core.pipeline.social_auth.auth_allowed',
    'social_core.pipeline.social_auth.social_user',
    'social_core.pipeline.user.get_username',
    'social_core.pipeline.user.create_user',
    'webapp.authentication.authorization.process_roles',
    'social_core.pipeline.social_auth.associate_user',
    'social_core.pipeline.social_auth.load_extra_data',
    'social_core.pipeline.user.user_details',
)
If you take a close look, you will see that, right before the associate_user function provided by social-auth-app-django, you are inserting your process_roles function.
After this change, you are ready to access the Django administration page after authenticating through Auth0. So, stop the development server (Control + C) and restart your server (python manage.py runserver). Then, back in your web application (http://localhost:8000), make sure you are logged out and log in again. This time, use the same email address you used while creating the Auth0 Rule.
If everything works as expected, Auth0 will redirect you back to your web application and, if you navigate to http://localhost:8000/admin/, you will see the administrative screen.
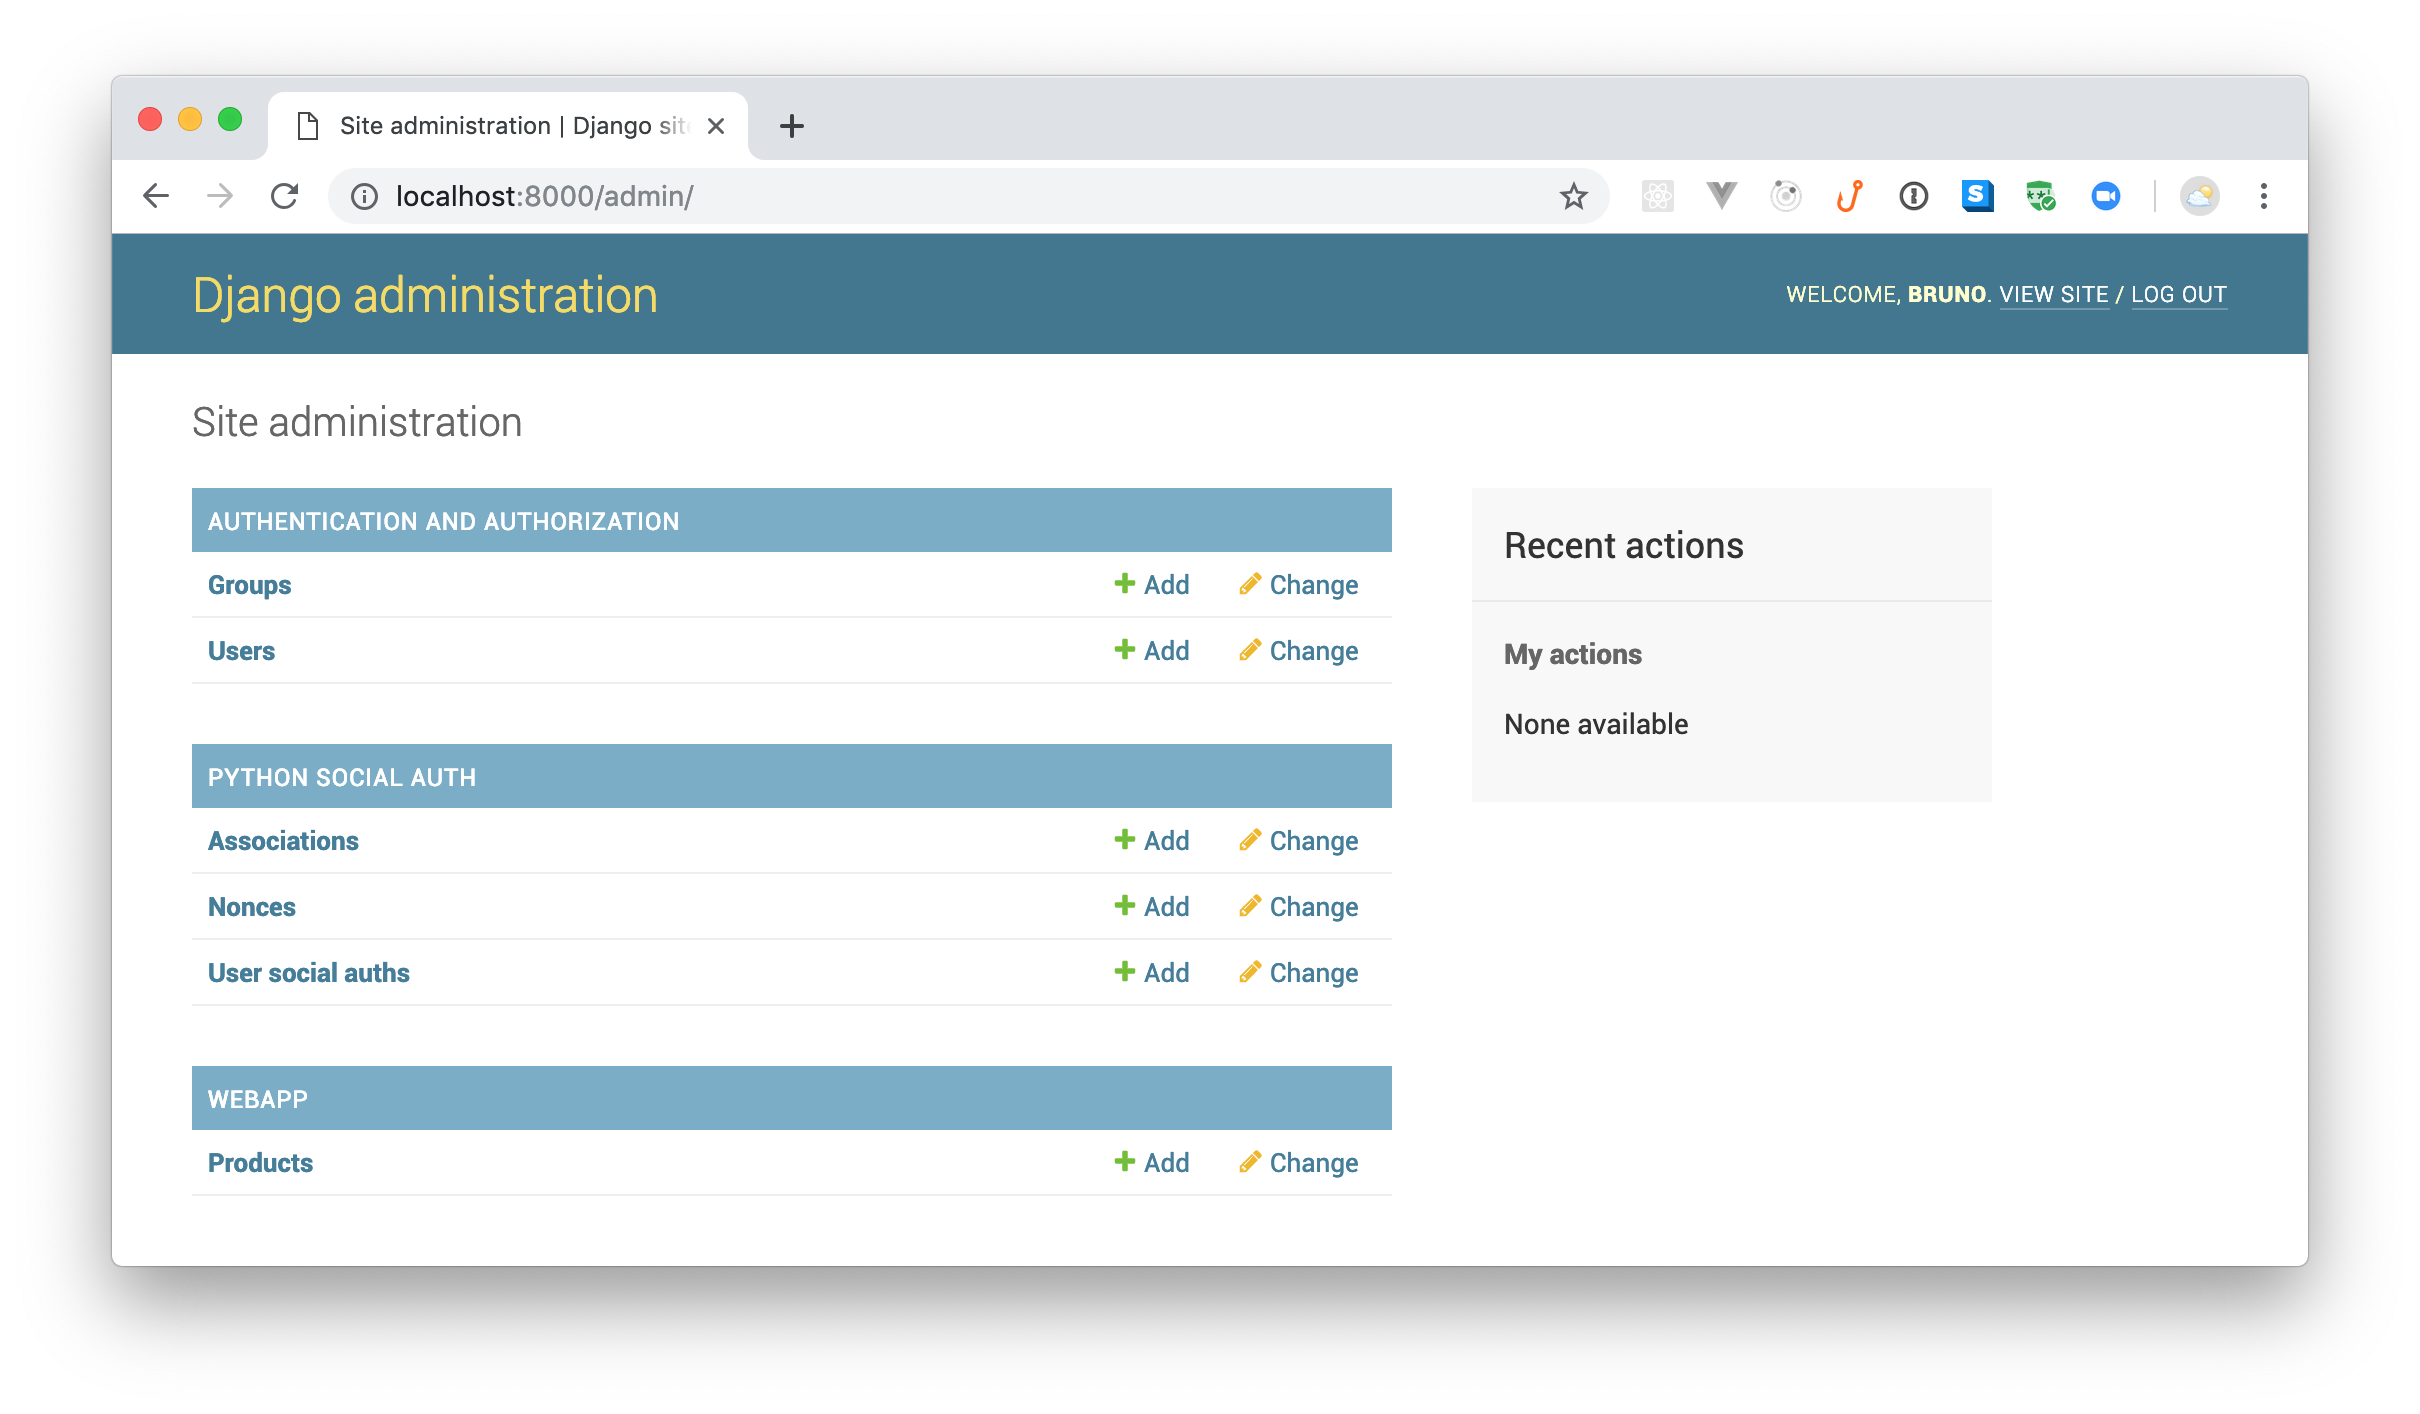
Lastly, if you click on the + Add button next to the Products label, you will see a form with three fields where you will be able to insert products. If you insert some products through this form, you will be able to see them in your http://localhost:8000.
Disabling the Django administration login screen
After applying the changes explained above, you have successfully integrated your Django web application with Auth0. However, there is one minor detail that you might be interested in fine tuning. Try logging out from your application and navigating to http://localhost:8000/admin/. Doing this, you will see the Django admin login form again. However, as you are using Auth0 as your identity provider, you might be interested on disabling this screen.
To disable Django's login screen, you can open the src/webapp/urls.py file and update it as follows:
# ... other import statements ...

from django.contrib.auth.decorators import login_required
from django.contrib import admin

admin.autodiscover()
admin.site.login = login_required(admin.site.login)

# ... urlpatterns definition ...
Now, if you reload the browser tab that is showing the Django admin login screen, you will see that Django will redirect you to Auth0.
"I just learned how to build secure web applications with Django and Auth0!"
Tweet This
Recap
In this article, you built a Django web application that enables visitors to see products recorded in a database. To do this, you started from scratch, where you installed pipenv to manage your dependencies, then you installed and used django to scaffold your application. After that, you create a good-looking homepage with the help of Bootstrap, and you used Auth0 to authenticate your users. In the end, you used an Auth0 Rule to define roles to users.
What do you think about Django to create web applications? Do you think this framework facilitates the process? What about the integration with Auth0? Let us know your thoughts on the comments box below. We hope you enjoyed reading it!


