It's here! Phoenix Live View leverages server-rendered HTML and Phoenix's native WebSocket tooling so you can build fancy real-time features without all that complicated JavaScript. If you're sick to death of writing JS (I had a bad day with Redux, don't ask), then this is the library for you!
Phoenix Live View is brand brand new so I thought I'd provide short write-up of a super simple demo I built for anyone looking to get up and running. Keep in mind that the library is still a release candidate and as such it it subject to change.
What is Live View?
Chris McCord said it best in his announcement back in December:
Phoenix LiveView is an exciting new library which enables rich, real-time user experiences with server-rendered HTML. LiveView powered applications are stateful on the server with bidrectional communication via WebSockets, offering a vastly simplified programming model compared to JavaScript alternatives.
Kill Your JavaScript
If you've waded through an overly complex SPA that Reduxes all the things (for example), you've felt the maintenance and iteration costs that often accompany all that fancy JavaScript.
Phoenix Live View feels like a perfect fit for the 90% of the time that you do want some live updates but don't actually need the wrecking ball of many modern JS frameworks.
Let's get Live View up and running to support a feature that pushes out live updates as our server enacts a step-by-step process of creating a GitHub repo.
Here's the functionality we're building, notice how the "Status" updates in real-time:
Getting Started
The following steps are detailed in the Phoenix Live View Readme.
- Install the dependency in your
mix.exsfile:
- Update your app's endpoint configuration with a signing salt for your live view connection to use. Note: you can generate a secret with
mix phx.secretfrom the command line.
- Update your configuration to enable writing Live View templates with the
.leexextension.
- Add the live view flash plug to your browser pipeline, after
:fetch_flash
- Import the following in your
lib/app_web.exfile:
- Expose a socket for Live View to use in your endpoint module:
- Add Live View to your NPM dependencies:
- Use the Live View JavaScript library to connect to the Live View socket in
app.js
- Your live views should be saved in the
lib/my_app_web/live/directory. For live page reload support, add the following pattern to yourconfig/dev.exs:
Now we're ready to build and render a live view!
Rendering a Live View from the Controller
You can serve live views directly from your router. However, in this example we'll teach our controller to render a live view. Let's take a look at our controller:
We're calling on the live_render/3 function which takes in an argument of the conn, the live view we want to render, and any session info we want to send down into the live view.
Now we're ready to define our very own live view.
Defining the Live View
Our first live view will live in my_app_web/live/github_deploy_view.ex. This view is responsible for handling an interaction whereby a user "deploys" some content to GitHub. This process involves creating a GitHub organization, creating the repo and pushing up some contents to that repo. We won't care about the implementation details of this process for the purpose of this example.
Our live view will use Phoenix.LiveView and must implement two functions: render/1 and mount/2.
Now that we have the basic pieces in place, let's break down the live view process.
How It Works
The live view connection process looks something like this:
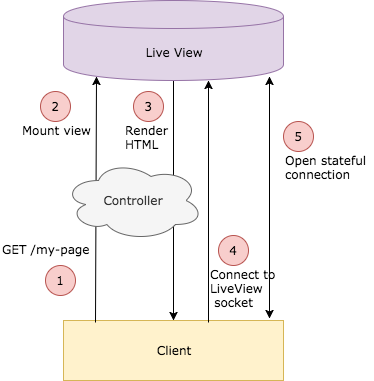
When our app receives an HTTP request for the index route, it will respond by rendering the static HTML defined in our live view's render/1 function. It will do so by first invoking our view's mount/2 function, only then rendering the HTML populated with whatever default values mount/2 assigned to the socket.
The rendered HTML will include the signed session info. The session is signed using the signing salt we provided to our live view configuration in config.exs. That signed session will be sent back to the server when the client opens the live view socket connection. If you inspect the page rendering your live view in the browser, you'll see that signed session:
Once that static HTML is rendered, the client will send the live socket connect request thanks to this snippet:
This initiates a stateful connection that will cause the view to be re-rendered anytime the socket updates. Since the page first renders as static HTML, we can rest assured that our page will always render for our user, even if JavaScript is disabled in the browser.
Now that we understand how the live view is first rendered and how the live view socket connection is established, let's render some live updates.
Rendering Live Updates
Live View is listening to updates to our socket and will re-render only the portions of the page that need updating. Taking a closer look at our render/1 function, we see that it renders the values of the keys assigned to our socket.
Where mount/2 assigned the values :deploy_step, our render/1 function renders them like this:
Note: The ~L sigil represents Live EEx. This is the built-in Live View template. Unlike .eex templates, LEEx templates are capable of tracking and rendering only necessary changes. So, if the value of @deploy_step changes, our template will re-render only that portion of the page.
Let's give our user a way to kick off the "deploy to GitHub" process and see the page update as each deploy step is enacted.
Live View supports DOM element bindings to give us the ability to respond to client-side events. We'll create a "deploy to GitHub" button and we'll listen for the click of that button with the phx-click event binding.
The phx-click binding will send our click event to the server to be handled by GithubDeployView. Events are handled in our live views by the handle_event/3 function. This function will take in an argument of the event name, a value and the socket.
There are a number of ways to populate the value argument, but we won't use that data point in this example.
Let's built out our handle_event/3 function for the "github_deploy" event:
Our function is responsible for two things. First, it will kick off the deploy process (coming soon). Then, it will update the value of the :deploy_step key in our socket. This will cause our template to re-render the portion of the page with <%= @deploy_step %>, so the user will see Status: Ready! change to Status: Starting deploy....
Next up, we need the "deploying to GitHub" process to be capable of updating the socket's :deploy_step at each turn. We'll have our view's handle_event/3 function send a message to itself to enact each successive step in the process.
This code is dummied-up--we're not worried about the implementation details of deploying our GitHub repo, but we can imagine how we might add error handling and other responsibilities into this code flow.
Our handle_event/3 function kicks off the deploy process by sending the :create_org message to the view itself. Our view responds to this message by calling on code that enacts that step and by updating the socket. This will cause our template to re-render once again, so the user will see Status: Starting deploy... change to Status: Creating GitHub org.... In this way, the view enacts each step in the GitHub deploy process, updating the socket and causing the template to re-render each time.
Now that we have our live updates working, let's refactor the HTML code out of our render/1 function and into its own template file.
Rendering a Template File
We'll define our template in lib/my_app_web/templates/page/index.html.leex:
Next, we'll have our live view's render/1 function simply tell our PageView to render this template:
Now our code is a bit more organized.
Conclusion
From even this limited example, we can see what a powerful offering this is. We were able to implement this real-time feature with only server-side code, and not that many lines of server-side code at that! I really enjoyed playing around with Phoenix Live View and I'm excited to see what other devs build with it. Happy coding!