Building Weather Forecast CLI tool Part 2
This is the second part of the Building CLI tools series that will go into detail how to call DarkSky API from your command line and print out the results and then publish our CLI to npm.
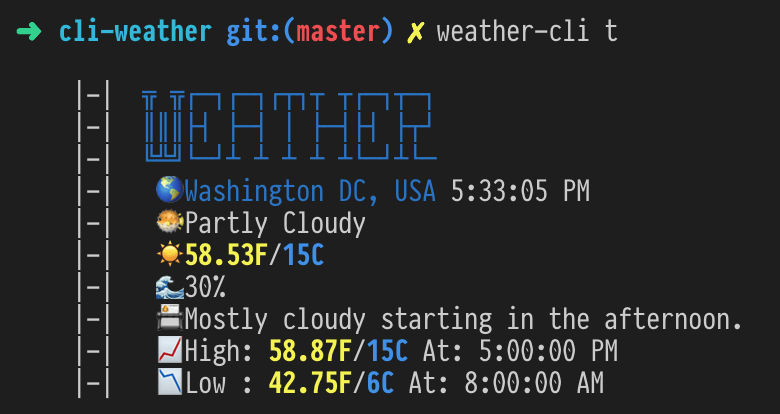
Just to recap from the Part 1 - We will be building something that will look similar to this image:
Part A - Call the API and retrieve info
Let's get the invocation of today's weather forecast from our main entry file
// index.ts
program
  .command("today")
  .alias("t")
  .description("Show weather information for today")
  .action(() => {
    weatherActions.today();
  });
Our weather API logic we will be sitting in a single file - weatherActions.ts where we will be calling DarkSky API, normalizing the data and printing it out. Calling API will be done through axios package and printing it out to the console will be done with chalk, be sure to have those installed before continuing.
//weatherActions.ts
import chalk from "chalk";
import axios from "axios";
const Configstore = require("configstore");
const log = console.log;
const conf = new Configstore("weather-cli");

exports.today = function() {
  const DARKSKY_API = conf.get("DARKSKYAPIKEY");
  let URL = `https://api.darksky.net/forecast/${DARKSKY_API}/38.889102,-77.050637?exclude=minutely`;
  axios.get(URL).then(response => {
    if (response.status !== 200) {
      return new Error(`DarkSky API error ${response.status}`);
    }
    //deconstruct current weather data
    const {
      time: currentTime,
      summary: currentSummary,
      temperature: currentTemperature,
      humidity: currentHumidity
    } = response.data.currently;

    //deconstruct today's weather data
    const {
      summary: dailySummary,
      temperatureHigh: dailyTempHigh,
      temperatureHighTime: dailyTempHighTime,
      temperatureLow: dailyTempLow,
      apparentTemperatureLowTime: dailyTempLowTime
    } = response.data.daily.data[0];
  });
};
OK, let's unpack what is going on in the file above. We are importing previously mentioned dependencies, and API key which we set up in the Part 1.
configstore has a handy method .get to retrieve whichever key you have set previously. We will be using it to call our API endpoint. You will notice that I hardcoded longitude and latitude to my location, we can implement city search as a future goal but for now you can just put your own coordinates instead.
Axios works as normal, after we check that response status is 200 (meaning everything is OK), we proceed to extract relevant data fields from the response payload. We are using object destructuring and rename feature of ES6.
Now if we simply console.log that received information, results will not be great, you may see something like this:

We clearly need to do some time conversion, temperature adjustments to include Celsius and Fahrenheit and basically make it much more appealing.
Part B - Pretty print please
First up - let's make this data presentable.
- Temperature needs to be converted to Celsius for convenience to display both C and F.
- Humidity needs to be shown in percentage
- Time indications need to be shown in human readable form
const currentTemperatureC: string = String(Math.round(((currentTemperature - 32) * 5) / 9));
const dailyTempHighC: string = String(Math.round(((dailyTempHigh - 32) * 5) / 9));
const dailyTempLowC: string = String(Math.round(((dailyTempLow - 32) * 5) / 9));
const currentTimeConverted: string = new Date(currentTime * 1000).toLocaleTimeString();
const humidityPercent: string = String(Math.round(currentHumidity * 100));
const highTime: string = new Date(dailyTempHighTime * 1000).toLocaleTimeString();
const lowTime: string = new Date(dailyTempLowTime * 1000).toLocaleTimeString();
We are doing a few conversions and rounding results with a handy Math.round() method. Time conversions are done with built-in new Date() object. You may notice something strange next to the variable declarations const currentTemperatureC: string = .... Those are TypeScript types. We indicate that the result of that particular assignment should always be a string. It seems trivial at this point, but if we ever want to change our program and how we calculate temperature, this will help us to make sure we do not change the type from string to number for example. You may also be asking why are we forcing some of the numbers to be converted to strings with String() -> that is needed because to print out the results we will be using JavaScript template literals (https://developer.mozilla.org/en-US/docs/Web/JavaScript/Reference/Template_literals) which will make TypeScript yell at us if we try to pass number to a string literal like this:
const someCalculation: number = 14;
console.log(`Print my calculation ${someCalculation}`); //TS yelling at us here!
I am not entirely sure why that is so if you have idea, do let me know in the comment below! 👇
Our last step in this part is to print the results in a nice and presentable fashion. chalk module comes to the rescue!
log(chalk`
|-|  {blue ╦ ╦┌─┐┌─┐┌┬┐┬ ┬┌─┐┬─┐}
|-|  {blue ║║║├┤ ├─┤ │ ├─┤├┤ ├┬┘}
|-|  {blue ╚╩╝└─┘┴ ┴ ┴ ┴ ┴└─┘┴└─}
|-|   🌎 {blue Washington DC, USA} ${currentTimeConverted}
|-|   🐡 ${currentSummary}
|-|   ☀️ {yellow.bold ${currentTemperature}F}/{blue.bold ${currentTemperatureC}C}
|-|   🌊 ${humidityPercent}%
|-|   📇 ${dailySummary}
|-|   📈 High: {yellow.bold ${dailyTempHigh}F}/{blue.bold ${dailyTempHighC}C} At: ${highTime}
|-|   📉 Low : {yellow.bold ${dailyTempLow}F}/{blue.bold ${dailyTempLowC}C} At: ${lowTime}
`);
return;
Result:
No magic going on here, we are simply injecting our variable values into template literal which we can shape and organize however we like. I added "weather" letters up top and some of the emojis to denote various measurements like temperature, humidity and so on. If it all goes according to the plan, we should be seeing result similar to the image at the top of this post.
Some of the things we could do but is out of scope for this post:
- hook up Google API to set any location based on name
- implement
-weekcommand showing forecast for the week - introduce some tests to make our program more robust
Part C - Publish to NPM
If we want to make this program truly reusable and available for others to install via npm registry, we need to publish it.
For that to happen we need to do a few things to make it "publishable":
- Make sure the name is unique or publish under scoped package (meaning that it would go under your username/module-name naming convention).
- Add version number to the app. npm uses semantic versioning
- Because this project is written in TypeScript, we need to make sure that A) We are not sending over transpiled javascript folder ("lib" folder in our case), add "types" to our package.json and
"declaration": trueto thetsconfig.jsonfile. Take a look at the required changes below:
//package.json
{
  "name": "@vaidotasp/weather-cli", //-> publishing under our username let's us not worry about unique naming
  "version": "1.0.0", //-> you cannot publish without version number
  "main": "lib/index.js", //-> note that this points to our transpiled .js entry file
  "types": "lib/index.d.ts", //-> that will be generated by TypeScript
  .....
  //other entries are the same as in Part 1
}


//tsconfig.json
{
  "include": ["src/**/*"],
  "exclude": ["node_modules"],
  "compilerOptions": {
    "declaration": true, //-> required step to generate .d.ts file
    "noImplicitAny": true,
    "target": "es5",
    "module": "commonjs",
    "types": ["node"],
    "outDir": "lib",
    "rootDir": "src"
  }
}
Once ready to publish, make sure you have an account with npm, if so, you can go ahead and login through your terminal
npm login
All that's left is to run npm publish --access=public command to push this little program out in the wild and have it accessible to the public.
If all goes well you can navigate to https://www.npmjs.com/package/@username/module-name and find you module!
That is it!
Here is the code if you want to take a look and compare notes. I will still continue to tinker with it so by the time this post is published some of the functionality may have already been changed!


Top comments (0)