- What You’ll Need
- The Code
- What I put together
- Languages we’ll be using
- Setting up our Raspberry Pi
- Our Node.js Scoreboard
- Our HTML
- Our Front-End JavaScript
- Wiring Things Up
- In Action
- Conclusion
- Other Raspberry Pi guides at SitePoint
- Frequently Asked Questions (FAQs) about Automated Scoreboards with Raspberry Pi
On an impulse just before Christmas, I bought myself an NBA “over-the-door” mini basketball hoop. I wasn’t sure what I’d do with it, but having a basketball hoop for my office seemed like a good move. In the end I decided to experiment and bring some connectivity to it by hooking it up to a Raspberry Pi to give it a scoreboard display. Here’s how that went, with step-by-step instructions if you’d like to try to adapt and improve upon it!
This tutorial isn’t intended to be used as a step-by-step “do exactly as I did” style guide — my hope is that you’ll take this concept and use it for all sorts of other ideas. Add a virtual scoreboard that counts how often people come into your office. Or go with a different sport (maybe a mini soccer goal tracker?). Or use an entirely different sensor but track hits on it visually with a Raspberry Pi! There are so many potential applications of this technique. Try stuff and let me know how you go!
What You’ll Need
In order to be able to follow along and make something similar, here’s a list of the parts I used (or their equivalent for the things I had around my lab already):
- Raspberry Pi 3 B+ — I used an older version of this from 2015, if you’re going to buy one, get a newer version like this!
- A MicroSD card with NOOBS — if you are looking to install this yourself and have an SD card ready to go Raspberry Pi foundation have a guide on how to do so here.
- Spalding NBA Slam Jam Over-The-Door Mini Basketball Hoop
— This is the mini basketball hoop I used. You could use a different one — especially if its net works better!
- Raspberry Pi 3.3190G 7″ Touchscreen Display
— This is my favourite display for the Raspberry Pi, it is a touchscreen, so you can interact with the UI without needing to connect up a mouse.
- RS Raspberry Pi 7-Inch LCD Touch Screen Case, Black
— To make the display look a bit nicer when all together with the Pi, I have my Pi in this black case.
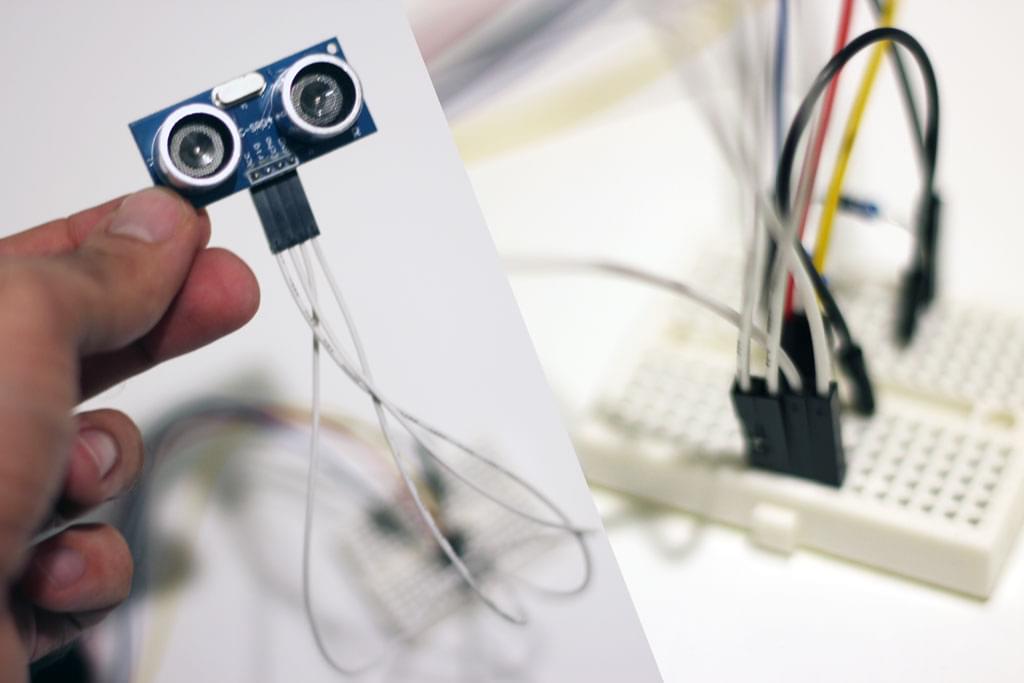
- HC-SR04 Ultrasonic Distance Measuring Sensor Module
— I had a spare cheap clone HC-SR04 sensor around, but I’d recommend buying a good quality one. My one has occasional odd readings and is a bit temperamental.
One thing to note — if you don’t have a 7 inch display for your Pi, you could display the score on a nearby computer monitor too. Any device on your local network with a web browser and a screen would work!
The Code
Want to skip to downloading the code? It’s available on GitHub here.
What I put together
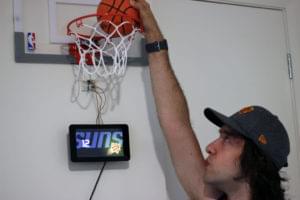
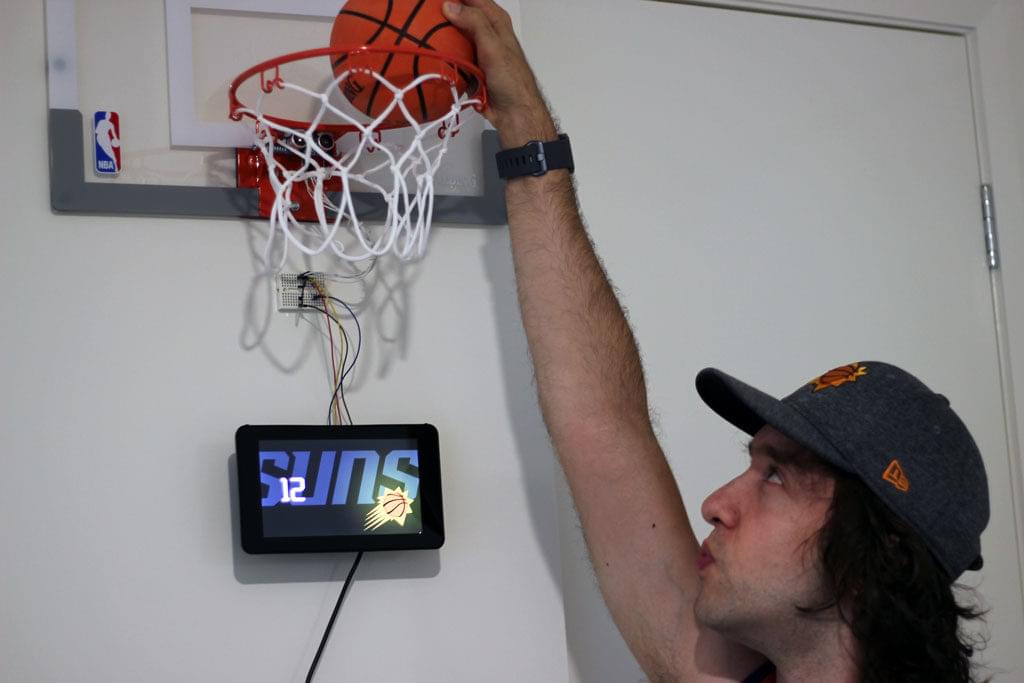
I hung my new basketball hoop up on a door with an ultrasonic sensor attached to the hoop to track when a ball goes into the hoop. Underneath is a Raspberry Pi powered scoreboard — I’d actually recommend finding longer cables so you can connect it outside of basketball falling range.
I’ll go over why everything is as it is below — along with some suggestions for those who might want to improve upon this base!
Languages we’ll be using
- JavaScript – In order to follow along, you’ll need a knowledge of the basics, but we won’t have lines upon lines of code, things are actually pretty simple in the JS side of things.
- Node.js – A basic knowledge of how to run npm and Node is needed to run our scoreboard server.
Setting up our Raspberry Pi
If you are completely new to the Raspberry Pi and haven’t set anything up yet, never fear! There are many guides out there for setting things up and it’s nice and straightforward. The Raspberry Pi foundation have a step by step guide for installing the Raspbian operating system using the NOOBS operating system manager. You’ll want to make sure the operating system is running before you get onto any of the other steps.
Touchscreen setup
I put together my connected scoreboard using a Raspberry Pi 3 with touchscreen. My touchscreen and case were already put together and screwed down tight as I’ve used this Pi 3 before for other projects, however if you are starting from scratch — it isn’t too hard to connect up. Newer shipments (like mine) actually have a bunch of it already assembled, with the adapter board already screwed onto the LCD screen, if that’s the case, half the steps are already complete! Instructions on how to assemble the screen are available online:
- Official instructions — these are the instructions which come with the screen in case you lose them!
- The Pi Hut have their own tutorial — they explain the details of the process too.
- ZDNet’s look at the touch display with case — they’ve got a good amount of detail and tips for setting up the screen and case to use in various situations.
Case setup
When it comes to putting the case around the LCD screen and Raspberry Pi, that process is also quite easy with the case I have. I already had mine together, however the general steps for this are:
- Make sure you’ve already got your microUSB card inside the Raspberry Pi and are happy with how it’s running! Annoyingly with a lot of cases, you can’t get the card out once the case is in place. My case linked above is one of those… so make sure the card is all good before you lose access to it!
- Place the Pi with screen into place inside the case
- Arrange the ribbon cables and cables coming from the GPIO so they aren’t in the way
- Make sure the holes for your USB ports and such are on the correct side of the bulkier part of the case and line up nicely.
- Once everything is lined up nicely, screw in the four screws to put it all together!
- Turn it on! If you find that the screen comes up upside down, don’t worry, it’s a side effect of the case manufacturers lining up the power to come out of the top. When I mounted my scoreboard though, I mounted it with the power coming out of the bottom, so this wasn’t an issue for me. If it is an issue for you:
- Run
sudo nano /boot/config.txtto open the config for the Pi - Then add
lcd_rotate=2to the end, this will rotate the screen around. - Press Ctrl X and the Ctrl Y to save your changes.
- Restart your Pi and when it loads back up it should be the right way around!
- Run
Running Node.js on our Raspberry Pi
Conveniently, Raspbian has Node installed by default! However, it is a rather old version of Node. You can check which version is installed on your Pi by opening up the Terminal and typing in:
node -v
I’ve got version 8.15.0 installed on my Pi. You can upgrade by running the following commands:
sudo su -
apt-get remove nodered -y
apt-get remove nodejs nodejs-legacy -y
apt-get remove npm  -y
curl -sL https://deb.nodesource.com/setup_5.x | sudo bash -
apt-get install nodejs -y
After running all of those, if you type in that version command again, you should see a better version:
node -v
You can also check npm is installed correctly by running:
npm -v
With node running on our device, we’re ready to get a scoreboard Node server running!
Our Node.js Scoreboard
The goal with our scoreboard is the following:
- Set up an ultrasonic sensor watching for movement just within the hoop.
- Our Node server will watch the distance readings from our ultrasonic sensor.
- We will run a simple web page that displays the score in reaction to our Node server sensing a point has been made.
- Send score triggers to our webpage between our Node server and the webpage using WebSockets.
So our Node server’s role will be to run a web server for the scoreboard web page, ping our ultrasonic sensor and send messages to our web page when movement of a ball is spotted.
Here is our final code for those who just want to copy and paste it in to try it out (or to see it as a whole to understand it).
const http = require('http'),
    express = require('express'),
    app = express(),
    server = require('http').Server(app),
    bodyParser = require('body-parser'),
    webpagePort = 8080,
    WebSocketServer = require('ws').Server,
    wss = new WebSocketServer({server: server}),
    Gpio = require('pigpio').Gpio,
    MICROSECONDS_PER_CM = 1e6/34321, // The number of microseconds it takes sound to travel 1cm at 20 degrees celsius
    trigger = new Gpio(23, {mode: Gpio.OUTPUT}),
    echo = new Gpio(24, {mode: Gpio.INPUT, alert: true});

let lastScoreTime = new Date();

app.use(bodyParser.json());

app.use(express.static(__dirname + '/public'));

app.use(function(err, req, res, next) {
  console.error(err.stack);
  res.status(500).send('Error came ');
});

server.listen(webpagePort, function() {
  console.log('Server is running on ' + webpagePort);
});

wss.on('connection', function connection(ws) {
  console.log('WebSockets are ready!');
});

function broadcast(message) {
  if (message) {
    console.log('Broadcasting ' + message);
    wss.clients.forEach(function each(client) {
      client.send(message);
    });
  }
}

trigger.digitalWrite(0); // Make sure trigger is low

const watchHCSR04 = () => {
  let startTick;

  echo.on('alert', (level, tick) => {
    if (level == 1) {
      startTick = tick;
    } else {
      const endTick = tick;
      const diff = (endTick >> 0) - (startTick >> 0);
      let distance = diff / 2 / MICROSECONDS_PER_CM;
      let currentScoreTime = new Date();
      console.log(distance);
      if (distance < 11 && (currentScoreTime - lastScoreTime > 1000)) {
        lastScoreTime = currentScoreTime;
        broadcast('SCORE:' + (diff / 2 / MICROSECONDS_PER_CM));
      }
    }
  });
};

watchHCSR04();

setInterval(() => {
  trigger.trigger(10, 1); // Set trigger high for 10 microseconds
}, 100); // Trigger every 100 milliseconds
We’ll go through each part now and cover what is happening in it.
We start out with a typical set of constants to run a Node Express server. This is a web server that’ll be running on port 8080. Express is a framework for Node.js which we’re using as it makes running a web server nice and simple!
const http = require('http'),
    express = require('express'),
    app = express(),
    server = require('http').Server(app),
    bodyParser = require('body-parser'),
    webpagePort = 8080,
Next, we continue defining constants, however these are for our WebSocket server. WebSockets are how we’ll end messages back and forth between our server and the web page displaying our score. Using WebSockets, we can have that web page open on many monitors and it will update them all. I’m only using the Raspberry Pi screen, but you could go wild and have large monitors around the place to make something pretty extraordinary if you wanted to.
For WebSockets, there are a few different libraries out there, but I like to use ws. It focuses on providing WebSockets in a way that modern browsers can understand natively using the WebSockets standard (so we don’t need to run a JavaScript library on the browser end).
In our code, we define the WebSocketServer object for our server and then make a new WebSocketServer which we allocate to the constant wss.
WebSocketServer = require('ws').Server,
wss = new WebSocketServer({server: server}),
Finally, the last of our constants are all so that we can listen to the readings coming from our ultrasonic sensor. To read data from the ultrasonic sensor, we use the pigpio Node library. This lets us access the GPIO (general-purpose input/output) pins along the top edge of the board — this is where we connect our ultrasonic sensor.
Gpio = require('pigpio').Gpio,We then add a calculation that is provided from pigpio’s ultrasonic sensor example in their GitHub docs. It calculates how many microseconds it’ll take for sound to travel 1cm at 20 degrees celsius. We’ll use that calculation as the ultrasonic sensor pings sound and then listens for a response — we use the MICROSECONDS_PER_CM to calculate the distance of the response.
MICROSECONDS_PER_CM = 1e6/34321, // The number of microseconds it takes sound to travel 1cm at 20 degrees celsiusThen the final two constants refer to the two GPIO pins we will have our ultrasonic sensors connected to. We will have pin 23 as an output pin called trigger and pin 24 as an input pin called echo.
trigger = new Gpio(23, {mode: Gpio.OUTPUT}),
echo = new Gpio(24, {mode: Gpio.INPUT, alert: true});
The following line allows us to send and interpret JSON strings.
app.use(bodyParser.json());Then, we set up a few more things for our web server. We first set up where our static HTML/CSS/JS files will be. This is where our Express server will look when we try to access the Raspberry Pi on the port we listed earlier.
app.use(express.static(__dirname + '/public'));We then set up what should happen when an error occurs, we tell it to log the error to the console and then send a 500 error back.
app.use(function(err, req, res, next) {
  console.error(err.stack);
  res.status(500).send('Error came ');
});
To run our web server, we call the following code. It’ll show a console message when successfully running.
server.listen(webpagePort, function() {
  console.log('Server is running on ' + webpagePort);
});
After our web server set up, we set up our WebSocket connection. The Node server is our WebSockets server — it will broadcast messages to connected clients (our web browser on the Raspberry Pi). The following code sets up what to do when our WebSocket server is ready. That occurs when the “connection” event occurs. When that happens, we send a console.log, if we don’t see this in the console, we know something has gone wrong on the WebSocket Server end.
wss.on('connection', function connection(ws) {
  console.log('WebSockets are ready!');
});
We follow that with a custom function we create that’ll send out a WebSocket message to any connected clients. Just before it sends that message, it will log a message to show that the message is broadcasting from the server.
function broadcast(message) {
  if (message) {
    console.log('Broadcasting ' + message);
    wss.clients.forEach(function each(client) {
      client.send(message);
    });
  }
}
The code that follows relates to our ultrasonic sensor. This largely comes straight from the pigpio GitHub page example. I did not need to change too much to get it to run nicely for this scenario.
We begin with setting our trigger pin to low (or 0) initially (we will then trigger it to high when we want to time it).
trigger.digitalWrite(0); // Make sure trigger is lowThe pigpio library can react to changes in the state of the GPIO pins using something called “alerts”. The pigpio library’s npm page say it tracks these “accurate to a few microseconds” which is enough for us. We set up a function called watchHCSR04 which will keep an eye out for ticks from the GPIO pins and if it receives one, we check how long it stays high (or on), we then work out based on that time and the MICROSECONDS_PER_CM calculation, how many cms away the nearest item was that caused a ping back.
If the distance is less than 11cm, then we trigger a broadcast from our WebSocket Server that’ll let our web browser clients know that movement was spotted. I decided on 11cm after some trial and error, holding the ball at different spots within the hoop while my console.log ran to see what values the ultrasonic sensor reported while the ball was there.
We also check whether the current time against the last time a score was read — if it hasn’t been more than 1000 milliseconds yet, we don’t trigger a new point (e.g. if the ball is rattling around a bit in the hoop, that doesn’t give someone more points!). This was something I added in after spotting a few instances of double counting of points.
const watchHCSR04 = () => {
  let startTick;

  echo.on('alert', (level, tick) => {
    if (level == 1) {
      startTick = tick;
    } else {
      const endTick = tick;
      const diff = (endTick >> 0) - (startTick >> 0);
      let distance = diff / 2 / MICROSECONDS_PER_CM;
      let currentScoreTime = new Date();
      console.log(distance);
      if (distance < 11 && (currentScoreTime - lastScoreTime > 1000)) {
        lastScoreTime = currentScoreTime;
        broadcast('SCORE:' + (diff / 2 / MICROSECONDS_PER_CM));
      }
    }
  });
};

watchHCSR04();
In order to actually cause a ping to occur, we need to set our trigger to high (or 1) to give an initial sound from our ultrasonic sensor to measure. In the final bit of our server code, we do that every 100 milliseconds. This is much more frequent than pigpio’s example as I wanted to have more of a chance of spotting movement in the hoop. I adjusted this value lower and lower after a few tests (turns out a basketball can move pretty fast!)
// Trigger a distance measurement once per second
setInterval(() => {
  trigger.trigger(10, 1); // Set trigger high for 10 microseconds
}, 100);
Our Package.json File
We’ll also need our dependencies listed in our package.json file so that we keep track of what our project needs to run! My package.json file looks like so:
{
  "name": "hoopspi",
  "version": "0.0.1",
  "description": "A connected scoreboard for my basketball hoop",
  "main": "index.js",
  "dependencies": {
    "body-parser": "^1.15.2",
    "express": "^4.14.0",
    "gulp": "^3.9.1",
    "pigpio": "^1.2.1",
    "ws": "^1.1.1"
  },
  "devDependencies": {},
  "author": "Patrick Catanzariti",
  "license": "MIT"
}
This contains all of our dependencies used in the Node server above. I’d recommend just copy pasting the above into a new package.json file in the same folder as your index.js file. Once you’ve got that in there, run the following command in your console to install everything needed:
npm install
Our HTML
The HTML is super simple:
<!doctype html>
<html>
    <head>
        <meta charset="UTF-8">
        <meta name="viewport" content="width=device-width, initial-scale=1">
        <meta name="robots" content="no index, no follow">
        <title>HoopsPi</title>
        <link href="/css/styles.css" rel="stylesheet" type="text/css">
        <link href="https://fonts.googleapis.com/css?family=ZCOOL+QingKe+HuangYou" rel="stylesheet">
    </head>
    <body>
        <div class="container">
            <div id="score"></div>
        </div>
        <script src="js/scoreboard.js"></script>
    </body>
</html>
Our Front-End JavaScript
Our front-end JavaScript looks like so:
(function() {
    var ws = new WebSocket('ws://192.168.1.133:8080', 'json');
    var score = 0;

    ws.onopen = function () {
        console.log('Websocket is open');
        ws.send('Hi from HoopPi!');
        document.getElementById('score').innerHTML = score;
    };

    ws.onmessage = function (event) {
        if (event.data.indexOf('SCORE:') != -1) {
            score++;
            document.getElementById('score').innerHTML = score;
        }
        console.log('Message was ', event.data);
    };

    ws.onerror = function(error) {
       console.log('Error detected: ' + error.data);
    }
}());
Let’s have a look at what is going on! We start by setting up a WebSocket to watch the IP address our Raspberry Pi is on (use the command ifconfig in the console to find that out). We also set our initial score on page load to 0.
(function() {
    var ws = new WebSocket('ws://192.168.1.133:8080', 'json');
    var score = 0;
After that, we open that WebSocket, send a message to the console and to our WebSocket (that’ll go to the server but we won’t use that message!) and we set our visible score on the web page to our score variable:
ws.onopen = function () {
    console.log('Websocket is open');
    ws.send('Hi from HoopPi!');
    document.getElementById('score').innerHTML = score;
};
When our WebSockets sees a message (this will be the messages from our Pi), we check if it has the contents of "SCORE:" and if so, we increase our score count by one. Technically, in basketball you get two points at least… but I don’t have a way to detect three point shots, so I figured one point was simple enough for now. One day! I also log the data that came through to the browser’s console so we can check it if anything seems wrong.
ws.onmessage = function (event) {
    if (event.data.indexOf('SCORE:') != -1) {
        score++;
        document.getElementById('score').innerHTML = score;
    }
    console.log('Message was ', event.data);
};
Finally, if there are any errors, we log them to the console:
ws.onerror = function(error) {
       console.log('Error detected: ' + error.data);
    }
}());
Wiring Things Up
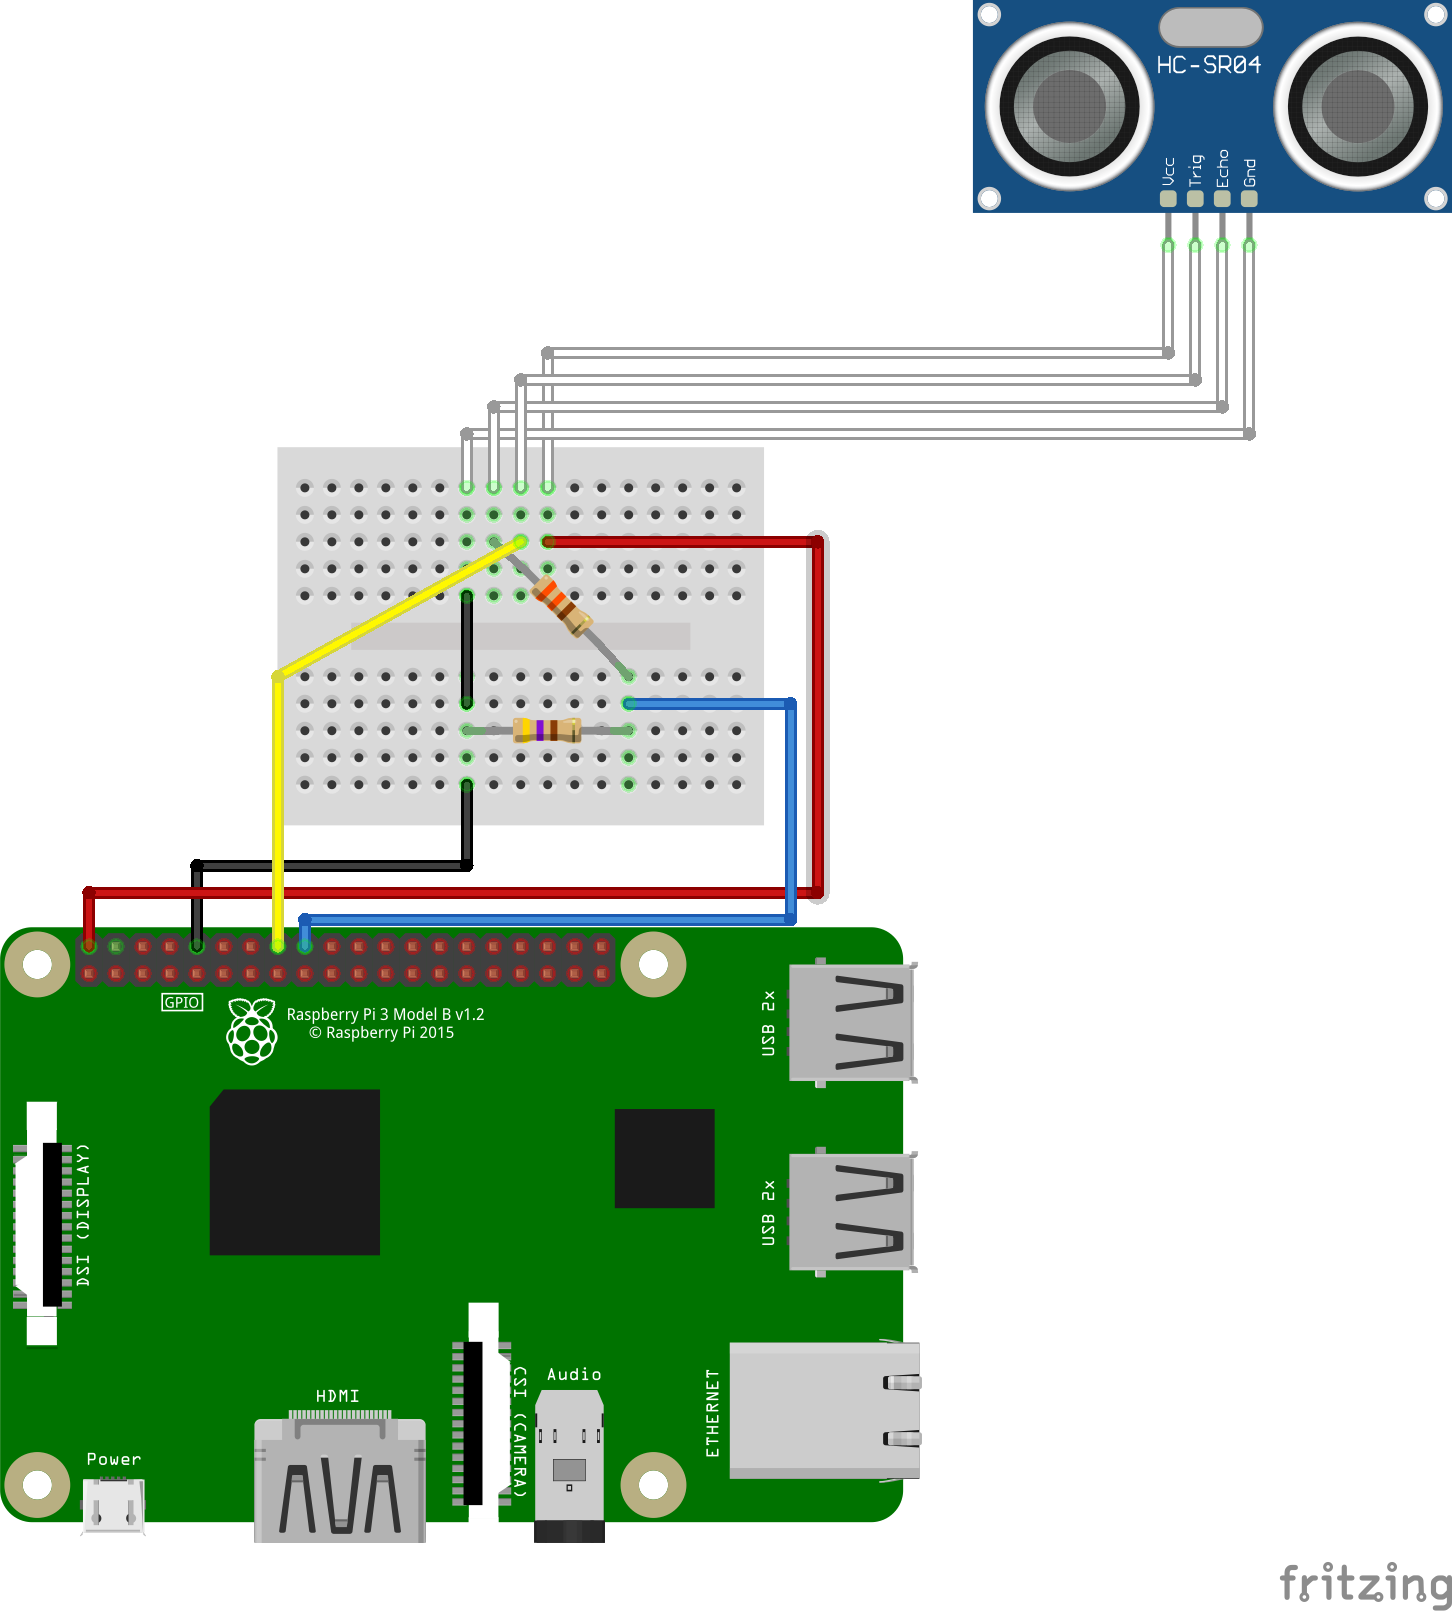
In order for any of the above to work, we need to have everything all hooked up correctly! The main bit of wiring we’ve got to do is connecting up our ultrasonic sensor to our Raspberry Pi’s GPIO pins we mentioned above.
My GPIO pins looked like so in the end:
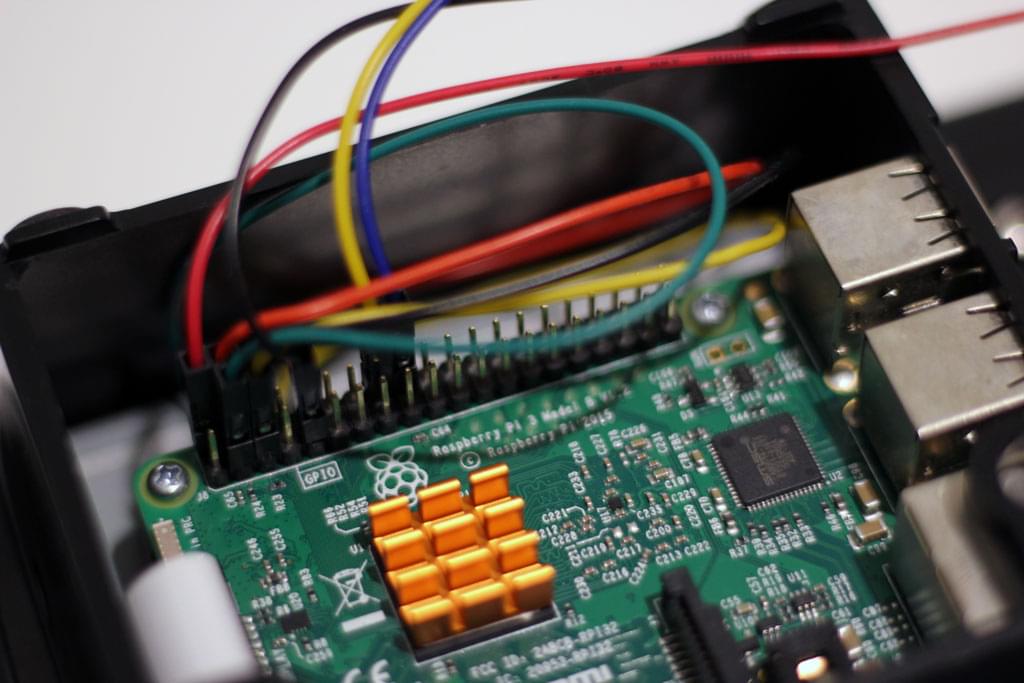
Let’s look at exactly what was connected where.
We’ve got to be careful connecting up our ultrasonic sensor. The ultrasonic sensor’s output is 5V, but the Raspberry Pi’s GPIO pins maximum voltage is 3.3V, so we need to include some resistors to make sure we do not damage the GPIO pins. I personally used a 1K and 2K resistor, however the pigpio library’s example uses a 330 and 470 ohm resistor instead (I just didn’t have these around and my resistor alternatives seemed to be okay, I’d recommend following the pigpio recommendation).
When it comes to connecting up the ultrasonic sensor to the breadboard, I connected it using some white jumper cables so that there’d be a bit more length between the breadboard and our Pi. The ultrasonic sensor will be stuck under the hoop, so we need it free from the breadboard to do that! However, before I connected it like that, I connected the ultrasonic sensor directly to the breadboard just to test (it was a lot easier to test the sensor was working while it was propped up in the breadboard, before mounting it to the hoop!).
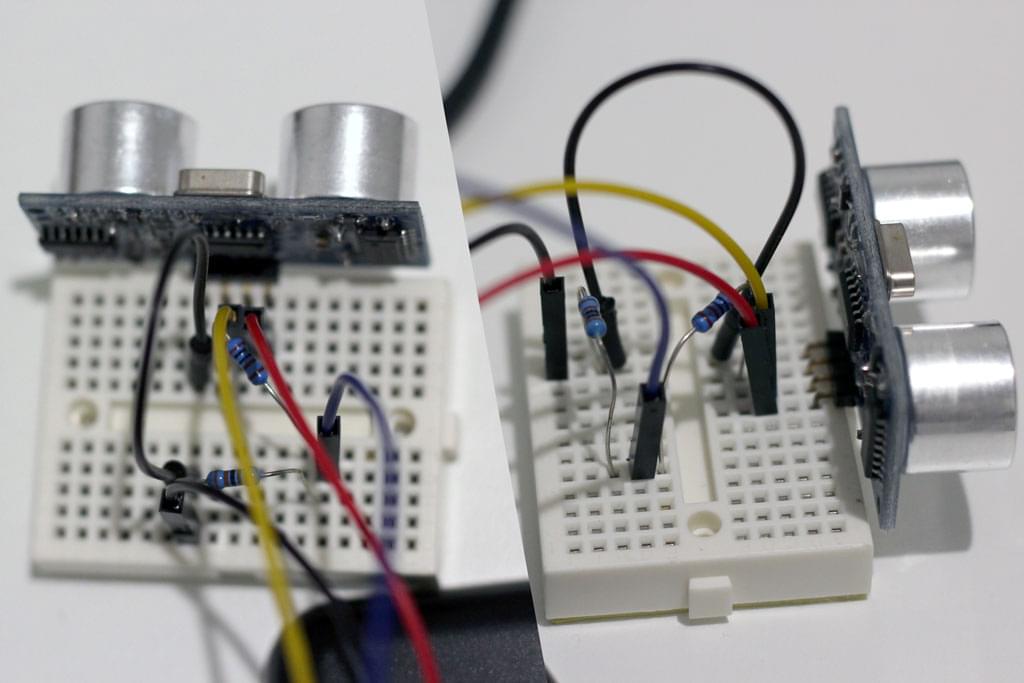
After adding the jumper cables to it, it looks more like so:
All wiring is shown in the diagram below. We connect up the VCC pin on our ultrasonic sensor to our 5V pin (the one not being used by the LCD screen), the GND pin on our ultrasonic sensor is connected to ground on the Pi, but we also place a 470 ohm resistor between the ground row and the row connected to pin 24 on the Pi. The 330 ohm resistor goes from the row connected to our echo on the ultrasonic sensor to that row connected to pin 24.
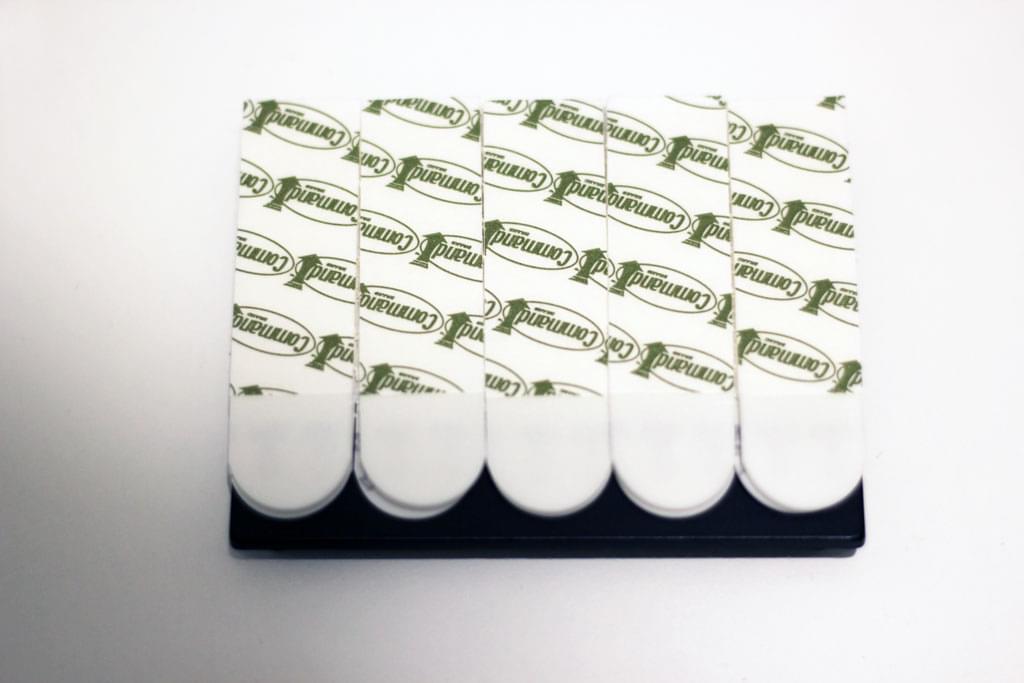
When it comes to actually hooking this up to the basketball hoop, I went the route of using picture hanging strips to stick my Raspberry Pi in its case to the wall. In particular, I used Command 5.4kg White Medium Picture Hanging Strips. I took off the removable back of the Pi case and stuck as many as I could to it:
I then reattached that back to the wall, lining up the Pi in its case to ensure it is straight. I stuck mine directly under the hoop — which in retrospect wasn’t the best spot for it. I’d recommend maybe putting it off to the side depending on the length of the jumper cables you’ve got. I gently detached the Pi case from the back once I had it lined up so that I could push down on the back of the case to stick it as firmly to the wall as I could.
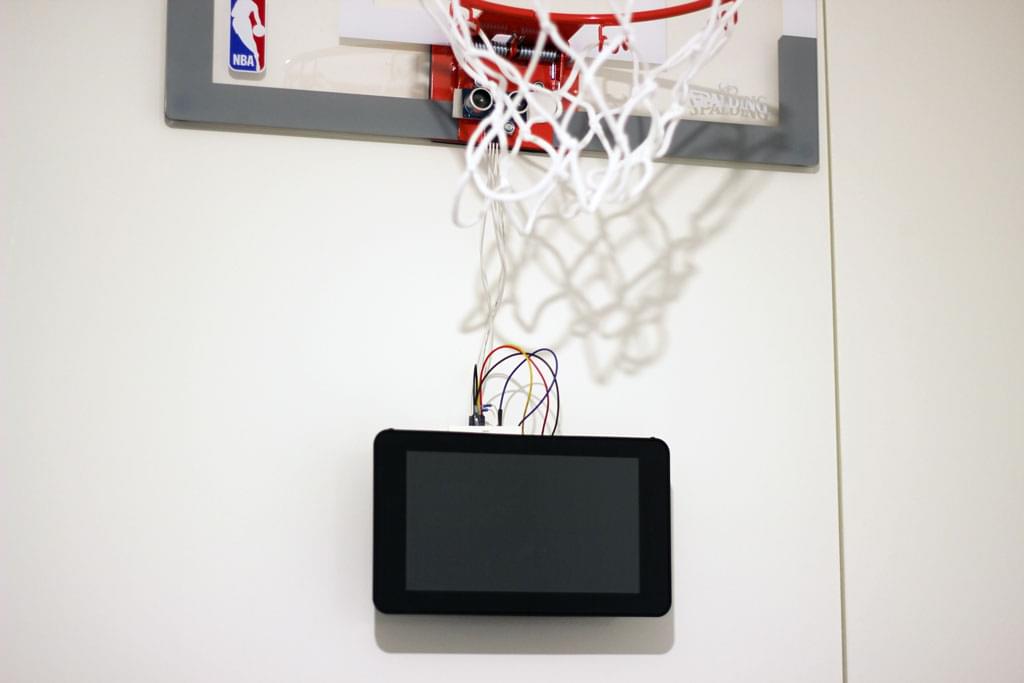
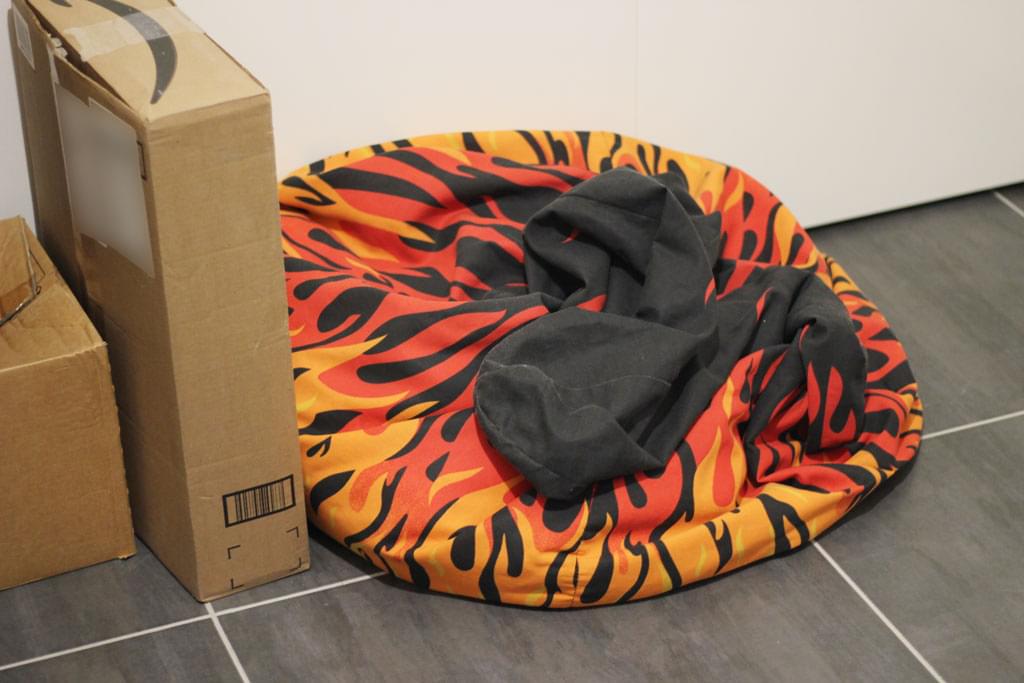
I was so worried about whether the Pi would stick that I placed a beanbag underneath the hoop just to be safe! Luckily, after over a week of it hanging there and being hit by a basketball numerous times… it’s still hanging! That tape is magic.
I attached my sensor initially with the same tape onto the hoop, but using tape meant I was limited to somewhere under the hoop that was flat enough to stick it to… this ended up being a bit too low and the basketball net often interferred with tracking. So this is how I’d recommend you not to stick the sensor!

Instead, I took off the sensor from that spot and used blutack to stick it directly under the hoop.
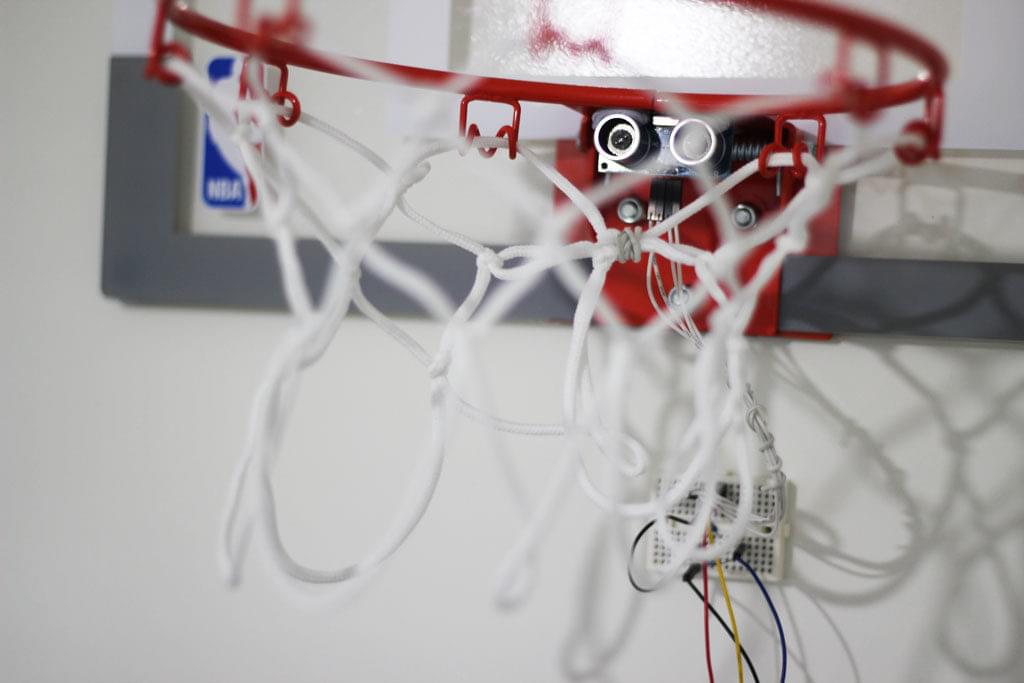
The net still managed to get in the way, so I used one of the cable ties from the NBA hoop packaging to tie some of the net together to avoid interference:
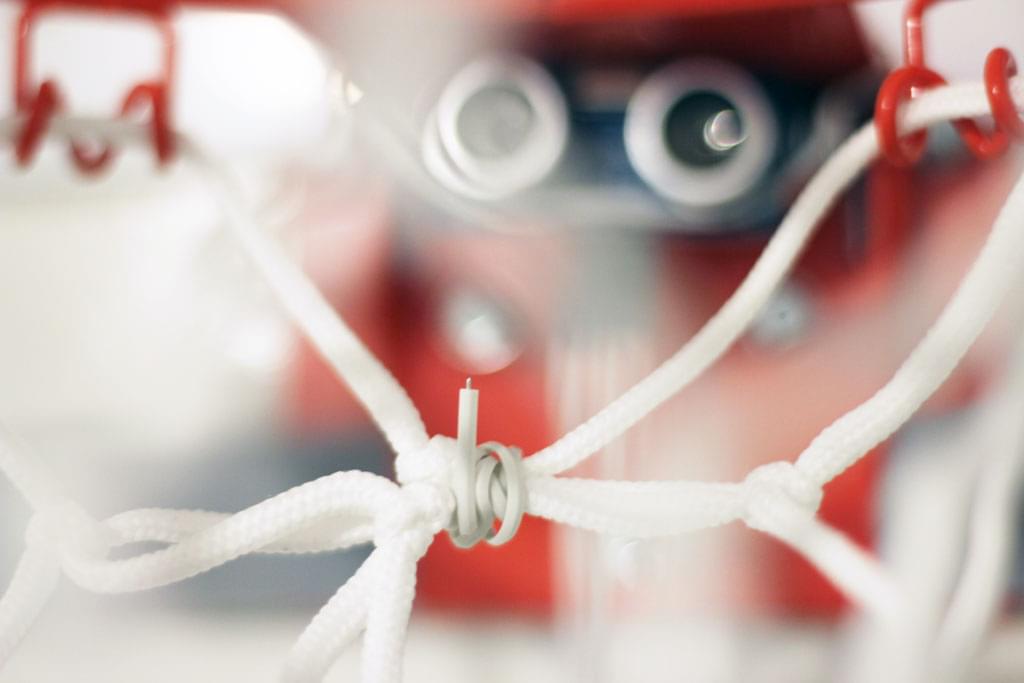
It’s still not perfect, but seemed to help a little!
I also used one of those cable ties to keep the cables connecting up the ultrasonic sensor together. Those cable ties are super handy.
In Action
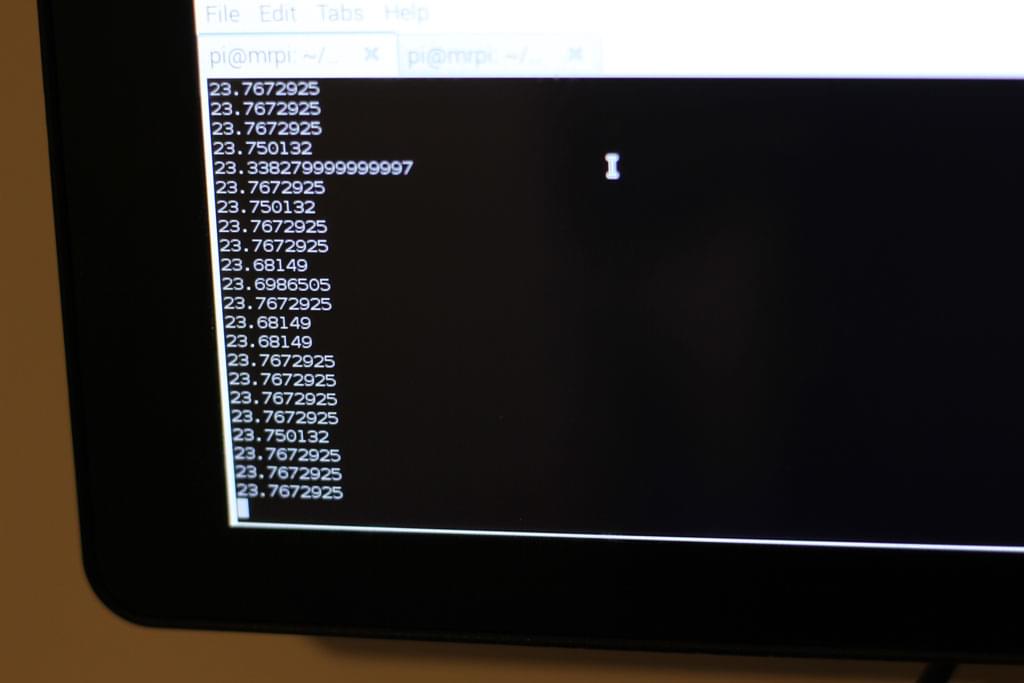
To run everything, we need to run the Node.js server using the sudo keyword as our Node app needs solid permissions to be allowed to access the GPIO pins. To run our Node.js server, we enter the following:
sudo node index.js
That should run and look like so in the console:
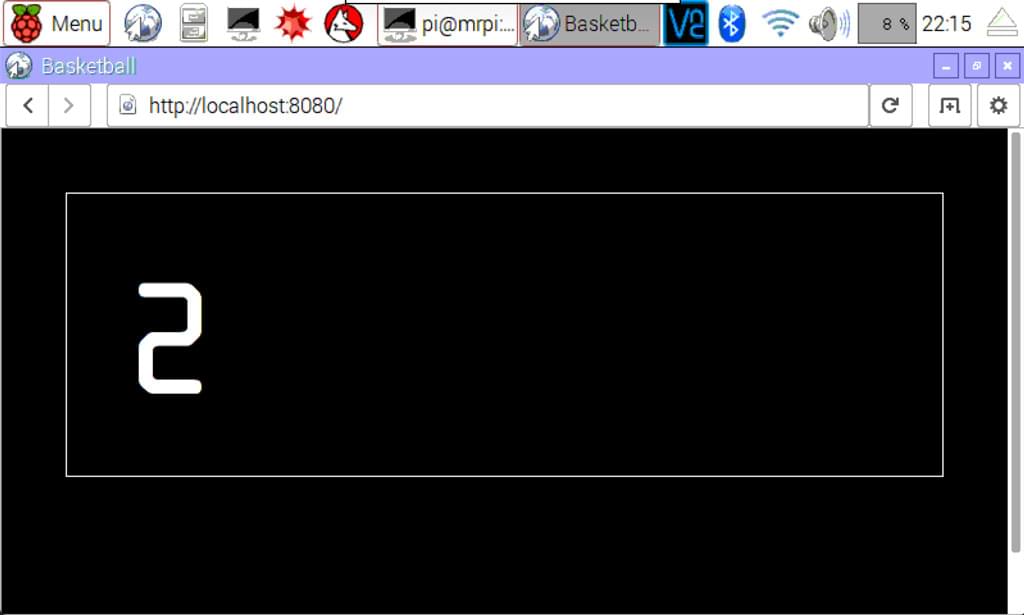
If we open up our Raspberry Pi’s browser and go to http://localhost:8080 we should see our scoreboard ready to count!
I personally prefer Chromium on my Raspberry Pi as I prefer its full screen mode and more up to date browser. If you don’t have Chromium on your Raspberry Pi, it’s simple to install with two commands:
The usual:
sudo apt-get updateFollowed by:
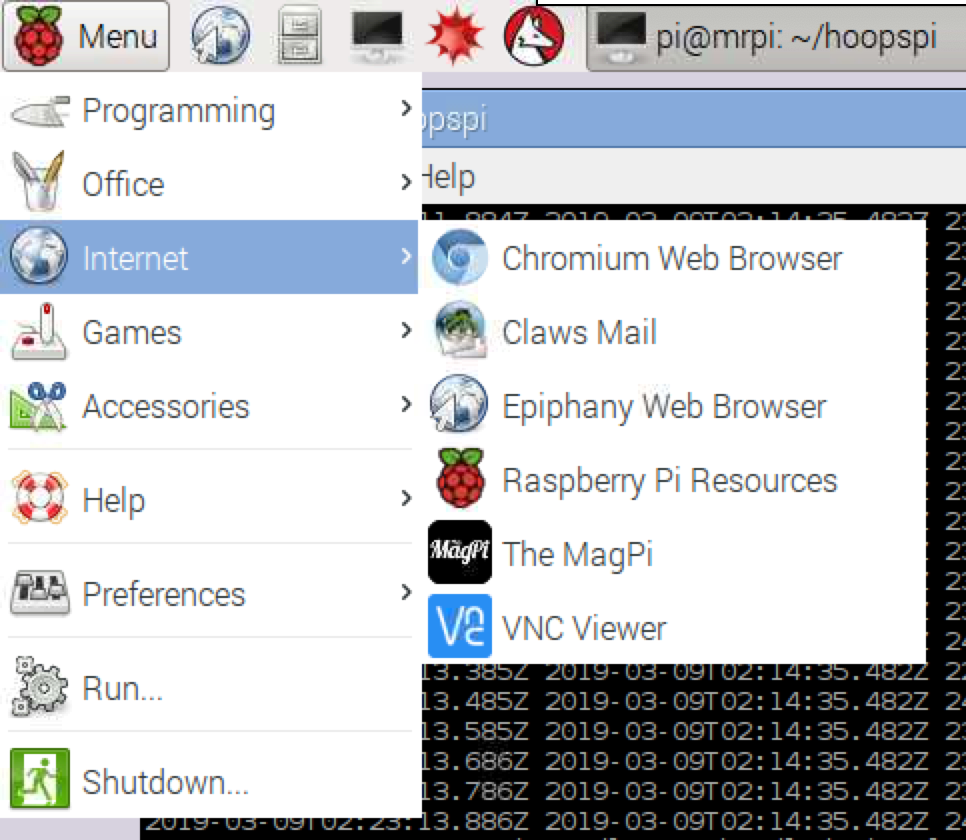
sudo apt-get install chromium-browser --yesIt should then be visible within the “Internet” section of your Pi’s menu:
The best part about it all being a web page is that it’s easily customisable! I customised my one to have a Phoenix Suns theme to it:

Conclusion
In the end, the basketball hoop score tracking works alright, but could definitely be taken to the next level. I’m tempted to purchase an IR distance sensor to see whether it tracks more accurately. There’s also a lot more that can be done with the browser-based scoreboard — you could add a countdown timer, or two player mode so you can take turns with a friend!
If you build something similar with my initial concept above, I’d love to hear about what you’ve built! Let me know in the comments below, or get in touch with me on Twitter at @thatpatrickguy.
Other Raspberry Pi guides at SitePoint
If you are keen on doing more with your Raspberry Pi, we’ve got other neat articles around Raspberry Pi tinkering below!
- Getting Started with the Raspberry Pi GPIO Pins in Node.js
- Setting up a Home VPN Server Using Your Raspberry Pi
Frequently Asked Questions (FAQs) about Automated Scoreboards with Raspberry Pi
How can I customize the display of my Raspberry Pi automated scoreboard?
Customizing the display of your Raspberry Pi automated scoreboard can be done by modifying the code that controls the display. This can include changing the color scheme, the font size, or even the information displayed. You can also add animations or transitions to make the display more dynamic. Remember to test your changes thoroughly to ensure they work as expected.
Can I use a Raspberry Pi automated scoreboard for different sports?
Yes, you can use a Raspberry Pi automated scoreboard for different sports. The code can be modified to accommodate the scoring system of different sports. For example, you can adjust the code to display points, goals, sets, or rounds depending on the sport. You can also add additional features like timers or countdowns.
How can I connect my Raspberry Pi automated scoreboard to the internet?
Connecting your Raspberry Pi automated scoreboard to the internet can be done using either a wired or wireless connection. This allows you to update the scoreboard in real-time from a remote location. You can also use this connection to pull data from online sources, like live game statistics or player information.
Can I use a Raspberry Pi automated scoreboard outdoors?
While the Raspberry Pi itself is not designed for outdoor use, you can use it in an outdoor setting with the right precautions. This includes using a weatherproof case to protect the Raspberry Pi and the display from the elements. You should also ensure that the power supply is safe and secure.
How can I troubleshoot issues with my Raspberry Pi automated scoreboard?
Troubleshooting issues with your Raspberry Pi automated scoreboard can involve checking the connections, reviewing the code, or testing the display. If you’re having trouble with the display, try connecting the Raspberry Pi to a different display to see if the issue persists. If you’re having trouble with the code, try running it in a debugger to identify any errors.
Can I add additional features to my Raspberry Pi automated scoreboard?
Yes, you can add additional features to your Raspberry Pi automated scoreboard. This can include adding a buzzer or alarm that sounds when a point is scored, or adding a light that illuminates when a team is in the lead. You can also add buttons or switches that allow you to manually control the scoreboard.
How can I power my Raspberry Pi automated scoreboard?
Powering your Raspberry Pi automated scoreboard can be done using a standard micro USB power supply. However, if you’re using additional components like a large display or multiple lights, you may need a more powerful power supply. Always ensure that your power supply is safe and reliable to prevent damage to your Raspberry Pi.
Can I use a Raspberry Pi automated scoreboard for non-sporting events?
Yes, you can use a Raspberry Pi automated scoreboard for non-sporting events. The scoreboard can be used to display any kind of numerical data, like scores in a quiz competition, countdowns for events, or even as a clock. The possibilities are only limited by your imagination and coding skills.
How can I make my Raspberry Pi automated scoreboard more interactive?
Making your Raspberry Pi automated scoreboard more interactive can be done by adding physical controls like buttons or switches, or by adding interactive elements to the display like animations or transitions. You can also make the scoreboard interactive by connecting it to the internet and allowing users to update the score from their devices.
Can I use a Raspberry Pi automated scoreboard as a learning tool?
Yes, a Raspberry Pi automated scoreboard can be a great learning tool. It can be used to teach coding, electronics, and even sports statistics. By building and programming the scoreboard, learners can gain hands-on experience with these concepts in a fun and engaging way.
 Patrick Catanzariti
PatCat is the founder of Dev Diner, a site that explores developing for emerging tech such as virtual and augmented reality, the Internet of Things, artificial intelligence and wearables. He is a SitePoint contributing editor for emerging tech, an instructor at SitePoint Premium and O'Reilly, a Meta Pioneer and freelance developer who loves every opportunity to tinker with something new in a tech demo.


