Secure kibana dashboards using keycloak
Kibana is an open source data visualization plugin for Elasticsearch. It provides visualization capabilities on top of the content indexed on an Elasticsearch cluster. Users can create bar, line, and scatter plots, or pie charts and maps on top of large volumes of data.
But while using kibana, you'll sooner or later face the need to secure it. Kibana itself doesn't support authentication or restricting access to dashboards and we need to use either the official solution from elastic: xpack security, or alternative solutions like search-gard or nginx.
This post, adds another option based on the open source identity and access management from Redhat: keycloak
Keycloak
Keycloak is a security server that allows for outsourcing and delegating all the authentication and authorization aspects. It's open-source, flexible, and agnostic of any technology, it is easily deployable/adaptable in its own infrastructure.
Moreover, Keycloak provides a complete Identity Management system, user federation for third parties like LDAP and more.
Keycloak also has an HTTP(S) proxy that we can put in front of web applications and services that don't have a built in authentication.. we can set up URL filters so that certain URLs are secured either by browser login and/or bearer token authentication.
Obviously, we'll be using the keycloak proxy to secure access to our kibana dashboards
How it works
The mode of operation is summed up in 3 simple steps:
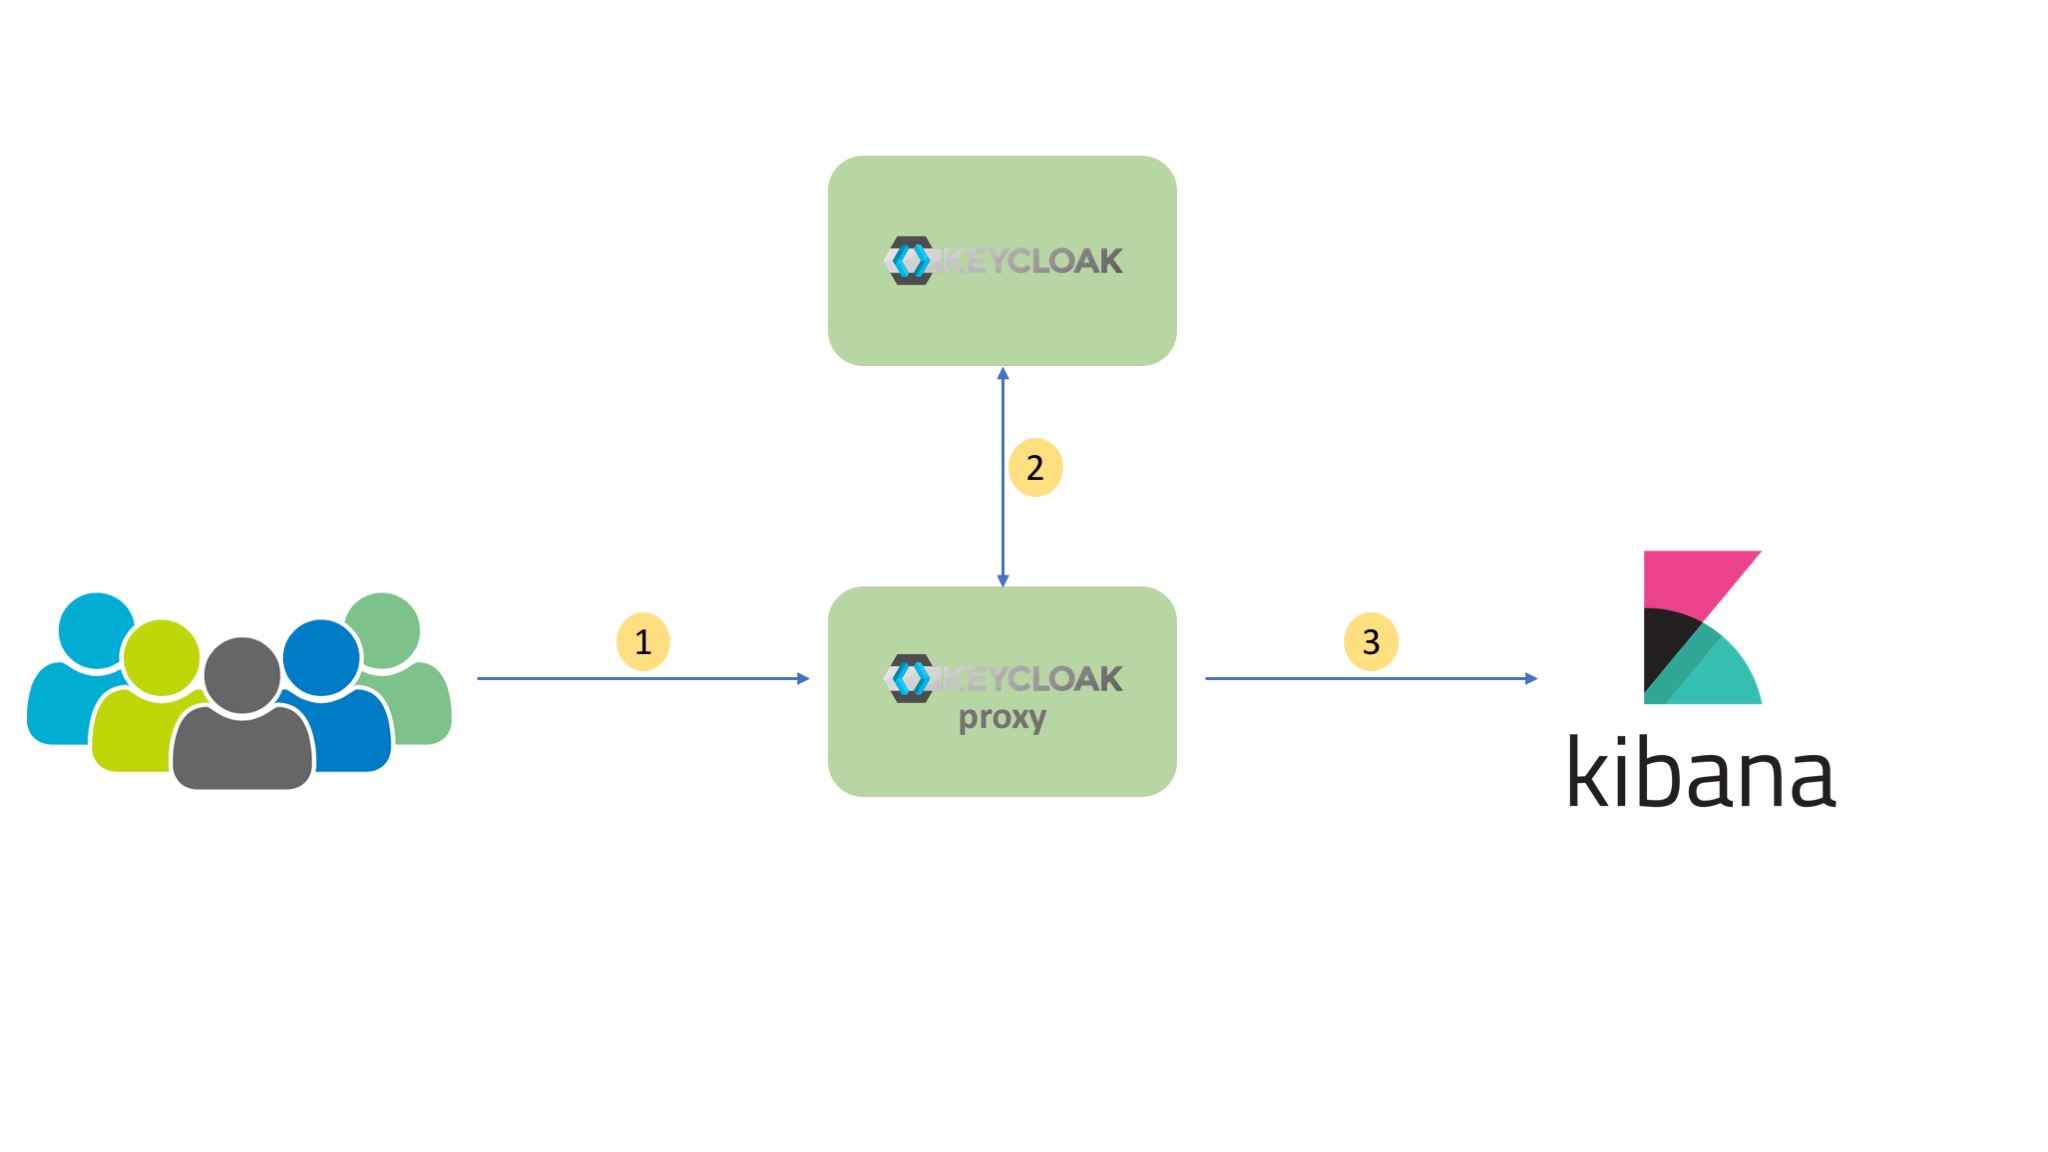
- External traffic is directed to the keycloak proxy. The proxy decides based on it configuration if the destination needs authentication.
- The keycloak Proxy work together with Keycloak and redirects the user to the authentication server so the user can login.
- After a successful login the proxy forwards the user to kibana instance.
Showtime
Below is a docker-compose file describing our 5 services:
postgres: as the main database for keycloakkeycloak: our IAM serverkeycloak-proxy: The http proxy to secure access to kibanaelasticsearch: elasticsearch instancekibana: kibana instance
version: '3'

services:
  postgres:
      image: postgres
      container_name: postgres
      volumes:
        - postgres_data:/var/lib/postgresql
      environment:
        POSTGRES_DB: keycloak
        POSTGRES_USER: keycloak
        POSTGRES_PASSWORD: password
  keycloak:
      image: jboss/keycloak:3.4.3.Final
      container_name: keycloak
      environment:
        POSTGRES_PORT_5432_TCP_ADDR: postgres
        POSTGRES_DATABASE: keycloak
        POSTGRES_USER: keycloak
        POSTGRES_PASSWORD: password
        KEYCLOAK_USER: admin
        KEYCLOAK_PASSWORD: password
      ports:
        - 8080:8080
      depends_on:
        - postgres
  keycloak-proxy:
      image: jboss/keycloak-proxy:3.4.2.Final
      container_name: keycloak-proxy
      environment:
        TARGET_URL: http://kibana:5601
        HTTP_PORT: 8180
        HTTPS_PORT: 8443
        BASE_PATH: /
        REALM_NAME: kibana
        AUTH_SERVER_URL: http://keycloak:8080/auth
        CLIENT_ID: kibana
        ROLE_ALLOWED: user
        SSL_REQUIRED: external
      volumes:
        - $PWD/conf:/opt/jboss/conf
      ports:
        - 8180:8180
      depends_on:
        - keycloak
  elasticsearch:
      image: docker.elastic.co/elasticsearch/elasticsearch-oss:6.2.2
      container_name: elasticsearch
      environment: ['http.host=0.0.0.0', 'transport.host=127.0.0.1', 'ELASTIC_PASSWORD=elastic']

  kibana:
      image: docker.elastic.co/kibana/kibana-oss:6.2.2
      container_name: kibana
      environment:
        - ELASTICSEARCH_USERNAME=elasticsearch
        - ELASTICSEARCH_PASSWORD=elastic
        - ELASTICSEARCH_HOST=elasticsearch
        - ELASTICSEARCH_PORT=9200
      depends_on: ['elasticsearch']

volumes:
  postgres_data:
      driver: local
Note that the config directory mounted with keycloak-proxy contains the proxy.json file, the configuration file needed by the proxy. See the proxy documentation for more details.
{
    "target-url": "${env.TARGET_URL}",
    "bind-address": "0.0.0.0",
    "http-port": "${env.HTTP_PORT}",
    "https-port": "${env.HTTPS_PORT}",
    "applications": [
        {
            "base-path": "${env.BASE_PATH}",
            "adapter-config": {
                "realm": "${env.REALM_NAME}",
                "auth-server-url": "${env.AUTH_SERVER_URL}",
                "public-client": true,
                "resource": "${env.CLIENT_ID}",
                "ssl-required": "${env.SSL_REQUIRED}"
            },
            "constraints": [
                {
                    "pattern": "/*",
                    "roles-allowed": [
                        "${env.ROLE_ALLOWED}"
                    ]
                }
            ]
        }
    ]
}
Once the services are up, we need to login to the keycloak admin console, add a new kibana Realm, create a user role and add some users to it (same as described on your proxy.json file). We also have to add a new kibana Client and a Valid Redirect URI, something like http://keycloak-proxy:8180/*. you can find more details on how to setup these steps on the keycloak documentation.
Voila! We've successfully restricted access to our kibana instance
The complete code is available on github.