Add an admin panel to your Node.js project

To see how Node.js has been developing lately, read the official 2018 Node.js User Survey Report. According to this survey, here’s how Node.js has impacted the businesses of respondents:
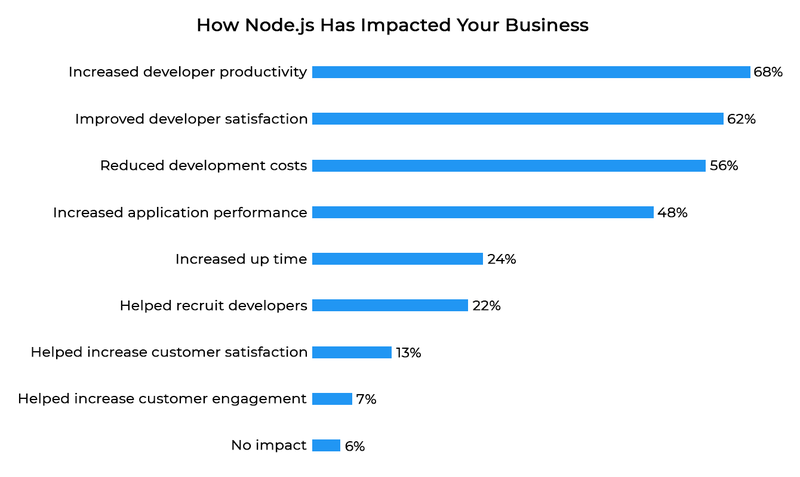
Source: nodejs.org
Node.js has its pros and cons. Let’s take a look at them.
Pros and cons of Node.js
Advantages of Node.js
Node.js has been growing rapidly. The reasons for this rapid growth lie in the advantages the Node.js platform has brought to backend development. The strongest advantage of Node.js is JavaScript, which lets developers have a shared code base written in one programming language for both frontend and backend. This speeds up development significantly by synchronizing data between the two parts of an app quickly and easily.
A scalable architecture is another advantage of Node.js. Node.js is a great solution for creating a microservices-based app architecture. The whole business logic is broken down into small, independent modules that interact with one another via an external API or the Message Queue. Breaking an app down into microservices lets developers increase fault tolerance and reliability and is ideal for applications that will include variants of vertical and horizontal scaling.
Other advantages of Node.js include:
- support of a very active and constantly growing JavaScript community, which generates lots of open-source projects that developers use in their apps;
- non-blocking input/output and a fast V8 JavaScript engine that makes the platform a perfect place for developing real-time applications, chats, and games. Due to this, Node.js offers high performance when processing lots of simultaneous connections that aren’t resource-demanding;
- simple to test and a diversity of testing tools;
- data streaming by default;
- simplicity of using Node.js as a proxy server;
- ability to use Node.js as the basis for web apps that require server-side rendering (SSR). All modern ready-made solutions for SSR have Node.js at their core.
Disadvantages of Node.js
As with any platform, Node.js has its disadvantages. Node.js uses EventLoop, which is responsible for the high performance of the platform. However, EventLoop is also problematic. Node.js works perfectly with large numbers of queries that don’t overload the processor. But as soon as there’s a resource-consuming task that needs significant system resources, Node.js lags in comparison with other solutions. If your system has tasks that create a heavy load, it’s best to address them to a platform that handles those specific tasks. You can use Node.js as a high-level layer over services that require intensive data processing.
Another disadvantage of Node.js lies in the reliability of JavaScript. JavaScript is a dynamically typed programming language, which prevents developers from detecting errors at the compilation stage. To increase reliability, it’s recommended to use typed languages that transpile into JavaScript (such as Typescript or Flow). It’s also compulsory to cover Node.js code with unit and end-to-end tests.
Adding an admin panel to a Node.js app
Despite the disadvantages of the Node.js platform, it’s still a good choice for solving different backend tasks. When developing with Node.js, there’s the challenge of adding an admin panel to the app. Many platforms have solutions for adding graphical interfaces for administering app data — for example, Django admin for Python or WordPress for PHP. In the Node.js world, there’s no default solution to this problem.
Let’s take a look at three ways to implement and add admin panels to Node.js projects:
- A big CMS that has Node.js at its core
- Ready-made styles and layouts (HTML + CSS)
- Ready-made frontend apps that can be adapted to your API
A CMS with Node.js at its core
Apps that are used to create scalable blogs or eСommerce sites refer to the given type of systems. The given systems can offer help in administering your API and also include the following functions:
- creating and changing the app’s content in a rich text editor;
- monitoring user roles and access to different parts of the app;
- adding to and scaling the system via plugins responsible for expanding the functionality and the CMS in particular.
KeystoneJS, ApostpropheCMS, Ghost, and Hexo are examples of CMS systems with Node.js at their core. Many of these systems position themselves as frameworks for managing a blog, but by expanding and supplementing their functionality, you can use them to develop more complex systems. The main disadvantage of such systems is their internal complexity and redundancy for many projects. If you need to build a project from scratch or add a blog to an existing system, it’s best to choose one of these systems. But using them to create admin panels for managing API entities is redundant, and developers will need a lot of time to figure out the external and internal structure of the CMS and its main plugins.
HTML + CSS layout for an admin panel
This variant involves admin panels with ready-made designs and layouts but without business logic. There are many solutions like this, and each is unique. These admin panels let developers add functionality to the existing layout to manage data. Most solutions are built with the support of responsive design, which lets you use your admin panel on tablets or even phones.
When you use these templates, you can scale and be flexible when you add functionality. The downside is the time-consuming development, since all admin panel functionality (data management, roles, and access) falls on the developers’ shoulders. This variant can be suitable when adding an admin panel to a small or mid-sized project where you need to cover API endpoints with a layer for project entity management.
If you want to save time on development, consider a ready-made admin panel.
Ready-made admin panels
These admin panels come with ready-made layouts, styles, and business logic. Each offers its own solution for adding data entities.
Some ready-made admin panels let you easily add entities through JSON or Yaml files (for example, express-admin). The main advantage of this approach is the simplicity of adding your own entities to administer. The disadvantage is that it’s difficult to scale these solutions.
Other variants may contain a set of components that you can use to develop your own panel. They look like the variant with a ready-made layout but without the business logic, but offer a set of ready-made components and containers that speed up the creation of the admin panel. The upside of these systems is that there’s a wide choice of components and the ability to customize them, which allows you to create easy to scale and flexible solutions. The downside of such a system is the development time — a bit less than without the business logic, but much more than the previous variant with JSON files.
To develop these admin panels, a developer needs to be familiar with the technology that makes up the system’s components. For an example of this type of admin panel, look at ngx-admin, which is based on the Angular framework.
Our solution for Node.js admin panel
As you can see, when choosing an admin panel, there’s a question of how long it will take to develop and how flexibly it will scale. At Globaldev, we decided to create an admin panel that offers both fast development and flexibility.
Our rest-admin-dashboard emphasizes the simplicity of adding entities and the flexible setup of their management. As a result, you can start development quickly and spend less time developing your admin panel. Our project includes a ready-made layout and business logic. All you need to do in order to add the admin panel is to write/describe entities in separate files. We use the .js or .jsx format to write/describe system entities (which we’ll discuss later).
Our project is built with the React framework and the Mobx-state-tree library for managing states. Thanks to Mobx, we were able to build a system that dynamically creates and adds models to the system. These models are generated from the added .js files. If you or your developers are familiar with React or Mobx, then it will be easy for you to expand the functionality of the admin panel. If you lack some major functionality, the system architecture is designed to let you add custom pages and components.
Let’s look at how our rest-admin-dashboard is used. To set up the admin panel, download it from our repository:
git clone https://git.steelkiwi.com/node/rest-admin-dashboard admin-dashboard
After downloading, run the following commands:
cd admin-dashboardyarn install // yarn (recommended) or npmyarn start
This will start the app in development mode. To build a project, use these commands:
yarn build // development versionyarn staging // staging versionyarn production // production version
After starting the app in development mode, you need to log in to the admin panel (for the demo mode, you can use any email address and password since the data you input won’t be saved anywhere except to your browser’s local storage).
After that, you’ll be granted access to the admin panel:
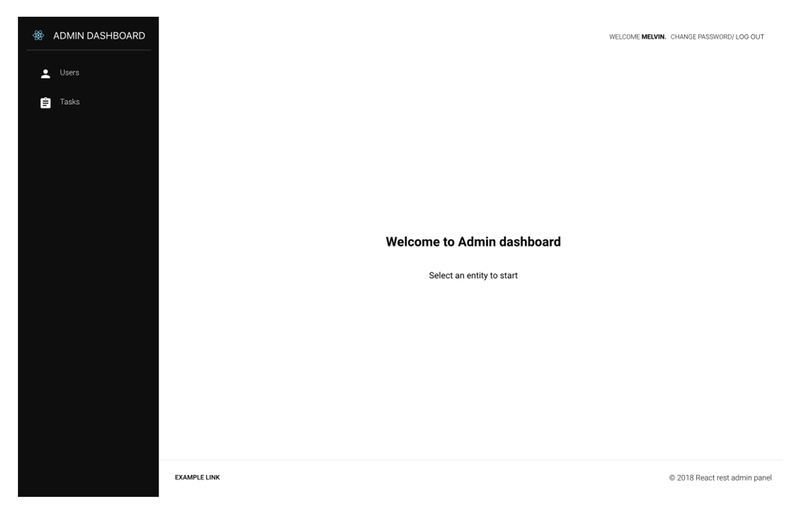
Source: globaldev.tech
Here you can see two available entities to manage (and the app bar). You can exit the system and change the password.
Note
// in api.js
// INFO: add valid API endpoint and remove fake APIexport default (baseApiUrl ? api : fakeApi)
Let’s look at the user entity:
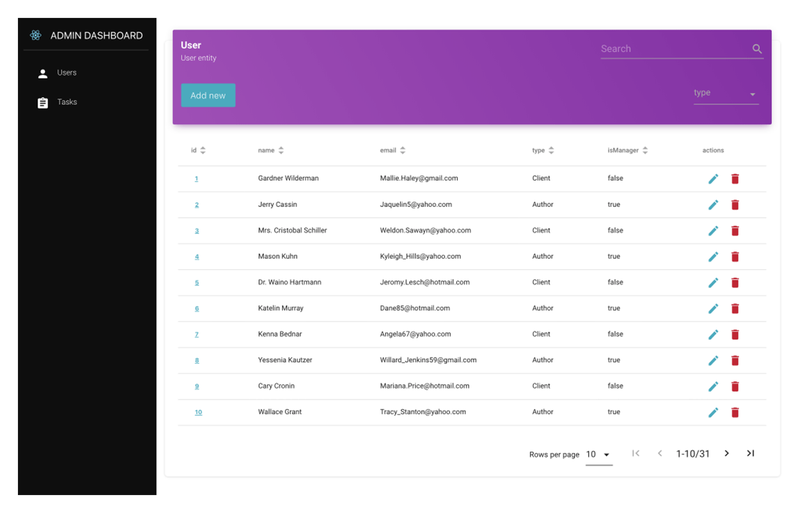
Source: globaldev.tech
The user entity is described in a table where the columns stand for fields. The main fields of the user are ID, name, email, type, and isManager. Below, you’ll find an example of the main contents of the .js file that describes the user entity:
export default { name: 'user', icon: Person, url: apiUrls.fake.user, filters: [ { name: 'type', value: '' } ], fields: [ { name: 'name', type: 'string', rules: 'required' }, { name: 'email', type: 'string', rules: 'email|required' }, { name: 'type', type: 'dropdown', rules: 'required', options: ['Client', 'Author'] }, { name: 'isManager', type: 'boolean', rules: 'required' } ] }
name – name of the entity
icon – icon for the panel
url – basic URL address through which CRUD operations for the entity are executed
updateUrlMethod – an optional parameter that describes which method will process updated data (the default variant is PUT)
filters – Here we describe which entity fields the dropdown with filters will be displayed for. The values for filtering can be described explicitly in the file (in the description of entity fields), or you can use an optional filterUrl field which contains an URL endpoint for fetching filters data.
fields – Array that contains entity fields description. The main parameters are name and type. The field type describes which control element will be displayed for the given field when adding or editing an entity (for example, the boolean type). When editing this field, a boolean field will be displayed as a checkbox.
actions – Provide most of the flexibility for describing fields in the admin panel. Actions are mechanisms that extend the behavior and display field entities. Actions come in two kinds: head and body.
actions: { head: { custom: // your custom header renderer } body: { custom: // your custom body renderer } }
Head actions describe how fields render in the table header. By default, all fields in the table have a sort action that sorts data. Body actions describe how the field is rendered in the body of the table. Default actions are actions of the default actions field, which displays buttons to delete and edit an entity.
Let’s take a look at actions using the example of the Task entity:
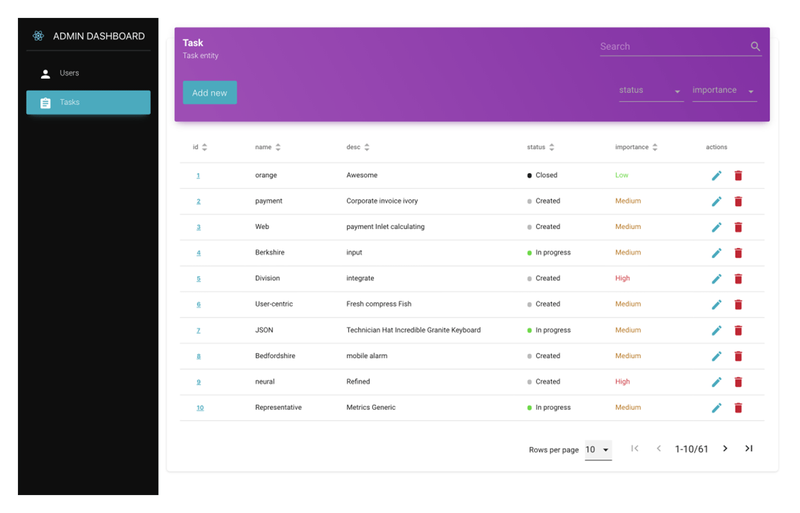
Source: globaldev.tech
As you can see, the status and importance fields have a custom look. To add an additional color to the importance field, it’s enough to add the necessary class to the action of this field. This class will redefine the color of the field. You can also use inline styles if you don’t want to change the CSS files directly. The importance field is shown below:
{ name: 'importance', type: 'dropdown', rules: 'required', options: ['Low', 'Medium', 'High'], actions: { body: { custom: ({ value }) => ( <span style={{ color: value === 'Low' ? '#3d2' : value === 'Medium' ? '#c37800' : '#e23' }} > {value} </span> ) } } }
The body field in action defines that the given field in the table should be rendered in accordance with the component passed. The status field is similar to the importance field, but there’s a point added to indicate the status type.
actions: { body: { custom: ({ value }) => ( <div style={{ display: 'flex', alignItems: 'center' }}> <span style={{ borderRadius: '50%', width: 8, height: 8, marginRight: 8, backgroundColor: value === 'Created' ? '#bbb' : value === 'In progress' ? '#3d2' : '#222' }} /> {value} </div> ) } }
Note
As you can see, if you want to add a new entity to the system, you need to describe a minimum amount of data. Optional fields provide for flexibility (validation rules, expansion of filtering functionality, and table pagination). The following examples show the fields that describe entities. To look at other fields and fine-tune your entity, read the project documentation.
Due to the simplicity of adding entities to the react-admin-dashboard admin panel and the possibilities to customize it, developing your admin panel will take much less time than developing from scratch or using a ready-made style and layout. It’s important to note that our admin panel isn’t tied to a particular system or platform. You can hook any REST API server to it. The reason for choosing Node.js is that the code base is written in one language, which significantly simplifies the process of adding new functionality to the admin panel, especially if developers are familiar with React.
We’ll be glad if you choose our project for the admin panel of your REST API services or as the foundation for a more complex system to administer your entities. In the future, we plan on growing this admin panel.
If you have any ideas for how to improve the project with new functionality or if you spot issues while using it, please create an issue in the repository or add a merge request and we’ll definitely look into the matter and fix it.