
First of all, if you want a guide on how to deploy MySQL in Oracle Cloud, then the best place to start is here.
So, what are we going to do here?
- Create an Oracle Storage container to keep our backups safe.
- Run a MySQL Enterprise Backup from on-premise 5.7 MySQL (GPL or Enterprise) streaming to our Oracle Storage container.
- Create an Oracle Cloud MySQL instance initiated from the previously backed up instance.
What data do we have:
- An e-mail address that you signed up to Oracle MySQL Cloud Service with.
- An IdentityDomain.
- You might also have a Data Centre assigned, as this can be chosen when you sign up.
And now, let’s go through how to get our data into the cloud and into a running MySQL instance:
To make things simpler, let’s use curl to create the Oracle Storage container (all this can be done via the Storage console page if needed):
We need to get authenticated first, for security reasons (the Auth token lasts 30 minutes so expect to revisit this part if we take long between steps):
 $ curl -v -X GET \
  -H 'X-Storage-User: Storage-mysqltest:keith.hollman@oracle.com' \
  -H 'X-Storage-Pass: password' \
  https://mysqltest.storage.oraclecloud.com/auth/v1.0
 ..
 < HTTP/1.1 200 OK
 ..
 < X-Auth-Token: AUTH_tk16d300f6b511956328c6a66dc2921267
 ..
Create a container called “5718_upload”:
curl -v -X PUT \
 -H "X-Auth-Token: AUTH_tk16d300f6b511956328c6a66dc2921267" \
 https://mysqltest.storage.oraclecloud.com/v1/Storage-mysqltest/5718_upload
 ..
 < HTTP/1.1 201 Created
 ..
List contents:
$ curl -v -s -X GET \
  -H 'X-Auth-Token: AUTH_tk16d300f6b511956328c6a66dc2921267' \
  https://mysqltest.storage.oraclecloud.com/v1/Storage-mysqltest/5718_upload
 ..
 < HTTP/1.1 204 No Content
 ..
Run an online backup (MEB version 4) of our 5.7.18 instance to cloud storage:
mysqlbackup --user=root --socket=/opt/mysql/5718/mysql_5718.sock \
 --cloud-service=openstack --cloud-container=5718_upload \
 --cloud-ca-info=/etc/ssl/certs/ca-certificates.crt \
 --cloud-object=5718_full_meb_backup.mbi \
 --cloud-user-id=Storage-mysqltest:keith.hollman@oracle.com \
 --cloud-password=password \
 --cloud-tempauth-url=https://mysqltest.storage.oraclecloud.com \
 --backup-dir=/tmp/5718backup/cloud \
 --compress=true --backup-image=- backup-to-image
(depending on your distro, the cloud-ca-info path might be different)
List contents again:
curl -v -s -X GET \
 -H 'X-Auth-Token: AUTH_tk16d300f6b511956328c6a66dc2921267' \
 https://mysqltest.storage.oraclecloud.com/v1/Storage-mysqltest/5718_upload
..
5718_full_meb_backup.mbi
5718_full_meb_backup.mbi_part_1
Now to create the cloud instance:
http://cloud.oracle.com -> “Sign In”
My account is what’s known as a Oracle Cloud Infrastructure Classic (OCI Classic) account. But it all depends on when you’ve signed up, what other cloud services you may have, etc.
All the following info you will get in an e-mail when you sign up for Oracle Cloud:
select account type -> “Traditional Cloud Account”
select Data Center -> “US Commercial 2 (us2)”
click on “My Services” button.
Now to enter some specific info:
Enter your Identity Domain -> “mysqltest”
click on “Go”
User Name -> “keith.hollman@oracle.com”
Password -> “password”
click on “Sign in”
Now you’ll see the Dashboard with all your cloud resources available.
There are some helpful rectangles / buttons “Guided Journey“, “Create Instance“, “Account Management” & “Customize Dashboard“.
Below that, you’ll see a summary of your “Cloud Services“.
Then, beneath that, you’ll see the services themselves, i.e. “MySQL“, “Compute Classic“, etc.
If you click on the “MySQL” wording, it will take you to an overview of all your information. This can be useful, eg. for the Public IP Address needed later on for ssh.
So, either on that screen, we can click on “Open Service Console“, or on the previous screen, click on the “Action Menu” which is the little button of 4 horizontal lines, and then choose the same: “Open Service Console“.

Now, we’ll see the different options available for our “Oracle MySQL Cloud Service“.
First you’ll see the “Instances“, “Activity“, “SSH Access” & “IP Reservations“. I’ll let you look into each one of those at your own pace, as what we want to do now is go direct to the “Create Instance” button on the right.
“Create New Instance” page.
Instance – Details – Confirm
Here we have to specify the Instance Name and Region. The others should be automatically selected or are optional:
Instance Name -> “MySQL57”
Description
Notification Email
Region -> “uscom-east-1” (chosen from the options in the dropdown)
IP Network -> “No Preference” (this option appears once we’ve chosen the Region.)
click on “Next”
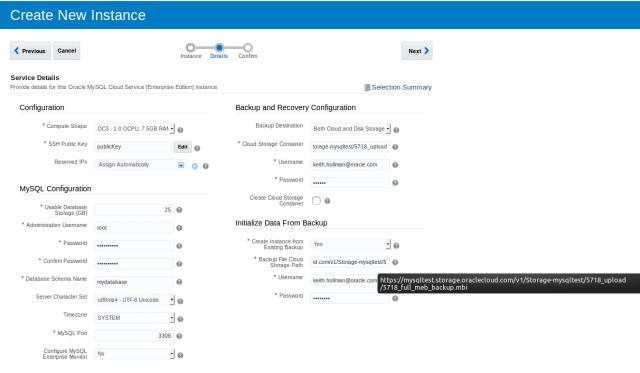
“Service Details”
Instance – Details – Confirm
Here we have to specify how to create our instance from the backup we previously did.
Configuration
First, remember how large the original environment was and this will help us to choose the “Compute Shape” that we need.
Then, we need a “SSH Public Key”.
Edit -> (a window opens up “SSH Public Key for VM Access”. Here we have different options, where I’m choosing “Create New Key”
click on “Enter”
Once the key pair is created we can now download the resulting zip file with the private & public keys. KEEP THESE SAFE. We will be needing these.
click on “Download”
save them somewhere safe.
click on “Done”
This closes the small pop up window, and now we can carry on sizing the environment according to our needs.
MySQL Configuration
Usable Database Storage (GB) -> Set the size of the storage needed for the database instance.
Password -> (We need to provide a good password, eg. “Oracle20!8” but it doesn’t matter as we’ll be using the existing passwords for our instance)
Backup and Recovery Configuration
Cloud Storage Container -> (this should be automatically filled out with something like “https://mysqltest.storage.oraclecloud.com/v1/Storage-mysqltest/MySQLCS” . We will want to change this to: “https://mysqltest.storage.oraclecloud.com/v1/Storage-mysqltest/5718_upload“)
Username -> “keith.hollman@oracle.com”
Password -> “password”
Create Cloud Storage Container -> UNCHECK THIS! We’ve already created ours.
Initialize Data From Backup
Create Instance from Existing Backup -> “Yes”
Backup File Cloud Storage Path -> “https://mysqltest.storage.oraclecloud.com/v1/Storage-mysqltest/5718_upload/5718_full_meb_backup.mbi”
Username -> “keith.hollman@oracle.com”
Password -> “password”
click on “Next”
Instance – Details – Confirm
Here we get a summary of what we’ve entered.
It has all been validated, i.e. if there’s an error somewhere, i.e. the password isn’t strong enough, the backup path is wrong, or a username doesn’t exist, then you’ll know so.
click on “Create”
You might get a window saying “Create Service Request” with just one option saying “OK”.
This is ok.
If you try to click on “Create” again, it will fail saying that the service already exists.
You can click on “Cancel” and it will take us back to the Summary page.
We can see that for the instance we’ve just created it will say “Status: Creating service …”
Then click on the name of the instance you gave, in my case “MySQL57“.
On the next page we’ll see the “Instance Overview” page.
Now click on the small arrow in the box under “In-Progress Operation Messages” to view the creation log.
Now, we have to get the IP address from the instance overview.
Connecting & confirming the instance has been restored
Let’s see what’s in the cloud instance:
$ ssh -i /path/2/private/key/previously/downloaded opc@123.456.78.90
Once connected:
$ sudo su - oracle
$ mysql -uroot -p (use the password from your backed up instance)
And now for our data:
mysql> show databases;
mysql> select user, host from mysql.user;
It should be self-explanatory, me thinks.
You could also connect in with MySQL Workbench. Here are the instructions on how to connect and remotely administer your cloud instance.
Hope this has helped!

Pingback: Going to Oracle MySQL Cloud via Enterprise Backup | MySQL Unleashed
Pingback: Going to Oracle MySQL Cloud via Enterprise Backup. - SSWUG.ORG