Docker security scanning using Microscanner (in Jenkins & Gitlab CI)!
Containers are nowadays everywhere. In this day and age, either you're using Docker or considering adopting it. Containers are lightweight and provide a consistent & portable software environment for applications to easily run and scale anywhere. They've made a huge impact on the way we architect, develop and ship our software.
But How about security?! A questions that I always get whenever I talk about docker! Containers security was initially a big obstacle to many organizations in adopting Docker, but things have radically changed now! Many Open Source projects, startups, cloud vendors and even Docker itself provide solutions to secure images and containers.
In this post we'll explore Microscanner, an open source tool that scans container images for package vulnerabilities, and discuss how we can integrate image scanning into our CI/CD pipelines.
Containers Security as part of your pipeline
Security is a big topic, and even a book could not cover all aspects related to it!
Including security checks into different stages of your project lifecycle is a great way to catch vulnerabilities at an early stage and take whatever needed actions to fix them.
"Don’t have a Meltdown" is one of my favorite session from DockerCon 2018! It advocates the necessity to integrate security into our continuous integration, continuous delivery, and continuous deployment pipeline. In a nutshell, it defines 6 stages and highlight the measures to take in each one to prevent the disaster:
DEV: This occurs during development phase, where static code analysis and code review practices help identify security vulnerabilities at an early stage.TEST: After commiting code, this step automatically triggers the build and perform basic automated testing of the application. It makes perfect sense to include security tests in this step as well to bring attention to critical and high security issues.BUILD: Here we perform advanced automated testing, with well defined security polities, of the application. It empowers development teams to remediate critical and high risk issues as they’re introduced.HOSTS: Resist the idea of putting into the container host something not-related to containers runtime. This will definitely help to minimise the attack surface. CIS Docker community benchmark lists many precious recommendations and best practices for hardening the host configuration and Docker daemon configuration .RUN: By simply following the least privilege principle in your containers, and making sure that each participant of the system must only have access to the information and resources that are necessary for its legitimate purpose. No more, no less.OBSERVE: By continuously monitoring your production environment, to gain insight into the types of traffic your application is receiving. Additionally, collecting application-level security metrics helps identify patterns of malicious users.
Using Aqua Microscanner
Security scanning is a method commonly used to ensure files have not been modified in a malicious way or to identify them as containing a security vulnerability. It is incredibly difficult and time-consuming to manually track all the files, packages, libraries, and so on, included in your docker image along with the vulnerabilities that they may possess.
The Aqua MicroScanner focuses on software packages and checks them against known vulnerability databases. It's an open source tool, easy-to-use and doesn’t need any elaborate or predefined server setups! and all that is needed to start is:
- A token from Aqua
- Scan the container image.
The later step can be configured in 2 ways as well:
- Adding the executable into the image, by specifying a
RUNstep to execute the scan, which examines the contents of the image filesystem for vulnerabilities. - Using Microscanner wrapper to scan existing images. It basically works by creating a new temporary
Dockerfilededicated for vulnerability scanning which startsFROMthe image to be scanned, adds and runs microscanner.
To see Microscanner in action, We're going also to re-use the same good old spring boot project I've prepared for "Google Jib & Gitlab registry" post. We're going to build image first, scan it and expose the results in HTML pages. We'll also see examples on how to configure it as part of our pipeline to enable security scanning before pushing docker images to some container registry, in both Gitlab CI & Jenkins
Gitlab CI
As mentioned above, there are 2 options to run Microscanner and we're going to make use of the second approach in Gitlab CI, since it is more flexible and does not require the overhead of adding (and cleaning) Microscanner executable in our image.
First we need to add & configure the .gitlab-ci.yml file in the root of our repository. 4 stages are defined in the configuration below:
- build: Build the spring boot app by running using maven
- package: Create docker image by building it from Dockerfile
- scan: Run microscanner scan
- publish: publish scan HTML results in gitlab page
image: docker:latest
services:
  - docker:dind

stages:
  - build
  - package
  - scan
  - publish

maven-build:
  image: maven:3-jdk-8
  stage: build
  script: "mvn package -DskipTests"
  artifacts:
    paths:
      - target/*.jar

docker-build:
  stage: package
  script:
    - docker build -t registry.gitlab.com/aboullaite/sb-app .
    - mkdir image_cache
    - docker save registry.gitlab.com/aboullaite/sb-app > image_cache/cached_image.tar
  artifacts:
    paths:
      - image_cache

aqua_scan:
  stage: scan
  script:
    - docker load -i image_cache/cached_image.tar
    - apk add git bash --no-cache
    - git clone https://github.com/lukebond/microscanner-wrapper.git aquasec
    - chmod +x aquasec/scan.sh
    - mkdir scan
    - MICROSCANNER_TOKEN=${AQUA_SEC_TOKEN} MICROSCANNER_OPTIONS="--html" bash aquasec/scan.sh registry.gitlab.com/aboullaite/sb-app > scan/index.html
  artifacts:
    when: always
    paths:
      - scan/

pages:
  stage: publish
  dependencies:
    - aqua_scan
  script:
    - mv scan/ public/
    - sed -i '/<!DOCTYPE html>/,$!d' public/index.html # Clean up the html
  artifacts:
    paths:
      - public
    expire_in: 1 day
  when: always
  only:
    - microscanner-gitlabci
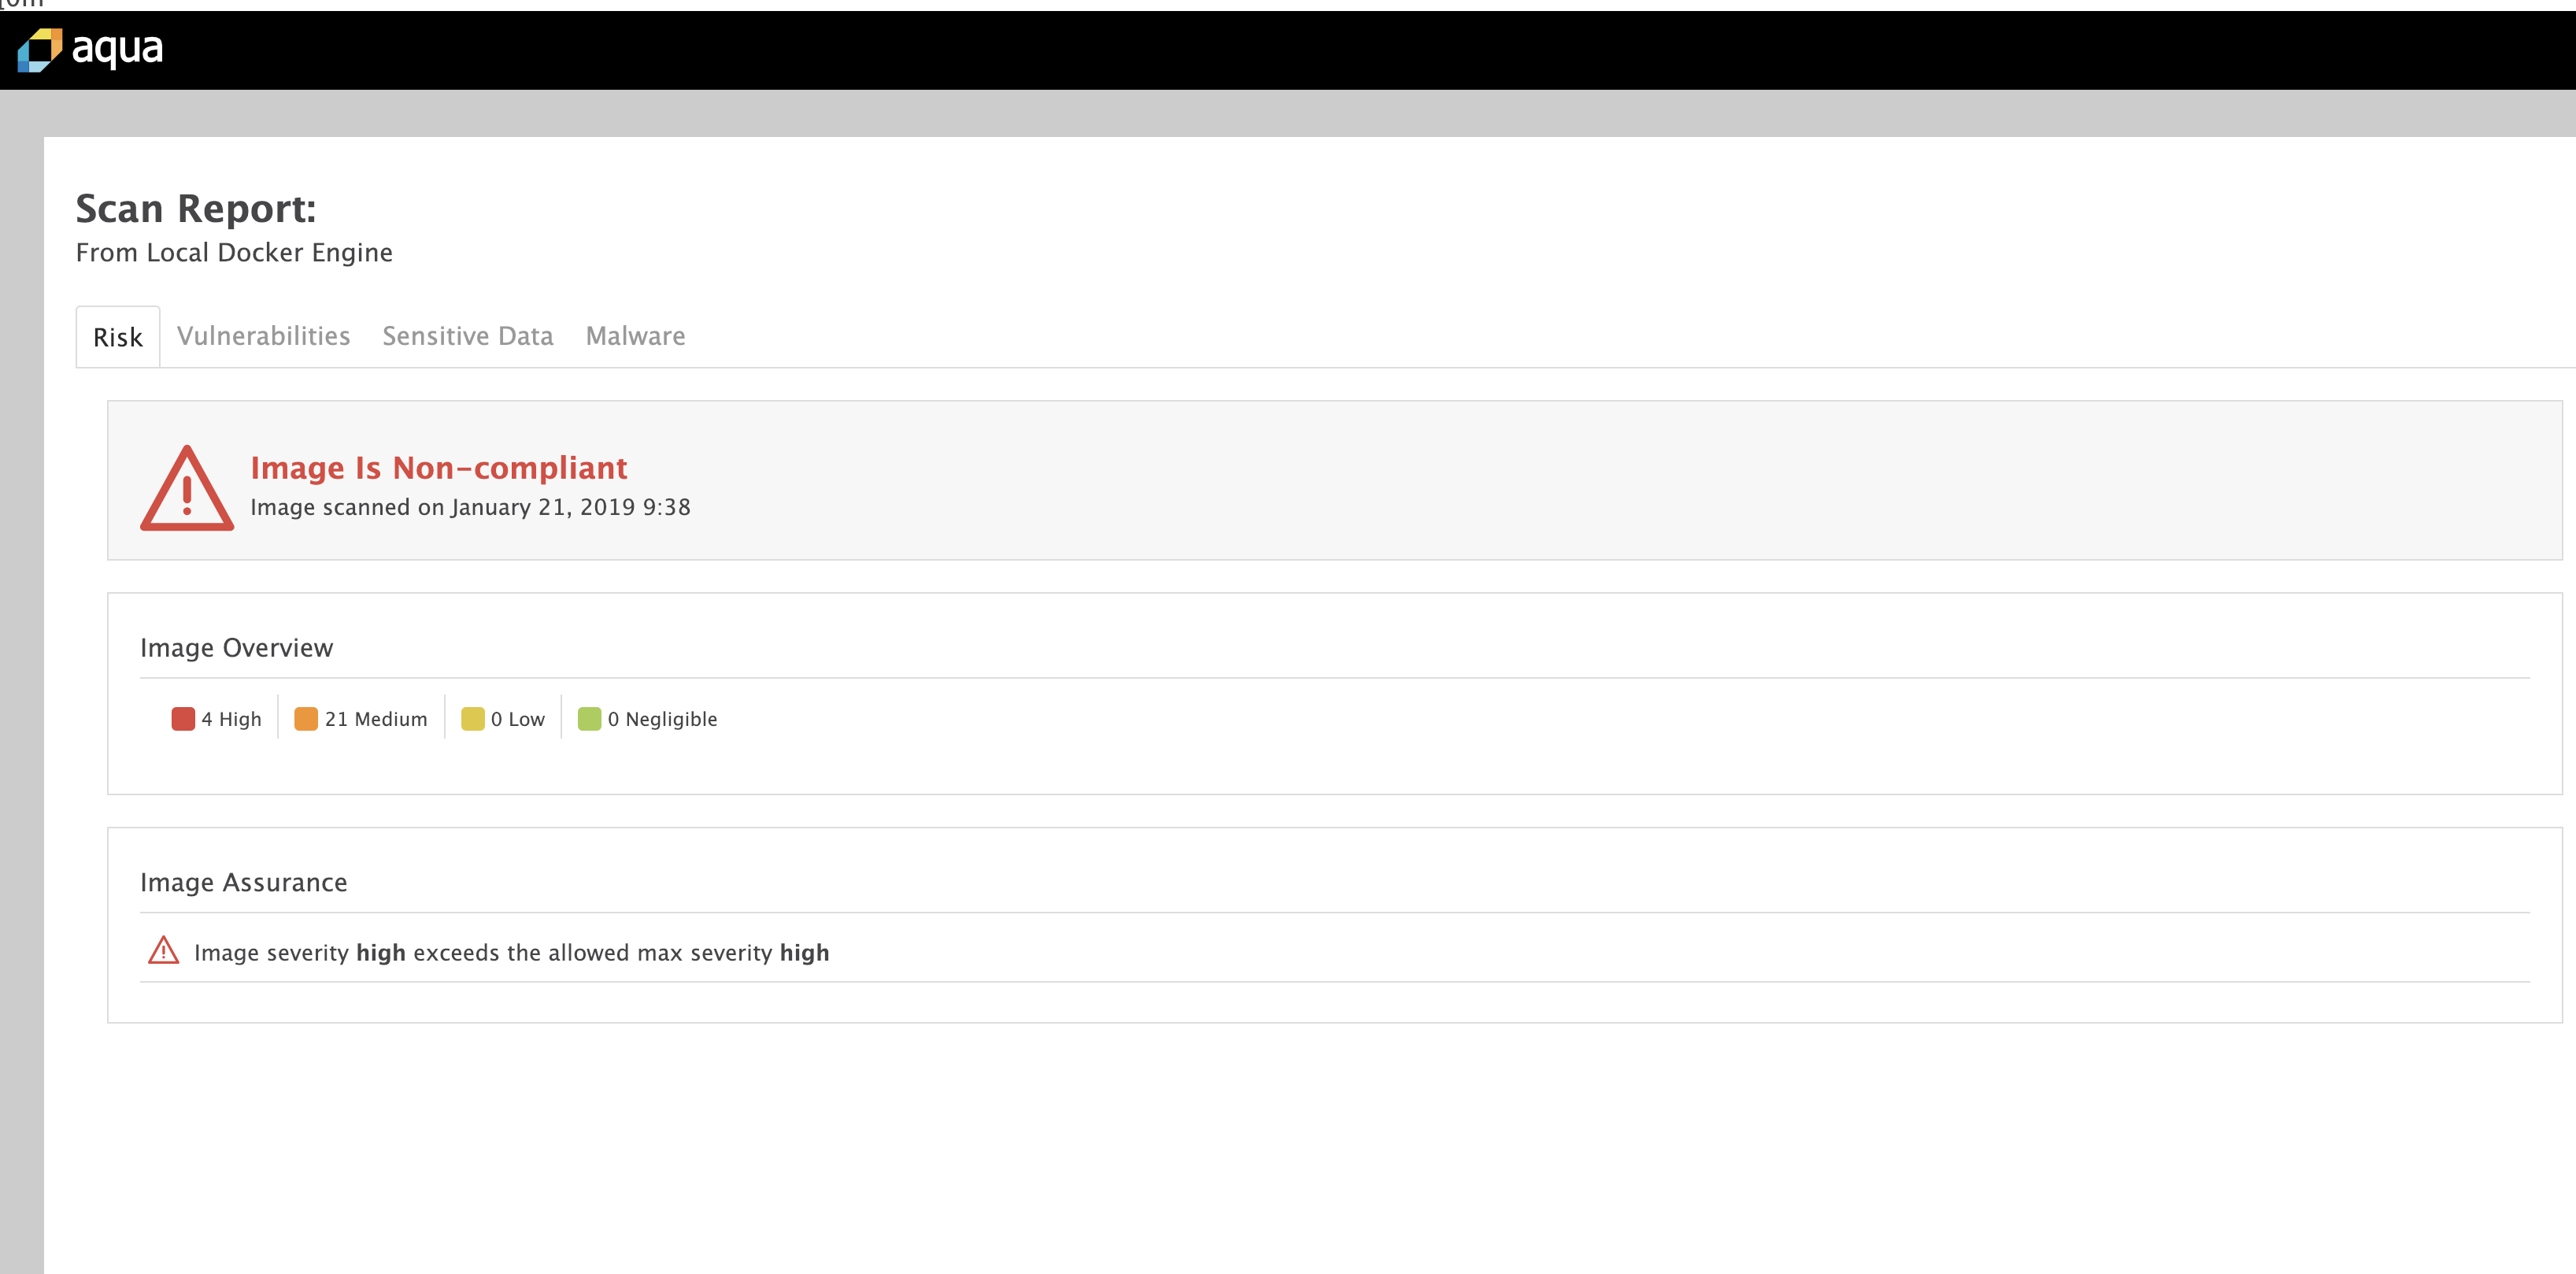
Note the use of AQUA_SEC_TOKEN variable defined in settings > CI/CD > Environment variables in gitlab! Once the scan stage is finished (either succeeded or not) the result on the vulnerabilities found are automatically published into gitlab pages, available for 1 day only.
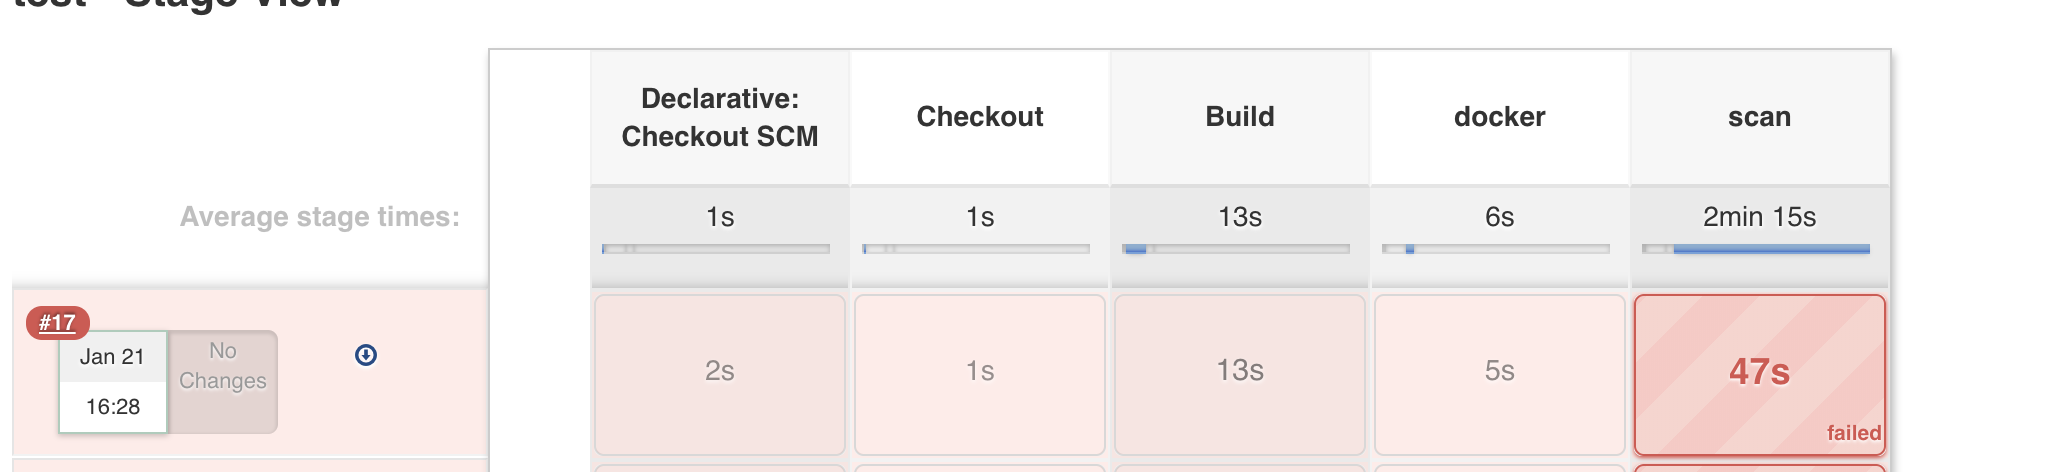
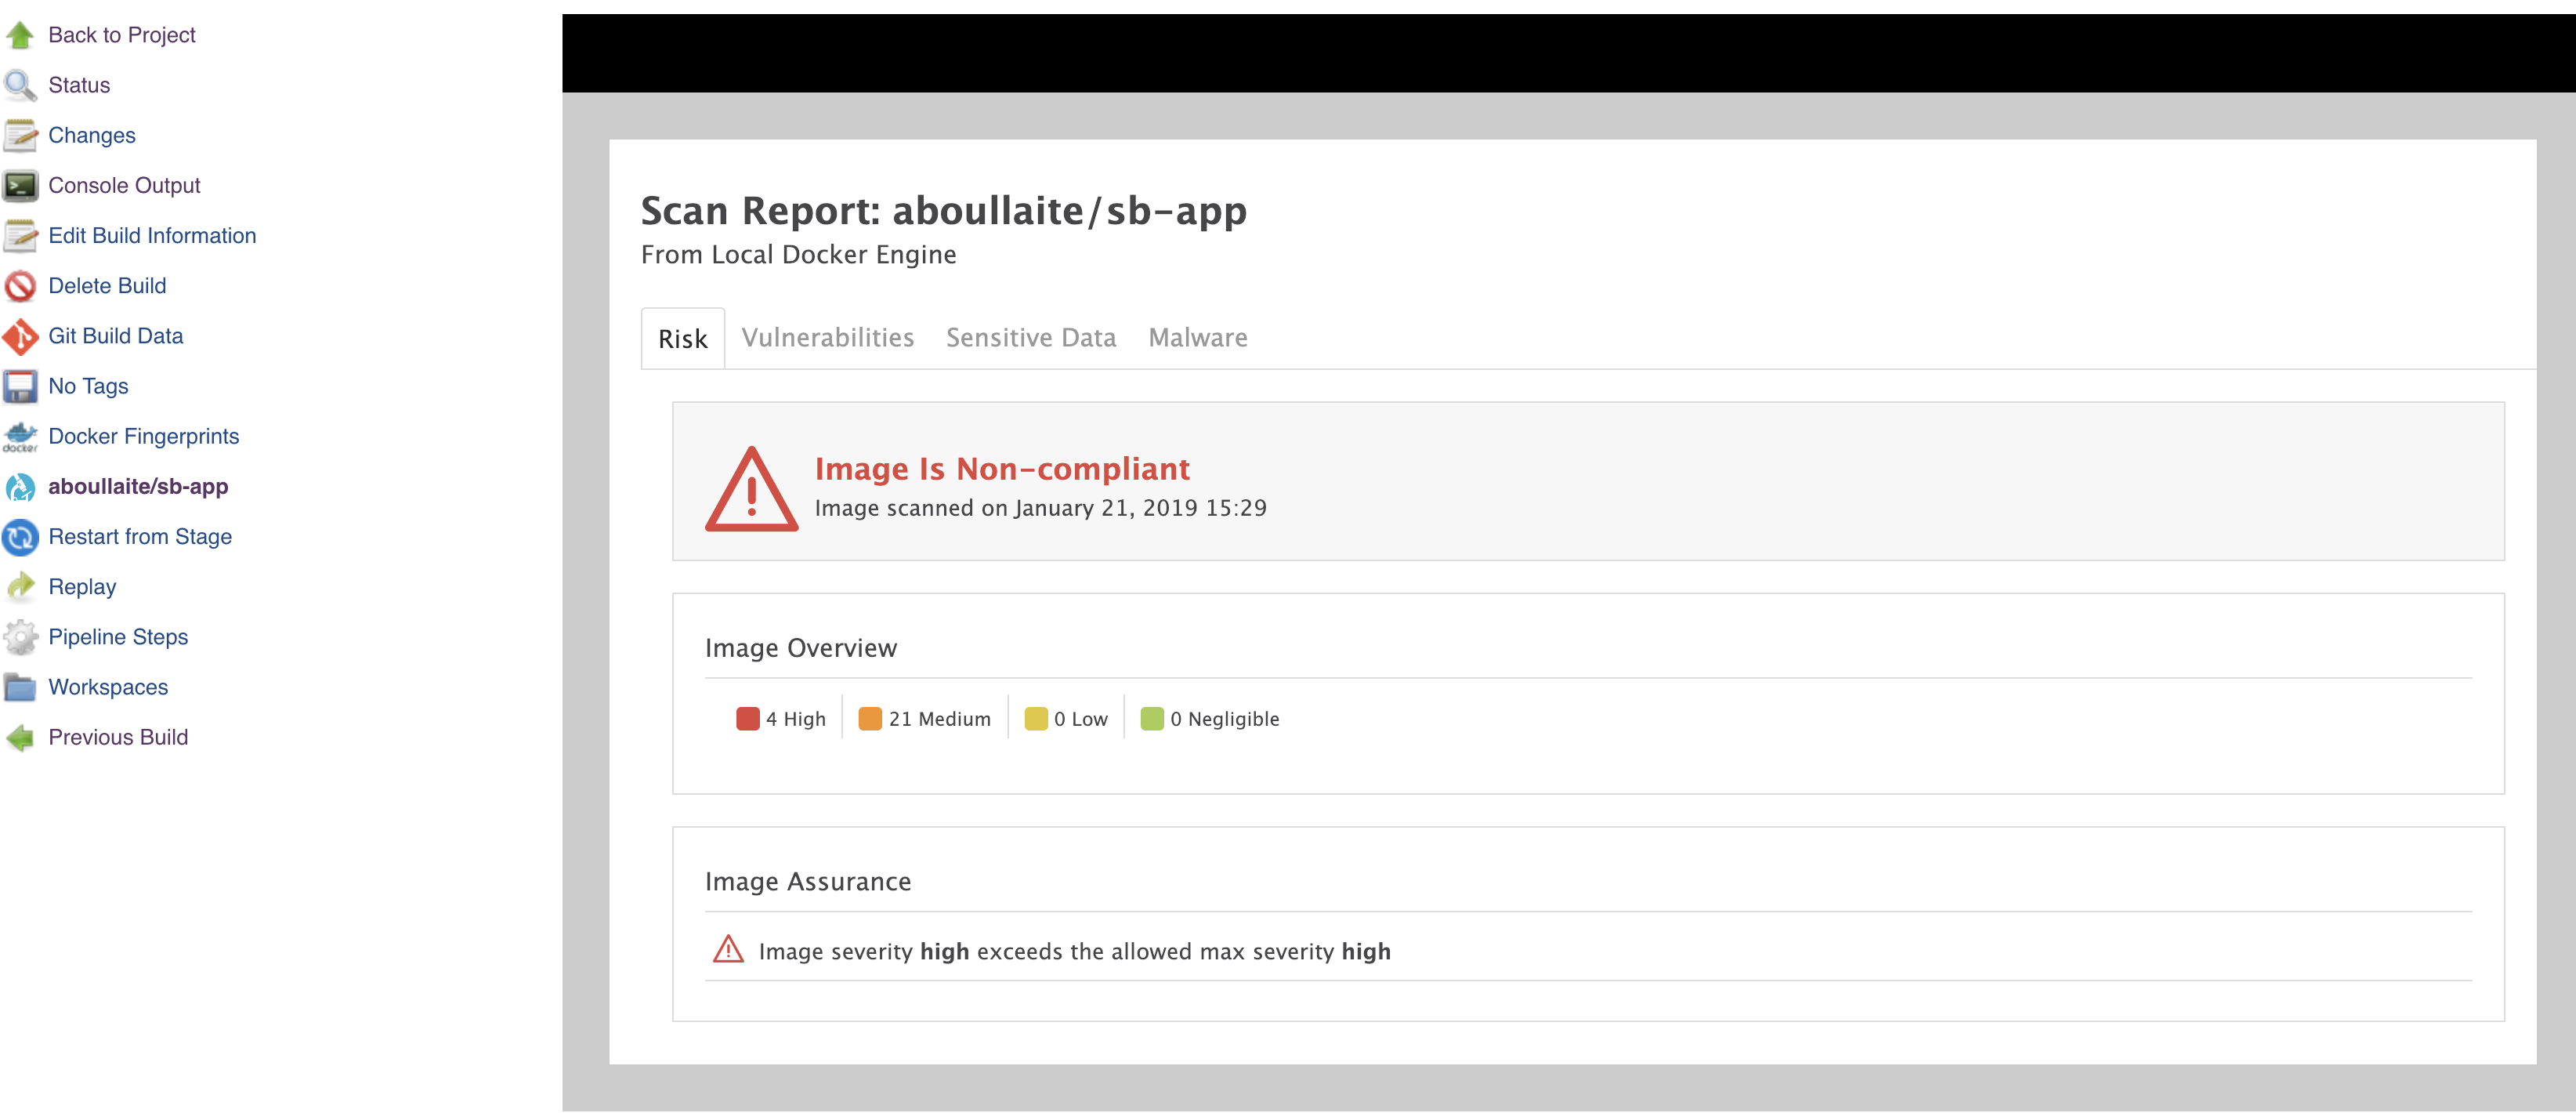
For our example, the newly created image is not compliant with the default security policy (with 4 High & 21 Medium vulnerabilities), hence the job fails & the image will not be pushed to the registry!

The HTML report got automatically published as well in the newly created page:
Jenkins
When it comes to jenkins, there's already an available plugin that makes the integration much more easier. We need obviously to provide a token to the plugin in order to properly work!
Our Jenkins pipeline contains relatively the same stages as the ones from Gitlab CI, with the exception of removing the final step (publish) and we will let the Microscanner plugin take care of it. Our jenkins file looks like below:
pipeline{
    agent any
    stages{
        stage('Checkout') {
            steps{
                git branch: 'microscanner-jenkinsci', url: 'https://gitlab.com/aboullaite/Jib-Springboot.git'

            }
        }

    stage('Build') {
        steps{
            sh 'mvn clean package -DskipTests'
         }
    }

    stage('Package') {
        steps{
            docker.build("aboullaite/sb-app")
         }
    }

    stage('Scan') {
        steps{
            aquaMicroscanner imageName: 'aboullaite/sb-app', notCompliesCmd: 'exit 4', onDisallowed: 'fail', outputFormat: 'html'
         }
    }
}
}
Note that we configured the plugin to fail the build (by using notCompliesCmd: 'exit 4') when high severity risks are found in the build. We've also configured HTML support that offers a nicely formatted HTML page describing the vulnerabilities found in the image.