GraphQL has been around for a while and is proving its value. It is not, unlike what’s been spread about, a framework or just a ready-tool for dealing with HTTP-based searches. Just like REST is a specification to access resources that partially expose the business models in client-server applications, GraphQL is a cleaner, more flexible way to execute and fetch specific data from the server.
In other words: ask for hat you need, get exactly that. That’s the anthem of GraphQL. Instead of having tons of different REST endpoints to provide access to every resource via a different HTTP request, you can do the same thing with only a single request, along with a smarter (smaller – just what you need) response body, getting summarized data from different resources.
It also comes with a strong type system, encapsulated in a syntax that resembles JSON. Also, you don’t need to worry about versioning the endpoints since you can deprecate your fields once they become old. And it is available for all the major languages for both client and server sides. Because of its committed community, you can find many different open source clients and projects being broadly supported around the world.
General Architecture
Think about graphs. In theory, they are used to mathematically model the relations two objects have in common. In GraphQL, you start to join this concept with a query language in order to fetch/send all the data you need with no more endpoints.
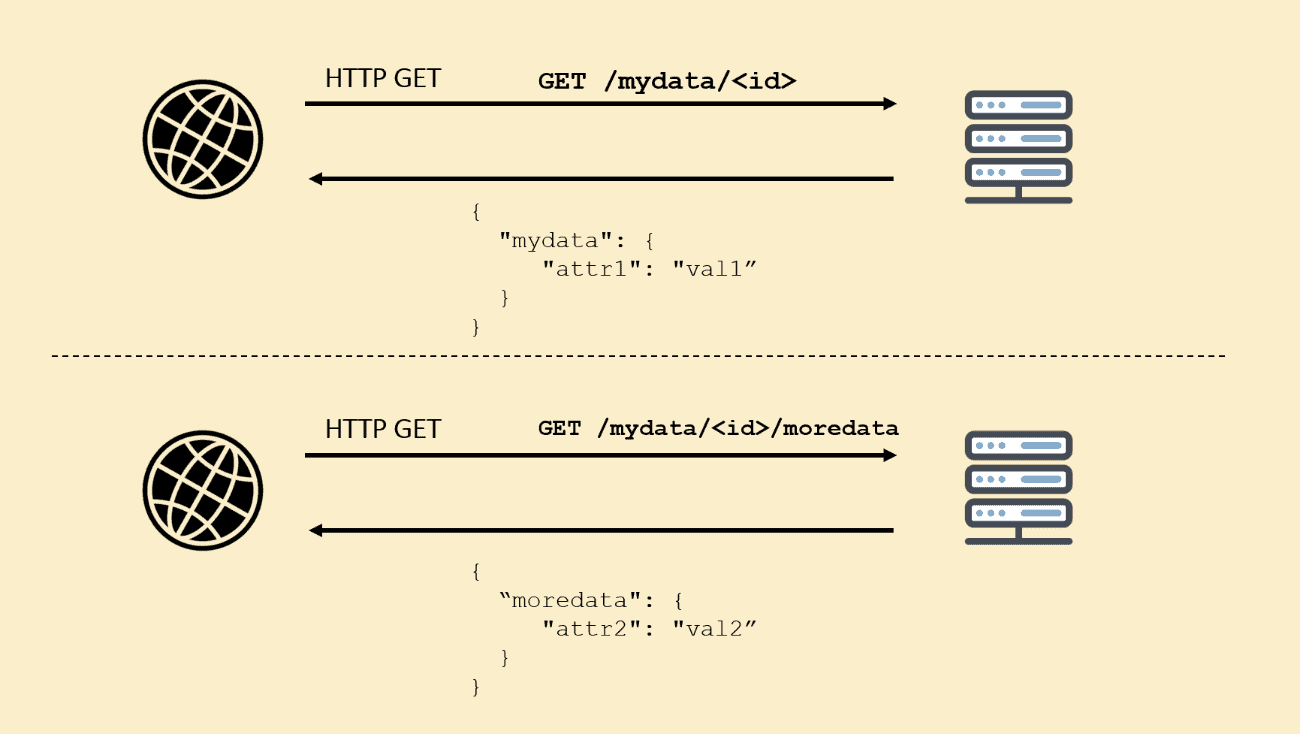
In a common REST API, developers grab information from endpoints that represent a single and understandable source of information, a resource. Usually, they return a lot of data, most of this not necessary for the current operation, making the whole conversation too verbose. Plus, since each resource hosts different data, you’d need to go through many of them to catch everything turning the calling to the server too chatty:
GraphQL, on the other hand, summarizes everything the client needs at once, by allowing you to specify all the data in a query fully supported by the back-end. One single HTTP request, all the data you need in hands:
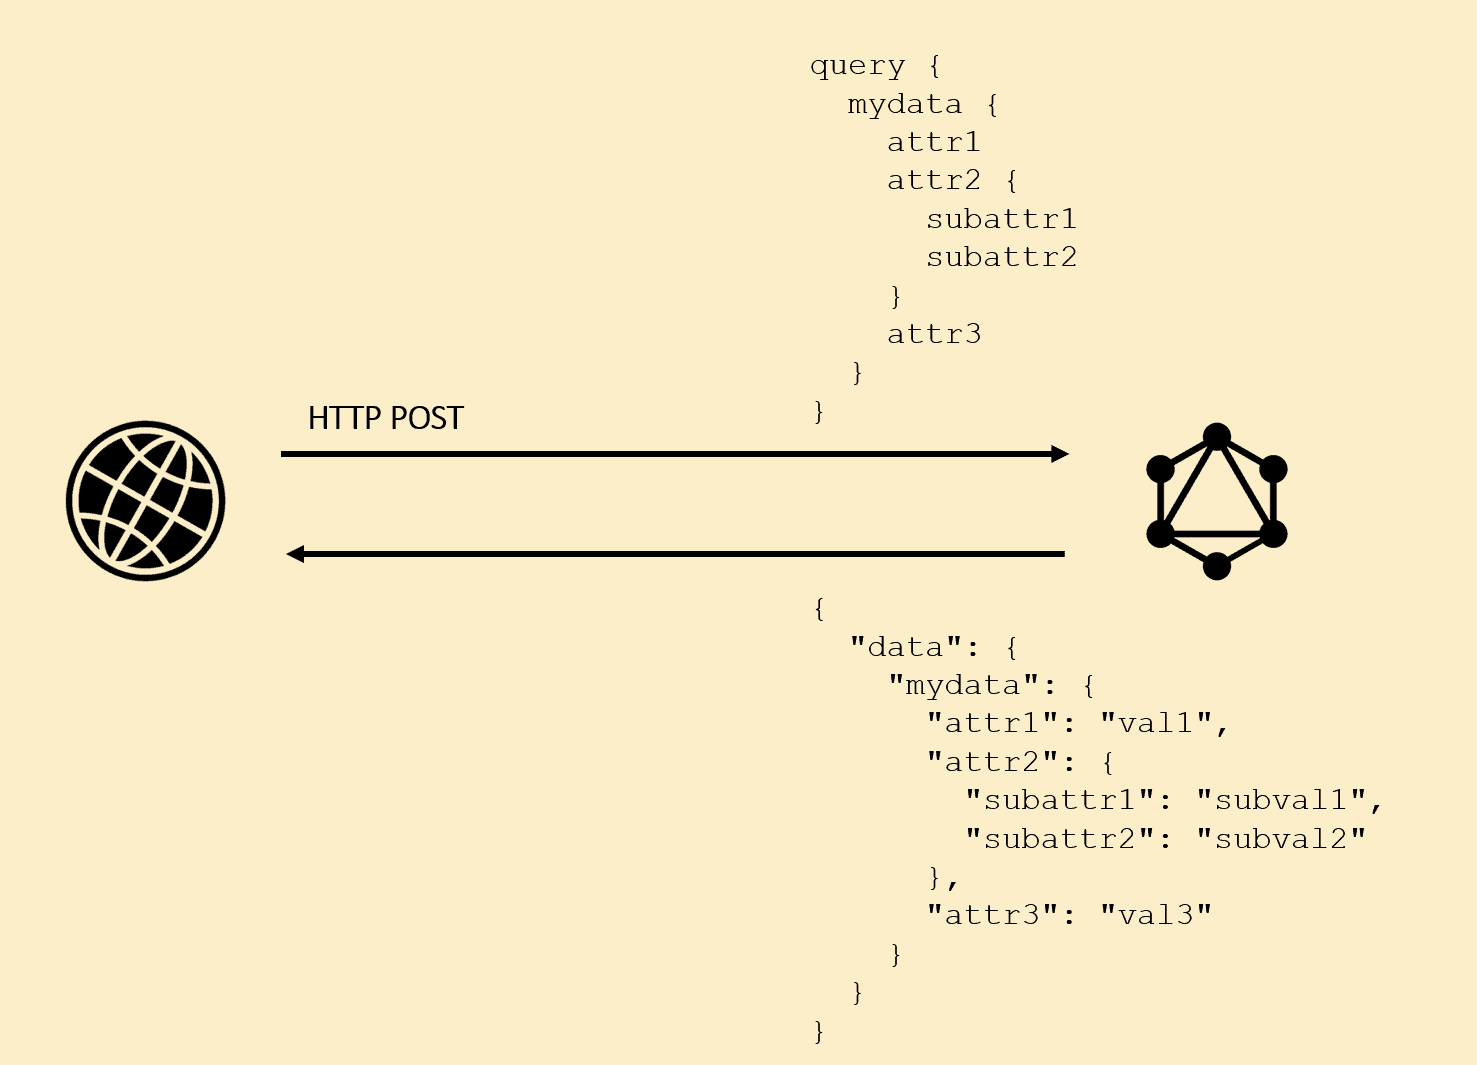
This way, GraphQL minimizes a lot of the over and under fetching issues that most modern applications deal with in addition to letting the front-end be freer to mount the request chaining the way they see it’s best.
Because of its HTTP-based nature, GraphQL also benefits from all the out-of-the-box features that REST did, including the stateless state, patterns, free from tech stack and heavily embraced by the community. Also, you can create your APIs within any supported language, just the same way you would with the clients. Most of the big platforms already support it.
Another important feature that comes with GraphQL are the resolvers. They basically allow the extraction of data from different sources and integrate the data into the same response. It is useful when you want to connect data that relates to the query objects are being fetched now, while accessing resources sometimes even via remote calls to other services. This architectural design, of course, can lead to slowness depending on the way you make each call. Remember, even though it’s a great feature to use, each integration you have in a single query can lead to more and more delay to the user’s response, so be careful just the same way you should be when designing REST web services. Finally, you also have to remember that a query still has to fetch relatable data, which means that a query that searches for a user data has nothing to do with your stockroom’s system data. So, keep anchored to your original design and make data design meaningful.
Demo Project
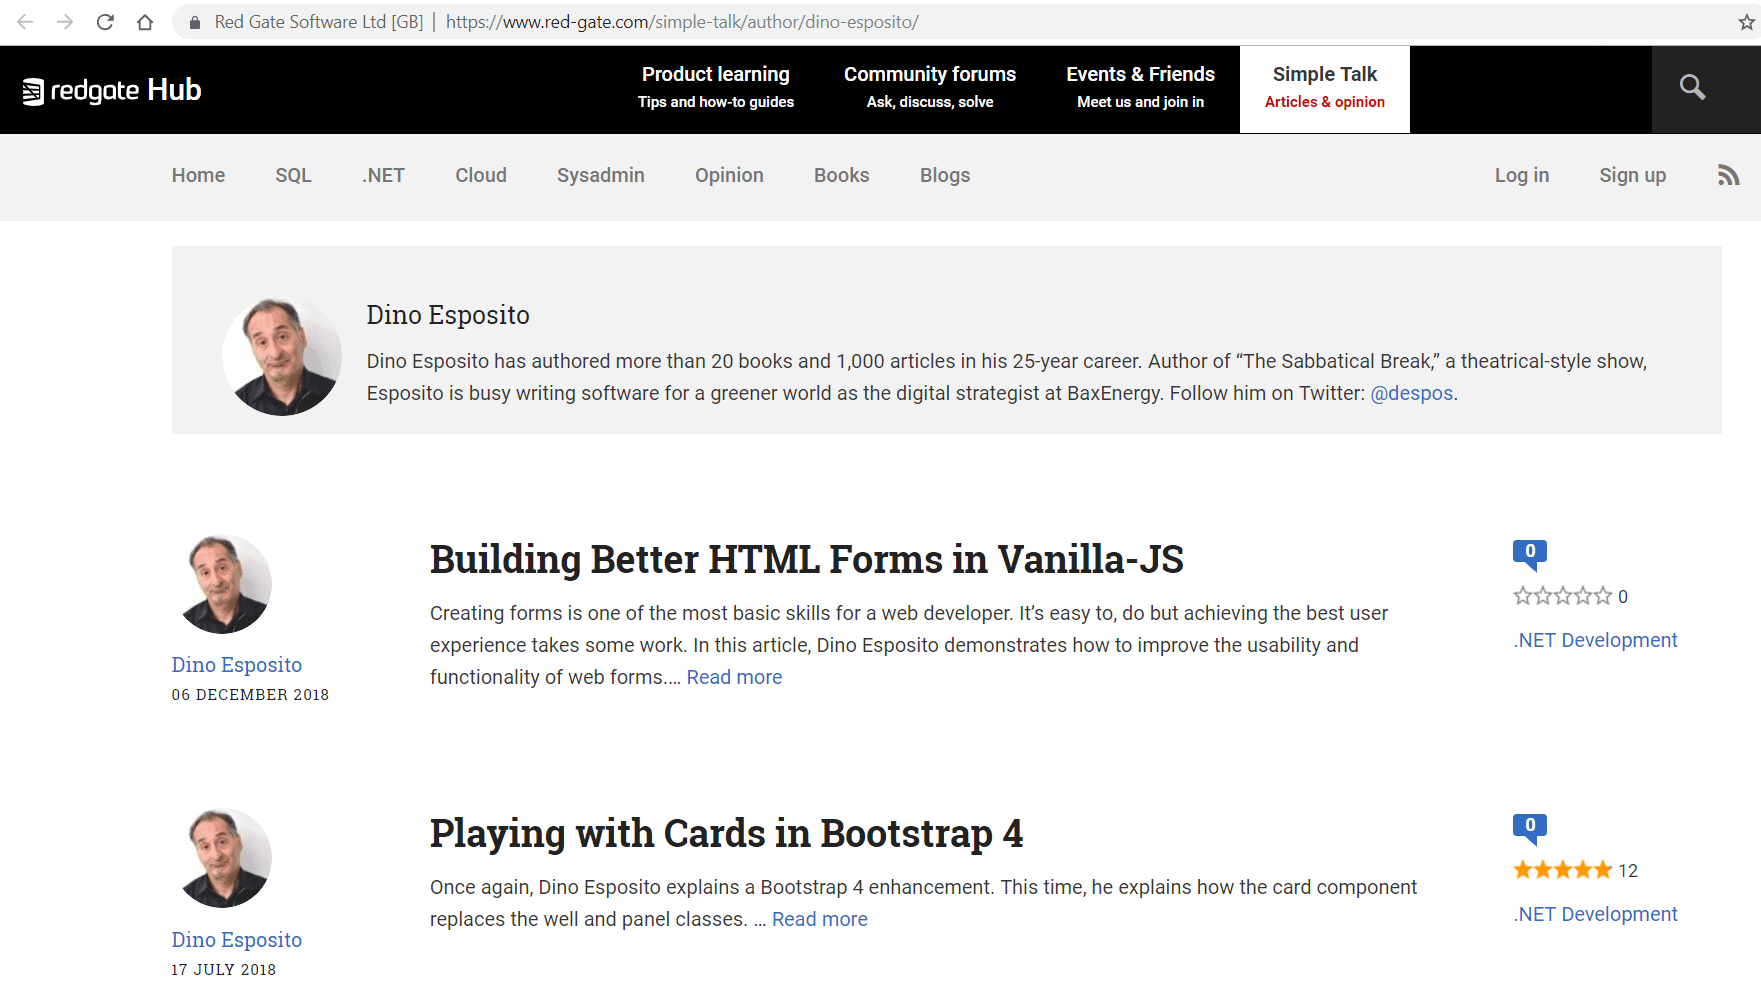
You have an idea about GraphQL basics, and now it’s time to practice with a relatable example. For this, you will go through an example that explores a comparison between an old fashion approach (REST) vs. the same thing with GraphQL. The Simple Talk author’s page will be the front-end client of a web service that returns the data necessary to build it.
In a common REST application, you’d have the following endpoints to retrieve the JSON/XML/etc. data:
- /authors/{id} – the core information related to user of id referenced at {id} path param;
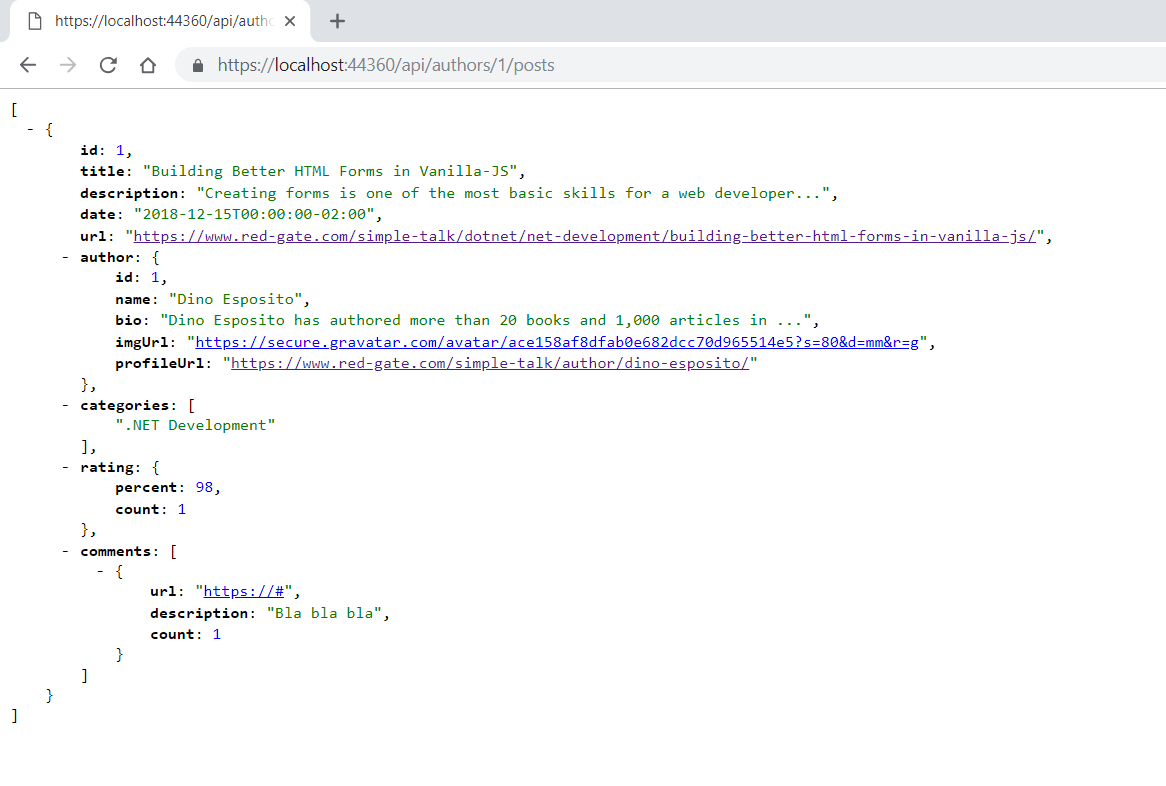
- /authors/{id}/posts – the posts data related to user of id referenced at {id} path param;
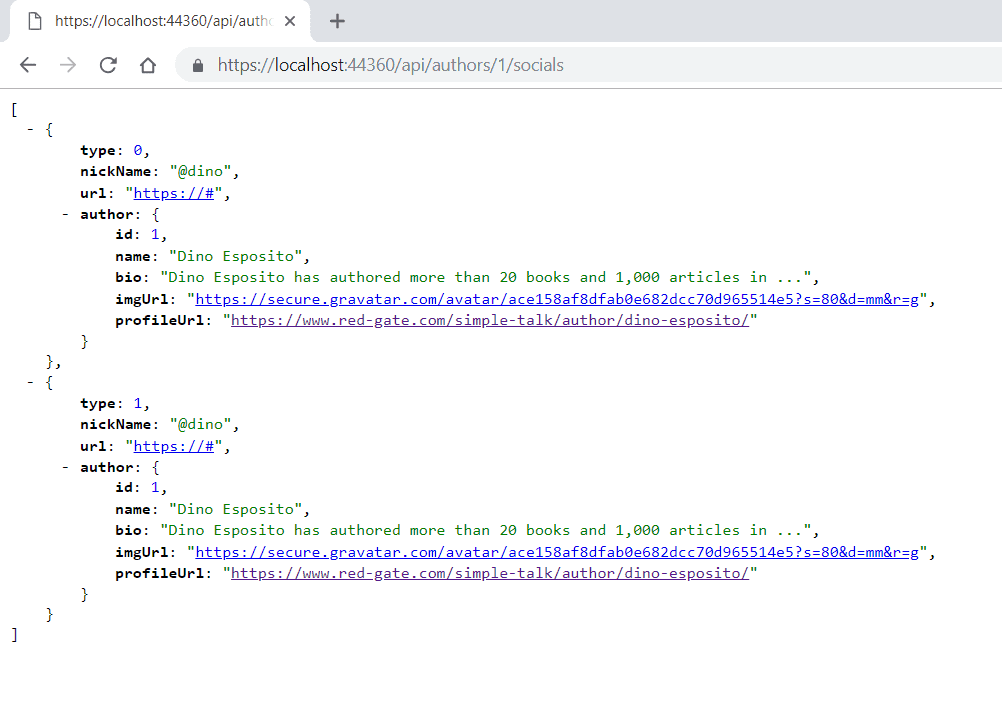
- /authors/{id}/socials – the social networks related to user of id referenced at {id} path param.
Therefore, REST is so chatty. For every new compositional data, that is related to a specific user, a new endpoint that identifies it is born, meaning that a new request must happen.
Instead, using GraphQL, you’d need a query like this one:
|
1 2 3 4 5 6 7 8 9 10 11 |
query GetBlogData($id: Int!) { author(id: $id) { // author core data } posts(id: $id) { // posts list } socials(id: $id) { // social networks list } } |
Inside of each query member, you can fetch just the exact information you want. It is contrary to REST, where each endpoint would return all the information related to a post or a social network, making the whole response heavier than what you need.
Environment and Setup
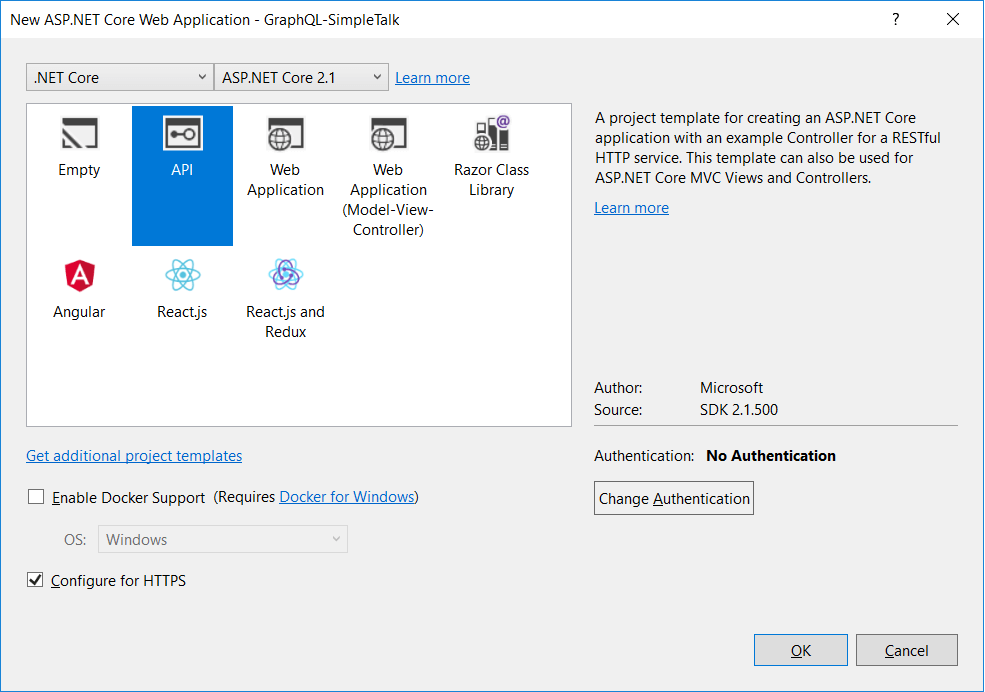
To get started, create a new ASP.NET Core Web Application called GraphQL-SimpleTalk using the New Project wizard in VS. You can use the Visual Studio Community Edition. For this, you must have the latest version of .NET Core SDK installed in your environment.
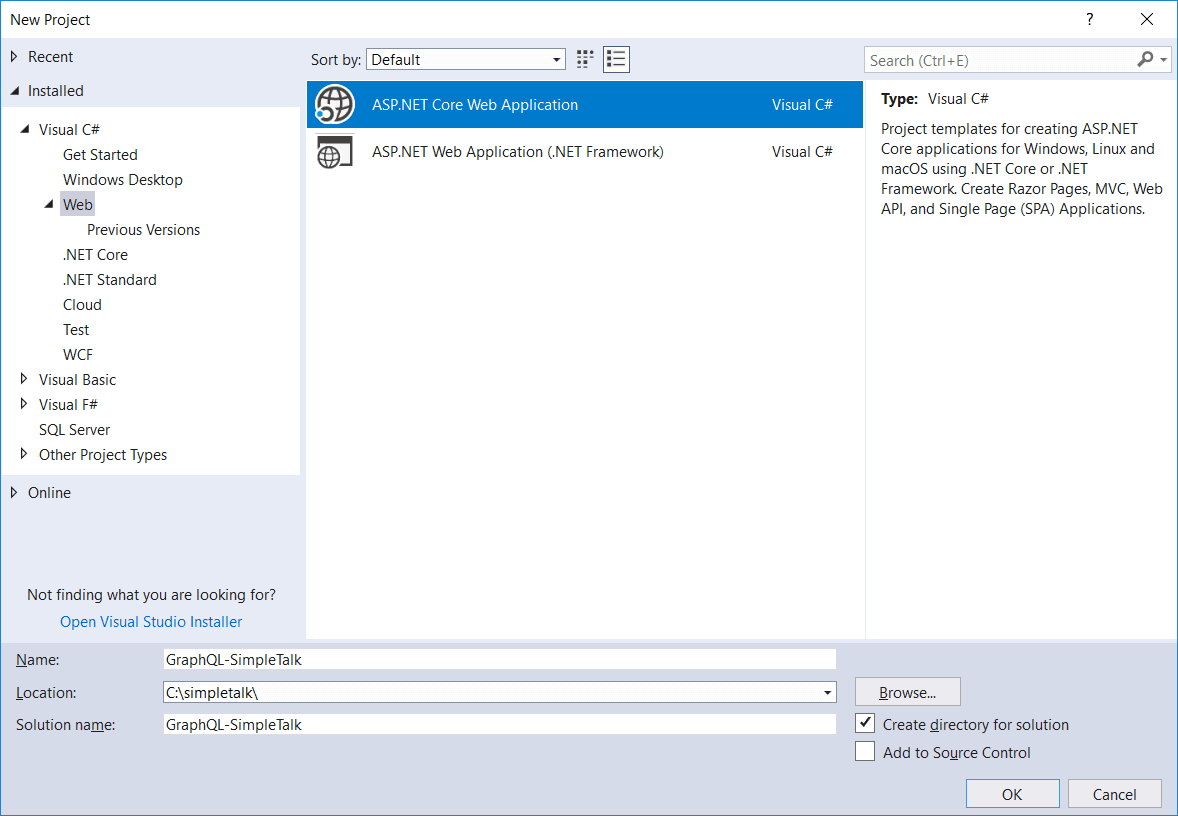
In the next screen, select the project template API.
Once with the project created, add the NuGet dependencies for GraphQL. Right-click the solution and go to NuGet manager. There, search for two dependencies:
- GraphQL: the core, parsers, Linq adapters, etc.
- GraphiQL: the UI necessary to perform the tests
That’s all. To simplify this article, you’ll create a service layer and manage objects in lists in memory. This way, you don’t have to worry about further integrations and details that don’t relate to the article purposes.
The Project Implementation
The first part of the project to create are the models. They’ll drive the rest of the implementation, and they are called entities (supposedly the ones that would attach to a database context). Take a look at the following diagram:

Idealistically, there would be more fields and relations happening here. However, this model keeps as close as possible to what is the ST’s authors page. Plus, the socials and posts models are separate from the author itself, since you’ll search them through the in-memory lists to return in separate service methods.
Continuing, inside the project, create a new folder Entities and create several classes.
The Author class:
|
1 2 3 4 5 6 7 8 9 10 11 |
namespace GraphQL_SimpleTalk.Entities { public class Author { public int Id { get; set; } public string Name { get; set; } public string Bio { get; set; } public string ImgUrl { get; set; } public string ProfileUrl { get; set; } } } |
The Comment class:
|
1 2 3 4 5 6 7 8 9 |
namespace GraphQL_SimpleTalk.Entities { public class Comment { public string Url { get; set; } public string Description { get; set; } public int Count { get; set; } } } |
The Rating class:
|
1 2 3 4 5 6 7 8 |
namespace GraphQL_SimpleTalk.Entities { public class Rating { public int Percent { get; set; } public int Count { get; set; } } } |
The Post class:
|
1 2 3 4 5 6 7 8 9 10 11 12 13 14 15 16 17 |
using System; using System.Collections.Generic; namespace GraphQL_SimpleTalk.Entities { public class Post { public int Id { get; set; } public string Title { get; set; } public string Description { get; set; } public DateTime Date { get; set; } public string Url { get; set; } public Author Author { get; set; } public string[] Categories { get; set; } public Rating Rating { get; set; } public List<Comment> Comments { get; set; } } } |
The SocialNetwork class:
|
1 2 3 4 5 6 7 8 9 10 11 12 13 14 |
namespace GraphQL_SimpleTalk.Entities { public class SocialNetwork { public SNType Type { get; set; } public string NickName { get; set; } public string Url { get; set; } public Author Author { get; set; } } public enum SNType { INSTAGRAM, TWITTER } } |
Make sure to create each one of them in a separate class file. Here, you also had to change the namespace from GraphQL-SimpleTalk to GraphQL_SimpleTalk, because .NET doesn’t accept hyphens for names.
They’re just simple POJO (plain old Java objects) structural objects to simulate what you’d have in a real database-based API application. You can also turn them into DDD (Domain Driven Design) objects to host business logic or important operations for your API.
The SocialNetwork has an enum (SNType) to host the types of social media the author could possibly have. It will be interesting to demonstrate how to deal with enums in GraphQL as well.
Now, move to the service layer. You’re going to create a single service class that will provide access to the main data related to the blog. Since it’s not the focus of the project, not much time will be spent on it. Again, create a new folder Services and add the following class inside:
|
1 2 3 4 5 6 7 8 9 10 11 12 13 14 15 16 17 18 19 20 21 22 23 24 25 26 27 28 29 30 31 32 33 34 35 36 37 38 39 40 41 42 43 44 45 46 47 48 49 50 51 52 53 54 55 56 57 58 59 60 61 62 63 64 65 66 67 68 69 70 71 72 73 74 75 76 77 78 79 80 81 82 83 84 85 86 87 88 89 90 91 92 93 94 95 96 97 98 99 100 101 102 103 104 105 106 107 108 109 110 111 112 113 114 115 |
using GraphQL_SimpleTalk.Entities; using System; using System.Collections.Generic; using System.Linq; namespace GraphQL_SimpleTalk.Services { public class BlogService { private readonly List<Author> authors = new List<Author>(); private readonly List<Post> posts = new List<Post>(); private readonly List<SocialNetwork> sns = new List<SocialNetwork>(); public BlogService() { Author DinoEsposito = new Author { Id = 1, Name = "Dino Esposito", Bio = "Dino Esposito has authored more than 20 books and 1,000 articles in ...", ImgUrl = "https://secure.gravatar.com/avatar/ace158af8dfab0e682dcc70d965514e5?s=80&d=mm&r=g", ProfileUrl = "https://www.red-gate.com/simple-talk/author/dino-esposito/" }; Author LanceTalbert = new Author { Id = 2, Name = "Lance Talbert", Bio = "Lance Talbert is a budding game developer that has been learning to program since ...", ImgUrl = "https://www.red-gate.com/simple-talk/wp-content/uploads/2018/01/red-gate-bio-pic.jpg", ProfileUrl = "https://www.red-gate.com/simple-talk/author/lancetalbert/" }; authors.Add(DinoEsposito); authors.Add(LanceTalbert); Comment comment1 = new Comment { Url = "https://#", Description = "Bla bla bla", Count = 1 }; Comment comment2 = new Comment { Url = "https://#", Description = "Bla bla bla", Count = 4 }; Rating rating1 = new Rating { Percent = 98, Count = 1 }; Rating rating2 = new Rating { Percent = 95, Count = 5 }; Post FormsInVanilla = new Post { Id = 1, Title = "Building Better HTML Forms in Vanilla-JS", Description = "Creating forms is one of the most basic skills for a web developer...", Date = DateTime.Today, Url = "https://www.red-gate.com/simple-talk/dotnet/net-development/building-better-html-forms-in-vanilla-js/", Author = DinoEsposito, Comments = new List<Comment>() { comment1 }, Rating = rating1, Categories = new string[] { ".NET Development" } }; Post VoiceCommands = new Post { Id = 2, Title = "Voice Commands in Unity", Description = "Today, we use voice in many ways. We can order groceries...", Date = DateTime.Today, Url = "https://www.red-gate.com/simple-talk/dotnet/c-programming/voice-commands-in-unity/", Author = LanceTalbert, Comments = new List<Comment>() { comment2 }, Rating = rating2, Categories = new string[] { "C# programming" } }; posts.Add(FormsInVanilla); posts.Add(VoiceCommands); SocialNetwork sn1 = new SocialNetwork() { Type = SNType.INSTAGRAM, Author = DinoEsposito, NickName = "@dino", Url = "https://#" }; SocialNetwork sn2 = new SocialNetwork() { Type = SNType.TWITTER, Author = DinoEsposito, NickName = "@dino", Url = "https://#" }; sns.Add(sn1); sns.Add(sn2); } public List<Author> GetAllAuthors() { return this.authors; } public Author GetAuthorById(int id) { return authors.Where(author => author.Id == id).FirstOrDefault<Author>(); } public List<Post> GetPostsByAuthor(int id) { return posts.Where(post => post.Author.Id == id).ToList<Post>(); } public List<SocialNetwork> GetSNsByAuthor(int id) { return sns.Where(sn => sn.Author.Id == id).ToList<SocialNetwork>(); } } } |
This is mostly boilerplate code. It spends some time to create data and feed the lists necessary to handle the main operations of getting them and sending back to the clients. Feel free to add as much data as you want to make the example even more real, or even connect to a different data source.
The get methods were built in a way to simulate the REST operations of getting each resource through a different endpoint plus the identifier of its parent.
Last, but not least, create the controller class (for the REST example) that will provide each endpoint pointed out before. Inside the Controllers folder, add the following controller class:
|
1 2 3 4 5 6 7 8 9 10 11 12 13 14 15 16 17 18 19 20 21 22 23 24 25 26 27 28 29 30 31 32 33 34 35 |
using GraphQL_SimpleTalk.Services; using Microsoft.AspNetCore.Mvc; namespace GraphQL_SimpleTalk.Controllers { [Route("api/[controller]")] [ApiController] public class AuthorsController : ControllerBase { private readonly BlogService blogService; public AuthorsController(BlogService blogService) { this.blogService = blogService; } [HttpGet] public IActionResult GetAll() { return new ObjectResult(blogService.GetAllAuthors()); } [HttpGet("{id}")] public IActionResult GetAuthorById(int id) { return new ObjectResult(blogService.GetAuthorById(id)); } [HttpGet("{id}/posts")] public IActionResult GetPostsByAuthor(int id) { return new ObjectResult(blogService.GetPostsByAuthor(id)); } [HttpGet("{id}/socials")] public IActionResult GetSocialsByAuthor(int id) { return new ObjectResult(blogService.GetSNsByAuthor(id)); } } } |
Note how simple it is — if you’re used to dealing with REST APIs in ASP.NET, of course. The code is basically encapsulating the BlogService service to access its operations for every endpoint. For now, the code is handling only GET HTTP operations.
That’s pretty much everything we need to run the example. But, before testing, don’t forget to add the scoped declaration of the BlogService service to the Startup class, inside the ConfigureServices() method:
|
1 |
services.AddScoped<BlogService>(); |
And you also need to import the respective class:
|
1 |
using GraphQL_SimpleTalk.Services; |
Now, start the server, go to your web browser and test each of the endpoints. Note that you may have a different port than shown here:
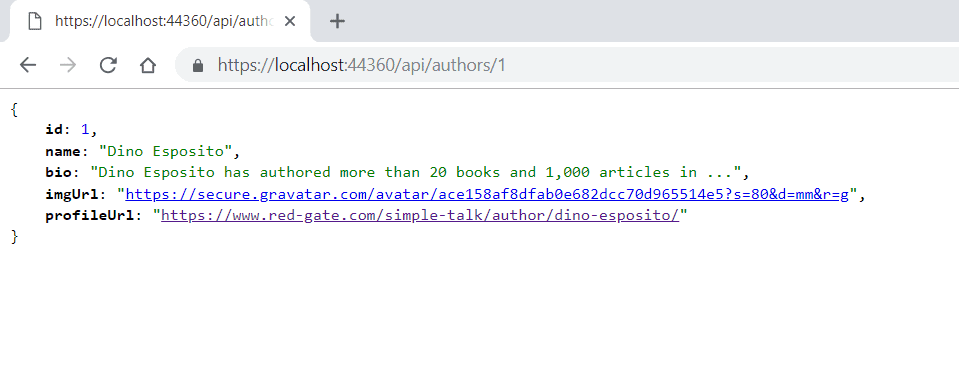
It seems simple, doesn’t it? What happens when you scale this conversational design to millions, billions of requests/responses per day?
Now to see how GraphQL addresses the same scenario.
The GraphQL Approach
Initially, set the GraphiQL up. GraphiQL (a NuGet dependency you’ve already installed) is an in-browser IDE for exploring GraphQL. It saves a lot of effort when testing GraphQL services by providing syntax highlighting, smart types, fields and query autocompletion tools, real-time error reporting and query inspecting.
Again, in the Startup class, make the following changes:
|
1 2 3 4 5 6 |
public const string GraphQlPath = "/graphql"; public void Configure(IApplicationBuilder app, IHostingEnvironment env) { // ... app.UseGraphiQl(GraphQlPath); } |
Again, make sure to import the proper class at the beginning of the Startup class:
|
1 |
using GraphiQl; |
This will define in what endpoint GraphiQL UI will be available.
Secondly, in order for this path be recognized as the official ruler of all GraphQL requests, you need to create a controller to manage the schema, variables and arguments. So, create the following class inside the Controllers folder:
|
1 2 3 4 5 6 7 8 9 10 11 |
using GraphQL; namespace GraphQL_SimpleTalk.Controllers { public class GraphQlQuery { public string OperationName { get; set; } public string NamedQuery { get; set; } public string Query { get; set; } public Inputs Variables { get; set; } } } |
This represents what a GraphQL query is. It’s kind of a limitation of the library still, since they hadn’t included this inside the graphql-dotnet. Then, create the following controller to handle all the operations:
|
1 2 3 4 5 6 7 8 9 10 11 12 13 14 15 16 17 18 19 20 21 22 23 24 25 26 27 28 29 30 31 32 33 34 |
using GraphQL; using GraphQL.Types; using GraphQL_SimpleTalk.Queries; using GraphQL_SimpleTalk.Services; using Microsoft.AspNetCore.Mvc; using System.Threading.Tasks; namespace GraphQL_SimpleTalk.Controllers { [Route(Startup.GraphQlPath)] public class GraphQlController : Controller { readonly BlogService blogService; public GraphQlController(BlogService blogService) { this.blogService = blogService; } [HttpPost] public async Task<IActionResult> Post([FromBody] GraphQlQuery query) { var schema = new Schema { Query = new AuthorQuery(blogService) }; var result = await new DocumentExecuter().ExecuteAsync(x => { x.Schema = schema; x.Query = query.Query; x.Inputs = query.Variables; }); if (result.Errors?.Count > 0) { return BadRequest(); } return Ok(result); } } } |
This post method is important to summarize all the GraphQL schemas of your application in one place. Here, you have already referenced the AuthorQuery object, even though it doesn’t exist yet. The DocumentExecuter is responsible for the GraphQL query execution, sending the schema, the query itself and the variables as arguments.
Now, you must define what type of objects you’re going to query. This example gets each of the author’s data, the main query will be AuthorQuery. This will be the place to store each REST endpoint respective as a same-query operation.
To understand it better, take a look at how the final GraphQL query will look (the same we’ll use to test things in GraphiQL) :
|
1 2 3 4 5 6 7 8 9 10 11 12 13 14 15 16 17 18 19 20 21 |
query GetBlogData($id: Int!) { author(id: $id) { id name } posts(id: $id) { author { bio } categories comments { description count url } } socials(id: $id) { nickName type } } |
The first thing to notice is the parameter this query requires: the author’s id. It is going to be used for each individual operation (author, posts and socials ones) as a query argument (yes, GraphQL also allows sending arguments) that’ll define which records will be returned.
The “!” sign says that this parameter is required, otherwise the query won’t work.
Lastly, see that you’re only fetching the data from each object, to demonstrate that with GraphQL, you are the owner of the server’s responses, that is, you only get what you really want.
In graphql-dotnet, each query field (in this case: author, posts and socials) must be represented as a GraphQL.Types.ObjectGraphType in order to encapsulate each subfield definitions. Start with the AuthorType by creating the class in a new Queries\Types folder:
|
1 2 3 4 5 6 7 8 9 10 11 12 13 14 15 16 |
using GraphQL.Types; using GraphQL_SimpleTalk.Entities; namespace GraphQL_SimpleTalk.Queries.Types { public class AuthorType : ObjectGraphType<Author> { public AuthorType() { Field(x => x.Id).Description("Id of an author"); Field(x => x.Name).Description("Name of an author"); Field(x => x.Bio).Description("Bio description of an author"); Field(x => x.ImgUrl).Description("Url of an author's profile picture"); Field(x => x.ProfileUrl).Description("Link of an author's profile"); } } } |
The ObjectGraphType must receive a generic argument of the class this GraphType will configure. It’s strictly necessary that you define here each one you want to be exposed by the GraphQL query mechanism. You’re also setting the description in this type for you to notice how it appears in the final documentation in the GraphiQL interface.
It’s important to notice that for all the primitive types (string, int, etc.), you don’t need to do anything other than referencing the field at Field ‘s method. For types that you have created, you’re obligated to say which ObjectGraphType is the one managing this specific subtype. Just like you see in the next SocialNetworkType:
|
1 2 3 4 5 6 7 8 9 10 11 12 13 14 15 |
using GraphQL.Types; using GraphQL_SimpleTalk.Entities; namespace GraphQL_SimpleTalk.Queries.Types { public class SocialNetworkType : ObjectGraphType<SocialNetwork> { public SocialNetworkType() { Field(x => x.NickName); Field<EnumerationGraphType<SNType>>("type"); Field(x => x.Url); Field<AuthorType>("author"); } } } |
It’s the same connotation and syntax, except for the SNType type (it will be created in the sequence). The EnumerationGraphType represents the default GraphType handler for enums in graphql-dotnet. The generic class must be provided subsequently along with the exact type name as a string. When it comes to the types, like the author, the AuthorType itself is enough.
Add the rest of the types.
The SNTypeType class:
|
1 2 3 4 5 6 7 8 9 10 11 12 |
using GraphQL.Types; using GraphQL_SimpleTalk.Entities; namespace GraphQL_SimpleTalk.Queries.Types { public class SNTypeType : EnumerationGraphType<SNType> { public SNTypeType() { Name = "SNTypeType"; } } } |
The CommentType class:
|
1 2 3 4 5 6 7 8 9 10 11 12 13 14 |
using GraphQL.Types; using GraphQL_SimpleTalk.Entities; namespace GraphQL_SimpleTalk.Queries.Types { public class CommentType : ObjectGraphType<Comment> { public CommentType() { Field(x => x.Count); Field(x => x.Description); Field(x => x.Url); } } } |
The RatingType class:
|
1 2 3 4 5 6 7 8 9 10 11 12 13 |
using GraphQL.Types; using GraphQL_SimpleTalk.Entities; namespace GraphQL_SimpleTalk.Queries.Types { public class RatingType : ObjectGraphType<Rating> { public RatingType() { Field(x => x.Count); Field(x => x.Percent); } } } |
The PostType class:
|
1 2 3 4 5 6 7 8 9 10 11 12 13 14 15 16 17 18 19 20 |
using GraphQL.Types; using GraphQL_SimpleTalk.Entities; namespace GraphQL_SimpleTalk.Queries.Types { public class PostType : ObjectGraphType<Post> { public PostType() { Field(x => x.Id); Field(x => x.Title); Field(x => x.Url); Field(x => x.Date); Field(x => x.Description); Field<AuthorType>("author"); Field<RatingType>("rating"); Field<ListGraphType<CommentType>>("comments"); Field(x => x.Categories, nullable: true); } } } |
For lists and arrays, in addition, you must use ListGraphType as the default handler. Notice, too, that the Categories field was defined as non-nullable, another possible config you’re going to use for testing.
Finally, create the AuthorQuery in the Queries folder. Even being an ObjectGraphType too, this object is the most important one, since is here where the schema is defined, as well as the resolvers you’ve seen before. There will be three fields: author, posts, and socials; each of them going through a different service method (which could possibly be another remote microservice, lambda or even data source) to fetch the data. See below the code:
|
1 2 3 4 5 6 7 8 9 10 11 12 13 14 15 16 17 18 19 20 21 22 23 24 25 26 27 28 29 30 31 32 33 34 35 36 37 38 39 |
using GraphQL.Types; using GraphQL_SimpleTalk.Services; using GraphQL_SimpleTalk.Queries.Types; namespace GraphQL_SimpleTalk.Queries { public class AuthorQuery : ObjectGraphType { public AuthorQuery(BlogService blogService) { Field<AuthorType>( name: "author", arguments: new QueryArguments(new QueryArgument<IntGraphType> { Name = "id" }), resolve: context => { var id = context.GetArgument<int>("id"); return blogService.GetAuthorById(id); } ); Field<ListGraphType<PostType>>( name: "posts", arguments: new QueryArguments(new QueryArgument<IntGraphType> { Name = "id" }), resolve: context => { var id = context.GetArgument<int>("id"); return blogService.GetPostsByAuthor(id); } ); Field<ListGraphType<SocialNetworkType>>( name: "socials", arguments: new QueryArguments(new QueryArgument<IntGraphType> { Name = "id" }), resolve: context => { var id = context.GetArgument<int>("id"); return blogService.GetSNsByAuthor(id); } ); } } } |
The first important impression is the new arguments field defining a new QueryArguments for the id of an author represented as an IntGraphType.
The code snippet var id = context.GetArgument<int>("id"); is responsible for retrieving this argument based on its previous definition. The rest are just simple service calls. Also, notice that for each different type of return, the right type of the field must be outlined (e.g. ListGraphType).
It’s up to you determine if the posts and socials come directly within the author. This way, you’d implement all the searches inside of author‘s resolve parameter, however, you’d also have to have the proper attributes into the Author entity and AuthorType graph type.
GraphiQL
Time to test it! Start up the application again and access the URL: https://localhost:44360/graphql. This is the screen that’ll appear:
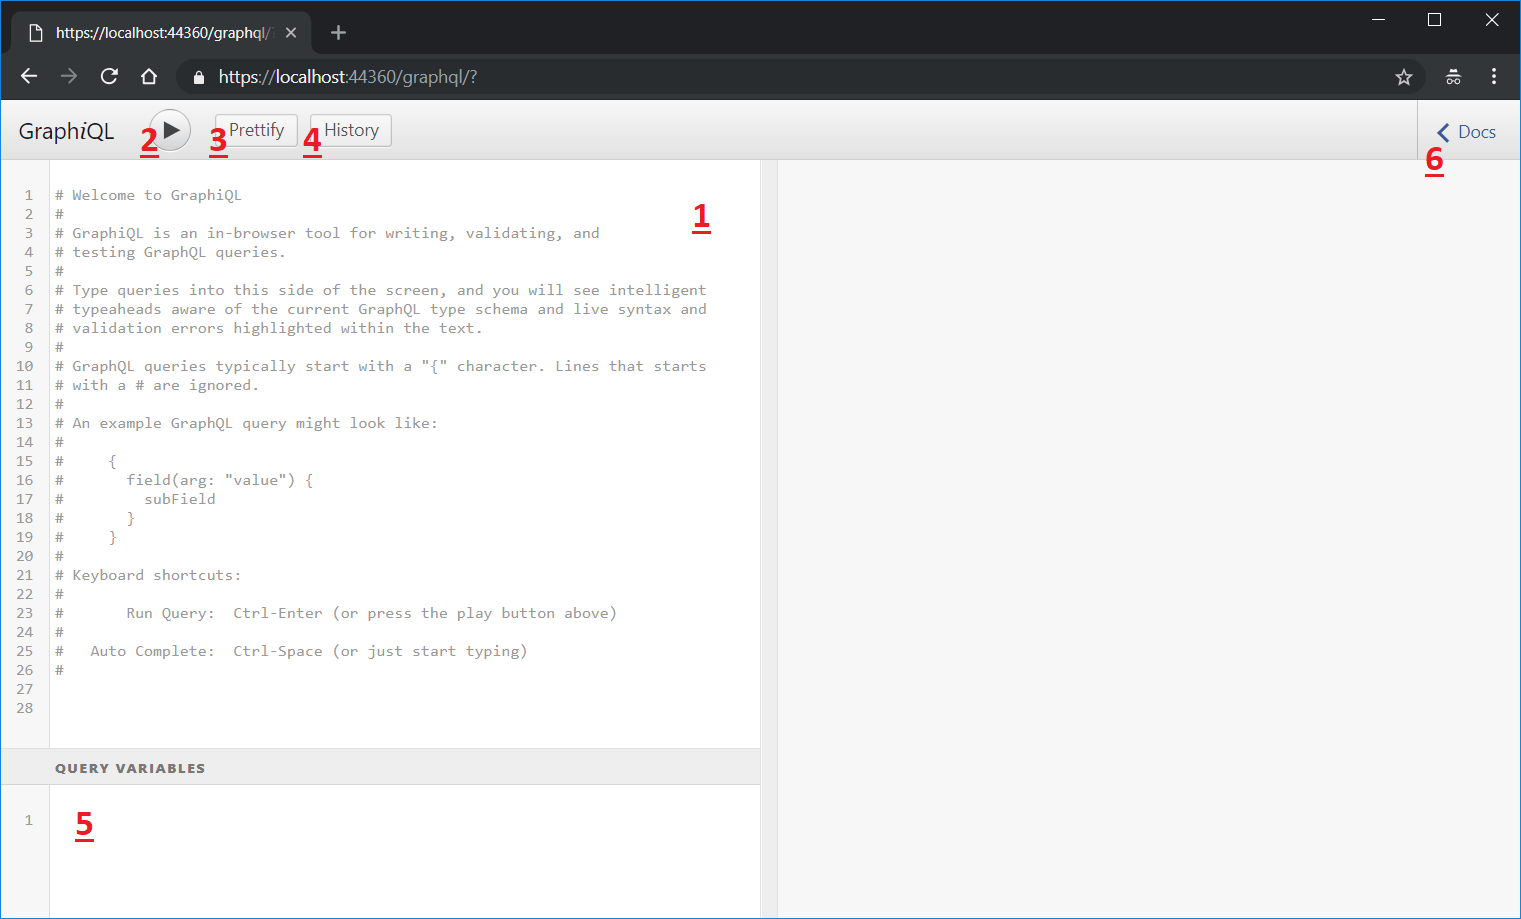
- The querying tool. In this box, you can type your GraphQL queries and it’ll give hints about the schema, autocomplete (“Ctrl + Escape” to trigger it), and validate the syntax;
- Button to run the queries;
- Button to prettify the code, indent;
- When clicked, show a side box with all the history of queries, even if you turn off the application;
- The box to add the query variables. They’re useful when you need to parameterize the query itself with data that comes from unknown sources;
- Documentation explorer. Here, you can search for query objects, its fields, arguments, types, nullability, etc.
The last item deserves a bit more of attention because it can be truly helpful when you’re accessing a GraphQL schema that you no nothing about. Have a look at the following screens:
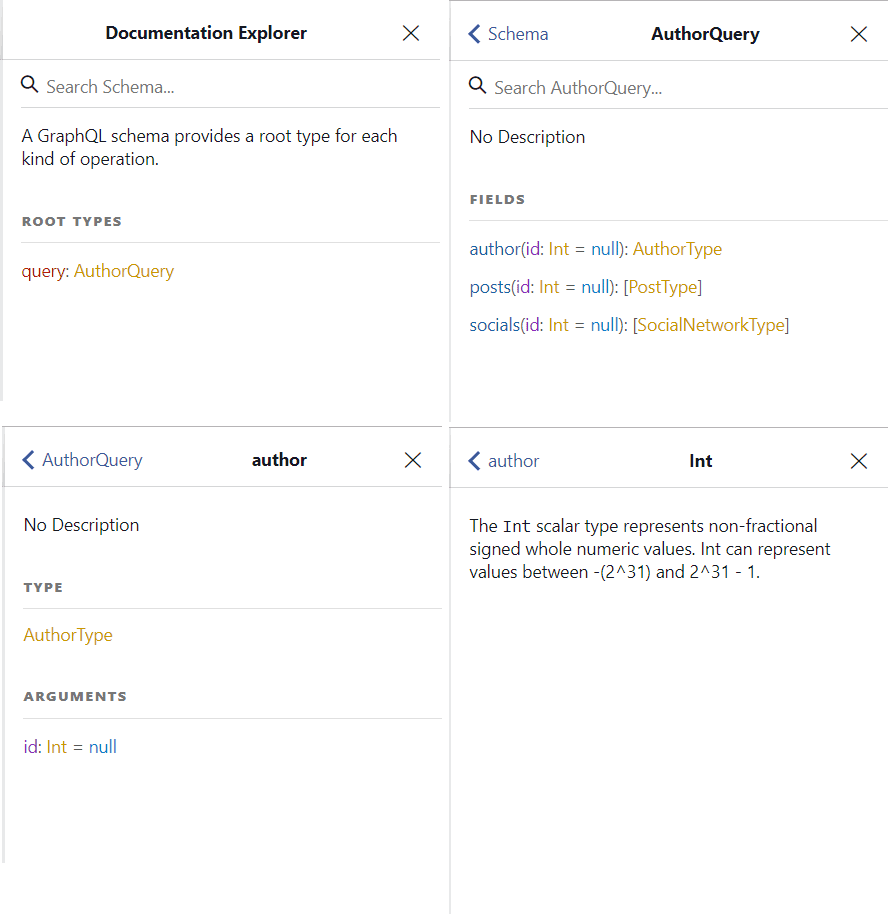
It represents the navigation upon the AuthorQuery schema. You can see docs from the list of root types (the available queries), each type’s fields (ant their respective declarations), to the arguments and even GraphQL inner types.
In the third screen, specifically, if you click in AuthorType type, you’ll see the following screen:
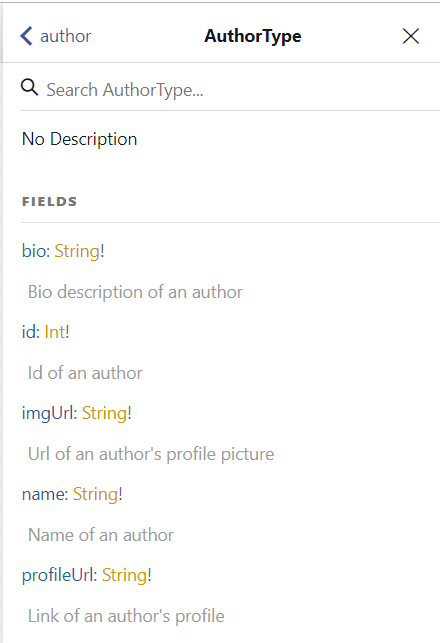
Those are the descriptions you’ve previously set at the AuthorType class. So, go ahead and customize your docs.
To see how this works, add this query to the Query window:
|
1 2 3 4 5 6 7 8 9 10 11 12 13 14 15 16 17 18 19 20 21 |
query GetBlogData($id: Int!) { author(id: $id) { id name } posts(id: $id) { author { bio } categories comments { description count url } } socials(id: $id) { nickName type } } |
You must also add the Query Variable:
|
1 2 3 |
{ "id":1 } |
Click the run button to try it out:
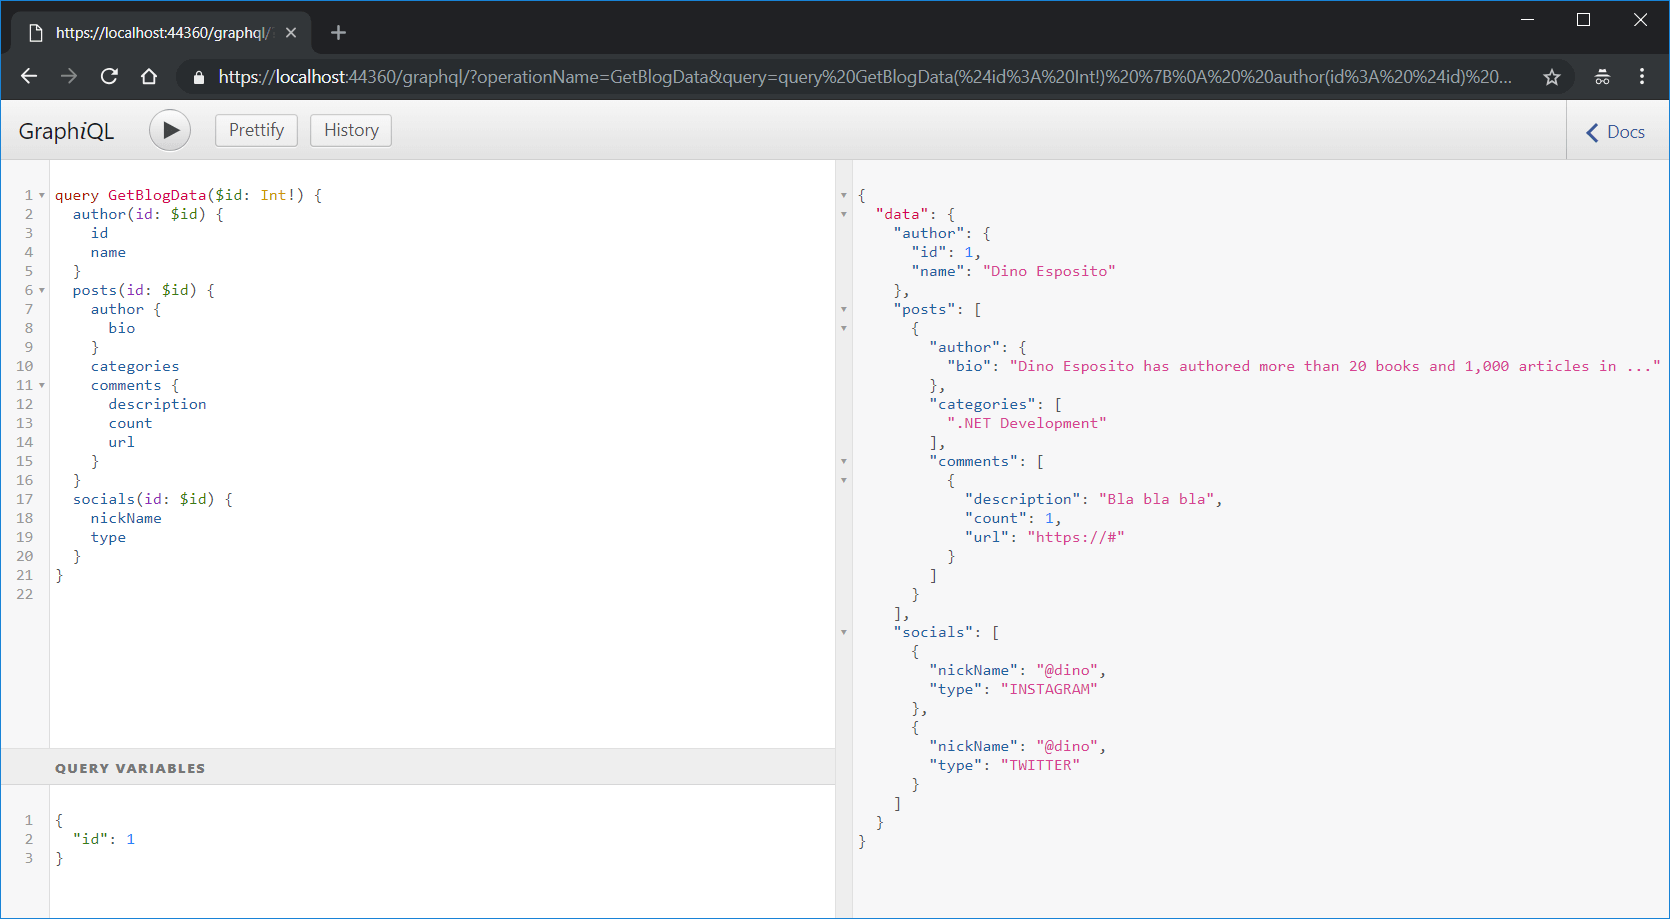
That’s the same query pointed out before. The only new thing here is the query variable id that’s passed. The results, at the right side of the screen, are pretty much everything you’ll receive from the server. If you don’t need the posts or the socials, you don’t have to add them to the query, and the resolver won’t be called just the same way.
The input variables for the query don’t have to be, necessarily, primitive values. You can specify another type to the schema, like AuthorType, and ask the clients to send a full filled author to register in your application, for example. This communication can happen with either action method, whether it is a single GET or a registration POST like you have in REST.
Summary
This article covered the main basics regarding GraphQL services exposure in ASP.NET applications. GraphQL is highly flexible and data-driven, which means that you can now focus you client development in the exact data you want to receive from the server, i.e., you’re the owner of the data you want to get.
In order to improve your skills, in addition to the official graphql-dotnet docs, graphql-dotnet also provides some sample projects with more configurations. Obviously, you can count on the official Facebook’s GraphQL specification as well as the howtographql.com popular learning courses arranged by and to the community. Best of studies!

Load comments