
Build authentication into your Java API’s with Json Web Token (Jwt)
In this article, I walk you through the development of a very basic Java JAX_RS web-services with Jwt (Json web token) authentication. For web-services, we’re going to use Jersey which is an open source framework for RESTful Web Services in Java. Before jump into coding and start authenticating the user I want to tell you a brief workflow of our application.
Application Workflow
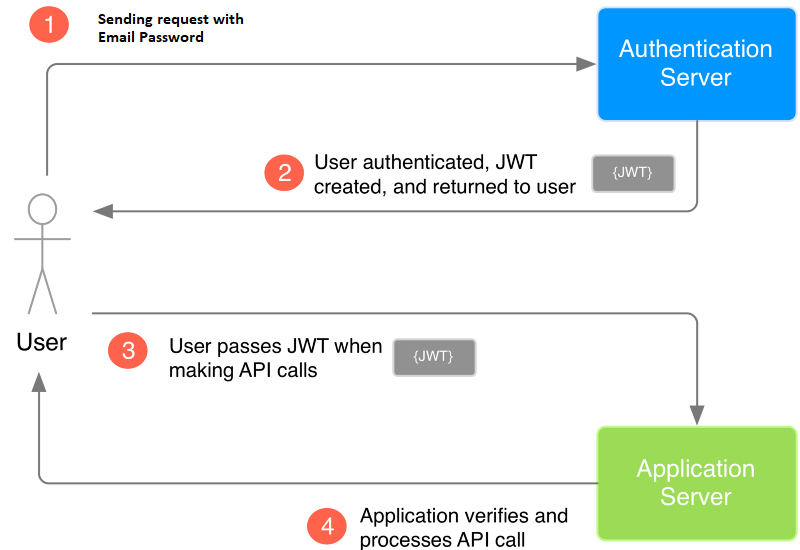
- In order to use the web-services, the user sends a request to get a token by passing his/her credentials.
- Our web-service validates the credentials, and return an encrypted
privateKeyaka token, which will only be valid for the next thirty minutes. - With every request, the user needs to send the
privateKeyin the request header, and if the key is invalid or expires then we send back the WebApplicationException, else we simply return the result.
We’ll implement a custom ContainerRequestFilter, which is in the simple words, a gateway of our application. Every request made by the client first came to our custom filter and we validate the privateKey before allowing the request to go to any service.
Like I said at the start of this article, we’ll create a privateKey aka token with Jwt (Json web token). In order to create a web-based token, we’ll use the Java Jwt library made by mighty lhazlewood.
There’s a great article on Json Web Token go and check it out => 5 Easy Septs to understand Json Web Token (Jwts)
Application Workflow Diagram
As mention above, in the Application Workflow section our server or web-services will generate a privateKey or Jwt token for the user. With the Jwt token, the user then safely communicate with the application. Below is the workflow diagram.
This is indeed a simplistic introduction to our application. Next, below is the demo of our application for visualization.
In case I miss something, you can follow me by looking in the code which I pushed on GitHub.
Get Started
To begin, create a new Maven web project using an IDE and open the pom.xml file. Here we need to add dependencies for Jersey and Jwt.
<dependencies>
        ...........
        <dependency>
            <groupId>com.sun.jersey</groupId>
            <artifactId>jersey-core</artifactId>
            <version>1.19.4</version>
        </dependency>
        <dependency>
            <groupId>com.sun.jersey</groupId>
            <artifactId>jersey-grizzly2</artifactId>
            <version>1.19.4</version>
        </dependency>
        <dependency>
            <groupId>com.sun.jersey</groupId>
            <artifactId>jersey-json</artifactId>
            <version>1.19.4</version>
        </dependency>
        <dependency>
            <groupId>org.glassfish.jersey.ext</groupId>
            <artifactId>jersey-entity-filtering</artifactId>
            <version>2.14</version>
        </dependency>
        <dependency>
            <groupId>io.jsonwebtoken</groupId>
            <artifactId>jjwt-api</artifactId>
            <version>0.10.5</version>
        </dependency>
        <dependency>
            <groupId>io.jsonwebtoken</groupId>
            <artifactId>jjwt-impl</artifactId>
            <version>0.10.5</version>
            <scope>runtime</scope>
        </dependency>
        <dependency>
            <groupId>io.jsonwebtoken</groupId>
            <artifactId>jjwt-jackson</artifactId>
            <version>0.10.5</version>
            <scope>runtime</scope>
        </dependency>
        .........
    </dependencies>
Once you’ve added the above dependencies compile the Maven project and you’re good to go.
In order to start building our application first let’s see our EndPoint class. Below is our HomeApiService, which is an EndPoint of our application.
@Path("/")
public class HomeApiService {

    @POST
    @Path(value = "authorization_service")
    @JwtCustomToken
    @Produces(MediaType.APPLICATION_JSON)
    public Response authorizationService(@QueryParam("username") String userName, @QueryParam("password") String password) {
        if (userName.isEmpty())
            return getResponse(new BaseResponse(BaseResponse.FAILURE, "username field cannot be empty!"));
        if (password.isEmpty())
            return getResponse(new BaseResponse(BaseResponse.FAILURE, "password field cannot be empty!"));
        String privateKey = JwTokenHelper.getInstance().generatePrivateKey(userName, password);
        return getResponse(new AuthorizationResponse(BaseResponse.SUCCESS, "You're authenticated successfully. Private key will be valid for 30 mins", privateKey));
    }

    @GET
    @Path("allDevices")
    @Produces(MediaType.APPLICATION_JSON)
    public Response getAllDevices() {
         return getResponse(new DeviceCollection(Arrays.asList(new Device("Electric Kettle", 1, true), new Device("Computer", 1, true), new Device("Motorcycle", 3, false), new Device("Sandwich Maker", 4, true))));
    }
As you can see the basic JAX-RX Endpoint has two methods both returning a Response object. Now if you guy’s have seen the demo, then you probably see that in order to get allDevices we first need to authenticate our user and pass the privateKey inside the header of the request. Below is the explanation of the above two methods:
- authorizationService: The user needs to get authenticated, invoking an HTTP POST and passing a
usernameandpassword. Once authenticated, we simply call our jwTokenHelper class to create a token based on theusernameandpasswordalso set some other claims like thirty minutes expiration. You’ll see that how to create Jwt token in a couple of minutes. - getAllDevices: Simply returns a
Listof devices.
Filter checking for json web Token (Jwt)
So, we’ve added the EndPoint to our application but where did we check that the user adds the privateKey inside the header of the request. For this, we need to implement ConatinerRequestFilter and after that the filter allows us to check the headers for every request. Like I said at the above of this article, the filter is like a gateway to our application. Every request sent by the client first came to our custom filter and after that, it goes to the EndPoint address. Below is JsTokenFilterNeeded class.
@Provider
@JwtCustomToken   // 1
@Priority(Priorities.AUTHENTICATION)  // 2
public class JsTokenFilterNeeded implements ContainerRequestFilter {

   private static final String AUTHORIZATION_SERVICE_PATH = "authorization_service";
   private static final String PRIVATE_KEY = "privateKey";
   private JwTokenHelper jwTokenHelper = JwTokenHelper.getInstance();

   @Override
    public ContainerRequest filter(ContainerRequest request) {  // 3
        String path = request.getPath();
        if(path.equals(AUTHORIZATION_SERVICE_PATH))        // |       4
             return request;
        String privateKeyHeaderValue = request.getHeaderValue(PRIVATE_KEY);  // 5
        if (privateKeyHeaderValue == null || privateKeyHeaderValue.isEmpty())
            throw new WebApplicationException(getUnAuthorizeResponse(PRIVATE_KEY + " is missing in header"))   // 6
        try {
             provider.jwTokenHelper.claimKey(privateKeyHeaderValue);   // 7
        } catch(Exception e) {
            if (e instanceof ExpiredJwtException) {
                throw new WebApplicationException(getUnAuthorizeResponse(PRIVATE_KEY + " is expired"));
            } else if (e instanceof MalformedJwtException) {
                throw new WebApplicationException(getUnAuthorizeResponse(PRIVATE_KEY + " is not correct"));
            }
        }
        return request;
    }

    private Response getUnAuthorizeResponse(String message) {
       return Response.ok(BaseResponse.FAILURE, message
       ).status(Response.Status.UNAUTHORIZED)
        .type(MediaType.APPLICATION_JSON)
        .build()
    }
}
Let’s go through the logic behind the implementation.
- The
JwtCustomTokenis just a JAX-RS name binding (think of it’s as a CDI interceptor binding), so it’s just an annotation that binds to a filter. We’ll see that how to createJwtCustomTokenannotation in a couple of minutes. - Priority for user authentication. You can read more about other priorities in this link.
- The filter method is invoked at runtime whenever a new request came.
- If the path of the current request is
authorization_servicethen we simply return the ContainerRequest immediately because at here our client trying to create a newprivateKey. Also in here, we don’t need to check that user added the Jwt token inside the header request or not. - Gets the HTTP Authorization header from the request (the privateKey).
- If
privateKeyis not added inside the header of the request then we simply throw WebApplicationException with a message (privateKey is missing in header). - It validates the token (privateKey) using the Jwt library. If the token is valid then, in the end, we simply return the
ContainerRequestand if it is not valid or token expiresWebApplicationExceptionthrown with a specific message.
The following shows the code snippet for JwtCustomToken annotation class.
@Retention(RetentionPolicy.RUNTIME)
@Target({ElementType.TYPE})
@NameBinding
public @interface JsonTokenNeeded {
}
Issue a json web token (Jwt) or privateKey
Now we have a filter that checks that the privateKey is passed inside the HTTP header. But how is this token issued? Here comes our JwTokenHelper class which create JJwt token based on user’s username and password also claims the token.
public class JwTokenHelper {

   private static JwTokenHelper jwTokenHelper = null;
   private static final long EXPIRATION_LIMIT = 30;
   private Key key = Keys.secretKeyFor(SignatureAlgorithm.HS256);

   private JwTokenHelper() {
   }

   public static JwTokenHelper getInstance() {
      if(jwTokenHelper == null)
           jwTokenHelper = new JwTokenHelper();
      return jwTokenHelper;
   }

   //  1
   public String generatePrivateKey(String username, String password) {
       return Jwts
                .builder()
                .setSubject(username)
                .setSubject(password)
                .setExpiration(getExpirationDate())
                .signWith(key)
                .compact();
   }

   // 2
   public void claimKey(String privateKey) throws ExpiredJwtException, MalformedJwtException  {
      Jwts
                .parser()
                .setSigningKey(key)
                .parseClaimsJws(privateKey);
   }

   // 3
   private Date getExpirationDate() {
       long currentTimeInMillis = System.currentTimeMillis();
       long expMilliSeconds = TimeUnit.MINUTES.toMillis(EXPIRATION_LIMIT);
       return new Date(currentTimeInMillis + expMilliSeconds);
   }

}
Below is the explanation of the above code.
- In here we set few claims for Json Web Token. Add the
usernameandpassword, set expiration date forprivateKeyand sign in withSignatureAlgorithm.HS256. - Validating the key with Jwts parser. If the key is not valid then the method throws MalformedJwtException and if it expires then it throws ExpiredJwtException.
- This is the method which sets that the
privateKeyis only valid for the next thirty minutes.
Now that we’ve all part’s, let’s put them together and run our application. In this article, we only see the configuration by extending ResourceConfig instead of a web.xml file.
public class MyResourceConfig extends DefaultResourceConfig {


    public MyResourceConfig() {
        super(HomeApiService.class);
        Map<String, Object> maps = new HashMap<String, Object>();
        maps.put(ResourceConfig.PROPERTY_CONTAINER_RESPONSE_FILTERS, CORSFilter.class);
        maps.put(ResourceConfig.PROPERTY_CONTAINER_REQUEST_FILTERS, JsTokenFilterNeeded.class);
        setPropertiesAndFeatures(maps);
    }
}
The DefaultResourceConfig class is itself an extension of JAX-RX Application class and also provides some convenience methods like setPropertiesAndFeatures to register our filters. Now in our MyResourceConfig constructor, we define a Map<String,Object> that will hold our resource and response filters and later set maps to ResourceConfig.
Run your rest Service
To run your web application paste the following code snippet inside your main method and afterward run the application like you run a simple java program.
public static void main(String[] args) {
        ResourceConfig resourceConfig = new MyResourceConfig();
        try {
             // change with your application ip and port address.
            GrizzlyServerFactory.createHttpServer(URI.create("http://000.000.000.000:xxxx"), resourceConfig);
            System.in.read();
        } catch (Exception e) {
            e.printStackTrace();
        }
    }
Closing Up
In this article, I just wanted to show you how easy it is to issue and validate the Json Web Token with JAX-RX. Anything which I miss in this article please let me know via comment.
What’s next
Thank you for being here and keep reading…


Update Pls
Git incomplete … Not @JwtCustomToken