
Android Cab Booking App Tutorial Part 2
This article is the second part of the series, Frisbee an Android cab booking app tutorial. If you did not read the previous one, you can start here.
Previously in Android cab booking App
In the previous pit stop, we had our discussion on GoogleMaps, Marker Animation and on Reverse Geocode. We learned how to show GoogleMaps, how to animate the Marker to user current location and Reverse Geocode the location where a user drags the PinView.
You can follow me by looking commits of code that I update on Github. Java application link and Kotlin application link.
4. Setting up firebase realtime Database
In the fourth part of Android Cab booking, we need to add firebase to our project. Please see the Manually add Firebase section in this link and configure your Android project into the firebase realtime database.
Note: Please set the security rules for firebase realtime database in a test mode.
5. Read online drivers from firebase realtime Database
After setting up the firebase project in firebase console we need to read the online drivers from the realtime database but there are some prerequisites before start reading the drivers.
5.1 Online drivers database Structure
Before start reading the online Drivers, you guys need to know how data represented in the firebase realtime database.
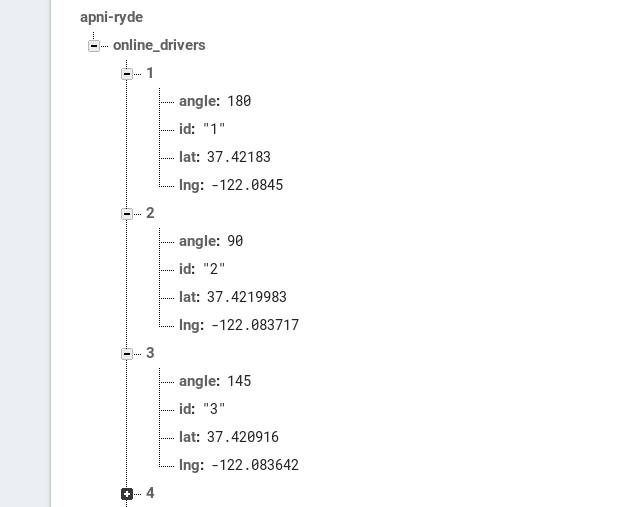 You see each Driver in
 online_drivers has its own key. Once any update happens like (Driver location changed) at a certain Driver node or a new Driver added you’ll receive a DataSnapshot. We parse snapshot to get the value, pretty straightforward! You’ll see how to do this in a couple of minutes.
5.2 Setting up the firebase DatabaseReference
In order to connect the DatabaseReference with the firebase database, we need to get the reference from FirebaseDatbase. Paste the following code at the top of the MainActivityViewModel class.
companion object {
   private const val ONLINE_DRIVERS = "online_drivers"  // 1
}

private val databaseReference = FirebaseDatabase
           .getInstance() // 2
           .reference  // 3
           .child(ONLINE_DRIVERS)  // 4
Here’s what each line means:
- The root node name for online drivers. All online drivers will be in this node.
- Get the default
FirebaseDatabaseinstance. - Get the reference of the database, which effectively points to the root of the tree/directory.
- Inside the root node get the reference to the
online_driversnode because we only need to read the online drivers.
5.3 Read online drivers
Now that we’ve online drivers in firebase realtime database and Database Reference, why not read it back from the database and show them inside our application. To read data or receive snapshots, we need to use Firebase’s Value Listener. There are three ways to read the online Drivers from the firebase realtime database. Let’s see what’s best for our use case:
- First, by calling the
addListenerForSingleValueEventonDatabaseReference, you read data only once. After you received it, the listener is removed. This is great when you need to read something once to use it in your app. - Second, using the
addValueEventListenermethod, you listen to a certain node and all its changes. Even if the smallest thing changes you get the entire snapshot again. This is great for showing data that isn’t large but tends to change and can benefit from a realtime update like a single Driver model. - Lastly, with the
addChildEventListenermethod, you subscribe to each change for each child in a node. If we change any of them, remove them or update them, we get an event for each of the mention cases. More importantly, it will emit each of the children one by one, by the first time you attach the listener.
The addChildEventListenermethod is best suitable for our use case, it will download all online Drivers from the database at application start and notify us whenever there’s a slight change in the online driver’s node.
Now add the child event listener to DatabaseReference inside the MainActivityViewModel init block. The reason we’re setting the event listener inside the initializer block because we need to retrieve all online drivers at application startup.
val firebaseValueEventListener = FirebaseValueEventListenerHelper(this)

init {
     databaseReference.addChildEventListener(firebaseValueEventListener)
}
The addChildEventListener method accepts the ChildEventListener type instance and our FirebaseValueEventListenerHelper class implements the ChildEventListener. Another thing we need to discuss is this parameter that we’re passing inside FirebaseValueEventListenerHelper. The FirebaseValueEventListenerHelper class constructor accepts the FirebaseObjectValueListener instance as a parameter and our MainActivityViewModel needs to implement it.
Create the below FirebaseObjectValueListener interface inside the listener package.
interface FirebaseObjectValueListener {

    fun onDriverOnline(Driver driver);

    fun onDriverChanged(Driver driver);

    fun onDriverOffline(Driver driver);
}
After creating the FirebaseObjectValueListener we need to implement the listener on MainActivityViewModel class and override all the abstract methods. You can get the Driver class inside the models’ package from GitHub code.
public class MainActivityViewModel : ViewModel(), CoroutineScope, FirebaseObjectValueListener {
.......
.......
.......
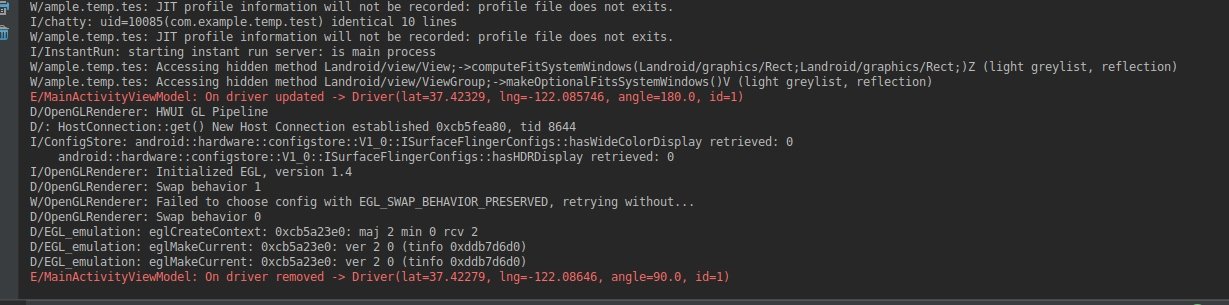
override fun onDriverOnline(driver : Driver) {
Log.e(TAG, "On driver online -> ${driver.toString()}")
}
override fun onDriverChanged(driver : Driver) {
Log.e(TAG, "On driver updated -> ${driver.toString()}")
}
override fun onDriverOffline(driver : Driver){
Log.e(TAG, "On driver removed -> ${driver.toString()}")
}
}
After implementing the listener on MainActivityViewModel class, we only need to call those abstract methods from FirebaseValueEventListenerHelper class. Add the following code inside FirebaseValueEventListenerHelper class.
class FirebaseValueEventListenerHelper constrcutor (private val firebaseObjectValueListener : FirebaseObjectValueListener) : ChildEventListener {

    // 1
    override fun onChildAdded(dataSnapshot : DataSnapshot, s : String?) {
       val driver = dataSnapshot.getValue(Driver.class)
       firebaseObjectValueListener.onDriverOnline(driver)
    }

    // 2
    override fun onChildChanged(dataSnapshot : DataSnapshot, s : String?) {
       val driver = dataSnapshot.getValue(Driver.class)
       firebaseObjectValueListener.onDriverChanged(driver)
    }

    // 3
    override fun onChildRemoved(dataSnapshot : DataSnapshot) {
       val driver = dataSnapshot.getValue(Driver.class)
       firebaseObjectValue.onDriverOffline(driver)
    }

    override fun onChildMoved(dataSnapshot : DataSnapshot, s : String?) {
    }

    override fun onCancelled(databaseError : DatabaseError) {
    }

}
Let’s go through the logic behind the implementation:
- This method will be triggered whenever there’s a new Driver added inside the
online_driversnode. Notice how we parse the Driver model, by calling the getValue method, the snapshot is parsed to whatever data model you want. After parsing the data we simply call the onDriverOnline method, which implemented inside the MainActivityViewModel class. - This method will be triggered whenever the Driver node update in the
online_driversnode. - The onChildRemoved method will be called when there’s a Driver goes offline inside the
online_driversnode.
So, we create the DatabaseReference and start listening to the online_drivers node. But what did we read? because currently, there are no online drivers in our online_drivers node. If you don’t want to test and run the application you can skip the Dummy insertion in a realtime Database and jump to the Driver Data Structure part.
6. Dummy insertion in firebase realtime Database (Optional)
I’ve created a couple of dummy drivers myself inside the online_drivers node for testing. You can see the following video of how to create dummy drivers inside the firebase realtime database.
After creating the dummy driver in the realtime database, build and run your application you should see the online Drivers log inside the Android Studio Logcat.

In order to see the update or remove driver log. Go ahead and change the lat or lng from any of the Driver nodes for an update and delete a single Driver node for remove.
Note: You can also insert dummy driver while opening the application, the moment you hit enter immediately you’ll see the log for online Driver inside Android Studio Logcat.
7. Drivers Data Structure
In order to store the multiples driver inside our application, we need to have some kind of Data Structure so, that we can update the Driver Marker whenever their current location changed or remove the Driver Marker when they go to offline. The same thing goes with the online, we insert the Driver inside our collection.
Now in this article, I’m not gonna discuss our Data Structure because it is a simple CRUD. Currently, we’ve DriverCollection and MarkerCollection inside our collection package. You can get these collections classes from GitHub.
The DriverCollection simply holds our online Drivers information inside List and have some utility methods regarding insert, delete, retrieve and update.
The MarkerCollection has the Map<String,Marker>, where String is for Driver’s key and Marker is for value. It also has the almost same utility method for insert, update, delete and retrieve.
7.1 Explanation of DriverCollection and MarkerCollection
Whenever a new online driver found inside the onDriverOnline method, we insert the Driver in DriverCollection, create a new instance of Marker and store the Marker with driver’s key inside the MarkerCollection’s class. Similarly, when the Driver node updates inside fiirebase database and the onDriverChanged method gets called, we get the previous Driver instance from DriverCollection and update the Driver with the updated lat, lng. After the update of Driver, we get the instance of Marker from MarkerCollection and animats the Marker to Driver’s new location.
8. Show or animate multiple markers simultaneously | remove | insert
Now that we’ve our collections classes, we only need to use these collections classes CRUD methods. Update the following methods inside MainActivityViewModel class.
public class MainActivityViewModel : ViewModel(), CoroutineScope, FirebaseObjectValueListener{

   .....
   .....
   .....

   // 1
    override fun onDriverOnline(driver: Driver) {
        if (driverRepo.insert(driver)) {
            val markerOptions = googleMapHelper.getDriverMarkerOptions(LatLng(driver.lat, driver.lng), driver.angle)
            _addNewMarker.value = Pair(driver.id, markerOptions)
        }
    }

   // 2
    fun insertNewMarker(key: String, value: Marker) {
        makerRepo.insert(key, value)
    }

   // 3
    override fun onDriverChanged(driver: Driver) {
        launch(context = coroutineContext) {
            val fetchedDriver = driverRepo.get(driver.id) ?: return@launch
            fetchedDriver.update(driver.lat, driver.lng, driver.angle)
            val marker = makerRepo.get(fetchedDriver.id) ?: return@launch
            withContext(Dispatchers.Main) {
                marker.rotation = fetchedDriver.angle + 90
                MarkerAnimationHelper.animateMarkerToGB(
                    marker,
                    LatLng(fetchedDriver.lat, fetchedDriver.lng),
                    LatLngInterpolator.Spherical()
                )
            }
        }
    }

    // 4
    override fun onDriverOffline(driver: Driver) {
        launch(context = coroutineContext) {
            if (driverRepo.remove(driver.id))
                makerRepo.remove(driver.id)
        }
    }

}
Let’s go through the logic behind the implementation:
- The driver will be stored inside the DriverCollection. After the insertion, we get the MarkerOptions from GoogleMapHelper class and send a
Pair(String, MarkerOptions)back to our MainActivity via LiveData. - To insert the new
Markerinside the MarkerCollection, we call this method from MainActivity. - We
launcha coroutine because ourgetmethod for DriverCollection andgetmethod for MarkerCollection are suspending functions. After the update of Driver, we switch context to Main Dispatcher from IO because in order to updateMarkerwe need to be in Main Thread. - Again
launcha coroutine because of the remove method for DriverCollection and remove method for MarkerCollection are suspending. After launching a coroutine we simply remove the Driver from DriverCollection and removeMarkerfrom MarkerCollection.
Before start observing the Pair<String,MarkerOptions> inside MainActivity, we need to define the _addNewMarker in the MainActivityViewModel class. Add the following code inside the MainActivityViewModel class.
private val _addNewMarker = MediatorLiveData<Pair<String, MarkerOptions>>()

val addNewMarker: LiveData<Pair<String, MarkerOptions>> = _addNewMarker
Now go to MainActivity and paste the following code inside the onCreate method to observe the addNewMarker instance from MainActivityViewModel.
viewModel.addNewMarker
      .observe(this, Observer<Pair<String,MarkerOptions> { markerPair ->
          val marker = googleMap.addMarker(markerPair.second)
          viewModel.insertNewMarker(markerPair.first, marker)
      })
When the Observer interface invoked we simply add the Marker in the GoogleMaps and call the insertNewMarker method.
Build and run to view your progress so far. You should see the Driver car markers in Google Maps. In order to see the Marker animation, you need to change the Driver location from firebase realtime database. I know! I know this is not a good solution but for now, we’ve to work like this. In the next article, we’ll see how to update the Driver location from a mobile application like real-time and the Frisbee app able to see the Driver car moving without updating it from the database.
 Note: You’ll not able to see the Driver car markers if the driver’s location inside the firebase realtime database is not near you.
Alright, guy’s, this was all from this article. See you in the next article.
Thank you for being here and keep reading…


How can I download this project???
in what language the code is written java or kotlin
Hey Deepansh,
I’ve wrote this code in both language. Here is the link for Java App -> https://github.com/CodingInfinite/FrisbeeJavaApp and Kotlin App -> https://github.com/CodingInfinite/FrisbeeKotlinApp
Hi Ahsen Saeed,
I just stumbled on your article this morning.
Good stuff.
I’m just reaching out because I’m a techno freak,
you put great effort in the programming of this tutorial. I would say you are a pretty expert coder.
Best Regards,
Alexa
It would be better if you start making videos and start uploading them on youtube.