Keep An Eye On Android Layout Performance Optimization | Rendering
Layout Performance Optimization is always a tricky business. Having a good, high-performance code is great. So, how can you write a good app? In a word to answer this question: details are always important. Today we will talk about how to improve Android application performance.
Optimizing your layouts fairly early in the development process is one easy way to save memory and increase performance. Some changes will be negligible, others may be quite noticeable.
1. Layout Inspector
The Layout Inspector in Android Studio allows you to compare your app layout with design mockups, display a magnified view of your app, and examine details of its layout at runtime. In order to use the Layout Inspector run your application on a connected device or Emulator -> Tools -> Layout Inspector. After selecting the Layout Inspector a dialog appears, select the app process you want to inspect and click OK.
The Layout Inspector inherited by deprecated Hierarchy Viewer and Pixel Perfect tools.
After selecting the process, the Layout Inspector captures the snapshot of your screen, saves it as a .li file, and opens it.
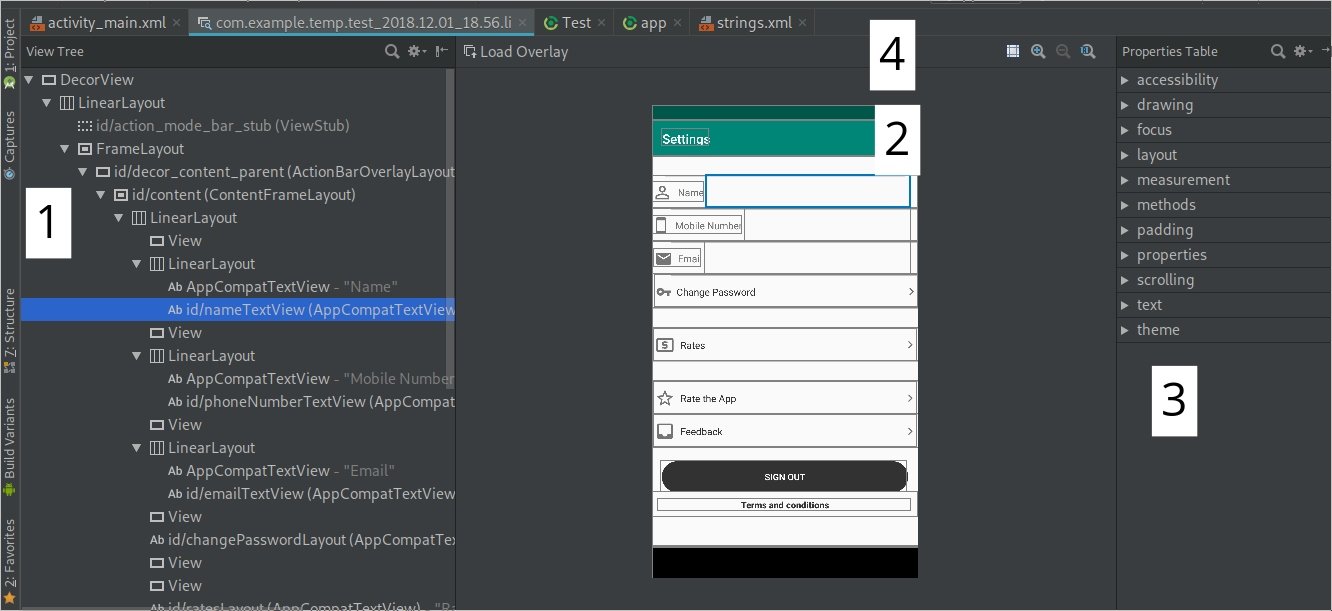 Layout Inspector displays the following:
- The hierarchy of views in the layout.
- Screenshot of app layout as it appears on your device, with layout bounds shown for each view.
- The Layout properties for the selected view.
- Tools for Layout Inspector.
2. Optimize code with Lint
Historically Android SDK toolchain provided a tool name lint, a static code analysis tool which checks your Android project source files for any potential bugs. Alongside potential optimizations for correctness, security performance, usability, accessibility, and internationalization. In our case lint can also check the layout xml files whether it needs to be modified or not.
To run lint on your code inside Android Studio, open up your project and select Analyze -> Inspect Code from the menu. This will kick off lint and present you a handy suite of a result. Let’s see an example first:
 The arrow indicates that the layout or its parent layout is Not necessary. The specific modification method is to remove the parent LinearLayout and promote the current LinearLayout as a parent layout.
The lint tool also makes changes to the underlying irrationality of the code or the bad code. Android lint can also check:
- Declared but not used the variable.
- Null pointers that may be generated.
- Return, continue to write.
- Invalid or unused imports.
- Empty if condition.
3. Layout Overdrawing
Overdraw describe how a pixel on the screen drawn multiple times during the same frame. There are still performance issues in rendering such as the most prone: over-rendering/over-drawing.
In a multi-level attempted structure, if the invisible UI is also doing the drawing operation, some pixel area will be drawn multiple times, which will waste a lot of CPU and GPU resources. The easiest way to detect Overdraw in Emulator or Real-World device. Go to Settings -> Developer Options -> Debug GPU Overdraw -> Show overdraw areas. 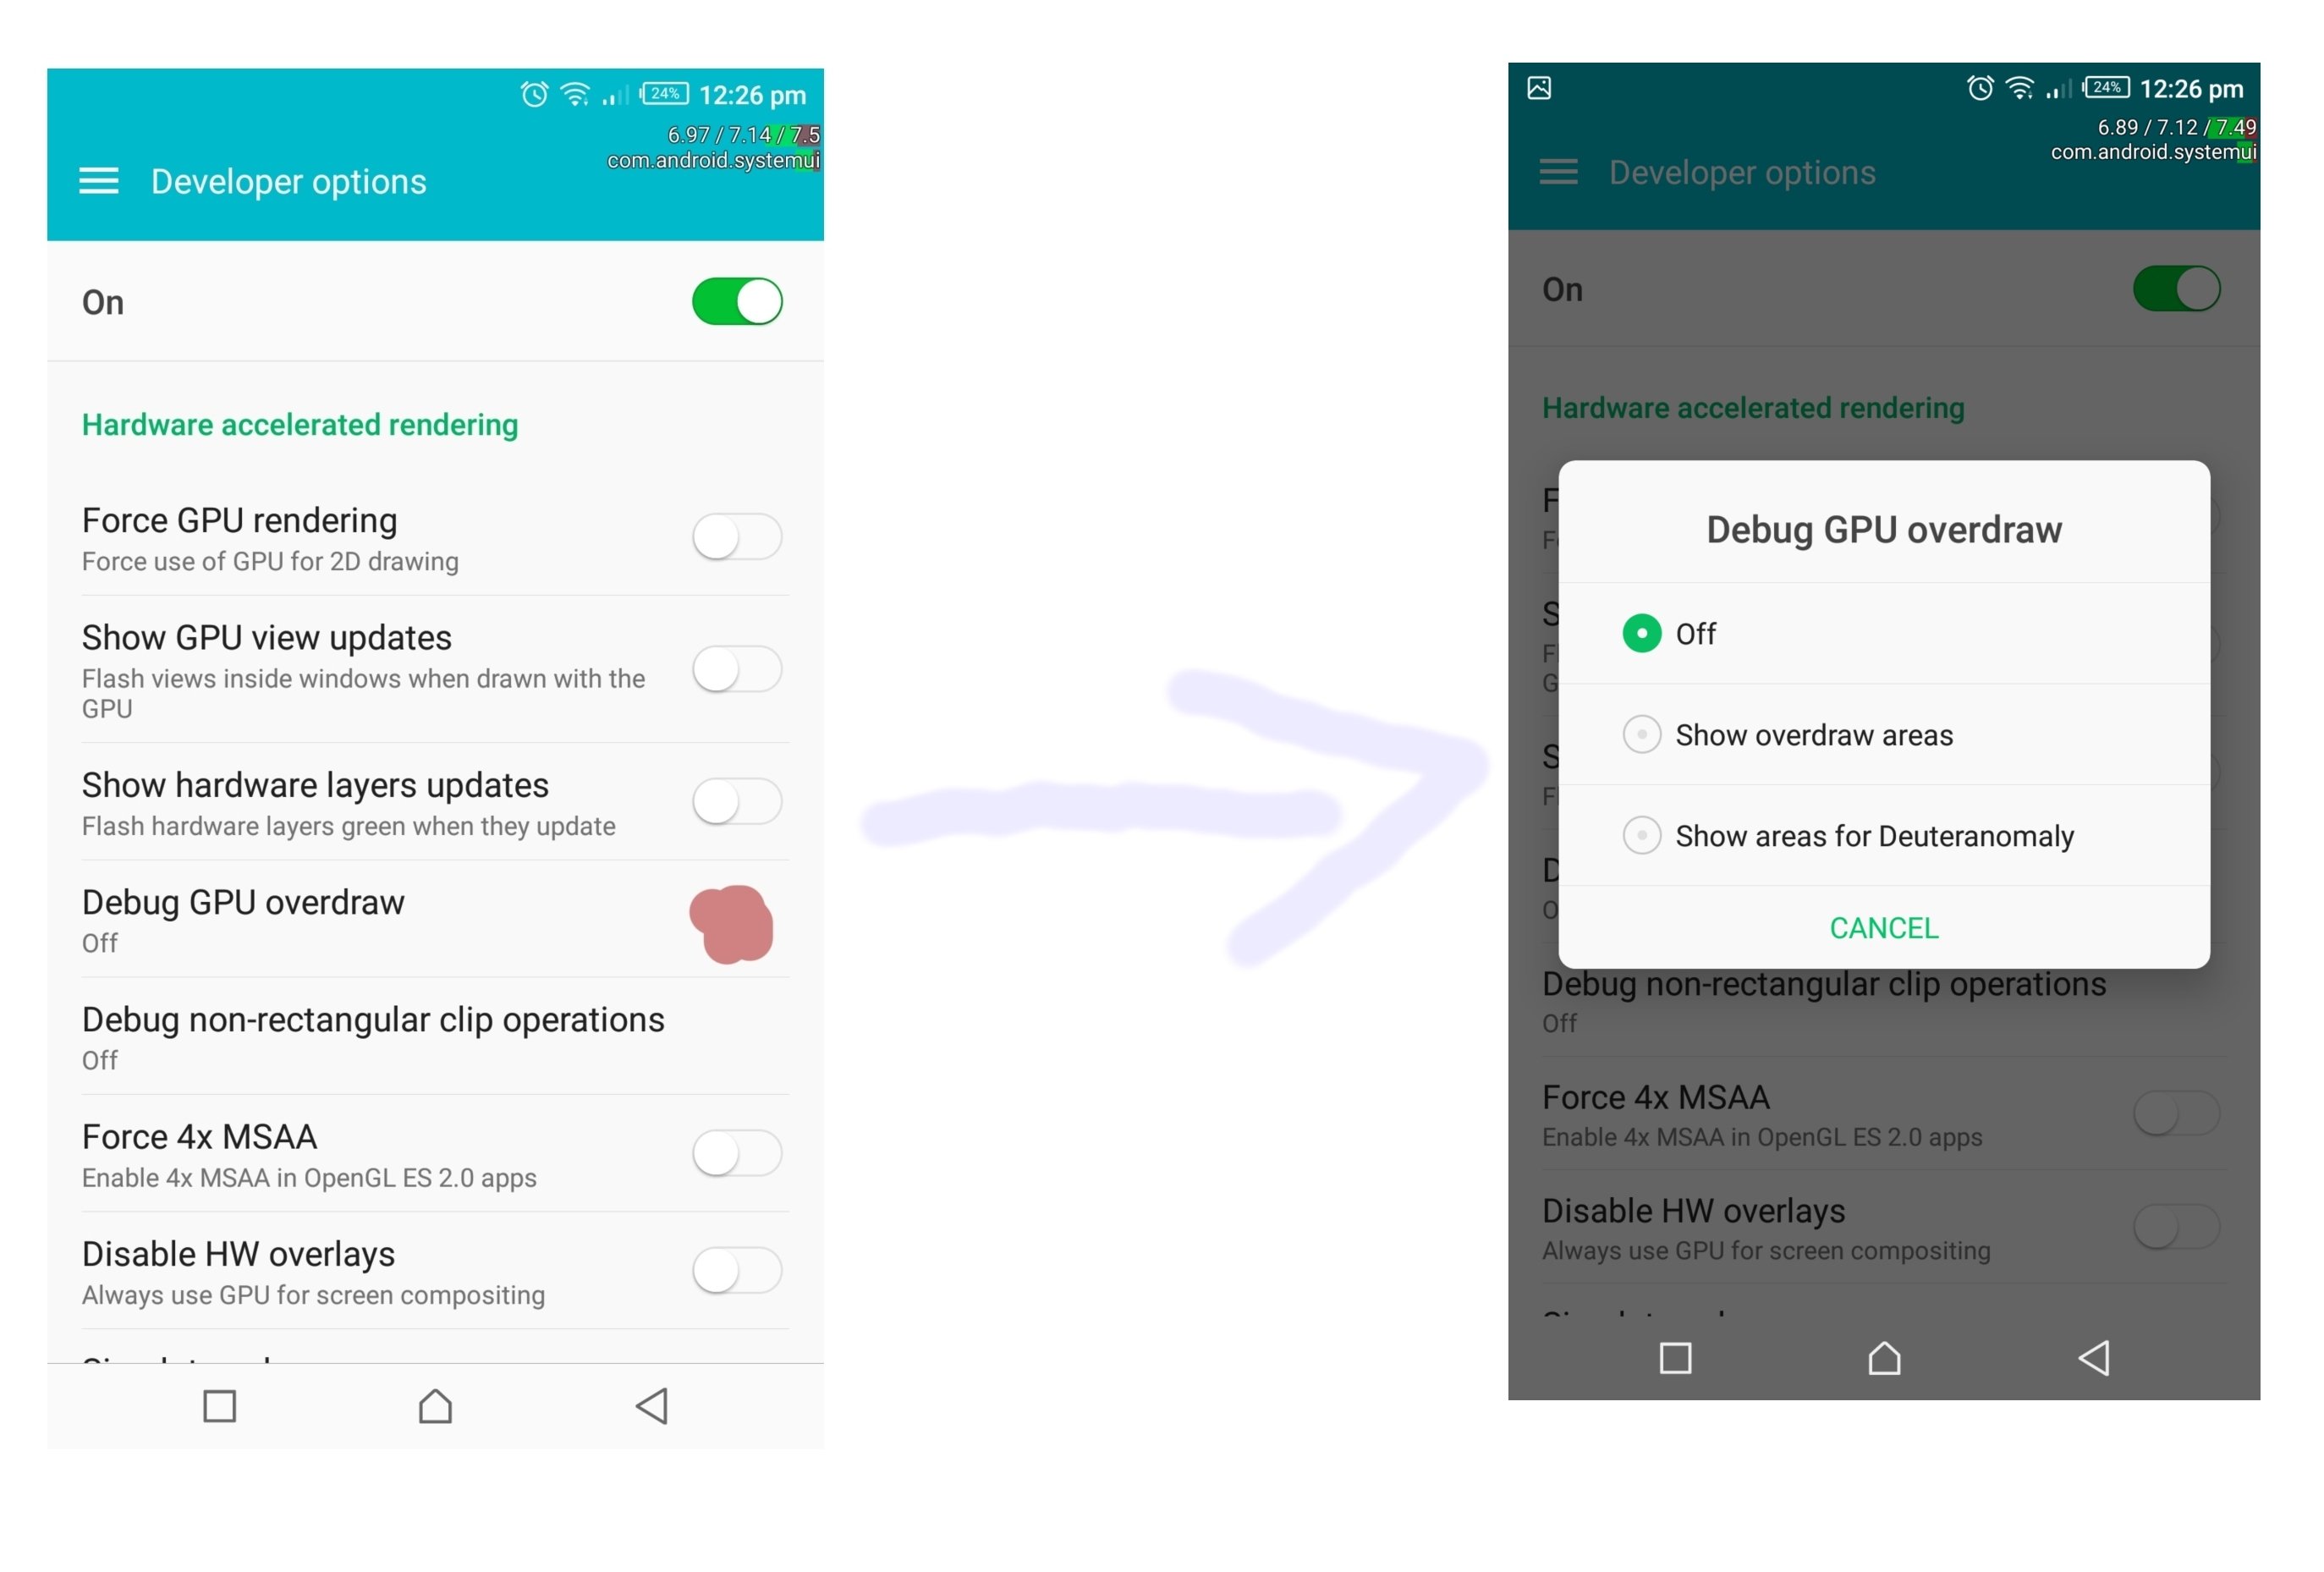 After turn on the GPU Debug Overdraw, you’ll see different colors highlighting the overdraw on your screen. Below is the screenshot stating different Overdraw colors.
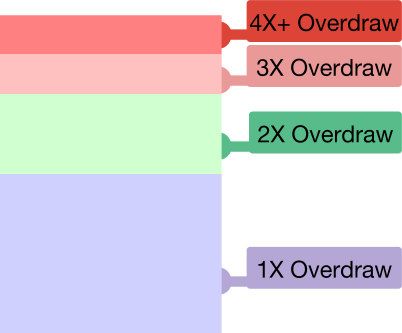 If the screen is drawn one time you should see it in its true color and as the Overdraw increase the color changes. The true meaning of the above colors:
- Primary color means no overdraw.
- Purple means one overdraw.
- Green twice overdraw.
- Pink three overdraw.
- Red Four or more overdraw.
Actually, the purple one is acceptable. And there are some ways to convert red ones into purple ones.
- Remove unnecessary background from the layout: an unnecessary background may never be visible.
- Use Canvas clipRect to help the system recognize the visible area of the custom control, and areas outside the visible area are ignored when drawing. Another important method is quickReject. It controls if the given area outside of the drawing is or not.
- Another thing to improve the Overdraw is to reduce the number of transparent objects you render. Visual effects like transparent animations, fade-outs, and drop shadows all involve transparency, and can, therefore, contribute significantly to overdraw. Try making the text a solid color and using transitions that don’t use
alpha, such as wipe transitions.
4. Refresh rate & frame loss
We all know Android system redraws the activity every 16ms, which means that your app must complete all the logical operations of the screen refresh within 16ms, So, that it can reach 16 frames/s. However, sometimes your program will have such a situation where your logical operation exceeds 16ms. At this time the frame loss will occur and a user sees the update picture within 32ms. Let’s see with an example:
I’m sure every one of us uses the Geocoder class to reverse geocode the latitude and longitude. Now if we try to convert the coordinates into readable place name from UI thread our thread will be blocked and we’re not able to interact with the UI until the response came.
class MainActivity : AppCompatActivity() {

    override fun onCreate(savedInstanceState: Bundle?) {
        super.onCreate(savedInstanceState)
        ......
        ......
        toastButton.setOnClickListener {
            Toast.makeText(this, "Button Click", Toast.LENGTH_SHORT).show()
        }
        val adresses = geoCoderValue.value.getFromLocation(31.485082, 74.319705, 1)
        placeNameTextView.text = adresses[0].getAddressLine(0)
    }
}
In the above code, we have got a Button and one TextView also inside the onCreate method, I’m trying to reverse geocode the coordinates. You see when the response came from Geocoder we’re setting the result inside the text view and on a button click show a Toast.
Now when you launch the above application immediately try to click the button you’ll notice a latency in showing the Toast and this caused, the user seeing the Toast after 32ms instead of 16ms.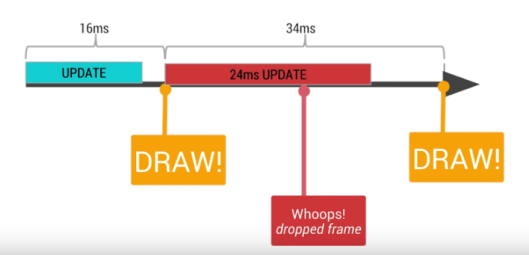
Actually, we need to call the getFromLocation method inside the worker Thread and we’re good! There are other things which will cause the application to slow down like bulk insertion in SQLite, parsing big data inside UI thread, Bitmap transformations etc. So, try to avoid tasks which blocks the Main Thread.
5. Flatten the view hierarchy to reduce Nesting
Along similar lines, the layout should not be deeply nested, in terms of parent and child layouts. The Android Developer team recommended keeping layout under 10 deep levels. If you find yourself continually making a very deep layout, try Relative Layout it is easier to reduce the view level than Linear Layout. 
The nested layout warning will typically be accompanied by warnings of possible useless layout widgets that can help assist in finding which layouts to remove, short of a full redesign of the screen layout. Keep your layout level flat as much as possible to avoid duplicate nested layouts.
There’s a great article on layout comparison by Piotr Krystyniak go and check it out.
Alright, guys, this was my demonstration about Android Layout Performance Optimization. Anything which I miss in this article please let me know via comment.
Thank you for being and here and keep reading…