
In this article, we’ll complete our foray into building a WordPress theme from scratch, focusing on refining our templates, adding meta information, post thumbnails, sidebars, user-friendly controls and more.
This is the third and last part of the WordPress series on building a WordPress theme. Part 1 introduced WordPress theming, and in part 2 we built a basic theme. We utilized the Clean Blog template by StartBootstrap to add style to our WordPress theme. The code we’ve written so far is available on GitHub.
We have added single.php, page.php, archive.php and index.php templates so far, but we left the task of finalizing it for this part of the task. We introduced functions.php — a file that WordPress uses to automatically include functionalities particular to our theme, and we added functions to it. We added a dynamic header function to our header.php, and we separated that functionality into our functions.php. Ideally, this should be organized into a separate file — possibly in an inc folder inside our theme — to keep things clean.
In part 2, we also introduced partials — footer.php and header.php.
Refining the Templates
In the previous article, we separated our <body> tag — the opening one — into header.php, and we added <?php body_class(); ?> to it. This adds some semantic classes to the body that tell us whether we are on a page, post, whether we’re logged in, or not, and so on — enabling us to style different elements of our website depending on pages visited, and other things.
If we visit the home page and open the browser console to inspect these classes, we’ll see that we lack the current template information among these classes:

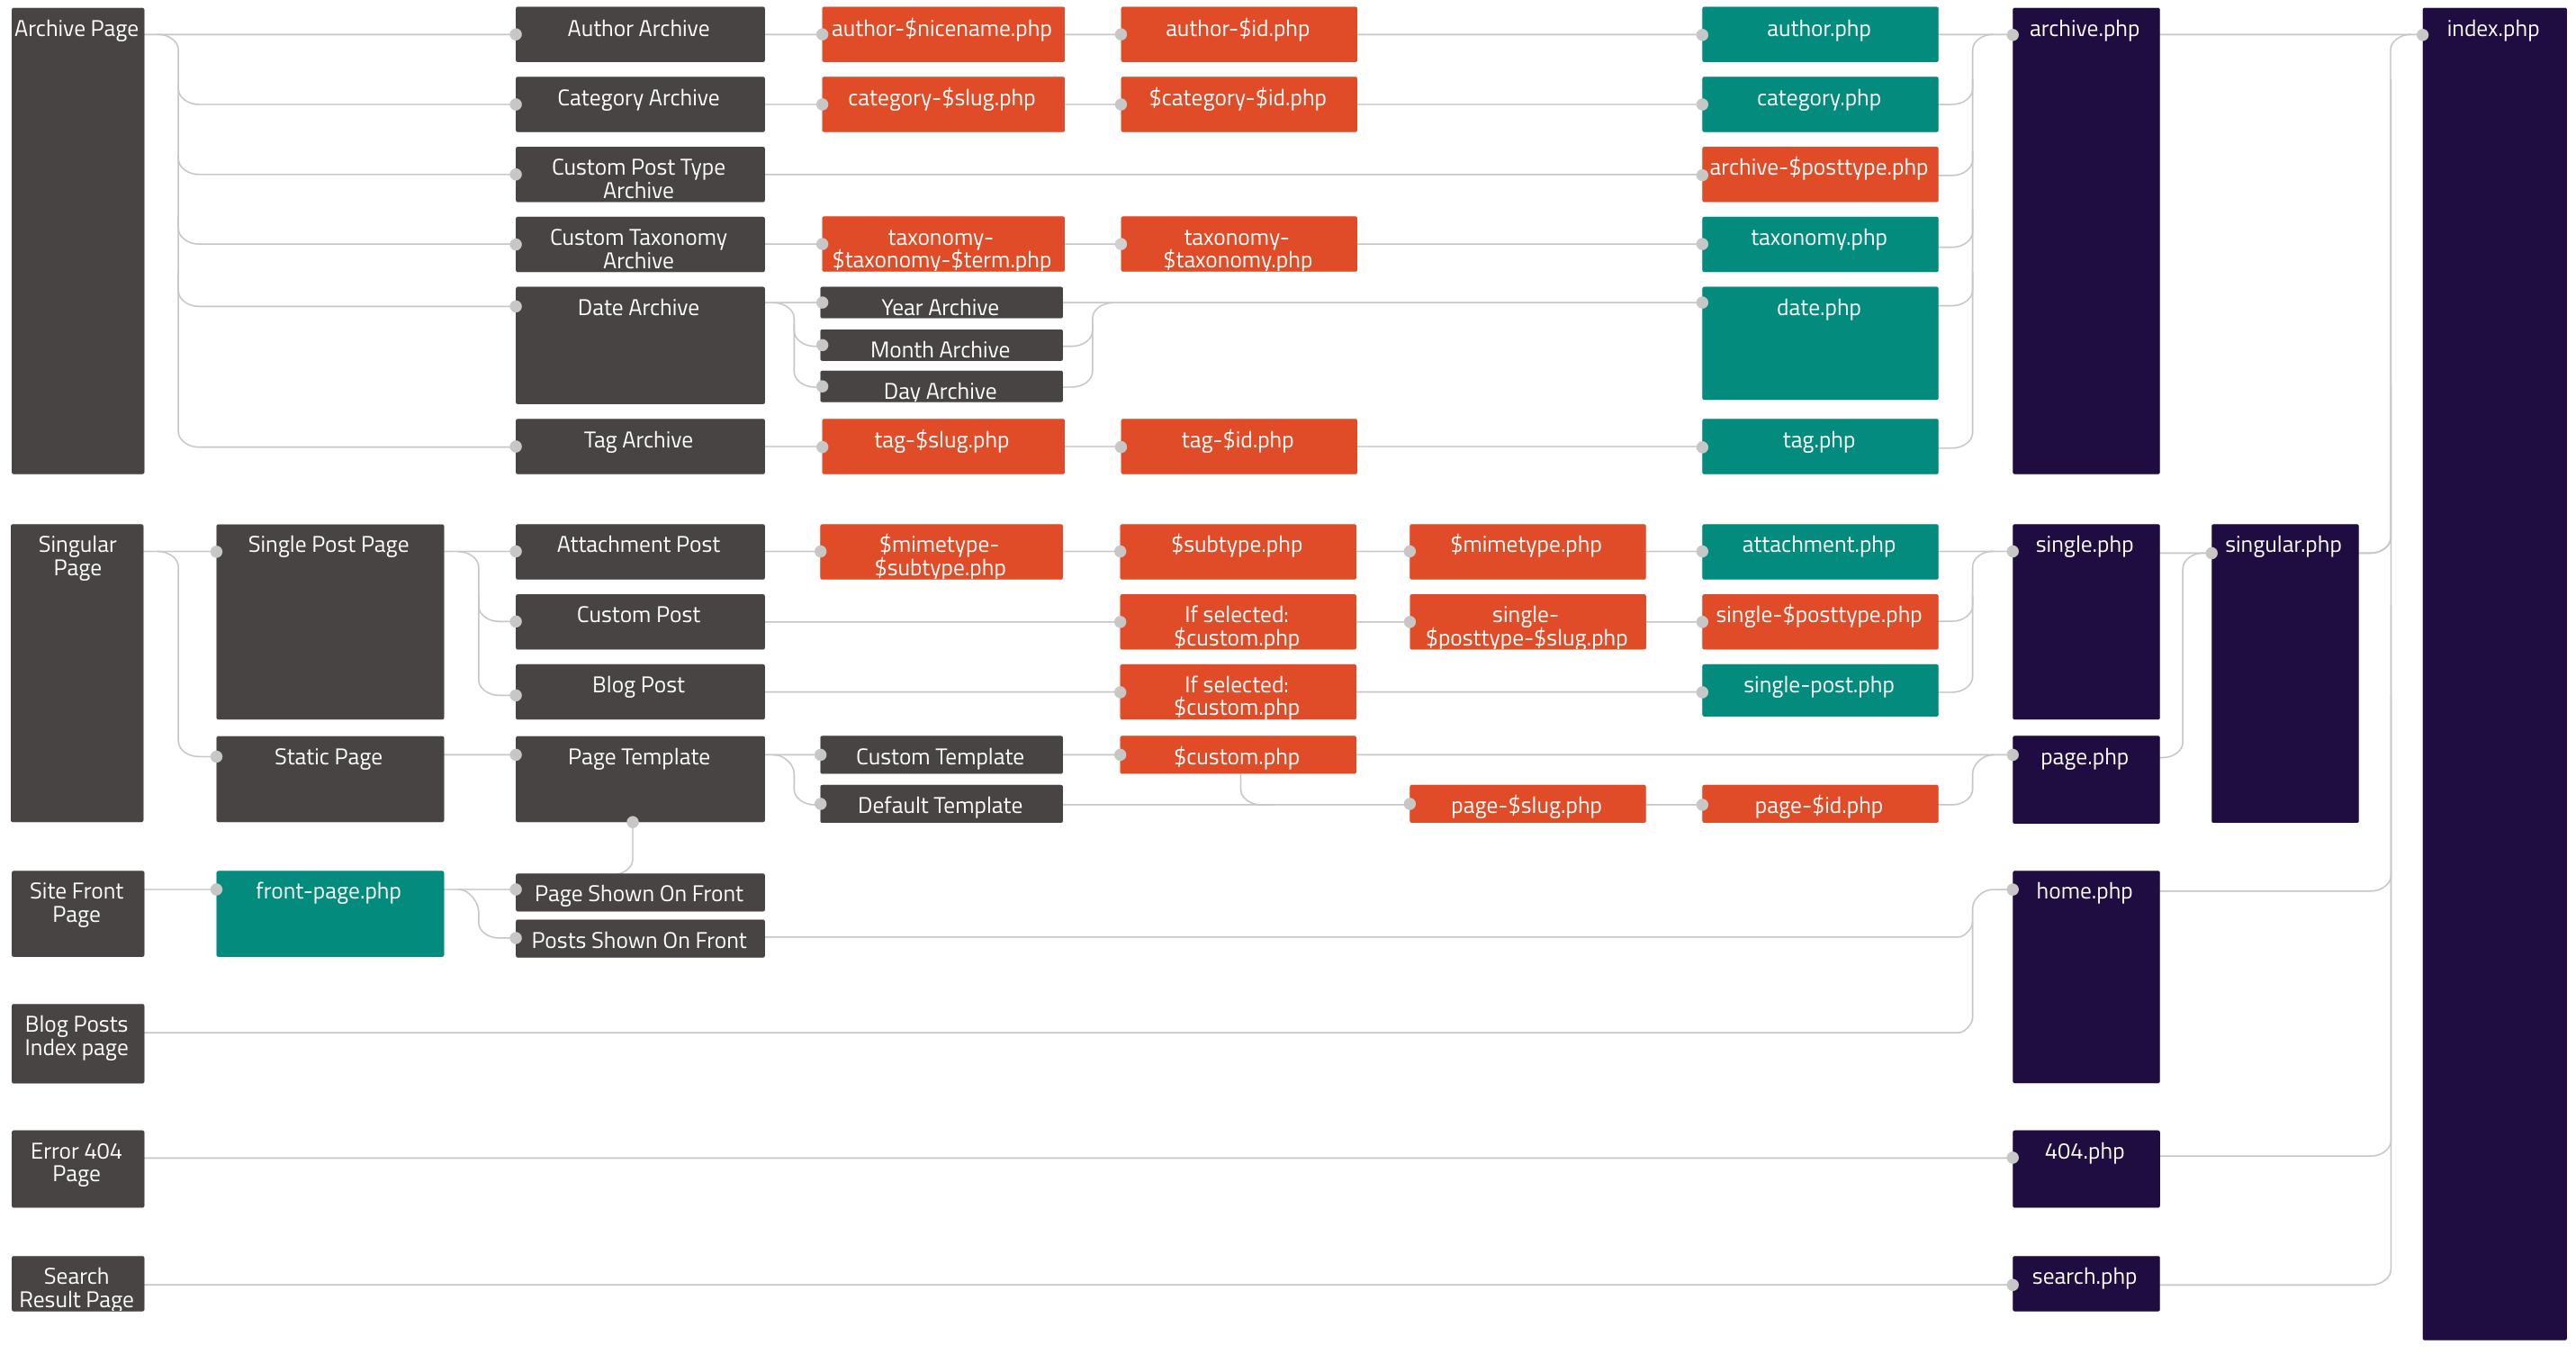
To be able to change the things WordPress displays, we need to know what file is being used. In our case, index.php is used as a default fallback template. This infographic shows the hierarchy of templates used. It can come very handy when overriding or creating themes.
In the previous article, we started refining the archive.php loop, adding meta information and post thumbnails to outputed articles. We’ll separate that loop into a separate file, include it in archive.php and index.php, and finish refining it.
Firstly, we’ll replace the content in both files between while and endwhile with a single line that requests the partial file, so index.php will look something like this:
<?php
/**
 * @package Botega_Scratch_Theme
 */

get_header(); ?>

    <?php
    if ( have_posts() ) : while ( have_posts() ): the_post();

                get_template_part( 'partials/content', get_post_type() );

        endwhile;
    endif;
    ?>

<?php get_footer(); ?>
Once we’ve done that, we’ll place the content we have replaced in archive.php into the partials/content.php file:
<div <?php post_class( 'post-preview' ); ?> id="post-<?php the_ID(); ?>">

<header class="entry-header">
    <?php
    if ( is_singular() ) :
        the_title( '<h1 class="entry-title">', '</h1>' );
    else :
        the_title( '<h2 class="entry-title"><a href="' . esc_url( get_permalink() ) . '" rel="bookmark">', '</a></h2>' );
    endif;

    if ( 'post' === get_post_type() ) :
        ?>
        <div class="entry-meta">
            <?php
            bsimple_posted_on();
            bsimple_posted_by();
            ?>
        </div><!-- .entry-meta -->
    <?php endif; ?>
</header><!-- .entry-header -->

        <a class="post-thumbnail" href="<?php the_permalink(); ?>" aria-hidden="true" tabindex="-1">
            <?php
            the_post_thumbnail( 'post-thumbnail', array(

            ) );
            ?>
        </a>

        <?php the_excerpt(); ?>

</div>
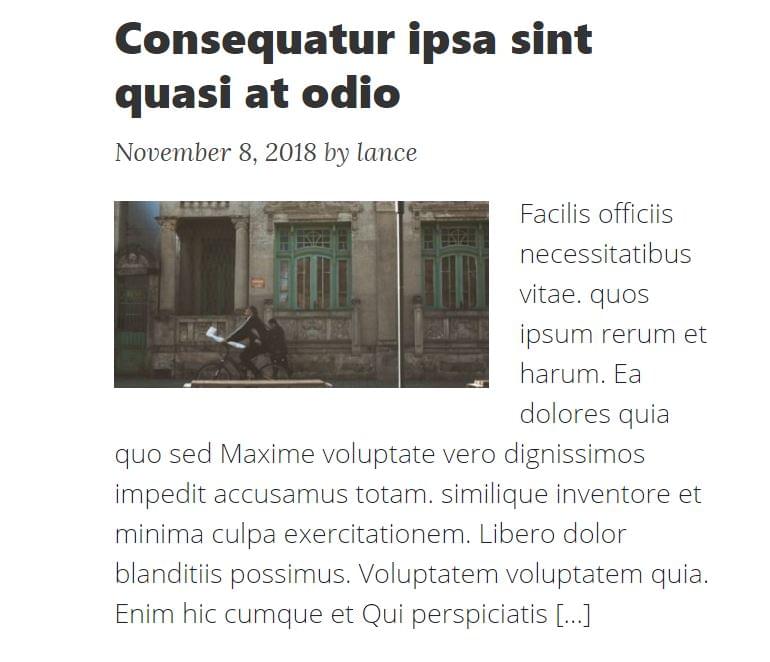
Once we upload these changes to the server, we’ll see that our front page now, in each post in the post list, has meta information — date and author links:

This means that our partial works.
Posts Thumbnails
We can see that none of our fake posts have any images in general, and no featured images specifically. If we go to the WordPress dashboard and try to add the featured image to our post/page, we’ll see that there’s no file upload field in the rightmost sidebar. (For those unfamiliar with WordPress, more about this feature can be read here.)
Post thumbnails aren’t enabled by default in WordPress themes. It’s a feature that needs to be turned on specifically in new themes. Most themes have it enabled.
To do this, we include add_theme_support( 'post-thumbnails' ); line to our functions.php.
Now thumbnails are enabled.
Now we can empty our WordPress installation of all the content by using the wp-cli command wp site empty --allow-root (or we can do it manually from the WordPress dashboard), and repopulate it with FakerPress. It should fill posts and pages with featured images it grabs from the Internet. (We’ll need to recreate the Top Menu like before, and assign pages and posts to it.)
One tip: if we’re building themes for sale, or generally themes that will be released to a wider audience, we may want to use theme unit test data provided by Automattic, as it may provide content for testing a wider scope of cases and theme details.
We can specify image sizes to FakerPress, but it will in all likelihood still result in a messy look.
When we build a theme, one of the techniques used to achieve a polished, standardized look is to specify thumbnail sizes. These are standard sizes WordPress will resize all uploaded image to fit. We’ll use the WordPress add_image_size() function to add several image sizes that our theme will use:
add_image_size( 'list-thumb-1', 730, 400, true);
add_image_size( 'small-list-thumb-1', 400, 200, true);
add_image_size( 'small-list-thumb-2', 300, 200, true);
add_image_size( 'small-list-thumb-3', 220, 140, true);
Then we’ll output any of the formatted images by using the_post_thumbnail() in our content.php:
<a class="post-thumbnail" href="<?php the_permalink(); ?>" aria-hidden="true" tabindex="-1">
    <?php
    the_post_thumbnail( 'small-list-thumb-1');
    ?>
</a>
To achieve a nicely formatted excerpt in our archive or blog list, we’ll increase font size, but to do this, we’ll reduce the number of words outputted by the_excerpt():
# functions.php
function custom_excerpt_length( $length ) {
    return 40;
}
add_filter( 'excerpt_length', 'custom_excerpt_length', 999 );
To be able to float image (thumbnail we just mentioned) and excerpt, we add the following to the parent element selector in our css:
.home .post-preview.post {
    overflow: hidden;
}
(We don’t cover here the smaller styling adjustments that aren’t crucial to the theme itself.)
Now, we can increase our font size, and have the excerpt float around the image, by floating the image (along with the a parent element):
We’ll also use post_thumbnails later, on single posts/pages.
Theme Sidebars
Theme Sidebars are widgetized areas in the theme. They need to be registered in the WordPress system so that we can place different widgets to these areas. Once we do that, we print — or output — these widgets in our template files.
We’ll register a number of sidebars in our theme, which can be seen in the GitHub repository of the theme. We do this by adding the following code to our functions.php:
// Register custom sidebars
function sidebar_register() {

    $args = array(
        'name'          => __( 'home_header', 'bsimple' ),
        'description'   => __( 'home_header', 'bsimple' ),
        'id'            => 'h_h',
        'class'         => 'home_header',
        'before_widget' => ' <div class="dyn-sidebar side sidebar">',
        'after_widget'  => '</div>',
        'before_title'  => '<h2 class="widgettitle">',
        'after_title'   => '</h2>',
    );
    register_sidebar($args);

    $args = array(
        'name'          => __( 'archive_sidebar_1', 'bsimple' ),
        'description'   => __( 'Archive Sidebar no 1', 'bsimple' ),
        'id'            => 'a_s_1',
        'class'         => 'archive_sidebar_1',
        'before_widget' => ' <div class="dyn-sidebar side sidebar">',
        'after_widget'  => '</div>',
        'before_title'  => '<h2 class="widgettitle">',
        'after_title'   => '</h2>',
    );
    register_sidebar($args);

    $args = array(
        'name'          => __( 'bottom_center_sidebar', 'bsimple' ),
        'description'   => __( 'Bottom Center Sidebar', 'bsimple' ),
        'id'            => 'b_c_s',
        'class'         => 'bottom_center_sidebar',
        'before_widget' => '<div id="bottom-center-sidebar">',
        'after_widget'  => '</div>',
        'before_title'  => '<h2 class="widgettitle">',
        'after_title'   => '</h2>',
    );
    register_sidebar($args);

}
add_action( 'widgets_init', 'sidebar_register' );
Here, we show how to register two sidebars. Further details on the register_sidebar() function can be found at wordpress.org.
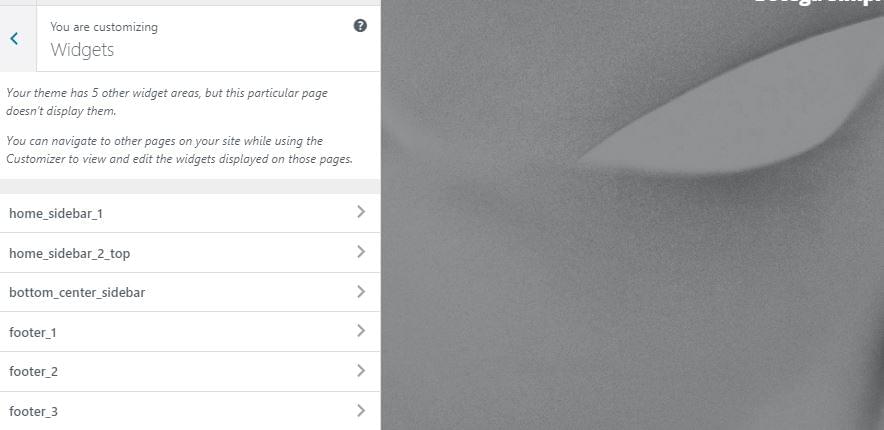
We register eleven sidebars, but we don’t need to output all of these in all page templates or website locations. If they’re outputed in the currently customized page, they’re accessible in the Customizer under widgets:
Here’s an example of actual output of the sidebar or widget area in the footer.php — which means it can be displayed globally:
<?php if ( is_active_sidebar( 'b_c_s' ) ) : ?>
    <div class="row b_c_s"><div class="col-lg-8 mx-auto  top-widget col-md-10 ">
<?php    get_sidebar( 'BottomCenterSidebar' ); ?>
    </div></div>
<?php endif; ?>
Here we use a sidebar ID we used in the register_sidebar function for the bottom_center_sidebar above.
We also conditioned the width of the central content container on the home page dependent on whether there are sidebars with active widgets ( is_active_sidebar()):
# index.php
<div class="row">
        <?php if ( (is_home() && is_active_sidebar( 'h_s_1' )) || (is_archive() && is_active_sidebar( 'archive_sidebar_1' )) ) { ?>
            <div class="col-lg-7 col-md-9">
        <?php } else { ?>
            <div class="col-lg-12 col-md-10 mx-auto">
        <?php } ?>


            <?php
            if ( have_posts() ) : while ( have_posts() ): the_post();
                        get_template_part( 'partials/content', get_post_type() );
                endwhile;
            endif;
            ?>

        </div>

            <?php if ( (is_home() && is_active_sidebar( 'h_s_1' )) || (is_archive() && is_active_sidebar( 'archive_sidebar_1' )) ) { ?>
                <div class="col-lg-4 offset-lg-1 col-md-10 col-sm-12 arch- sidebar-side-cont">

            <?php }

            if ( is_home() ) :
            get_sidebar( 'HomeSidebar1' );
            elseif ( is_archive() ) :
                get_sidebar( 'ArchiveSidebar1' );
            endif;
            ?>

            <?php if ( (is_home() && is_active_sidebar( 'h_s_1' )) || (is_archive() && is_active_sidebar( 'archive_sidebar_1' )) ) { ?>
            </div>
            <?php } ?>

    </div>
We output Bootstrap classes dependent on these conditions, making sure the theme won’t look empty if we omit setting up widgets for pages such as home.
After we fill these widget areas with widgets and images, this is what we get:
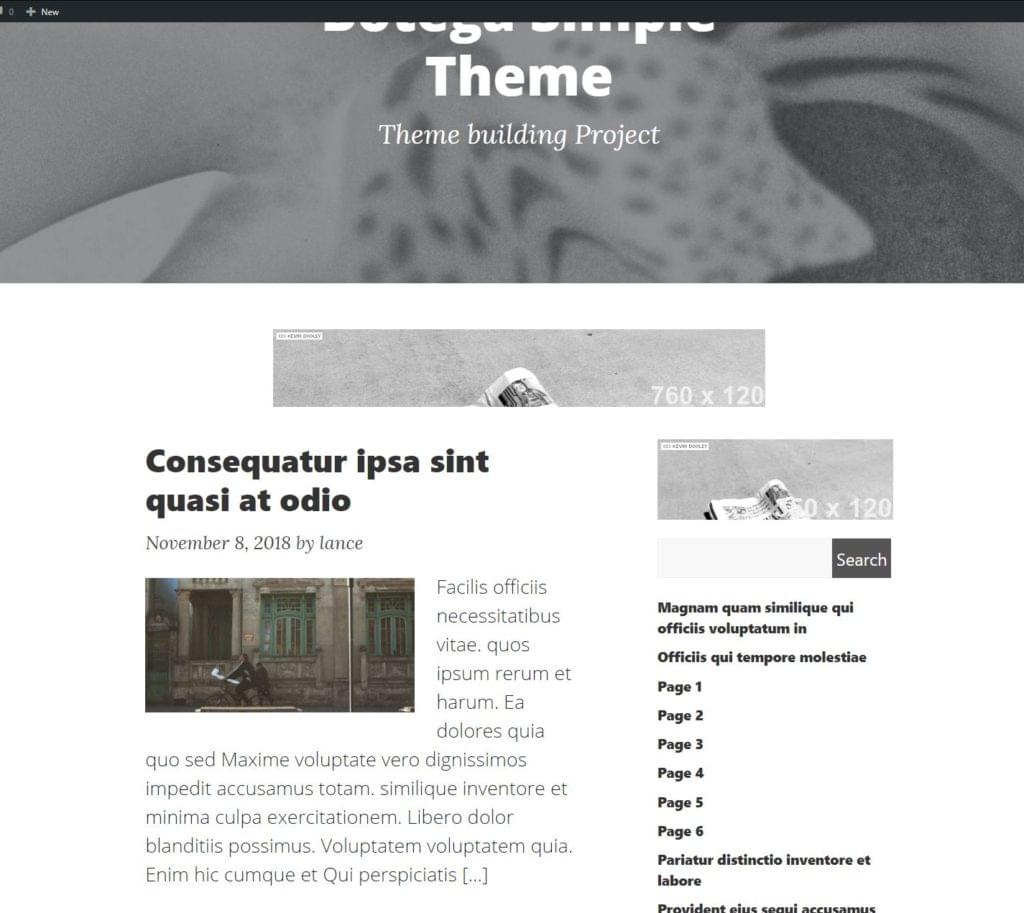
Theme is shaping up nicely. Readers will, of course, adapt the styling to their liking.
Customizer API
When we talk about styling, we’ll mention the customizer API, and show how to use it to give user-friendly control of the background images for the headers.
Here’s an example of how we create new panel, section and control in our theme (functions.php again):
function register_customizer_controls( $wp_customize ) {
    // Create custom panel.
    $wp_customize->add_panel( 'basic_stylings', array(
        'priority'       => 70,
        'theme_supports' => '',
        'title'          => __( 'Basic Stylings', 'bsimple' ),
        'description'    => __( 'Set main website headers.', 'bsimple' ),
    ) );


    // Add section
    $wp_customize->add_section( 'frontpage_settings' , array(
        'title'      => __( 'Frontpage Settings','bsimple' ),
        'panel'      => 'basic_stylings',
        'priority'   => 20,
    ) );


    // Add setting.
    $wp_customize->add_setting( 'frontpage_header_bg_img', array(
        'default'     => get_stylesheet_directory_uri() . '/images/basic_header_bg.jpg',
    ) );

    // Add control.
    $wp_customize->add_control( new WP_Customize_Image_Control(
        $wp_customize, 'frontpage_background_image', array(
              'label'      => __( 'Add Home Header Background Image Here, the width should be approx 1900px', 'bsimple' ),
              'section'    => 'frontpage_settings',
              'settings'   => 'frontpage_header_bg_img',
              )
    ) );

}

add_action( 'customize_register', 'register_customizer_controls' );
The main thing here is the customize_register hook, and the order of $wp_customize methods (add_panel, add_section, add_setting, add_control. Order matters. The WordPress Codex has a detailed reference of Customizer API.
Once we add our settings and controls in functions.php, we add the following code to the bottom of the bsimple_scripts() function we created to enqueue our scripts and styles:
$css = '';
$home_header_bg_image = get_theme_mod( 'home_header_bg_img' , get_stylesheet_directory_uri() . '/images/basic_header_bg.jpg'  );
$frontpage_header_bg_image = get_theme_mod( 'frontpage_header_bg_img' , get_stylesheet_directory_uri() . '/images/basic_header_bg.jpg'  );
$global_header_bg_image = get_theme_mod( 'global_header_bg_img' , get_stylesheet_directory_uri() . '/images/basic_header_bg.jpg'  );

$css .= ( !empty($home_header_bg_image) ) ? sprintf('
#main_header.phome {
    background: url(%s) no-repeat center;
}
', $home_header_bg_image ) : '';

$css .= ( !empty($frontpage_header_bg_image) ) ? sprintf('
#main_header.pfront {
    background: url(%s) no-repeat center;
}
', $frontpage_header_bg_image ) : '';

$css .= ( !empty($global_header_bg_image) ) ? sprintf('
#main_header.pglobal {
    background: url(%s) no-repeat center;
}
', $global_header_bg_image ) : '';

if ( $css ) {
    wp_add_inline_style( "bsimple-style"  , $css );
}
We’ve added phome, pfront and pglobal classes to our header containers. Now we use wp_add_inline_style() and the bsimple-style handle we used to enqueue our base theme style at the beginning — to output customizer settings we just created. We use get_theme_mod() to get each setting we registered.
This way, we can set images for the headers that we separated into the dynamic_header() function in part 2 of the guide:
if(!function_exists('dynamic_header')){

function dynamic_header(){

    global $post;

    ?>

    <?php if (is_home()){ ?>

        <header class="masthead phome" id="main_header">
            <div class="overlay"></div>
            <div class="container">
                <div class="row">
                    <div class="col-lg-8 col-md-10 mx-auto">
                        <div class="site-heading">
                        <h1 class="site-title"><?php bloginfo( 'name' ); ?></h1>
                        <span class="subheading"><?php bloginfo( 'description', 'raw' );?></span>
                        </div>
                    </div>
                </div>
            </div>
        </header>
        <!-- etc. -->
Single Pages and Posts
The WordPress template hierarchy helps us to target the exact URL and post that’s loaded upon visit, so that we can atomically design the HTML output for each of these. Many times, we won’t need to create all the templates.
Adding a generic background image for all posts or pages wouldn’t make much sense. So our Customizer strategy will work for archives, for blog list of posts, for the front page, and even for terms maybe. But for specific pages and posts, we’ll probably want to set the images individually.
How do we do this?
In our dynamic_header() function, we have pinpointed the header for pages, so now we’ll use an inline style and the get_the_post_thumbnail_url() function to set the pages’ featured image as a header background:
<?php } else if (is_page()){

    ?>

    <header class="masthead ppage" id="main_header" style="background-image:url(<?php echo get_the_post_thumbnail_url($post, "full" ); ?>)">
        <div class="overlay"></div>
        <div class="container">
            <div class="row">
                <div class="col-lg-8 col-md-10 mx-auto">
                    <div class="site-heading">
                    <h1 class="site-title"><?php the_title() ?></h1>
                    <span class="subheading"><?php echo get_post_meta($post->ID, "subtitle_", true);?></span>
                    </div>
                </div>
            </div>
        </div>
    </header>
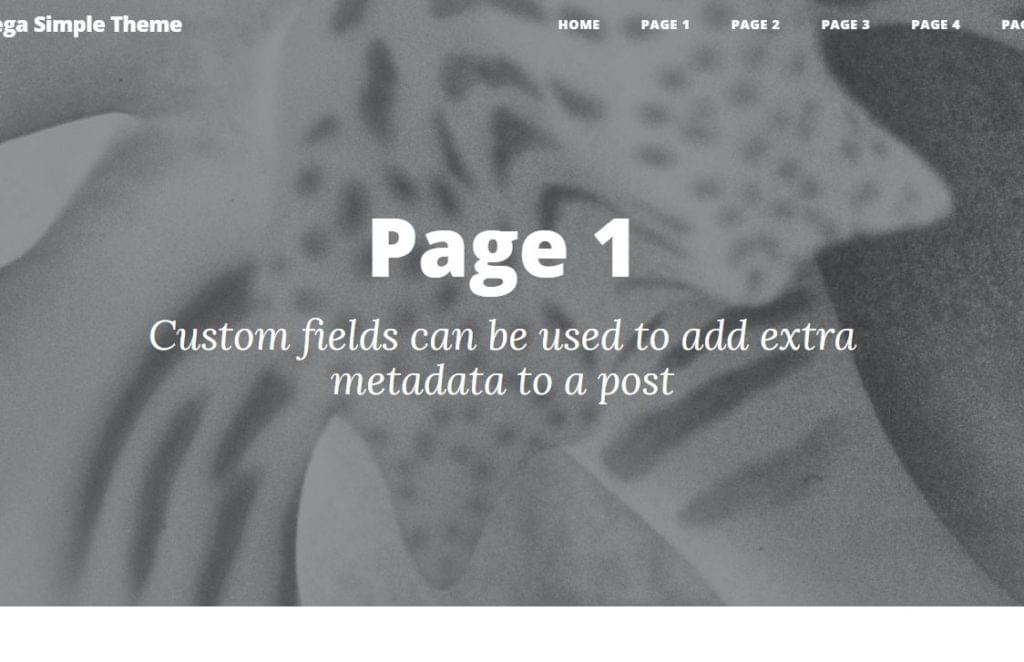
Now the user can set a header image for every single page. We can do the same thing for the is_single() case, which will apply the same solution for all posts — including custom post types.
This line will allow users to add a custom field to every page, named subtitle_, and it will be outputted to page header:
<span class="subheading"><?php echo get_post_meta($post->ID, "subtitle_", true);?></span>
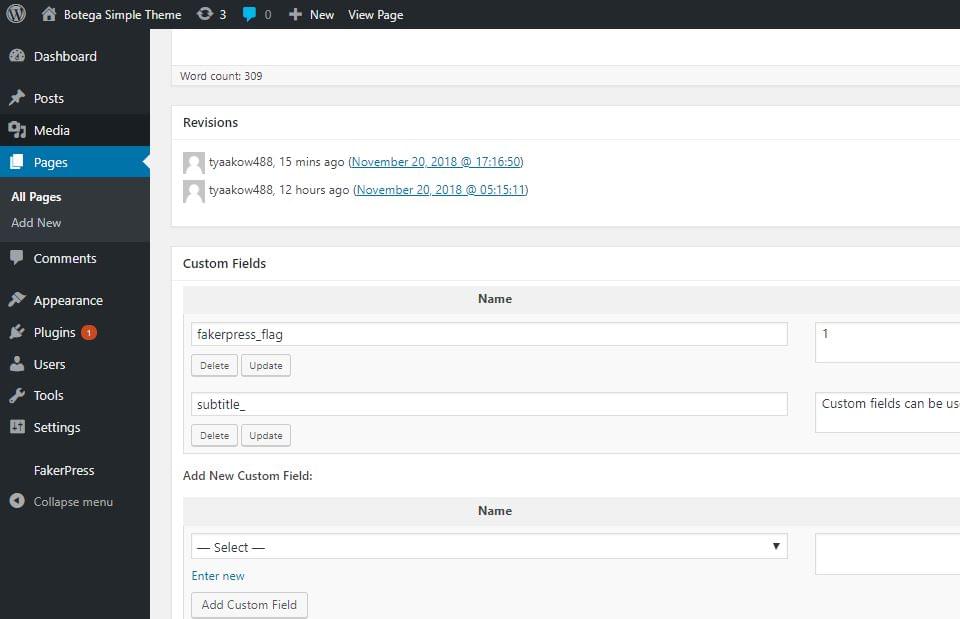
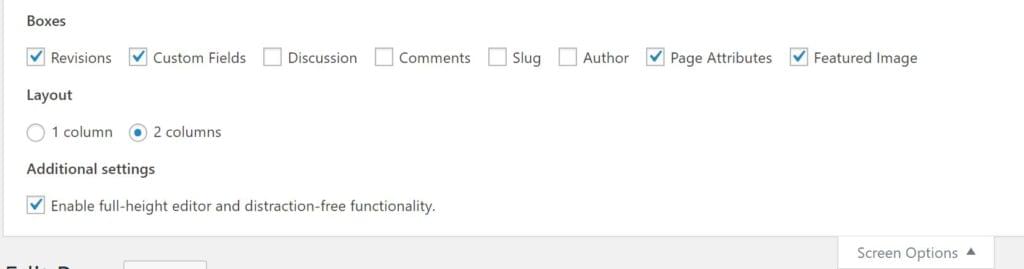
If we don’t see the Custom Fields section, we can enable it through the Screen Options in the to right corner of the edit screen:
After this is done, we’ll see our subtitle_ meta field showing below the page title on singular pages:
All these things — and styles — can be applied to posts as well.
We now need to format the output in single.php and page.php too.
Due to the space constraints of this guide, we’ll create the content we’ll use in both of these templates, but the structure will allow the readers to adapt and customize these templates more specifically if needed:
<?php
/**
 *
 * @package Botega Simple Theme
 */

get_header(); ?>

    <div class="col-lg-10 mx-auto col-md-10 col-md-offset-1 single-container">

<?php if ( have_posts() ) : ?>

<?php while ( have_posts() ) : the_post(); ?>

<?php get_template_part( 'partials/content', 'single' ); ?>

<?php endwhile; // End of the loop. ?>

<?php endif; ?>

</div>
<!-- /.col-lg-8.col-lg-offset-2.col-md-10.col-md-offset-1 -->

<?php get_footer(); ?>
Here we’re using a single-column layout, 10/12 wide, centered with mx-auto class. We use the partial content-single.php to output the actual content.
In this partial, we use the_content() and wp_link_pages():
<?php
/**
 * Template part for displaying single posts.
 *
 * @package Botega Simple Theme
 */

?>

<?php

the_content();

wp_link_pages();

?>
Now we have basic minimum for single pages and posts, but more can be added using WordPress functions. We can automatically specify what details we want WordPress to output in a single post, single page, and pages belonging to specific categories etc.
Global Widgets and Footer
We’ve created three widget (sidebar) areas for our footer, and we added the output to footer.php. We also added a section — or widget area — just above the footer tag. These widgets are not specific to the home page, or pages, or archives, but they are rather global. Once we assign widgets to them, they’ll display site-wide:
<?php
/**
 * Footer template partial
 *
 * @package Botega_Scratch_Theme
 *
 */

?>

    <?php if ( is_active_sidebar( 'b_c_s' ) ) : ?>
     <div class="row b_c_s"><div class="col-lg-8 mx-auto  top-widget col-md-10 ">
    <?php    get_sidebar( 'BottomCenterSidebar' ); ?>
     </div></div>
    <?php endif; ?>

  </div>
  <!-- /.container -->

  <!-- Footer -->
  <footer id="footer">
    <div class="container">
      <div class="row">
     <div class="col-lg-4 col-sm-12" id="f_1">  <?php  get_sidebar( 'Footer1' ); ?> </div>
     <div class="col-lg-4 col-sm-12" id="f_2">  <?php  get_sidebar( 'Footer2' ); ?> </div>
     <div class="col-lg-4 col-sm-12" id="f_3">  <?php  get_sidebar( 'Footer3' ); ?> </div>

      </div><!-- /.row -->
    </div><!-- /.container -->
  </footer><!-- /footer -->

<?php wp_footer(); ?>

</body>
</html>
What we get is a simple bottom and footer area we can populate with widgets:
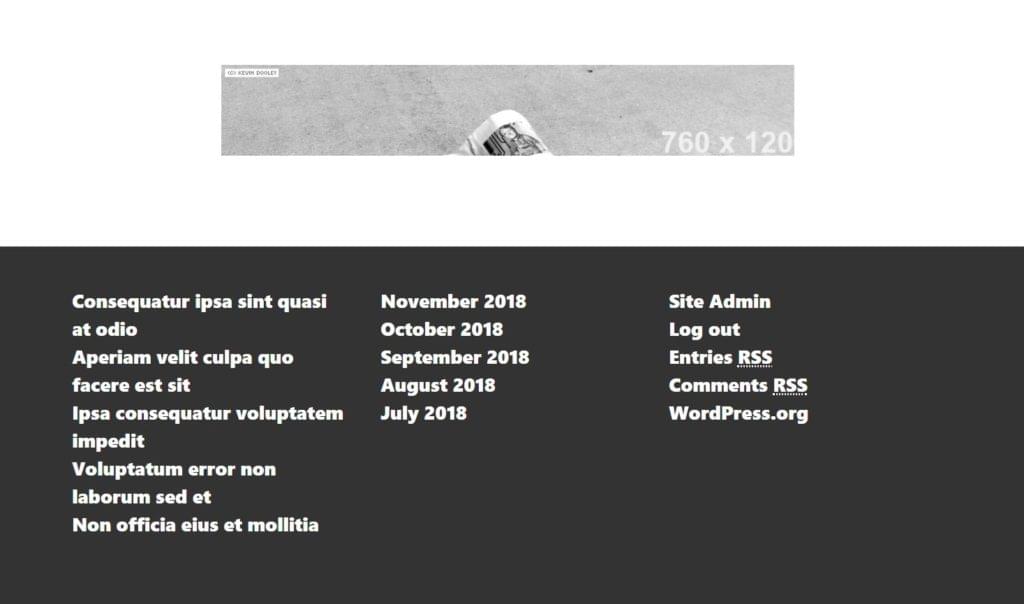
We now have a minimal but functional theme we can use to display content.
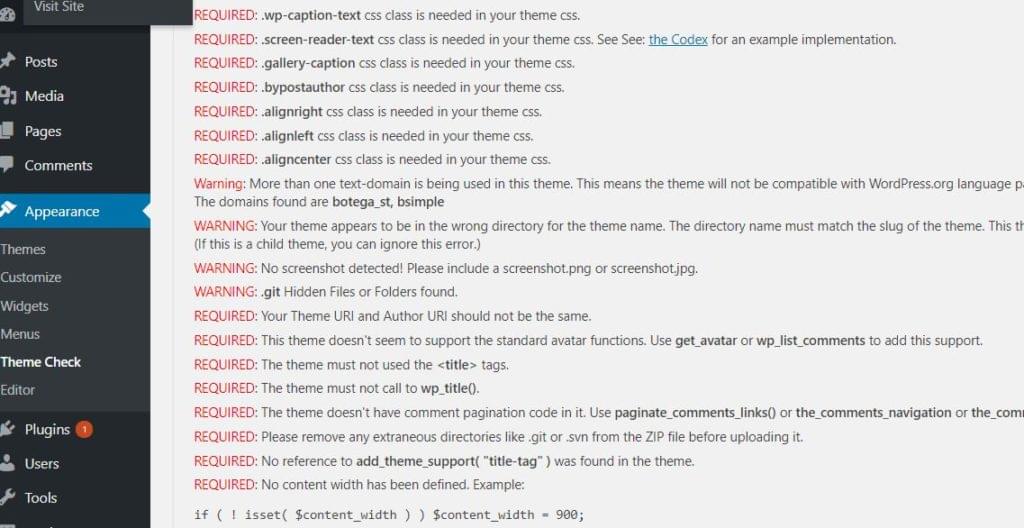
This guide will stop here, but next thing a prospective theme builder may want to do is to make sure that all use cases are covered, and that the theme is 100% full-featured. to do so, install the Theme Check plugin, among other tools, to inspect what our theme is lacking, and make sure everything is up to standards:
Conclusion
This guide has aimed to be a thorough introduction to WordPress theme building. It’s hopefully introduced all the fundamental WordPress theme building concepts, and demonstrated how they come together.
But there are still things to learn — like comments partials, author templates, 404 pages and many other little details that should be covered if we wanted to go more professional with this theme.
The initial code for this series is available at GitHub here, and the final version of the theme we built in this guide is available here.
On these foundations a lot more can be built, with the help of the comprehensive WordPress Codex.
There are three articles in this series on building a WordPress theme from scratch:
- understanging a theme’s structure
- theme basics
- refining the theme
Frequently Asked Questions about Building a WordPress Theme from Scratch
How can I display the content for a given page ID without the
wrapper in WordPress?
In WordPress, the content for a given page ID is usually wrapped in a
tag for styling purposes. However, if you want to display the content without the
wrapper, you can use the ‘the_content’ filter. This filter allows you to modify the content of a post after it is retrieved from the database but before it is printed to the screen. Here’s a simple example of how you can use this filter to remove the
tags:function remove_p_tags($content) {
return strip_tags($content, '<p>');}add_filter('the_content', 'remove_p_tags');
This code will remove all
tags from the post content. Please note that this will affect all posts, so use it carefully.
Why is my front page not loading in WordPress?
There could be several reasons why your front page is not loading in WordPress. Here are a few common issues and their solutions:
1. Incorrect Settings: Check your WordPress settings under Settings > Reading and make sure the correct page is set as the front page.
2. Theme Issues: The problem could be with your theme. Try switching to a default WordPress theme and see if the problem persists.
3. Plugin Conflicts: Sometimes, plugins can conflict with each other or with your theme, causing your front page to not load. Try deactivating all plugins and then reactivating them one by one to identify the problematic plugin.
4. Corrupted .htaccess File: A corrupted .htaccess file can also cause this issue. Try renaming your .htaccess file to something like .htaccess_old and see if that resolves the issue.
If none of these solutions work, it might be a good idea to contact your hosting provider or a WordPress expert for further assistance.
How can I get a post ID to show its content in a popup in WordPress?
Displaying a post’s content in a popup can be achieved by using a combination of WordPress functions and JavaScript. Here’s a basic example of how you can do this:
First, you need to get the post ID. You can do this using the get_the_ID() function in WordPress. This function will return the ID of the current post in the loop.$post_id = get_the_ID();
Next, you need to get the content of the post. You can do this using the get_post_field() function. This function retrieves the values of a particular field from a post. In this case, you want to get the ‘post_content’ field.$post_content = get_post_field('post_content', $post_id);
Finally, you can use JavaScript to display this content in a popup. Here’s a simple example using the alert() function:alert('<?php echo $post_content; ?>');
Please note that this is a very basic example and might not work perfectly in all situations. For a more robust solution, you might want to consider using a plugin or a more advanced JavaScript library for creating popups.
 Tonino Jankov
Tonino is a web developer and IT consultant who's dived through open-source code for over a decade. He's also a crypto enthusiast, Linux fan, and moderate libertarian.


