Introduction
Here we will see Codeigniter REST + ReactJS CRUD example. We have seen previously Codeigniter REST API examples for GET, POST, PUT and DELETE but here we will see them together. We will use ReactJS as a front-end technology to represent our UI.
In this example we will use Codeigniter version 3.1.9 and node version 6.11.3 and npm version 3.10.10.
We basically create two projects – one is frontend or client side called web-app and another one is server side called ci-3-1-9.
Obviously as the name suggests web-app, so it will contain only client side technologies to build the application whereas ci-3-1-9 will contain only PHP technologies to build the application.
Prerequisites
PHP 7.0.15, Codeigniter 3.1.9
React, Apache 2.4
Example with Source Code
Let’s move on to the Codeigniter REST + ReactJS CRUD example…
Server Side – Codeigniter
Setting up the project
Extract your Codeigniter zip folder version 3.1.9 under Apache 2.4 htdocs directory. Now make following changes into the codeigniter directory ci-3-1-9.
Make sure to have below line in sync in ci-3-1-9/application/config/autoload.php.
$autoload['libraries'] = array('database', 'table');
$autoload['helper'] = array('url', 'file', 'text', 'form');
We will use MySQL database for our example, so please make sure to have similar configuration for your MySQL database connection at ci-3-1-9/application/config/database.php:
'hostname' => 'localhost',
'username' => 'root',
'password' => '',
'database' => 'roytuts',
'dbdriver' => 'mysqli',
As the title suggests this tutorial is regarding Codeigniter REST API, so we have to first setup the support for REST API in Codeigniter. Please read here setup RESTful service with codeigniter.
Now you are done with the important setup of your project.
Creating Table in MySQL
The below table stores information about websites.
CREATE TABLE `website` (
  `id` int(10) unsigned NOT NULL AUTO_INCREMENT,
  `title` varchar(255) COLLATE utf8_unicode_ci NOT NULL,
  `url` varchar(255) COLLATE utf8_unicode_ci NOT NULL,
  PRIMARY KEY (`id`)
) ENGINE=InnoDB AUTO_INCREMENT=1 DEFAULT CHARSET=utf8 COLLATE=utf8_unicode_ci;
Creating Model Class
Now create below Codeigniter model class to perform the database operations, such as, fetching, saving, updating, deleting.
The first method fetches all website information from database table. The second method fetches a particular website information for a given website id.
The third method adds new website information. The fourth one updates the existing information and fifth one deletes the information.
<?php

defined('BASEPATH') OR exit('No direct script access allowed');

class Website_model extends CI_Model {

    private $website = 'website';

    function get_website_list() {
        $query = $this->db->get($this->website);
        if ($query) {
            return $query->result();
        }
        return NULL;
    }

    function get_website($id) {
        $query = $this->db->get_where($this->website, array("id" => $id));
        if ($query) {
            return $query->row();
        }
        return NULL;
    }

    function add_website($website_title, $website_url) {
        $data = array('title' => $website_title, 'url' => $website_url);
        $this->db->insert($this->website, $data);
    }

    function update_website($website_id, $website_title, $website_url) {
        $data = array('title' => $website_title, 'url' => $website_url);
        $this->db->where('id', $website_id);
        $this->db->update($this->website, $data);
    }

    function delete_website($website_id) {
        $this->db->where('id', $website_id);
        $this->db->delete($this->website);
    }

}
Creating Controller Class
The below controller class defines all the methods required for Codeigniter REST API CRUD operations.
Notice we have used below header to avoid error No ‘Access-Control-Allow-Origin’ header is present on the requested resource.
header('Access-Control-Allow-Origin: *');The above line allows requests coming from any source.
The below controller class defines CRUD methods:
<?php
use Restserver\Libraries\REST_Controller;

defined('BASEPATH') OR exit('No direct script access allowed');

header('Access-Control-Allow-Origin: *');

if($_SERVER['REQUEST_METHOD'] === 'OPTIONS') {
	header('Access-Control-Allow-Methods: GET, PUT, POST, DELETE, OPTIONS');
	header('Access-Control-Allow-Headers: Content-Type');
	exit;
}

require APPPATH . 'libraries/REST_Controller.php';
require APPPATH . 'libraries/Format.php';

class WebsiteRestController extends REST_Controller {

	use REST_Controller {
		REST_Controller::__construct as private __resTraitConstruct;
	}

	function __construct() {
        parent::__construct();
		$this->__resTraitConstruct();
		$this->load->model('website_model', 'wm');
    }

	function websites_get() {
        $websites = $this->wm->get_website_list();

        if ($websites) {
            $this->response($websites, 200);
        } else {
            $this->response(array(), 200);
        }
    }

    function website_get() {
        if (!$this->get('id')) { //query parameter, example, websites?id=1
            $this->response(NULL, 400);
        }

        $website = $this->wm->get_website($this->get('id'));

        if ($website) {
            $this->response($website, 200); // 200 being the HTTP response code
        } else {
            $this->response(array(), 500);
        }
    }

	function add_website_post() {
        $website_title = $this->post('title');
        $website_url = $this->post('url');

        $result = $this->wm->add_website($website_title, $website_url);

        if ($result === FALSE) {
            $this->response(array('status' => 'failed'));
        } else {
            $this->response(array('status' => 'success'));
        }
    }

    function update_website_put() {
        $website_id = $this->put('id');
        $website_title = $this->put('title');
        $website_url = $this->put('url');

        $result = $this->wm->update_website($website_id, $website_title, $website_url);

        if ($result === FALSE) {
            $this->response(array('status' => 'failed'));
        } else {
            $this->response(array('status' => 'success'));
        }
    }

	function delete_website_delete($website_id) { //path parameter, example, /delete/1

        $result = $this->wm->delete_website($website_id);

        if ($result === FALSE) {
            $this->response(array('status' => 'failed'));
        } else {
            $this->response(array('status' => 'success'));
        }
    }

}
I will explain later in front-end or ReactJS part the below code snippets written into the above Codeigniter controller class:
if($_SERVER['REQUEST_METHOD'] === 'OPTIONS') {
	header('Access-Control-Allow-Methods: GET, PUT, POST, DELETE, OPTIONS');
	header('Access-Control-Allow-Headers: Content-Type');
	exit;
}
Configuring Route
Now make a small change into ci-3-1-9/application/config/routes.php for routing the URI path:
$route['default_controller'] = 'websiterestcontroller';Client Side – React
Now we will see how do we create client side UI code using React framework.
Setting up Project
Create a directory called web-app and ow navigate to the directory web-app in cmd window and run the below command to create required modules and project structures under web-app directory.
Please read how to setup node.js in Windows before you create the ReactJS application.
>create-react-app web-app
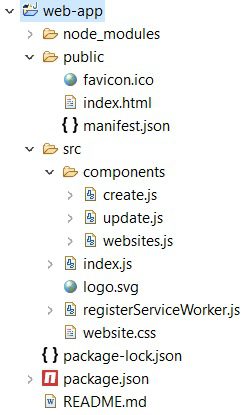
We will write everything into js (javaScript) files under src folder. We want to keep each component’s js file under src/components. Therefore create components directory under src folder.
So the typical directory structure of web-app would be similar to below image:
Apply Styles
Create below website.css file under src directory to apply some basic style to the UI.
#container {
	width: 800px;
	margin: auto;
}
table {
	border-collapse: collapse;
	width: 800px;
	margin: 10px auto;
}
th, td {
	border: 1px solid #ddd;
	text-align: left;
	padding: 8px;
}
tr:nth-child(even) {
	background-color: #f2f2f2
}
tr:hover {
	background-color: #ddd;
}
th {
	padding-top: 12px;
	padding-bottom: 12px;
	text-align: left;
	background-color: #4CAF50;
	color: white;
}
Creating JS files for CRUD Operations
Create a folder called components under src folder where we will put our js files.
index.js file
This file is the root file and it defines all paths required to navigate once your application functionality is displayed on ReactJS UI. You may click on link for creating new website, you may click on update link for updating existing website information etc.
import React from 'react';
import ReactDOM from 'react-dom';
import { BrowserRouter as Router, Route } from 'react-router-dom';
import './website.css';
import Websites from './components/websites';
import Create from './components/create';
import Update from './components/update';
import registerServiceWorker from './registerServiceWorker';
ReactDOM.render(
	<Router>
		<div>
			<Route exact path='/' component={Websites} />
			<Route path='/create' component={Create} />
			<Route path='/update/:id' component={Update} />
		</div>
	</Router>,
document.getElementById('root'));

registerServiceWorker();
The registerServiceWorker.js file has already been created under the src folder during the initial ReactJS project creation.
Retrieve All Websites
Create below websites.js file under src/components directory, which will hold all the logic to retrieve all websites and display on a HTML table. In each row we will provide two links – edit, for updating the existing website and delete, for deleting the existing website.
We will also provide Create Website link on top of the table, using which you will be able to add new website information to the server side.
You may find more on componentDidMount. We have exported the class as export default <component name> to use (import) it elsewhere as you have seen in the index.js file.
import React from 'react';
import { Link } from 'react-router-dom';

class Websites extends React.Component {
	constructor(props) {
		super(props);
		this.state = {websites: []};
		this.headers = [
			{ key: 'id', label: 'Id'},
			{ key: 'title', label: 'Title' },
			{ key: 'url', label: 'URL' }
		];
		this.deleteWebsite = this.deleteWebsite.bind(this);
	}

	componentDidMount() {
		fetch('http://localhost/ci-3-1-9/index.php/websiterestcontroller/websites')
			.then(response => {
				return response.json();
			}).then(result => {
				console.log(result);
				this.setState({
					websites:result
				});
			});
	}

	deleteWebsite(id) {
		if(window.confirm("Are you sure want to delete?")) {
			fetch('http://localhost/ci-3-1-9/index.php/websiterestcontroller/delete_website/' + id, {
                                method : 'DELETE'
                                   }).then(response => {
					if(response.status === 200) {
						alert("Website deleted successfully");
                                                fetch('http://localhost/ci-3-1-9/index.php/websiterestcontroller/websites')
						.then(response => {
							return response.json();
						}).then(result => {
							console.log(result);
							this.setState({
								websites:result
							});
						});
					}
			 });
		}
	}

	render() {
		return (
			<div id="container">
				<Link to="/create">Add Website</Link>
				<p/>
				<table>
					<thead>
						<tr>
						{
							this.headers.map(function(h) {
								return (
									<th key = {h.key}>{h.label}</th>
								)
							})
						}
						  <th>Actions</th>
						</tr>
					</thead>
					<tbody>
						{
							this.state.websites.map(function(item, key) {
							return (
								<tr key = {key}>
								  <td>{item.id}</td>
								  <td>{item.title}</td>
								  <td>{item.url}</td>
								  <td>
										<Link to={`/update/${item.id}`}>Edit</Link>

										<a href="javascript:void(0);" onClick={this.deleteWebsite.bind(this, item.id)}>Delete</a>
								  </td>
								</tr>
											)
							}.bind(this))
						}
					</tbody>
				</table>
			</div>
		)
	}
}

export default Websites;
Creating Website
You need to create below js file under src/components directory, which will hold all the logic to add new website information. It will display a form where user inputs website information and click on Submit button to add the website information.
Once you add successfully, an alert box will show you successful message.
You will also be given a link that will take you to the list of websites page.
import React from 'react';
import { Link } from 'react-router-dom';

class Create extends React.Component {
  constructor(props) {
    super(props);
    this.state = {title: '', url:''};
    this.handleChange = this.handleChange.bind(this);
    this.handleSubmit = this.handleSubmit.bind(this);
  }
  handleChange(event) {
	  const state = this.state
	  state[event.target.name] = event.target.value
	  this.setState(state);
  }
  handleSubmit(event) {
	  event.preventDefault();
	  fetch('http://localhost/ci-3-1-9/index.php/websiterestcontroller/add_website', {
			method: 'POST',
			body: JSON.stringify({
							title: this.state.title,
							url: this.state.url
			}),
			headers: {
							"Content-type": "application/json; charset=UTF-8"
			}
		}).then(response => {
				if(response.status === 200) {
					alert("New website saved successfully");
				}
			});
  }
  render() {
    return (
		<div id="container">
		  <Link to="/">Websites</Link>
			  <p/>
			  <form onSubmit={this.handleSubmit}>
				<p>
					<label>Title:</label>
					<input type="text" name="title" value={this.state.title} onChange={this.handleChange} placeholder="Title" />
				</p>
				<p>
					<label>URL:</label>
					<input type="text" name="url" value={this.state.url} onChange={this.handleChange} placeholder="URL" />
				</p>
				<p>
					<input type="submit" value="Submit" />
				</p>
			  </form>
		   </div>
    );
  }
}

export default Create;
Updating Website
Create below js file under src/components directory, which will hold all the logic to update existing website information. It will display a form where user modifies the existing website information and click on Submit button to update the website information.
We pass website id value with the browser URL as a path parameter and that’s why we have the route path as /update/:id in the index.js file. Accordingly we have added Link element in the table for editing exiting information. Using this id value we first fetch the website information from server and populate the form fields in update page.
Once you update successfully, an alert box will show you successful message.
You will also be given a link that will take you to the list of websites page.
import React from 'react';
import { Link, withRouter } from 'react-router-dom';

class Update extends React.Component {
  constructor(props) {
    super(props);
    this.state = {id: '', title: '', url: ''};
    this.handleChange = this.handleChange.bind(this);
    this.handleSubmit = this.handleSubmit.bind(this);
  }

  componentDidMount() {
	fetch('http://localhost/ci-3-1-9/index.php/websiterestcontroller/website?id=' + this.props.match.params.id)
		.then(response => {
			return response.json();
		}).then(result => {
			console.log(result);
			this.setState({
				id:result.id,
				title:result.title,
				url:result.url
			});
		});
  }
  handleChange(event) {
	  const state = this.state
	  state[event.target.name] = event.target.value
	  this.setState(state);
  }
  handleSubmit(event) {
	  event.preventDefault();
	  fetch('http://localhost/ci-3-1-9/index.php/websiterestcontroller/update_website', {
			method: 'PUT',
			body: JSON.stringify({
							id:this.state.id,
							title: this.state.title,
							url: this.state.url
			}),
			headers: {
							"Content-type": "application/json; charset=UTF-8"
			}
		}).then(response => {
				if(response.status === 200) {
					alert("Website update successfully.");
				}
			});
  }

  render() {
    return (
			<div id="container">
			  <Link to="/">Websites</Link>
				  <p/>
				  <form onSubmit={this.handleSubmit}>
					<input type="hidden" name="id" value={this.state.id}/>
						<p>
						<label>Title:</label>
							<input type="text" name="title" value={this.state.title} onChange={this.handleChange} placeholder="Title" />
						</p>
						<p>
							<label>URL:</label>
							<input type="text" name="url" value={this.state.url} onChange={this.handleChange} placeholder="URL" />
						</p>
						<p>
							<input type="submit" value="Submit" />
						</p>
				  </form>
			   </div>
    );
  }
}

export default Update;
Deleting Website
You click on the Delete link given on table at each row on the right side to delete the existing website information. When you click on the Delete link you will be shown an alert box to get confirmation whether you really want to delete. If you click on yes then only website information will get deleted from server otherwise you will stay on the same page.
The delete functionality is given in the websites.js file.
Notice how I have used normal anchor link <a/> to create delete link for deleting website information.
Note: if you receive module react-router-dom is not found then you can install it using command npm install –save react-router-dom.
Testing the Application
Now you have to first deploy the Codeigniter application. Here you will find the feeling of Codeigniter REST + ReactJS CRUD example.
Next to run your ReactJS application, navigate to the directory web-app in cmd window and execute the command npm start. A browser with URL http://localhost:3000/ will automatically open and a home page gets displayed with no website listed in the table but you will see only table headers.

Now try to add a new website by clicking on the link Add Website, you have to fill title and URL of the website and click on Submit button.
But, wait… you won’t be able to do that. If you monitor the http request and response in browser by pressing F12 key from keyboard. You will see the error – http status code 405, which means method not allowed.
You will also notice that you are sending POST request but in the Request headers you will find it OPTIONS. So what went wrong?
You can find details on this error here at https://stackoverflow.com/questions/29954037/why-is-an-options-request-sent-and-can-i-disable-it.
Now remember I said while I was writing Codeigniter REST Controller class that I will explain the below code snippets later in ReactJS section. Now the below code is required to avoid this error in development environment. You won’t find this error in your PROD environment.
That’s why I added this below code snippets to the controller class:
if($_SERVER['REQUEST_METHOD'] === 'OPTIONS') {
	header('Access-Control-Allow-Methods: GET, PUT, POST, DELETE, OPTIONS');
	header('Access-Control-Allow-Headers: Content-Type');
	exit;
}
To reproduce the error, you can remove above code snippets from your controller class and test the application. I searched in Google but I did not get a good solution for this, if you find any good solution on this issue please let me know.
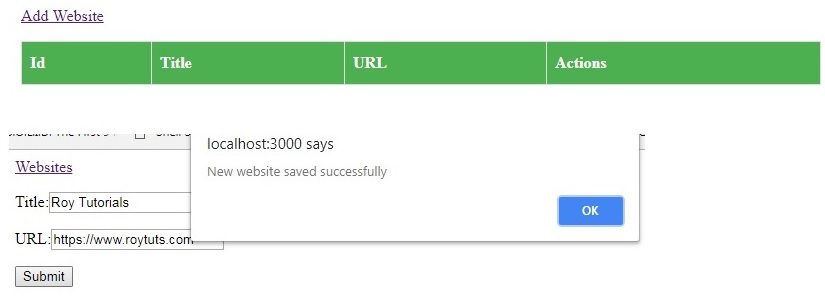
A new website gets created and you will see an alert box showing “New website saved successfully” similar to below image:
Now when you click on Websites link will find a new website information in the home page.

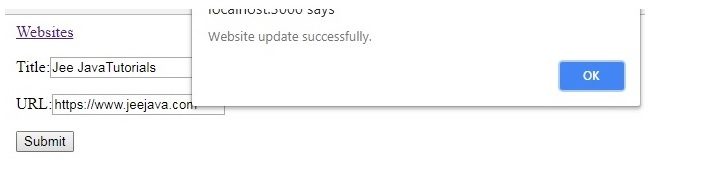
Next you may want to update the existing website. So let’s update by clicking on the edit link given on the right side of the table row. A form with auto-populated existing website information will be opened and once you update by clicking on the Submit button, you will see an alert box showing “Website updated successfully”:
Now you will get updated list on home page:

Now if you want to delete the website then you may click on Delete link. When you click on Delete link you will get an alert box for confirmation whether you really want to delete or not?

When you click yes then above row will get deleted and you will be left with no more website.
Improvements
There are many areas you can improve in the example Codeigniter REST + ReactJS CRUD Example. Some of the them are given below:
1. Look and feel of the UI
2. Validation of the input fields
3. When you add or update website information then you can navigate to the list of websites page
4. Error handling, currently I am only checking http status 200
5. Apply security with roles
…more
That’s all. Hope you got idea how to create Codeigniter REST + ReactJS CRUD example.
Source Code
Thanks for reading.
Hi
reactjs Not Worked In Linux?
Thanks