How to Setup Apache Subversion with Let's encrypt SSL on Ubuntu 18.04
On this page
Apache Subversion or SVN is an open-source software versioning and revision control system developed by the Apache Software Foundation. It's used to maintain the current and historical versions of source code, documents, and web pages.
The Subversion or svn widely used for the large project and open source community such as Apache Software Foundation, FreeBSD, GCC, SourceForge etc.
In this article, I will show you how to set up the Apache Subversion using Ubuntu 18.04 LTS server. We will install and configure the svn software with Apache as the web server, enable 'basic authentication' for users, and secure access by using Letsencrypt SSL for the repository access.
And for those who prefer GIT, the Ubuntu 18.04 GIT tutorial is here.
Prerequisites
- Ubuntu 18.04
- Root privileges
What we will do
- Install Apache2 web server on Ubuntu 18.04
- Install Apache Subversion (SVN)
- Configure the Subversion Repository
- Generate SSL Letsencrypt for Ubuntu Apache2
- Configure Subversion Virtual Host on Apache2
- Testing
Step 1 - Install Apache2 web server on Ubuntu 18.04 LTS
In this first step, we will install the Apache2 web server and add new services ssh and HTTP to the ufw firewall configuration.
Install the Apache2 web server using the apt command below.
sudo apt install apache2 apache2-utils -y
After the installation is complete, add the SSH and HTTP services to the ufw firewall configuration.
Run ufw commands below.
ufw allow ssh
ufw allow http
Enable the firewall.
ufw enable
Now start the Apache2 service and enable it to launch every time at system boot.
systemctl start apache2
systemctl enable apache2
The Apache2 web server is up and running, and the SSH and HTTP services have been added to the firewall services list.

Step 2 - Install Apache Subversion (SVN)
In this tutorial, we will install the subversion and the svn libapache packages from the official Ubuntu repository.
Install Subversion using the apt command below.
sudo apt install subversion subversion-tools libapache2-mod-svn -y
Now check the svn command.
svn --version
The Apache Subversion (SVN) has been installed on Ubuntu 18.04 Server.

Step 3 - Configure a Subversion Repository
After the subversion installation, we will configure the master subversion repository directory. We will create a new 'svn' directory that will be used to store all source code and repositories.
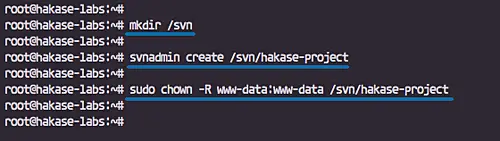
Create a new '/svn' master directory.
mkdir /svn
And create a new sample repository named 'hakase-project' using the svnadmin command below.
svnadmin create /svn/hakase-project
Now change the owner of the '/svn/hakase-project' directory to the 'apache' user and group.
sudo chown -R apache:apache /svn/hakase-project
And the svn repository has been created.
Step 4 - Generate Letsencrypt SSL Certificate
In this tutorial, we will configure the svn server to use the HTTPS connection with a domain named 'svn.hakase-labs.io'. We will be using the free SSL Letsencrypt, and it's can be generated using the certbot tool.
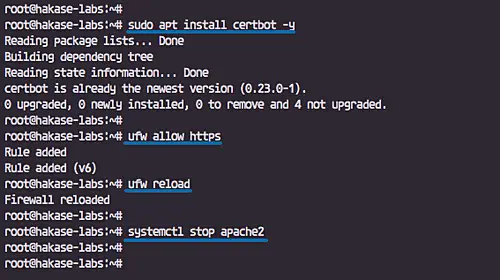
Install certbot on Ubuntu server using the yum command below.
sudo apt install certbot -y
After the installation is complete, we need to add the HTTPS service to the ufw firewall service lists.
Run ufw commands below.
ufw allow https
ufw reload
Now stop the httpd service, so we can generate the SSL Letsencrypt using the 'standalone' temporary web server.
systemctl stop apache2
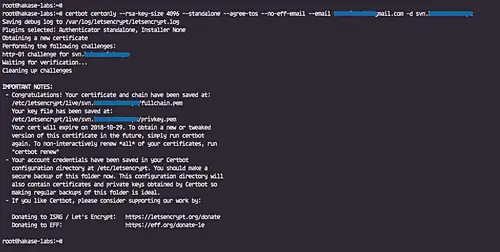
Generate the SSL Letsencrypt for the domain name 'svn.hakase-labs.io' using the certbot command below.
certbot certonly --rsa-key-size 4096 --standalone --agree-tos --no-eff-email --email [email protected] -d svn.hakase-labs.io
And after it's complete, you will get the certificate files inside the '/etc/letsencrypt/live' directory.
Step 5 - Configure Subversion Virtual Host on Apache2
In this step, we will create a new Apache httpd configuration for svn access. We will configure the svn repository using a domain name 'svn.hakase-labs.io', and it will be accessible only for registered users using the HTTP basic auth.
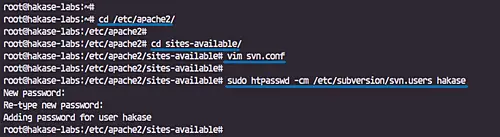
Go to the '/etc/apache2' configuration directory.
cd /etc/apache2/
Create a new subversion virtual host configuration 'svn.conf' on the 'sites-available' directory.
cd sites-available/
vim svn.conf
Paste the configuration below.
<VirtualHost svn.hakase-labs.io:80>

ServerName svn.hakase-labs.io
DocumentRoot /var/www/html
Redirect permanent / https://svn.hakase-labs.io

</VirtualHost>

<VirtualHost svn.hakase-labs.io:443>

DocumentRoot /var/www/html
ServerName svn.hakase-labs.io

SSLEngine on
SSLProtocol all -SSLv2
SSLCipherSuite ALL:!ADH:!EXPORT:!SSLv2:RC4+RSA:+HIGH:+MEDIUM:+LOW
SSLCertificateFile /etc/letsencrypt/live/svn.hakase-labs.io/fullchain.pem
SSLCertificateKeyFile /etc/letsencrypt/live/svn.hakase-labs.io/privkey.pem

ErrorLog /var/log/apache2/svn_error_log
TransferLog /var/log/apache2/svn_access_log
LogLevel warn

<location /repo>
DAV svn
SVNParentPath /svn/
AuthType Basic
AuthName "Authorization Realm"
AuthUserFile /etc/subversion/svn.users
Require valid-user
</location>

<Files ~ "\.(cgi|shtml|phtml|php3?)$">
    SSLOptions +StdEnvVars
</Files>

SetEnvIf User-Agent ".*MSIE.*" \
         nokeepalive ssl-unclean-shutdown \
         downgrade-1.0 force-response-1.0
CustomLog /var/log/apache2/ssl_request_log \
          "%t %h %{SSL_PROTOCOL}x %{SSL_CIPHER}x \"%r\" %b"
</VirtualHost>
Save and exit.
Next, we need to create a new list of users that will be able to view and commit files to the repository.
Create a new user named 'hakase' using the htpasswd command.
sudo htpasswd -cm /etc/subversion/svn.users hakase
Enable the SSL module on apache and enable the svn virtual host by running commands below.
sudo a2enmod ssl
sudo a2ensite svn
Restart the Apache2 service.
systemctl restart apache2

The virtual host configuration for subversion has been created, and the 'hakase' user now has an access to view and commit the source code to the 'hakase-project' repository.
Step 6 - Testing
View Repository
Open your web browser and type the server URL, mine is the one below).
https://svn.hakase-labs.io/repo/hakase-project/
And you will be shown the basic user authentication.

Login with the 'hakase' user and password, and you will get the page blank page repository as below.

Import Project to the SVN Repository
Now we will import the svn sample project templates to the 'hakase-project' repository.
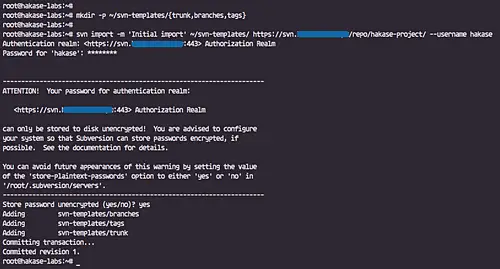
Create a new svn-templates project directory.
mkdir -p ~/svn-templates/{trunk,branches,tags}
Add templates directory to the 'hakase-project' repository using the svn command below.
svn import -m 'Initial import' ~/svn-templates/ https://svn.hakase-labs.io/repo/hakase-project/ --username hakase
You will be asked about some things, act in following ways.
- Type 'p' to add permanently the Letsencrypt certificate.
- Type the 'hakase' user and password.
- And type 'yes' to confirm about the saving unencrypted password.
Check the 'hakase-project' from the web browser, and you will get all the templates directory on it.

Clone the Repository
After creating and uploading the svn templates directory, we will try cloning the repository to the local environment.
Login to the non-root/normal user.
useradd -m -s /bin/bash misaka
su - misaka
Clone to the 'hakase-project' repository the local directory named 'myproject' as a 'hakase' user.
svn co https://svn.hakase-labs.io/repo/hakase-project/ ~/myproject --username hakase
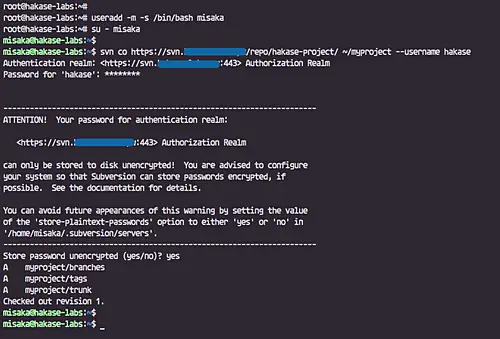
Check the new 'myproject' directory and you will get all svn templates.
tree ~/myproject

Commit Source Code
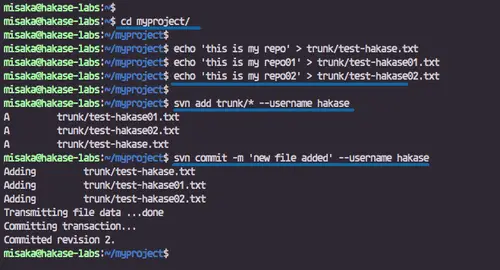
Go to the 'myproject' directory.
cd myproject/
Create some files on the 'trunk' directory.
echo 'this is my repo' > trunk/test-hakase.txt
echo 'this is my repo01' > trunk/test-hakase01.txt
echo 'this is my repo02' > trunk/test-hakase02.txt
Add and commit
svn add trunk/* --username hakase
svn commit -m 'new file added' --username hakase
Check the repository from the web browser, and you will get all files has been added to the repository.
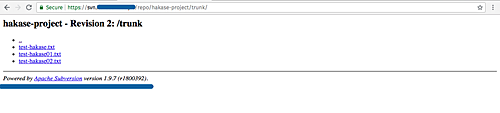
The Apache Subversion installation and configuration on Ubuntu 18.04 LTS Server has been completed successfully.

