Cordova Frameworks: Ionic vs. Framework7
Hybrid mobile apps may have their limitations, but often it’s well worth the boost in cross-platform consistency and development speed. Apps made with Apache Cordova in particular can further leverage existing web developer skills through the use of Cordova frameworks. This tutorial compares Ionic with Framework7.
Hybrid mobile apps may have their limitations, but often it’s well worth the boost in cross-platform consistency and development speed. Apps made with Apache Cordova in particular can further leverage existing web developer skills through the use of Cordova frameworks. This tutorial compares Ionic with Framework7.

Alex’s decade-plus of JS coding has taught him the language’s internals. He’s lead a dev team for Yandex and built fault-tolerant systems.
Expertise
These days, web developers rule the world. JavaScript is used everywhere one can program. Among these areas, mobile app development was one of the first ways to branch out: About ten years ago, PhoneGap allowed HTML and JavaScript app installation for iOS and Android.
Since then, the technology has had its ups and downs: Despite the ease of development, these apps were obviously quite different from native apps. Vanilla HTML and browser-based JavaScript were targeted at browsers, and there was no way for them to flawlessly migrate to this new field.
To this day the main issues still are:
- Difficulties in adhering to native design and animation
- Complex screen transition effects
- Touch events handling
- Performance on big lists
- Positioning fixed elements
- Adapting for different screen sizes
- Locations of native control elements (for example, the iOS status bar)
- Adapting to different mobile browsers
Why Use a Framework for Cordova Apps?
Cordova technology is often underestimated because of apps that have the above issues. Frameworks aim to offset them and take HTML apps as close to native apps as possible, both in design and performance.
Let’s look at a couple of hybrid app examples. They’re made with the two currently most successful frameworks—besides Onsen UI—which are set to facilitate the expansion of web developers in the modern world: Framework7 and Ionic.
About the Ionic Framework
Ionic was developed by Drifty Co. in 2012 and is based on Angular. Since then, it has been in active development, receiving significant investments and a strong developer community. The official website claims that millions of apps have been developed based on it.
At the moment of writing of this article, the most recent version is Ionic 3 based on Angular 5. Ionic 4, aiming for flexibility and independence from Angular, is in early beta.
Apart from the UI engine, a wonderful component library, and an interface for accessing native device functions, Ionic offers multiple extra capabilities, services, and utilities.
The Ionic CLI
Ionic’s command-line interface is used for interactive project initialization (i.e., a wizard), generating pages and components, and running a development server that allows you to build apps on the go and Live Reload them. It also provides integration with Ionic cloud services.
Lab and DevApp
Lab is the extremely useful mini-service that allows you to imitate the work of the application on different platforms in the Ionic developer’s browser. DevApp helps you quickly deploy an app to a real device.
Packaging, Deploying, and Monitoring
Ionic comes with a bundle of web services that simplify and speed up building, debugging, testing, and updating applications for testers and users.
Ionic’s plans change often, though. Some previously existing services—such as Auth, Push, Analytics, and View—were closed, causing an outcry from the subscribers.
Creator
This is Ionic’s drag-and-drop graphic editor for developing functional interfaces.
About Framework7
This framework was developed in 2014 by Russian studio iDangero. Ultimately, one developer has been working on the project, not including several minor contributors to the GitHub repository.
Originally, Framework7 consisted of the set of UI components in the style of then-recently-released iOS 7, from which it gets its name. Later, an Android theme was added, and both themes were updated for the most recent iOS and Material Design.
Recently, the project’s development picked up pace, and it expanded from a set of components to a full-fledged framework for mobile applications, integrating popular technologies and tools.
Framework7’s support and examples using Vue.js have existed since v1, and v3 also supports React. This is what may allow the project to seriously compete with the more popular Ionic, which only offers Angular and TypeScript.
Installation and First Launch
Ionic
To start working with Ionic, install it with NPM:
npm install -g ionic
Then, select the template for the future application. The official Ionic website offers multiple templates, or you can select an empty template to build the application from the ground up with ionic start myApp blank.
Let’s select a simple design. Execute the following command:
ionic start Todo tabs
Answer “Yes” when the installer asks “Would you like integrate your new app with Cordova to target native iOS and Android?” This will automatically integrate the application with Cordova and prepare it for deployment on mobile platforms.
In the next step, the installer will offer to connect us to the Ionic Pro SDK. Answer “No” for now to keep the example simple.
Install the additional @ionic/lab package to get the convenient debugging UI—in-browser imitations of iOS, Android, and Windows devices:
cd Todo

npm i --save-dev @ionic/lab
Now you can start the application in debug mode. This allows you to develop and debug the application live in the web browser:
ionic lab
As a result, you will get several useful addresses:
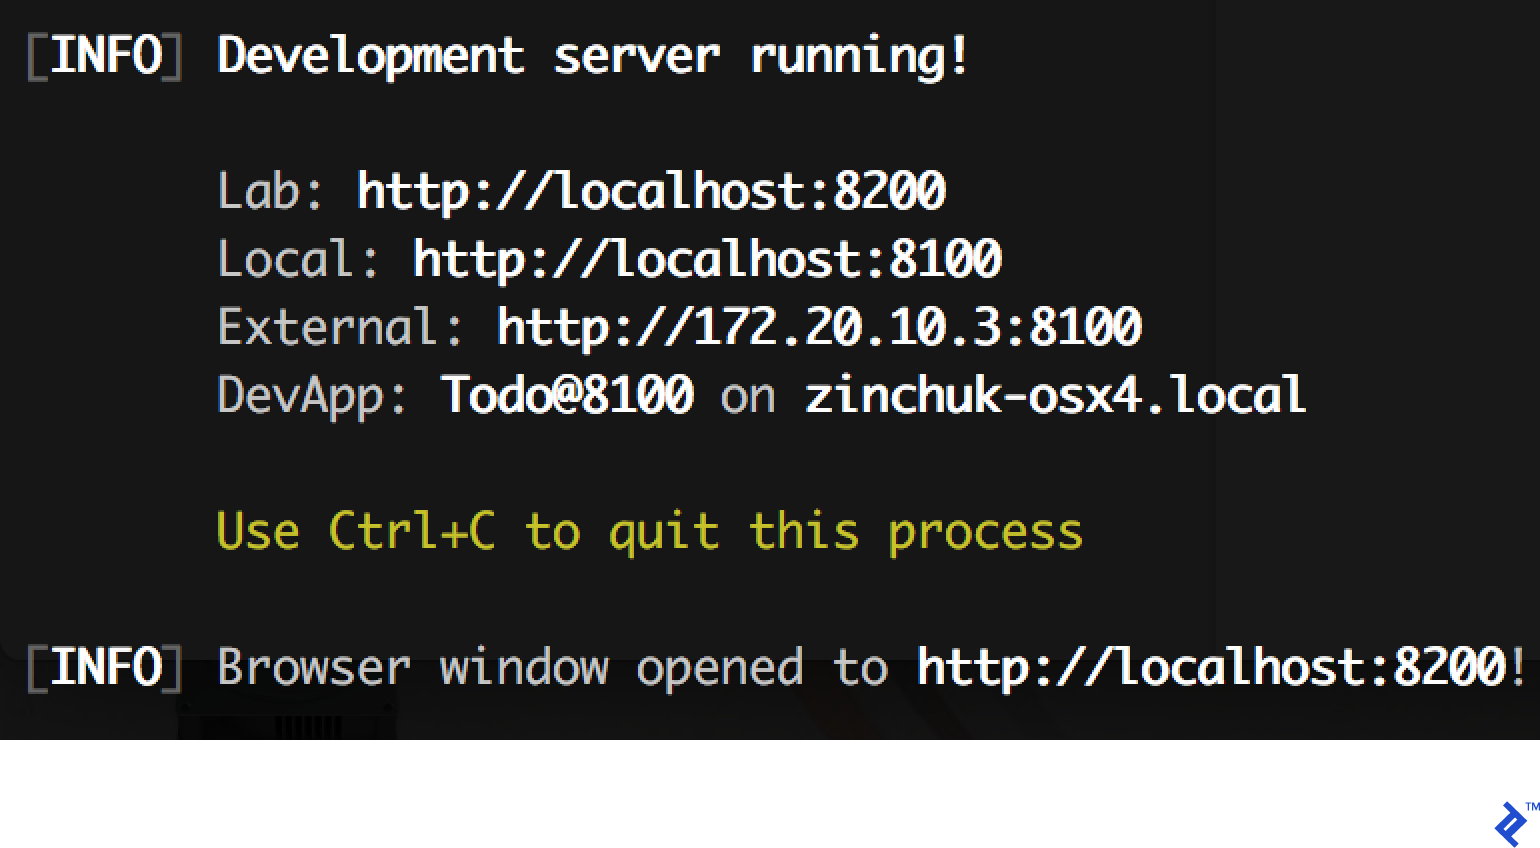
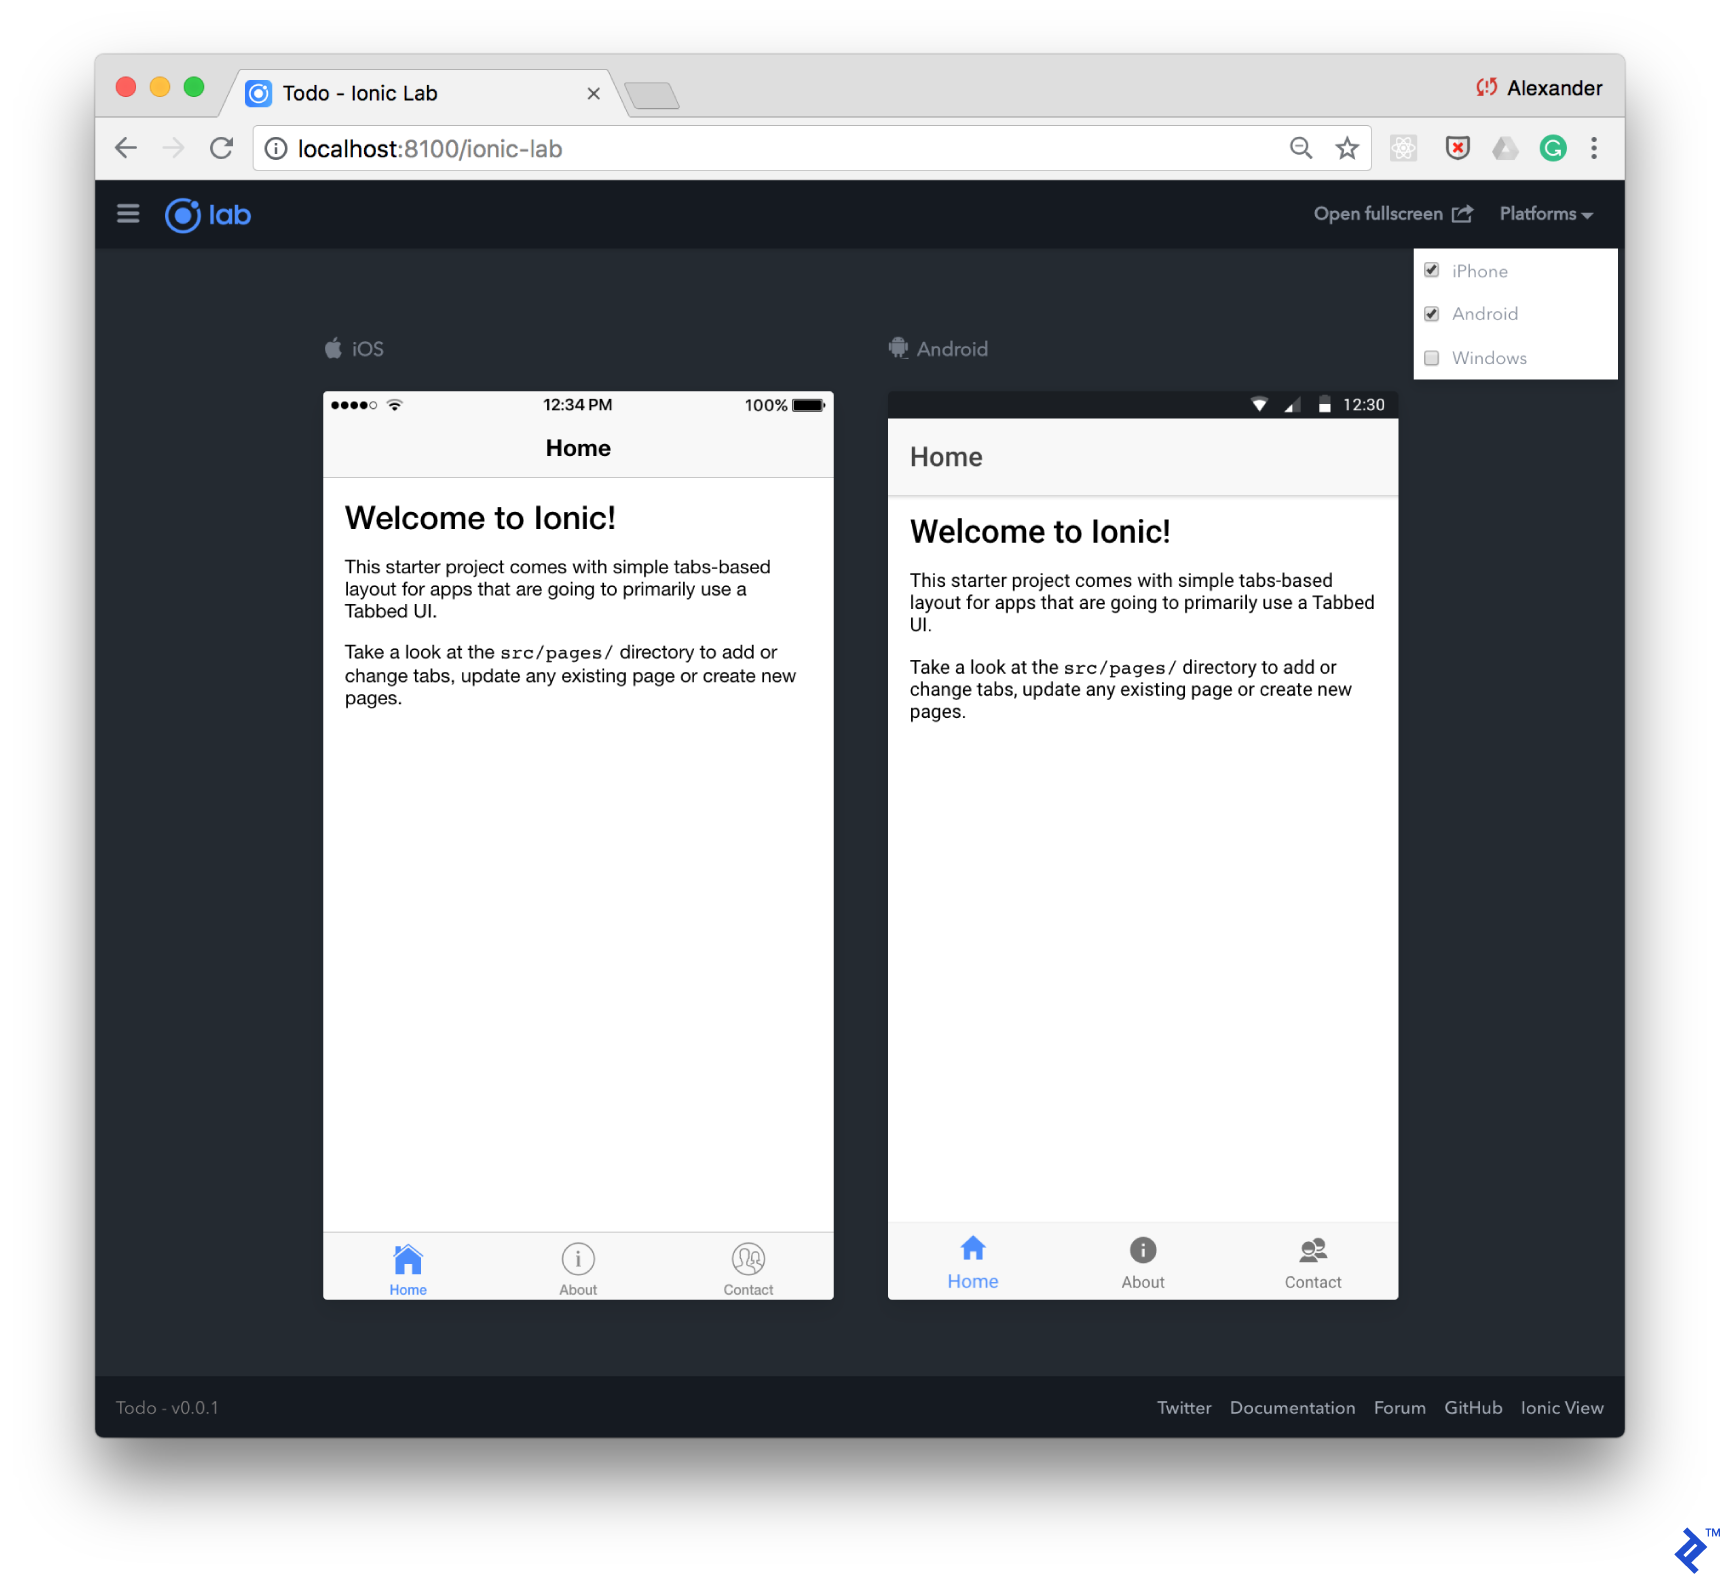
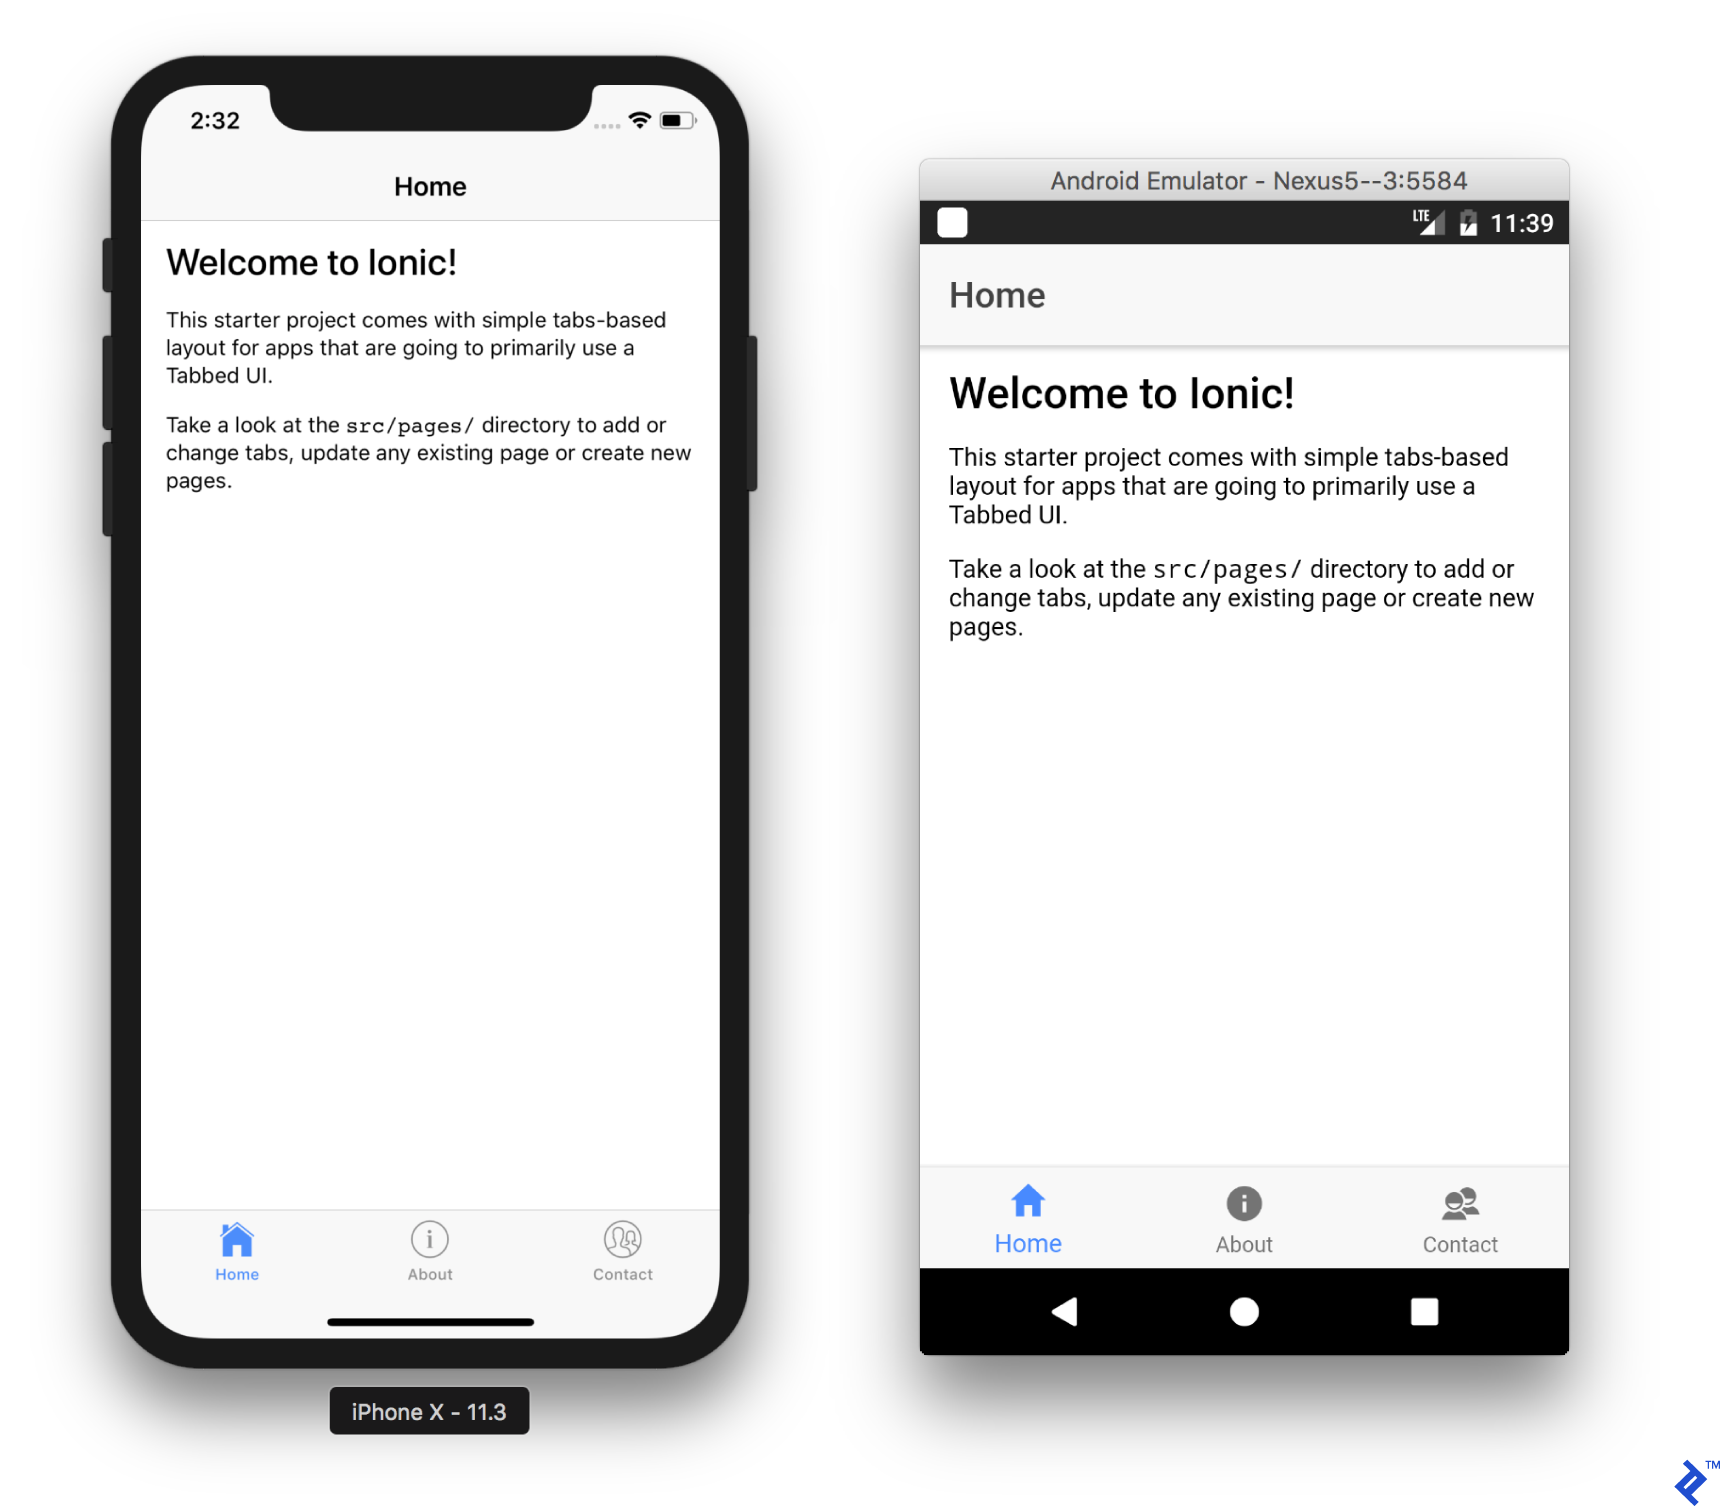
The Ionic Lab debugging service is launched on port 8200. The application itself runs on port 8100, and the Open fullscreen link from Ionic Lab leads there. The browser window with the running Ionic Lab opens automatically.
Additionally, Ionic provides the application address in the local network. This is extremely useful, as it allows you to open the application in the mobile device browser, as long as the device is in the local network (for example, via Wi-Fi). Additionally, you can use the Add to Home Screen button to reopen the application in fullscreen mode. This is the quickest way to test your application on the device.
Another way is the Ionic DevApp application, which can be installed on a mobile device and provides access to the application via the local network. It offers plugin support (Ionic Native) for access to native device functions and displaying logs.
Framework7
F7’s development tools are less advanced than Ionic’s, and the automatic initialization CLI is not documented. However, the official website provides several GitHub repositories with template projects that will help you start developing.
Similar to the Tabs template in Ionic, F7 offers Tabbed Views, but we will use a more functional template that integrates Framework7 with React. The support for React was added in v3. For that, clone the template repository:
git clone https://github.com/framework7io/framework7-template-react.git Todo
Switch to the project folder, fetch dependencies, and start the process:
cd Todo

npm install

npm start
The execution results are similar to Ionic: You get a local link and a link within your network for instant access from a real device:
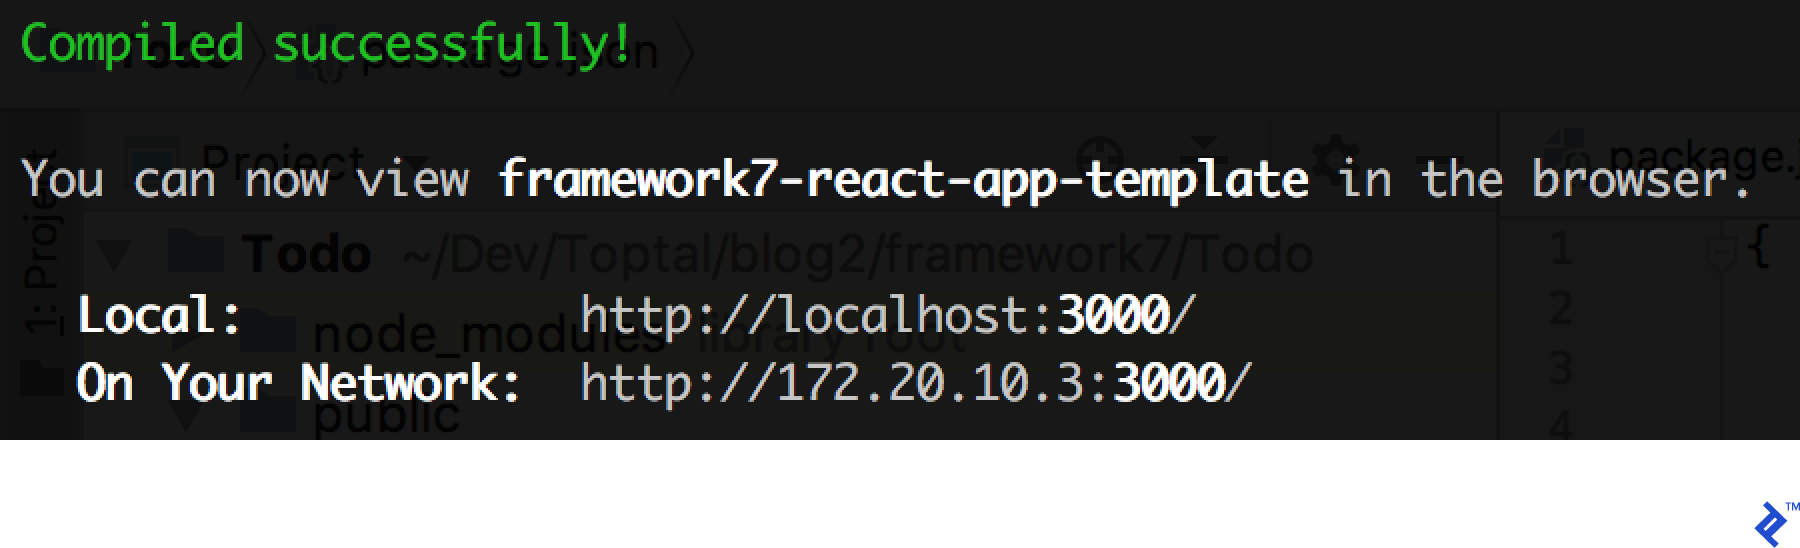
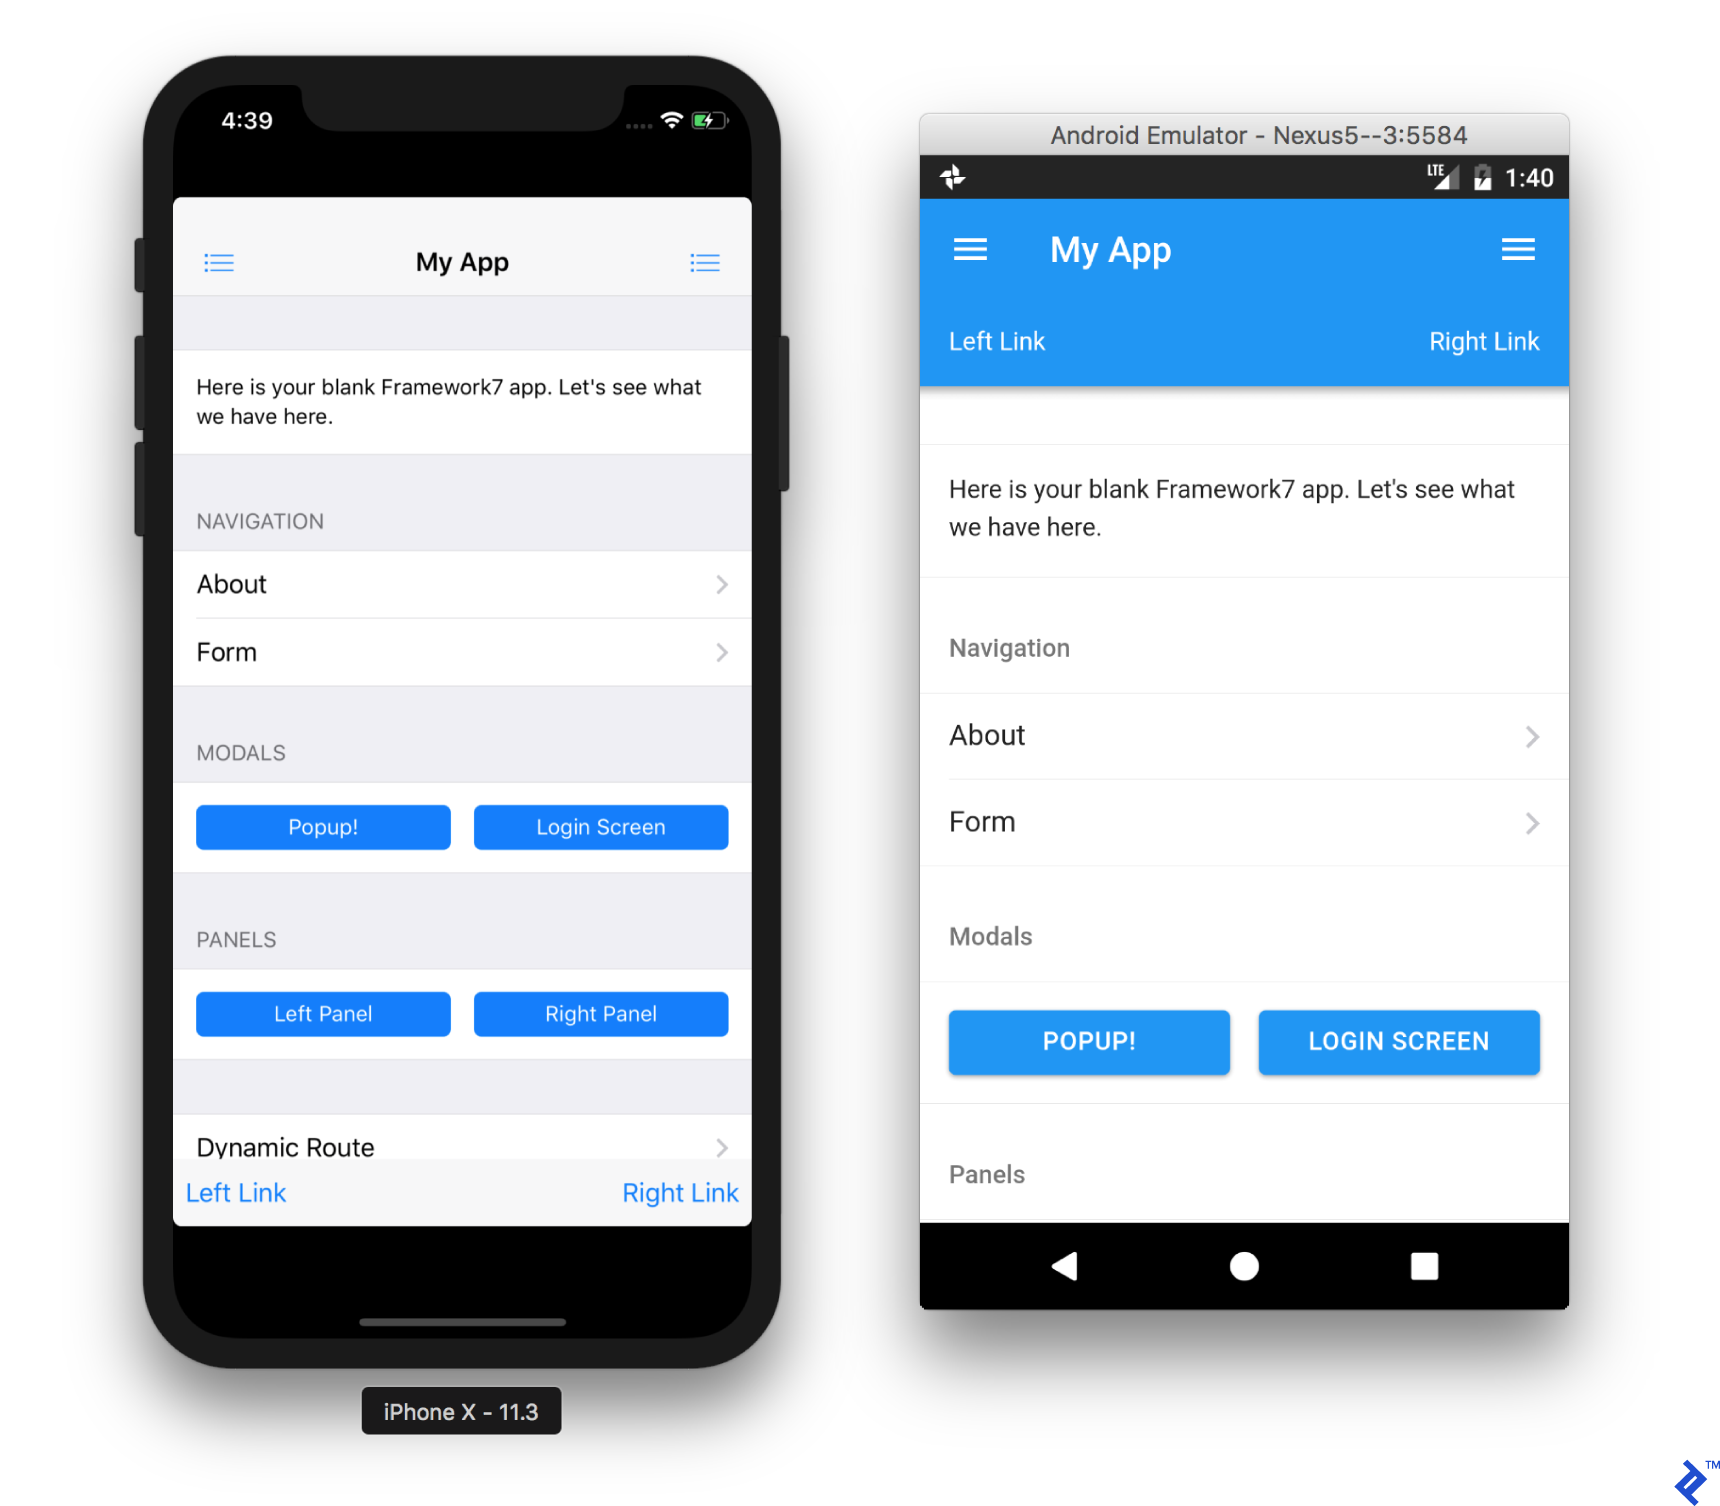
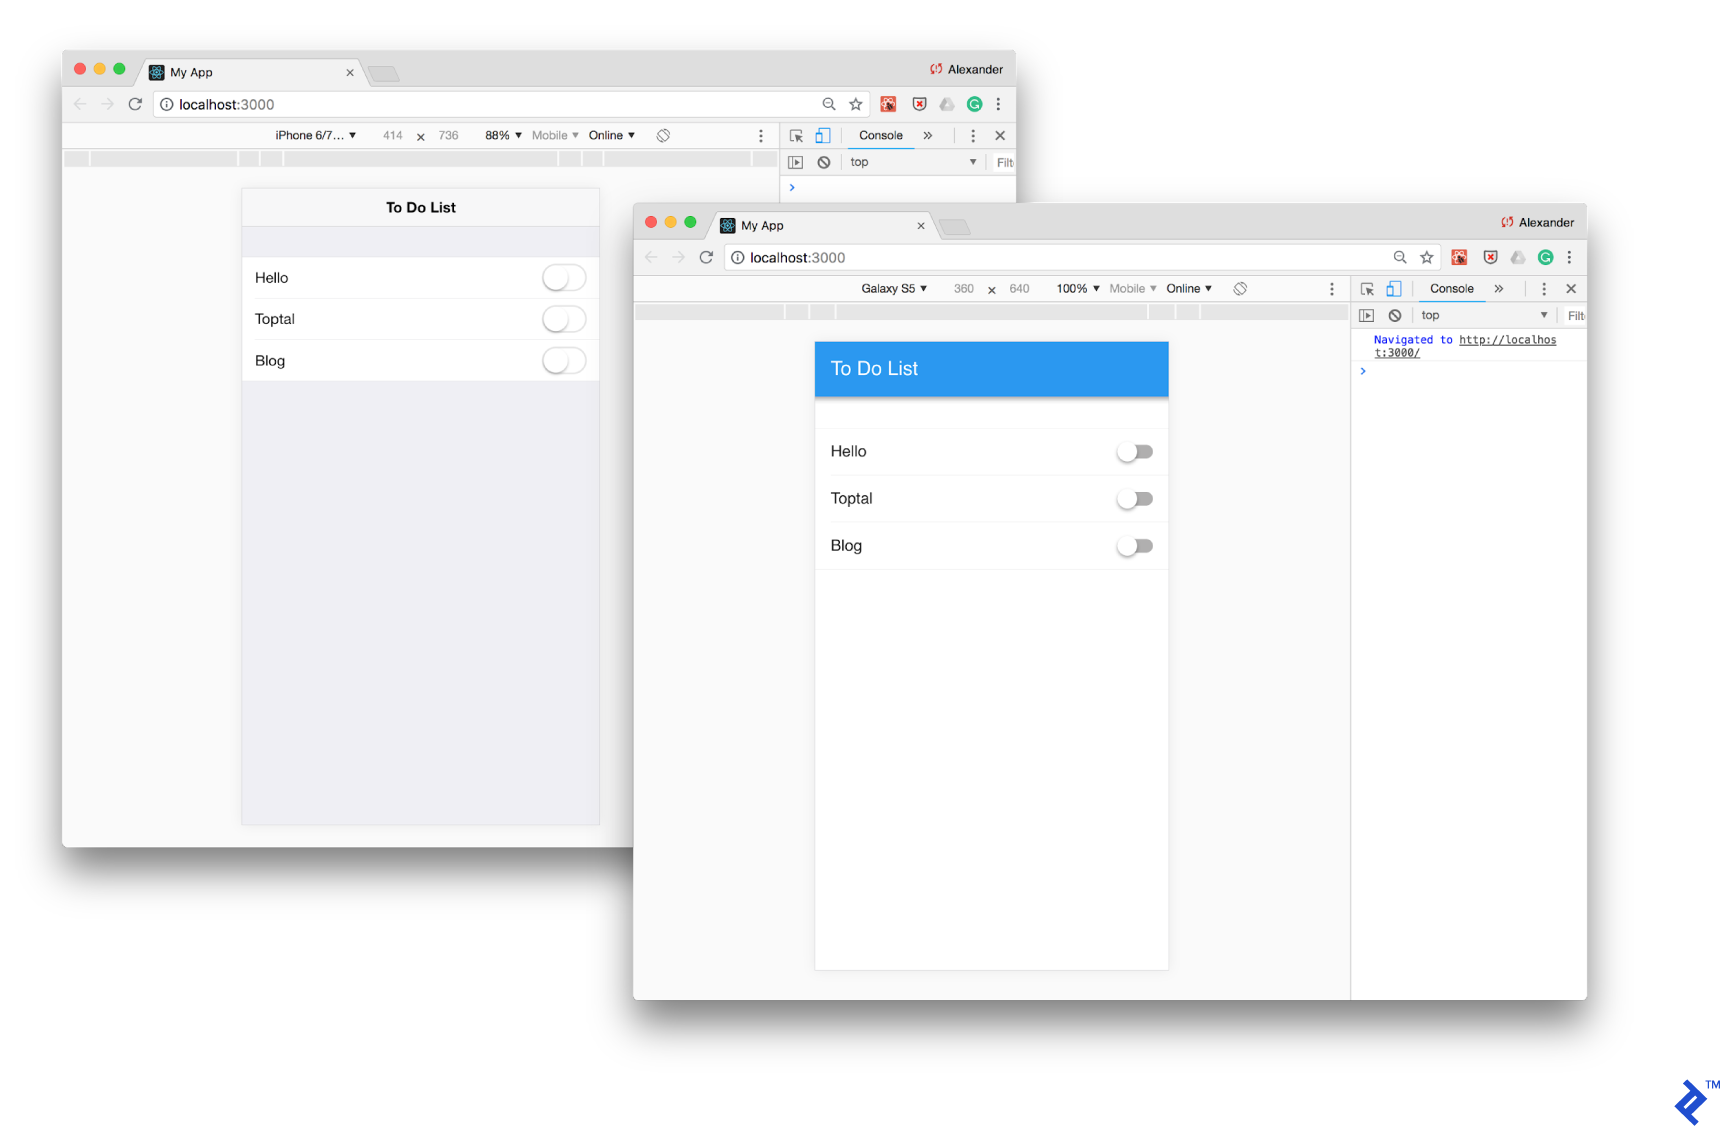
Now you can open http://localhost:3000/ in a browser. Framework7 does not include built-in device emulators, so let’s use Chrome DevTools’ Device Mode to get a similar result:
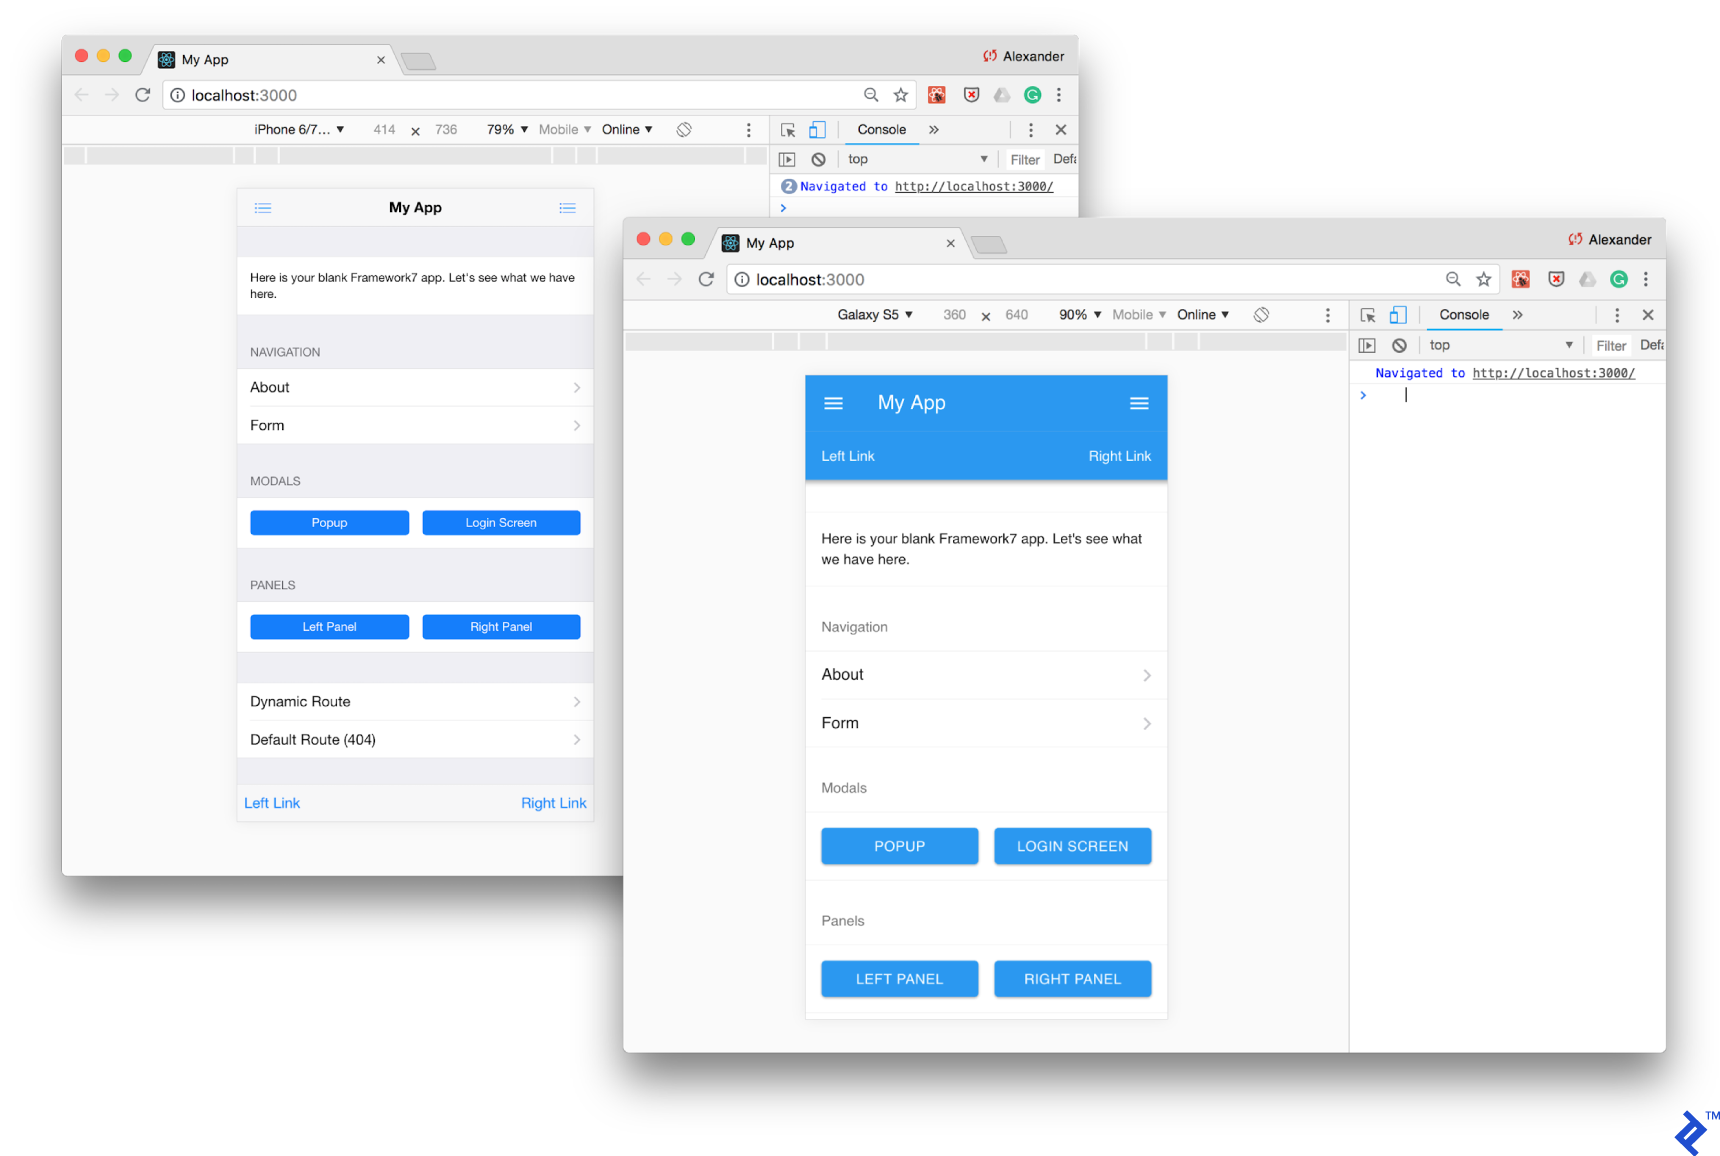
As you can see, Framework7 is similar to Ionic in that it has iOS and Material Design as its two standard themes. The theme is selected based on the platform.
Sadly, unlike a similar template with Vue.js support in the official React templates, Webpack is not yet implemented and this prohibits us from using Hot Module Replacement to quickly update applications without reloading the page. Still, you can use the default live-reload feature, which reloads the page whenever you change the source code.
Setting up Cordova
To install applications on devices and emulators with Cordova, you need to download and set up development tools for iOS and Android, as well as Cordova CLI. You can read more about this in our previous article and on the official Cordova website in the iOS Platform Guide and Android Platform Guide sections.
Ionic
Experience shows that to successfully solve the majority of Ionic issues, browser-based debugging with occasional tests on real devices is sufficient.
Despite you accepting the integration for iOS and Android, and Ionic preparing the required settings in the config.xml file and resources in resources folder, you still need to connect both platforms to the application with Cordova:
cordova platform add ios

cordova platform add android
Now you can start the Cordova app in “real” emulators, install it on the mobile device, and even send it to the App Store and Google Play.
The next command installs the application to your iOS device if it is connected by USB. Otherwise, the app will be installed on the iOS Simulator.
cordova run ios
Most likely, Xcode Command Line Tools will inform you about the need to set up developer certificates. You will need to open the project in Xcode and perform the required actions. This only needs to be done once, and afterwards you will be able to run the application with Cordova CLI.
Sometimes iOS Simulator does not launch automatically. In this case, start it manually, for example through Spotlight.
The Android emulator can be started in a similar way:
cordova run android
Note that the cordova run command starts and installs the already compiled application, which does not use the ionic serve/ionic lab server, so Live Reload will not work. To develop and debug the application live, use the browser in the local network or install the Ionic DevApp application.
Experience shows that to successfully solve the majority of Ionic issues, browser-based debugging with occasional tests on real devices is sufficient.
Framework7
The “React” Framework7 template chosen earlier does not provide setup automation for Cordova, so you will need to add platforms manually. Create a Cordova project in the cordova subfolder of your project folder:
cordova create cordova/ com.example.todo Todo

cd cordova/

cordova platform add ios

cordova platform add android

cd ../
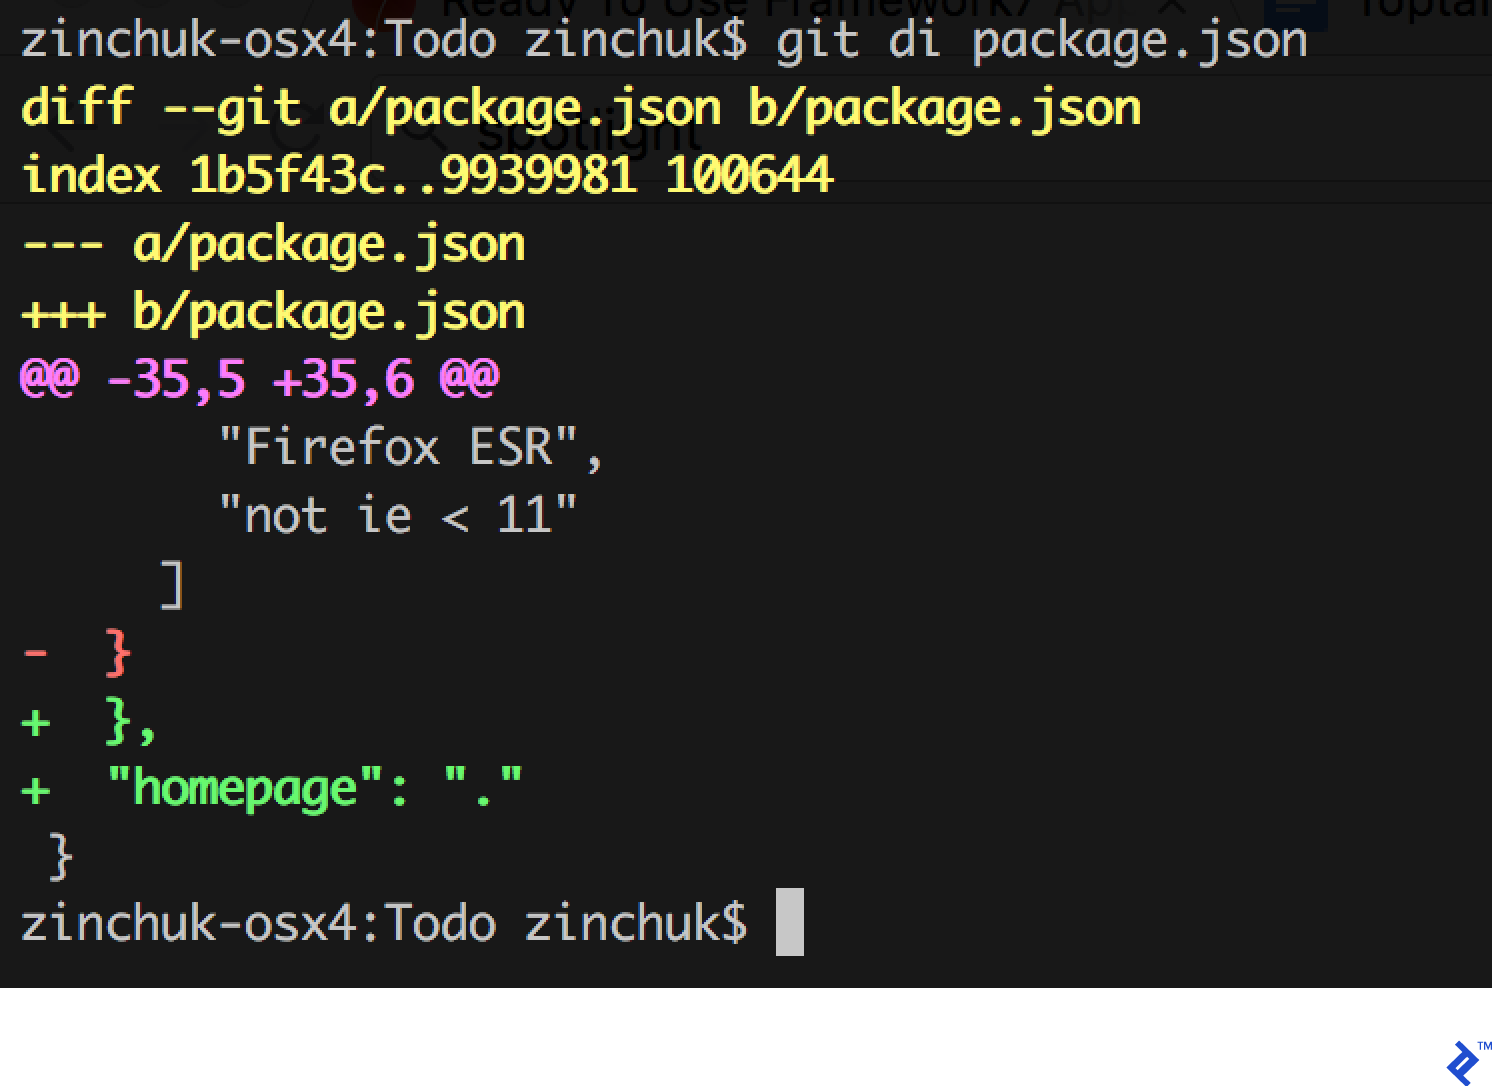
The template is based on the Create React App, so to run the compiled project in a Cordova environment you need to add the "homepage": "." setting to the ./package.json file. This file can be found at the root level of the project:
Compile the Framework7 project and copy the result to the Cordova project:
npm run build

rm -rf cordova/www/*

cp -r build/* cordova/www/
Now you can start the application on a device or an emulator:
cd cordova/

cordova run ios
You are done! Let us hope that Framework7 catches up to Ionic’s standard of development and initial setup convenience.
Creating Task Lists
Ionic
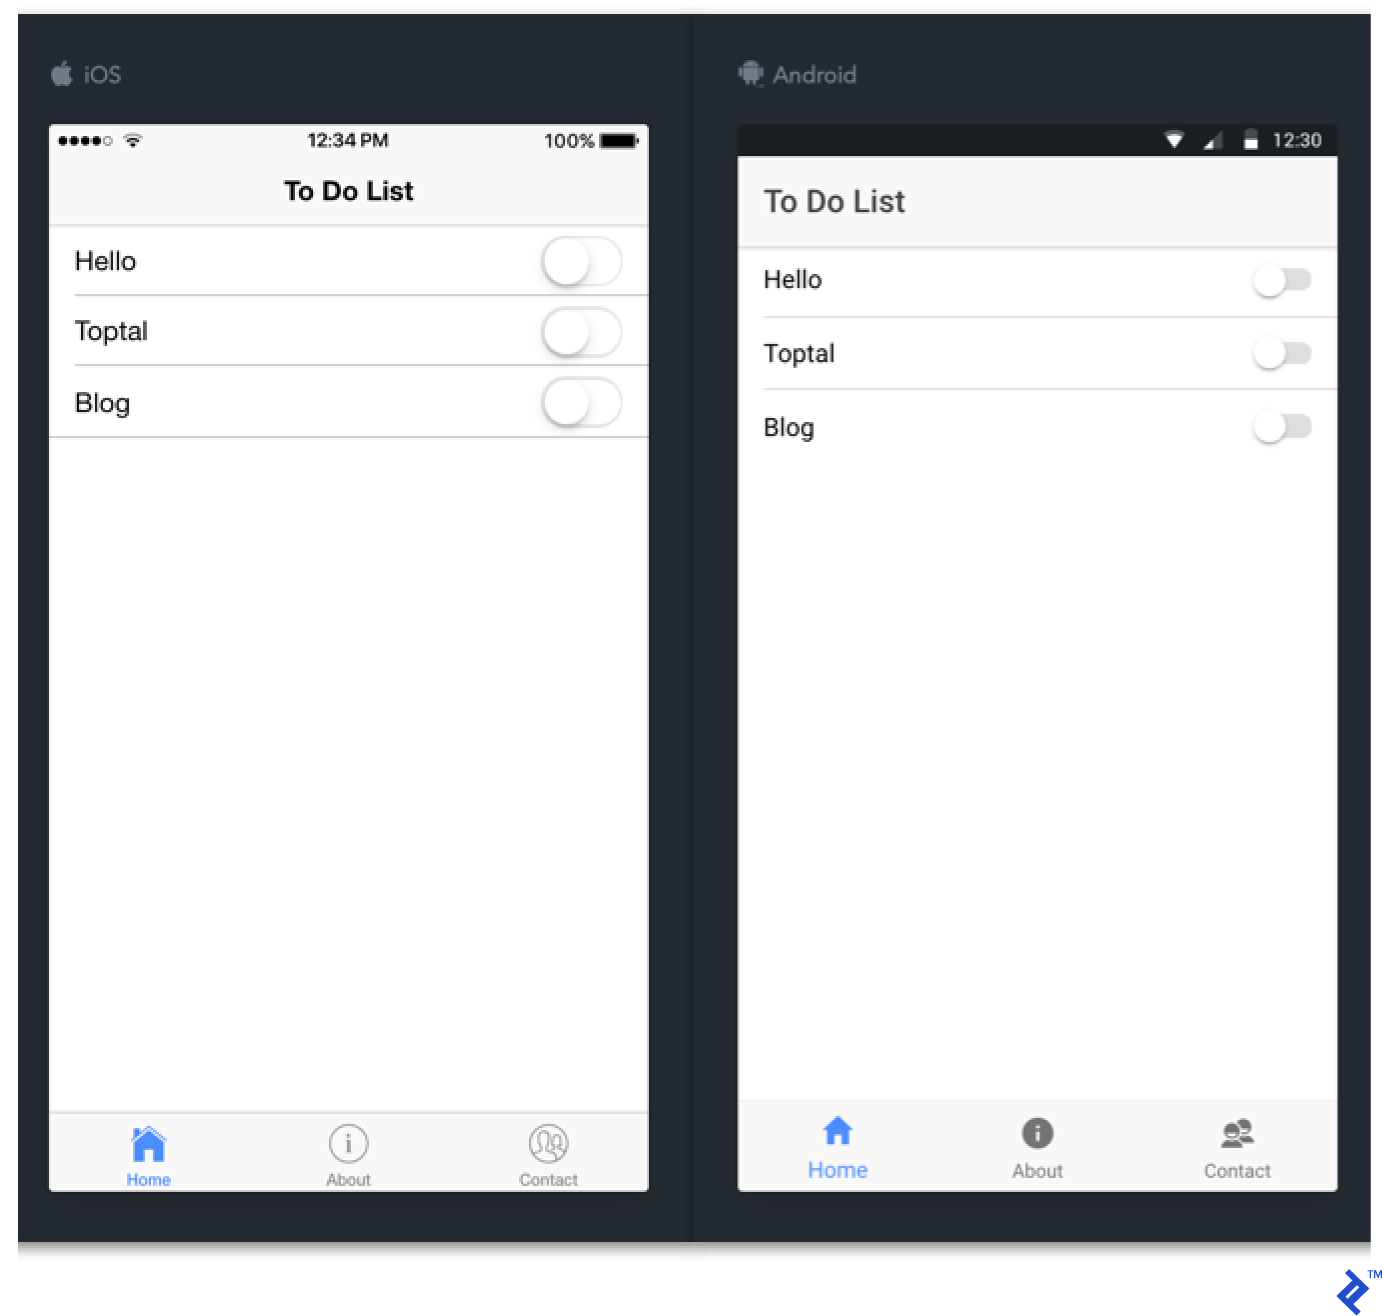
Let’s finally start creating the application! Since this is a To Do application, the main page (src/pages/home/home.html file) will contain the list of tasks with the ability to “mark completed” and “add new.”
Ionic offers the components <ion-list> and <ion-item> for lists. First, remove the padding property from the <ion-content> element to make the list screen-wide. In the list, place the text using an <ion-label> element and add an <ion-toggle> element to mark completed tasks.
<ion-content>
  <ion-list>
    <ion-item>
      <ion-label>Hello</ion-label>
      <ion-toggle></ion-toggle>
    </ion-item>

    <ion-item>
      <ion-label>Toptal</ion-label>
      <ion-toggle></ion-toggle>
    </ion-item>

    <ion-item>
      <ion-label>Blog</ion-label>
      <ion-toggle></ion-toggle>
    </ion-item>
  </ion-list>
</ion-content>
Go back to the browser tab with the Ionic Lab service running. The application was updated automatically:
Great! Now move the task data to the JS object and set up its HTML presentation with Angular. Go to the src/pages/home/home.ts file and create the tasks property of the HomePage class instance:
export class HomePage {
  tasks = [{
    name: 'Hello'
  }, {
    name: 'Toptal'
  }, {
    name: 'Blog'
  }];

  constructor() { }
}
Now you can refer to the tasks array in HTML code. Use the *ngFor Angular construct to iteratively create list elements for each array element. The code gets smaller:
<ion-list>
  <ion-item *ngFor="let task of tasks">
    <ion-label>{{task.name}}</ion-label>
    <ion-toggle></ion-toggle>
  </ion-item>
</ion-list>
All that is left is to add the button to create new tasks to the page header. To do this, use the <ion-navbar>, <ion-buttons>, <button>, and <ion-icon> components:
<ion-header>
  <ion-navbar>
    <ion-title>To Do List</ion-title>

    <ion-buttons end>
      <button ion-button icon-only (click)="addTask()">
        <ion-icon name="add-circle"></ion-icon>
      </button>
    </ion-buttons>
  </ion-navbar>
</ion-header>
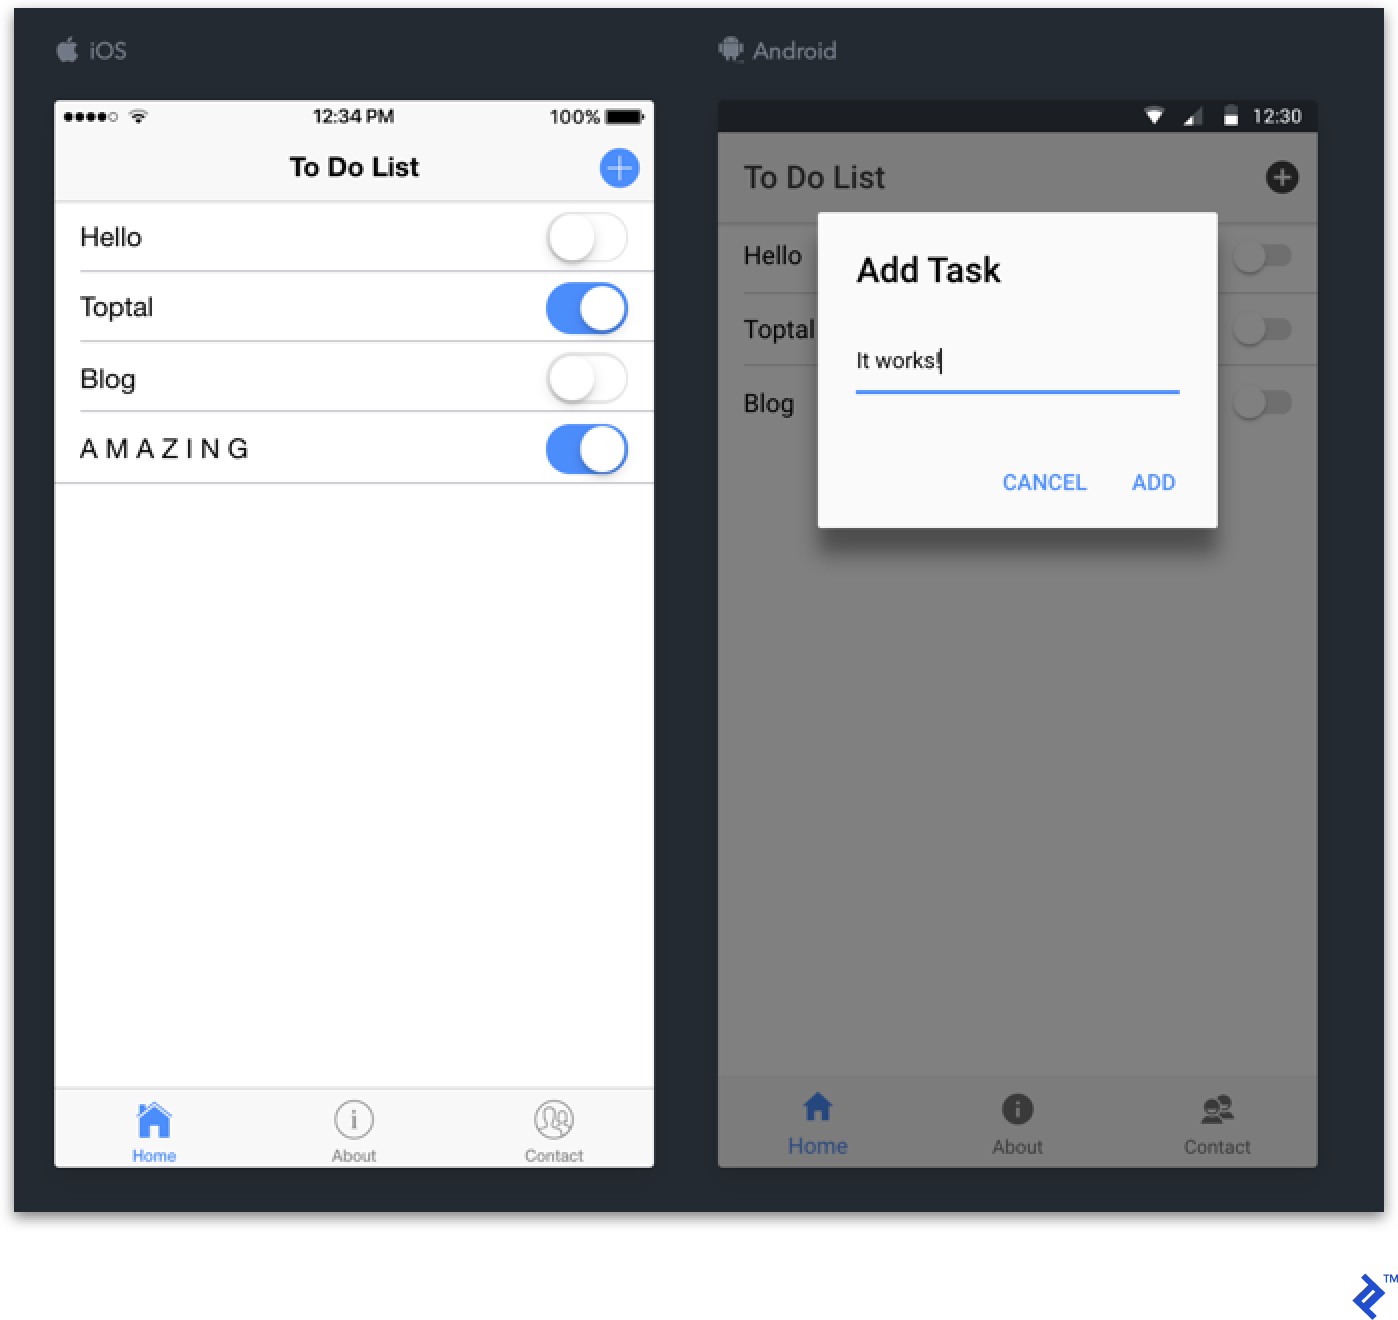
Note the (click)="addTask()" Angular construction. As you can guess, it adds the tap handler to the button and calls the addTask() method for our component. Let’s implement this method to open the task name dialog window when the button is tapped.
For this you need the AlertController Ionic component. To use this component, import its type:
import { AlertController } from 'ionic-angular';
And specify it in the constructor parameters list for the page:
constructor(public alertCtrl: AlertController) { }
Now you can call it in the addTask() method. Set it up after the controller. You can create and display the dialog window with the following calls:
this.alertCtrl
  .create(/* options */)
  .present();
Specify the message header, the description of the field and two buttons in the options object. The “OK” button will add a new task to the tasks array:
handler: (inputs) => {
  this.tasks.push({ name: inputs.name });
}
After you add the element to the array this.tasks, the component will be rebuilt reactively and a new task will be displayed in the list.
The full page code looks like this now:
import { Component } from '@angular/core';
import { AlertController } from 'ionic-angular';

@Component({
  selector: 'page-home',
  templateUrl: 'home.html'
})
export class HomePage {
  tasks = [{
    name: 'Hello'
  }, {
    name: 'Toptal'
  }, {
    name: 'Blog'
  }];

  constructor(public alertCtrl: AlertController) { }

  addTask() {
    this.alertCtrl
      .create({
        title: 'Add Task',
        inputs: [
          {
            name: 'name',
            placeholder: 'Task'
          }
        ],
        buttons: [
          {
            text: 'Cancel',
            role: 'cancel'
          },
          {
            text: 'Add',
            handler: ({ name }) => {
              this.tasks.push({ name });
            }
          }
        ]
      })
      .present();
  }
}
Reinstall the application on the device:
cordova run ios
That’s it! Not that hard, was it? Now let’s try to do the same with Framework7.
Framework7
Framework7 templates are made to show all of the component capabilities, so you need to leave only the src/components/pages/HomePage.jsx page in the src/components/App.jsx and src/routes.js files, clean up its content and remove extra code comments.
Now create the tasks list. Framework7 provides <List simple-list> and <ListItem> components for this. To place a task completion switch in it, add the <Toggle slot="after"/> component. Remember to import all these components from the framework7-react module. Now the page code looks like this:
import React from 'react';
import {
  Page, Navbar, NavTitle, List, ListItem, Toggle
} from 'framework7-react';

export default () => (
  <Page>
    <Navbar>
      <NavTitle>To Do List</NavTitle>
    </Navbar>

    <List simple-list>
      <ListItem title="Hello">
        <Toggle slot="after"/>
      </ListItem>
      <ListItem title="Toptal">
        <Toggle slot="after"/>
      </ListItem>
      <ListItem title="Blog">
        <Toggle slot="after"/>
      </ListItem>
    </List>
  </Page>
);
And the application itself looks like this:
Pretty good start. Let’s try moving the static data out from HTML code again. For this, use a smart component instead of the stateless one we had. Import the Component abstract class from React:
import React, { Component } from 'react';
And write the tasks array to the state variable instance:
export default class HomePage extends Component {
  state = {
    tasks: [{
      name: 'Hello'
    }, {
      name: 'Toptal'
    }, {
      name: 'Blog'
    }]
  };
  /* ... */
}
The real application is likely to use a more abstract data flow—for example with Redux or MobX—but for a small example we’ll keep to the internal component state.
Now you can use the JSX syntax to iteratively create list elements for each task in the array:
{this.state.tasks.map((task, i) => (
  <ListItem title={task.name} key={i}>
    <Toggle slot="after"/>
  </ListItem>
))}
All that is left is to add the header with the button to create a new task again. The <Navbar> element already exists, so add <Link iconOnly> to the <NavRight> element:
<Navbar>
  <NavTitle>To Do List</NavTitle>
  <NavRight>
    <Link iconOnly iconF7="add_round_fill" onClick={this.addTask}/>
  </NavRight>
</Navbar>
In React you add tap handlers by using the onClick property and setting the callback pointer in it. Implement the handler to show the task name dialog.
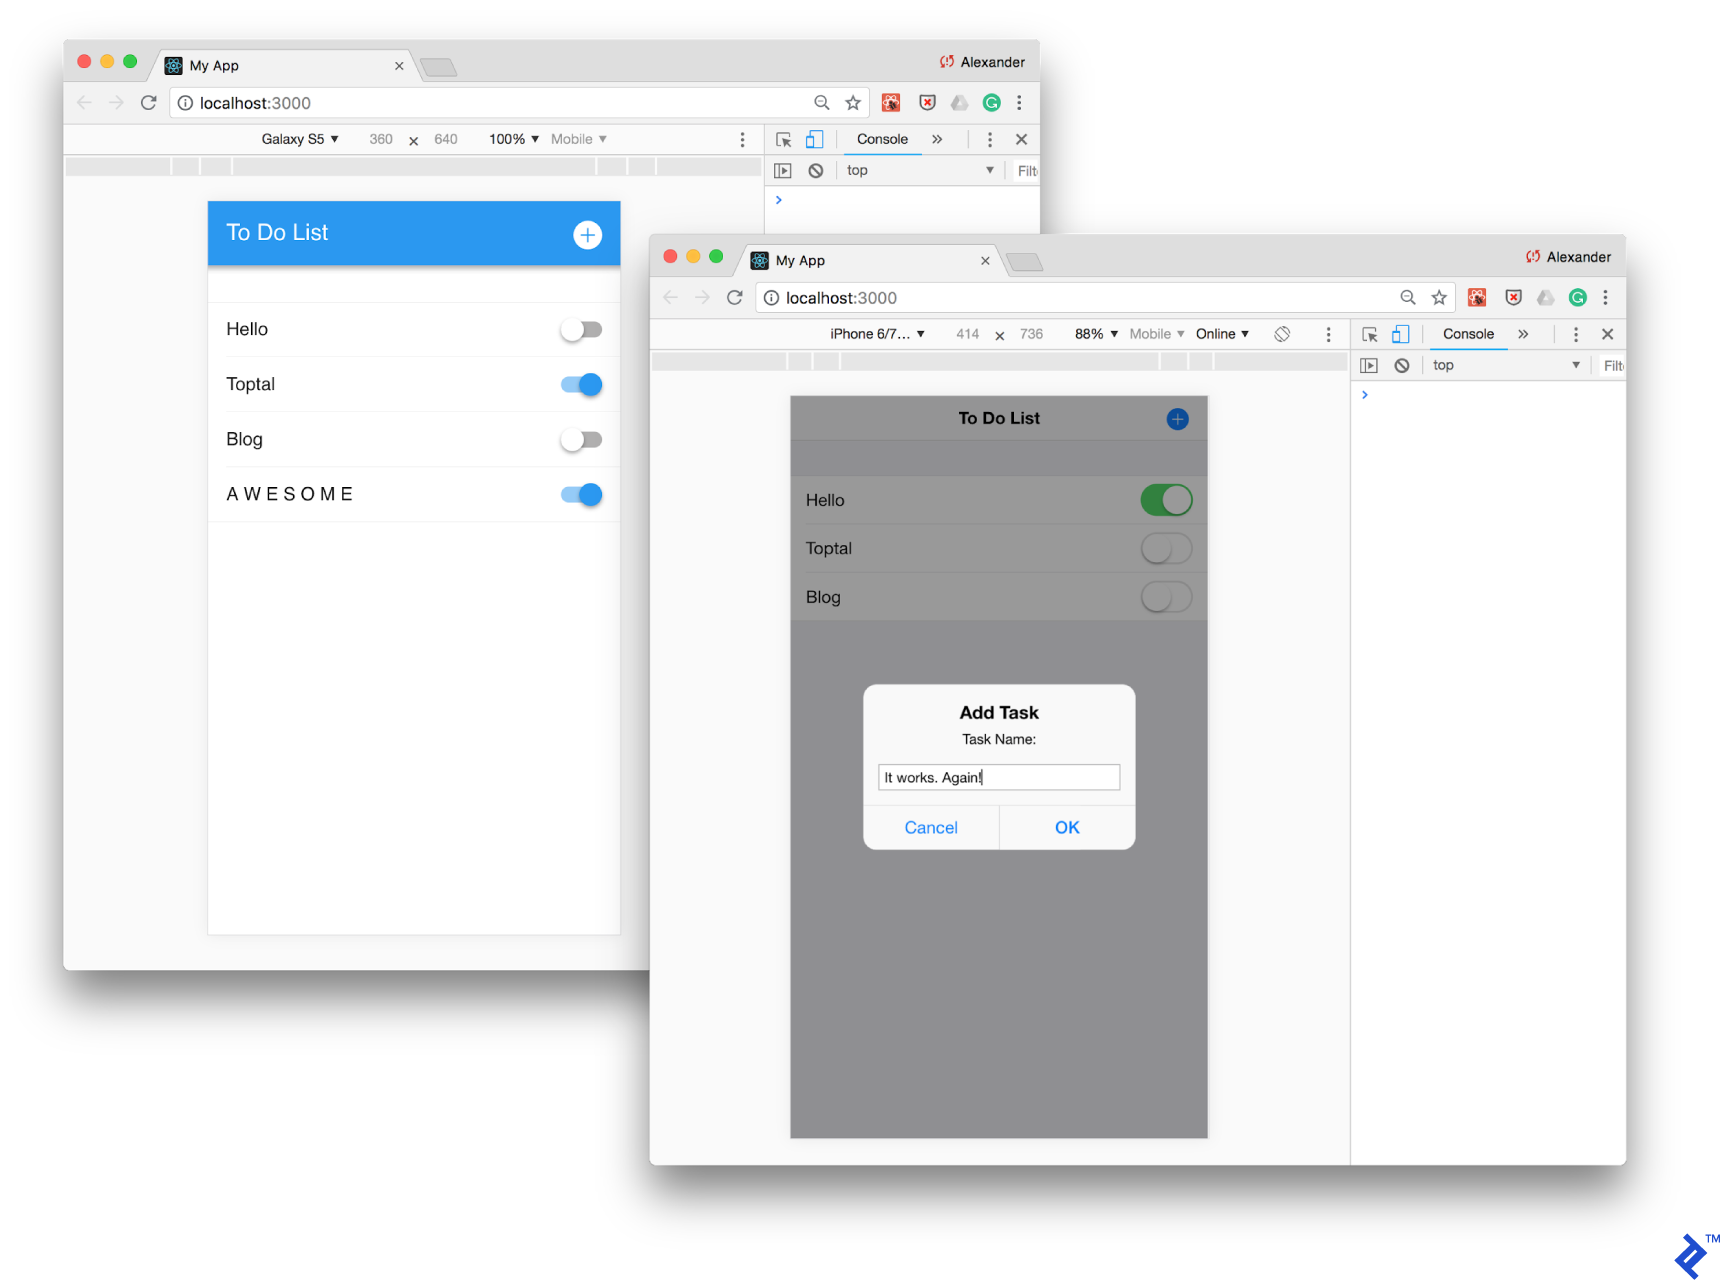
Each element in Framework7 has access to the application instance through this.$f7 property. You can use the dialog.prompt() method this way. Before closing the dialog, call the setState() method of the React component and pass it the copy of the previous array with a new element. This will reactively update the list.
addTask = () => {
  this.$f7.dialog.prompt('Task Name:', 'Add Task', (name) => {
    this.setState({
      tasks: [
        ...this.state.tasks,
        { name }
      ]
    });
  });
};
Here is the full component code:
import React, { Component } from 'react';
import {
  Page, Navbar, NavTitle, NavRight, Link, List, ListItem, Toggle
} from 'framework7-react';

export default class HomePage extends Component {
  state = {
    tasks: [{
      name: 'Hello'
    }, {
      name: 'Toptal'
    }, {
      name: 'Blog'
    }]
  };

  addTask = () => {
    this.$f7.dialog.prompt('Task Name:', 'Add Task', (name) => {
      this.setState({
        tasks: [
          ...this.state.tasks,
          { name }
        ]
      });
    });
  };

  render = () => (
    <Page>
      <Navbar>
        <NavTitle>To Do List</NavTitle>
        <NavRight>
          <Link iconOnly iconF7="add_round_fill" onClick={this.addTask}/>
        </NavRight>
      </Navbar>

      <List simple-list>
        {this.state.tasks.map((task, i) => (
          <ListItem title={task.name} key={i}>
            <Toggle slot="after"/>
          </ListItem>
        ))}
      </List>
    </Page>
  );
}
Check the result:
All that is left is to rebuild and deploy to the device:
npm run build

rm -rf cordova/www/*

cp -r build/* cordova/www/

cd cordova/

cordova run ios
Done!
The final code for both of these projects is available on GitHub:
Results
Now you’ve seen the full tutorial with each Cordova framework. How does Framework7 stack up against Ionic?
Initial Setup
Ionic is much easier to install thanks to its CLI, while F7 requires more time for selecting and setting up a template or step-by-step installation from the ground up.
Component Diversity
Both frameworks have a full set of wonderfully crafted standard components in two themes: iOS and Material Design. Ionic additionally provides these components in Windows theme and a gigantic user themes marketplace.
In addition to fully mimicking native design and animations, a lot of attention is paid to performance optimization, providing fantastic results: Often, it’s almost impossible to discern applications on either framework from native ones.
Framework7 provides an additional list of more complex and useful components, such as Smart Select, Autocomplete, Calendar, Contacts List, Login Screen, Messages, and Photo Browser. On the other hand, Ionic provides a huge selection of user-created components.
Ecosystem and Community
Ionic obviously wins on these parameters thanks to its longer lifespan, strong financial backing, and active community. Ionic infrastructure is constantly evolving: Supporting services and cloud solutions give way to new ones and the number of plugins keeps growing.
Framework7 is better than ever, but sorely lacks community support.
Third-party Dependencies
Framework7 is more flexible in regards to third-party solutions. Its biggest strength is probably the ability to choose if you use Vue or React in the project, as well as Webpack or Browserify. Ionic is based on Angular and requires knowledge in it (and therefore TypeScript, too.)
However, recently, Ionic developers announced a new Ionic 4 beta, claiming to be completely UI-framework-agnostic—no more Angular dependencies if you don’t want them.
Cordova Frameworks: Still a Powerful Way to Develop Cross-platform Mobile Apps
Whether to use Cordova depends on the specific project. Indeed, the speed of hybrid mobile app development and its support of multiple platforms are its main advantages. But it’s always a trade-off, and sometimes you may face some flaws that would not exist with a native approach. These wonderful frameworks and their communities do a great job to reduce those flaws and make our lives easier. So, why not give them a try?
Understanding the basics
What is Cordova?
Cordova packages web apps into native containers to run them on various mobile platforms. It loads an app in a “web view,” a kind of full-screen mobile browser. It also provides an interface between JS and native code to access the native API: device features such as push notifications and camera access.
What is PhoneGap?
PhoneGap is the original name of the technology that has later been contributed to the open-source community and named Apache Cordova. Nowadays PhoneGap itself is a project that belongs to Adobe, being a set of CLI, GUI, and cloud-based tools providing useful services for Cordova-based mobile app developers.
What is Onsen UI?
Onsen UI is an HTML and JavaScript framework providing a set of UI components imitating the native look and feel of the iOS and Android platforms. It pairs with Monaca, a set of tools helping the development cycle of hybrid mobile apps.
What is Ionic?
Ionic is a UI framework based on Angular, providing a set of mobile UI components in different themes, including iOS, Material Design, and Windows Platform. Similar to PhoneGap, it also provides various additional features and services helping the cycle of development, testing, and delivery of hybrid mobile apps.
What is Framework7?
Framework7 is used for creating hybrid mobile apps. It’s a set of UI components representing iOS and Material Design style guides. It has several implementations based on top of popular front-end frameworks such as React and Vue.
What is a native app?
A native app is one made for a specific mobile platform, using the native SDK and development stack. For example, an native iOS app would be developed using Swift or Objective-C, whereas a native app for Android would be written using Kotlin or Java.
What is a hybrid mobile application?
A hybrid mobile app is built using a combination of a native mobile SDK and some other technology stack, e.g., HTML and JavaScript. Technologies that produce hybrid apps are Cordova, Xamarin, React Native, and Native Script, among many others.
Barcelona, Spain
Member since September 15, 2016
About the author
Alex’s decade-plus of JS coding has taught him the language’s internals. He’s lead a dev team for Yandex and built fault-tolerant systems.