
Build a Token Visualizer in Dotnet

Using the dotnet stack of Blazor, MLNET and Telerik UI for Blazor, we can create a simple tool for visualizing how text is encoded by LLMs. The visualizer can be used to complement your AI development workflow by estimating token size in a given prompt, showing how LLMs see text data, and can be included in applications to estimate a user’s chat input.
Working with large language models (LLMs) requires sending long strings of text to be processed by the AI model. When processing the information, the LLM will use tokenization to convert the strings into vector information so it can be processed by its model.
In this article, we will unpack how tokenization works by creating a visualization with dotnet and explore how we can use this code to estimate the token size of the text transmitted to the LLM. In a real-world application, this technique can be used to estimate or reduce the cost of inference or training or to enhance user experience by providing checks before text is submitted.
Understanding Tokens and Tokenization
Tokens are the key to how AI models process and understand text. A token consists of a small unit of text which can be a word, subword or even a single character, depending on the tokenizer’s rules and the language model’s design. LLMs like GPT don’t analyze paragraphs, sentences or words directly. Instead, they break text into smaller parts (tokens) that are encoded into numeric data so they can be contextualized and used for prediction.
While LLMs share similarities, the implementation of the tokenizer may vary between them. We’ll be starting with Tiktoken, the tokenizer used by OpenAI’s models, including GPT. It is a fast implementation of Byte Pair Encoding (BPE), specifically optimized for OpenAI’s models. Tiktoken operates at the byte level, which enables compatibility with all Unicode characters, including emojis and special symbols. It’s designed to be significantly faster than other tokenizers. Tokens can be converted back to the original text without loss and it compresses text into fewer tokens, which is crucial for models with token limits.
Tokenization vs. Embeddings
When working with LLMs, embedding models are often used to provide additional processing capabilities such as creating vector stores for use with Retrieval Augmented Generation (RAG). Processing text with an embedding model share similarities in regards to tokenization and generating vectors, however they serve different purposes.
A tokenizer like Tiktoken focuses on tokenizing text into tokens for use with models. While it does provide text encoding, it doesn’t introduce or include any semantic meaning or contextualize the token. However, an embedding model is typically pretrained with a vector representation of words, phrases or documents that capture semantics and contextual meaning. This allows the results to be used in semantic search, similarity scoring or clustering.
If your goal involves capturing the relationships or meanings between words (e.g., finding similar documents or clustering data), embeddings are the better choice. Tiktoken is a lower-level tool and is optimal for preprocessing text to tokens.
Planning the Token Visualizer
Now that we understand the technology, we can assemble the visualization. Keep in mind that these components are just a general guide and can be interchanged with your preferred .NET technologies. The application in this example will use a dotnet stack that includes the following packages/frameworks:
- ML.NET (ML dotnet) – Allows us to access Tiktoken directly though C#.
- Blazor – Will be used to host the user interface (UI) in the browser. The browser offers a low learning curve and runs on virtually any platform. And Blazor allows us to use C# as the programming language.
- Progress Telerik UI for Blazor – Provides easy-to-use UI components, reducing the need to create visualizations from scratch.
Begin by creating a Blazor application using your preferred template—any will suffice. The fastest option is to use the Telerik UI for Blazor template, which already includes the references and dependencies for the Telerik components. If you use one of the Microsoft templates, the Telerik UI for Blazor dependencies will need to be installed separately; simply follow the instructions outlined by the documentation.
In addition to the Telerik components, we’ll make use of the Progress CSS Utilities library. This is a free add-on library that is powered by the design system included with the Telerik components. Simply follow the instructions provided under the heading Using a CDN Link.
Next, add the ML dotnet Tokenizers dependencies to the application. You’ll need Microsoft.ML.Tokenizers version 2.0 (currently preview) or above. In addition, one or more encoders are needed depending on which models you would like to support. Choose the NuGet package that applies to your scenario, or all if you want the ability to change between encoders at runtime.
The choices are:
Microsoft.ML.Tokenizers.Data.Cl100kBase(cl100k-base), which supports compatibility with: gpt-4, gpt-3.5-turbo, gpt-3.5-turbo-16k, gpt-35, gpt-35-turbo, gpt-35-turbo-16k, text-embedding-ada-002, text-embedding-3-small and text-embedding-3-large.Microsoft.ML.Tokenizers.Data.O200kBase(o200k-base), which supports compatibility with GPT-4o.
The resuting .csproj file should resemble the following excerpt:
With the prerequisites complete, we can begin building the application. We’ll go step-by-step building features to enhance the user experience.
Defining the Input UI
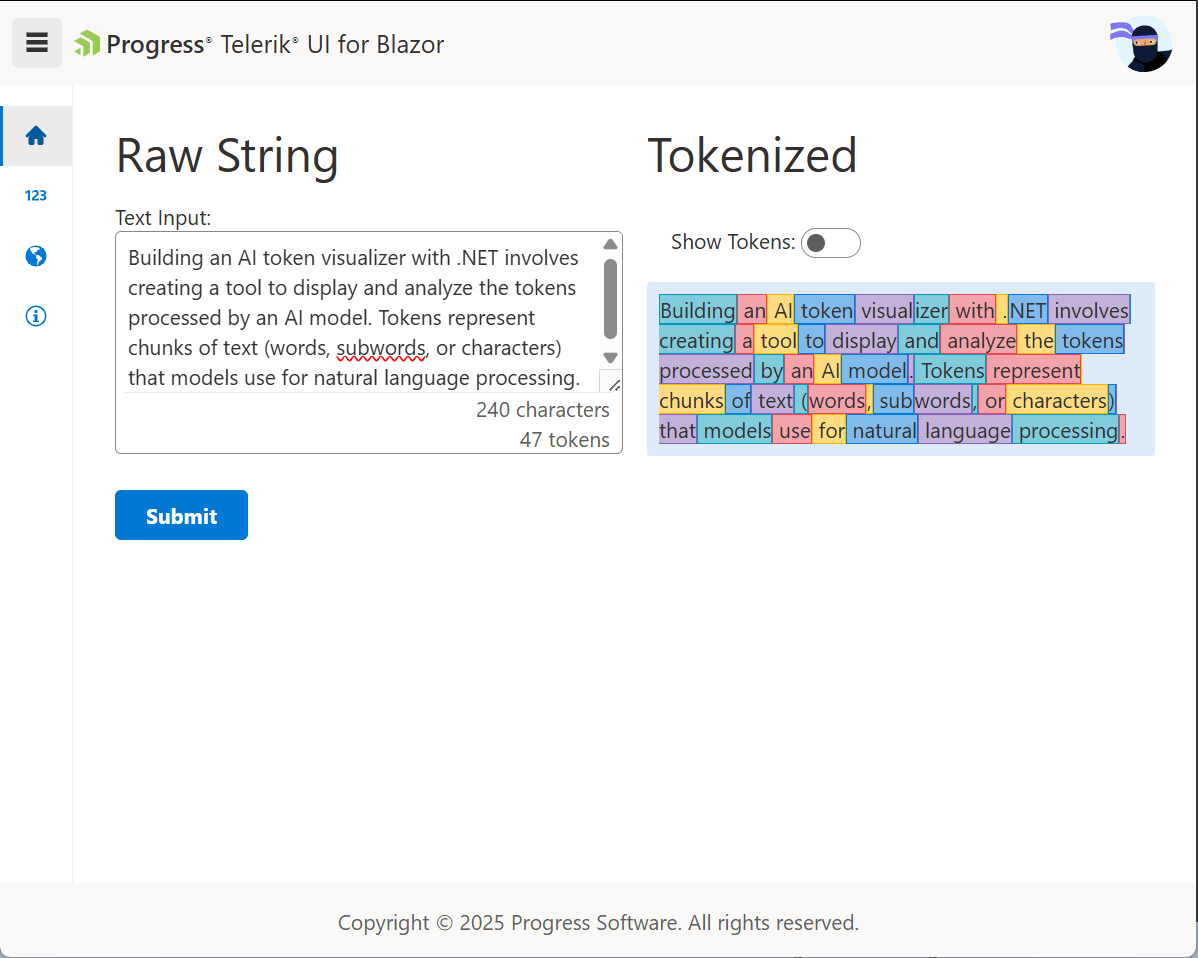
Start by creating a layout where the UI elements will be displayed. The markup below uses the design system’s utility classes to create a two column layout. The first column will contain a form used to input raw string data. The second column will display the tokenized output.
Next, we’ll need a form to accept user input. Before we can add the form component, we need to create an object to hold the data. Add a @code block with a private class named FormData that exposes a RawText property. Then add an instance of the FormData named data to the page.
In the markup, under the Raw String heading, add a TelerikForm with the Model property set to the data field.
Inside the FormItems section of the form a FormItem is added for the RawText property. Then, a Template is used to customize the input rendered on the form. Add a TeleirkTextArea component in the template and use two-way data binding to connect the Value property with the data, bind-Value="@data.RawText.
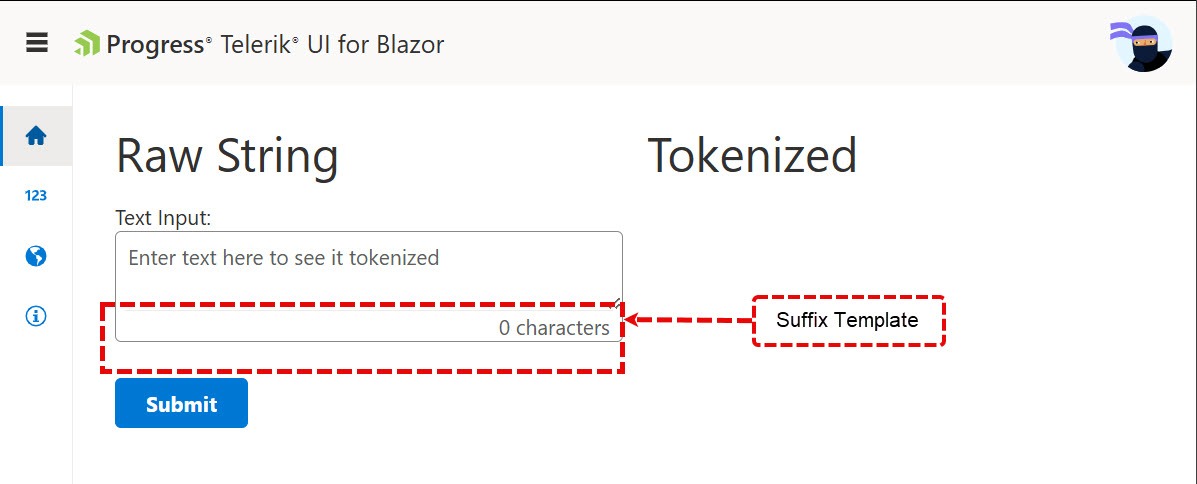
Adornments are added to the TelerikTextArea using the TextAreaSuffixTemplate. When the AdornmentsOrientation is set to Vertical, the suffix template will render along the bottom of the textarea input. Then, inside the template render a character count inside a span element. The design kit utility classes applied to the span element justify the text end of the template area.
With the input form complete, we can focus on displaying the tokenized data through a visualization.
Defining the Output UI
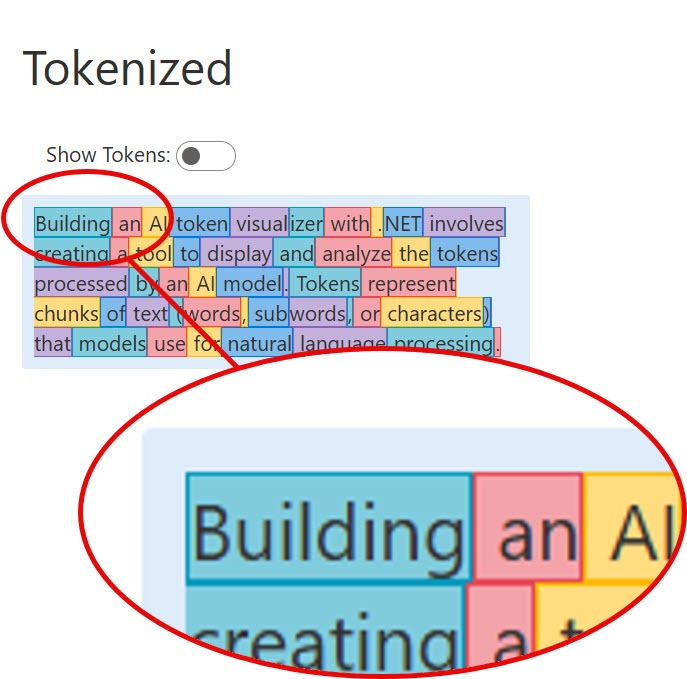
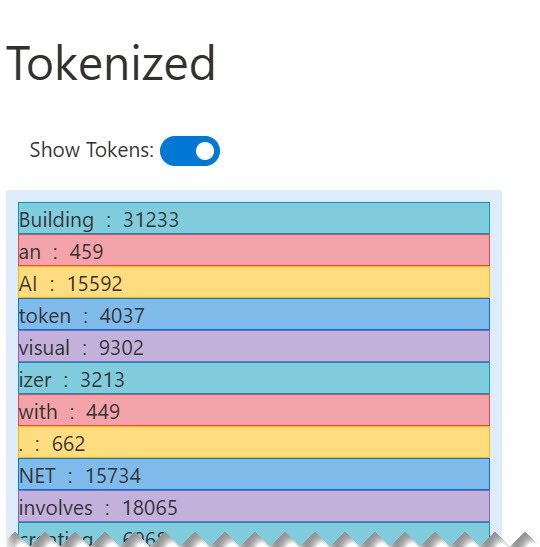
For the visualization, we’ll create two methods of viewing the data. The first will display the sentence with the tokens highlighted using sequential colors. The second displays the token and its numeric value allowing the user to see how values were assigned to each token. The user can switch between views using a toggle switch.
Begin by adding a code block with three members representing the UI state. The output of the tokenization process is a list of EncodedToken objects. The EncodedToken object has an Id property containing the numeric representation of the token and a corresponding Value property with the tokenized string.
To display these values, the tokenized data set is stored in a ReadOnlyList of encoded tokens named Tokens. Next, the HasTokens utility property is added to indicate when the tokens list is populated. Finally, a flag named showTokens is added to toggle between two visualizations.
In the markup under the second column, add a div container. Inside the container, iterate over the list of tokens. Render the tokens in span tags so they can be individually styled using the CSS selector token-colors. When the showTokens toggle is set to true, render the Value and Id in a flex wrapper so the values are listed in a single column.
Next, above the visualization a TelerikSwitch is added to toggle between two visualizations by binding to the showTokens flag. When true the visualization will display both the Id and Value properties in a single column. Toggling the switch to false will display the text inline with each token highlighted with a color sequence showing how the string is partitioned by the tokenizer.

Some CSS is required to complete the visualization. To align the output with other visualization components like charts and gauges, the design system’s *series* color values are used. These are styles are typically used to color individual bars or lines in a chart.
In the CSS below, the colors are used to style a consecutive repeating set of five colorized tokens with a subtle border color. The :nth-child(5n+x) selector applies the styles without requiring additional component logic.
With the form ready to accept the user’s input and the visualization capable of rendering the token output, the final step is generating the tokens.
Generating Tokens with TiktokenTokenizer
Generating tokens with Tiktokenizer is straightforward. Start by initializing the tokenizer through the CreateForModel method. The CreateForModel method creates an instance of the tokenizer for a specific model type identified by the modelName argument.
In this example, the gpt-4 model is the target LLM; therefore, the o200k-base package is required for the application to execute. The instance is created and assigned to a field named tokenizer. Next, the method TokenizeText is added. TokenizeText makes a call to the tokenizer’s EncodeToTokens method with the RawText from the form. The optional out variable is discarded as the resulting string is not needed.
To connect the application’s input and output, the form is updated with an OnValidSubmit handler set to the TokenizeText method. When the user clicks Submit, EncodeToTokens is called and the tokens are stored in the Tokens list. When the Tokens list is populated the visualization will be displayed.
To enhance the UI, a token count is added to the textarea’s suffix template. In the TextAreaSuffixTemplate, render the token count. This will provide a better user experience and allow the character count and token count to be compared at a glance.
This completes the token visualizer. Entering text in the textarea and clicking submit will display how the text is seen by an LLM.

Clicking the Show Tokens toggle displays a vertical list with each token and the integer encoding that represents it.
Conclusion
Using the dotnet stack of Blazor, MLNET and Telerik UI for Blazor, we created a simple tool for visualizing how text is encoded by LLMs. The visualizer can be used to complement your AI development workflow by estimating token size in a given prompt, learning how LLMs see text data, and can be included in applications to estimate a user’s chat input.
The tokenizer is just one small example of how the dotnet stack is a powerful tool for building AI modern applications. Tokenization is just a fraction of a much larger ecosystem that includes ML training and evaluation, generative AI chat completions and much more.

Ed Charbeneau
Ed
Related Posts
Comments
All articles
Topics
Web Mobile DesktopDesktop
Design
Productivity
People

Latest Stories
in Your Inbox
Subscribe to be the first to get our expert-written articles and tutorials for developers!
All fields are required