How to draw a custom view?

In Android SDK we can use a lot of useful predefined and ready-to-go views like TextView, Button, CheckBox, ProgressBar and many others. However there are cases in which we have to do more than just use one of them — we have to create a custom one. If the view is very similar to one of the provided with the Android platform, we can try to extend it and customize it in a proper manner that meets our expectations. But yet, the day will come and there will be no escape — eventually we’ll need to create a totally custom view from the scratch.
I was always terrified at the very thought of extending a View class and implementing everything on my own. But it turned out to not be that difficult. Let’s try to implement one together.
Imagine that we need to create a custom volume bar. The first thing we’re going to do is to create a class that extends the View.

Just one constructor is overridden. The one that we’re using when we’re creating a view from the xml file. For the purpose of the article it’s enough.
Now it’s time to draw something! Let’s start from a line.
How to draw a line?
To draw something, we have to override the onDraw() template method.

There is just one parameter that this method gives us — Canvas. We’ll be drawing on it. But how? Let’s see how the API for drawing looks like.
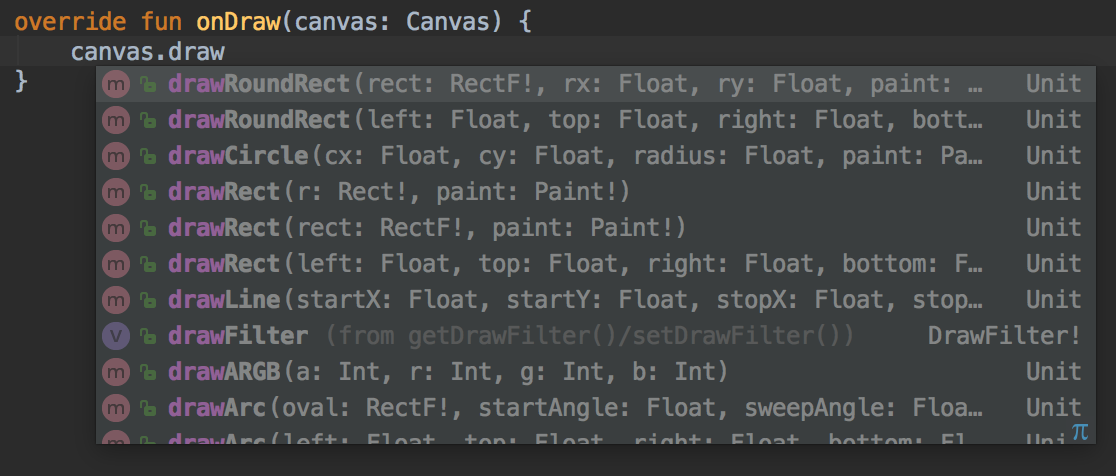
Canvas gives as a lot of methods to draw something, like drawCircle(), drawPath(), drawRect() and so forth. We need a line, so we’ll use drawLine().

The method takes five parameters:
- startX, startY — the point from which the line should starts,
- stopX, stopY — the point of the end of the line,
- paint — the paint which we’re using to draw the line.
The first four are pretty obvious and the last one we’ll cover in a minute. First, we should care about the warning.

Simply put, we shouldn’t create any new instances of objects inside the onDraw() method, because our UI won’t be smooth if we allocate a lot of new objects that eventually will be garbage collected. We need to move creation of the Paint object out of this method.

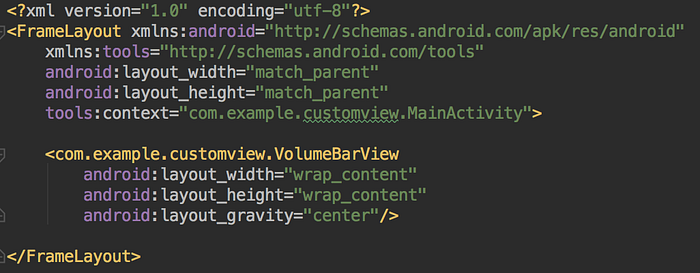
The last thing is to add our view to the layout file.
Now let’s run our project and see the results!
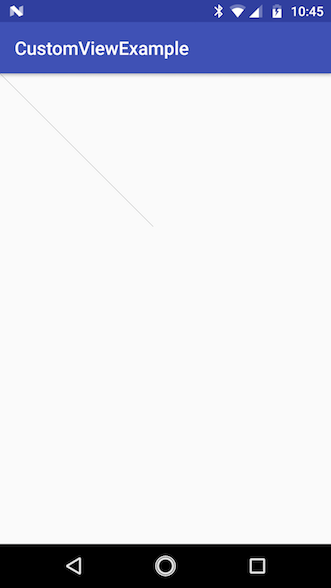
Yeah! We’ve drawn a line 😊 But it’s not centered as we wanted to. Actually our view takes the whole space. Probably because we haven’t specified how much space the view should take. It’s time to override onMeasure() method.
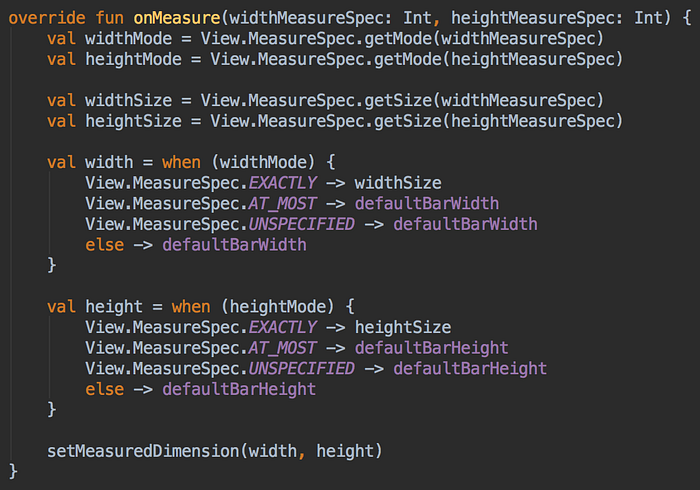
First, we need to decode the mode and size of the view. Why? Let’s look at what the documentation of onMeasure() says about these parameters.
Parameters:
widthMeasureSpec — horizontal space requirements as imposed by the parent. The requirements are encoded with View.MeasureSpec.
heightMeasureSpec — vertical space requirements as imposed by the parent. The requirements are encoded with View.MeasureSpec.
Parent view passes these parameters in the encoded form, so we need to decode them first — it’s probably connected with some kind of optimisations.
Then we need to check the mode. There are three different modes:
- EXACTLY — when we set the exact dp value (like 300dp) on our view or it’s
match_parent, - AT_MOST — when it’s
wrap_content, - UNSPECIFIED — when it doesn’t matter, and a View can be as big as it want to be, because i.e. parent is a ScrollView (then the height in portrait mode is irrelevant).
You can play with it and check if it’s true, for example by adding some logs inside the onMeasure() method and changing layout params.
So as we can see, we take the given dp value if it’s provided, otherwise we take the default ones which are defined in the res/values/dimens.xml resource file.


After all, remember to call setMeasuredDimension() method ⚠️ to apply the view dimensions.
Now let’s change the parameters a bit to have a horizontal line and run the project!

Cool! Again, now you should play a bit with different layout_width and layout_height parameters to see what’s changing. Turn on Show Layout Bounds option in Developer Options to see the exacts space that our view is taking. If you aren’t familiar with this option, you can find how to enable it for example in my article about margin and padding.
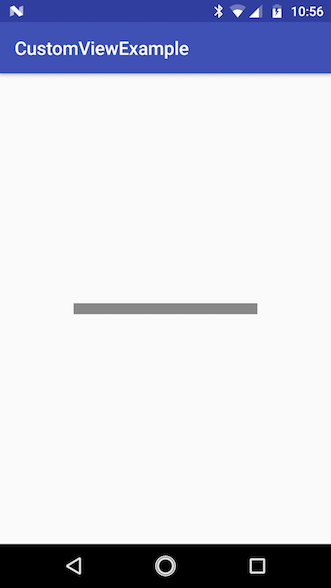
Ok, but we want to have a thicker line, kind of a bar, so we’ll be able to manipulate its height as well as the width. Let’s change the line to the rectangle
How to draw a rectangle?
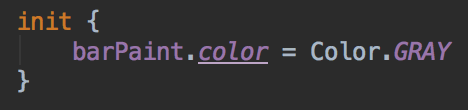
Fortunately it’s pretty easy with our example. All we need to do is to change drawLine() method to drawRect() and apply the height value instead of 0.0F to the bottom parameter. We should also refactor the name of the linePaint to barPaint.

Let’s also change the volume_bar_default_height to 12dp and run the project.

Now we want to change a color, let’s say, to grey. But there is no color parameter on the drawRectangle() method. And it shouldn’t be, because through the Canvas we’re saying what to draw, however we use the Paint class to say how we’re going to do this. So we’ll use our barPaint to change the color.
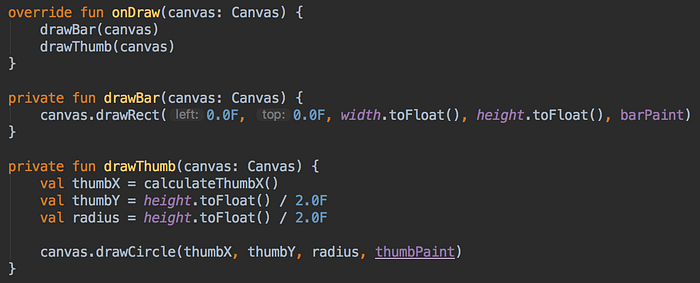
The next step is to draw a circle that will show the current volume level.
How to draw a circle?
To do this we’ll use drawCircle() method and we’ll create a new Paint object to set a different color for the circle.


For now we’ve centered it (the center point of our circle is a half of the bar width and half of the height) and we set the radius to fit the height of the bar.

Now it’s time to react on the volume level changes and change the circle position.
How to react on the volume level changes?
Before we’ll be changing our view dynamically, let’s set the current volume level when the MainActivity view is created.
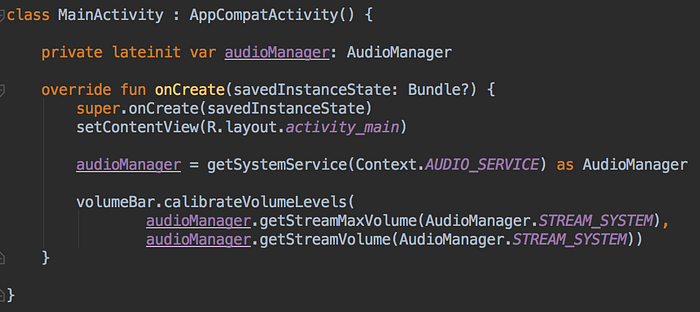
We’re using AudioManager class to retrieve volume levels — the maximum levels count and the current one. Android has a couple of different volume streams like STREAM_ALARM for defining volume level for alarms or STREAM_MUSIC for setting it for music. You can see different streams when you press the volume button and expand the list.

We’re using STREAM_SYSTEM because when we run our app that’s the default one that will be changing when we hit one of the volume buttons.
Let’s see what is inside the calibrateVolumeLevels() method.

We’ve just saved the parameters and call invalidate() method which will call onDraw(). In the second one we have to do some calculations to draw the circle correctly.
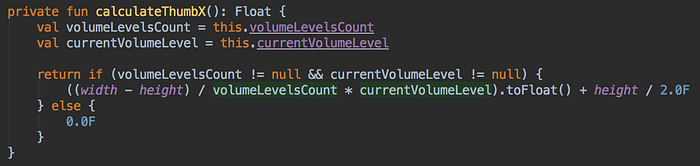
To clean the code a bit we’ve extracted drawing the bar and drawing the thumb to separate methods. drawThumb() is actual the one with the new calculations. We didn’t change the Y or radius values, just the X one because we want to move our thumb on the horizontal axis.
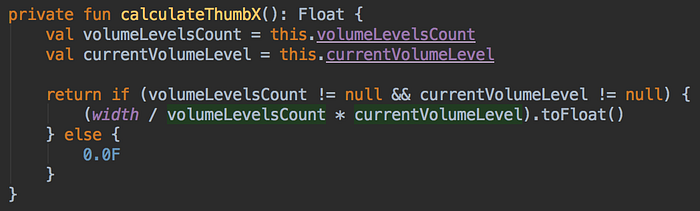
All we have to do is to divide the width of our bar by the volume levels count and multiply it by the current volume level. So for example if our volume bar width is 700, the volume level count is 7 and the current one is 5, the method returns 500.
These two volume values unfortunately can be null because we’re not sure if the calibrateVolumeLevels() method was called. We also have to store the values in the local ones because there is a probability of a race condition — volumeLevelsCount and currentVolumeLevel are mutable properties and they can be changed right after checking is they are not null.
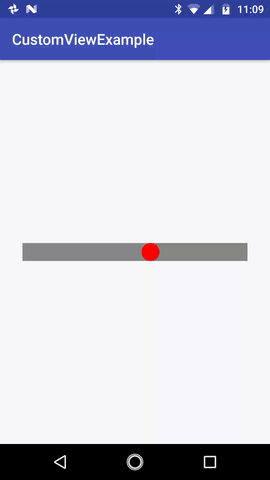
Let’s see if we calibrate our view correctly.

It seems that it’s working. But not exactly as we wanted to… Before I’ll show you the problem, let’s implement changing the circle positions whenever the volume is changed.

In the MainActivity we’ve overridden the dispatchKeyEvent() method. We don’t want to consume the event so false is returned and the super method is called as a first thing. Thanks to that the volume is changed and we can retrieve the current level from the AudioManager.
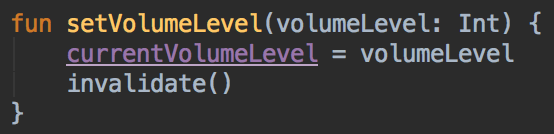
Setting the current volume level on VolumeBarView is pretty simple because we’re just updating the property and invalidate the view.
Let’s run the project and set the volume to min or max level. I’ve made the view bigger so we’ll see it more clearly.
On the edges we see just the half of the thumb. That’s because we‘re drawing the center of the circle starting with the left edge — on the right side it’s the same problem. Hmm… All we need is a half of the circle on the left side and another half on the right side, kind of. So maybe we should just subtract the circle size (height of the volume bar) from the width and at the end of calculations just move the circle by half of its size? Let’s implement this and see if it helped.
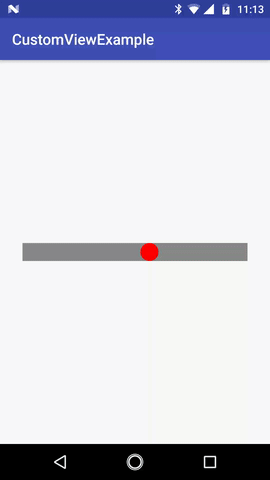
Now the calculations are done correctly. Our custom volume bar is working!
You can find the whole code on the GitHub Repo.
Conclusion
Implementing a custom view is a challenge at the beginning. Complicated calculations can discourage us easily from doing it and that’s why in this article we’ve implemented a very simple version of custom volume bar. It’s not that delightful as you might thought when you started reading this but it’s just a start. We’ve learned basics and now we can customize it further and I encourage you to do this. Hope this article was helpful.
Best!
Bonus!
If you want to see more delightful version of this custom volume bar, you can switch to the delightful branch on the repo that I’ve mentioned.