
The WordPress API has opened many doors for developers – particularly when it comes to managing content for other web applications and mobile apps. In this instance, we’ll be looking at how we can integrate the WordPress API into Dialogflow with Node JS to deliver content to Facebook messenger. This tutorial explains some basic concepts, but working knowledge of Node and Dialogflow will be beneficial. PS I've written this for intermediate devs, as an intermediate dev, feel free to skip over some of the easy concepts
Before you get started, ensure that you have done the following (links are available):
- Installed a working version of Node JS
- Installed the Heroku CLI
- Created a new Node project
- Created an empty GIT repository
- Set up a Dialogflow account
- Installed Postman or JSONview for Chrome (recommended)
- Have access to a WordPress blog to pull content from (I am using this blog as an example)
Setting up the intent
Set up our tags as entities
In order for our chatbot to understand what type of content our users are looking for, we need Dialogflow to use its natural language capabilities to understand the tags within a user’s intent. To do this, we will set up an entity. Entities are types of content within a message that allows our bot to have more context; for example a place or a date. We need to create our tags as entities as we will later be using them to pull specific content from our WordPress blog.
Start by clicking on the Entities tab to the left of the Dialogflow console. Ensure that your entity has a semantic name (like tags) and tick the Define synonyms box. Add each tag as a new row: in the first column, add the tag number (or ID) and in the second column list all of the different synonyms for this tag. The tag number will make it easier for us to pull posts by tag from our webhook – you can get this by editing the tag in WordPress, or calling the API URL to get all tags. Once you’re done click Save and head over to the Intents tab.

Create an intent for content delivery
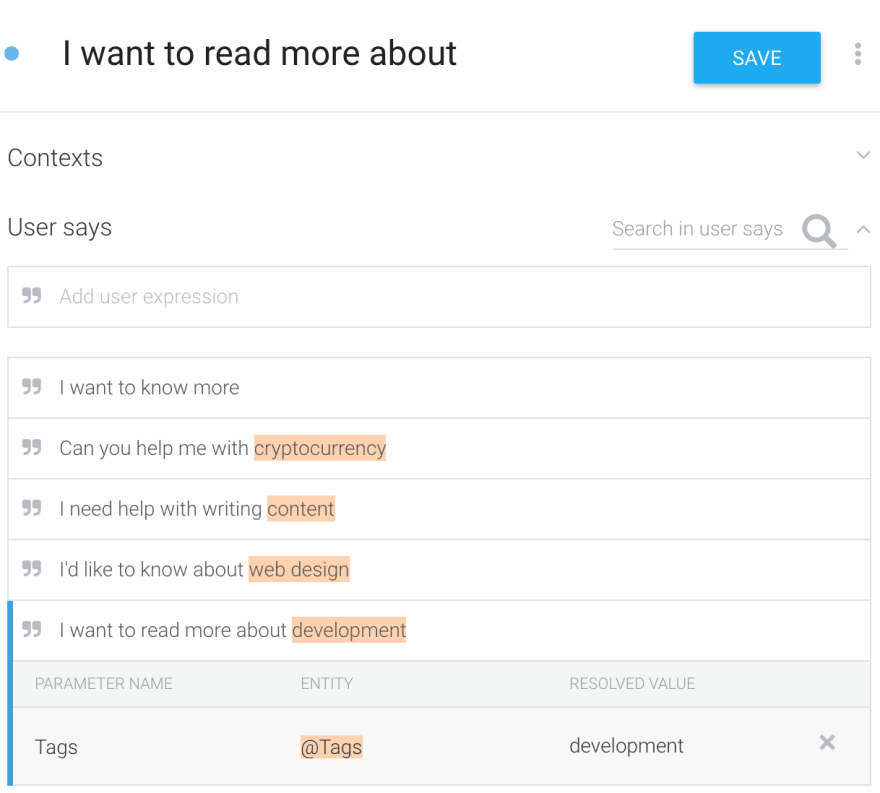
We’ll now set up an Intent to enable us deliver content to our users. A good strategy is to name your intent something similar to what the user might ask – this is especially useful when you have more than 10 intents. Next we add an example of a user’s input. In this case, we are using I want to read more about development. In order for Dialogflow to understand development within context of the user’s message, we need to map the word to our entity. Select the entire word and the entity menu should automatically open up – scroll down or use the filter to select the tag (@tag) entity that we created.
Training our bot
If we now send a I want to read more about development as a test message within the right-hand message console, you will notice that Dialogflow returns an empty message, with a set Paramater of Tags and a value of 22 (which is the ID for the development tag). If we change our message to I want to read more about content; we get a similar response but the value of our tag parameter will be content. This means that Dialogflow is able to understand our message and discern that we want to know specifically about development or content.
If we however change our message to I want to know more about web design, Dialogflow will in most cases not be able to understand which tag we are referring to. This is because our bot needs some additional training – which means we need to add more possible user messages. These could include I want to know more about, tell me more about, I’d like to read about, can you help me with. There’s no limit to the amount of scenarios you can add to Dialogflow; but 10 usually does the trick. As you add these messages you might find Dialogflow picking up the entities automatically, which just means that your training is working.
Setting an action and making tag a required entity
One of the requirements for webhooks is having something to identify our intent by. This can be done in many ways, but my recommendation is to use the action property of an intent. Dialogflow will take the entire intent’s payload (a JSON object) and send this to our webhook. We can then access the payload and check the value of the action key and ultimately use this to build our logic. I’ll show you how this works later, but in the meantime, just give your intent an action by entering it into the action input field. Call it something semantic – in my case I am using get.wp.content.
Next we need to ensure that our bot always has some context when it sends off that payload to our bot. If you were to ask your bot something like I want to know more you will notice that it is unable to pick up our Tag entity – because our message doesn’t contain one. To fix this problem we need to set our tag entity to required by ticking this box underneath the action input field. We also need to give our bot a way to ask for this information, and this can be done by selecting the prompts column and adding a prompt for more information. Good examples include What do you need help with? or What is your profession?

Once done, save your intent and we should now be ready to move on to building our webhook and integrating it into a WordPress blog.
Creating a webhook
There are plenty of repositories available online for pre-built webhooks; but for the purpose of this article we will be building one from scratch. I will provide code samples, but this is not necessarily a Node tutorial, so if you have any questions leave a comment. You are also welcome to fork the repo for this project.
Setting up our project
For our webhook, we will be using the express, body-parser and request packages. To get started, we will install these packages via npm install:
npm install express body-parser request
Once you have these packages installed, you can set up the rest of your project by organizing assets. I will be saving all of my code (except server.js) in a lib folder; this will help us segment our functionality to make our code more readable and reusable. Lastly don’t forget to add node_modules to .gitignore!
To get started, create a new file in your project root called server.js. This will house all our express code and will be our default script. Open up server.js and start off by importing the express and body-parser modules – we will be using ES6.
// Modules
const express = require('express');
const bodyParser = require('body-parser');
Next we declare app as a new express instance, and add body-parser to it as a middleware to enable us to read our JSON payload from Dialogflow.
// Express set up
let app = express();
app.use(bodyParser.json());
Once the express app is set up, we need to start our own server. Express requires us to set a port number in order to start a server; but because Heroku assigns ports at server runtime; we will need to get the port number from the Heroku environment. To achieve this, we use process.env.PORT with a default to 3100 should no environmental port exist. You can read more about this here. Your code should now look like this:
// Modules
const express = require('express');
const bodyParser = require('body-parser');

// Set port for server
const port = process.env.PORT || 3100;

// Express set up
let app = express();
app.use(bodyParser.json());

// Start server
app.listen(port, () => {
    console.log(`Listening on port ${port}`)
});
That’s it for now – we have everything we need to start writing our webhook.
Writing our webhook route
Dialogflow requires a route in order to successfully communicate with our webhook. We will be creating a new post express route to handle this. I am naming this route /webhook to make our code more scalable, should we want to add more routes later. In the lines following the loading of the body parser middleware, create a new post route:
app.post('/webhook', (req, res, next) => {
});
Inside our webhook route, let’s get the action from our Dialogflow payload. If you are unsure of how the payload is structured, you can view the JSON structure within Dialogflow when sending a test message on the right-hand side of the console. In our JSON object, the action is within the result object of our payload. We need to access this by getting the body of our request object – the request object is any information sent via post to our webhook route. Our body parser middleware will allow us to get the body from the request object, which we’ll store in a new variable called action. Let’s also declare another empty variable called message (which will be the message our webhook sends back to Dialogflow).
let action = req.body.result.action;
let message = '';
The last step is to send a response back to Dialogflow by using our routes response object – this is done by calling res.send. We will be sending back a JSON object containing our message, which forms part of Dialogflow’s fulfillment lifecycle. We will also use a simple if/else ternary to check whether or not we are hitting the get.wp.content action we set up in Dialogflow. Our server.js file should then look something like this:
const express = require('express');
const bodyParser = require('body-parser');

const port = process.env.PORT || 3100;

let app = express();
app.use(bodyParser.json());

app.post('/webhook', (req, res, next) => {

    let action = req.body.result.action;
    let message = action === 'get.wp.content' ? `Hey, our webhook is connected!` : `Sorry, I didn't get that`;

    res.send({
        speech: message,
        displayText: message,
        source: 'wp-webhook',
    });

});

app.listen(port, () => {
    console.log(`Listening on port ${port}`)
});
Connecting our webhook
Now that our base webhook is done, it needs to be uploaded to Heroku. Heroku offers free hosting for Node (and many more) applications, with the option to scale when necessary which makes it a great option for deploying our webhook. Dialogflow requires webhooks to be hosted on https, which Heroku takes care of too.
First off, let’s cd into your project folder and create a new Heroku app by running heroku create within terminal or command prompt. If you are asked to log in, use your Heroku credentials and retry the command. Once created, you will be presented with a unique Heroku url which is the link we’ll be using later within Dialogflow. Next we add all our files to our git repo, and commit them. The last step is to push these files up to our Heroku app by running git push heroku master.
heroku create
git add .
git commit -m "Init webhook"
git push heroku master
Once you push up your code, it will run all the necessary build steps and once done you should see Build succeeded! within the console. You can now test your application by running heroku open, which will open your heroku app. You should see an error message; Cannot get /; this is normal as we haven’t set up this route.
Now that our webhook is working, we need to enable fulfillment within Dialogflow. To do this, click on the fulfillment tab in the left-hand menu, and on this page enable it. Paste your webhook url (you have to include /webhook) into the first input and save.

The final step is to go into our intent on Dialogflow and enable Use webhook under the fulfillment section of the page (right at the bottom). Click save and wait for the agent to train. Now when you send I want to read more about development to the testing console on the right-hand side, you should get Hey, our webhook is connected! as a response!
Getting WordPress articles
For this next part, I’d recommend you use something like Postman to have a better understanding of responses from the WordPress API look like. If you don’t have your own blog to pull content from, you can use Diginauts (as per this demo) as it gets a low amount of traffic. To do some testing, hit http://yoursite.coma/wp-json/wp/v2/posts in Postman (or a browser) and you should see a JSON object with a list of posts from that blog. This is how all of our posts will be structured and we will later use this information to format our Facebook messenger response.
We can also get posts with specific tags, if you hit http://yoursite.com/wp-json/wp/v2/posts?tags=22 you’ll see only posts tagged with the development tag. This is great news as it means we can now use our Dialogflow tag parameter to get the posts we need.
Setting up the API request
Back in our project, I’m going to create a new folder called wordpress in our lib folder, and create a new file called wordpress.js. The first thing we need is to load the request module we installed earlier, as we will be making an API request. I am also going to declare a new variable with a link to the API.
const request = require('request');
const api = 'http://yourblog.com/wp-json/wp/v2/';
We now want to set up a function that will allow us to load posts from the WordPress API. Our function will take two arguments, the tag we want to fetch content for as well as a callback for when our API call is completed.
let getPosts = (tag, callback) => {
}
Now we want to construct the URL for our API call. There are various ways to do this, and ideally you want to refactor the getPosts function by adding more logic to our API URL, but for now we’ll keep it simple. Our API call has three requirements: we will firstly be hitting the /post route of the WordPress API which will allow us to get posts. Secondly, we need add a URL parameter to only get posts of a particular tag by its ID. Lastly, we want to add the _embed parameter as this will include the featured image in our payload. I will embed all of these using ES6 template strings.
let getPosts = (tag, callback) => {
    let url = `${api}/posts?tags=${tag}&_embed`;
}
Handling the error and not found cases
We are now ready to fire a request to the WordPress API using the request module. Request takes two arguments: our API URL (or an object with data) and a callback function with an error, response and body argument. Within an I’d statement we will handle the error and success case. For now, let’s call our callback if an error occurs by adding a user-friendly error message and returning the error.
let getPosts = (tag, callback) => {
    let url = `${api}/posts?tags=${tag}&_embed`;
    request({url}, (err, res, body) => {
        if (err) {
            callback('Sorry, there was an error getting posts from our blog', err)
        } else {
        }
    });
}
For our not found and success cases, we need to firstly parse our response’s body as the WordPress API will return an array of stringified JSON objects and assign this to a variable. Once we’ve parsed the response we need to check the amount of items in our array – if the array is empty no articles were returned so we can let our users know via a friendly message.
let getPosts = (tag, callback) => {
    let url = `${api}/posts?tags=${tag}&_embed`;
    request({url}, (err, res, body) => {
        if (err) {
            callback('Sorry, there was an error getting posts from our blog', err)
        } else {
            let posts = JSON.parse(body);
            if (posts.length === 0)
                callback(`It doesn't seem like there's any content available on this topic`);
            }
        }
    });
}
Handling the success case
Add an else statement to our check for the array length to deal with the success case. The WordPress API returns a lot of data that we won’t be needing for our Facebook cards, so we need to map the data into a new array and take only the information we need. At the same time, it would be beneficial to structure our array in the format required by Facebook to show cards within messenger. Most of the information we need can be found by traversing our API response (you can use Postman for a better view of what this response looks like). For the subtitle we need to strip out all HTML tags and entities to ensure we send a clean string to Facebook as the API does not return a clean string – we can do this with regex. Lastly, we need to get our featured image. This is embedded very deep into our API response and you have to use bracket notation when referencing wp:featuremedia as it contains a colon.
The last thing we need to do for our success case is add a text message to our bot’s response as it would be odd if our users only got a list of articles. We can do this by adding a custom message at the beginning of our formattedPosts array using unshift. Once this is done, we can call our callback by setting our first argument as undefined (as there was no error) and setting our second argument equal to formattedPosts. Export getPosts via module.exports and we’re done with our wordpress module.
const request = require('request');
const api = 'http://diginauts.co.za/wp-json/wp/v2';

let getPosts = (tag, callback) => {
    let url = `${api}/posts?tags=${tag}&_embed`;
    request({url}, (err, res, body) => {
        if (err) {
            callback('Sorry, there was an error getting posts from our blog', err)
        } else {
            let posts = JSON.parse(body);
            if (posts.length === 0) {
                callback(`It doesn't seem like there's any content available on this topic`);
            } else {
                let formattedPosts = posts.map((post) => {
                    return {
                        type: 1,
                        platform: 'facebook',
                        title: post.title.rendered,
                        subtitle: post.excerpt.rendered.replace(/<(?:.|\n)*?>/gm, '').replace(/&[^\s]*/, ''),
                        imageUrl: post._embedded['wp:featuredmedia'][0].media_details.sizes.listing.source_url,
                        buttons: [
                            {
                                text: 'Read more',
                                postback: post.link
                            }
                        ]
                    }
                });

                formattedPosts.unshift({
                    type: 0,
                    platform: 'facebook',
                    speech: 'Sure, here are some helpful articles'
                });

                callback(undefined, formattedPosts);
            }
        }
    });
}

module.exports = {getPosts};
Tying it all together
Since our post data is ready to be consumed, we can go ahead and send a response back to Dialogflow from server.js. First, let’s import our wordpress.js module using require and remove our message variable as well as the existing code for sending a response. Create a new variable for the tag we will be passing to our getPosts function and set this equal to the parameters property of our Dialogflow payload.
const express = require('express');
const bodyParser = require('body-parser');

const wordpress = require('./lib/wordpress/wordpress');

const port = process.env.PORT || 3100;

let app = express();
app.use(bodyParser.json());

app.post('/webhook', (req, res, next) => {

    let action = req.body.result.action;
    let tag = req.body.result.parameters.tags;

});

app.listen(port, () => {
    console.log(`Listening on port ${port}`)
});
We are now able to call our getPosts function via the wordpress module we imported. This function will take our tag as an argument followed by our callback function. Our callback function has its own parameters: an error message and our post content. If there is an error message present, we can send that error message as a Dialogflow response to the user by using the same JSON format we used earlier. For our success case (i.e errorMessage is undefined) we can send our post content to Dialogflow, but this time we will be sending it via the message property. The message property contains an array of messages for different platforms and types and since we specified this array in wordpress.js, we can simply send off our postContent variable. Leave speech and displayText empty as we won’t be needing a generic response.
const express = require('express');
const bodyParser = require('body-parser');

const wordpress = require('./lib/wordpress/wordpress');

const port = process.env.PORT || 3100;

let app = express();
app.use(bodyParser.json());

app.post('/webhook', (req, res, next) => {

    let action = req.body.result.action;
    let tag = req.body.result.parameters.tags;

    wordpress.getPosts(tag, (errorMessage, postContent) => {
        if (errorMessage) {
            res.status(400).send({
                speech: errorMessage,
                displayText: errorMessage,
                source: 'wp-webhook',
            });
        } else {
            res.status(200).send({
                speech: '',
                displayText: '',
                source: 'wp-webhook',
                messages: postContent
            });
        }
    });

});

app.listen(port, () => {
    console.log(`Listening on port ${port}`)
});
Push this code up to Heroku and test your intent within the Dialogflow console. You can switch the response type to Facebook messenger to test that the cards are pulling through properly. If you are happy with the results, connect Dialogflow to Facebook messenger via the _Integrations _tab and you’re ready to go.
Further notes
- It would be potentially beneficial to refactor our code and create a function for creating Facebook cards. Currently our getPost function is quite messy, and it would be better to separate those concerns
- Sometimes people might provide multiple tags – Dialogflow has the ability to interpret entities in a list. Our code would need to be modified considerably but it should be do-able.
- Remember to train your bot often – there is nothing worse than hitting a dead-end when chatting to a bot!
- Integration into Chatbase is a must, especially if you are delivering large amounts of content via chat channels
- Consider other chat channels – Slack is a good one and also offers cards
- Enable caching so bot responses are faster.


Top comments (0)