

It has been previously established on this blog that I, like many developers, absolutely deplore writing documentation. It's slow, it's boring, anything I write is probably gonna be obsolete in like five minutes, I hate doing it. Unfortunately, while it definitely sucks, we're gonna have to do it anyway.
My most recent project is using ASP.NET Core, and their own site suggests we implement documentation is to use Swagger, an open-source API documentation tool.
I'm all for things that make writing documentation less boring, so I jumped on the change to use Swagger and implement in in my Core project. Turns out, it's surprisingly easy! Let's see how to implement Swagger in our ASP.NET Core API projects!
The Sample
As with most of my tutorials, there's already a sample project hosted on GitHub that's ready for you to take a look at and use to follow along with this post.
 exceptionnotfound
On to the tutorial!
It has been previously established on this blog that I, like many developers, absolutely deplore writing documentation. It's slow, it's boring, anything I write is probably gonna be obsolete in like five minutes, I hate doing it. Unfortunately, while it definitely sucks, we're gonna have to do it anyway.
My most recent project is using ASP.NET Core, and their own site suggests we implement documentation is to use Swagger, an open-source API documentation tool.
I'm all for things that make writing documentation less boring, so I jumped on the change to use Swagger and implement in in my Core project. Turns out, it's surprisingly easy! Let's see how to implement Swagger in our ASP.NET Core API projects!
The Setup
Let's imagine that we have a very simple Web API controller, with only two stub methods:
[Route("api/[controller]")]
[ApiController]
public class EmployeeController : ControllerBase
{
    [HttpGet]
    [Route("{id}")]
    public ActionResult<string> GetByID(int id)
    {
        return "Found Employee";
    }

    [HttpGet]
    [Route("byname/{firstName}/{lastName}")]
    public ActionResult<string> GetByName(string firstName, string lastName)
    {
        return "Found another employee";
    }
}
What we want to do is generate documentation for these methods.
Here's the goal of this tutorial: to setup Swagger to use XML comments generated by ASP.NET, and to show a default Swagger UI implementation that will allow us to manually test our two sample methods.
Our goal is to make writing these necessary docs fun!
...
What?
Fine. Maybe not fun, exactly... but less boring. Better? Cool. Let's get going!
The Package
First, we need to grab the NuGet package for the project known as Swashbuckle.AspNetCore. This package adds Swagger, SwaggerUI, and other libraries to make it easy for us to create our API documentation.
With the package installed, we now need to enable our project to generate XML comments. The comments come from triple-slash (///) comments throughout our code.
First, in the project properties, check the box labeled "Generate XML Documentation".
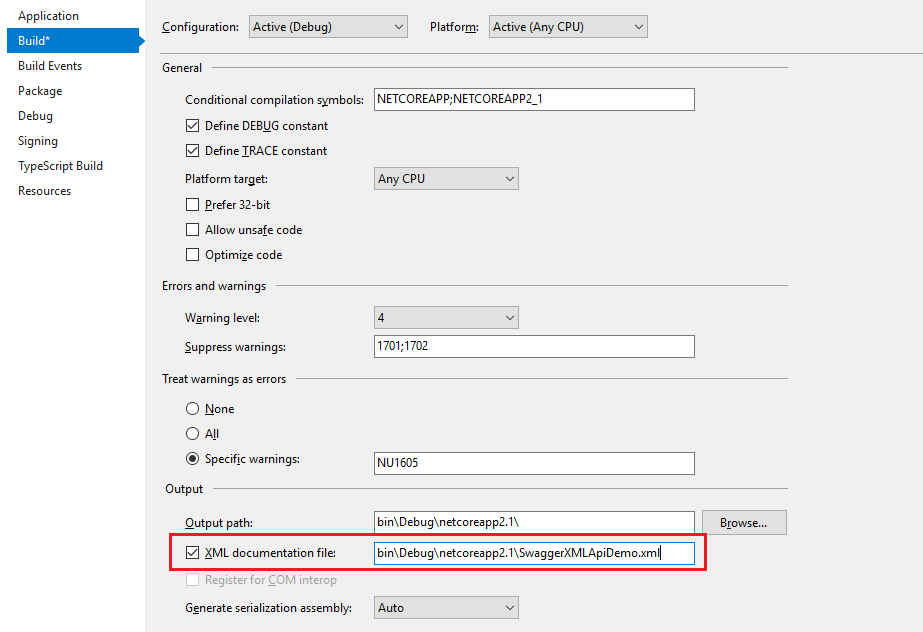
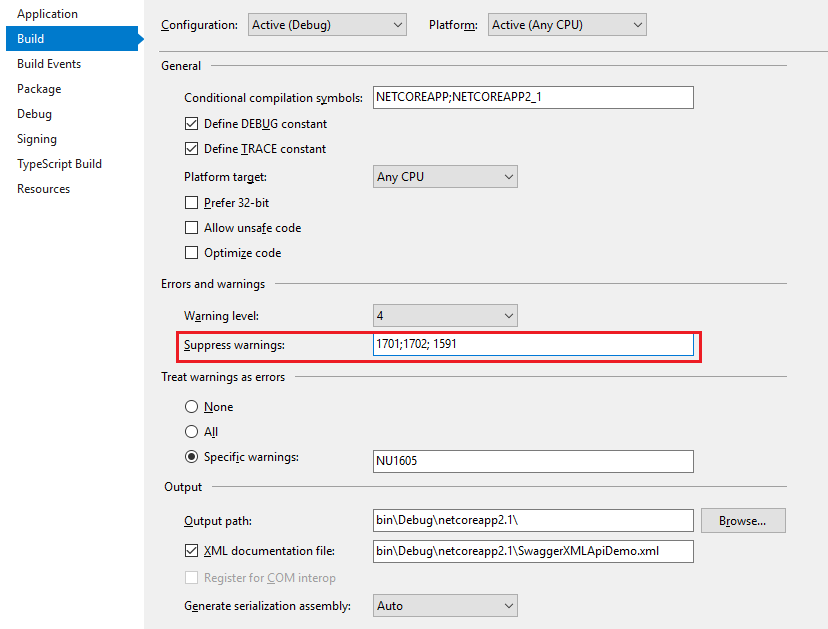
You will probably also want to suppress warning 1591, which will now give warnings about any method, class, or field that doesn't have triple-slash comments.
Configuring Swagger
With the project now generating XML documentation, we need to make some changes to our Startup.cs file. Specifically, we need to enable the services layer to use Swagger and tell the app to use both Swagger and Swagger UI. Here's the code; details are immediately after.
public class Startup
{
    //...

    public void ConfigureServices(IServiceCollection services)
    {
        services.AddMvc().SetCompatibilityVersion(CompatibilityVersion.Version_2_1);

        //This line adds Swagger generation services to our container.
        services.AddSwaggerGen(c =>
        {
            //The generated Swagger JSON file will have these properties.
            c.SwaggerDoc("v1", new Info
            {
                Title = "Swagger XML Api Demo",
                Version = "v1",
            });

            //Locate the XML file being generated by ASP.NET...
            var xmlFile = $"{Assembly.GetExecutingAssembly().GetName().Name}.XML";
            var xmlPath = Path.Combine(AppContext.BaseDirectory, xmlFile);

            //... and tell Swagger to use those XML comments.
            c.IncludeXmlComments(xmlPath);
        });
    }

    // This method gets called by the runtime.
    // Use this method to configure the HTTP request pipeline.
    public void Configure(IApplicationBuilder app, IHostingEnvironment env)
    {
        if (env.IsDevelopment())
        {
            app.UseDeveloperExceptionPage();
        }

        app.UseMvc();

        //This line enables the app to use Swagger,
        //with the configuration in the ConfigureServices method.
        app.UseSwagger();

        //This line enables Swagger UI,
        //which provides us with a nice, simple UI
        //with which we can view our API calls.
        app.UseSwaggerUI(c =>
        {
            c.SwaggerEndpoint("/swagger/v1/swagger.json",
                              "Swagger XML Api Demo v1");
        });
    }
}
Writing XML Comments
Back in our EmployeeController, let's write some XML comments for the two methods. Here's what the sample project has:
[Route("api/[controller]")]
[ApiController]
public class EmployeeController : ControllerBase
{
    /// <summary>
    /// Retrieve the employee by their ID.
    /// </summary>
    /// <param name="id">The ID of the desired Employee</param>
    /// <returns>A string status</returns>
    [HttpGet]
    [Route("{id}")]
    public ActionResult<string> GetByID(int id)
    {
        return "Found Employee";
    }

    /// <summary>
    /// Returns a group of Employees matching the given first and last names.
    /// </summary>
    /// <remarks>
    /// Here is a sample remarks placeholder.
    /// </remarks>
    /// <param name="firstName">The first name to search for</param>
    /// <param name="lastName">The last name to search for</param>
    /// <returns>A string status</returns>
    [HttpGet]
    [Route("byname/{firstName}/{lastName}")]
    public ActionResult<string> GetByName(string firstName, string lastName)
    {
        return "Found another employee";
    }
}
Here's the XML nodes in use:
- summary: A high-level summary of what the method/class/field is or does.
- remarks: Additional detail about the method/class/field.
- param: A parameter to the method, and what it represents.
- returns: A description of what the method returns.
Viewing Swagger
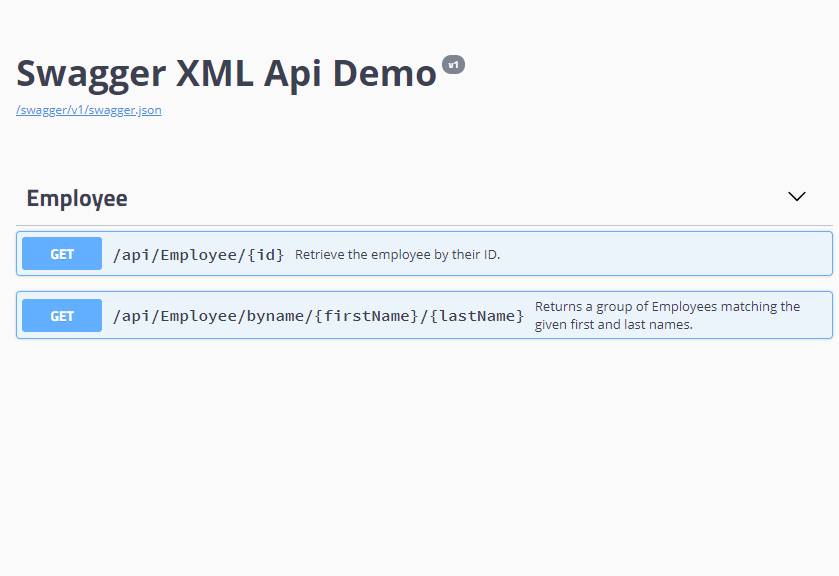
With all of this in place, we are now ready to run the project. When you do so, go to localhost:portnumber/swagger to see the Swagger UI, which looks something like this:
For completeness, let's highlight where each of the different XML documentation nodes (summary, remarks, param) appears.
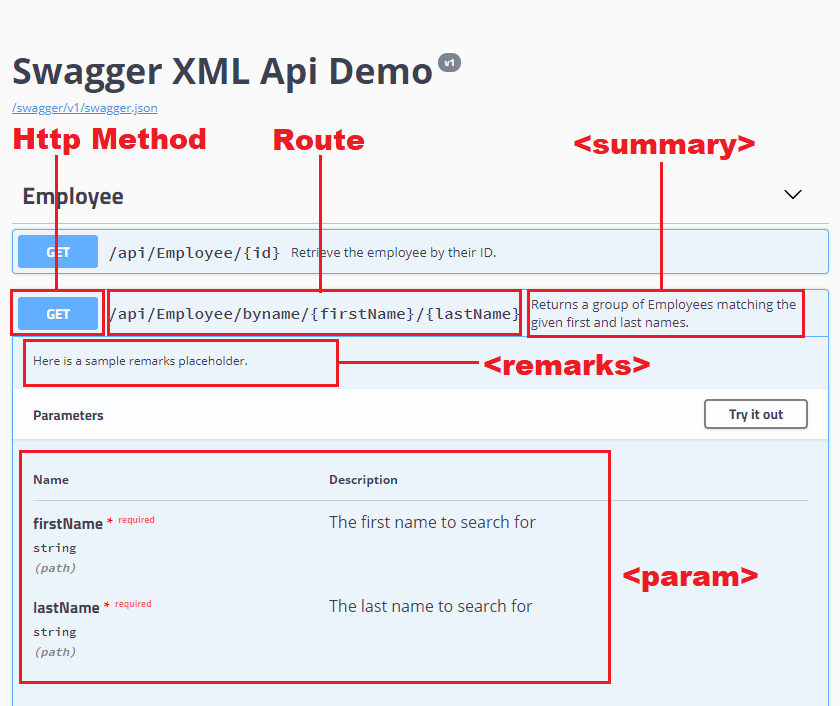
If you're wondering where the returns XML node went, well, I'm not sure either. I'd appreciate if anyone could point out where it is in Swagger in the comments.
But, in spite of that little hiccup, we're done! Now our ASP.NET Core API project will have auto-generated Swagger documentation using simple XML comments!
Summary
Swagger is a fantastic library to help you generate documentation for your Web APIs, and with a little setup it can easily use generated XML comments to make your API docs that much simpler to create. Best of all, it makes writing documentation, well, not fun, but a little less boring. And that can make all the difference.
Go check out the sample project on GitHub if you haven't already. Did you catch something I did wrong, or can you make my implementation better? Let me know in the comments!
Happy Documenting!