Okta Workflows Tutorial: Build a Connector for Spotify API (with OAuth 2.0)

This tutorial will teach you how to build a connector for Spotify API that uses OAuth for authentication using the Okta Workflows Connector Builder.
- Connector for Spotify API
- Build a connector for Spotify API
- Resources
Connector for Spotify API
You will build a connector for Spotify API because it uses OAuth for authentication. This tutorial will teach you how to create a connector in the Connector Builder that uses OAuth for authentication.
OAuth authentication is an advanced topic. If you are new to the Connector Builder, read and complete other articles and tutorials in this series:
- Understanding Okta Workflows Connectors.
- Okta Workflows Tutorial: Build a Connector for OpenWeather API.
If you want to call Spotify API using the API Connector card, read this KB:
This KB will teach you how to set up OAuth connection and call the Spotify API using the API Connector card.
Build a connector for Spotify API
In this section, you will build a connector to Spotify in the Connector Builder.
The Connector Builder uses Workflows flows and cards (action, function) to build a connector.
A connector consists of several flows:
- A flow to make HTTP requests.
- A flow to check authentication to the service is working.
- One or more action flows. Each action flow calls a service’s API endpoint.
- Custom action flow to allow calling any API endpoint on the service (see the Build a Connector for OpenWeather API tutorial).
First, you need a Spotify account before you start building the connector.
Set up a Spotify account and app
Create a Spotify account
- Create a Spotify account, if you don’t have one.
Create an app
After implementing an authorization flow, the app will provide an access token to make calls to Spotify API.
- To create an app, go to your Dashboard, click on the Create an app.
- Enter Workflows Connector Builder for App name.
- Enter Workflows Connector Builder app for App description.
- Enter http://localhost:8080 for the Redirect URIs. You will change this value later.
- Check Web API for Which API/SDKs are you planning to use?
- Check the Developer Terms of Service checkbox.
- Click Save to create the app.

Spotify app.
Create a connector project
Launch the Connector Builder
- Click the menu next to your name to launch the Connector Builder.
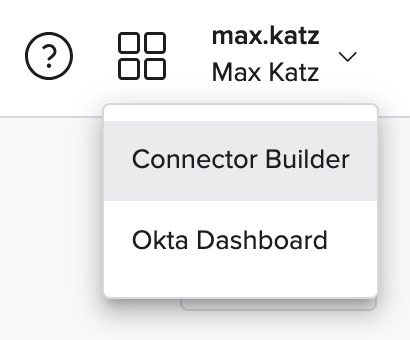
Launch the Connector Builder.
Create a connector project
- Click the ➕ in the left panel to create a connector project.
- Enter Spotify for the Connector name.
- Enter Spotify connector for the Connector description.
- Click Save to create the project.

Spotify connector project.
Connector flows and authentication
Connector flows
The connector you will build has three flows:
- httpHelper: manages all authentication and HTTP requests for the connector.
- authPing: checks connection health.
- List User Albums: lists the current Spotify albums of users (API docs).
Authentication
Authentication is where you define the parameters required to create a secure connection to the API service.
When an end user creates a connection to your service, the New Connection dialog collects the specific authentication details.
There are three authentication types:
- Basic: uses username and password.
- OAuth 2.0: grants limited access to resources to a third party. You can use Authorization Code or Client Credential grant types in a connector.
- Custom: uses API key or other authentication process.
You will set up an OAuth connection for Spotify.
Create authentication for Spotify API
Create an OAuth connection
- Scroll down and click on Set up authentication on the Overview page to create a connection.
- Select Oauth 2.0 from the Auth Type list.
- Select Authorization Code from the Grant Type.
- Enter https://accounts.spotify.com for the Base URL.
- Enter /authorize for the Authorize Path.
- Enter /api/token for the Token Path.
- Leave the Refresh Token Path field blank.

Creating a connection.
Update the Redirect URI in the Spotify app
- Copy the link under Redirect URI. This is the callback URL.
- Return to the Spotify app you created earlier. Click Settings.
- At the bottom of the page, click Edit.
- In the Redirect URIs section, click Remove to delete the current URI.
- Paste the URI from the Connector Builder and click Add.
- Click Save to save the changes.
Set up the Client ID and Client Secret
- Return to the Connector Builder.
- Keep Developer for the Client Ownership.
- Copy the Client ID from the Spotify app and paste it into the Client ID field in the connection.
- Copy the Client Secret from the Spotify app (click View client secret) and paste it into the Client Secret field in the connection.
Set up scope
The Get Current User’s Playlists API requires the playlist-read-private scope. Scopes define the resources to which the app has access.

Creating new connection (continued).
- In the Scopes section, click Add Scope.
- Enter playlist-read-private for the Name.
- The right side shows the connection preview. Click Save to create the connection.

Spotify connection information.
Create a flow to make HTTP requests
You will create a flow named httpHelper.
The httpHelper is a system flow that manages authentication and HTTP requests for the connector. The httpHelper flow is a helper flow; other flows can call it. The flow has:
- Several inputs.
- Function cards to build request query, header, and body information.
- The HTTP – Raw Request card to make a call to an API.
- Several outputs.
Create a flow
- Open the Flows page.
- To create a flow click + New Flow.
- Click Unnamed in the upper left corner to name the flow.
- Enter httpHelper for the Flow name.
- Enter This flow manages all authentication and HTTP requests for the connector for the Description.
- Check the Save all data that passes through the Flow? option.
- To save the flow, click Save.
Set up flow inputs
- Click Add event and choose Helper Flow.
- Add the following fields on the Helper Flow card:
- relative_url (type: Text).
- request_method (Text).
- query (Object).
- headers (Object).
- body (Object).
The httpHelper flow with inputs

httpHelper flow.
Set up the API URL
The connector can support multiple Spotify endpoints. The base URL stays the same, and the relative URL will change. You need to combine the two values into a full URL.
- Add the Text – Concatenate card after the Helper Flow card.
- Enter https://api.spotify.com the text 1 field.
- Connect relative_url to the text 2 field.
- Rename the card’s output field.
- To edit the card, click ⚙️ > Edit card.
- To rename the output field, click on its ✏️ icon and set the name to full_url.

Setting up the URL.
Set up the headers
You need to set up two header parameters:
- Content-Type: application/json.
- Authorization: Bearer access_token.
The connection you set up will acquire the access token. The Connection field lists the Access Token value in the first card.
To set up the Authorization header:
- Add the Text – Compose card.
- Type Bearer inside the card.
- Connect Access Token after the string Bearer (add a space between the strings).
- Rename the Compose card output field to bearer.
To set up the Content-Type header:
- Add the Object – Construct card.
- Create a Content-Type field and for the value enter application/json.
- Create an Authorization field, and for the value connect the bearer field from the Compose card.
- Rename the output field to headers_auth.
You need to merge the Content-Type and Authorization headers with any headers a Workflows user might provide.
- Add the Object – Merge card.
- Connect the headers field from the first card to the object 1 field.
- Connect headers_auth from the Construct card to the object 2 field.
- Rename the output field to merged_headers.

httpHelper flow with headers cards.
Make the API call
- Add the HTTP – Raw Request card.
- Create the following connections:
- full_url to the url field on the Raw Request card.
- request_method to the method on the Raw Request card.
- merged_headers to the headers field on the Raw Request card.
- query from the first card to the query field.
- body to the body field.
Set up flow outputs
- Connect statusCode, headers, and body fields from the HTTP – Raw Request card to the Flow Control – Return card.
- Change the body field type to Object.
Final httpHelper flow:

httpHelper flow.
Test the flow
- Click Run to test the flow.
- Select New connection from the Test Connection list.
- Enter Spotify for the Name field.
- Enter Spotify connection for the Description field.
- Click Create. You will see a popup asking you to sign into Spotify and allow the app you created (Workflows Connector Builder) to access your playlist information.
- Enter /v1/me/playlists for the relative_url field.
- Enter GET for the request_method field.
- Click Run to test the flow.
Create a flow to check for a valid connection
You will create a flow named _authPing. An _authPing flow is a system flow used by the platform to call an API and check for valid authorization.
This action acts as a validation check and runs when you first authenticate the connector, add new connectors, or open flows.
Create a flow
- Return to the connector project view.
- Click + New Flow from the Flows page.
- Click Add event, and select the Authping event.
- To save the flow, click Unnamed in the upper left corner.
- Enter _authping for the the Name.
- Enter Connection health check for the description.
- Check the Save all data that passes through the Flow? option.
- Click Save.

_authping flow.
Add connection health check cards
- Click Add function, and select Error Handling – If Error card.
- In the Try block (automatically selected), click ➕, then function (calculator icon), and select the Flow Control – Call Flow card.
- On the Call Flow card, click Choose Flow.
- Select the httpHelper flow, and click Choose.
The flow looks like this:

_authping flow with the Call Flow card.
This flow calls the httpHelper flow to check the connection to the service is working. You must use an API endpoint that requires authentication.
Note: The Okta Workflows team recommends a request with the smallest response size. For example, some APIs have a /me endpoint to get information about the logged-in user.
The Spotify API has a /me endpoint you can use in this flow.
Finish configuring the Call Flow card:
- Enter /v1/me for the relative_url.
- Enter GET for the request_method.
- Leave the query, headers, and body fields blank.
- Connect the Connection field from the first card to the Connection field on the Call Flow card.

Calling the /me endpoint.
To create outputs on the Call Flow card:
- Click inside the Click or drag to create area and create the following output fields:
- statusCode (type Number).
- headers (Object).
- body (Object).

Call Flow card with outputs.
Next, you will set up a message when the connection is working and a message when the connection is not working.
To set up a message when for working connection:
- Click the ➕ after the Call Flow card inside the If Error card and select the Flow Control – Assign card.
- Add a message field and set it to The connection is successful value in the Control – Assign card.
Create outputs for the If Error card:
- Click View Outputs in the If Error card (upper right corner). The card opens a section where you define the card’s outputs.
- Click inside the field box and create two outputs:
- statusCode.
- message.
- Create the following connections:
- statusCode from the Call Flow card to the statusCode‘s first sub-field.
- message from the Assign card to the message‘s first sub-field.
The cards look like this:
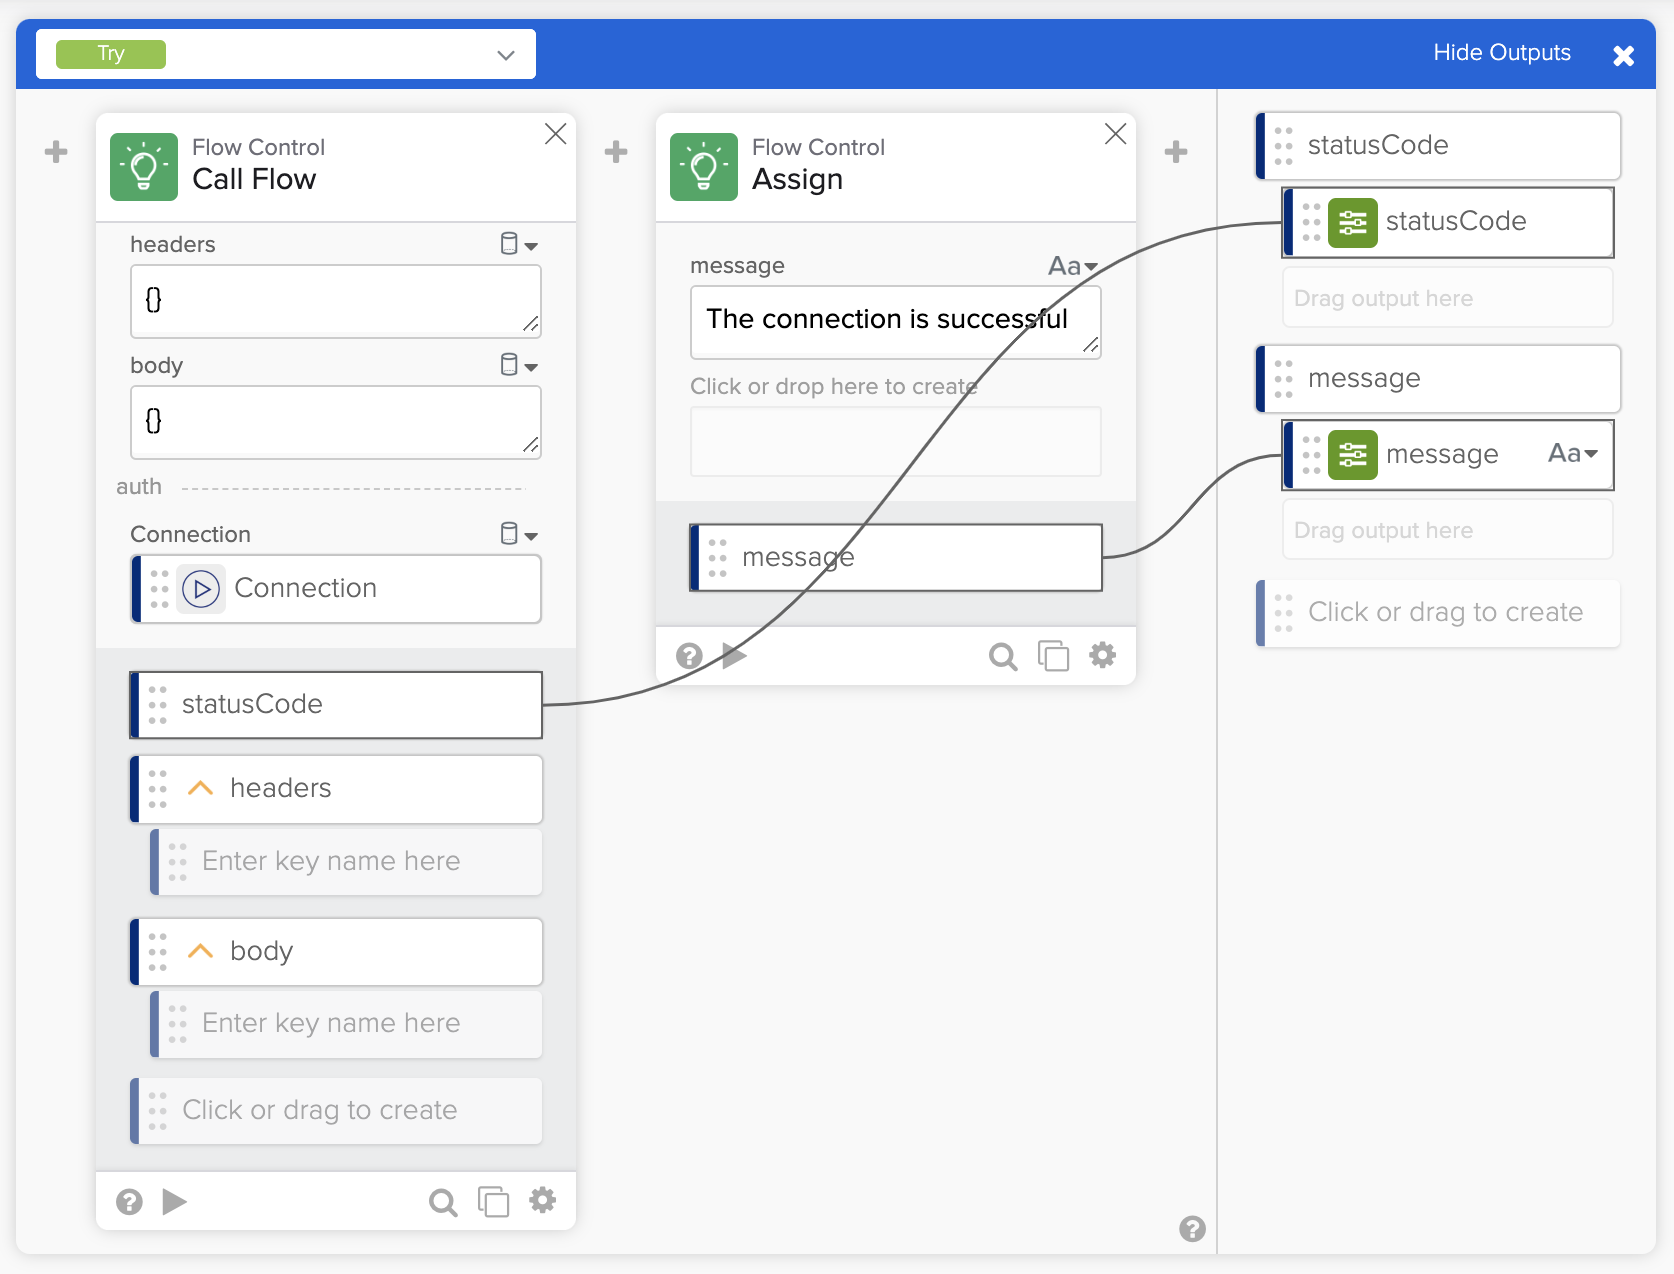
Set up a message when the connection is working.
To set up a message when the connection is not working:
- Using the list where it says Try, switch to the If Error block on the If Error card.
- Add two fields to the Error object:
- statusCode (type Text).
- description (Text).
- Click ➕ to the right of the Error object inside the If Error block and add the Text – Concatenate card.
- Create the following connections:
- description from the Error object to the text 1 field.
- Enter : (colon) in the text 2 field.
- Click to create a third field and connect message from Error to it.
Next, you will connect the message to the If Error card output.
- Click View Outputs on the If Error card.
- Create the following connections:
- statusCode from Error to the statusCode‘s second sub-field.
- output from Concatenate to the message‘s second sub-field.
The cards look like this:
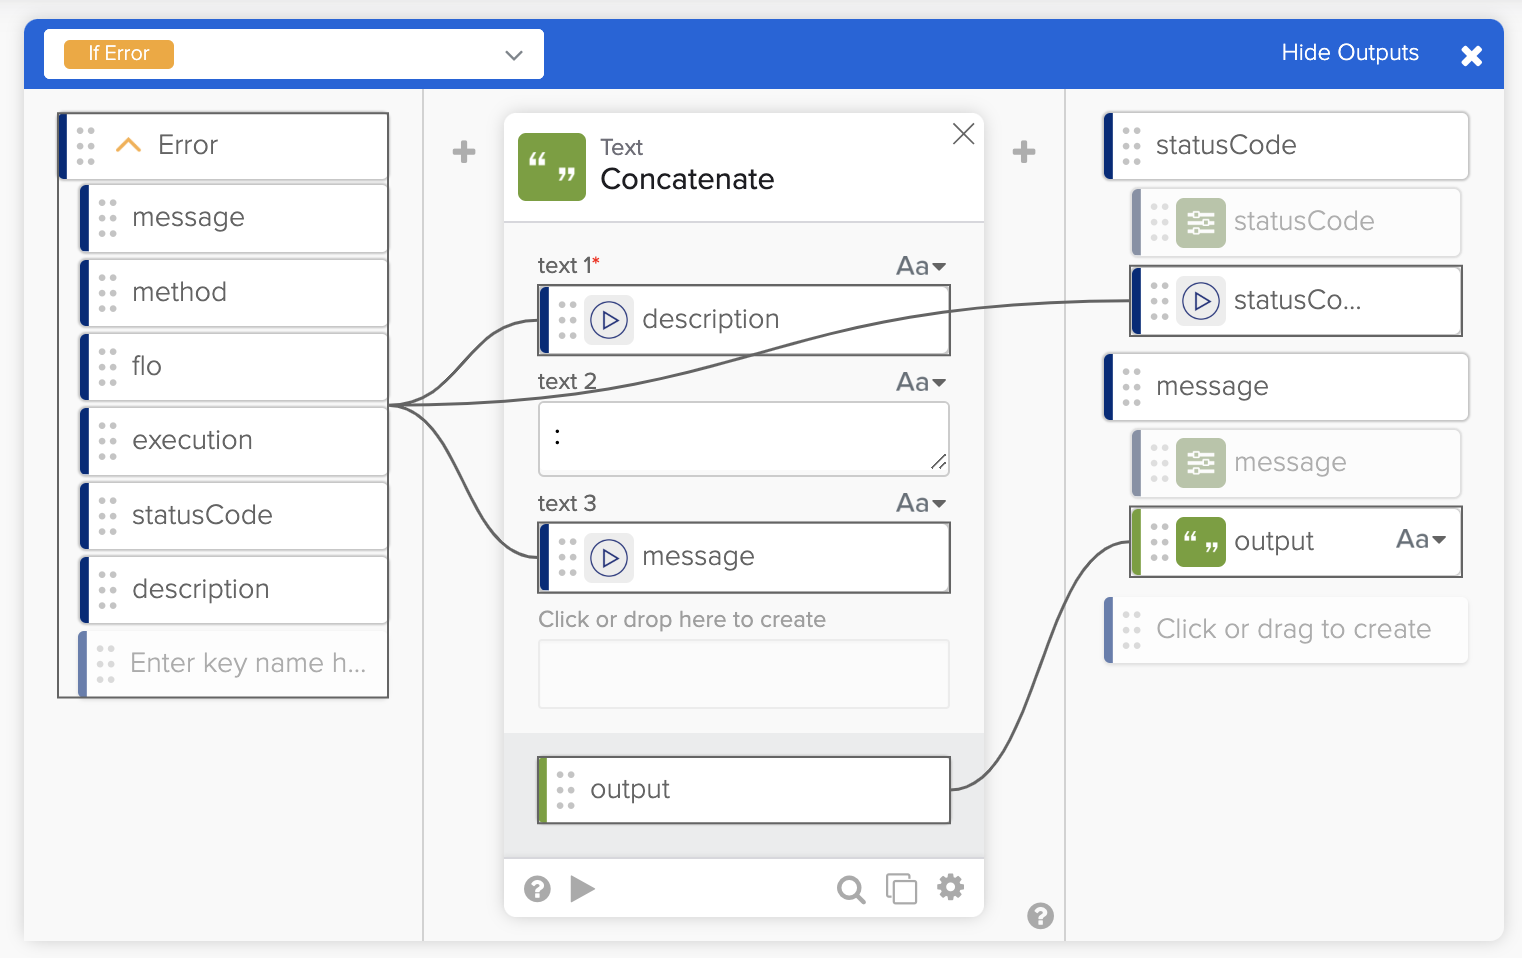
Set up a message when the connection is not working.
Set up flow output
The Flow Control – Return Status card has two fields: working and serviceResponse. You will use the information available in this flow to set these fields.
- Click ➕ after the If Error card and add the True/False – Compare card.
- Connect statusCode from If Error card output to value a field.
- Enter 200 for the value b field.
- Rename the result output field to working.
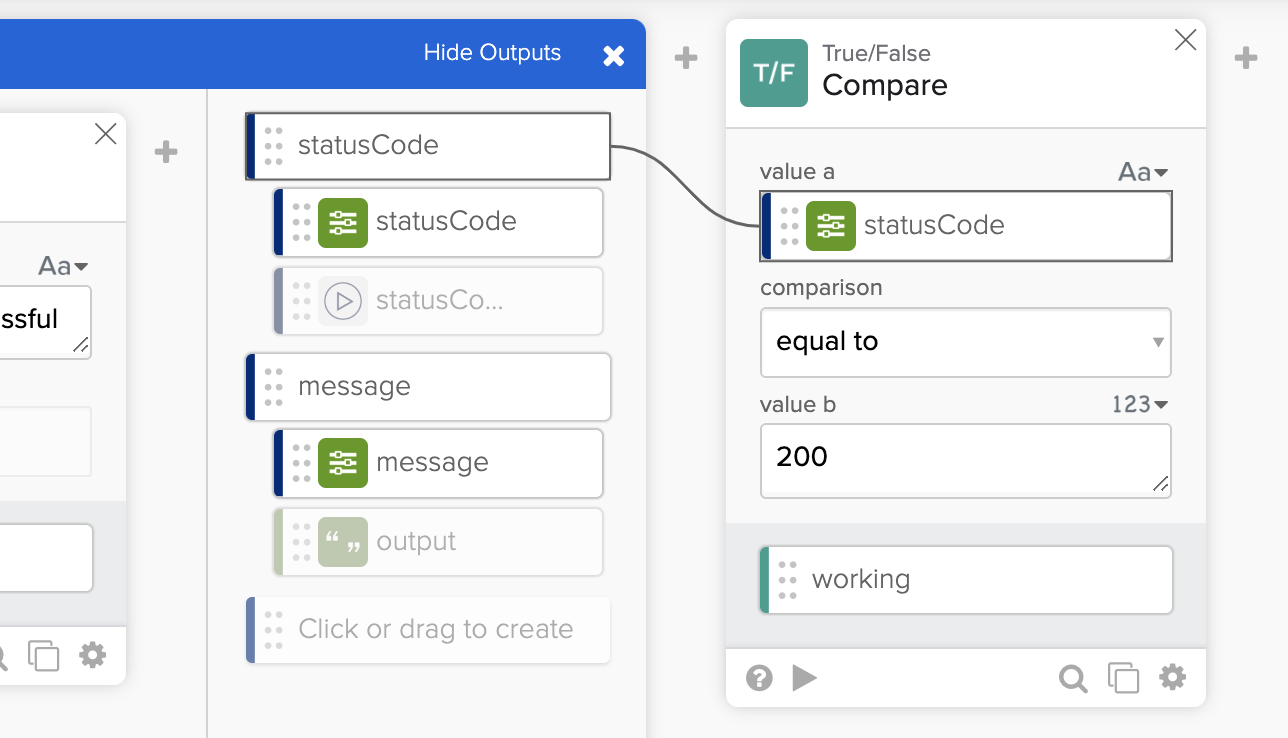
Setting up connection status code.
If the call to the API is successful (200), the connection is working.
- Click ➕ after the True/False – Compare card and add the Object – Construct card.
- Create two fields on the Construct card:
- statusCode (type Text).
- body (Text).
- Create the following connections:
- statusCode from If Error card output to the statusCode field on the Construct card.
- message from If Error card output to to body field on the Construct card.
- Rename the output field on the Construct card to serviceResponse.
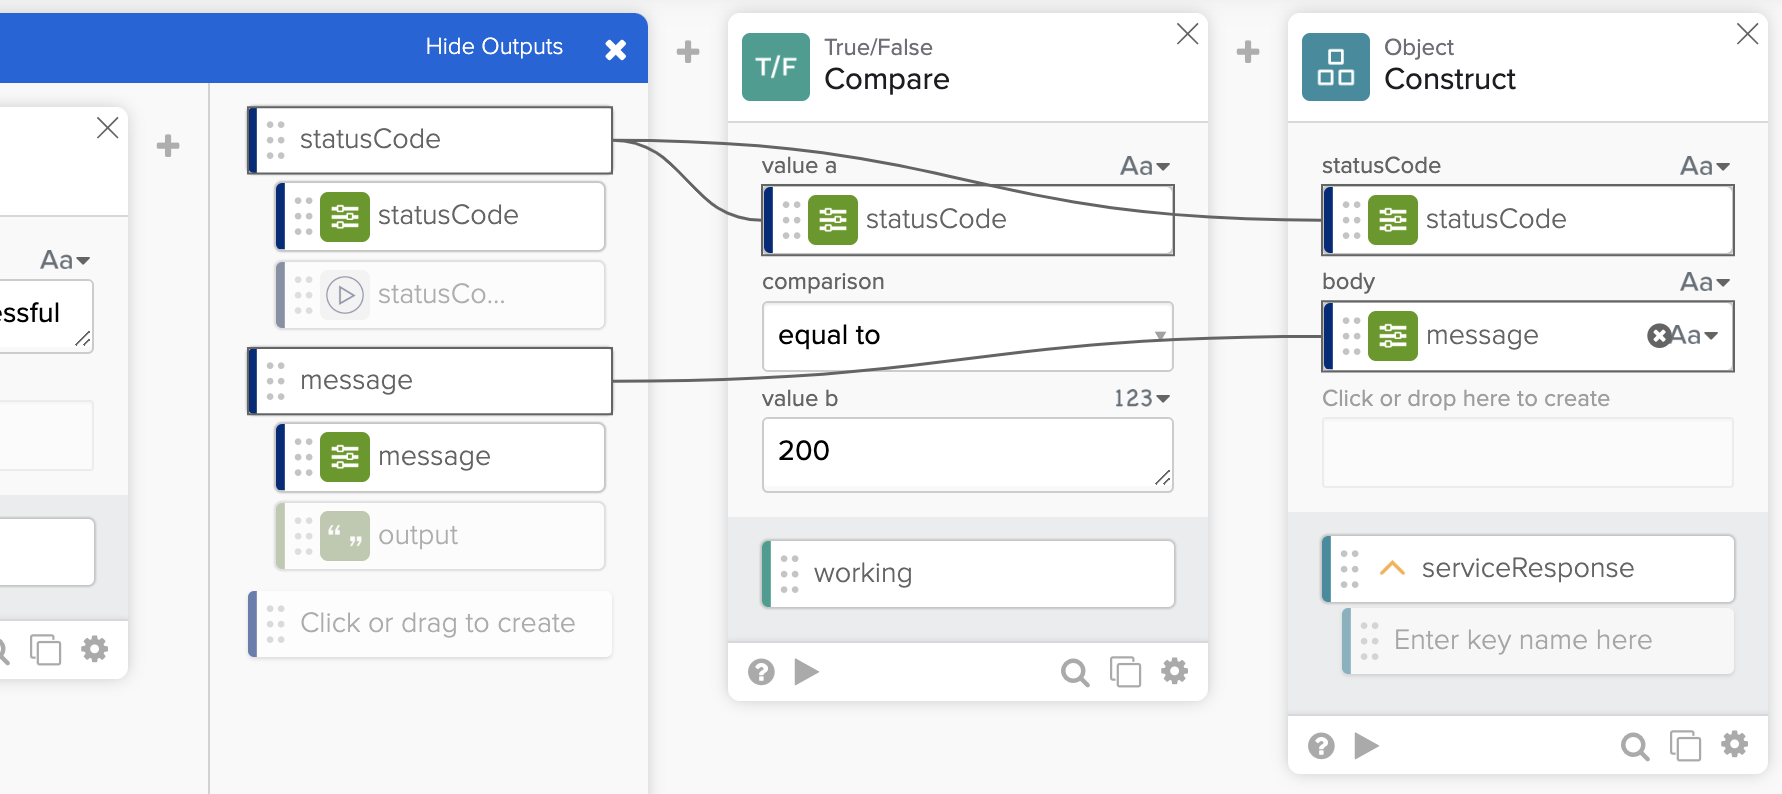
Setting up connection status response.
To set up flow outputs:
- Connect the working from the Compare card to the working field on the Return Status card.
- Connect serviceResponse from the Construct card to the serviceResponse field on the Return Status card.
The complete flow:

The complete _auththing flow.
Test the flow
- Save the flow.
- Click Run.
- Select the Spotify connection and click Run.
Create an action to list user’s albums
In this section, you will create a connector action for the Get Current User’s Playlists endpoint.
Create a flow
- Go back to the connector’s project view.
- Click + New Flow to create a new flow.
- Click Unnamed in the upper left corner to name the flow.
- Enter List Current User Albums for the Flow name.
- Enter List current user Spotify albums for the Description.
- Check the Save all data that passes through the Flow? option
- Click Save to save the flow.
Configure the flow as an action
An action flow makes a service API call.
To set up this flow as an action flow:
- Click Add event and then Action event type.
The action flow doesn’t need inputs since the Get Current User’s Playlists endpoint doesn’t have inputs.
The flow looks like this:

List Current User Albums action.
Call the Spotify API
In this step, you will make a call to Spotify API.
- Add the Flow Control – Call Flow card.
- Click Choose Flow, select the httpHelper flow and click Choose.
- Enter /v1/me/playlists for the relative_url field.
- Enter GET for the request_method.
- Connect the Connection field from the first card to the Connection field on the Call Flow card.
- Create three outputs for the Call Flow card:
- statusCode (type Number).
- headers (Object).
- body (Object).

Call Flow card.
Create flow outputs
Create the following outputs on the Flow Control – Return Outputs card:
- Click Add Outputs.
- Open Add group and select Add Static Group.
- Create three outputs:
- Status Code (type Number).
- Headers (Object).
- Delete the empty key entry.
- Body (Object).
- Delete the empty key entry.
- Click Apply to save the outputs.
- Connect data from the Call Flow card to the Return Outputs card:
- statusCode to the Status Code field.
- headers to the Headers field.
- body to the Body field.
The end of the flow looks like this:

The complete List Current User Albums action flow.
Test the flow
- Click Run to test the flow.
- Select the Spotify connection from the Test Connection list and click Run.
Deploy the connector`
Turn flows on
Flows need to be on before deploying.
- Return to the Flows page.
- Turn the three flows on.
Update connector settings
In this section you will enter additional information in settings.
- Return to the main project view.
- Open to the Overview page.
- Click Edit in the Settings section.
- Download and set the Spotify icon for the connector.
- Change the Accent Color if you want.
- Enter User Documentation URL and Support Contact Email information.
- Click Save to save all changes.

Connector settings.
Deploy the connector
To deploy the connector:
- Switch to the Deployment tab.
- Click Create test version.
- Select the three vertical dots under Actions for a test version you created and select Deploy Version.
You will see the connector deployed in the Private deployment section.

Connector deployment.
You are ready to use the connector in a flow.
Using the connector in a flow
In this step, you will use the connector action in a flow.

Spotify connector.
Add the card

Spotify connector action.
- Create a new flow in Workflows.
- Click Add app action and select the Spotify connector. You can also search for it.
- Select the Spotify – List Current User Albums action.
Create a connection
- Click on + New Connection and follow the steps to create a connection for Spotify.

Spotify – List Current User Albums action.
Test
- Test the card or the flow.

Testing the flow.
Congratulations
Nice work!
You built a connector for Spotify that leverages OAuth for authentication.
Resources
📚 Building a Custom Connector in Okta Workflows, a Video Series.
📖 Okta Workflows Connector Builder documentation.
🍫 Get help from Workflows specialists during weekly community office hours.
📺 Learn from Workflows videos.
🛟 Get help from support: discuss a Workflows topic or ask a question.
🙋🏻♀️ Get help from the community: join the #okta-workflows channel on MacAdmins Slack.
