

In this article, we are going to learn how to implement the HSTS header in ASP.NET Core applications.
So let’s get going.
What Is HSTS
HTTP Strict Transport Security (HSTS) is a web security mechanism that forces browsers to access a website using only secure HTTPS connections. When enabled, the browser automatically upgrades any HTTP connections to HTTPS, encrypting the data transmitted between a user and the web server.

We can implement HSTS by adding the Strict-Transport-Security response header. Once a browser identifies this header, it will ensure that subsequent requests to this website are over HTTPS and refuse to establish an insecure connection.
Enabling HSTS for a website follows a particular pattern:
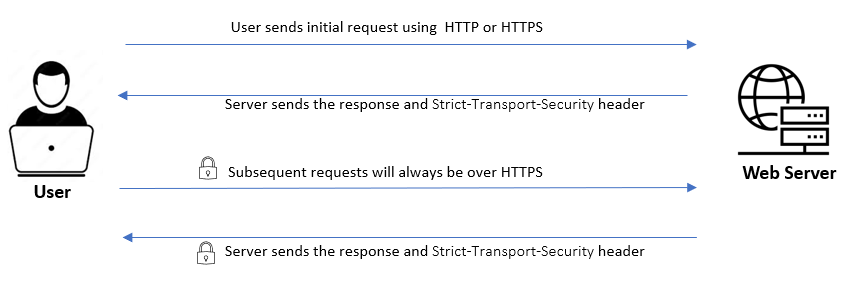
Initially, the user connects to the website using either HTTP or HTTPS. The server sends a response back that includes the Strict-Transport-Security header. This header will have a max-age directive that indicates for how long the browser should remember to access this website only through HTTPS. Consequently, during this specified duration, the browser will automatically default to using HTTPS for all future requests, even if the user inputs an HTTP URL.
However, even with HSTS enabled, the first request may still be over HTTP and can be vulnerable. We’ll see how to prevent this later by using HSTS preloading.
Why Is HSTS Needed
HTTP Strict Transport Security (HSTS) is a crucial security measure to protect websites from many types of attacks. Let’s see why it is important to implement this.
Enforces Secure Connections
HSTS ensures that websites are accessed only through secure HTTPS connections. Once a website implements the HSTS policy, the browser rejects all insecure connections to that website. This is significant because HTTPS encrypts all data during transmission, shielding it from interception and tampering.
Prevents Man-in-the-Middle Attacks
HSTS prevents several types of man-in-the-middle attacks. These are security attacks in which attackers intercept and potentially alter the communication between a user and a web server without them knowing. Here the two parties believe that they are communicating with each other, however, it is the attacker who controls and manipulates the messages. Once we implement HSTS, attackers cannot read or alter the communications.
Protects From Session Hijacking
Session hijacking is a type of man-in-the-middle attack in which an attacker takes over a user’s session by intercepting the communication with the server. After taking over a session, the attacker can steal personal data, impersonate the authenticated user, or exploit the system, without even knowing the user’s credentials.
Avoids Protocol Downgrade Attacks
A protocol downgrade attack is another type of man-in-the-middle attack where the attacker intercepts the communication between a user and a web server, forcing them to use a less secure version of the communication protocol. The SSL stripping attack or SSL downgrade attack is a common example where an attacker downgrades the connection from secure HTTPS to unencrypted HTTP:
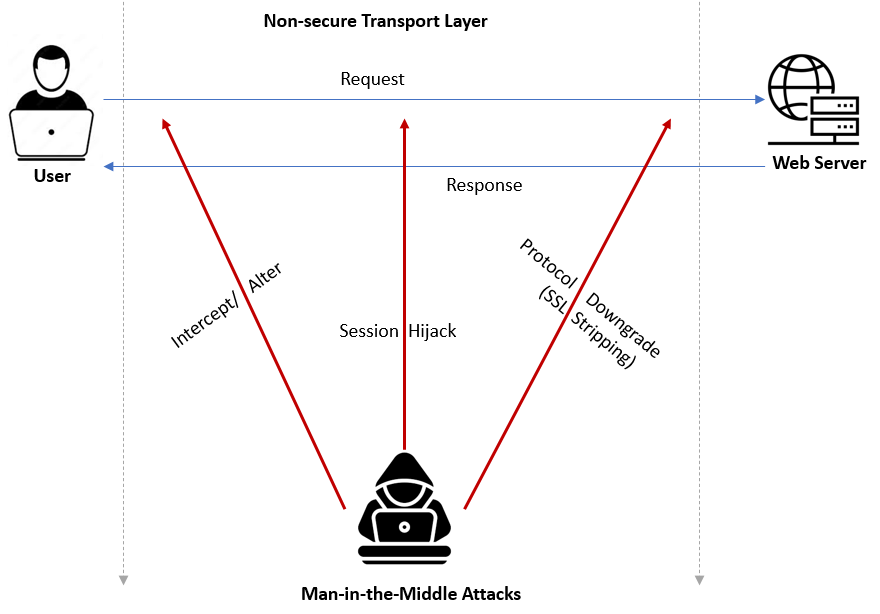
By implementing HSTS, we can prevent these types of man-in-the-middle attacks.
Implement HSTS in ASP.NET Core
We have explained how to encrypt all data in transit as part of discussing how to prevent sensitive data exposure vulnerability, which is part of OWASP’s Top 10 Vulnerabilities.
To understand this better, let’s first create an ASP.NET Core Web API application and configure it without HSTS and HTTPS redirection, using the dotnet new webapi command or the Visual Studio WebAPI templates. For this example, let’s keep the WeatherForecast controller that comes default with the template. However, let’s make sure to remove the HTTPS redirection middleware that’s included by default in the Program class:
app.UseHttpsRedirection();
At this point, our application doesn’t have HSTS or HTTPS redirection enabled. However, browsers ignore HSTS settings for requests coming from localhost anyway, so let’s deploy the application to an Azure Web App to test the functionality.
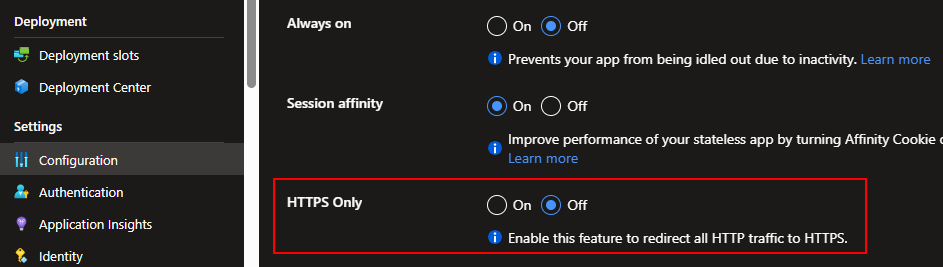
By default, Azure Web Apps will have the “HTTPS Only” feature, which enforces the secure HTTPS protocol for all web traffic. For testing purposes, let’s disable it by navigating to Configuration under the Settings section of the web app in the Azure portal, and turning off the HTTPS Only setting in the General Settings tab:
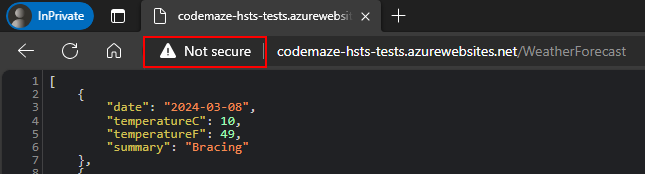
Now let’s try to open the API URL using the HTTP protocol. We can see that the browser will load the API using HTTP and warn us about the website’s security:
Disabling this feature is for example purposes only. It’d be very poor practice to create and configure our applications like this. Attackers could easily intercept requests and responses and perform different types of attacks.
Now let’s see how to protect our website by adding different security middleware. We can look at how to enable HSTS in an ASP.NET Core application. For that, we need to configure 2 middleware – HTTPS Redirection Middleware and HSTS Middleware.
HTTPS Redirection Middleware
First, let’s configure the HTTPS Redirection Middleware by re-adding it to the Program class:
app.UseHttpsRedirection();
By enabling this, we can enforce secure communications to our website. Even if a user tries to access our website using HTTP, the server will automatically redirect them to use HTTPS.
Now let’s see this in action, by deploying the latest changes to the Azure web app. After that, let’s try to access the API once again using the HTTP protocol:
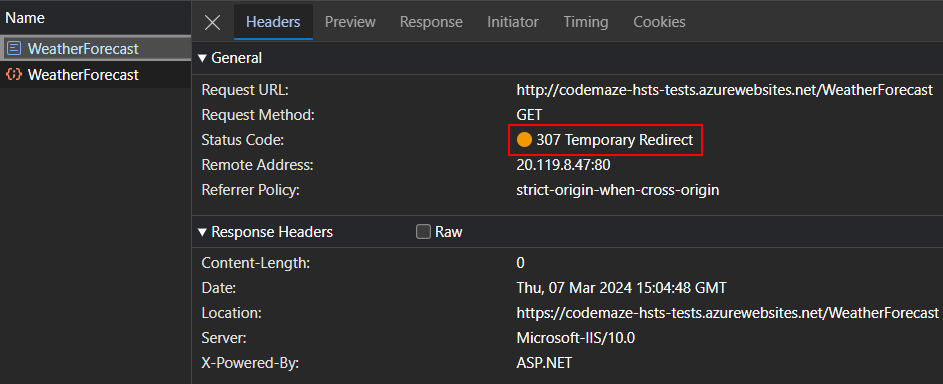
This time, we can see that the server returns a 307 Temporary Redirect response for the HTTP request with the location set to the HTTPS URL. This will trigger a new request to the HTTPS URL and the website will now load in HTTPS.
By default, the middleware sends 307 Temporary Redirect with all redirects. However, if we need to send a permanent redirect status code, especially while in production, we could configure that while adding the middleware:
builder.Services.AddHttpsRedirection(options =>
{
    options.RedirectStatusCode = StatusCodes.Status308PermanentRedirect;
    options.HttpsPort = 443;
});
Notice that there is an option to set the HTTPS port as well.
HSTS Middleware
Now let’s remove the HTTPS Redirection Middleware by removing the UseHttpsRedirection() method from the Program class.
Then we’ll add the HSTS middleware to the Program class to see how it works:
app.UseHsts();
Let’s deploy these changes to the Azure web app once again and try accessing the API using the HTTP protocol:
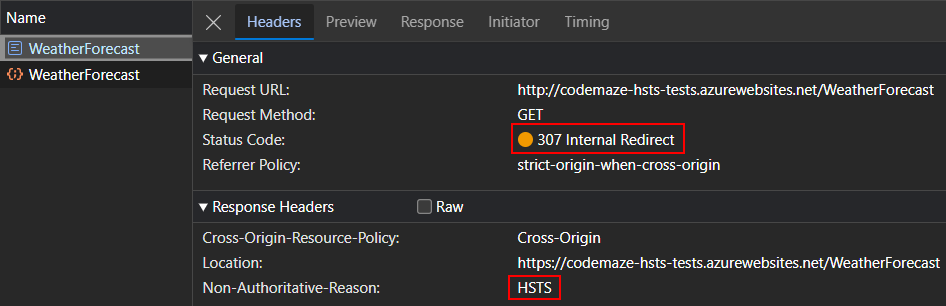
This time, the server responds with a 307 Internal Redirect with the location set to the HTTPS URL. This triggers a new request to the HTTPS URL and the website will now load in HTTPS.
Note that there is a Non-Authoritative-Reason header with the value HSTS, which indicates that the redirect was because of HSTS. This demonstrates that if a website has HSTS configured and a user attempts to access it via an insecure HTTP connection, it will respond with a 307 Internal Redirect status code and automatically upgrade the connection to a secure HTTPS connection. This ensures that all communications between the browser and the website are securely encrypted.
Also, for the new HTTPS request, the server sends back a response header corresponding to HSTS:
Strict-Transport-Security: max-age=2592000
This further ensures that the browser will initiate all future communications with this website using HTTPS only.
The HSTS Parameters
While using HSTS, we can configure a few parameters:
MaxAge– A TimeSpan value representing the duration for which the browser should use only HTTPS to access the serverIncludeSubDomains– When set to true, applies the HSTS policy to the host domain and all its subdomainsPreload– When set to true, this parameter indicates that we want to include the site on the browser’s HSTS preload list.
We could set these parameters by setting the options and making a call to the AddHsts() method:
builder.Services.AddHsts(options =>
{
    options.MaxAge = TimeSpan.FromDays(365);
    options.IncludeSubDomains = true;
    options.Preload = true;
});
Once we set these values, the server will include the Strict-Transport-Security header with these values in responses:
Strict-Transport-Security: max-age=31536000; includeSubDomains; preload
This instructs the browser to access the site only via HTTPS for the next year, applies this rule to all subdomains, and authorizes the domain’s inclusion in the browser’s HSTS preload list.
While implementing HSTS for the first time in production, it is a good practice to start by setting the value of MaxAge to a small period, like a few hours. By doing so, we could easily revert it in case it doesn’t work as expected. Once we are confident with the HSTS configurations, we could increase it to a larger value. One year is an ideal period that most applications use in production.
Testing UseHsts Locally
By default, browsers ignore HSTS headers coming from localhost. So for local testing, we’ll have to make some changes to the system hosts file and then modify the launch settings.
However, remember that the UseHsts() method isn’t recommended during development because the HSTS settings are highly cacheable by browsers. When a browser receives the HSTS header from a website, it remembers that for the period mentioned in the max-age attribute of the header. If localhost is used with HSTS and something goes wrong, such as an SSL certificate expiry, the browser will continue to enforce HSTS for localhost until the specified max-age has passed. This will make it very difficult to debug and run the application locally during that period.
That said, if there is a need to test HSTS in localhost, we can use a workaround. We have to add an entry to our system hosts file, a small file in the operating system that maps hostnames to IP addresses. It functions like a local DNS, translating domain names to IP addresses.
For Unix-based systems, the hosts file can be accessed at /etc/hosts. For Windows-based systems, the hosts file is available at C:\Windows\System32\drivers\etc\hosts. In the hosts file, we can map a fake domain to localhost. For example, we can map the myweb.local domain to localhost:
127.0.0.1 myweb.local
After that, we can test our website using myweb.local instead of localhost over HTTPS:
https://myweb.local:7154/WeatherForecast
This time, we can see that the browser will send the HSTS response header:
Strict-Transport-Security: max-age=2592000
Great! We can now test the implementation of HSTS locally.
HSTS Preloading
HSTS preloading is a mechanism by which a browser preloads the list of websites that wish to enforce the use of SSL/TLS on their site. This preloaded list of websites is known as the HSTS Preload List. When a browser that supports HSTS preloading (such as Chrome, Firefox, Safari, Edge, etc.) encounters a website that is included in the preload list, the browser automatically uses a secure HTTPS connection for all communication with that website, instead of using an insecure HTTP connection.
The most significant advantage is that HSTS preloading allows a website to request a secure connection even before the first connection is made. Remember that while enabling HSTS, sending the first request over HTTP was still possible. By using HSTS preloading, we can prevent an attacker from exploiting the brief window of opportunity between the user’s first request and the website’s redirection response – the vulnerability for HTTPS downgrade attack or SSL stripping.
That said, if we need to include a website in the HSTS preload list, it needs to meet certain criteria:
- have a valid SSL certificate
- redirect all HTTP traffic to HTTPS including subdomains as well
- send back an HSTS header on the base domain for HTTPS requests
- specify all subdomains via the
includeSubDomainsdirective - specify a
preloaddirective - be submitted to the HSTS preload list.
Remember, once a site is included in the HSTS preload list it is complicated to remove, so the decision to preload should be taken very cautiously.
HSTS Best Practices
In review, there are several best practices that we can pursue to ensure optimal security.
The first line of defense is enforcing HTTPS redirection at the application level. We can configure the web application to redirect HTTP traffic to HTTPS to prevent sending data over an insecure connection. It would also be beneficial to enforce the HTTPS redirection at the hosting level. Some hosting services offer server configurations or controls for enforcing HTTP to HTTPS redirection. Having this redirection at the hosting level supplements the application-level redirection and adds an extra layer of security.
Another important step is to enable HSTS in our web application. This instructs the browser to always use HTTPS instead of HTTP for communication and mitigates the risk of man-in-the-middle attacks. It is advisable to start with a low max-age directive in the Strict-Transport-Security header. As we confirm everything works correctly over HTTPS, we can gradually increase this value to a period like one year. When considering the includeSubDomains option, we must exercise caution. We should use this only when we are certain that all site subdomains will also support HTTPS, as it applies the HSTS policy across all subdomains.
Additionally, we may consider HSTS preloading. Once we set up HSTS correctly and test it, we can consider adding the preload directive to it and submitting our domain to the HSTS preload list. But remember, this effectively hard-codes our domain into the browser as HTTPS-only and is difficult to revert. So we should do this only when we are fully confident.
Implementing HSTS is a significant step toward web application security, and following these best practices will ensure that we add multiple layers of defense. Once implemented correctly, all communications to our application will be secure over HTTPS.
Conclusion
In this article, we learned how to implement the HTTP Strict Transport Security (HSTS) header in ASP.NET Core applications. We also discussed HTTPS redirection middleware, HSTS middleware, how to test HSTS locally, and wrapped up with the concept of HSTS preloading.