


OAuth 2.0 and OpenID Connect are the authentication and authorization de facto standards for online web applications. In this post, you will learn how to enable the extension Proof Key for Code Exchange (PKCE) in a Spring Boot confidential client, adhering to the OAuth 2.0 Security Best Current Practice (BCP).
This tutorial was created with the following tools and services:
Authorization Code Flow and PKCE
OAuth 2.0 is a standard designed to authorize a website or application to access resources hosted by third-party services on behalf of a user. For web and mobile applications, OpenID Connect 1.0 (OIDC) was born in 2014, a simple identity layer on top of OAuth 2.0, now widely adopted as part of the Identity and Access Management strategy of many identity providers and identity clients on the internet.
The OpenID Connect core specification defines the following roles:
- End-User: Human participant
- Authorization Server: The server issues access tokens to the client after successfully authenticating the resource owner and obtaining authorization.
- Client: An application making protected resource requests on behalf of the resource owner (the end-user) and with its authorization.
From the OpenID Connect specification, the authentication using Authorization Code Flow has the following steps:
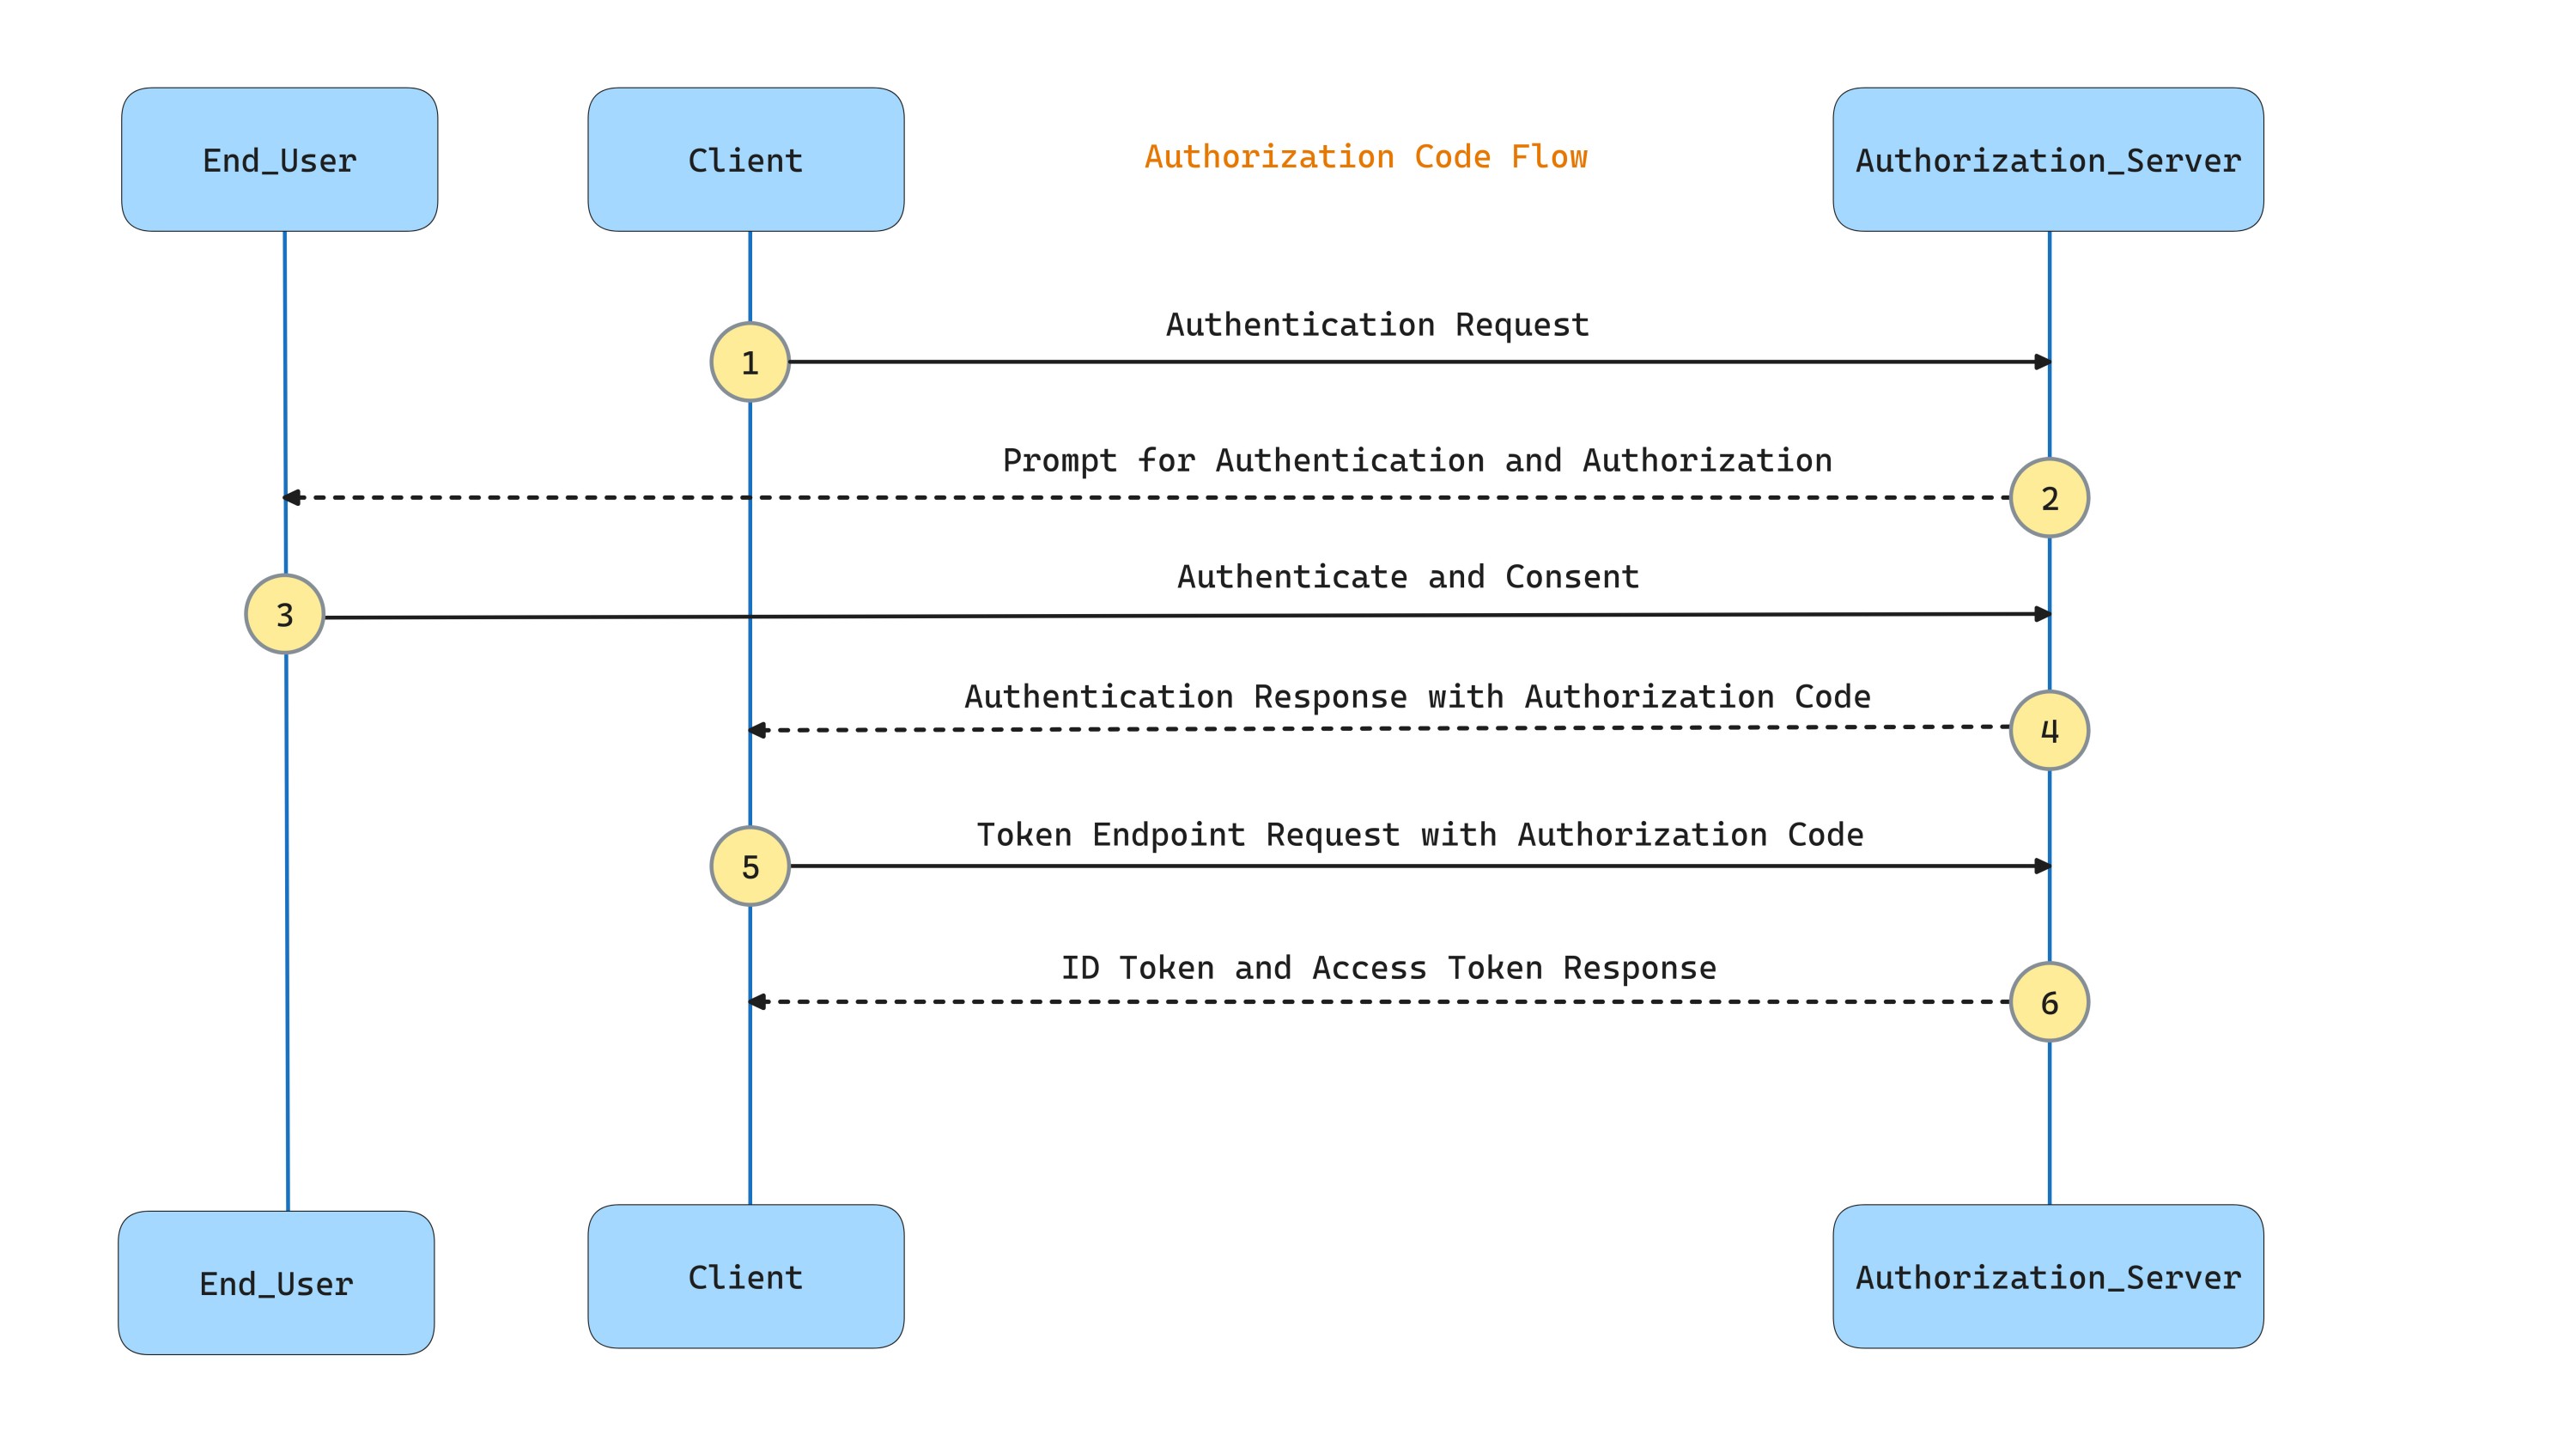
- The client prepares an authentication request and sends the request to the Authorization Server.
- Authorization Server prompts for the End-User authentication and obtains End-User consent/authorization.
- The End-User authenticates and gives consent
- The Authorization Server sends the End-User back to the Client with an Authorization Code.
- The client requests a response using the Authorization Code at the Token Endpoint.
- The client receives a response that contains an ID Token and an Access Token in the response body.
The diagram is a simplified sequence of the Authorization Code Flow, where the User Agent (the browser) redirections are not shown.
When calling the Token Endpoint, the client application must authenticate itself. The protocol provides several ways for client authentication:
client_secret_basic: The client was assigned a secret (confidential client) and authenticates using HTTP basic authentication scheme.client_secret_post: The client was assigned a secret and authenticates by including the client credentials in the request body.client_secret_jwt: The client was assigned a secret and authenticates using a JWT signed with part of the secret as a shared key.private_key_jwt: The client has registered a public key and authenticates using a JWT signed with the private key.none: The client does not authenticate itself at the Token Endpoint because it is a public client.
As browser and mobile applications cannot hold credentials securely and therefore cannot identify themselves using a client secret, PKCE was created for extending the OAuth 2.0 Authorization Code Flow, adding a dynamically created cryptographically random key called "code verifier". This extension was created to mitigate the authorization code interception attack.
The modified flow has the following steps:
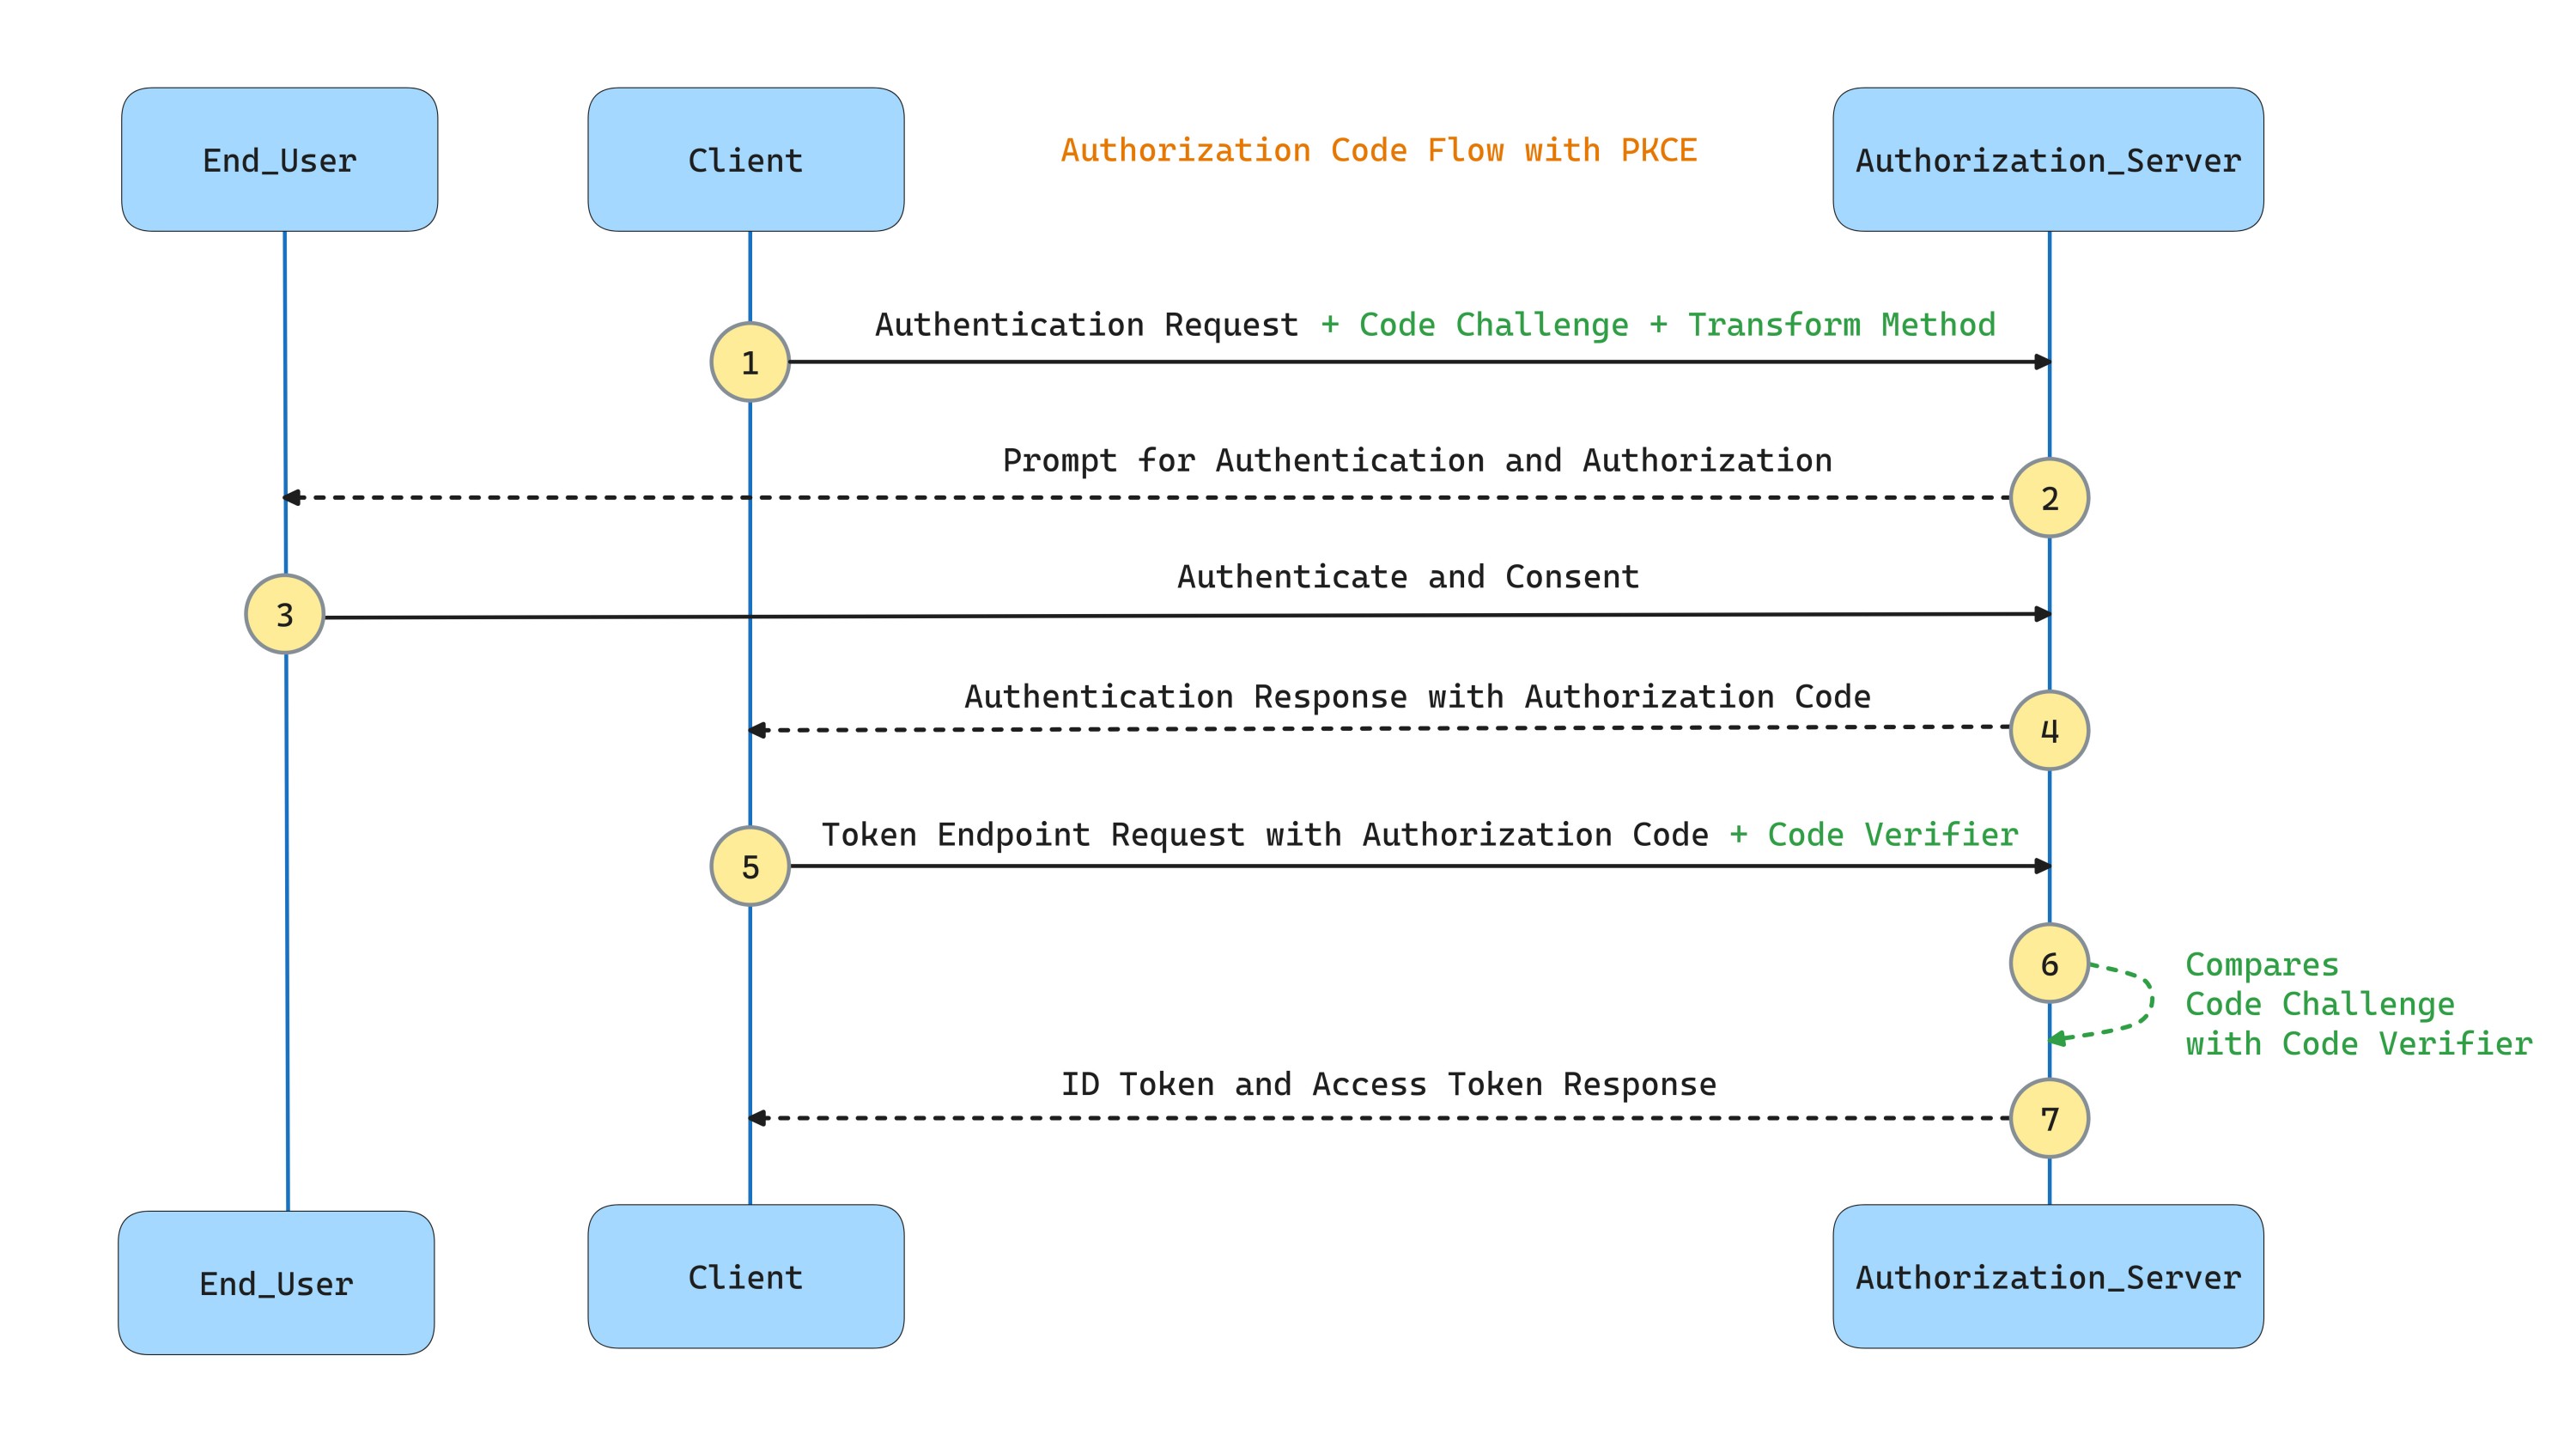
- The Client creates and records a secret named the "codeverifier" and derives a transformed version referred to as the "codechallenge", which is sent in the OAuth 2.0 Authorization Request along with the transformation method.
- The Authorization Endpoint responds as usual but records the "code_challenge" and the transformation method.
- The Client then sends the authorization code in the Access Token Request as usual but includes the "code_verifier" secret generated in the first step.
- The Authorization Server transforms "codeverifier" and compares it to the recorded "codechallenge". Access is denied if they are not equal.
The OAuth 2.0 Security BCP states that PKCE should be enabled for all types of clients, public and confidential (browser-based applications, mobile applications, native applications, and secure server applications) for added security.
Authorization Code Flow for confidential clients with Okta Starter
You can experiment with how to configure the authorization code flow configuration by creating a simple Spring Boot web application and following the step-by-step guide in the following sections.
Create a simple Spring Boot application
With Spring Initializr and curl, create a Spring Boot project:
curl -G https://start.spring.io/starter.tgz \
  -d dependencies=web,okta,thymeleaf \
  -d baseDir=spring-web \
  -d bootVersion=3.2.4 \
  -d javaVersion=21 \
  -d artifactId=spring-web \
  -d packageName=com.example.demo \
 | tar -xzvf -
Note: You can also create the project using Spring Initalizr Web UI
If you inspect the contents of build.gradle, you will find the Okta Spring Boot Starter dependency is included. The Okta Spring Boot Starter is Okta's Spring Security integration. It simplifies the process of adding authentication into your Spring Boot application by auto-configuring the necessary classes and adhering to best practices, eliminating the need for you to do it manually. It leverages the OAuth 2.0 and OpenID Connect protocols for user authentication.
Add the following dependency to build.gradle:
implementation 'org.thymeleaf.extras:thymeleaf-extras-springsecurity6'Create the home.html template at src/main/resources/templates with the following content:
<!-- src/main/resources/templates/home.html -->
<html xmlns:th="http://www.thymeleaf.org">
<head>
<title>Spring Boot ❤️ Auth0</title>
<link
rel="stylesheet"
href="https://cdn.jsdelivr.net/npm/bootstrap@5.2.3/dist/css/bootstrap.min.css"
integrity="sha384-rbsA2VBKQhggwzxH7pPCaAqO46MgnOM80zW1RWuH61DGLwZJEdK2Kadq2F9CUG65"
crossorigin="anonymous"
/>
</head>
<body>
<div class="container">
<h2>Spring Boot PKCE Example</h2>
<div th:unless="${#authorization.expression('isAuthenticated()')}">
<p>Hello!</p>
<p>If you're viewing this page then you have successfully configured and started this application.</p>
<p>
This example shows you how to use the <a href="https://github.com/okta/okta-spring-boot">Okta Spring Boot Starter</a> to add the
<a href="https://auth0.com/docs/get-started/authentication-and-authorization-flow/authorization-code-flow"
>Authorization Code Flow</a
>
to your application.
</p>
<p>
When you click the login button below, you will be redirected to login. After you authenticate, you will be returned to this
application.
</p>
</div>
<div th:if="${#authorization.expression('isAuthenticated()')}">
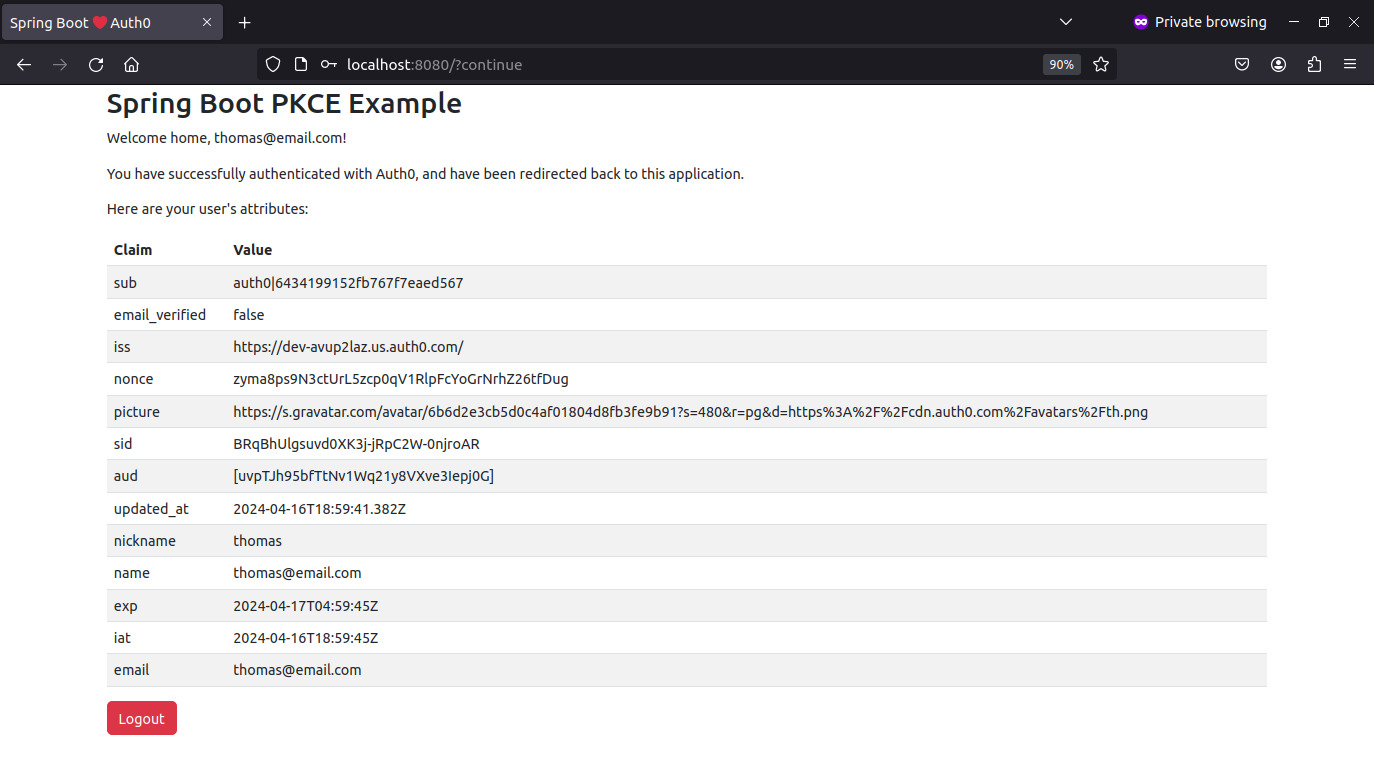
<p>Welcome home, <span th:text="${#authentication.principal.attributes['name']}">Mary Coder</span>!</p>
<p>You have successfully authenticated with Auth0, and have been redirected back to this application.</p>
<p>Here are your user's attributes:</p>
<table class="table table-striped">
<thead>
<tr>
<th>Claim</th>
<th>Value</th>
</tr>
</thead>
<tbody>
<tr th:each="item : ${claims}">
<td th:text="${item.key}">Key</td>
<td th:id="${'claim-' + item.key}" th:text="${item.value}">Value</td>
</tr>
</tbody>
</table>
</div>
<form method="get" th:action="@{/oauth2/authorization/okta}" th:unless="${#authorization.expression('isAuthenticated()')}">
<button id="login" class="btn btn-primary" type="submit">Login</button>
</form>
<form method="post" th:action="@{/logout}" th:if="${#authorization.expression('isAuthenticated()')}">
<input type="hidden" th:name="${_csrf.parameterName}" th:value="${_csrf.token}" />
<button id="logout" class="btn btn-danger" type="submit">Logout</button>
</form>
</div>
</body>
</html>Create a web folder in src/main/java/com/example/demo and create a HomeController.java in that package:
// src/main/java/com/example/demo/web/HomeController.java
package com.example.demo.web;

import org.springframework.security.core.annotation.AuthenticationPrincipal;
import org.springframework.security.oauth2.core.oidc.user.OidcUser;
import org.springframework.web.bind.annotation.GetMapping;
import org.springframework.web.bind.annotation.RestController;
import org.springframework.web.servlet.ModelAndView;

import java.util.Collections;

@RestController
class HomeController {

    @GetMapping("/")
    public ModelAndView home(@AuthenticationPrincipal OidcUser user) {
        return new ModelAndView("home", Collections.singletonMap("claims", user.getClaims()));
    }
}
Configure Authentication Code Flow with PKCE at Auth0
Auth0 supports OAuth 2.0 Security Best Current Practice, and you can register the application as a Regular Web Application (confidential client), and the Auth0 authorization server will honor the PKCE flow.
Sign up at Auth0 and install the Auth0 CLI. Then, in the command line, run:
auth0 loginThe command output will display a device confirmation code and open a browser session to activate the device.
Using the Auth0 CLI, register the web application as an authentication client for Auht0:
auth0 apps create \
  --name "Spring MVC" \
  --description "Spring Boot Webapp" \
  --type regular \
  --callbacks http://localhost:8080/login/oauth2/code/okta \
  --logout-urls http://localhost:8080 \
  --reveal-secrets
Notice the output contains your Auth0 domain, clientId, and clientSecret.
Rename application.properties to application.yml and add the following values:
# src/main/resources/application.yml
logging:
  level:
    org.springframework.security: DEBUG
    org.springframework.web: DEBUG
Create a new application.yml at the root of the project with the following properties:
# application.yml
okta:
  oauth2:
    # trailing slash is required
    issuer: https://<your-auth0-domain>/
    client-id: <client-id>
    client-secret: <client-secret>
Replace the placeholders with the values from the previous auth0 apps create command output. Add the root application.yml to the .gitignore file so the credentials are not pushed to the repository.
The Okta Spring Boot Starter will detect the presence of the properties above and auto-configure the Spring Security filter chain for OpenID Connect authentication. The configuration also enables security and web logs to analyze the authentication flow.
The default client authentication method (how the application identifies itself when calling the token endpoint) in Auth0, when you register a regular web application, is
client_secret_post, but it supportsclient_secret_basicas well. The default client authentication method in Spring Security for confidential clients isclient_secret_basicif the provider supports it (available in the provider configuration metadata). This example uses the defaultclient_secret_basicmethod, and no explicit configuration is required.
Run the application with:
./gradlew bootRunIn your browser, open a private window and go to http://localhost:8080/. Upon clicking the "Log In" button, Spring MVC redirects you to the Auth0 Universal Login page. If you check the application logs, you will see Spring Security redirects to your Auth0 '/authorize' endpoint:
Redirecting to https://dev-avup2laz.us.auth0.com/authorize?response_type=code&client_id=3SgEFDZfV2402hKmNhc0eIN10Z7tem1R&scope=profile%20email%20openid&state=qw8rMCn7N6hv7V4Wx8z5-ejsV8Av8Ypx9KBm5jL6tN4%3D&redirect_uri=http://localhost:8080/login/oauth2/code/okta&nonce=3aiFDmu7aOktibpACDUYuUh4HxLpBAMnVw79EcHDapk&code_challenge=andLN4-6Lu2mtHoPp1Pteu2v87oK_RmzmFLgPaHaY0s&code_challenge_method=S256As you can see, the last two query parameters in the request to /authorize endpoint are codechallenge and codechallengemethod_.
Spring Security will automatically enable PKCE when
client-secretis omitted or empty, andclient-authentication-methodis none. A client without a secret is assumed to be a public client.Since version 2.1.6, the Okta Starter enables PKCE by default for confidential clients as well, meaning for clients that require a client-secret. Be careful when using custom
HttpSecurity, overriding the Okta auto-configuration.As the application was registered as regular web at Auth0, you must configure a client-secret for the flow; otherwise, Auth0 will reject the authentication requests and return code 401.
In the browser window, continue with the sign-in flow and give consent to the application to access your user information:

After the approval, Auth0 will redirect the browser to the home.html page, displaying the ID Token claims. At the bottom left, you can find a Logout button. If you click on Logout, it will end the local session and redirect to a logged out page generated by Spring Security. But if you visit http://localhost:8080/ again, you will still be logged in as the Auth0 session remains active. To fix this, you need to configure RP-Initated Logout.
Configure the logout
Modify the logout flow with the following configuration:
# application.yml
...
okta:
  oauth2:
    ...
    post-logout-redirect-uri: "{baseUrl}"
...
Spring security will resolve {baseUrl} placeholder to the application base URL at the request time.
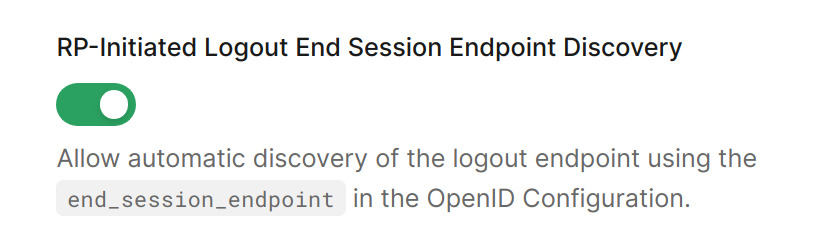
Make sure End Session Endpoint Discovery is enabled in your Auth0 tenant. If enabled, Spring Security will log out the user at the provider with RP-Initated Logout.
In the Auth0 dashboard, choose the Settings option from the left menu, and then click the Advanced tab.
Restart the application. Now, the Logout link will end the session at Auth0, and the browser will redirect to the Universal Login page.
Enable PKCE When Using Okta Starter and Custom HttpSecurity
You can customize the OIDC login by defining your own web security and adding a custom LogoutSuccessHandler for making the application redirect to the base URL after the logout.
If the default security configuration is customized with
HttpSecurity.oauth2Login(), you can re-enable PKCE for confidential clients withOAuth2AuthorizationRequestCustomizers.withPkce()or with the utility methodOkta.configureOAuth2WithPkce()
The Okta Starter auto-configuration is conditional to the application not defining its own web security, so when customizing with HttpSecurity.oauth2Login(), PKCE is not enabled by default for confidential clients (clients with a secret), and you must enable it explicitly.
// src/main/java/com/example/demo/config/SecurityConfiguration.java
package com.example.demo.config;

import com.okta.spring.boot.oauth.Okta;
import org.springframework.context.annotation.Bean;
import org.springframework.context.annotation.Configuration;
import org.springframework.security.config.annotation.web.builders.HttpSecurity;
import org.springframework.security.oauth2.client.oidc.web.logout.OidcClientInitiatedLogoutSuccessHandler;
import org.springframework.security.oauth2.client.registration.ClientRegistrationRepository;
import org.springframework.security.web.SecurityFilterChain;
import org.springframework.security.web.authentication.logout.LogoutSuccessHandler;

@Configuration
public class SecurityConfiguration {

    private final ClientRegistrationRepository clientRegistrationRepository;

    public SecurityConfiguration(ClientRegistrationRepository clientRegistrationRepository) {
        this.clientRegistrationRepository = clientRegistrationRepository;
    }

    private LogoutSuccessHandler logoutSuccessHandler() {
        OidcClientInitiatedLogoutSuccessHandler logoutSuccessHandler = new OidcClientInitiatedLogoutSuccessHandler(this.clientRegistrationRepository);
        logoutSuccessHandler.setPostLogoutRedirectUri("{baseUrl}");

        return logoutSuccessHandler;
    }

    @Bean
    public SecurityFilterChain filterChain(HttpSecurity http) throws Exception {
        http.authorizeHttpRequests(authorize ->
                authorize.anyRequest().authenticated())
                .logout(logout -> logout.logoutSuccessHandler(logoutSuccessHandler()));
        Okta.configureOAuth2WithPkce(http, clientRegistrationRepository);
        return http.build();
    }
}
Enable PKCE with Spring Security
Spring Security will automatically enable PKCE when
client-secretis omitted or empty, andclient-authentication-methodis none. A client without a secret is assumed to be a public client.
For confidential clients, implementing OIDC Login in a Spring Boot application without the Okta Starter dependency can be done using just Spring Security as well. You must add the following dependency to build.gradle:
implementation 'org.springframework.boot:spring-boot-starter-oauth2-client'You must also set the following properties in the application.yml file:
spring:
  security:
    oauth2:
      client:
        registration:
          okta:
            provider: okta
            client-id: <client-id>
            client-secret: <client-secret>
            authorization-grant-type: authorization_code
            scope: openid,profile,email
        provider:
          okta:
            issuer-uri: https://<your-auth0-domain>/
When the client-secret is defined, you must explicitly enable PKCE if required. The following SecurityConfig class does the job:
package com.example.demo;

import org.springframework.context.annotation.Bean;
import org.springframework.context.annotation.Configuration;
import org.springframework.security.config.annotation.web.builders.HttpSecurity;
import org.springframework.security.config.annotation.web.configuration.EnableWebSecurity;
import org.springframework.security.oauth2.client.oidc.web.logout.OidcClientInitiatedLogoutSuccessHandler;
import org.springframework.security.oauth2.client.registration.ClientRegistrationRepository;
import org.springframework.security.oauth2.client.web.DefaultOAuth2AuthorizationRequestResolver;
import org.springframework.security.oauth2.client.web.OAuth2AuthorizationRequestCustomizers;
import org.springframework.security.web.SecurityFilterChain;
import org.springframework.security.web.authentication.logout.LogoutSuccessHandler;

@Configuration
@EnableWebSecurity
public class SecurityConfig {

    private final ClientRegistrationRepository clientRegistrationRepository;

    public SecurityConfig(ClientRegistrationRepository clientRegistrationRepository) {
        this.clientRegistrationRepository = clientRegistrationRepository;
    }

    private LogoutSuccessHandler logoutSuccessHandler() {
        OidcClientInitiatedLogoutSuccessHandler logoutSuccessHandler = new OidcClientInitiatedLogoutSuccessHandler(this.clientRegistrationRepository);
        logoutSuccessHandler.setPostLogoutRedirectUri("{baseUrl}");

        return logoutSuccessHandler;
    }
    @Bean
    public SecurityFilterChain securityFilterChain(HttpSecurity http) throws Exception {
        DefaultOAuth2AuthorizationRequestResolver authorizationRequestResolver = new DefaultOAuth2AuthorizationRequestResolver(this.clientRegistrationRepository, "/oauth2/authorization");
        authorizationRequestResolver.setAuthorizationRequestCustomizer(OAuth2AuthorizationRequestCustomizers.withPkce());

        http.authorizeHttpRequests(authorize -> authorize.anyRequest().authenticated())
                .logout(logout -> logout.logoutSuccessHandler(logoutSuccessHandler()))
                .oauth2Login(oauth2 -> oauth2
                    .authorizationEndpoint(authorization -> authorization
                            .authorizationRequestResolver(authorizationRequestResolver))
                );
        return http.build();
    }

}
Learn More about Security and Spring Boot
I hope this post helped you gain a basic understanding of authentication with OpenID Connect Authorization Code Flow with PKCE and how to enable the PKCE security best practice in Spring Boot applications using the Okta Spring Boot Starter.
You can find the code shown in this tutorial on GitHub. If you'd rather skip the step-by-step and prefer running a sample application, follow the README instructions in the same repository.
If you liked this post, you might enjoy these related posts:
- Deploy Secure Spring Boot Microservices on Amazon EKS Using Terraform and Kubernetes
- Get started with Spring Boot and Auth0
- Build a Beautiful CRUD App with Spring Boot and Angular
- Get Started with Jetty, Java, and OAuth
Check out the Spring Boot resources in our Developer Center:
- Authorization in Spring Boot
- Authentication in Spring Boot
- Role Based Access Control in Spring Boot
- Build and Secure Spring Boot Microservices
- Spring MVC Code Sample: Basic Authentication
Please follow us on Twitter @oktadev and subscribe to our YouTube channel for more Spring Boot and microservices knowledge.
You can also sign up for our developer newsletter to stay updated on everything about identity and security.


