 Google Local Services API
 Baidu Search API
 Bing Search API
 DuckDuckGo Search API
 Ebay Search API
 Walmart Search API
 The Home Depot Search API
 Naver Search API
 TypeScript
 Ruby
Ruby
 Golang
 .Net
.Net
 C++
C++

Web scraping is a way to collect information from websites. However, not all websites are easy to get data from, especially dynamic websites. These websites change what they show you depending on what you do, like when you click a button or enter information. To get data from these types of websites, we can use a tool called Selenium.
Are you new to web scraping in Python? feel free to read our introduction post:
 Hilman Ramadhan
Selenium helps by acting like a real person browsing the website. It can click buttons, enter information, and move through pages like we do. This makes it possible to collect data from websites that change based on user's behavior.

Web scraping with Selenium basic tutorial
Prerequisites:
- Basic knowledge of Python and web scraping
- Python is installed on your machine
Step 1: Install Selenium
First, install Selenium using pip:
pip install selenium
Step 2: Download WebDriver
You'll need a WebDriver for the browser you want to automate (e.g., Chrome, Firefox). For Chrome, download ChromeDriver. Make sure the WebDriver version matches your browser version. Place the WebDriver in a known directory or update the system path.
Step 3: Import Selenium and Initialize WebDriver
Import Selenium and initialize the WebDriver in your script.
from selenium import webdriver

driver = webdriver.Chrome()
Step 4: Sample running browser
Open a website and fetch its content. Let's use https://www.scrapethissite.com/pages/forms as an example.
url = 'https://www.scrapethissite.com/pages/forms'
driver.get(url)
Print title
Here is an example of how to get a specific element on the page.
print(driver.title)Try to run this script. You'll see a new browser pop up and open the page.
Step 5: Interact with page
For example, I want to search for certain keyword by adding text on the search box and submit it.
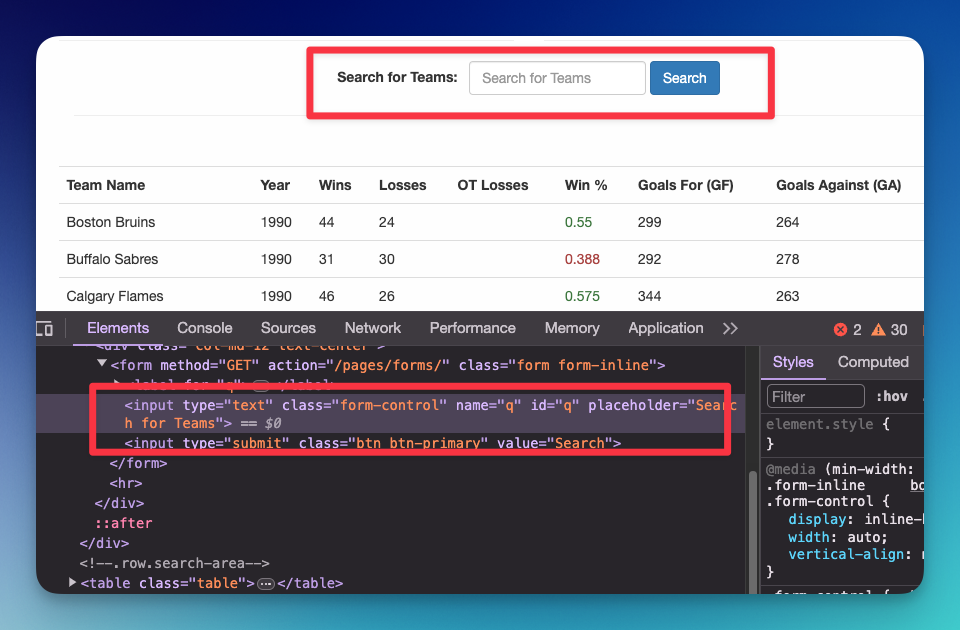
# fill q
q = driver.find_element("id", "q")
# fill with keyword "kings"
q.send_keys("kings")
# submit
q.submit()

# read current url
print(driver.current_url)
You should be able to see the current URL https://www.scrapethissite.com/pages/forms/?q=kings, which means the form submission through Selenium is working.
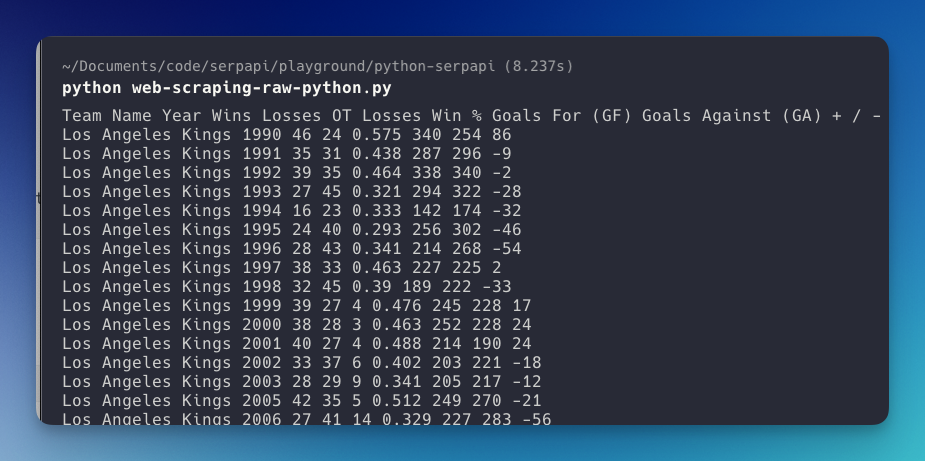
Step 6: Print content
Now, you can print the content after performing a certain action on the page. For example, I want to print the table content:
from selenium import webdriver
from selenium.webdriver.common.by import By

driver = webdriver.Chrome()

driver.get("https://www.scrapethissite.com/pages/forms")

# Search form submission
q = driver.find_element(By.ID, "q")
q.send_keys("kings")
q.submit()

# Print all table values
table = driver.find_element(By.CLASS_NAME, "table")
print(table.text)
Result from printing content:
Step 7: Close the Browser
Once done, don't forget to close the browser:
driver.quit()
Additional Tips:
- Selenium can perform almost all actions that you can do manually in a browser.
- For complex web pages, consider using explicit waits to wait for elements to load.
- Remember to handle exceptions and errors.
Here is a video tutorial on YouTube using Selenium for automation in Python by NeuralNine.
How to take screenshots with Selenium?
You can take screenshots of the whole window or specific area from your code.
Screenshot of a specific area
Let's say we want to take a screenshot for the table element:
table = driver.find_element(By.CLASS_NAME, "table")
# take screenshot
table.screenshot("table-screenshot.png")
You can name the file whatever you want.
Screenshot of a whole area
driver.save_screenshot('screenshot.png')Screenshot of the whole page
While there is no method for this, we can try this by zooming out the page first
driver.execute_script("document.body.style.zoom='50%'")
driver.save_screenshot('screenshot.png')
Notes: There is no guarantee that the whole page is visible on zoom out 50%
How do you add a proxy in Selenium?
You can adjust many settings to the browser that runs in Selenium, including the proxy, using the addArgument method when launching the browser or using the desiredCapabilites method.
For example, using the Chrome drive
from selenium import webdriver

PROXY = "0.0.0.0" # your proxy here
options = WebDriver.ChromeOptions()
options.add_argument('--proxy-server=%s' % PROXY)
chrome = webdriver.Chrome(chrome_options=options)
chrome.get("https://www.google.com")
Alternatively, you can also add the desiredCapabilities method. Here is an example taken from Selenium documentation:
from selenium import webdriver

PROXY = "<HOST:PORT>"
webdriver.DesiredCapabilities.FIREFOX['proxy'] = {
"httpProxy": PROXY,
"ftpProxy": PROXY,
"sslProxy": PROXY,
"proxyType": "MANUAL",
}

with webdriver.Firefox() as driver:
    driver.get("https://selenium.dev")
Headless mode in Selenium
Headless mode in Selenium allows you to run your browser-based program without the need to display the browser's UI, making it especially useful for running tests in server environments or for continuous integration (CI) processes where no display is available.
Why use headless mode in Selenium?
- Headless mode enables faster test execution by eliminating the need for UI rendering.
- It facilitates automated testing in environments without a graphical user interface (GUI).
- Running tests in headless mode consumes fewer system resources.
How to set headless mode in Selenium?
Add --headless=new in the add_argument method before launching the browser. Here is an example code for Chrome:
from selenium.webdriver.chrome.options import Options as ChromeOptions

options = ChromeOptions()
options.add_argument("--headless=new")
driver = webdriver.Chrome(options=options)
Why use Selenium for Web scraping?
Selenium is particularly useful for web scraping in scenarios where dynamic content and interactions are involved. Here are 10 sample use cases where Selenium might be the preferred choice:
- Automating Form Submissions: Scraping data from a website after submitting a form, such as a search query, login credentials, or any input that leads to dynamic results.
- Dealing with Pagination: Automatically navigating through multiple pages of search results or listings to collect comprehensive data sets.
- Extracting Data Behind Login Walls: Logging into a website to access and scrape data that is only available to authenticated users.
- Interacting with JavaScript Elements: Managing websites that rely heavily on JavaScript to render their content, including clicking buttons or links that load more data without refreshing the page.
- Capturing Real-time Data: Collecting data that changes frequently, such as stock prices, weather forecasts, or live sports scores, requiring automation to refresh or interact with the page.
- Scraping Data from Web Applications: Extracting information from complex web applications that rely on user interactions to display data, such as dashboards with customizable charts or maps.
- Automating Browser Actions: Simulating a user's navigation through a website, including back and forward button presses, to scrape data from a user's perspective.
- Handling Pop-ups and Modal Dialogs: Interacting with pop-ups, alerts, or confirmation dialogs that need to be accepted or closed before accessing certain page content.
- Extracting Information from Dynamic Tables: Scraping data from tables that load dynamically or change based on user inputs, filters, or sorting options.
- Automated Testing of Web Applications: Although not strictly a scraping use case, Selenium's ability to automate web application interactions makes it a valuable tool for testing web applications, ensuring they work as expected under various scenarios.
What are some alternatives to Selenium?
In Python, you can try Pyppeteer, an open source program based on Javascript web scraping tool: Puppeteer.
If the website you want to scrape doesn't require interaction, you can use Beautiful Soup in Python to parse the HTML data.
That's it! I hope you enjoy reading this post!