
Building A Real-Time App with React, Node and WebSockets

Learn to integrate WebSockets with React and Node.js by delving into the foundational elements of real-time web applications. Leveraging Fastify and its core WebSocket library, we’ll see how to develop full-stack real-time applications with easy-to-follow code examples.
In the evolving world of web applications, real-time functionality has become a pivotal feature, enabling interactive and dynamic user experiences.
Whether it’s live chats, notifications or collaboration tools, having instant feedback is critical for user experience. Great examples are chat applications where users can see each others’ messages instantly or editor tools, such as Figma or Google Docs, that allow many users to collaborate together in real-time.
All of this is made possible by real-time technologies, such as WebSockets. In this article, we will take advantage of WebSockets and build a real-time application using React on the client side and Fastify with Node.js on the server-side.
What Are WebSockets?
WebSocket is a powerful communication protocol that enables two-way, full-duplex communication between a client and a server over a single, long-lived connection. Unlike traditional HTTP requests, which are stateless and involve opening a new connection for each request, WebSockets maintain a persistent connection.
WebSockets Advantages
- Real-time updates: WebSockets allow for instant updates and notifications to connected clients.
- Low latency: WebSockets offer lower latency compared to HTTP requests.
- Bi-directional: Both the client and the server can send messages to each other at any time.
- Efficiency: WebSockets are more efficient for applications requiring frequent updates or chat functionality.
WebSockets Disadvantages
- Complexity: Implementing WebSockets can be more complex than traditional HTTP.
- Server runtime: Requires a running server, so WebSockets are not compatible with serverless environments, such as AWS Lambda or Azure functions.
- Firewall issues: Some firewall configurations may block WebSocket connections.
Project Setup
You can find the full code example for this tutorial in the GitHub repository.
Let’s start by creating a client-side React app with Vite and server-side project with Fastify.
Prerequisites
- Node 20.8.1
- A package manager, such as npm, yarn or pnpm (in this tutorial, we will use npm)
Setting Up a Client-Side React App with Vite
- Initialize a new React project using Vite.
npm create vite@latest client -- --template react
- Navigate into the created project, install all dependencies and start the client dev server.
cd client
npm install
npm run dev
A newly created Vite app runs on port 5173, so visit http://localhost:5173 in your browser to access it.

Setting up a Server-Side Node App with Fastify
After the Vite project is created, we need to create the server side.
- Create a new server directory and initialize a Fastify project.
mkdir server
cd server
npm init -y
npm install fastify
- Create a basic Fastify server.
server/index.mjs
import fastify from "fastify";

const app = fastify({
  logger: true,
});

app.get("/", async (request, reply) => {
  return { hello: "world" };
});

try {
  await app.listen({ port: 3000 });
  app.log.info(`Server is running on port ${3000}`);
} catch (error) {
  app.log.error(error);
  process.exit(1);
}
- Modify the package.json file and add a new
"dev"script to run the server.
server/package.json
{
  "name": "server",
  "version": "1.0.0",
  "description": "",
  "main": "index.js",
  "scripts": {
    "test": "echo \"Error: no test specified\" && exit 1",
    "dev": "node --watch index.js"
  },
  "keywords": [],
  "author": "",
  "license": "ISC",
  "dependencies": {
    "fastify": "^4.24.3"
  }
}
Note that the node --watch command is only available since Node 18. If you’re using an older version, you can use Nodemon instead.
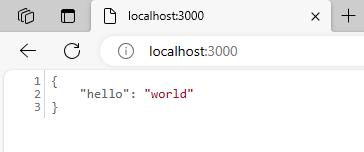
After running the npm run dev command, the Fastify server should start on port 3000. After visiting http://localhost:3000, you should see the following response in the browser.
Adding WebSockets to Fastify and React
There are multiple ways of implementing WebSockets on the server and client side. For example, we could use libraries, such as ws and socket.io. However, Fastify has a core library called @fastify/websocket that provides WebSocket functionality and integrates well with the Fastify framework. Therefore, if you’re using Fastify in your project, consider using the @fastify/websocket library. Otherwise, you can use other solutions.
Let’s install @fastify/websocket and @fastify/cors in the server directory.
npm install @fastify/websocket @fastify/cors
If your project uses TypeScript, make sure to also install types.
npm i @types/ws -D
Next, we need to register the @fastify/websocket plugin to start listening for messages and the @fastify/cors plugin to allow connections from other ports. We need to do this because the React app runs on http://localhost:5137, while the Fastify app will run on http://localhost:3000.
server/index.mjs
import Fastify from "fastify";
import fastifyWebSockets from "@fastify/websocket";
import cors from "@fastify/cors";

const fastify = Fastify({
  logger: true,
});

/**
 * Register cors to allow all connections. Note that in production environments, you should
 * narrow down domains that should be able to access your server.
 */
fastify.register(cors);

/**
 * Register the Fastify WebSockets plugin.
 */
fastify.register(fastifyWebSockets);
/**
 * Register a new handler to listen for WebSocket messages.
 */
fastify.register(async function (fastify) {
  fastify.get(
    "/online-status",
    {
      websocket: true,
    },
    (connection, req) => {
      connection.socket.on("message", msg => {
        connection.socket.send(`Hello from Fastify. Your message is ${msg}`);
      });
    }
  );
});

fastify.get("/", async (request, reply) => {
  return { hello: "world" };
});

try {
  await fastify.listen({ port: 3000 });
  fastify.log.info(`Server is running on port ${3000}`);
} catch (error) {
  fastify.log.error(error);
  process.exit(1);
}
Fastify will forward all WebSocket connections to the /online-status endpoint. When a new message is received, a response is sent immediately.
connection.socket.send(`Hello from Fastify. Your message is ${msg}`);
Next, let’s modify our React app to send and receive messages from the server.
client/src/App.jsx
import { useEffect } from "react";
import "./App.css";
/**
 * Establish a new WebSocket connection.
 */
const ws = new WebSocket(`ws://localhost:3000/online-status`);

/**
 * When a WebSocket connection is open, inform the server that a new user is online.
 */
ws.onopen = function () {
  ws.send("hello from react");
};

function App() {
  useEffect(() => {
    /**
     * Listen to messages and change the users' online count.
     */
    ws.onmessage = message => {
      console.log("message from server:", message.data);
    };
  }, []);

  return <div></div>;
}

export default App;
We establish a new WebSocket connection and send the “hello from react” message when the connection is opened.

Now we have a working WebSocket connection. Let’s modify the client-side further to display the count of all online users sent from the server. Moreover, we can add a select to allow users to change their online status.
client/src/App.jsx
import { useEffect, useState } from "react";
import "./App.css";

/**
 * Get a random user ID. This is fine for this example, but for production, use libraries like paralleldrive/cuid2 or uuid to generate unique IDs.
 */
const userId = localStorage.getItem("userId") || Math.random();
localStorage.setItem("userId", userId);
/**
 * Establish a new WebSocket connection.
 */
const ws = new WebSocket(`ws://localhost:3000/online-status`);

/**
 * When a WebSocket connection is open, inform the server that a new user is online.
 */
ws.onopen = function () {
  ws.send(
    JSON.stringify({
      onlineStatus: true,
      userId,
    })
  );
};

function App() {
  /**
   * Store the count of all users online.
   */
  const [usersOnlineCount, setUsersOnlineCount] = useState(0);
  /**
   * Store the selected online status value.
   */
  const [onlineStatus, setOnlineStatus] = useState();

  useEffect(() => {
    /**
     * Listen to messages and change the users online count.
     */
    ws.onmessage = message => {
      const data = JSON.parse(message.data);
      setUsersOnlineCount(data.onlineUsersCount);
    };
  }, []);

  const onOnlineStatusChange = e => {
    setOnlineStatus(e.target.value);
    if (!e.target.value) {
      return;
    }
    const isOnline = e.target.value === "online";
    ws.send(
      JSON.stringify({
        onlineStatus: isOnline,
        userId,
      })
    );
  };

  return (
    <div>
      <div>Users Online Count - {usersOnlineCount}</div>

      <div>My Status</div>

      <select value={onlineStatus} onChange={onOnlineStatusChange}>
        <option value="">Select Online Status</option>
        <option value="online">Online</option>
        <option value="offline">Offline</option>
      </select>
    </div>
  );
}

export default App;
Let’s digest the code step by step. At first, we create a random ID for the user and save it in the local storage so it’s not recreated on every page reload.
const userId = localStorage.getItem("userId") || Math.random();
localStorage.setItem("userId", userId);
Further, when a WebSocket connection is opened, the server is notified that a new user has visited the page.
/**
 * When a WebSocket connection is open, inform the server that a new user is online.
 */
ws.onopen = function () {
  ws.send(
    JSON.stringify({
      onlineStatus: true,
      userId,
    })
  );
};
After receiving this message, the server will broadcast a message to all subscribed clients that the online users status has changed. We will implement it in a moment.
We have two states. The first one, usersOnlineCount, will store the count of all online users. This information will be sent from the server. The second state stores the information about the user’s selected online status.
/**
 * Store the count of all users online.
 */
const [usersOnlineCount, setUsersOnlineCount] = useState(0);
/**
 * Store the selected online status value.
 */
const [onlineStatus, setOnlineStatus] = useState();
With useEffect, we listen for new messages and update the users online state accordingly.
useEffect(() => {
  /**
   * Listen to messages and change the users online count.
   */
  ws.onmessage = message => {
    const data = JSON.parse(message.data);
    setUsersOnlineCount(data.onlineUsersCount);
  };
}, []);
Finally, the onOnlineStatusChange status method keeps the state in sync with the select element and notifies the server when the user’s status is changed.
const onOnlineStatusChange = e => {
  setOnlineStatus(e.target.value);
  if (!e.target.value) {
    return;
  }
  const isOnline = e.target.value === "online";
  ws.send(
    JSON.stringify({
      onlineStatus: isOnline,
      userId,
    })
  );
};
Let’s update the server so it stores online users and updates the count whenever the online users status is changed.
server/index.mjs
import Fastify from "fastify";
import fastifyWebSockets from "@fastify/websocket";
import cors from "@fastify/cors";

const fastify = Fastify({
  logger: true,
});

/**
 * Register cors to allow all connections. Note that in production environments, you should
 * narrow down domains that should be able to access your server.
 */
fastify.register(cors);

/**
 * Register the Fastify WebSockets plugin.
 */
fastify.register(fastifyWebSockets);

const usersOnline = new Set();
/**
 * Register a new handler to listen for WebSocket messages.
 */
fastify.register(async function (fastify) {
  fastify.get(
    "/online-status",
    {
      websocket: true,
    },
    (connection, req) => {
      connection.socket.on("message", msg => {
        const data = JSON.parse(msg.toString());
        if (
          typeof data === "object" &&
          "onlineStatus" in data &&
          "userId" in data
        ) {
          // If the user is not registered as logged in yet, we add this user's id.
          if (data.onlineStatus && !usersOnline.has(data.userId)) {
            usersOnline.add(data.userId);
          } else if (!data.onlineStatus && usersOnline.has(data.userId)) {
            usersOnline.delete(data.userId);
          }

          /**
           * Broadcast the change in online users status to all subscribers.
           */
          fastify.websocketServer.clients.forEach(client => {
            if (client.readyState === 1) {
              client.send(
                JSON.stringify({
                  onlineUsersCount: usersOnline.size,
                })
              );
            }
          });
        }
      });
    }
  );
});

fastify.get("/", async (request, reply) => {
  return { hello: "world" };
});

try {
  await fastify.listen({ port: 3000 });
  fastify.log.info(`Server is running on port ${3000}`);
} catch (error) {
  fastify.log.error(error);
  process.exit(1);
}
On line 20, we have the usersOnline set that stores the count of currently online users. In a real app, this information could be handled using a solution like Redis, but for this example the above implementation will suffice.
After a user is connected, we listen for messages using connection.socket.on("message", msg => {}). In the on message handler, we check if the msg value received from the client is an object with onlineStatus and userId properties. If it is, we check if a user’s status is online or offline. Based on the status, we either add or remove the user’s id from the usersOnline set.
if (data.onlineStatus && !usersOnline.has(data.userId)) {
  usersOnline.add(data.userId);
} else if (!data.onlineStatus && usersOnline.has(data.userId)) {
  usersOnline.delete(data.userId);
}
Finally, the users online status change is broadcast to all subscribed clients.
fastify.websocketServer.clients.forEach(client => {
  if (client.readyState === 1) {
    client.send(
      JSON.stringify({
        onlineUsersCount: usersOnline.size,
      })
    );
  }
});
That’s it. We have just implemented an app with a real-time functionality. Whenever a new user visits the page, all users who are currently online will be notified about the online status change, as shown in the video below.
In this video, the same app is visited using different browsers to simulate different users. Whenever a new page is opened, the users count is updated immediately in other browsers. It also changes when the online status is changed using the user status select functionality.
We can use a tool like Progress Telerik Fiddler Everywhere to check if the WebSockets were set up correctly and what messages are sent between a client and server. Fiddler Everywhere can be used as a local proxy to intercept and spy on http and web socket requests.
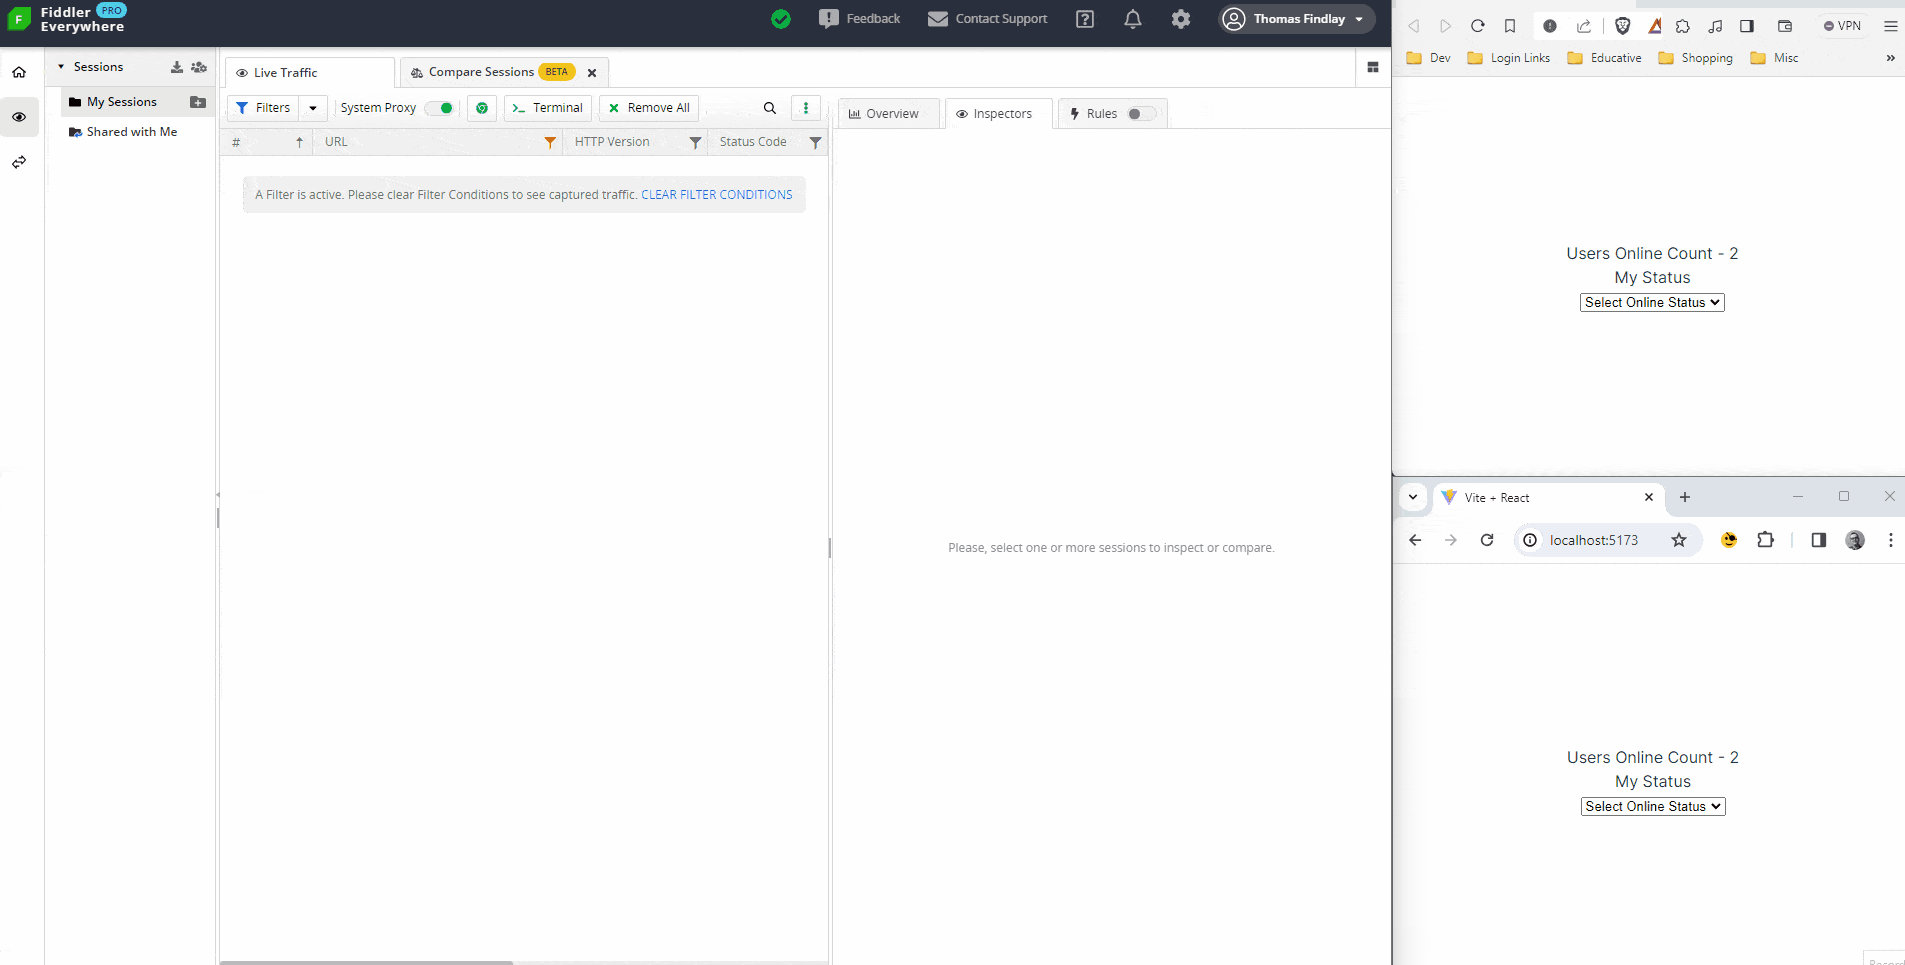
The GIF above shows how to capture traffic to the http://localhost:3000/online-status endpoint. As we change the online status, Fiddler records the messages sent between the clients and the server. For instance, we can see client messages that are sent when the user changes their online status, as well as messages from the server, which comprise the new online user count. Fiddler Everywhere can show various information about the messages, such as their size, content, when they were sent, who was the sender and more.
If you would like to learn more about how to use Fiddler Everywhere to inspect WebSocket connections and more, check out the documentation.
Conclusion
In this article, we have covered how to build a real-time application using WebSockets, React and Fastify. WebSockets are a great tool for implementing real-time communication. This tutorial should give you an understanding of how to add real-time functionality to your own applications.
Keep in mind the example in this tutorial is very simplified, as its purpose is to showcase how to use WebSockets. A real online status tracking functionality should also have some way of detecting if a user was idle for a specific period of time and then change their status to offline automatically.

Thomas Findlay
Thomas Findlay is a 5-star rated mentor, full-stack developer, consultant, technical writer and the author of “React - The Road To Enterprise” and “Vue - The Road To Enterprise.” He works with many different technologies such as JavaScript, Vue, React, React Native, Node.js, Python, PHP and more. Thomas has worked with developers and teams from beginner to advanced and helped them build and scale their applications and products. Check out his Codementor page, and you can also find him on Twitter.
Related Posts
Comments
All articles
Topics

Latest Stories
in Your Inbox
Subscribe to be the first to get our expert-written articles and tutorials for developers!
All fields are required