How to Install Pydio Cells File Sharing on Rocky Linux 9
Pydio Cells is an open-source document-sharing and collaboration platform for your organization. It allows you to share documents and files across your organization and gives you full control of your document-sharing environment. The Pydio Cells are fast in performance, can handle huge file transfer sizes, and provide advanced workflow automation.
In this guide, we'll show you how to install Pydio Cells on Rocky Linux 9 server with MariaDB server and Apache or httpd web server. You will also secure your installation with SSL/TLS from Letsencrypt.
Prerequisites
Before you begin, make sure you have:
- A Rocky Linux 9 server.
- A non-root user with sudo privileges.
- A domain name pointed to a server IP address.
- SELinux with status permissive.
Installing Dependencies
Pydio cells is a document-sharing and collaboration platform that you can run with an Apache web server and MariaDB server. So first, you will install and start both Apache and MariaDB on your Rocky Linux machine.
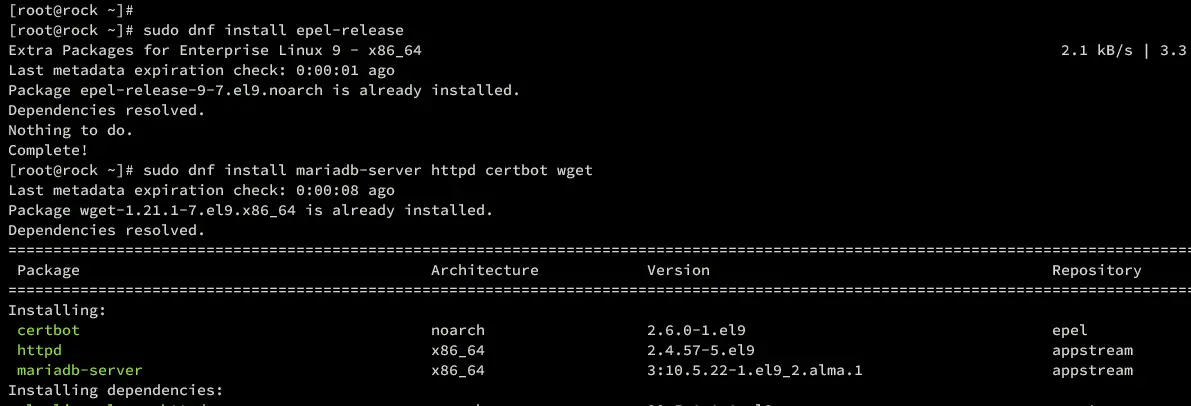
To get started, install the EPEL repository, then install the MariaDB server and Apache web server with the following command. Also, you will install certbot for generating SSL/TLS certificates.
sudo dnf install epel-release
sudo dnf install mariadb-server httpd certbot wget
Input Y to confirm the installation.
After installation is complete, start and enable the httpd service with the command below.
sudo systemctl start httpd
sudo systemctl enable httpd
Then, verify the httpd service to ensure that the service running and enabled.
sudo systemctl status httpd
As you can see below the httpd service is running.

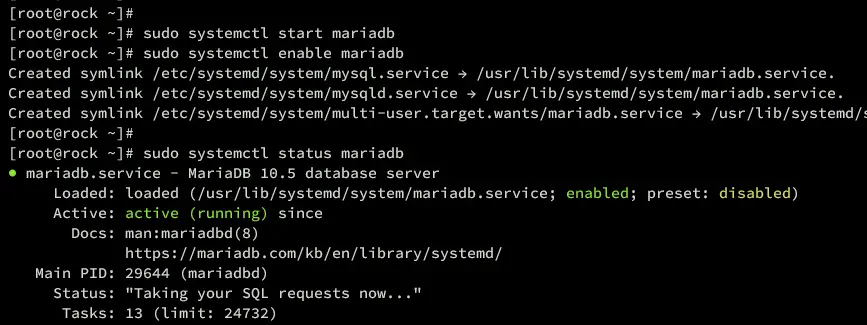
Next, start and enable the mariadb server using the following command.
sudo systemctl start mariadb
sudo systemctl enable mariadb
Lastly, verify the mariadb service with the command below to ensure it's running.
sudo systemctl status mariadb
Below you can see the mariadb service is also running.
Configuring Firewalld
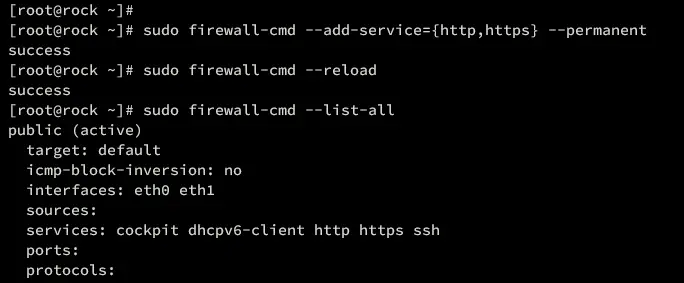
By default, firewalld is active on Rocky Linux. So now you must open both HTTP and HTTPS services on firewalld and allow access to your httpd web server.
Run the command below to open both HTTP and HTTPS service on firewalld. Then, reload firewalld to apply your changes.
sudo firewall-cmd --add-service={http,https} --permanent
sudo firewall-cmd --reload
Now verify the firewalld status using the command below. Make sure both HTTP and HTTPS services are added to firewalld.
sudo firewall-cmd --list-all
Configuring MariaDB Server
By default, the MariaDB server comes without password authentication. To secure and set up the password, you can utilize the mariadb-secure-installation utility. After that, you also need to create a new database and user for your Pydio Cells installation.
To secure MariaDB server installation, run the command below.
sudo mariadb-secure-installation
Once the command is executed, you will be prompted with some of the MariaDB configurations below:
- Switch local authentication to unix_socket? Input n.
- Set up the new MariaDB root password? Input y to confirm, then type the new password for your MariaDB server deployment.
- Remove anonymous user? Input y to confirm.
- Remove the default database test from the deployment?. Input y to confirm.
- Disallow MariaDB root login from remote connections? Input y to confirm.
- Reload table privileges and apply the changes? Input y and press ENTER.
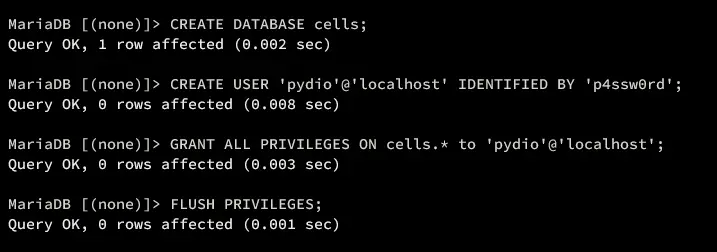
Now that you have secured MariaDB and configured the root password, move on to create a new database and user for Pydio Cells.
Log in to the MariaDB server with the command below. Type your MariaDB root password when prompted.
sudo mariadb -u root -p
Run the following queries to create a new MariaDB database and user for Pydio Cells. In this example, you'll create a new database cells with the user pydio. Also, make sure to change the following password with your own.
CREATE DATABASE cells;
CREATE USER 'pydio'@'localhost' IDENTIFIED BY 'p4ssw0rd';
GRANT ALL PRIVILEGES ON cells.* to 'pydio'@'localhost';
FLUSH PRIVILEGES;
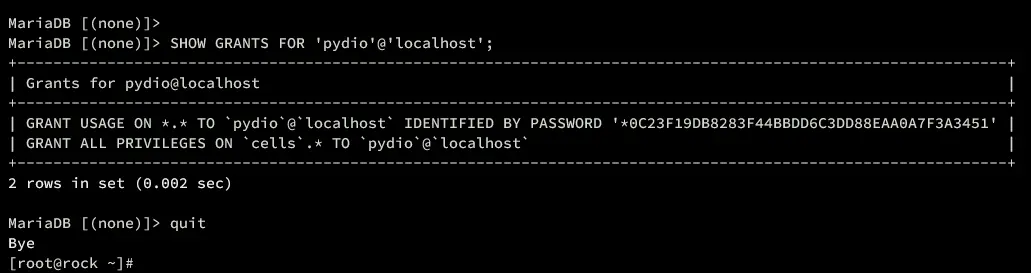
Next, run the following query to verify the privileges for user pydio. Make sure that the user pydio can access the database cells.
SHOW GRANTS FOR 'pydio'@'localhost';
Lastly, type quit to exit from the MariaDB server.
Adding Pydio User
In this section, you will create a new Linux user that will be used to run Pydio Cells. This also will load some global environment variables for Pydio.
To create a new pydio user, run the following command.
sudo useradd -m -s /bin/bash pydio
Now run the following command to create the required directories /opt/pydio/bin and /var/cells that will be used by Pydio Cells.
sudo mkdir -p /opt/pydio/bin /var/cells
sudo chown -R pydio: /opt/pydio /var/cells
Create a new bash profile script /etc/profile.d/cells-env.sh and make it executable using the command below. This file will be loaded automatically by users.
sudo touch /etc/profile.d/cells-env.sh
sudo chmod +x /etc/profile.d/cells-env.sh
Open the /etc/profile.d/cells-env.sh using the nano editor command.
sudo nano /etc/profile.d/cells-env.sh
Add the following configuration to create environment variables for Pydio Cells.
export CELLS_WORKING_DIR=/var/cells
export CELLS_BIND=127.0.0.1:8080
export CELLS_EXTERNAL=https://cells.hwdomain.io
When you're done, save and exit the file.
Below are detailed environment variables for Pydio Cells:
- CELLS_WORKING_DIR: the default working directory for Pydio.
- CELLS_BIND: where Pydio Cells will be running. In this example, Pydio will be run at 127.0.0.1:8080.
- CELLS_EXTERNAL: an external domain name that the client can visit to access your Pydio Cells installation.
Downloading Pydio Cells
Now that you've installed and configured dependencies, and also create a new user for Pydio. You can now proceed to download Pydio to your Rocky Linux system.
Download and install Pydio Cells to /opt/pydio/bin/cells using the following command. The Pydio Cells is a single binary program that you can install on the binary path.
export distribId=cells
wget -O /opt/pydio/bin/cells https://download.pydio.com/latest/${distribId}/release/{latest}/linux-amd64/${distribId}
Once downloaded, make it executable with the command below.
chmod a+x /opt/pydio/bin/cells
Now run the command below to allow the /opt/pydio/bin/cells program to bind and run in the privileged port. Then, create a symlink of Pydio Cells to the system bin path.
sudo setcap 'cap_net_bind_service=+ep' /opt/pydio/bin/cells
sudo ln -s /opt/pydio/bin/cells /usr/local/bin/cells
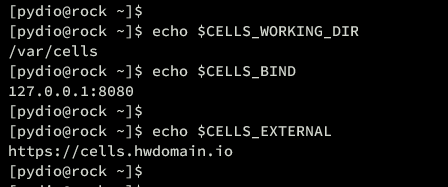
Next, log in as user pydio and verify available environment variables with the following command. Make sure that each environment variable is pointed to the proper value like in the /etc/profile.d/cells-env.sh file.
su - pydio

echo $CELLS_WORKING_DIR
echo $CELLS_BIND
echo $CELLS_EXTERNAL
Lastly, you can verify the Pydio Cells version with the command below.
cells version
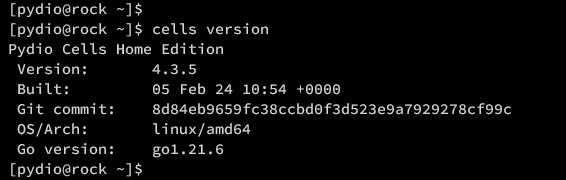
As shown below, the Pydio Cells 4.3.5 is installed on your Rocky Linux system.
Installing Pydio Cells via Command Line
Now that you have downloaded Pydio Cells, you can continue to configure the Pydio Cells installation via the command line. This way, you can easily install Pydio from your terminal.
Run the cells command below to configure the Pydio Cells installation via the command line.
cells configure --cli
You will now be asked about some configurations below:
- Database Connection: select via TCP, then input details of your MariaDB database host, port, user, and password.
- MongoDB configuration: Input n for no.
- Administrative User Configuration: input your admin user and password for Pydio Cells.
- Default storage location: press ENTER to use default and continue.
After everything is configured, the installation should be started. When finished, you should get an output 'Installation Finished'.

Running Pydio Cells as Systemd Service
In this section, you will create a new systemd service file that will be used to run Pydio Cells. With this, you can easily manage Pydio Cells via the systemctl command utility.
Create a new systemd service file /etc/systemd/system/cells.service using the following nano editor command.
sudo nano /etc/systemd/system/cells.service
Add the configuration below to set up Pydio Cells as a systemd service. You can also see that Pydio will be running within the user pydio, and be sure to adjust environment variables with your settings.
[Unit]
Description=Pydio Cells
Documentation=https://pydio.com
Wants=network-online.target
After=network-online.target
AssertFileIsExecutable=/opt/pydio/bin/cells

[Service]
User=pydio
Group=pydio
PermissionsStartOnly=true
AmbientCapabilities=CAP_NET_BIND_SERVICE
ExecStart=/opt/pydio/bin/cells start
Restart=on-failure
StandardOutput=journal
StandardError=inherit
LimitNOFILE=65536
TimeoutStopSec=5
KillSignal=INT
SendSIGKILL=yes
SuccessExitStatus=0
WorkingDirectory=/home/pydio

# Add environment variables
Environment=CELLS_WORKING_DIR=/var/cells
Environment=CELLS_BIND=127.0.0.1:8080
Environment=CELLS_EXTERNAL=https://cells.hwdomain.io

[Install]
WantedBy=multi-user.target
When you're done, save and exit the file.
Now run the command below to reload the systemd manager.
sudo systemctl daemon-reload
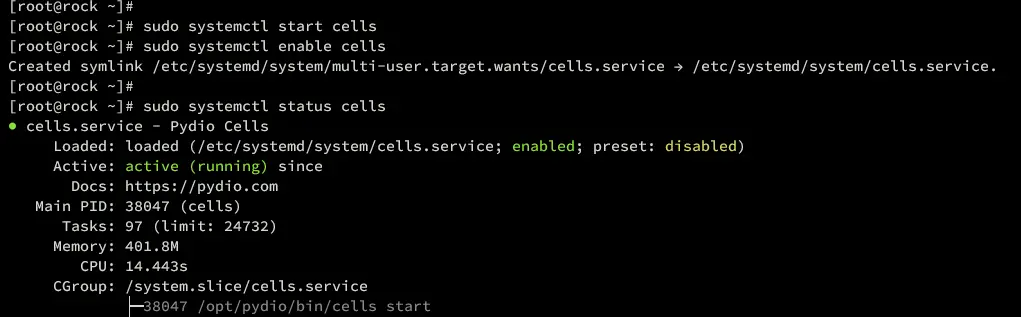
Then, start and enable the cells service with the following command.
sudo systemctl start cells
sudo systemctl enable cells
Lastly, verify the cells service status using the command below. You should get the cells service running on your system.
sudo systemctl status cells
Configuring httpd Reverse Proxy
Now that Pydio Cells is running, you will need to create a new httpd configuration that will be used as a reverse proxy. Also, you need to generate an SSL/TLS certificate to secure your installation.
First, create a new directory /var/www/html/cells/public_html using the command below.
sudo mkdir -p /var/www/html/cells/public_html
sudo chown -R apache:apache /var/www/html/cells/public_html
Generate SSL/TLS certificates using the certbot command below. Make sure to change the email address and target domain name of your Pydio Cells installation.
sudo certbot certonly --agree-tos --email [email protected] --no-eff-email --webroot -w /var/www/html/cells/public_html -d cells.hwdomain.io
Once the process is finished, create a new httpd virtual host file /etc/httpd/conf.d/cells.conf using the following nano editor command.
sudo nano /etc/httpd/conf.d/cells.conf
Insert the following configuration and be sure to change the domain name with your target installation.
<VirtualHost *:80>
ServerName cells.hwdomain.io

RewriteEngine On
RewriteCond %{HTTPS} off
RewriteRule (.*) https://%{HTTP_HOST}%{REQUEST_URI}

RewriteCond %{SERVER_NAME} =cells.hwdomain.io
RewriteRule ^ https://%{SERVER_NAME}%{REQUEST_URI} [END,NE,R=permanent]
</VirtualHost>

<VirtualHost *:443>
ServerName cells.hwdomain.io
AllowEncodedSlashes On
RewriteEngine On

# be aware of this
# Allow reverse proxy via self-signed certificates
SSLProxyEngine On
SSLProxyVerify none
SSLProxyCheckPeerCN off
SSLProxyCheckPeerName off
SSLProxyCheckPeerExpire off

## The order of the directives matters.
# If Cells is not running with https, consider using ws instead of wss
ProxyPassMatch "/ws/(.*)" wss://localhost:8080/ws/$1 nocanon

## This rewrite condition is required if using Cells-Sync
# RewriteCond %{HTTP:Content-Type} =application/grpc [NC]
# RewriteRule /(.*) h2://localhost:8080/$1 [P,L]

ProxyPass "/" "https://127.0.0.1:8080/"
ProxyPassReverse "/" "https://127.0.0.1:8080/"

ErrorLog /var/log/httpd/error.log
CustomLog /var/log/httpd/access.log combined

SSLCertificateFile /etc/letsencrypt/live/cells.hwdomain.io/fullchain.pem
SSLCertificateKeyFile /etc/letsencrypt/live/cells.hwdomain.io/privkey.pem
#Include /etc/letsencrypt/options-ssl-apache.conf
</VirtualHost>
When finished, save the file and exit.
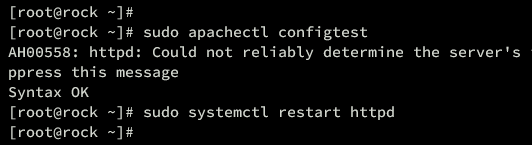
Now, run the command below to verify your httpd syntax. Then, restart the httpd service to apply your changes.
sudo apachectl configtest
sudo systemctl restart httpd
If you've proper httpd syntax, you should see an output Syntax OK.
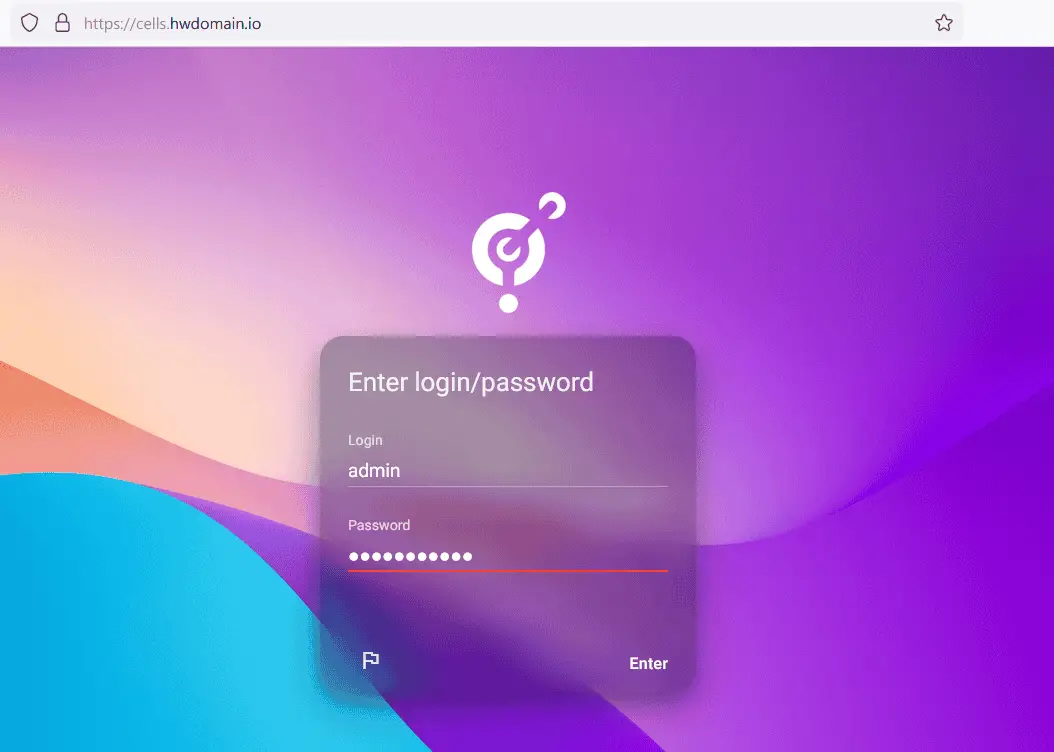
Lastly, launch your web browser and visit the Pydio Cells domain name, such as https://ceels.hwdomain.io/. If your installation is successful, you should see the Pydio Cells login page.
Input your admin user and password that you have created, then click ENTER.
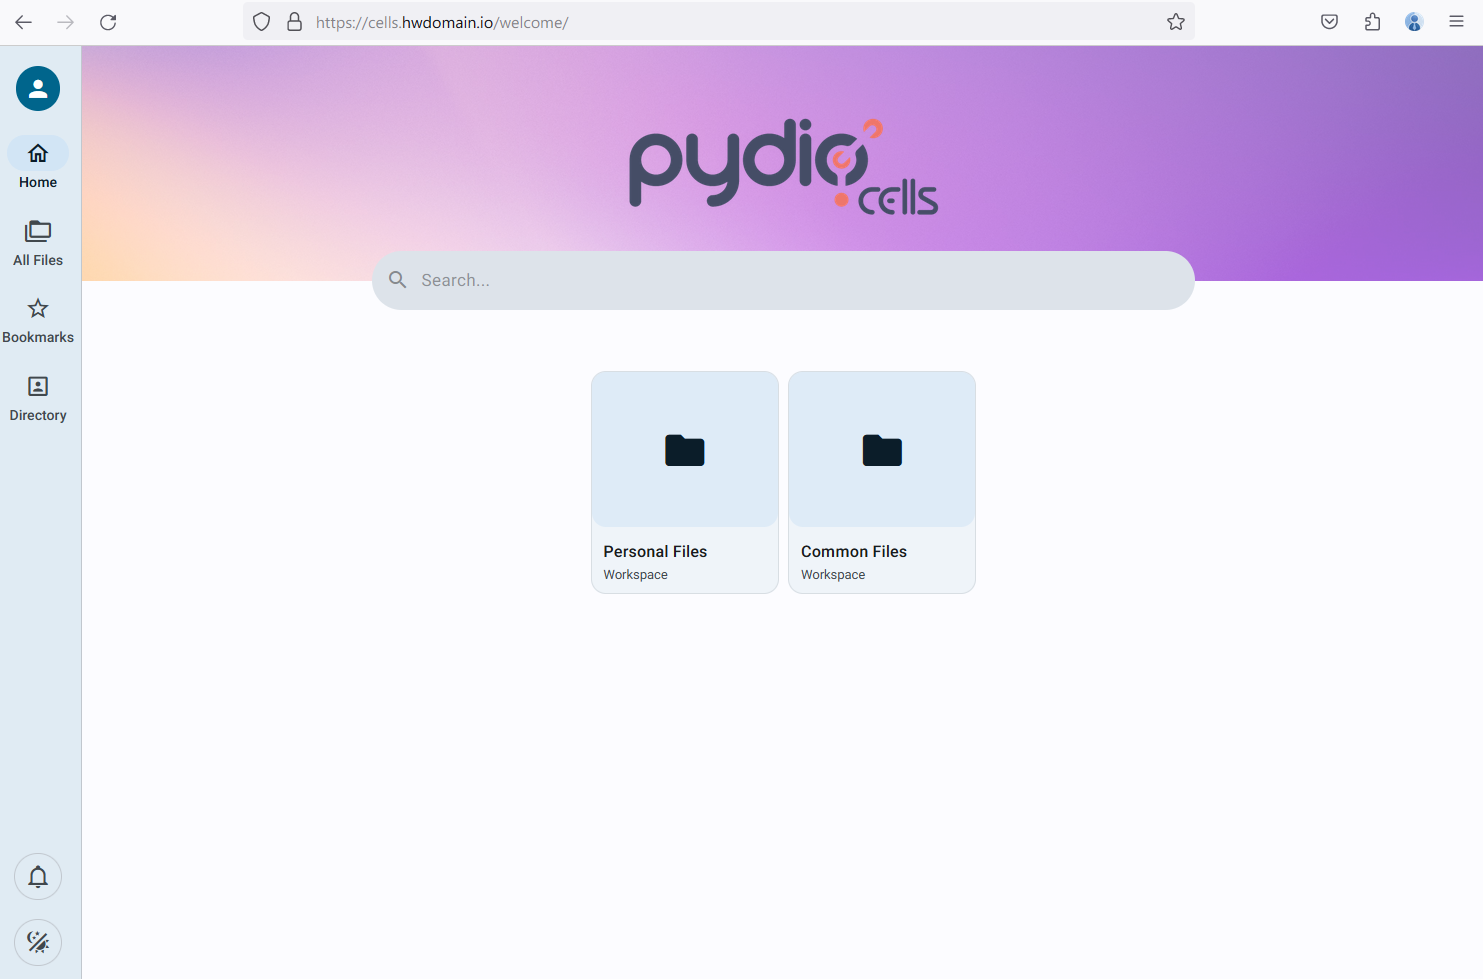
Once logged in, you should get the Pydio Cells user dashboard like the following:
Conclusion
Congratulations! You have now successfully installed Pydio Cells on the Rocky Linux 9 server. You have installed Pydio Cells with the MariaDB database server and httpd reverse proxy. Also, you have secured your installation with SSL/TLS certificates from Letsencrypt.

