I used Bitrise platform to set up a continuous integration flow for my Android app’s build and release processes. This means that all I have to do now is push new code and tags into my app’s repository, and Bitrise will test the app, build it and publish new releases automatically. This will spare me a lot of manual work going forward and prevent silly mistakes.
In this article, I’ll explain how you can do that yourself in your own Android project.
Sign Up for Bitrise Continuous Integration
The first step, just like with any other service, is to create an account on Bitrise. So, proceed to bitrise.io and sign up using one of the supported methods.

After you sign up and verify your email address, go ahead and select Bitrise CI. At this point, you’ll be enrolled for a free 30 days trial period. If you’re an individual, like me, and just need to build your relatively small project, you can switch to their free “Hobby” plan afterwards.
Generate New Access Token to Grant Bitrise Access to Your Git Repository
In the next step, I’ll be adding a new app project on Bitrise, so I’ll need to either grant Bitrise access to my Git hosting account (through simple integration), or manually specify the repository’s URL and provide a targeted access token. I prefer the later option. Therefore, as a preliminary step, I had to generate an access token for my repo.
Note: this step changes according to which Git hosting provider you use.
I host my application on GitHub, so, to allow Bitrise access the repo’s contents, I generated a new Fine-Grained Personal Access Token (PAT). “Fine-Grained” means that this PAT can be scoped to just one specific repository, which is more secure that opening up the entire account.
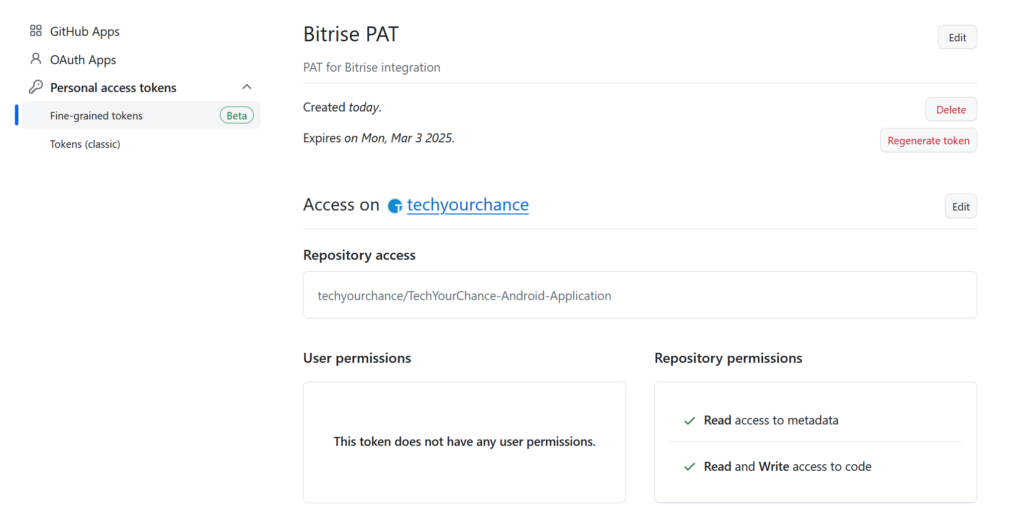
At the minimum, the PAT should have “Contents Read-Only” permission to clone the source code. I gave it “Contents Read-Write” permission because I want Bitrise to upload new releases to GitHub after successful builds (explained later).
Add New Android Application to Your Bitrise Workspace
Click on “Add New App” button and proceed to fill in the required information.
When selecting repository, you can either authorize Bitrise to access your Git hosting directly, or just copy-paste the repository’s URL. As I explained earlier, I prefer the later approach. If you’re like me, then, during the authorization step, paste in the GitHub PAT that you generated previously (or an analogous access token from another Git hosting provider).
Bitrise can inspect your app’s repo and infer its build configuration automatically. If this process doesn’t yield correct results, you’ll need to help it a bit with manual configuration. For example, this configuration corresponds to the default Android project layout that uses Groovy in Gradle scripts:

After you provide all the required information, click on a button to add the application to your workspace.
Inspect and Edit the Workflows
Workflow on Bitrise is a sequence of individual steps executed as a standalone flow. When you add a new Android application to Bitrise, it’ll create two default workflows for you: build_apk and run_tests.
To edit workflows, select your application in the dashboard and then click on the Workflows button. Now you can select a specific workflow to inspect and edit its configuration.
Let’s review the layout of the Workflow Editor:

The main parts of this interface are:
- Workflow selector: shows the name of the current workflow and lets you switch between different workflows.
- Workflow steps editor: this elements shows the workflow’s steps and lets you change them.
- Details pane: when no step is selected, it will show the information about the workflow; once you select a step, this pane will show that step’s information and let you change it.
- Run Workflow button: runs the selected workflow.
- Workflow editor menu: use the entries in this menu to configure the environment for all workflows (more on this later).
Tip: when you’ll be editing your workflows, don’t forget to click that grayed out Save Changes button at the top 😉
Declare Environment Variables and Secrets
If your app’s build files read any environment variables, then you can easily declare them in the Env Vars menu entry of the Workflow Editor. Once you do that, these variables will be added to all workflows.
There is also Secrets menu entry, which is somewhat similar to Env Vars, but can be used for injecting sensitive data into workflows that you want to store securely. For example, you should probably declare passwords and authentication tokens to third-party services that your app might be using as secrets.
Adjust App’s Gradle Configuration for Bitrise’s Environment (Optional)
Note: this step is optional and, depending on your build files configuration, you might not even need it.
In my case, the build scripts expected to find a local file containing passwords and authentication tokens for various services. Since this file isn’t committed to Git (security precaution), Bitrise wouldn’t get it by just cloning the app’s repository. Therefore, my app wouldn’t build on Bitrise out-of-the-box.
There were two straightforward solutions to this problem:
- Upload the file to Bitrise and change the build files to accommodate its alternative location.
- Declare a set of Secrets corresponding to the entries in that file and use them as environment variables in the build files.
I chose the later approach. Therefore, I had to edit my app’s build files to first check whether the respective env variables exist, and if not then fall back to looking for a local file.
Switch Your Workflows to Java 17
Starting with version 8.0, Android Gradle Plugin requires Java 17 to build Android apps. Bitrise uses an earlier version by default, so I changed the version by adding “Set Java Version” step into my workflow and selecting 17 as “Java version” input variable:

Adding a new step into a workflow is very simple: just click that small + button in the place where you need that step and start typing the step’s name. You can see in the above screenshot that I added the new step right after the default Git Clone step.
Upload Android Keystore File to Bitrise
To sign the artifacts of the build process, for example APKs, Bitrise will need a valid keystore file. So, you’ll need to provide it.
Go to your app’s main page on Bitrise and then click on the gear button to open its settings. Find “Code signing” menu entry, select it, and then go to “Android” tab. Upload your keystore file and enter its password, key alias and key password.
That’s it, now Bitrise can sing build artifacts on your behalf!
Select the Required Build Artifact: APK or AAB
By default, “Android Build” step is configured to produce APK files. If you want to build AABs, change this step’s configuration accordingly.
Switch to Apksigner Tool (Optional)
“Android Sign” step, which is responsible for signing the artifacts, uses jarsigner tool by default. This is the correct tool to use if you build AABs. However, in my special case, I build APKs, so I modified “Android Sign” step to use apksigner instead, which is a newer tool for signing APKs.
Add Webhook to Trigger Workflows Automatically (Optional)
In most cases, you’ll want Bitrise to run workflows in response to external events: pushes into specific branches, new pull requests, new tags, etc. This means that Bitrise should be notified when these events occur in the app’s repository. That’s where webhooks enter the picture.
Webhooks are basically URLs that Git hosting services (GitHub, GitLab, etc.) can use to send information about various events that occur in the app’s repository. For example, whenever a new commit is pushed into the repo, Git hosting service will send a request to that URL with some info describing what change took place.
So, the first step to set up a webhook is getting its URL. Go to your app’s settings in Bitrise, select “Integrations” menu entry, then go to “Webhooks” tab. Scroll down to “Incoming Webhooks” section. Here you’ll have to choose to either set the webhook automatically, or manually. I prefer the manual route, so I selected this option, chose my Git hosting service (GitHub), and copied the resulting Webhook URL.
Next, I opened my app’s main page on GitHub, went to settings, then selected Webhooks menu entry and added a new webhook using the URL that I copied from Bitrise. To make the life simpler, I chose to be notified of all events.
That’s it, now GitHub will notify Bitrise about new events in my app’s repository.
Configure Webhook Triggers for Workflows (Optional)
After the previous step, Bitrise will receive notifications about all new events in my app’s repository, but I don’t want to run workflows on every possible event. Luckily, you can configure specific triggers that will invoke individual workflows.
In Workflow Editor, select “Triggers” menu entry:

Here you have three types of triggers: Push, Pull Request and Tag.
By default, Bitrise sets up run_tests workflow to run on each push to master and each pull request. I didn’t need these triggers, so I deleted them. Instead, I wanted to invoke build_apk workflow whenever I push new tags into the repo (that’s how I mark releases), and that’s the configuration that you see on the above screenshot.
Auto-Deploying the APK (Optional)
The default configuration of build_apk workflow makes the produced artifacts available for download from Bitrise. I wanted to take it one step further and automate the deployment of new APKs to GitHub releases section.
Turned out that releasing to GitHub is very simple with Bitrise. I appended “Github Release” step to build_apk workflow, configured its variables, and, voila, newly built APKs appear on GitHub. Magic!
Sure enough, releasing APKs to GitHub is not the main deployment strategy. If you want to automate deployment to Google Play, replace “Github Release” step with “Google Play Deploy” step.
Conclusion
Alright, that’s how I set up continuous integration for my Android application using Bitrise.
All in all, it took me several hours to figure out all the details of Bitrise’s platform and adjust my app’s build configuration for CI environment. I’m pretty sure that I’ll get this time back relatively soon, because now, when this flow is automated, I’ll be “earning” time back on each future release. I hope this guide will spare you at least part of the initial setup effort.
In conclusion, I want to thank Bitrise for sponsoring this infrastructure work in TechYourChance application and this article. It’s great to see companies that invest to bring the best resources for their clients.
As usual, thank you for reading and please leave your comments and questions below.
