
You’ve likely interacted with large language models (LLMs), like the ones behind OpenAI’s ChatGPT, and experienced their remarkable ability to answer questions, summarize documents, write code, and much more. While LLMs are remarkable by themselves, with a little programming knowledge, you can leverage libraries like LangChain to create your own LLM-powered chatbots that can do just about anything.
In an enterprise setting, one of the most popular ways to create an LLM-powered chatbot is through retrieval-augmented generation (RAG). When you design a RAG system, you use a retrieval model to retrieve relevant information, usually from a database or corpus, and provide this retrieved information to an LLM to generate contextually relevant responses.
In this tutorial, you’ll step into the shoes of an AI engineer working for a large hospital system. You’ll build a RAG chatbot in LangChain that uses Neo4j to retrieve data about the patients, patient experiences, hospital locations, visits, insurance payers, and physicians in your hospital system.
In this tutorial, you’ll learn how to:
- Use LangChain to build custom chatbots
- Design a chatbot using your understanding of the business requirements and hospital system data
- Work with graph databases
- Set up a Neo4j AuraDB instance
- Build a RAG chatbot that retrieves both structured and unstructured data from Neo4j
- Deploy your chatbot with FastAPI and Streamlit
Click the link below to download the complete source code and data for this project:
Get Your Code: Click here to download the free source code for your LangChain chatbot.
Demo: An LLM RAG Chatbot With LangChain and Neo4j
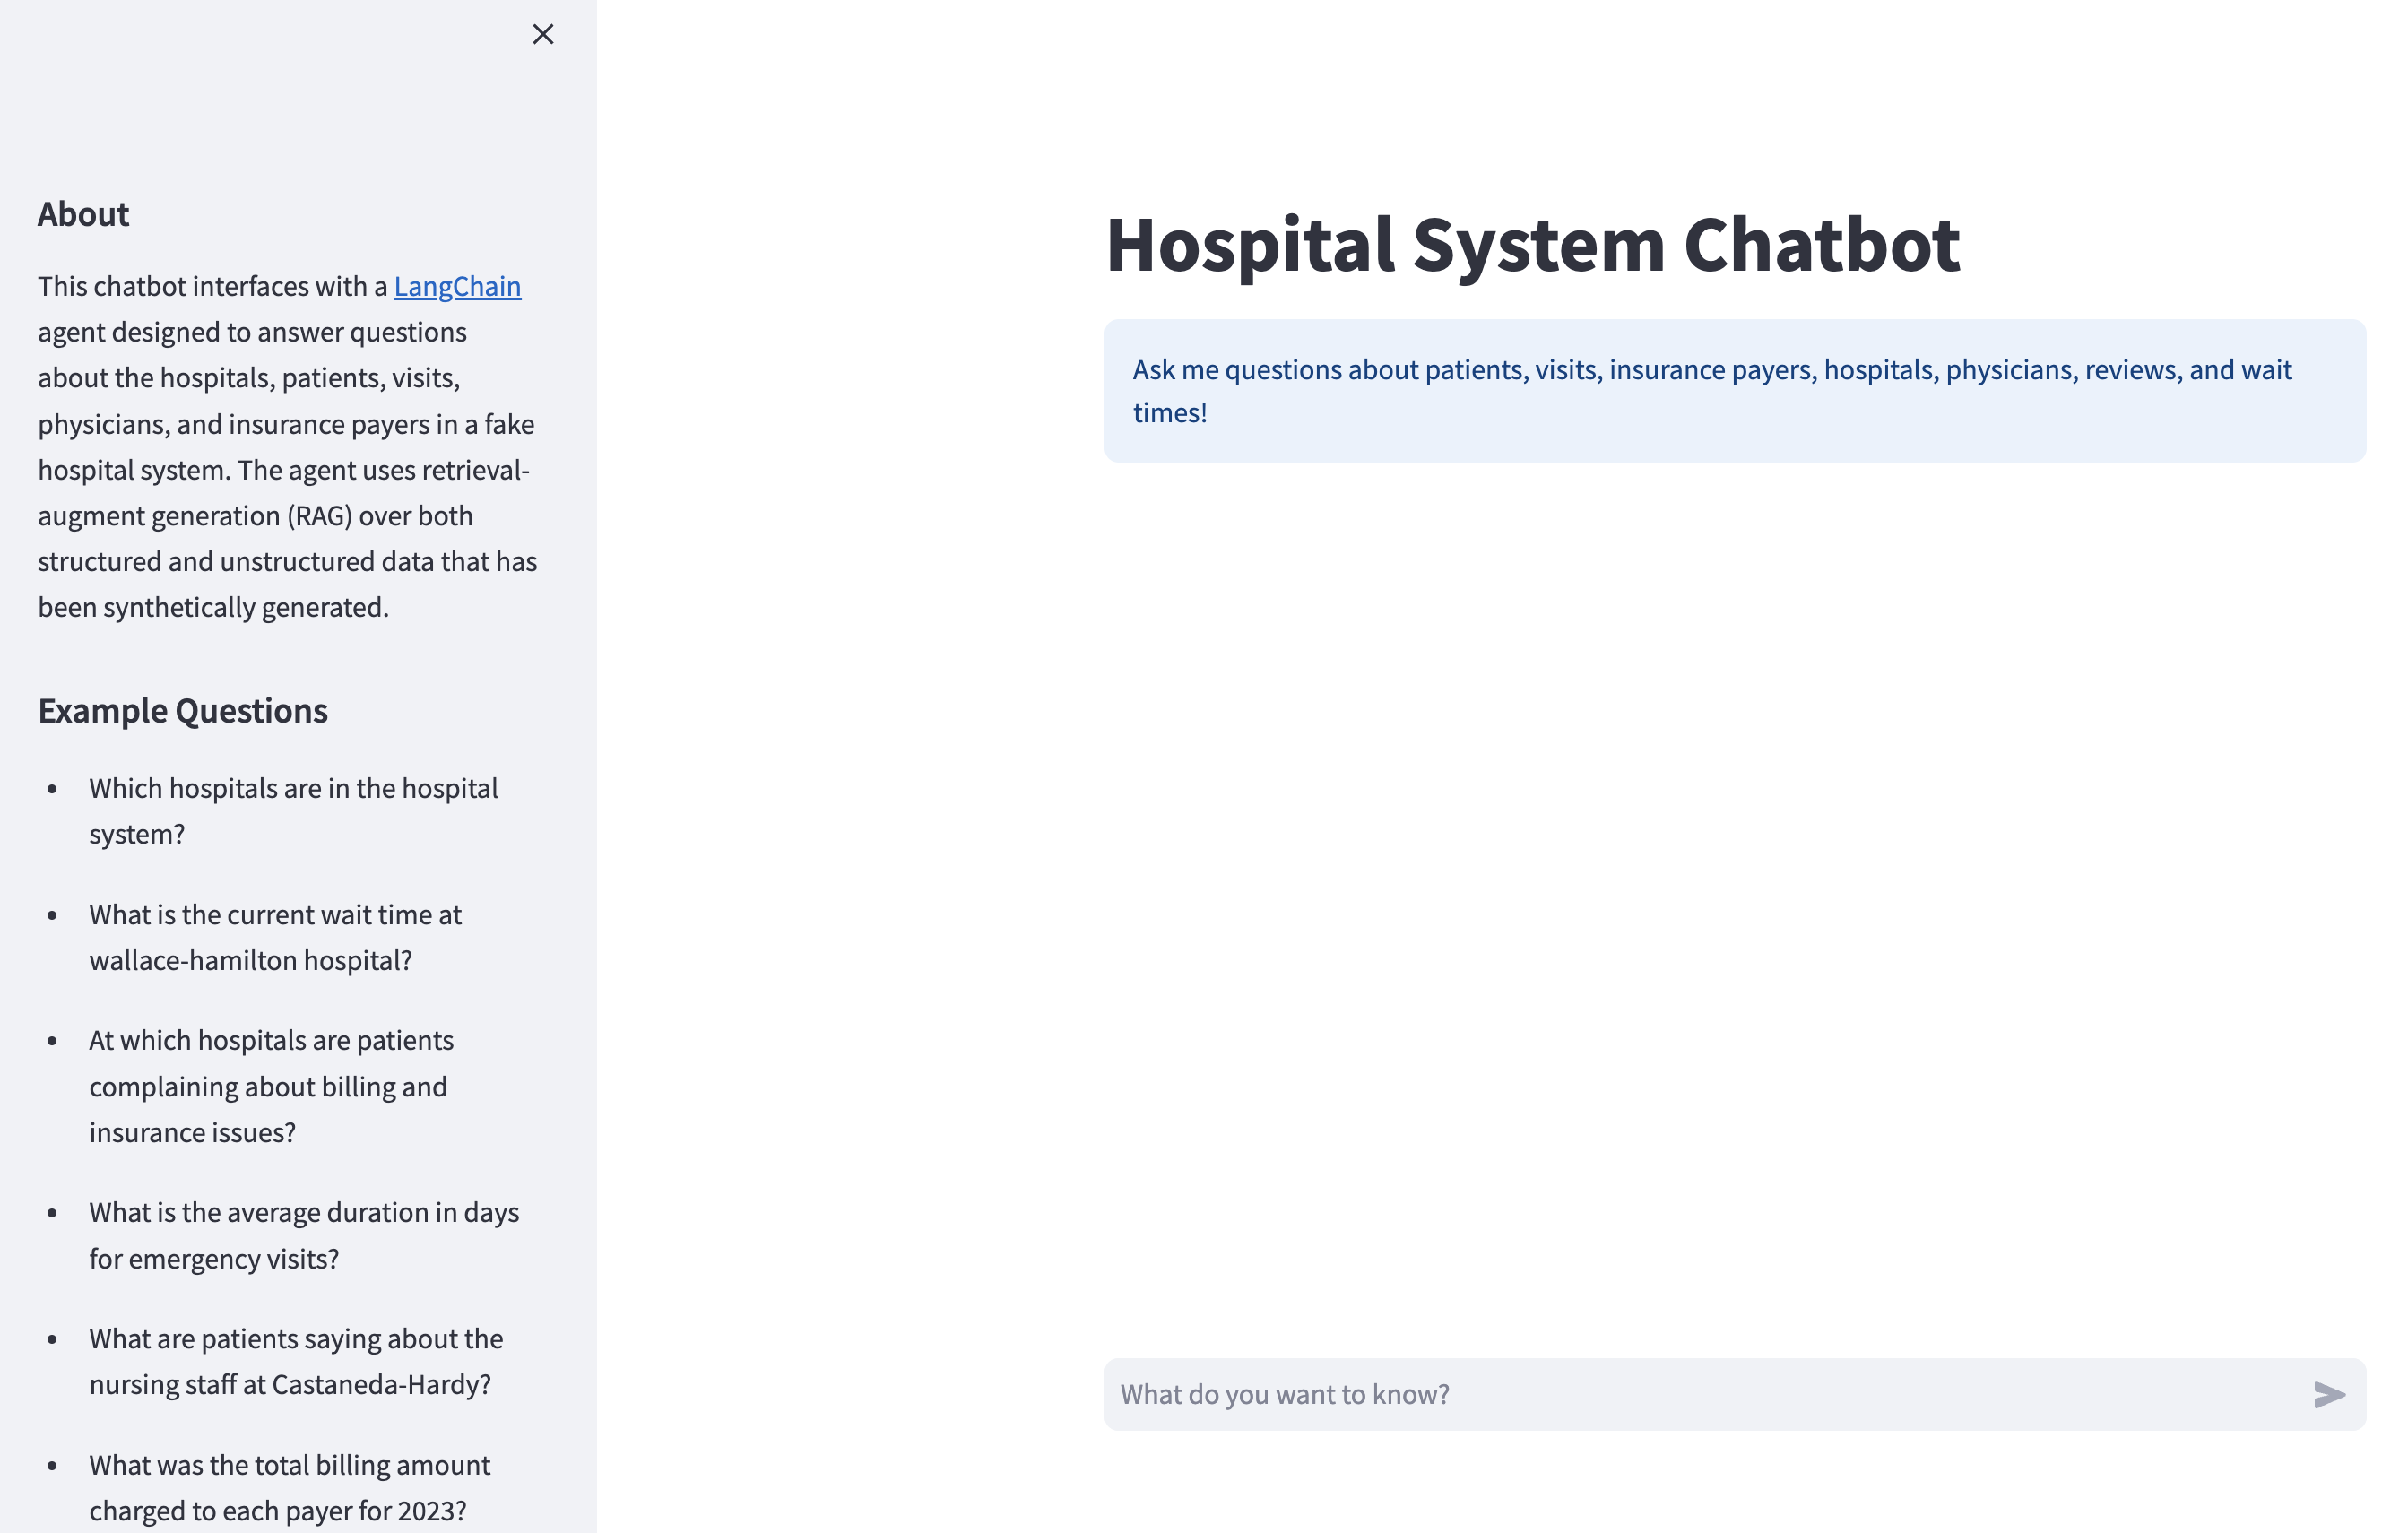
By the end of this tutorial, you’ll have a REST API that serves your LangChain chatbot. You’ll also have a Streamlit app that provides a nice chat interface to interact with your API:
Under the hood, the Streamlit app sends your messages to the chatbot API, and the chatbot generates and sends a response back to the Streamlit app, which displays it to the user.
You’ll get an in-depth overview of the data that your chatbot has access to later, but if you’re anxious to test it out, you can ask questions similar to the examples given in the sidebar:
You’ll learn how to tackle each step, from understanding the business requirements and data to building the Streamlit app. There’s a lot to unpack in this tutorial, but don’t feel overwhelmed. You’ll get some background on each concept introduced, along with links to external sources that will deepen your understanding. Now, it’s time to dive in!
Prerequisites
This tutorial is best suited for intermediate Python developers who want to get hands-on experience creating custom chatbots. Aside from intermediate Python knowledge, you’ll benefit from having a high-level understanding of the following concepts and technologies:
- Large language models (LLMs) and prompt engineering
- Text embeddings and vector databases
- Graph databases and Neo4j
- The OpenAI developer ecosystem
- REST APIs and FastAPI
- Asynchronous programming
- Docker and Docker Compose
Nothing listed above is a hard prerequisite, so don’t worry if you don’t feel knowledgeable in any of them. You’ll be introduced to each concept and technology along the way. Besides, there’s no better way to learn these prerequisites than to implement them yourself in this tutorial.
Next up, you’ll get a brief project overview and begin learning about LangChain.
Project Overview
Throughout this tutorial, you’ll create a few directories that make up your final chatbot. Here’s a breakdown of each directory:
-
langchain_intro/will help you get familiar with LangChain and equip you with the tools that you need to build the chatbot you saw in the demo, and it won’t be included in your final chatbot. You’ll cover this in Step 1. -
data/has the raw hospital system data stored as CSV files. You’ll explore this data in Step 2. In Step 3, you’ll move this data into a Neo4j database that your chatbot will query to answer questions. -
hospital_neo4j_etl/contains a script that loads the raw data fromdata/into your Neo4j database. You have to run this before building your chatbot, and you’ll learn everything you need to know about setting up a Neo4j instance in Step 3. -
chatbot_api/is your FastAPI app that serves your chatbot as a REST endpoint, and it’s the core deliverable of this project. Thechatbot_api/src/agents/andchatbot_api/src/chains/subdirectories contain the LangChain objects that comprise your chatbot. You’ll learn what agents and chains are later, but for now, just know that your chatbot is actually a LangChain agent composed of chains and functions. -
tests/includes two scripts that test how fast your chatbot can answer a series of questions. This will give you a feel for how much time you save by making asynchronous requests to LLM providers like OpenAI. -
chatbot_frontend/is your Streamlit app that interacts with the chatbot endpoint inchatbot_api/. This is the UI that you saw in the demo, and you’ll build this in Step 5.
All the environment variables needed to build and run your chatbot will be stored in a .env file. You’ll deploy the code in hospital_neo4j_etl/, chatbot_api, and chatbot_frontend as Docker containers that’ll be orchestrated with Docker Compose. If you want to experiment with the chatbot before going through the rest of this tutorial, then you can download the materials and follow the instructions in the README file to get things running:
Get Your Code: Click here to download the free source code for your LangChain chatbot.
With the project overview and prerequisites behind you, you’re ready to get started with the first step—getting familiar with LangChain.
Step 1: Get Familiar With LangChain
Before you design and develop your chatbot, you need to know how to use LangChain. In this section, you’ll get to know LangChain’s main components and features by building a preliminary version of your hospital system chatbot. This will give you all the necessary tools to build your full chatbot.
Use your favorite code editor to create a new Python project, and be sure to create a virtual environment for its dependencies. Make sure you have Python 3.10 or later installed. Activate your virtual environment and install the following libraries:
(venv) $ python -m pip install langchain==0.1.0 openai==1.7.2 langchain-openai==0.0.2 langchain-community==0.0.12 langchainhub==0.1.14
You’ll also want to install python-dotenv to help you manage environment variables:
(venv) $ python -m pip install python-dotenv
Python-dotenv loads environment variables from .env files into your Python environment, and you’ll find this handy as you develop your chatbot. However, you’ll eventually deploy your chatbot with Docker, which can handle environment variables for you, and you won’t need Python-dotenv anymore.
If you haven’t already, you’ll need to download reviews.csv from the materials or GitHub repo for this tutorial:
Get Your Code: Click here to download the free source code for your LangChain chatbot.
Next, open the project directory and add the following folders and files:
./
│
├── data/
│   └── reviews.csv
│
├── langchain_intro/
│   ├── chatbot.py
│   ├── create_retriever.py
│   └── tools.py
│
└── .env
The reviews.csv file in data/ is the one you just downloaded, and the remaining files you see should be empty.
You’re now ready to get started building your first chatbot with LangChain!
Chat Models
You might’ve guessed that the core component of LangChain is the LLM. LangChain provides a modular interface for working with LLM providers such as OpenAI, Cohere, HuggingFace, Anthropic, Together AI, and others. In most cases, all you need is an API key from the LLM provider to get started using the LLM with LangChain. LangChain also supports LLMs or other language models hosted on your own machine.
You’ll use OpenAI for this tutorial, but keep in mind there are many great open- and closed-source providers out there. You can always test out different providers and optimize depending on your application’s needs and cost constraints. Before moving forward, make sure you’re signed up for an OpenAI account and you have a valid API key.
Once you have your OpenAI API key, add it to your .env file:
OPENAI_API_KEY=<YOUR-OPENAI-API-KEY>
While you can interact directly with LLM objects in LangChain, a more common abstraction is the chat model. Chat models use LLMs under the hood, but they’re designed for conversations, and they interface with chat messages rather than raw text.
Using chat messages, you provide an LLM with additional detail about the kind of message you’re sending. All messages have role and content properties. The role tells the LLM who is sending the message, and the content is the message itself. Here are the most commonly used messages:
HumanMessage: A message from the user interacting with the language model.AIMessage: A message from the language model.SystemMessage: A message that tells the language model how to behave. Not all providers support theSystemMessage.
There are other messages types, like FunctionMessage and ToolMessage, but you’ll learn more about those when you build an agent.
Getting started with chat models in LangChain is straightforward. To instantiate an OpenAI chat model, navigate to langchain_intro and add the following code to chatbot.py:
langchain_intro/chatbot.py
import dotenv
from langchain_openai import ChatOpenAI

dotenv.load_dotenv()

chat_model = ChatOpenAI(model="gpt-3.5-turbo-0125", temperature=0)
You first import dotenv and ChatOpenAI. Then you call dotenv.load_dotenv() which reads and stores environment variables from .env. By default, dotenv.load_dotenv() assumes .env is located in the current working directory, but you can pass the path to other directories if .env is located elsewhere.
You then instantiate a ChatOpenAI model using GPT 3.5 Turbo as the base LLM, and you set temperature to 0. OpenAI offers a diversity of models with varying price points, capabilities, and performances. GPT 3.5 turbo is a great model to start with because it performs well in many use cases and is cheaper than more recent models like GPT 4 and beyond.
Note: It’s a common misconception that setting temperature=0 guarantees deterministic responses from GPT models. While responses are closer to deterministic when temperature=0, there’s no guarantee that you’ll get the same response for identical requests. Because of this, GPT models might output slightly different results than what you see in the examples throughout this tutorial.
To use chat_model, open the project directory, start a Python interpreter, and run the following code:
>>> from langchain.schema.messages import HumanMessage, SystemMessage
>>> from langchain_intro.chatbot import chat_model

>>> messages = [
...     SystemMessage(
...         content="""You're an assistant knowledgeable about
...         healthcare. Only answer healthcare-related questions."""
...     ),
...     HumanMessage(content="What is Medicaid managed care?"),
... ]
>>> chat_model.invoke(messages)
AIMessage(content='Medicaid managed care is a healthcare delivery system
in which states contract with managed care organizations (MCOs) to provide
healthcare services to Medicaid beneficiaries. Under this system, MCOs are
responsible for coordinating and delivering healthcare services to enrollees,
including primary care, specialty care, hospital services, and prescription
drugs. Medicaid managed care aims to improve care coordination, control costs,
and enhance the quality of care for Medicaid beneficiaries.')
In this block, you import HumanMessage and SystemMessage, as well as your chat model. You then define a list with a SystemMessage and a HumanMessage and run them through chat_model with chat_model.invoke(). Under the hood, chat_model makes a request to an OpenAI endpoint serving gpt-3.5-turbo-0125, and the results are returned as an AIMessage.
Note: You may find copying and pasting multiline code from this tutorial into your standard Python REPL a bit cumbersome. For a better experience, you could install an alternative Python REPL, such as IPython, bpython or ptpython, into your virtual environment and run the REPL interactions with those.
As you can see, the chat model answered What is Medicaid managed care? provided in the HumanMessage. You might be wondering what the chat model did with the SystemMessage in this context. Notice what happens when you ask the following question:
>>> messages = [
...     SystemMessage(
...         content="""You're an assistant knowledgeable about
...         healthcare. Only answer healthcare-related questions."""
...     ),
...     HumanMessage(content="How do I change a tire?"),
... ]
>>> chat_model.invoke(messages)
AIMessage(content='I apologize, but I can only provide assistance
and answer questions related to healthcare.')
As described earlier, the SystemMessage tells the model how to behave. In this case, you told the model to only answer healthcare-related questions. This is why it refuses to tell you how to change your tire. The ability to control how an LLM relates to the user through text instructions is powerful, and this is the foundation for creating customized chatbots through prompt engineering.
While chat messages are a nice abstraction and are good for ensuring that you’re giving the LLM the right kind of message, you can also pass raw strings into chat models:
>>> chat_model.invoke("What is blood pressure?")
AIMessage(content='Blood pressure is the force exerted by
the blood against the walls of the blood vessels, particularly
the arteries, as it is pumped by the heart. It is measured in
millimeters of mercury (mmHg) and is typically expressed as two
numbers: systolic pressure over diastolic pressure. The systolic
pressure represents the force when the heart contracts and pumps
blood into the arteries, while the diastolic pressure represents
the force when the heart is at rest between beats. Blood pressure
is an important indicator of cardiovascular health and can be influenced
by various factors such as age, genetics, lifestyle, and underlying medical
conditions.')
In this code block, you pass the string What is blood pressure? directly to chat_model.invoke(). If you want to control the LLM’s behavior without a SystemMessage here, you can include instructions in the string input.
Note: In these examples, you used .invoke(), but LangChain has other methods that interact with LLMs. For instance, .stream() returns the response one token at time, and .batch() accepts a list of messages that the LLM responds to in one call.
Each method also has an analogous asynchronous method. For instance, you can run .invoke() asynchronously with ainvoke().
Next up, you’ll learn a modular way to guide your model’s response, as you did with the SystemMessage, making it easier to customize your chatbot.
Prompt Templates
LangChain allows you to design modular prompts for your chatbot with prompt templates. Quoting LangChain’s documentation, you can think of prompt templates as predefined recipes for generating prompts for language models.
Suppose you want to build a chatbot that answers questions about patient experiences from their reviews. Here’s what a prompt template might look like for this:
>>> from langchain.prompts import ChatPromptTemplate

>>> review_template_str = """Your job is to use patient
... reviews to answer questions about their experience at a hospital.
... Use the following context to answer questions. Be as detailed
... as possible, but don't make up any information that's not
... from the context. If you don't know an answer, say you don't know.
...
... {context}
...
... {question}
... """

>>> review_template = ChatPromptTemplate.from_template(review_template_str)

>>> context = "I had a great stay!"
>>> question = "Did anyone have a positive experience?"

>>> review_template.format(context=context, question=question)
"Human: Your job is to use patient\nreviews to answer questions about
 their experience at a hospital.\nUse the following context to
 answer questions. Be as detailed\nas possible, but don't make
 up any information that's not\nfrom the context. If you don't
 know an answer, say you don't know.\n\nI had a great
 stay!\n\nDid anyone have a positive experience?\n"
You first import ChatPromptTemplate and define review_template_str, which contains the instructions that you’ll pass to the model, along with the variables context and question in replacement fields that LangChain delimits with curly braces ({}). You then create a ChatPromptTemplate object from review_template_str using the class method .from_template().
With review_template instantiated, you can pass context and question into the string template with review_template.format(). The results may look like you’ve done nothing more than standard Python string interpolation, but prompt templates have a lot of useful features that allow them to integrate with chat models.
Notice how your previous call to review_template.format() generated a string with Human at the beginning. This is because ChatPromptTemplate.from_template() assumes the string template is a human message by default. To change this, you can create more detailed prompt templates for each chat message that you want the model to process:
>>> from langchain.prompts import (
...     PromptTemplate,
...     SystemMessagePromptTemplate,
...     HumanMessagePromptTemplate,
...     ChatPromptTemplate,
... )

>>> review_system_template_str = """Your job is to use patient
... reviews to answer questions about their experience at a
... hospital. Use the following context to answer questions.
... Be as detailed as possible, but don't make up any information
... that's not from the context. If you don't know an answer, say
... you don't know.
...
... {context}
... """

>>> review_system_prompt = SystemMessagePromptTemplate(
...     prompt=PromptTemplate(
...         input_variables=["context"], template=review_system_template_str
...     )
... )

>>> review_human_prompt = HumanMessagePromptTemplate(
...     prompt=PromptTemplate(
...         input_variables=["question"], template="{question}"
...     )
... )

>>> messages = [review_system_prompt, review_human_prompt]
>>> review_prompt_template = ChatPromptTemplate(
...     input_variables=["context", "question"],
...     messages=messages,
... )
>>> context = "I had a great stay!"
>>> question = "Did anyone have a positive experience?"

>>> review_prompt_template.format_messages(context=context, question=question)
[SystemMessage(content="Your job is to use patient\nreviews to answer
 questions about their experience at a\nhospital. Use the following context
 to answer questions.\nBe as detailed as possible, but don't make up any
 information\nthat's not from the context. If you don't know an answer, say
 \nyou don't know.\n\nI had a great stay!\n"), HumanMessage(content='Did anyone
 have a positive experience?')]
In this block, you import separate prompt templates for HumanMessage and SystemMessage. You then define a string, review_system_template_str, which serves as the template for a SystemMessage. Notice how you only declare a context variable in review_system_template_str.
From this, you create review_system_prompt which is a prompt template specifically for SystemMessage. Next you create a review_human_prompt for the HumanMessage. Notice how the template parameter is just a string with the question variable.
You then add review_system_prompt and review_human_prompt to a list called messages and create review_prompt_template, which is the final object that encompasses the prompt templates for both the SystemMessage and HumanMessage. Calling review_prompt_template.format_messages(context=context, question=question) generates a list with a SystemMessage and HumanMessage, which can be passed to a chat model.
To see how to combine chat models and prompt templates, you’ll build a chain with the LangChain Expression Language (LCEL). This helps you unlock LangChain’s core functionality of building modular customized interfaces over chat models.
Chains and LangChain Expression Language (LCEL)
The glue that connects chat models, prompts, and other objects in LangChain is the chain. A chain is nothing more than a sequence of calls between objects in LangChain. The recommended way to build chains is to use the LangChain Expression Language (LCEL).
To see how this works, take a look at how you’d create a chain with a chat model and prompt template:
langchain_intro/chatbot.py
 1import dotenv
 2from langchain_openai import ChatOpenAI
 3from langchain.prompts import (
 4    PromptTemplate,
 5    SystemMessagePromptTemplate,
 6    HumanMessagePromptTemplate,
 7    ChatPromptTemplate,
 8)
 9
10dotenv.load_dotenv()
11
12review_template_str = """Your job is to use patient
13reviews to answer questions about their experience at
14a hospital. Use the following context to answer questions.
15Be as detailed as possible, but don't make up any information
16that's not from the context. If you don't know an answer, say
17you don't know.
18
19{context}
20"""
21
22review_system_prompt = SystemMessagePromptTemplate(
23    prompt=PromptTemplate(
24        input_variables=["context"],
25        template=review_template_str,
26    )
27)
28
29review_human_prompt = HumanMessagePromptTemplate(
30    prompt=PromptTemplate(
31        input_variables=["question"],
32        template="{question}",
33    )
34)
35messages = [review_system_prompt, review_human_prompt]
36
37review_prompt_template = ChatPromptTemplate(
38    input_variables=["context", "question"],
39    messages=messages,
40)
41
42chat_model = ChatOpenAI(model="gpt-3.5-turbo-0125", temperature=0)
43
44review_chain = review_prompt_template | chat_model
Lines 1 to 42 are what you’ve already done. Namely, you define review_prompt_template which is a prompt template for answering questions about patient reviews, and you instantiate a gpt-3.5-turbo-0125 chat model. In line 44, you define review_chain with the | symbol, which is used to chain review_prompt_template and chat_model together.
This creates an object, review_chain, that can pass questions through review_prompt_template and chat_model in a single function call. In essence, this abstracts away all of the internal details of review_chain, allowing you to interact with the chain as if it were a chat model.
After saving the updated chatbot.py, start a new REPL session in your base project folder. Here’s how you can use review_chain:
>>> from langchain_intro.chatbot import review_chain

>>> context = "I had a great stay!"
>>> question = "Did anyone have a positive experience?"

>>> review_chain.invoke({"context": context, "question": question})
AIMessage(content='Yes, the patient had a great stay and had a
positive experience at the hospital.')
In this block, you import review_chain and define context and question as before. You then pass a dictionary with the keys context and question into review_chan.invoke(). This passes context and question through the prompt template and chat model to generate an answer.
Note: When calling chains, you can use all of the same methods that a chat model supports.
In general, the LCEL allows you to create arbitrary-length chains with the pipe symbol (|). For instance, if you wanted to format the model’s response, then you could add an output parser to the chain:
langchain_intro/chatbot.py
import dotenv
from langchain_openai import ChatOpenAI
from langchain.prompts import (
    PromptTemplate,
    SystemMessagePromptTemplate,
    HumanMessagePromptTemplate,
    ChatPromptTemplate,
)
from langchain_core.output_parsers import StrOutputParser

# ...

output_parser = StrOutputParser()

review_chain = review_prompt_template | chat_model | output_parser
Here, you add a StrOutputParser() instance to review_chain, which will make the model’s response more readable. Start a new REPL session and give it a try:
>>> from langchain_intro.chatbot import review_chain

>>> context = "I had a great stay!"
>>> question = "Did anyone have a positive experience?"

>>> review_chain.invoke({"context": context, "question": question})
'Yes, the patient had a great stay and had a
positive experience at the hospital.'
This block is the same as before, except now you can see that review_chain returns a nicely-formatted string rather than an AIMessage.
The power of chains is in the creativity and flexibility they afford you. You can chain together complex pipelines to create your chatbot, and you end up with an object that executes your pipeline in a single method call. Next up, you’ll layer another object into review_chain to retrieve documents from a vector database.
Retrieval Objects
The goal of review_chain is to answer questions about patient experiences in the hospital from their reviews. So far, you’ve manually passed reviews in as context for the question. While this can work for a small number of reviews, it doesn’t scale well. Moreover, even if you can fit all reviews into the model’s context window, there’s no guarantee it will use the correct reviews when answering a question.
To overcome this, you need a retriever. The process of retrieving relevant documents and passing them to a language model to answer questions is known as retrieval-augmented generation (RAG).
For this example, you’ll store all the reviews in a vector database called ChromaDB. If you’re unfamiliar with this database tool and topics, then check out Embeddings and Vector Databases with ChromaDB before continuing.
You can install ChromaDB with the following command:
(venv) $ python -m pip install chromadb==0.4.22
With this installed, you can use the following code to create a ChromaDB vector database with patient reviews:
langchain_intro/create_retriever.py
 1import dotenv
 2from langchain.document_loaders.csv_loader import CSVLoader
 3from langchain_community.vectorstores import Chroma
 4from langchain_openai import OpenAIEmbeddings
 5
 6REVIEWS_CSV_PATH = "data/reviews.csv"
 7REVIEWS_CHROMA_PATH = "chroma_data"
 8
 9dotenv.load_dotenv()
10
11loader = CSVLoader(file_path=REVIEWS_CSV_PATH, source_column="review")
12reviews = loader.load()
13
14reviews_vector_db = Chroma.from_documents(
15    reviews, OpenAIEmbeddings(), persist_directory=REVIEWS_CHROMA_PATH
16)
In lines 2 to 4, you import the dependencies needed to create the vector database. You then define REVIEWS_CSV_PATH and REVIEWS_CHROMA_PATH, which are paths where the raw reviews data is stored and where the vector database will store data, respectively.
You’ll get an overview of the hospital system data later, but all you need to know for now is that reviews.csv stores patient reviews. The review column in reviews.csv is a string with the patient’s review.
In lines 11 and 12, you load the reviews using LangChain’s CSVLoader. In lines 14 to 16, you create a ChromaDB instance from reviews using the default OpenAI embedding model, and you store the review embeddings at REVIEWS_CHROMA_PATH.
Note: In practice, if you’re embedding a large document, you should use a text splitter. Text splitters break the document into smaller chunks before running them through an embedding model. This is important because embedding models have a fixed-size context window, and as the size of the text grows, an embedding’s ability to accurately represent the text decreases.
For this example, you can embed each review individually because they’re relatively small.
Next, open a terminal and run the following command from the project directory:
(venv) $ python langchain_intro/create_retriever.py
It should only take a minute or so to run, and afterwards you can start performing semantic search over the review embeddings:
>>> import dotenv
>>> from langchain_community.vectorstores import Chroma
>>> from langchain_openai import OpenAIEmbeddings

>>> REVIEWS_CHROMA_PATH = "chroma_data/"

>>> dotenv.load_dotenv()
True

>>> reviews_vector_db = Chroma(
...     persist_directory=REVIEWS_CHROMA_PATH,
...     embedding_function=OpenAIEmbeddings(),
... )

>>> question = """Has anyone complained about
...            communication with the hospital staff?"""
>>> relevant_docs = reviews_vector_db.similarity_search(question, k=3)

>>> relevant_docs[0].page_content
'review_id: 73\nvisit_id: 7696\nreview: I had a frustrating experience
at the hospital. The communication between the medical staff and me was
unclear, leading to misunderstandings about my treatment plan. Improvement
is needed in this area.\nphysician_name: Maria Thompson\nhospital_name:
Little-Spencer\npatient_name: Terri Smith'

>>> relevant_docs[1].page_content
'review_id: 521\nvisit_id: 631\nreview: I had a challenging time at the
hospital. The medical care was adequate, but the lack of communication
between the staff and me left me feeling frustrated and confused about my
treatment plan.\nphysician_name: Samantha Mendez\nhospital_name:
Richardson-Powell\npatient_name: Kurt Gordon'

>>> relevant_docs[2].page_content
'review_id: 785\nvisit_id: 2593\nreview: My stay at the hospital was challenging.
The medical care was adequate, but the lack of communication from the staff
created some frustration.\nphysician_name: Brittany Harris\nhospital_name:
Jones, Taylor and Garcia\npatient_name: Ryan Jacobs'
You import the dependencies needed to call ChromaDB and specify the path to the stored ChromaDB data in REVIEWS_CHROMA_PATH. You then load environment variables using dotenv.load_dotenv() and create a new Chroma instance pointing to your vector database. Notice how you have to specify an embedding function again when connecting to your vector database. Be sure this is the same embedding function that you used to create the embeddings.
Next, you define a question and call .similarity_search() on reviews_vector_db, passing in question and k=3. This creates an embedding for the question and searches the vector database for the three most similar review embeddings to question embedding. In this case, you see three reviews where patients complained about communication, which is exactly what you asked for!
The last thing to do is add your reviews retriever to review_chain so that relevant reviews are passed to the prompt as context. Here’s how you do that:
langchain_intro/chatbot.py
import dotenv
from langchain_openai import ChatOpenAI
from langchain.prompts import (
    PromptTemplate,
    SystemMessagePromptTemplate,
    HumanMessagePromptTemplate,
    ChatPromptTemplate,
)
from langchain_core.output_parsers import StrOutputParser
from langchain_community.vectorstores import Chroma
from langchain_openai import OpenAIEmbeddings
from langchain.schema.runnable import RunnablePassthrough

REVIEWS_CHROMA_PATH = "chroma_data/"

# ...

reviews_vector_db = Chroma(
    persist_directory=REVIEWS_CHROMA_PATH,
    embedding_function=OpenAIEmbeddings()
)

reviews_retriever  = reviews_vector_db.as_retriever(k=10)

review_chain = (
    {"context": reviews_retriever, "question": RunnablePassthrough()}
    | review_prompt_template
    | chat_model
    | StrOutputParser()
)
As before, you import ChromaDB’s dependencies, specify the path to your ChromaDB data, and instantiate a new Chroma object. You then create reviews_retriever by calling .as_retriever() on reviews_vector_db to create a retriever object that you’ll add to review_chain. Because you specified k=10, the retriever will fetch the ten reviews most similar to the user’s question.
You then add a dictionary with context and question keys to the front of review_chain. Instead of passing context in manually, review_chain will pass your question to the retriever to pull relevant reviews. Assigning question to a RunnablePassthrough object ensures the question gets passed unchanged to the next step in the chain.
You now have a fully functioning chain that can answer questions about patient experiences from their reviews. Start a new REPL session and try it out:
>>> from langchain_intro.chatbot import review_chain

>>> question = """Has anyone complained about
...            communication with the hospital staff?"""
>>> review_chain.invoke(question)
'Yes, several patients have complained about communication
with the hospital staff. Terri Smith mentioned that the
communication between the medical staff and her was unclear,
leading to misunderstandings about her treatment plan.
Kurt Gordon also mentioned that the lack of communication
between the staff and him left him feeling frustrated and
confused about his treatment plan. Ryan Jacobs also experienced
frustration due to the lack of communication from the staff.
Shannon Williams also mentioned that the lack of communication
between the staff and her made her stay at the hospital less enjoyable.'
As you can see, you only call review_chain.invoke(question) to get retrieval-augmented answers about patient experiences from their reviews. You’ll improve upon this chain later by storing review embeddings, along with other metadata, in Neo4j.
Now that you understand chat models, prompts, chains, and retrieval, you’re ready to dive into the last LangChain concept—agents.
Agents
So far, you’ve created a chain to answer questions using patient reviews. What if you want your chatbot to also answer questions about other hospital data, such as hospital wait times? Ideally, your chatbot can seamlessly switch between answering patient review and wait time questions depending on the user’s query. To accomplish this, you’ll need the following components:
- The patient review chain you already created
- A function that can look up wait times at a hospital
- A way for an LLM to know when it should answer questions about patient experiences or look up wait times
To accomplish the third capability, you need an agent.
An agent is a language model that decides on a sequence of actions to execute. Unlike chains where the sequence of actions is hard-coded, agents use a language model to determine which actions to take and in which order.
Before building the agent, create the following function to generate fake wait times for a hospital:
langchain_intro/tools.py
import random
import time

def get_current_wait_time(hospital: str) -> int | str:
    """Dummy function to generate fake wait times"""

    if hospital not in ["A", "B", "C", "D"]:
        return f"Hospital {hospital} does not exist"

    # Simulate API call delay
    time.sleep(1)

    return random.randint(0, 10000)
In get_current_wait_time(), you pass in a hospital name, check if it’s valid, and then generate a random number to simulate a wait time. In reality, this would be some sort of database query or API call, but this will serve the same purpose for this demonstration.
You can now create an agent that decides between get_current_wait_time() and review_chain.invoke() depending on the question:
langchain_intro/chatbot.py
import dotenv
from langchain_openai import ChatOpenAI
from langchain.prompts import (
    PromptTemplate,
    SystemMessagePromptTemplate,
    HumanMessagePromptTemplate,
    ChatPromptTemplate,
)
from langchain_core.output_parsers import StrOutputParser
from langchain_community.vectorstores import Chroma
from langchain_openai import OpenAIEmbeddings
from langchain.schema.runnable import RunnablePassthrough
from langchain.agents import (
    create_openai_functions_agent,
    Tool,
    AgentExecutor,
)
from langchain import hub
from langchain_intro.tools import get_current_wait_time

# ...

tools = [
    Tool(
        name="Reviews",
        func=review_chain.invoke,
        description="""Useful when you need to answer questions
        about patient reviews or experiences at the hospital.
        Not useful for answering questions about specific visit
        details such as payer, billing, treatment, diagnosis,
        chief complaint, hospital, or physician information.
        Pass the entire question as input to the tool. For instance,
        if the question is "What do patients think about the triage system?",
        the input should be "What do patients think about the triage system?"
        """,
    ),
    Tool(
        name="Waits",
        func=get_current_wait_time,
        description="""Use when asked about current wait times
        at a specific hospital. This tool can only get the current
        wait time at a hospital and does not have any information about
        aggregate or historical wait times. This tool returns wait times in
        minutes. Do not pass the word "hospital" as input,
        only the hospital name itself. For instance, if the question is
        "What is the wait time at hospital A?", the input should be "A".
        """,
    ),
]

hospital_agent_prompt = hub.pull("hwchase17/openai-functions-agent")

agent_chat_model = ChatOpenAI(
    model="gpt-3.5-turbo-1106",
    temperature=0,
)

hospital_agent = create_openai_functions_agent(
    llm=agent_chat_model,
    prompt=hospital_agent_prompt,
    tools=tools,
)

hospital_agent_executor = AgentExecutor(
    agent=hospital_agent,
    tools=tools,
    return_intermediate_steps=True,
    verbose=True,
)
In this block, you import a few additional dependencies that you’ll need to create the agent. You then define a list of Tool objects. A Tool is an interface that an agent uses to interact with a function. For instance, the first tool is named Reviews and it calls review_chain.invoke() if the question meets the criteria of description.
Notice how description gives the agent instructions as to when it should call the tool. This is where good prompt engineering skills are paramount to ensuring the LLM calls the correct tool with the correct inputs.
The second Tool in tools is named Waits, and it calls get_current_wait_time(). Again, the agent has to know when to use the Waits tool and what inputs to pass into it depending on the description.
Next, you initialize a ChatOpenAI object using gpt-3.5-turbo-1106 as your language model. You then create an OpenAI functions agent with create_openai_functions_agent(). This creates an agent designed to pass inputs to functions. It does this by returning valid JSON objects that store function inputs and their corresponding value.
To create the agent run time, you pass the agent and tools into AgentExecutor. Setting return_intermediate_steps and verbose to True will allow you to see the agent’s thought process and the tools it calls.
Start a new REPL session to give your new agent a spin:
>>> from langchain_intro.chatbot import hospital_agent_executor

>>> hospital_agent_executor.invoke(
...     {"input": "What is the current wait time at hospital C?"}
... )

> Entering new AgentExecutor chain...

Invoking: `Waits` with `C`

1374The current wait time at Hospital C is 1374 minutes.

> Finished chain.
{'input': 'What is the current wait time at hospital C?',
'output': 'The current wait time at Hospital C is 1374 minutes.',
'intermediate_steps': [(AgentActionMessageLog(tool='Waits',
tool_input='C', log='\nInvoking: `Waits` with `C`\n\n\n',
message_log=[AIMessage(content='', additional_kwargs={'function_call':
{'arguments': '{"__arg1":"C"}', 'name': 'Waits'}})]), 1374)]}

>>> hospital_agent_executor.invoke(
...     {"input": "What have patients said about their comfort at the hospital?"}
... )

> Entering new AgentExecutor chain...

Invoking: `Reviews` with `What have patients said about their comfort at the
hospital?`

Patients have mentioned both positive and negative aspects of their comfort at
the hospital. One patient mentioned that the hospital's dedication to patient
comfort was evident in the well-designed private rooms and comfortable furnishings,
which made their recovery more bearable and contributed to an overall positive
experience. However, other patients mentioned that the uncomfortable beds made
it difficult for them to get a good night's sleep during their stay, affecting
their overall comfort. Another patient mentioned that the outdated and
uncomfortable beds affected their overall comfort, despite the doctors being
knowledgeable and the hospital having a clean environment. Patients have shared
mixed feedback about their comfort at the hospital. Some have praised the well-designed
private rooms and comfortable furnishings, which contributed to a positive experience.
However, others have mentioned discomfort due to the outdated and uncomfortable beds,
affecting their overall comfort despite the hospital's clean environment and knowledgeable
doctors.

> Finished chain.
{'input': 'What have patients said about their comfort at the hospital?', 'output':
"Patients have shared mixed feedback about their comfort at the hospital. Some have
praised the well-designed private rooms and comfortable furnishings, which contributed
to a positive experience. However, others have mentioned discomfort due to the outdated
and uncomfortable beds, affecting their overall comfort despite the hospital's clean
environment and knowledgeable doctors.", 'intermediate_steps':
[(AgentActionMessageLog(tool='Reviews', tool_input='What have patients said about their
comfort at the hospital?', log='\nInvoking: `Reviews` with `What have patients said about
their comfort at the hospital?`\n\n\n', message_log=[AIMessage(content='',
additional_kwargs={'function_call': {'arguments': '{"__arg1":"What have patients said about
their comfort at the hospital?"}', 'name': 'Reviews'}})]), "Patients have mentioned both
positive and negative aspects of their comfort at the hospital. One patient mentioned that
the hospital's dedication to patient comfort was evident in the well-designed private rooms
and comfortable furnishings, which made their recovery more bearable and contributed to an
overall positive experience. However, other patients mentioned that the uncomfortable beds
made it difficult for them to get a good night's sleep during their stay, affecting their
overall comfort. Another patient mentioned that the outdated and uncomfortable beds affected
their overall comfort, despite the doctors being knowledgeable and the hospital having a clean
environment.")]}
You first import the agent and then call hospital_agent_executor.invoke() with a question about a wait time. As indicated in the output, the agent knows that you’re asking about a wait time, and it passes C as input to the Waits tool. The Waits tool then calls get_current_wait_time(hospital="C") and returns the corresponding wait time to the agent. The agent then uses this wait time to generate its final output.
A similar process happens when you ask the agent about patient experience reviews, except this time the agent knows to call the Reviews tool with What have patients said about their comfort at the
hospital? as input. The Reviews tool runs review_chain.invoke() using your full question as input, and the agent uses the response to generate its output.
This is a profound capability. Agents give language models the ability to perform just about any task that you can write code for. Imagine all of the amazing, and potentially dangerous, chatbots you could build with agents.
You now have all of the prerequisite LangChain knowledge needed to build a custom chatbot. Next up, you’ll put on your AI engineer hat and learn about the business requirements and data needed to build your hospital system chatbot.
All of the code you’ve written so far was intended to teach you the fundamentals of LangChain, and it won’t be included in your final chatbot. Feel free to start with an empty directory in Step 2, where you’ll begin building your chatbot.
Step 2: Understand the Business Requirements and Data
Before you start working on any AI project, you need to understand the problem that you want to solve and make a plan for how you’re going to solve it. This involves clearly defining the problem, gathering requirements, understanding the data and technology available to you, and setting clear expectations with stakeholders. For this project, you’ll start by defining the problem and gathering business requirements for your chatbot.
Understand the Problem and Requirements
Imagine you’re an AI engineer working for a large hospital system in the US. Your stakeholders would like more visibility into the ever-changing data they collect. They want answers to ad-hoc questions about patients, visits, physicians, hospitals, and insurance payers without having to understand a query language like SQL, request a report from an analyst, or wait for someone to build a dashboard.
To accomplish this, your stakeholders want an internal chatbot tool, similar to ChatGPT, that can answer questions about your company’s data. After meeting to gather requirements, you’re provided with a list of the kinds of questions your chatbot should answer:
- What is the current wait time at XYZ hospital?
- Which hospital currently has the shortest wait time?
- At which hospitals are patients complaining about billing and insurance issues?
- Have any patients complained about the hospital being unclean?
- What have patients said about how doctors and nurses communicate with them?
- What are patients saying about the nursing staff at XYZ hospital?
- What was the total billing amount charged to Cigna payers in 2023?
- How many patients has Dr. John Doe treated?
- How many visits are open and what is their average duration in days?
- Which physician has the lowest average visit duration in days?
- How much was billed for patient 789’s stay?
- Which hospital worked with the most Cigna patients in 2023?
- What’s the average billing amount for emergency visits by hospital?
- Which state had the largest percent increase inedicaid visits from 2022 to 2023?
You can answer questions like What was the total billing amount charged to Cigna payers in 2023? with aggregate statistics using a query language like SQL. Crucially, these questions have a single objective answer. You could run pre-defined queries to answer these, but any time a stakeholder has a new or slightly nuanced question, you have to write a new query. To avoid this, your chatbot should dynamically generate accurate queries.
Questions like Have any patients complained about the hospital being unclean? or What have patients said about how doctors and nurses communicate with them? are more subjective and might have many acceptable answers. Your chatbot will need to read through documents, such as patient reviews, to answer these kinds of questions.
Ultimately, your stakeholders want a single chat interface that can seamlessly answer both subjective and objective questions. This means, when presented with a question, your chatbot needs to know what type of question is being asked and which data source to pull from.
For instance, if asked How much was billed for patient 789’s stay?, your chatbot should know it needs to query a database to find the answer. If asked What have patients said about how doctors and nurses communicate with them?, your chatbot should know it needs to read and summarize patient reviews.
Next up, you’ll explore the data your hospital system records, which is arguably the most important prerequisite to building your chatbot.
Explore the Available Data
Before building your chatbot, you need a thorough understanding of the data it will use to respond to user queries. This will help you determine what’s feasible and how you want to structure the data so that your chatbot can easily access it. All of the data you’ll use in this article was synthetically generated, and much of it was derived from a popular health care dataset on Kaggle.
In practice, the following datasets would likely be stored as tables in a SQL database, but you’ll work with CSV files to keep the focus on building the chatbot. This section will give you a detailed description of each CSV file.
You’ll need to place all CSV files that are part of this project in your data/ folder before continuing with the tutorial. Make sure that you downloaded them from the materials and placed them in your data/ folder:
Get Your Code: Click here to download the free source code for your LangChain chatbot.
hospitals.csv
The hospitals.csv file records information on each hospital that your company manages. There 30 hospitals and three fields in this file:
hospital_id: An integer that uniquely identifies a hospital.hospital_name: The hospital’s name.hospital_state: The state the hospital is located in.
If you’re familiar with traditional SQL databases and the star schema, you can think of hospitals.csv as a dimension table. Dimension tables are relatively short and contain descriptive information or attributes that provide context to the data in fact tables. Fact tables record events about the entities stored in dimension tables, and they tend to be longer tables.
In this case, hospitals.csv records information specific to hospitals, but you can join it to fact tables to answer questions about which patients, physicians, and payers are related to the hospital. This will be more clear when you explore visits.csv.
If you’re curious, you can inspect the first few rows of hospitals.csv using a dataframe library like Polars. Make sure Polars is installed in your virtual environment, and run the following code:
>>> import polars as pl

>>> HOSPITAL_DATA_PATH = "data/hospitals.csv"
>>> data_hospitals = pl.read_csv(HOSPITAL_DATA_PATH)

>>> data_hospitals.shape
(30, 3)

>>> data_hospitals.head()
shape: (5, 3)
┌─────────────┬───────────────────────────┬────────────────┐
│ hospital_id ┆ hospital_name             ┆ hospital_state │
│ ---         ┆ ---                       ┆ ---            │
│ i64         ┆ str                       ┆ str            │
╞═════════════╪═══════════════════════════╪════════════════╡
│ 0           ┆ Wallace-Hamilton          ┆ CO             │
│ 1           ┆ Burke, Griffin and Cooper ┆ NC             │
│ 2           ┆ Walton LLC                ┆ FL             │
│ 3           ┆ Garcia Ltd                ┆ NC             │
│ 4           ┆ Jones, Brown and Murray   ┆ NC             │
└─────────────┴───────────────────────────┴────────────────┘
In this code block, you import Polars, define the path to hospitals.csv, read the data into a Polars DataFrame, display the shape of the data, and display the first 5 rows. This shows you, for example, that Walton, LLC hospital has an ID of 2 and is located in the state of Florida, FL.
physicians.csv
The physicians.csv file contains data about the physicians that work for your hospital system. This dataset has the following fields:
physician_id: An integer that uniquely identifies each physician.physician_name: The physician’s name.physician_dob: The physician’s date of birth.physician_grad_year: The year the physician graduated medical school.medical_school: Where the physician attended medical school.salary: The physician’s salary.
This data can again be thought of as a dimension table, and you can inspect the first few rows using Polars:
>>> PHYSICIAN_DATA_PATH = "data/physicians.csv"
>>> data_physician = pl.read_csv(PHYSICIAN_DATA_PATH)

>>> data_physician.shape
(500, 6)

>>> data_physician.head()
shape: (5, 6)
┌──────────────────┬──────────────┬───────────────┬─────────────────────┬───────────────────────────────────┬───────────────┐
│ physician_name   ┆ physician_id ┆ physician_dob ┆ physician_grad_year ┆ medical_school                    ┆ salary        │
│ ---              ┆ ---          ┆ ---           ┆ ---                 ┆ ---                               ┆ ---           │
│ str              ┆ i64          ┆ str           ┆ str                 ┆ str                               ┆ f64           │
╞══════════════════╪══════════════╪═══════════════╪═════════════════════╪═══════════════════════════════════╪═══════════════╡
│ Joseph Johnson   ┆ 0            ┆ 1970-02-22    ┆ 2000-02-22          ┆ Johns Hopkins University School … ┆ 309534.155076 │
│ Jason Williams   ┆ 1            ┆ 1982-12-22    ┆ 2012-12-22          ┆ Mayo Clinic Alix School of Medic… ┆ 281114.503559 │
│ Jesse Gordon     ┆ 2            ┆ 1959-06-03    ┆ 1989-06-03          ┆ David Geffen School of Medicine … ┆ 305845.584636 │
│ Heather Smith    ┆ 3            ┆ 1965-06-15    ┆ 1995-06-15          ┆ NYU Grossman Medical School       ┆ 295239.766689 │
│ Kayla Hunter DDS ┆ 4            ┆ 1978-10-19    ┆ 2008-10-19          ┆ David Geffen School of Medicine … ┆ 298751.355201 │
└──────────────────┴──────────────┴───────────────┴─────────────────────┴───────────────────────────────────┴───────────────┘
As you can see from the code block, there are 500 physicians in physicians.csv. The first few rows from physicians.csv give you a feel for what the data looks like. For instance, Heather Smith has a physician ID of 3, was born on June 15, 1965, graduated medical school on June 15, 1995, attended NYU Grossman Medical School, and her salary is about $295,239.
payers.csv
The next file, payers.csv, records information about the insurance companies that your hospitals bills for patient visits. Similar to hospitals.csv, it’s a small file with a couple fields:
payer_id: An integer that uniquely identifies each payer.payer_name: The payer’s company name.
The only five payers in the data are Medicaid, UnitedHealthcare, Aetna, Cigna, and Blue Cross. Your stakeholders are very interested in payer activity, so payers.csv will be helpful once it’s connected to patients, hospitals, and physicians.
reviews.csv
The reviews.csv file contains patient reviews about their experience at the hospital. It has these fields:
review_id: An integer that uniquely identifies a review.visit_id: An integer that identifies the patient’s visit that the review was about.review: This is the free form text review left by the patient.physician_name: The name of the physician who treated the patient.hospital_name: The hospital where the patient stayed.patient_name: The patient’s name.
This dataset is the first one you’ve seen that contains the free text review field, and your chatbot should use this to answer questions about review details and patient experiences.
Here’s what reviews.csv looks like:
>>> REVIEWS_DATA_PATH = "data/reviews.csv"
>>> data_reviews = pl.read_csv(REVIEWS_DATA_PATH)

>>> data_reviews.shape
(1005, 6)

>>> data_reviews.head()
shape: (5, 6)
┌───────────┬──────────┬───────────────────────────────────┬─────────────────────┬──────────────────┬──────────────────┐
│ review_id ┆ visit_id ┆ review                            ┆ physician_name      ┆ hospital_name    ┆ patient_name     │
│ ---       ┆ ---      ┆ ---                               ┆ ---                 ┆ ---              ┆ ---              │
│ i64       ┆ i64      ┆ str                               ┆ str                 ┆ str              ┆ str              │
╞═══════════╪══════════╪═══════════════════════════════════╪═════════════════════╪══════════════════╪══════════════════╡
│ 0         ┆ 6997     ┆ The medical staff at the hospita… ┆ Laura Brown         ┆ Wallace-Hamilton ┆ Christy Johnson  │
│ 9         ┆ 8138     ┆ The hospital's commitment to pat… ┆ Steven Watson       ┆ Wallace-Hamilton ┆ Anna Frazier     │
│ 11        ┆ 680      ┆ The hospital's commitment to pat… ┆ Chase Mcpherson Jr. ┆ Wallace-Hamilton ┆ Abigail Mitchell │
│ 892       ┆ 9846     ┆ I had a positive experience over… ┆ Jason Martinez      ┆ Wallace-Hamilton ┆ Kimberly Rivas   │
│ 822       ┆ 7397     ┆ The medical team at the hospital… ┆ Chelsey Davis       ┆ Wallace-Hamilton ┆ Catherine Yang   │
└───────────┴──────────┴───────────────────────────────────┴─────────────────────┴──────────────────┴──────────────────┘
There are 1005 reviews in this dataset, and you can see how each review relates to a visit. For instance, the review with ID 9 corresponds to visit ID 8138, and the first few words are “The hospital’s commitment to pat…”. You might be wondering how you can connect a review to a patient, or more generally, how you can connect all of the datasets described so far to each other. This is where visits.csv comes in.
visits.csv
The last file, visits.csv, records details about every hospital visit your company has serviced. Continuing with the star schema analogy, you can think of visits.csv as a fact table that connects hospitals, physicians, patients, and payers. Here are the fields:
visit_id: The unique identifier of a hospital visit.patient_id: The ID of the patient associated with the visit.date_of_admission: The date the patient was admitted to the hospital.room_number: The patient’s room number.admission_type: One of ‘Elective’, ‘Emergency’, or ‘Urgent’.chief_complaint: A string describing the patient’s primary reason for being at the hospital.primary_diagnosis: A string describing the primary diagnosis made by the physician.treatment_description: A text summary of the treatment given by the physician.test_results: One of ‘Inconclusive’, ‘Normal’, or ‘Abnormal’.discharge_date: The date the patient was discharged from the hospitalphysician_id: The ID of the physician that treated the patient.hospital_id: The ID of the hospital the patient stayed at.payer_id: The ID of the insurance payer used by the patient.billing_amount: The amount of money billed to the payer for the visit.visit_status: One of ‘OPEN’ or ‘DISCHARGED’.
This dataset gives you everything you need to answer questions about the relationship between each hospital entity. For example, if you know a physician ID, you can use visits.csv to figure out which patients, payers, and hospitals the physician is associated with. Take a look at what visits.csv looks like in Polars:
>>> VISITS_DATA_PATH = "data/visits.csv"
>>> data_visits = pl.read_csv(VISITS_DATA_PATH)

>>> data_visits.shape
(9998, 15)

>>> data_visits.head()
shape: (5, 15)
┌─────────┬─────────┬─────────┬─────────┬─────────┬─────────┬────────┬────────┬────────┬────────┬────────┬────────┬────────┬────────┬────────┐
│ patient ┆ date_of ┆ billing ┆ room_nu ┆ admissi ┆ dischar ┆ test_r ┆ visit_ ┆ physic ┆ payer_ ┆ hospit ┆ chief_ ┆ treatm ┆ primar ┆ visit_ │
│ _id     ┆ _admiss ┆ _amount ┆ mber    ┆ on_type ┆ ge_date ┆ esults ┆ id     ┆ ian_id ┆ id     ┆ al_id  ┆ compla ┆ ent_de ┆ y_diag ┆ status │
│ ---     ┆ ion     ┆ ---     ┆ ---     ┆ ---     ┆ ---     ┆ ---    ┆ ---    ┆ ---    ┆ ---    ┆ ---    ┆ int    ┆ script ┆ nosis  ┆ ---    │
│ i64     ┆ ---     ┆ f64     ┆ i64     ┆ str     ┆ str     ┆ str    ┆ i64    ┆ i64    ┆ i64    ┆ i64    ┆ ---    ┆ ion    ┆ ---    ┆ str    │
│         ┆ str     ┆         ┆         ┆         ┆         ┆        ┆        ┆        ┆        ┆        ┆ str    ┆ ---    ┆ str    ┆        │
│         ┆         ┆         ┆         ┆         ┆         ┆        ┆        ┆        ┆        ┆        ┆        ┆ str    ┆        ┆        │
╞═════════╪═════════╪═════════╪═════════╪═════════╪═════════╪════════╪════════╪════════╪════════╪════════╪════════╪════════╪════════╪════════╡
│ 0       ┆ 2022-11 ┆ 37490.9 ┆ 146     ┆ Electiv ┆ 2022-12 ┆ Inconc ┆ 0      ┆ 102    ┆ 1      ┆ 0      ┆ null   ┆ null   ┆ null   ┆ DISCHA │
│         ┆ -17     ┆ 83364   ┆         ┆ e       ┆ -01     ┆ lusive ┆        ┆        ┆        ┆        ┆        ┆        ┆        ┆ RGED   │
│ 1       ┆ 2023-06 ┆ 47304.0 ┆ 404     ┆ Emergen ┆ null    ┆ Normal ┆ 1      ┆ 435    ┆ 4      ┆ 5      ┆ null   ┆ null   ┆ null   ┆ OPEN   │
│         ┆ -01     ┆ 64845   ┆         ┆ cy      ┆         ┆        ┆        ┆        ┆        ┆        ┆        ┆        ┆        ┆        │
│ 2       ┆ 2019-01 ┆ 36874.8 ┆ 292     ┆ Emergen ┆ 2019-02 ┆ Normal ┆ 2      ┆ 348    ┆ 2      ┆ 6      ┆ null   ┆ null   ┆ null   ┆ DISCHA │
│         ┆ -09     ┆ 96997   ┆         ┆ cy      ┆ -08     ┆        ┆        ┆        ┆        ┆        ┆        ┆        ┆        ┆ RGED   │
│ 3       ┆ 2020-05 ┆ 23303.3 ┆ 480     ┆ Urgent  ┆ 2020-05 ┆ Abnorm ┆ 3      ┆ 270    ┆ 4      ┆ 15     ┆ null   ┆ null   ┆ null   ┆ DISCHA │
│         ┆ -02     ┆ 22092   ┆         ┆         ┆ -03     ┆ al     ┆        ┆        ┆        ┆        ┆        ┆        ┆        ┆ RGED   │
│ 4       ┆ 2021-07 ┆ 18086.3 ┆ 477     ┆ Urgent  ┆ 2021-08 ┆ Normal ┆ 4      ┆ 106    ┆ 2      ┆ 29     ┆ Persis ┆ Prescr ┆ J45.90 ┆ DISCHA │
│         ┆ -09     ┆ 44184   ┆         ┆         ┆ -02     ┆        ┆        ┆        ┆        ┆        ┆ tent   ┆ ibed a ┆ 9 -    ┆ RGED   │
│         ┆         ┆         ┆         ┆         ┆         ┆        ┆        ┆        ┆        ┆        ┆ cough  ┆ combin ┆ Unspec ┆        │
│         ┆         ┆         ┆         ┆         ┆         ┆        ┆        ┆        ┆        ┆        ┆ and    ┆ ation  ┆ ified  ┆        │
│         ┆         ┆         ┆         ┆         ┆         ┆        ┆        ┆        ┆        ┆        ┆ shortn ┆ of     ┆ asthma ┆        │
│         ┆         ┆         ┆         ┆         ┆         ┆        ┆        ┆        ┆        ┆        ┆ ess o… ┆ inha…  ┆ , un…  ┆        │
└─────────┴─────────┴─────────┴─────────┴─────────┴─────────┴────────┴────────┴────────┴────────┴────────┴────────┴────────┴────────┴────────┘
You can see there are 9998 visits recorded along with the 15 fields described above. Notice that chief_complaint, treatment_description, and primary_diagnosis might be missing for a visit. You’ll have to keep this in mind as your stakeholders might not be aware that many visits are missing critical data—this may be a valuable insight in itself! Lastly, notice that when a visit is still open, the discharged_date will be missing.
You now have an understanding of the data you’ll use to build the chatbot your stakeholders want. To recap, the files are broken out to simulate what a traditional SQL database might look like. Every hospital, patient, physician, review, and payer are connected through visits.csv.
Wait Times
You might have noticed there’s no data to answer questions like What is the current wait time at XYZ hospital? or Which hospital currently has the shortest wait time?. Unfortunately, the hospital system doesn’t record historical wait times. Your chatbot will have to call an API to get current wait time information. You’ll see how this works later.
With an understanding of the business requirements, available data, and LangChain functionalities, you can create a design for your chatbot.
Design the Chatbot
Now that you know the business requirements, data, and LangChain prerequisites, you’re ready to design your chatbot. A good design gives you and others a conceptual understanding of the components needed to build your chatbot. Your design should clearly illustrate how data flows through your chatbot, and it should serve as a helpful reference during development.
Your chatbot will use multiple tools to answer diverse questions about your hospital system. Here’s a flowchart illustrating how you’ll accomplish this:
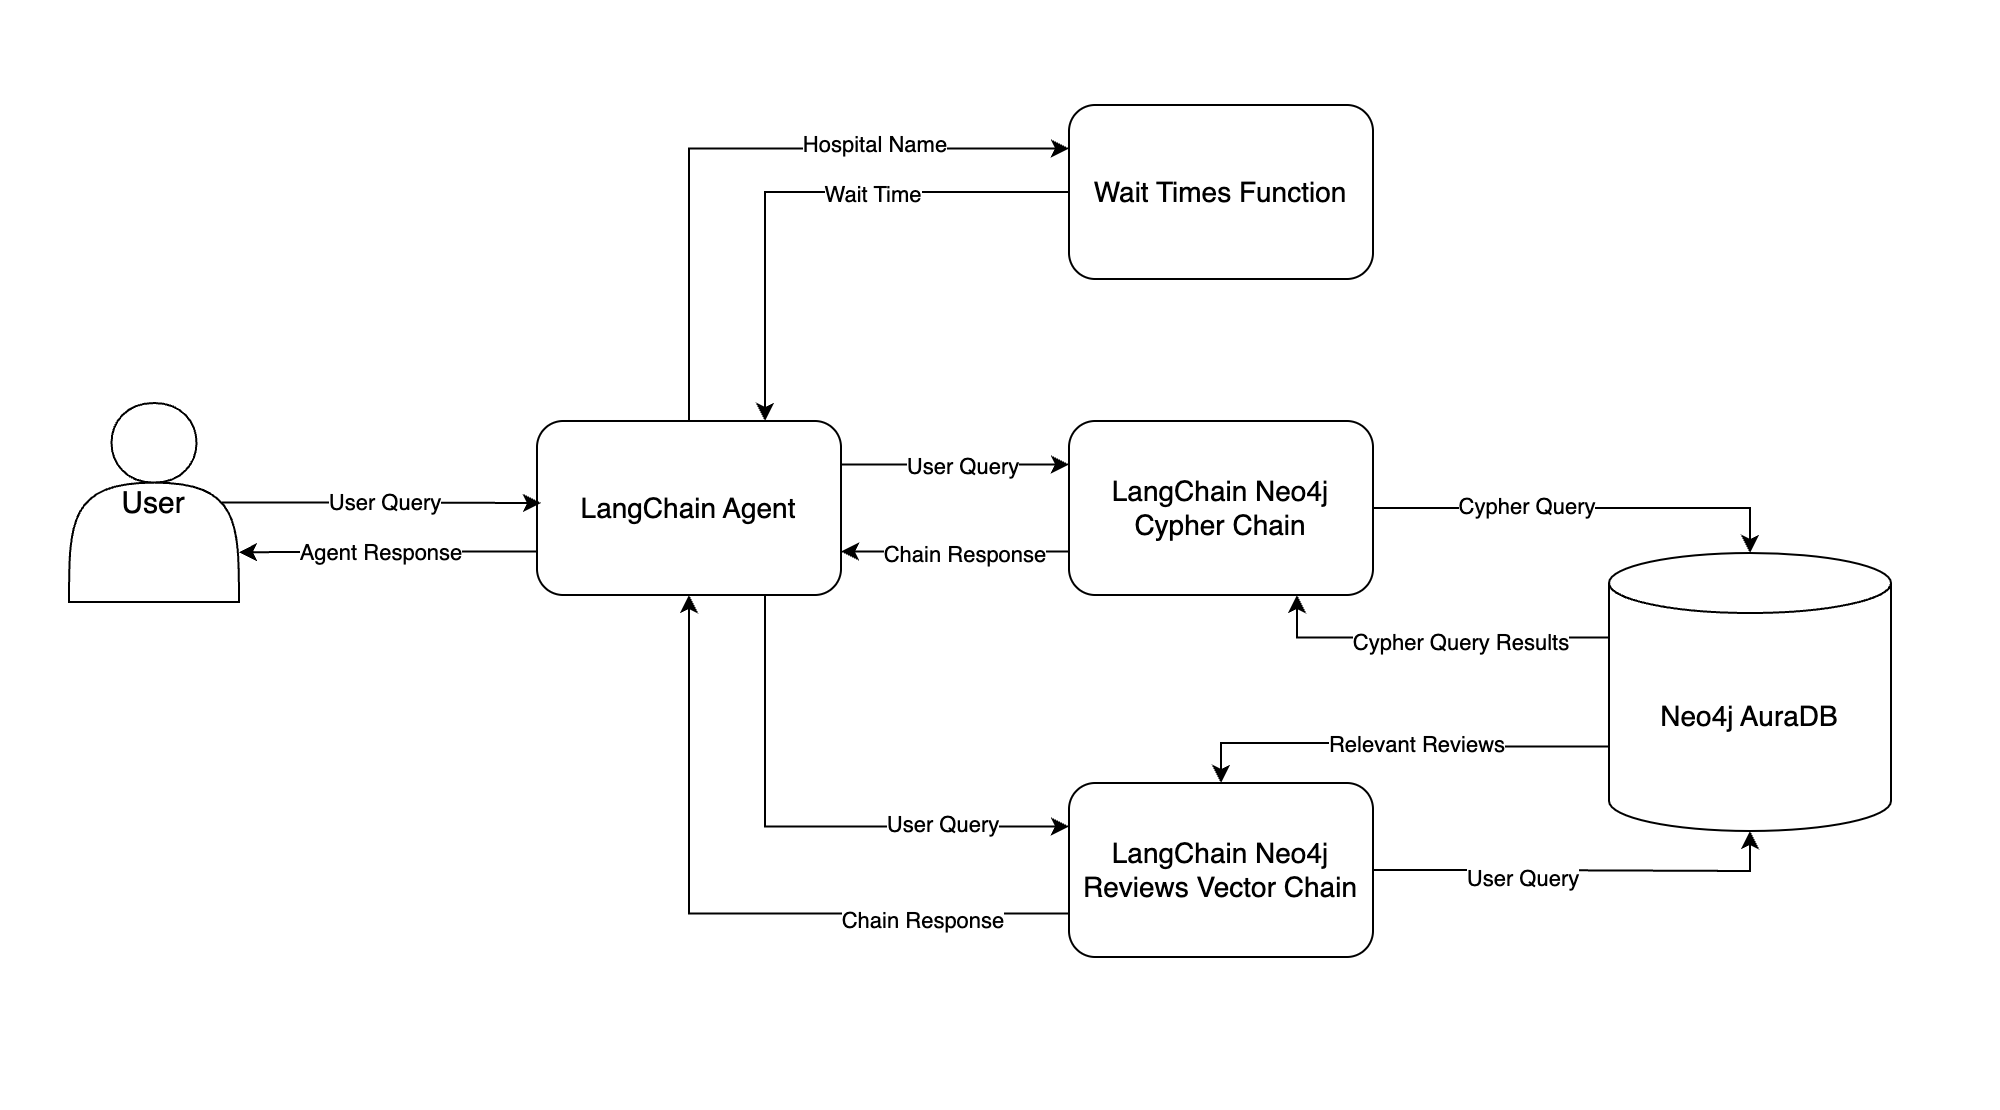
This flowchart illustrates how data moves through your chatbot, starting from the user’s input query all the way to the final response. Here’s a summary of each component:
- LangChain Agent: The LangChain agent is the brain of your chatbot. Given a user query, the agent decides which tool to call and what to give the tool as input. The agent then observes the tool’s output and decides what to return to the user—this is the agent’s response.
- Neo4j AuraDB: You’ll store both structured hospital system data and patient reviews in a Neo4j AuraDB graph database. You’ll learn all about this in the next section.
- LangChain Neo4j Cypher Chain: This chain tries to convert the user query into Cypher, Neo4j’s query language, and execute the Cypher query in Neo4j. The chain then answers the user query using the Cypher query results. The chain’s response is fed back to the LangChain agent and sent to the user.
- LangChain Neo4j Reviews Vector Chain: This is very similar to the chain you built in Step 1, except now patient review embeddings are stored in Neo4j. The chain searches for relevant reviews based on those semantically similar to the user query, and the reviews are used to answer the user query.
- Wait Times Function: Similar to the logic in Step 1, the LangChain agent tries to extract a hospital name from the user query. The hospital name is passed as input to a Python function that gets wait times, and the wait time is returned to the agent.
To walk through an example, suppose a user asks How many emergency visits were there in 2023? The LangChain agent will receive this question and decide which tool, if any, to pass the question to. In this case, the agent should pass the question to the LangChain Neo4j Cypher Chain. The chain will try to convert the question to a Cypher query, run the Cypher query in Neo4j, and use the query results to answer the question.
Once the LangChain Neo4j Cypher Chain answers the question, it will return the answer to the agent, and the agent will relay the answer to the user.
With this design in mind, you can start building your chatbot. Your first task is to set up a Neo4j AuraDB instance for your chatbot to access.
Step 3: Set Up a Neo4j Graph Database
As you saw in step 2, your hospital system data is currently stored in CSV files. Before building your chatbot, you need to store this data in a database that your chatbot can query. You’ll use Neo4j AuraDB for this.
Before learning how to set up a Neo4j AuraDB instance, you’ll get an overview of graph databases, and you’ll see why using a graph database may be a better choice than a relational database for this project.
A Brief Overview of Graph Databases
Graph databases, such as Neo4j, are databases designed to represent and process data stored as a graph. Graph data consists of nodes, edges or relationships, and properties. Nodes represent entities, relationships connect entities, and properties provide additional metadata about nodes and relationships.
For example, here’s how you might represent hospital system nodes and relationships in a graph:

This graph has three nodes - Patient, Visit, and Payer. Patient and Visit are connected by the HAS relationship, indicating that a hospital patient has a visit. Similarly, Visit and Payer are connected by the COVERED_BY relationship, indicating that an insurance payer covers a hospital visit.
Notice how the relationships are represented by an arrow indicating their direction. For example, the direction of the HAS relationship tells you that a patient can have a visit, but a visit cannot have a patient.
Both nodes and relationships can have properties. In this example, Patient nodes have id, name, and date of birth properties, and the COVERED_BY relationship has service date and billing amount properties. Storing data in a graph like this has several advantages:
-
Simplicity: Modeling real-world relationships between entities is natural in graph databases, reducing the need for complex schemas that require multiple join operations to answer queries.
-
Relationships: Graph databases excel at handling complex relationships. Traversing relationships is efficient, making it easy to query and analyze connected data.
-
Flexibility: Graph databases are schema-less, allowing for easy adaptation to changing data structures. This flexibility is beneficial for evolving data models.
-
Performance: Retrieving connected data is faster in graph databases than in relational databases, especially for scenarios involving complex queries with multiple relationships.
-
Pattern Matching: Graph databases support powerful pattern-matching queries, making it easier to express and find specific structures within the data.
When you have data with many complex relationships, the simplicity and flexibility of graph databases makes them easier to design and query compared to relational databases. As you’ll see later, specifying relationships in graph database queries is concise and doesn’t involve complicated joins. If you’re interested, Neo4j illustrates this well with a realistic example database in their documentation.
Because of this concise data representation, there’s less room for error when an LLM generates graph database queries. This is because you only need to tell the LLM about the nodes, relationships, and properties in your graph database. Contrast this with relational databases where the LLM must navigate and retain knowledge of the table schemas and foreign key relationships throughout your database, leaving more room for error in SQL generation.
Next, you’ll begin working with graph databases by setting up a Neo4j AuraDB instance. After that, you’ll move the hospital system into your Neo4j instance and learn how to query it.
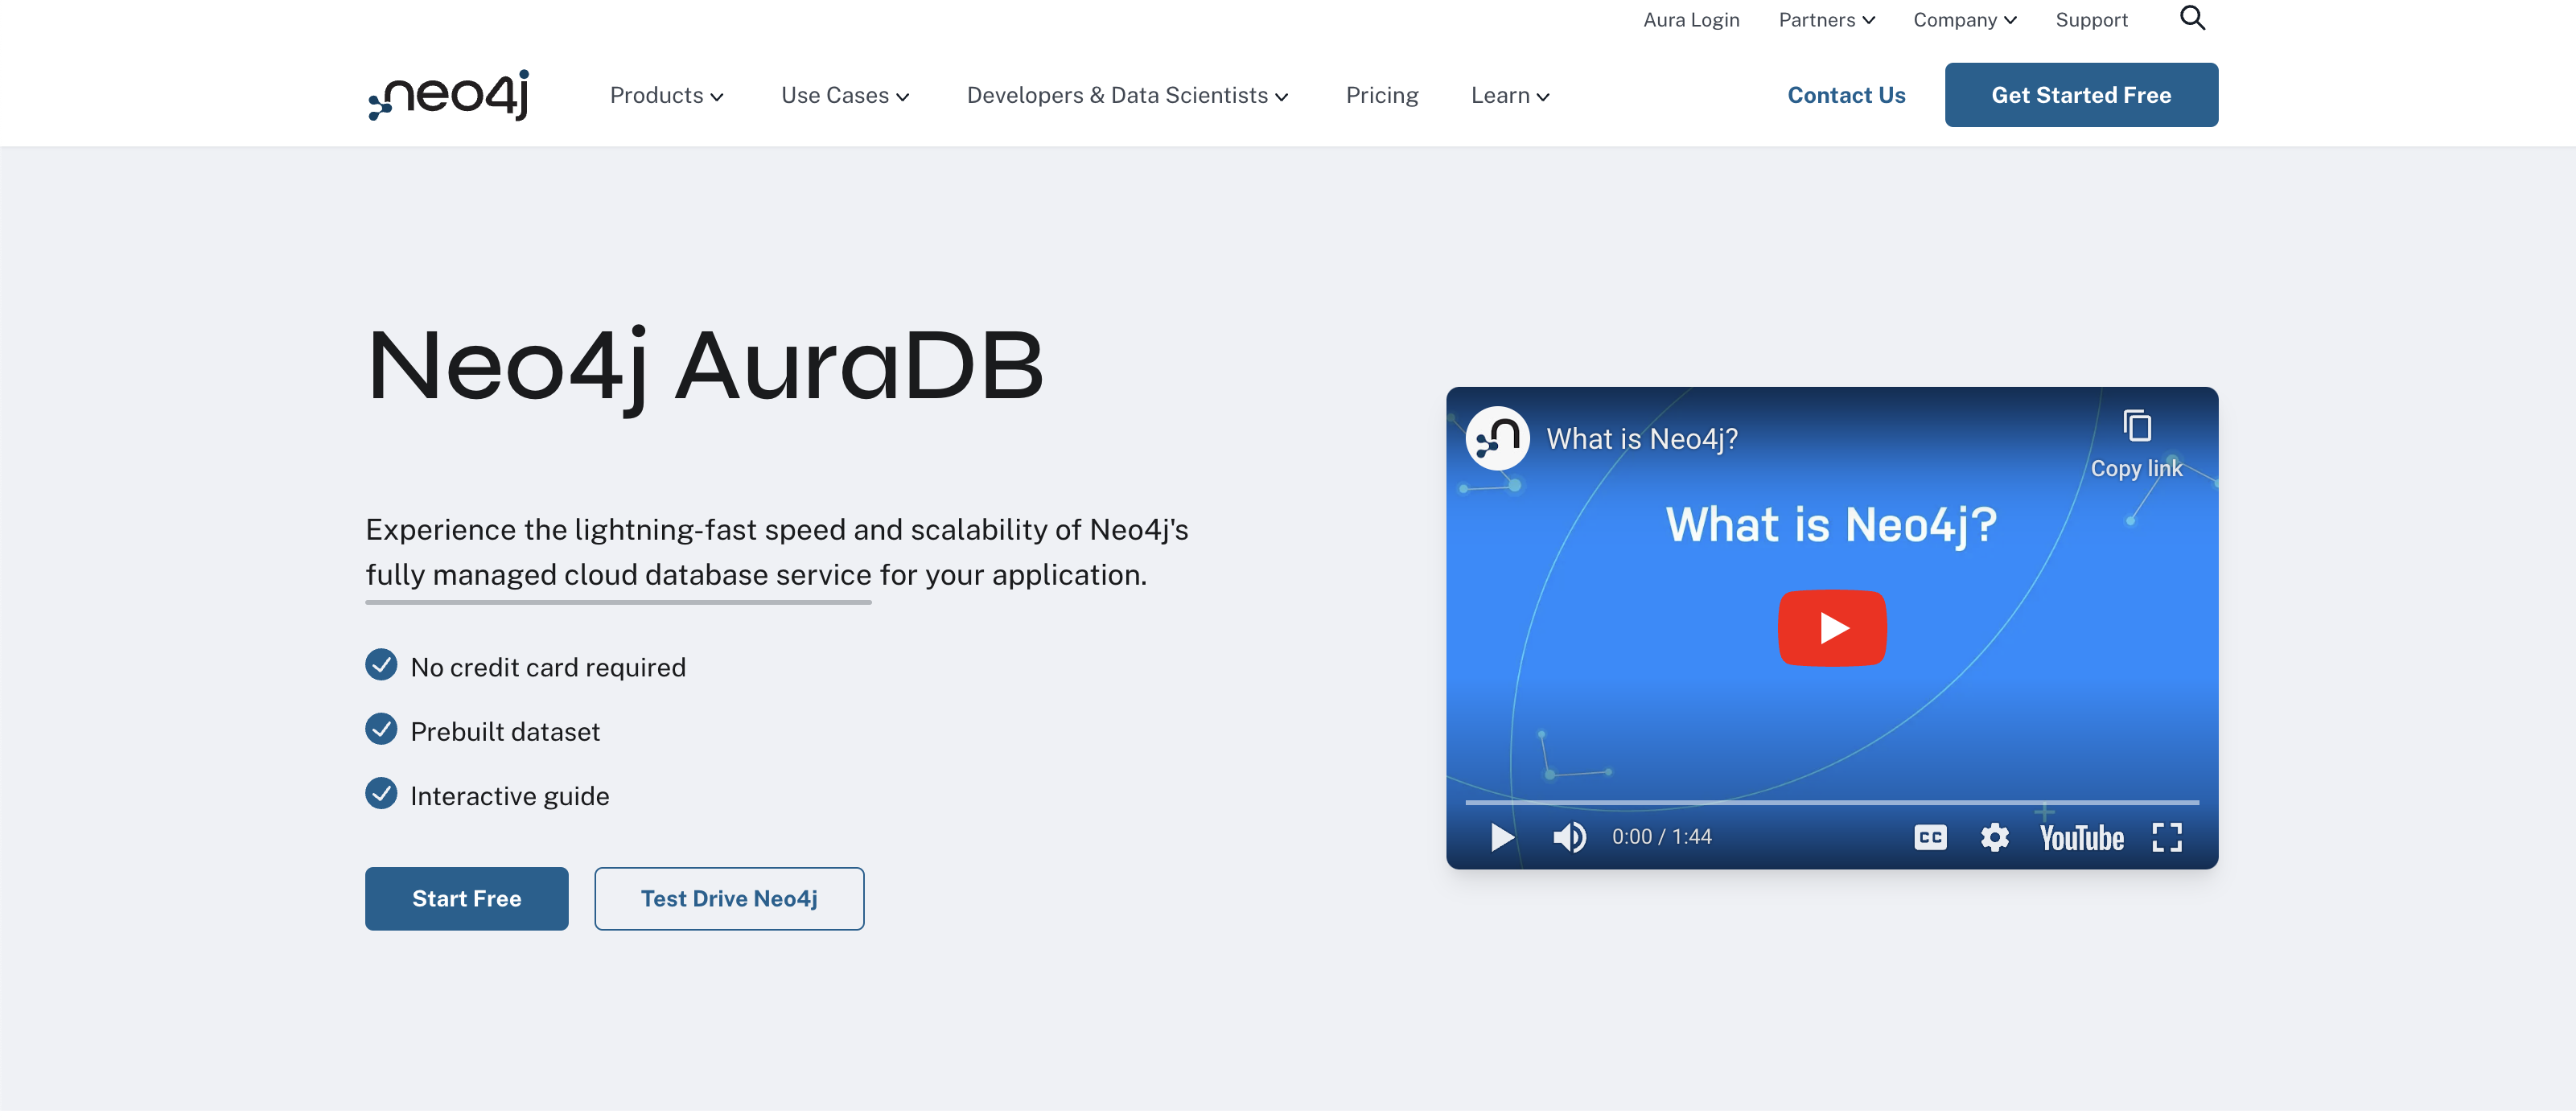
Create a Neo4j Account and AuraDB Instance
To get started using Neo4j, you can create a free Neo4j AuraDB account. The landing page should look something like this:
Click the Start Free button and create an account. Once you’re signed in, you should see the Neo4j Aura console:
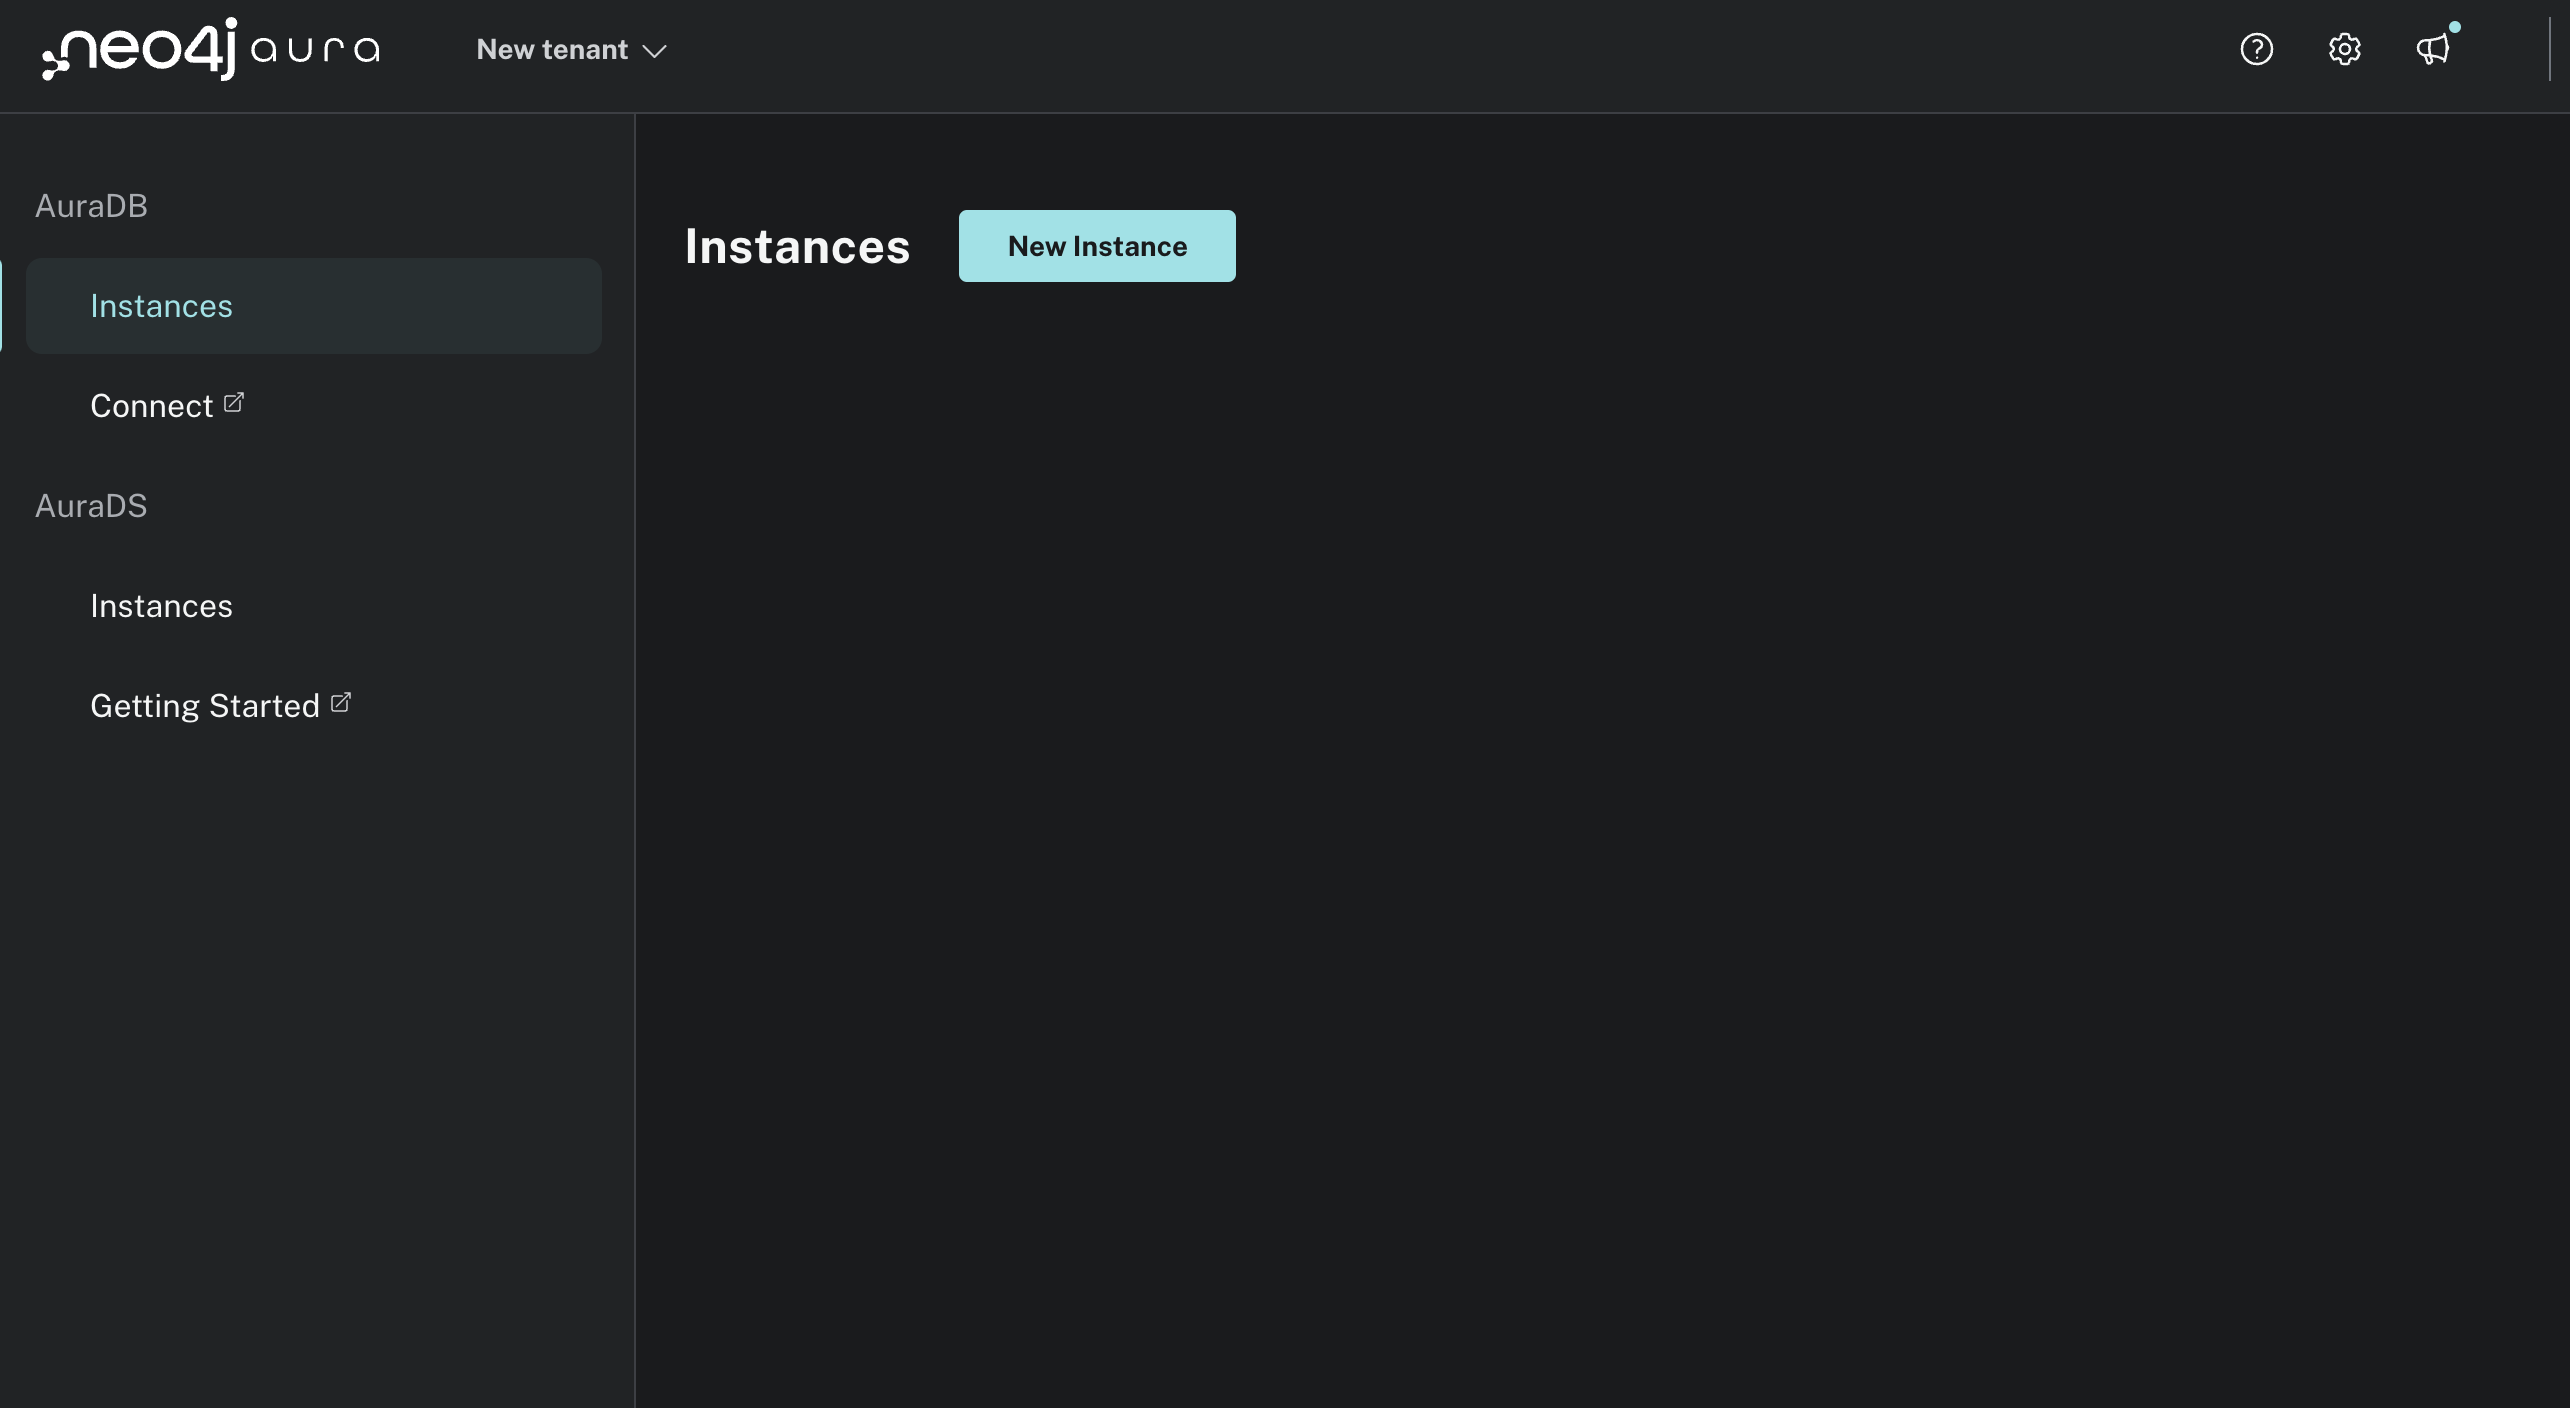
Click New Instance and create a free instance. A modal should pop up similar to this:
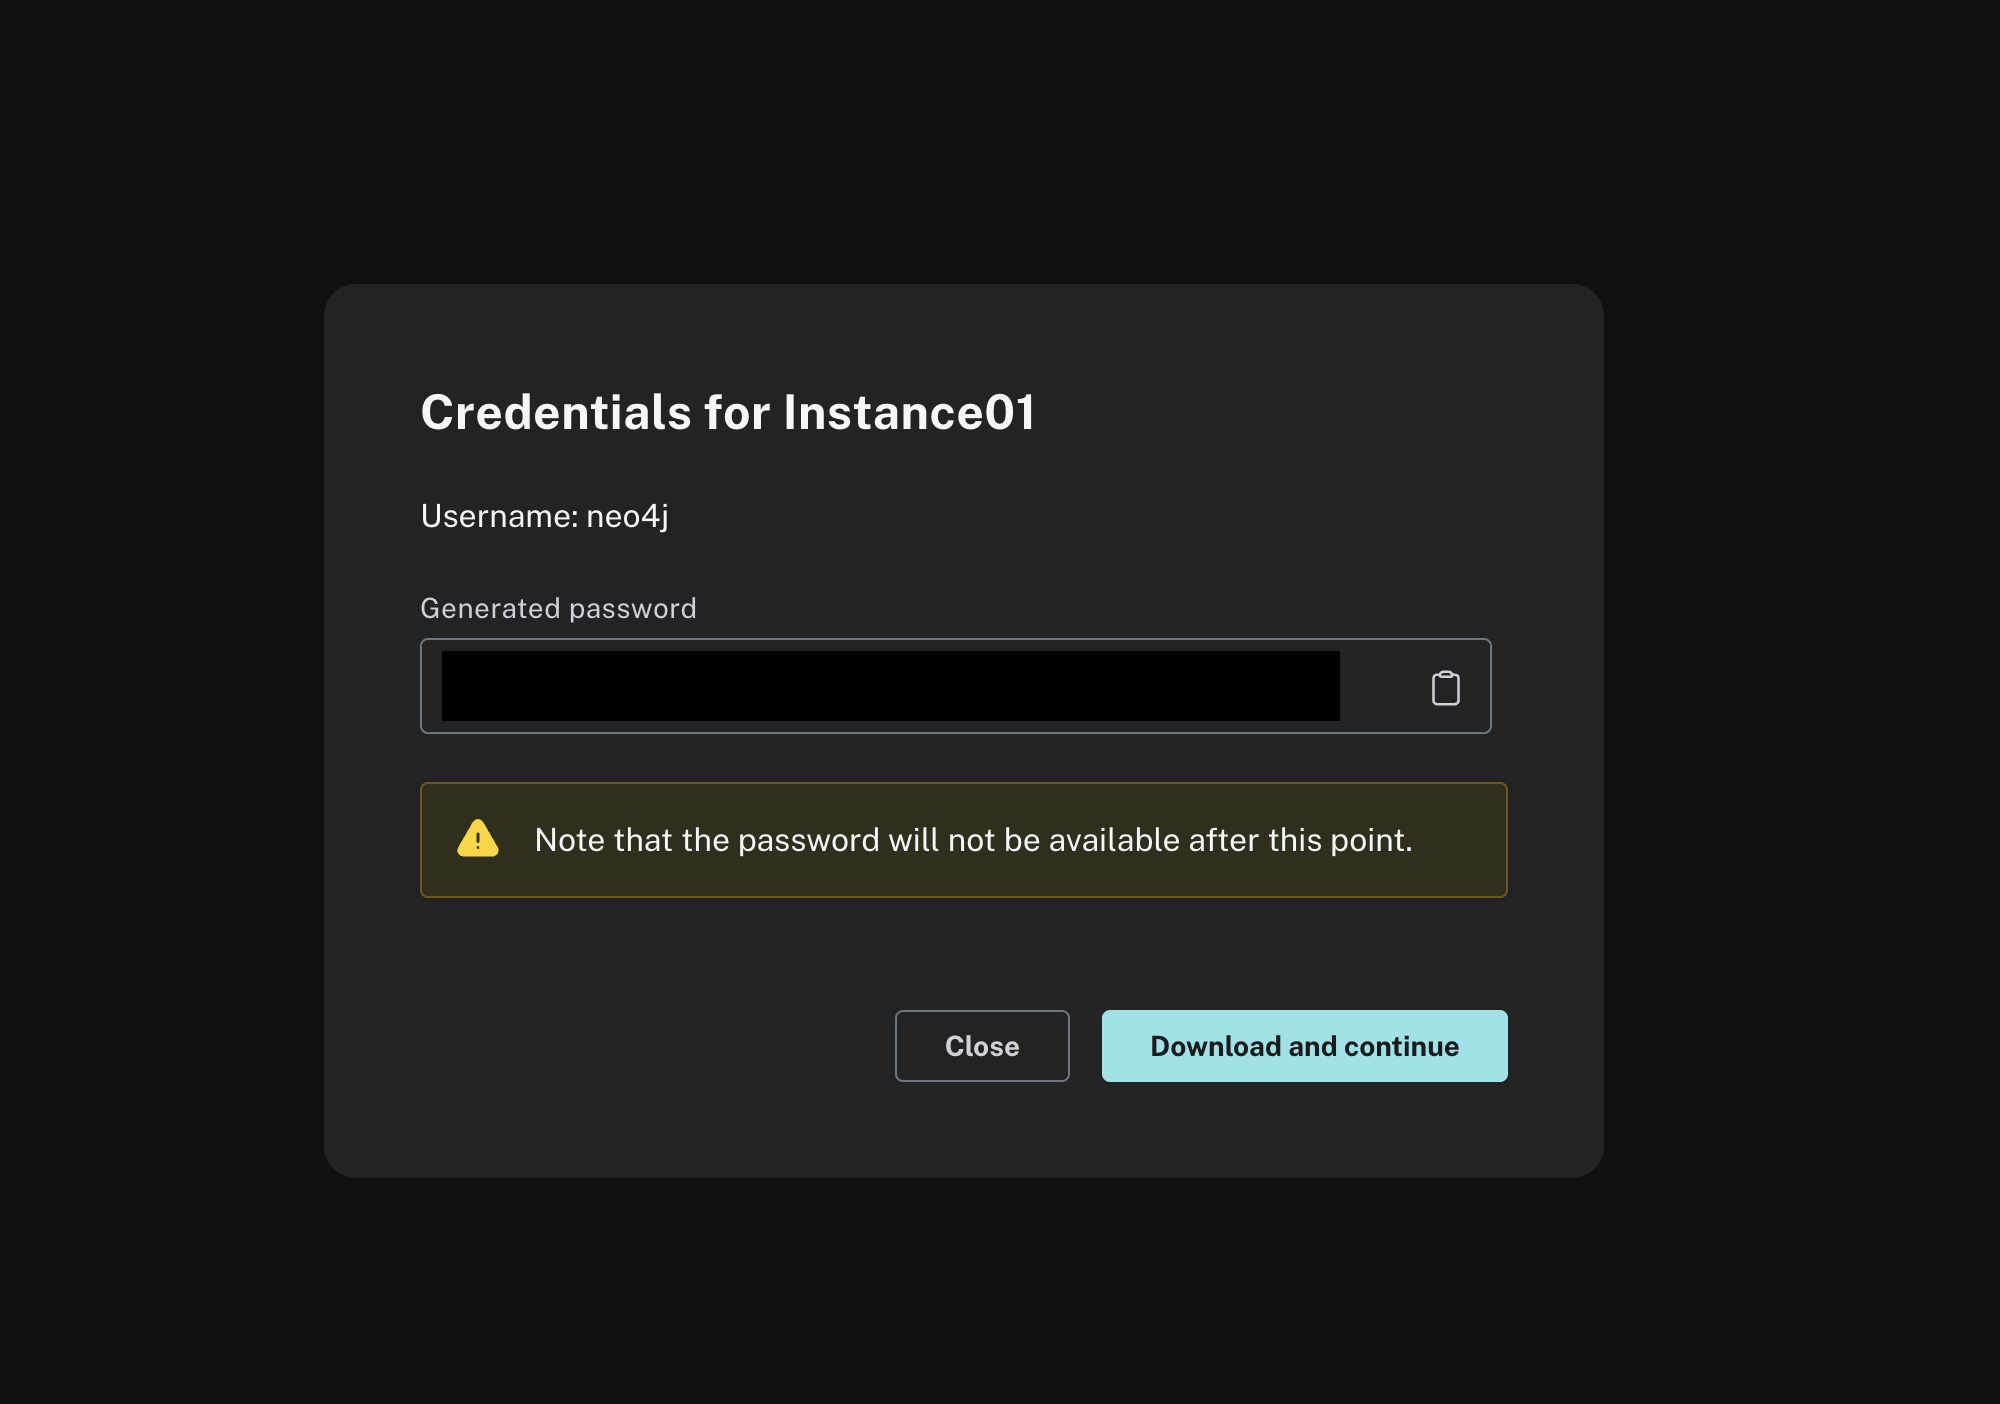
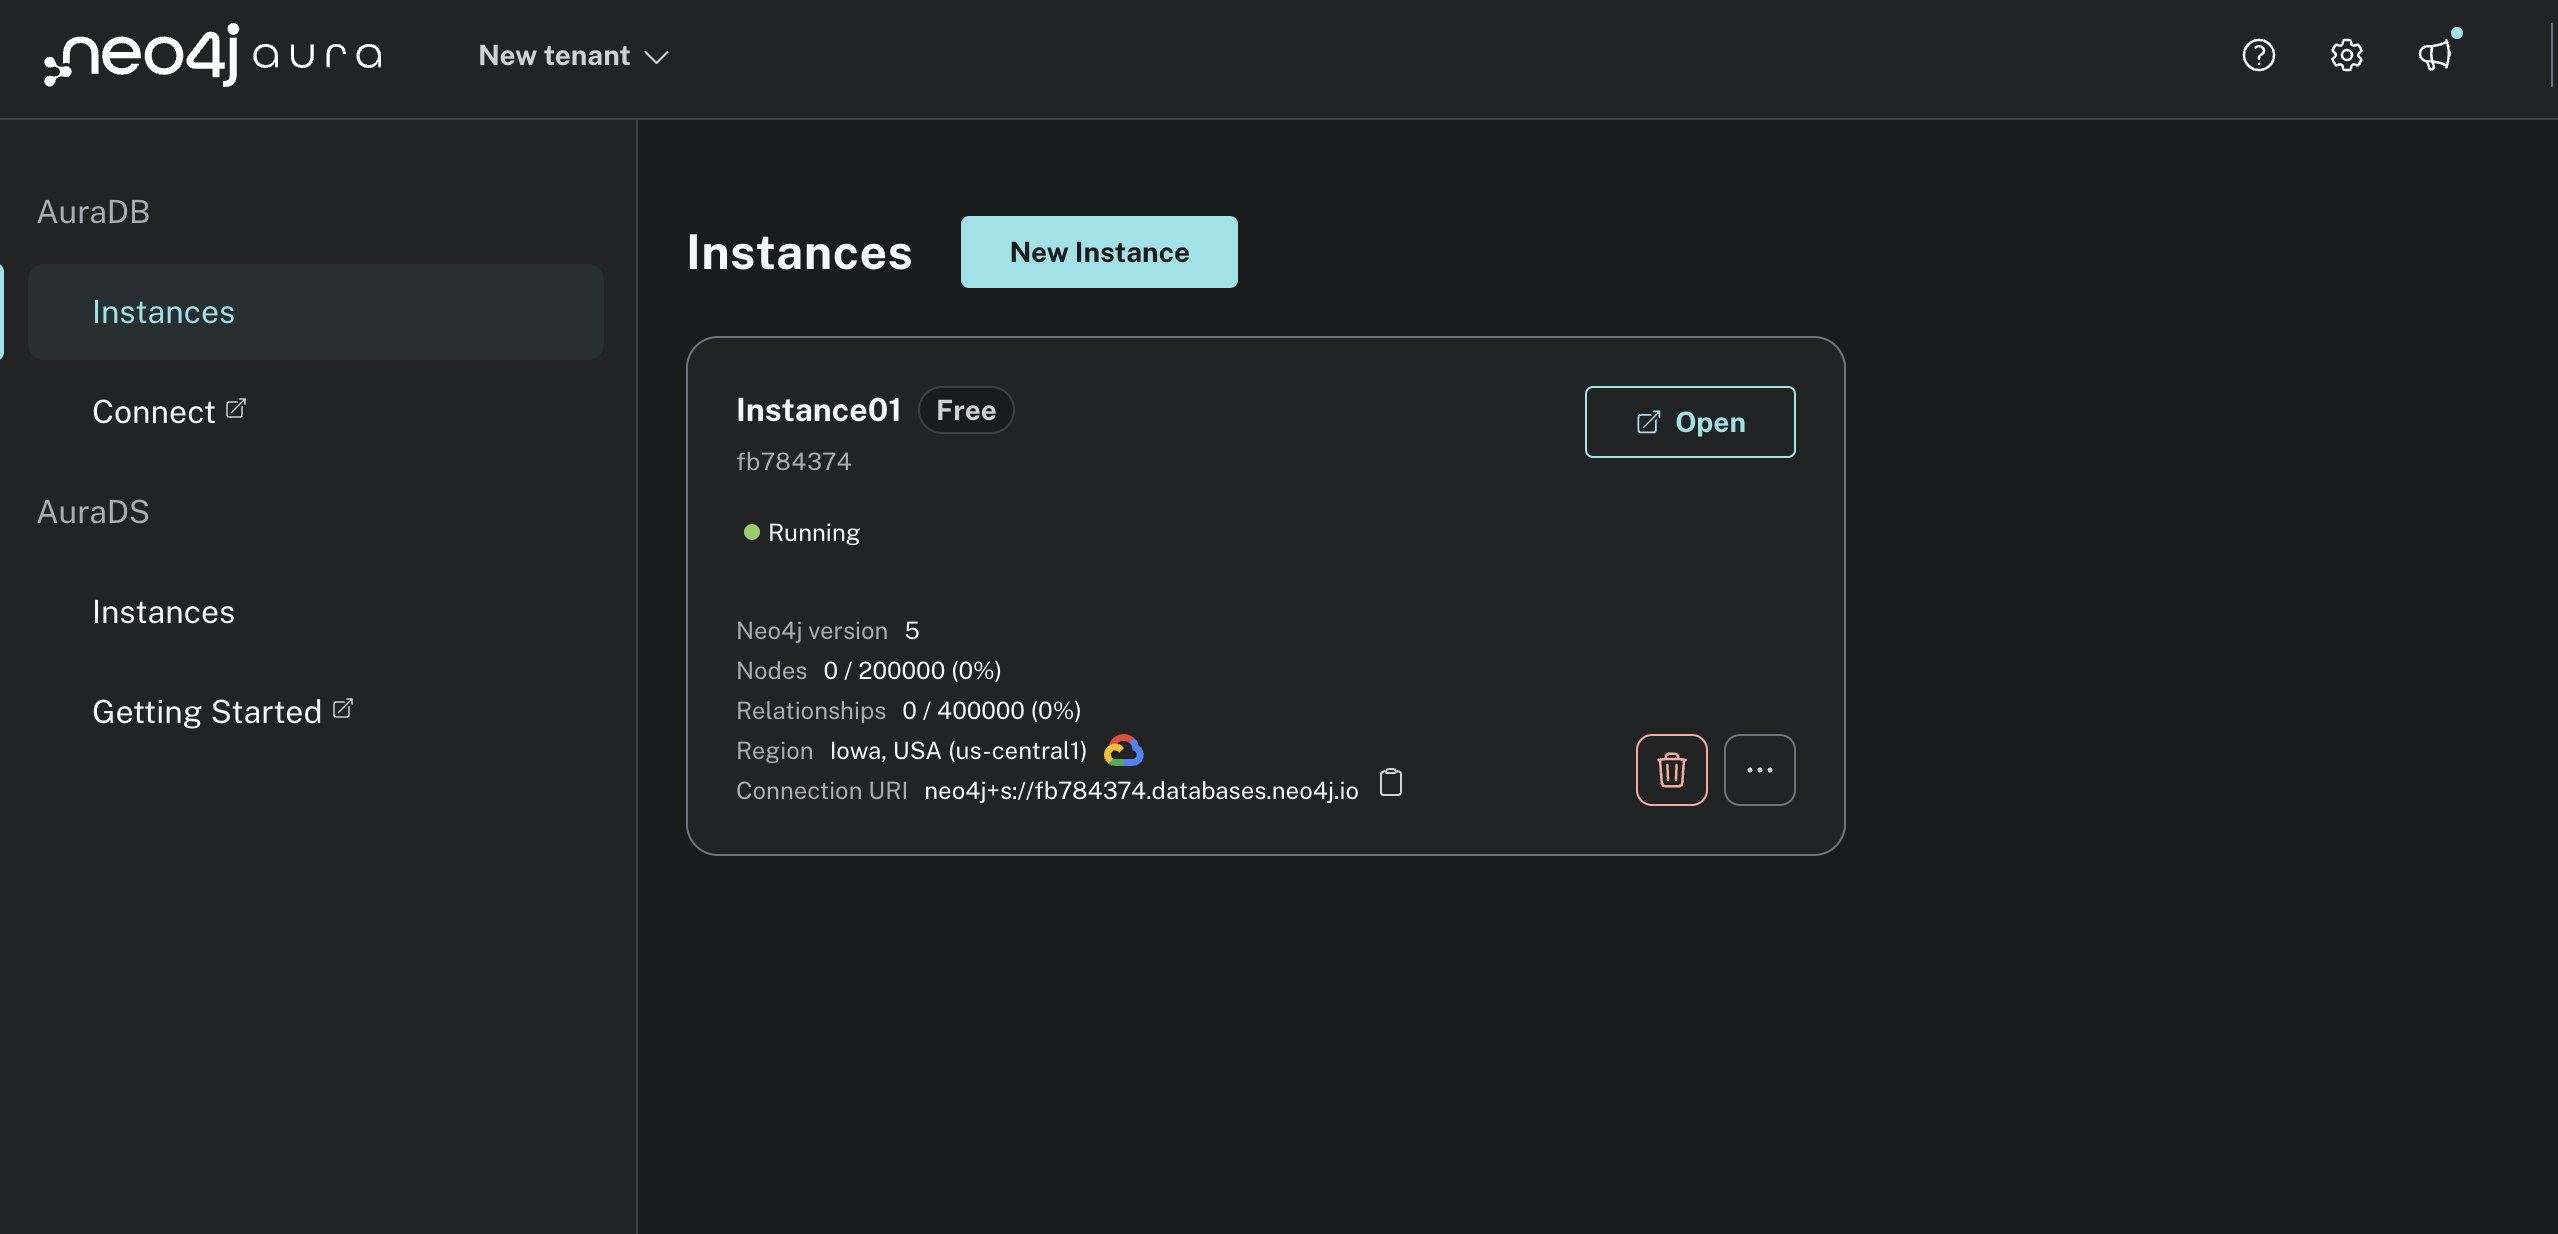
After you click Download and Continue, your instance should be created and a text file containing the Neo4j database credentials should download. Once the instance is created, you’ll see its status is Running. There should be no nodes or relationships yet:
Next, open the text file you downloaded with your Neo4j credentials and copy the NEO4J_URI, NEO4J_USERNAME, and NEO4J_PASSWORD into your .env file:
OPENAI_API_KEY=<YOUR_OPENAI_API_KEY>

NEO4J_URI=<YOUR_NEO4J_URI>
NEO4J_USERNAME=<YOUR_NEO4J_URI>
NEO4J_PASSWORD=<YOUR_NEO4J_PASSWORD>
You’ll use these environment variables to connect to your Neo4j instance in Python so that your chatbot can execute queries.
Note: By default, your NEO4J_URI should be similar to neo4j+s://
You now have everything in place to interact with your Neo4j instance. Next up, you’ll design the hospital system graph database. This will tell you how the hospital entities are related, and it will inform the kinds of queries you can run.
Design the Hospital System Graph Database
Now that you have a running Neo4j AuraDB instance, you need to decide which nodes, relationships, and properties you want to store. One of the most popular ways to represent this is with a flowchart. Based on your understanding of the hospital system data, you come up with the following design:
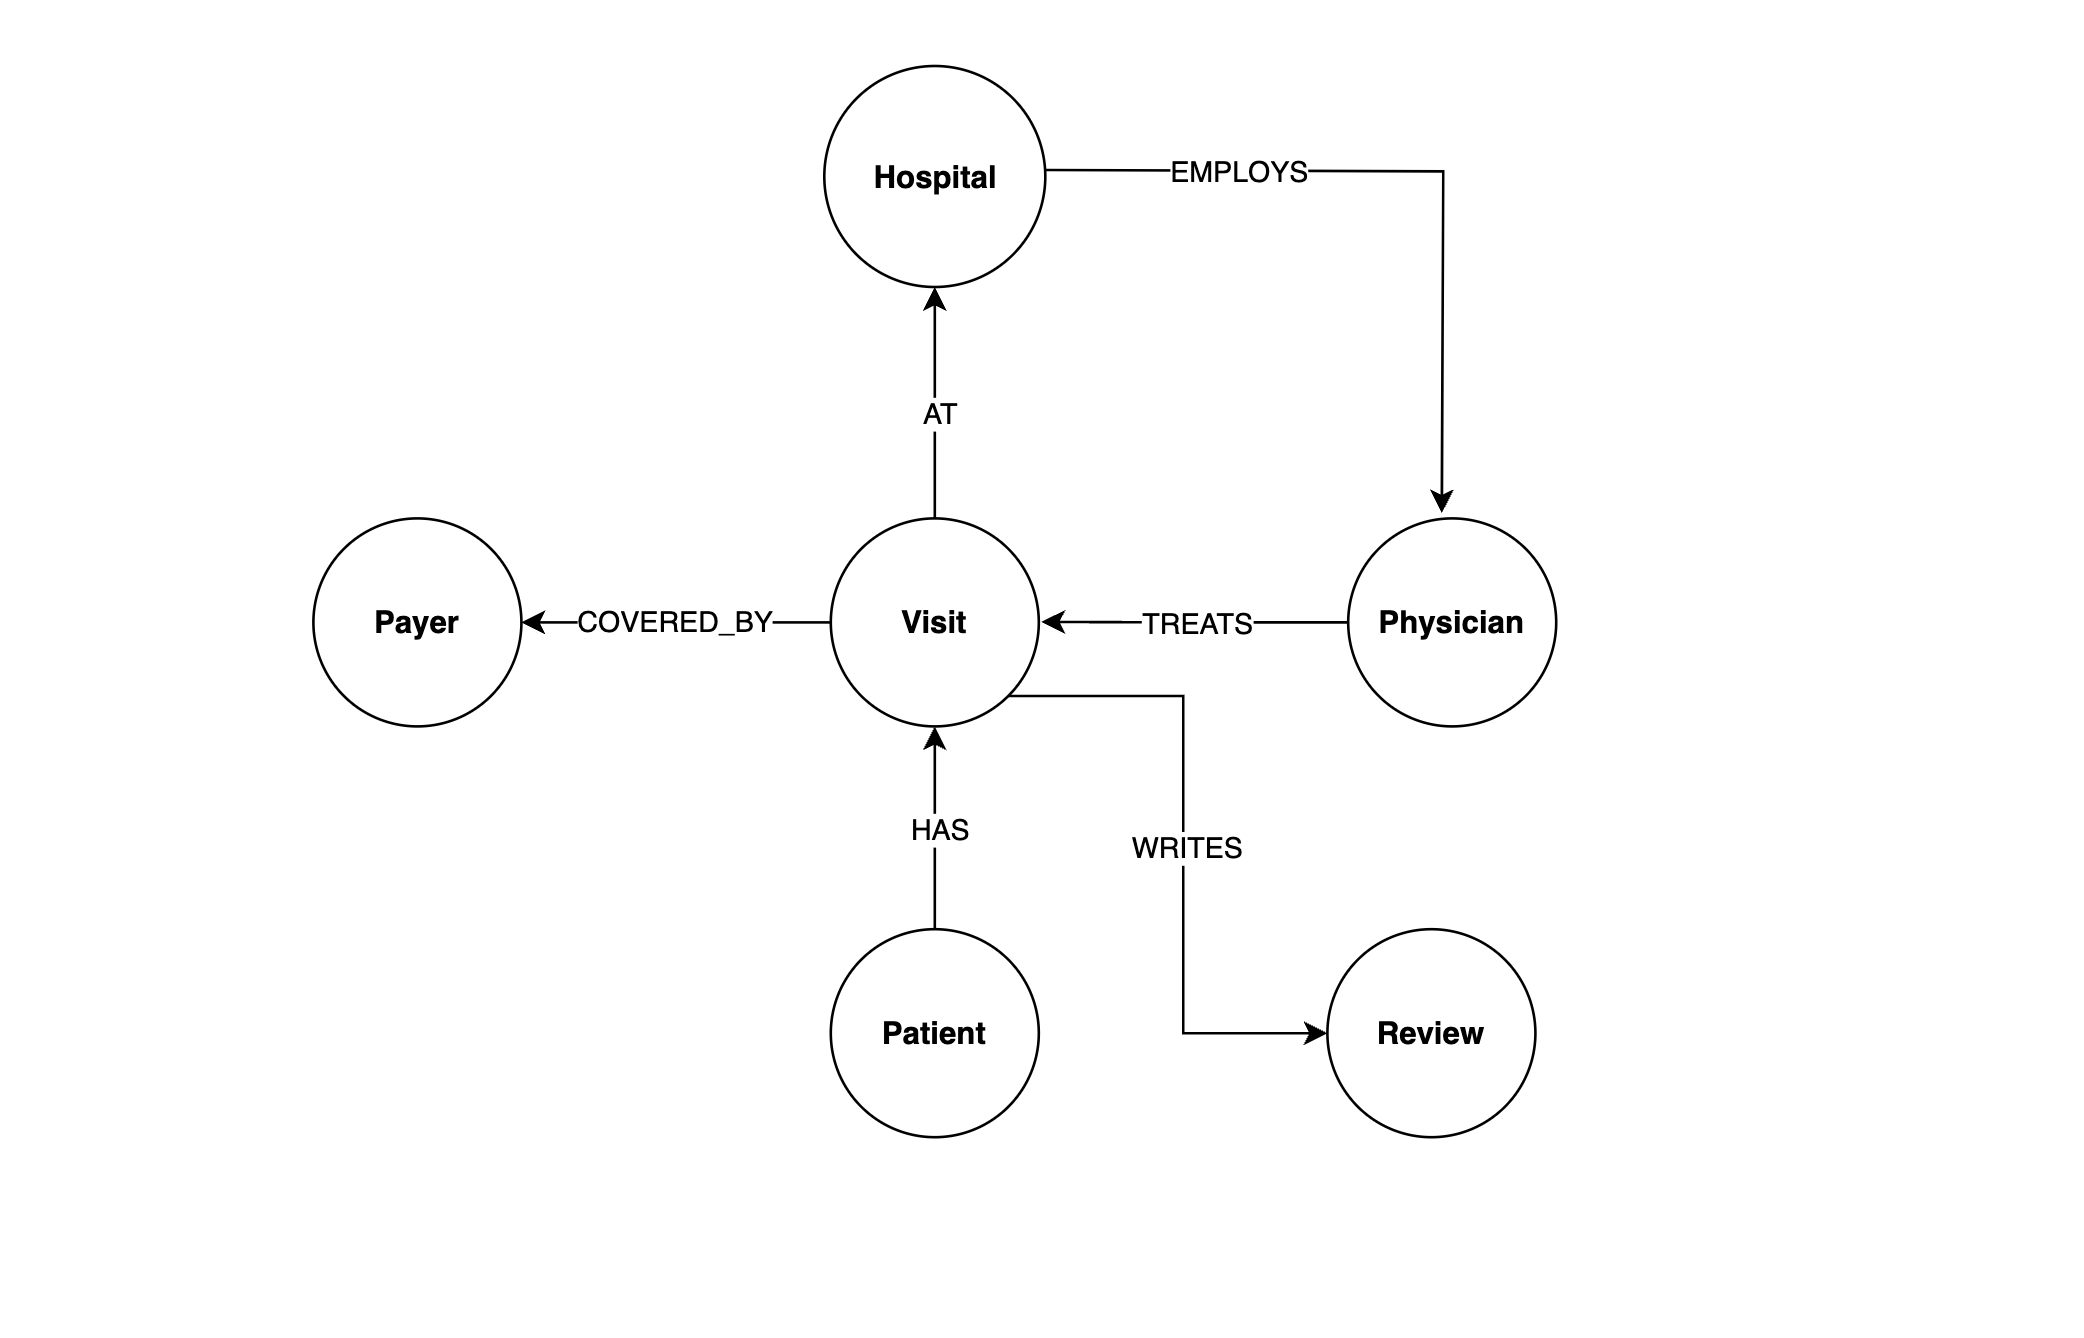
This diagram shows you all of the nodes and relationships in the hospital system data. One useful way to think about this flowchart is to start with the Patient node and follow the relationships. A Patient has a visit at a hospital, and the hospital employs a physician to treat the visit which is covered by an insurance payer.
Here are the properties stored in each node:
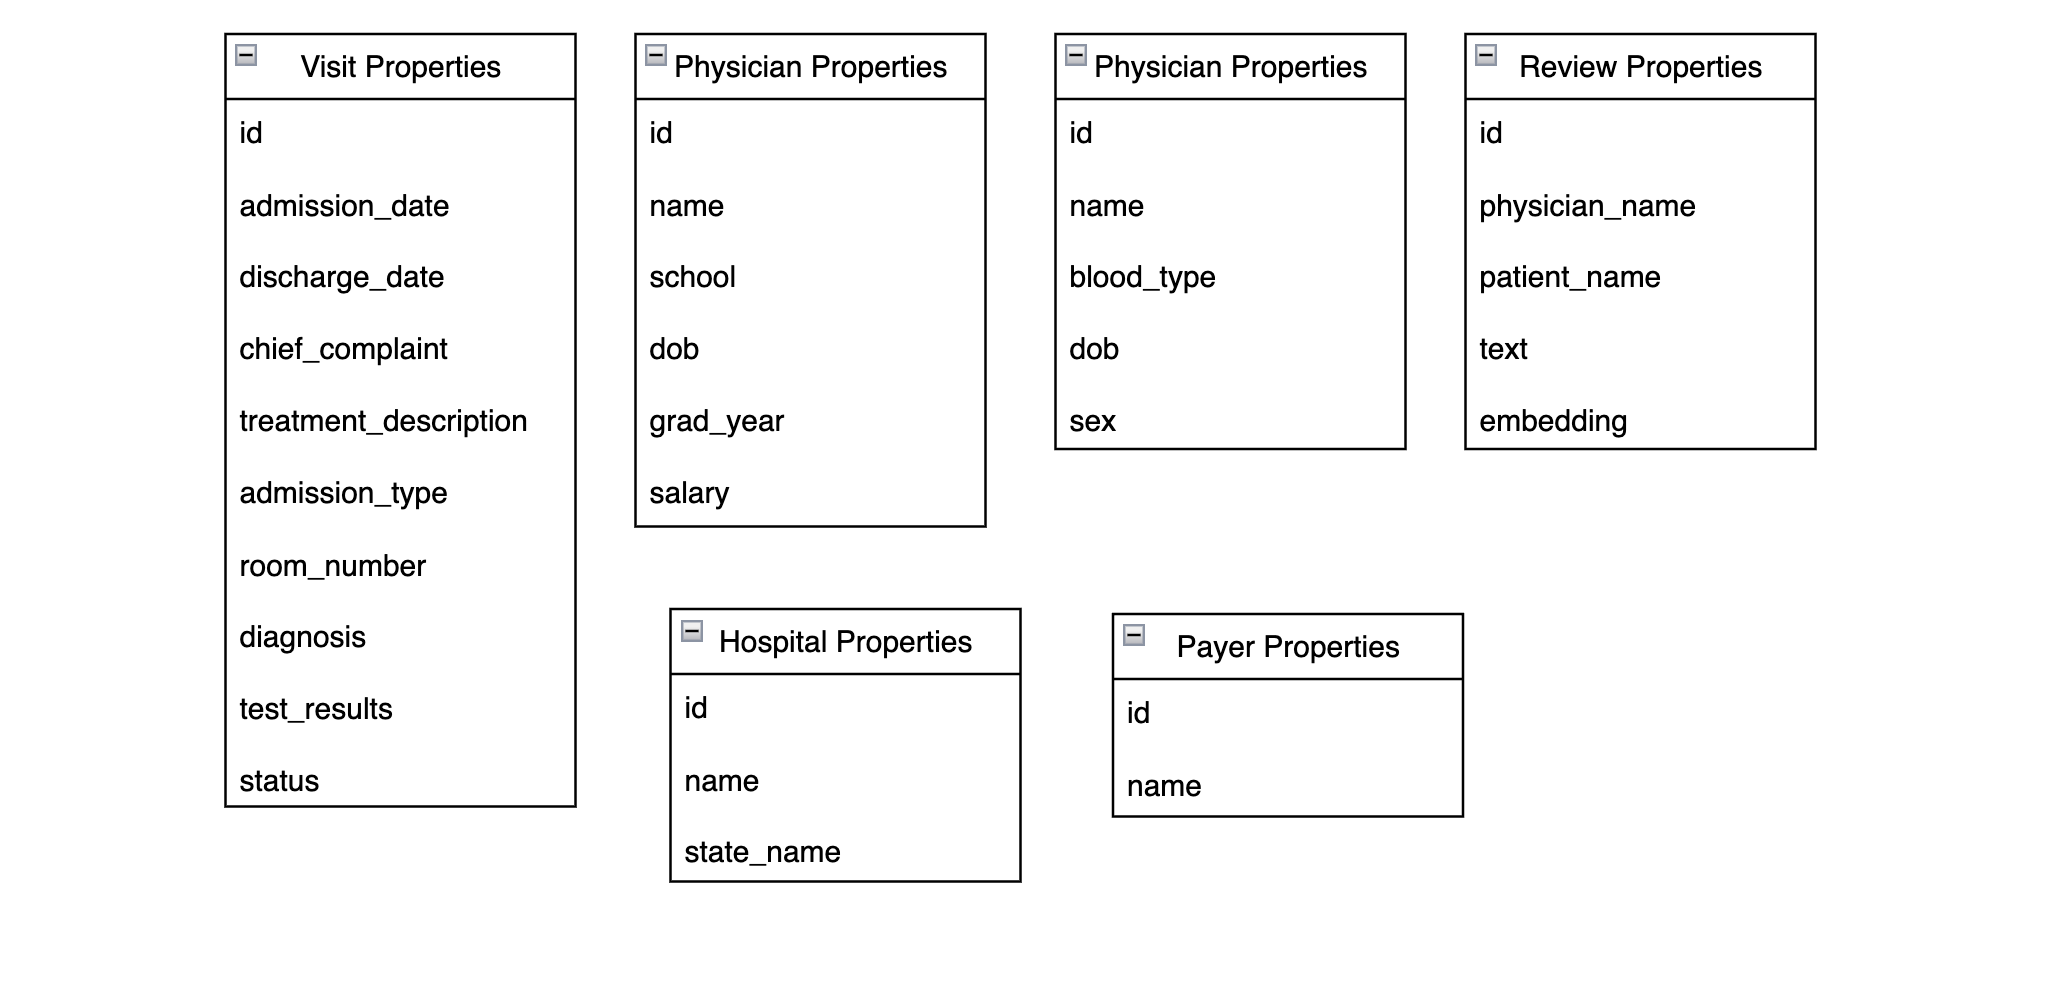
The majority of these properties come directly from the fields you explored in step 2. One notable difference is that Review nodes have an embedding property, which is a vector representation of the patient_name, physician_name, and text properties. This allows you to do vector searches over review nodes like you did with ChromaDB.
Here are the relationship properties:
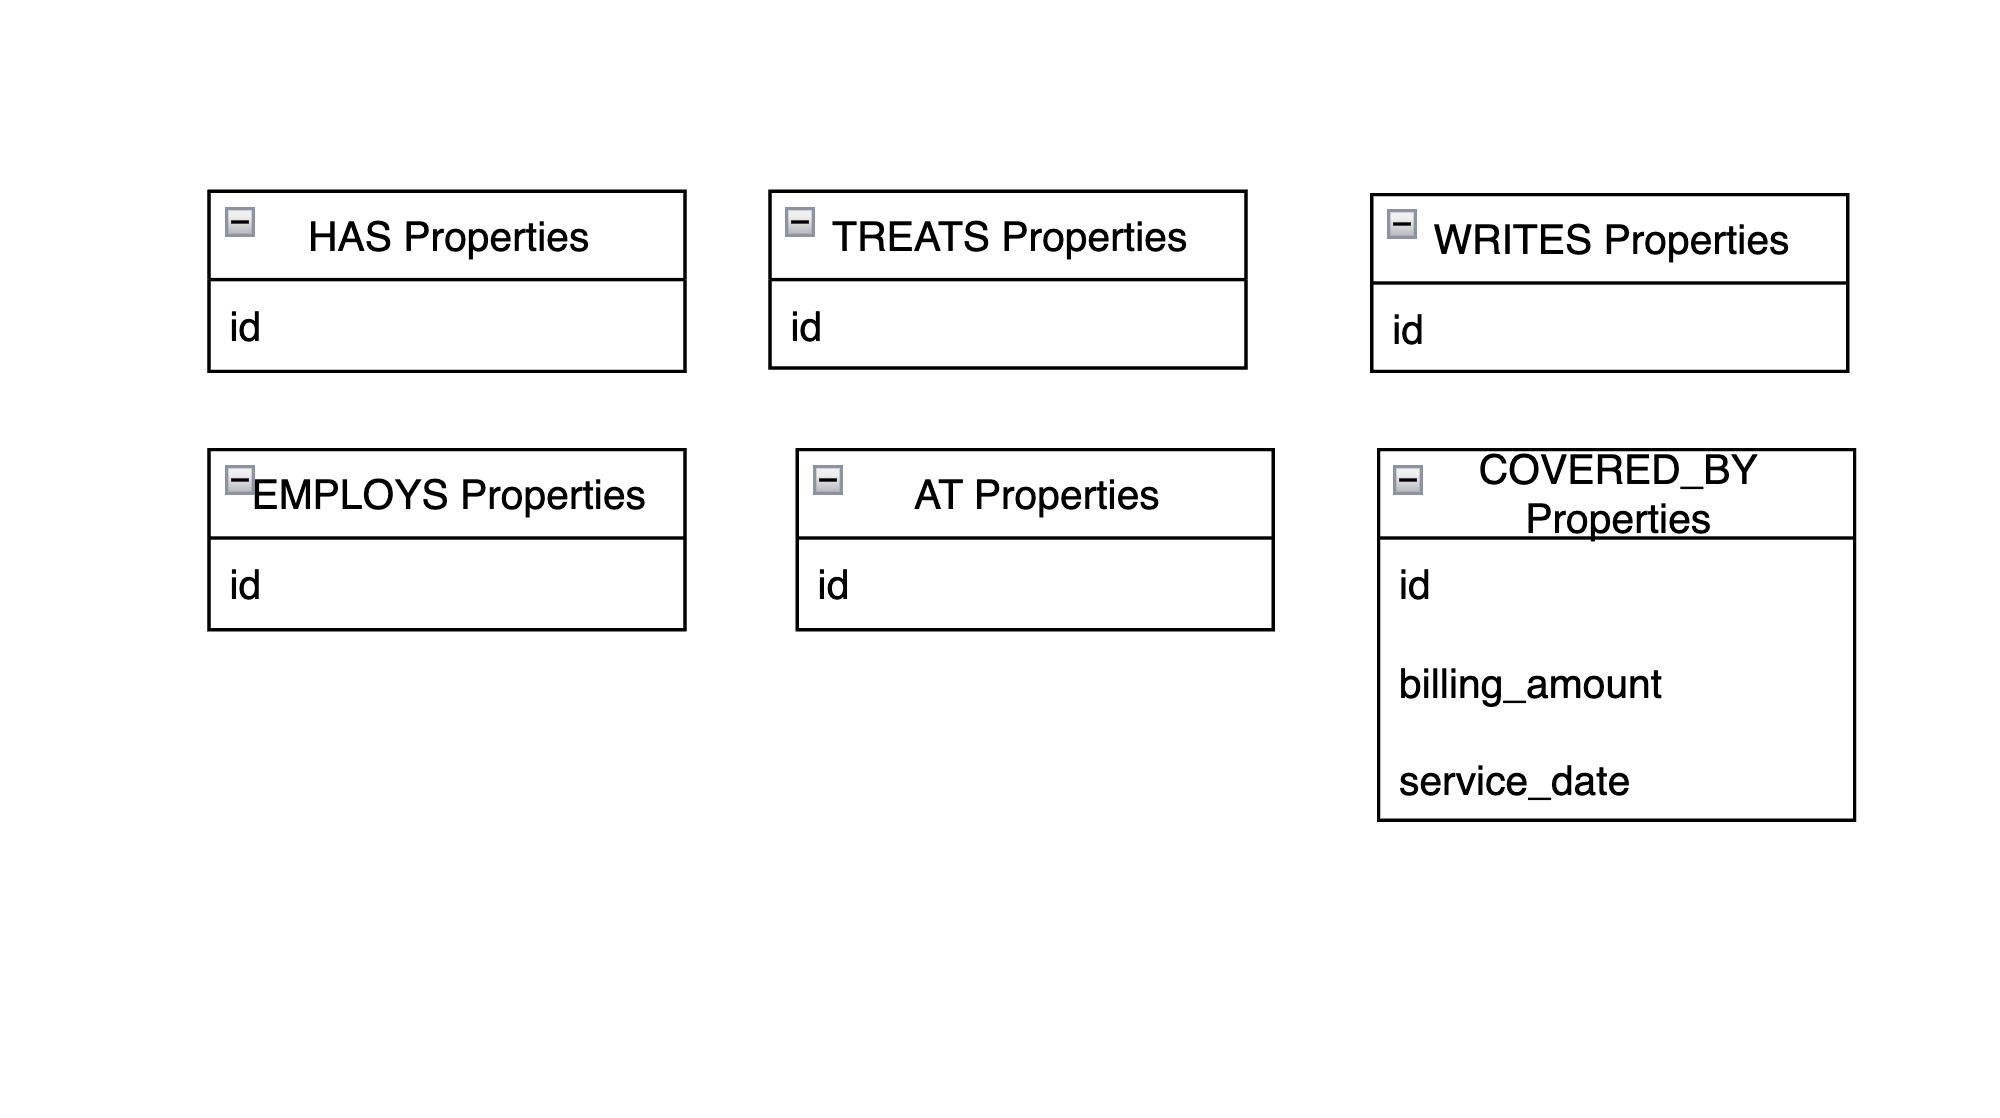
As you can see, COVERED_BY is the only relationship with more than an id property. The service_date is the date the patient was discharged from a visit, and billing_amount is the amount charged to the payer for the visit.
Note: This fake hospital system data has a relatively small number of nodes and relationships than what you’d typically see in an enterprise setting. However, you can easily imagine how many more nodes and relationships you could add for a real hospital system. For instance, nurses, pharmacists, pharmacies, prescription drugs, surgeries, patient relatives, and many more hospital entities could be represented as nodes.
You could also redesign this so that diagnoses and symptoms are represented as nodes instead of properties, or you could add more relationship properties. You could do all of this without changing the design you already have. This is the beauty of graphs—you simply add more nodes and relationships as your data evolves.
Now that you have an overview of the hospital system design you’ll use, it’s time to move your data into Neo4j!
Upload Data to Neo4j
With a running Neo4j instance and an understanding of the nodes, properties, and relationships you want to store, you can move the hospital system data into Neo4j. For this, you’ll create a folder called hospital_neo4j_etl with a few empty files. You’ll also want to create a docker-compose.yml file in your project’s root directory:
./
│
├── hospital_neo4j_etl/
│   │
│   ├── src/
│   │   ├── entrypoint.sh
│   │   └── hospital_bulk_csv_write.py
│   │
│   ├── Dockerfile
│   └── pyproject.toml
│
├── .env
└── docker-compose.yml
Your .env file should have the following environment variables:
OPENAI_API_KEY=<YOUR_OPENAI_API_KEY>

NEO4J_URI=<YOUR_NEO4J_URI>
NEO4J_USERNAME=<YOUR_NEO4J_URI>
NEO4J_PASSWORD=<YOUR_NEO4J_PASSWORD>

HOSPITALS_CSV_PATH=https://raw.githubusercontent.com/hfhoffman1144/langchain_neo4j_rag_app/main/data/hospitals.csv
PAYERS_CSV_PATH=https://raw.githubusercontent.com/hfhoffman1144/langchain_neo4j_rag_app/main/data/payers.csv
PHYSICIANS_CSV_PATH=https://raw.githubusercontent.com/hfhoffman1144/langchain_neo4j_rag_app/main/data/physicians.csv
PATIENTS_CSV_PATH=https://raw.githubusercontent.com/hfhoffman1144/langchain_neo4j_rag_app/main/data/patients.csv
VISITS_CSV_PATH=https://raw.githubusercontent.com/hfhoffman1144/langchain_neo4j_rag_app/main/data/visits.csv
REVIEWS_CSV_PATH=https://raw.githubusercontent.com/hfhoffman1144/langchain_neo4j_rag_app/main/data/reviews.csv
Notice that you’ve stored all of the CSV files in a public location on GitHub. Because your Neo4j AuraDB instance is running in the cloud, it can’t access files on your local machine, and you have to use HTTP or upload the files directly to your instance. For this example, you can either use the link above, or upload the data to another location.
Note: If you’re uploading proprietary data to Neo4j, always ensure that it’s stored in a secure location and transferred appropriately. The data used for this project is all synthetic and not proprietary, so there’s no problem with uploading it over a public HTTP connection. However, this would not be a good idea in practice. You can read more about secure ways to import data into Neo4j in their documentation.
Once you have your .env file populated, open pyproject.toml, which provides configuration, metadata, and dependencies defined in the TOML format:
hospital_neo4j_etl/pyproject.toml
[project]
name = "hospital_neo4j_etl"
version = "0.1"
dependencies = [
   "neo4j==5.14.1",
   "retry==0.9.2"
]

[project.optional-dependencies]
dev = ["black", "flake8"]
This project is a bare bones extract, transform, load (ETL) process that moves data into Neo4j, so it’s only dependencies are neo4j and retry. The main script for the ETL is hospital_neo4j_etl/src/hospital_bulk_csv_write.py. It’s too long to include the full script here, but you’ll get a feel for the main steps hospital_neo4j_etl/src/hospital_bulk_csv_write.py executes. You can copy the full script from the materials:
Get Your Code: Click here to download the free source code for your LangChain chatbot.
First, you import dependencies, load environment variables, and configure logging:
hospital_neo4j_etl/src/hospital_bulk_csv_write.py
import os
import logging
from retry import retry
from neo4j import GraphDatabase

HOSPITALS_CSV_PATH = os.getenv("HOSPITALS_CSV_PATH")
PAYERS_CSV_PATH = os.getenv("PAYERS_CSV_PATH")
PHYSICIANS_CSV_PATH = os.getenv("PHYSICIANS_CSV_PATH")
PATIENTS_CSV_PATH = os.getenv("PATIENTS_CSV_PATH")
VISITS_CSV_PATH = os.getenv("VISITS_CSV_PATH")
REVIEWS_CSV_PATH = os.getenv("REVIEWS_CSV_PATH")

NEO4J_URI = os.getenv("NEO4J_URI")
NEO4J_USERNAME = os.getenv("NEO4J_USERNAME")
NEO4J_PASSWORD = os.getenv("NEO4J_PASSWORD")

logging.basicConfig(
    level=logging.INFO,
    format="%(asctime)s [%(levelname)s]: %(message)s",
    datefmt="%Y-%m-%d %H:%M:%S",
)

LOGGER = logging.getLogger(__name__)

# ...
You import the GraphDatabase class from neo4j to connect to your running instance. Notice here that you’re no longer using Python-dotenv to load environment variables. Instead, you’ll pass environment variables into the Docker container that runs your script. Next, you’ll define functions to move hospital data into Neo4j following your design:
hospital_neo4j_etl/src/hospital_bulk_csv_write.py
# ...

NODES = ["Hospital", "Payer", "Physician", "Patient", "Visit", "Review"]

def _set_uniqueness_constraints(tx, node):
    query = f"""CREATE CONSTRAINT IF NOT EXISTS FOR (n:{node})
        REQUIRE n.id IS UNIQUE;"""
    _ = tx.run(query, {})


@retry(tries=100, delay=10)
def load_hospital_graph_from_csv() -> None:
    """Load structured hospital CSV data following
    a specific ontology into Neo4j"""

    driver = GraphDatabase.driver(
        NEO4J_URI, auth=(NEO4J_USERNAME, NEO4J_PASSWORD)
    )

    LOGGER.info("Setting uniqueness constraints on nodes")
    with driver.session(database="neo4j") as session:
        for node in NODES:
            session.execute_write(_set_uniqueness_constraints, node)
    # ...

# ...
First, you define a helper function, _set_uniqueness_constraints(), that creates and runs queries enforcing each node to have a unique ID.
In load_hospital_graph_from_csv(), you instantiate a driver that connects to your Neo4j instance and set uniqueness constraints for each hospital system node.
Notice the @retry decorator attached to load_hospital_graph_from_csv(). If load_hospital_graph_from_csv() fails for any reason, this decorator will rerun it one hundred times with a ten second delay in between tries. This comes in handy when there are intermittent connection issues to Neo4j that are usually resolved by recreating a connection. However, be sure to check the script logs to see if an error reoccurs more than a few times.
Next, load_hospital_graph_from_csv() loads data for each node and relationship:
hospital_neo4j_etl/src/hospital_bulk_csv_write.py
# ...

@retry(tries=100, delay=10)
def load_hospital_graph_from_csv() -> None:
    """Load structured hospital CSV data following
    a specific ontology into Neo4j"""

    # ...

    LOGGER.info("Loading hospital nodes")
    with driver.session(database="neo4j") as session:
        query = f"""
        LOAD CSV WITH HEADERS
        FROM '{HOSPITALS_CSV_PATH}' AS hospitals
        MERGE (h:Hospital {{id: toInteger(hospitals.hospital_id),
                            name: hospitals.hospital_name,
                            state_name: hospitals.hospital_state}});
        """
        _ = session.run(query, {})

   # ...

if __name__ == "__main__":
    load_hospital_graph_from_csv()
Each node and relationship is loaded from their respective csv files and written to Neo4j according to your graph database design. At the end of the script, you call load_hospital_graph_from_csv() in the name-main idiom, and all of the data should populate in your Neo4j instance.
After writing hospital_neo4j_etl/src/hospital_bulk_csv_write.py, you can define an entrypoint.sh file that will run when your Docker container starts:
hospital_neo4j_etl/src/entrypoint.sh
#!/bin/bash

# Run any setup steps or pre-processing tasks here
echo "Running ETL to move hospital data from csvs to Neo4j..."

# Run the ETL script
python hospital_bulk_csv_write.py
This entrypoint file isn’t technically necessary for this project, but it’s a good practice when building containers because it allows you to execute necessary shell commands before running your main script.
The last file to write for your ETL is the Docker file. It looks like this:
hospital_neo4j_etl/Dockerfile
FROM python:3.11-slim

WORKDIR /app

COPY ./src/ /app

COPY ./pyproject.toml /code/pyproject.toml
RUN pip install /code/.

CMD ["sh", "entrypoint.sh"]
This Dockerfile tells your container to use the python:3.11-slim distribution, copy the contents from hospital_neo4j_etl/src/ into the /app directory within the container, install the dependencies from pyproject.toml, and run entrypoint.sh.
You can now add this project to docker-compose.yml:
docker-compose.yml
version: '3'

services:
  hospital_neo4j_etl:
    build:
      context: ./hospital_neo4j_etl
    env_file:
      - .env
The ETL will run as a service called hospital_neo4j_etl, and it will run the Dockerfile in ./hospital_neo4j_etl using environment variables from .env. Since you only have one container, you don’t need docker-compose yet. However, you’ll add more containers to orchestrate with your ETL in the next section, so it’s helpful to get started on docker-compose.yml.
To run your ETL, open a terminal and run:
$ docker-compose up --build
Once the ETL finishes running, return to your Aura console:
Click Open and you’ll be prompted to enter your Neo4j password. After successfully logging into the instance, you should see a screen similar to this:

As you can see under Database Information, all of the nodes, relationships, and properties were loaded. There are 21,187 nodes and 48,259 relationships. You’re ready to start writing queries!
Query the Hospital System Graph
The last thing you need to do before building your chatbot is get familiar with Cypher syntax. Cypher is Neo4j’s query language, and it’s fairly intuitive to learn, especially if you’re familiar with SQL. This section will cover the basics, and that’s all you need to build the chatbot. You can check out Neo4j’s documentation for a more comprehensive Cypher overview.
The most commonly used key word for reading data in Cypher is MATCH, and it’s used to specify patterns to look for in the graph. The simplest pattern is one with a single node. For example, if you wanted to find the first five patient nodes written to the graph, you could run the following Cypher query:
MATCH (p:Patient)
RETURN p LIMIT 5;
In this query, you’re matching on Patient nodes. In Cypher, nodes are always indicated by parentheses. The p in (p:Patient) is an alias that you can reference later in the query. RETURN p LIMIT 5; tells Neo4j to only return five patient nodes. You can run this query in the Neo4j UI, and the results should look like this:
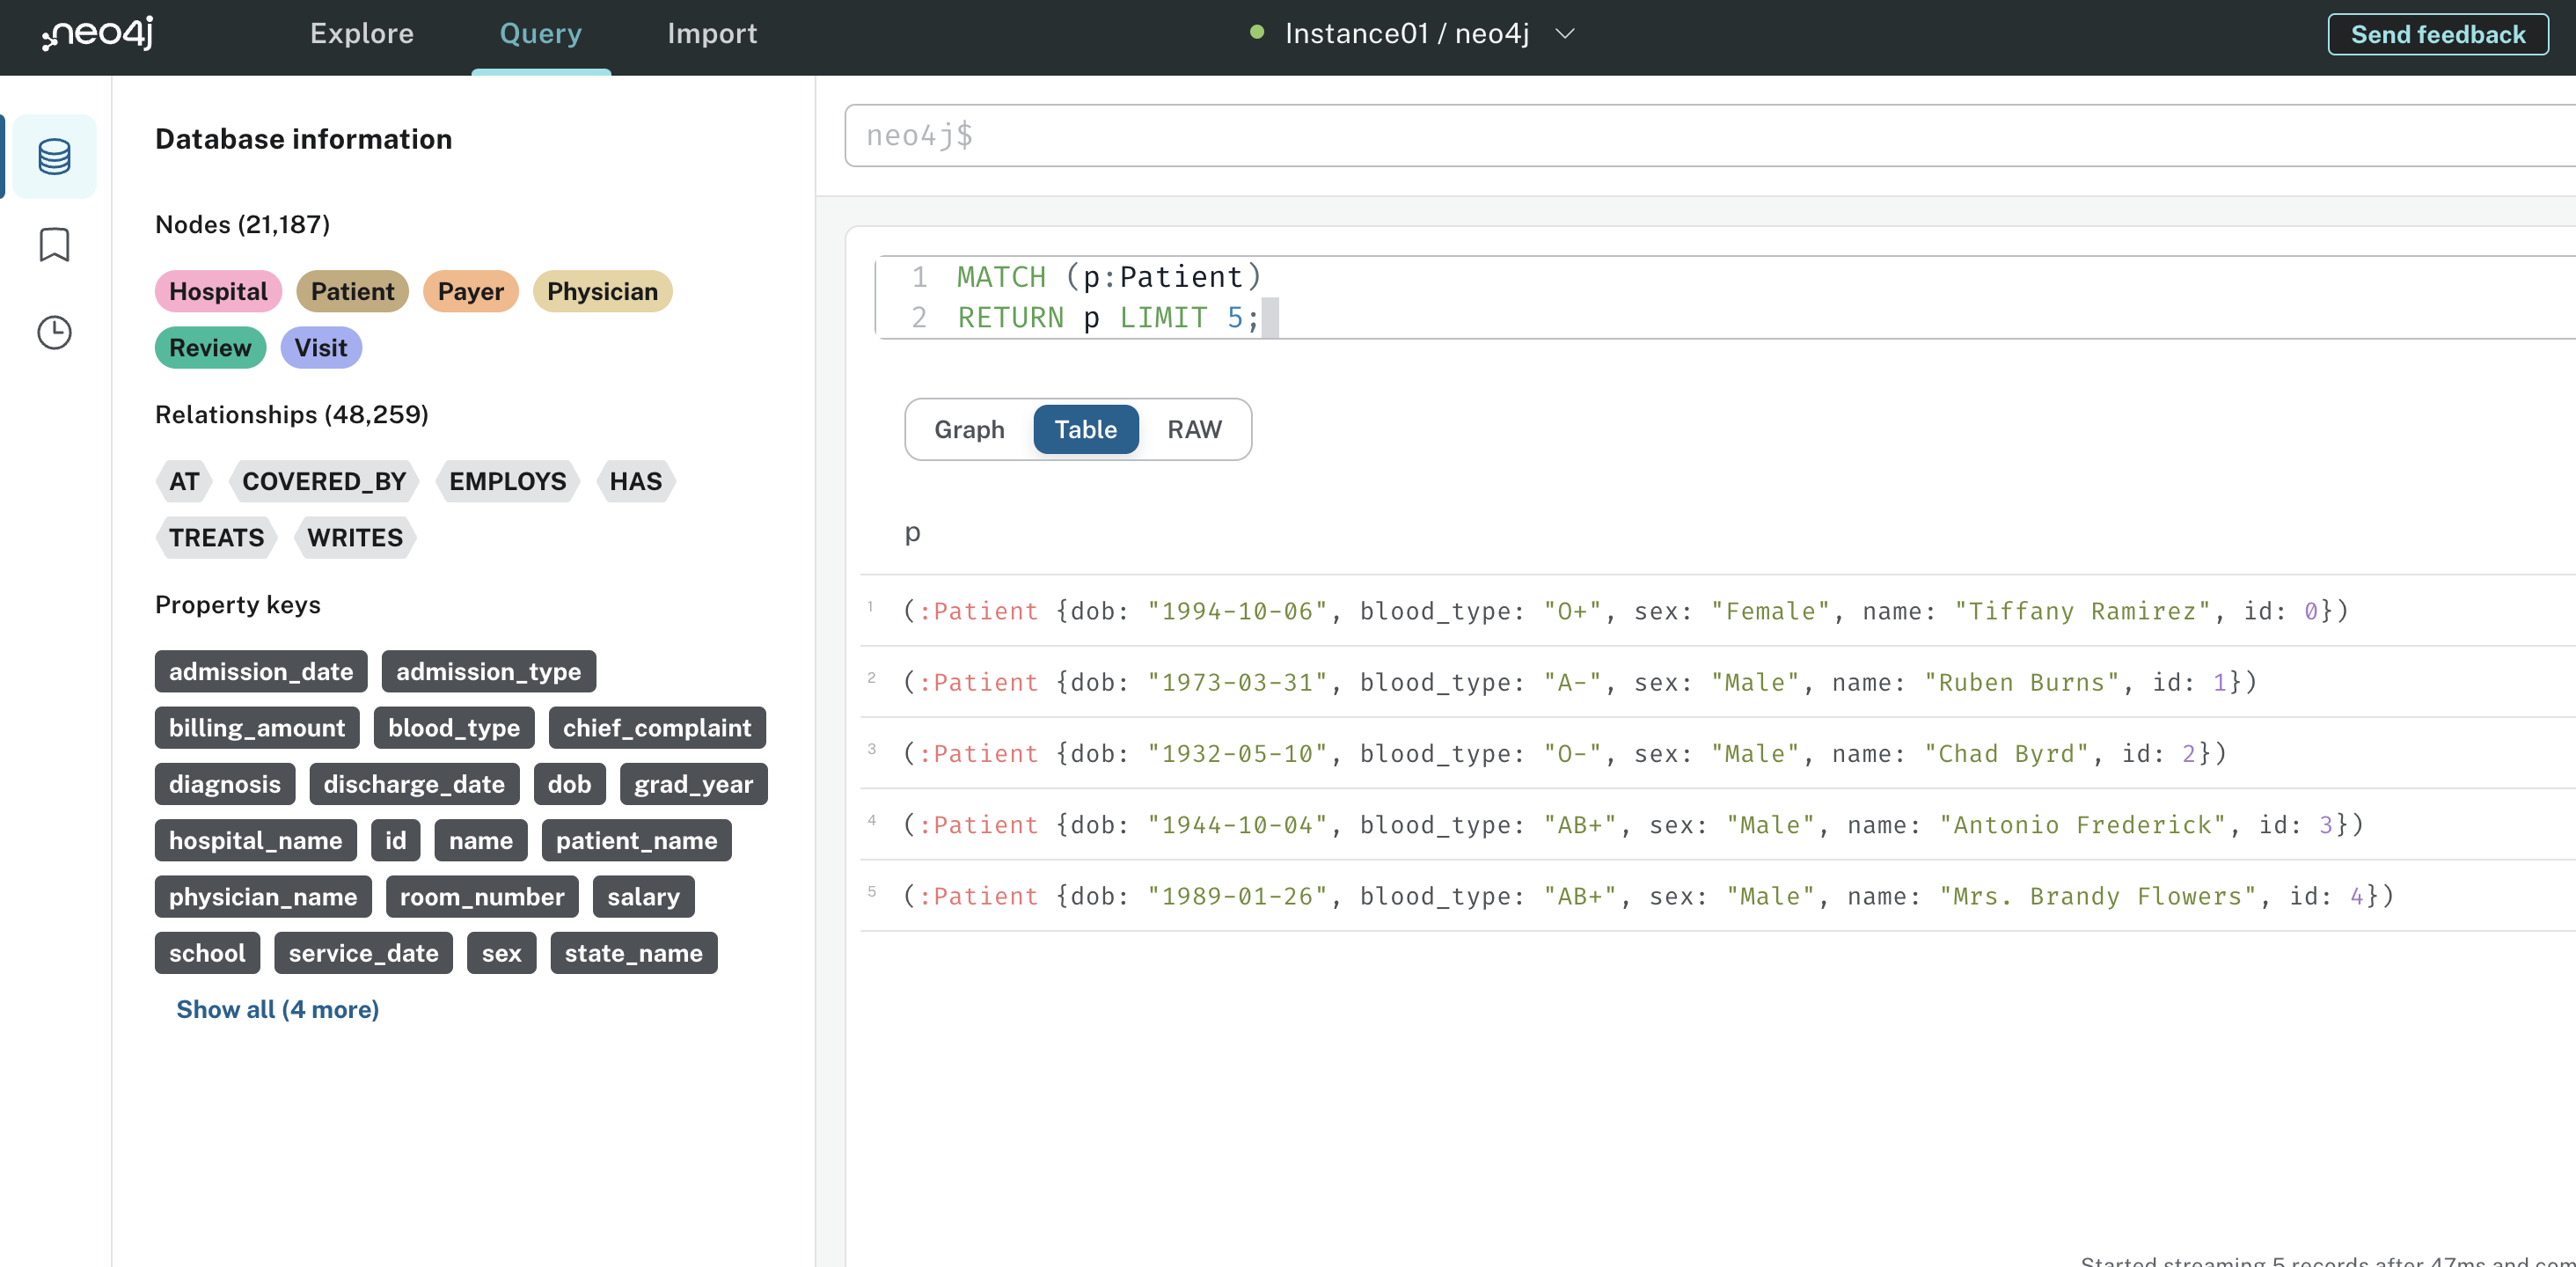
The Table view shows you the five Patient nodes returned along with their properties. You can also explore the graph and raw view if you’re interested.
While matching on a single node is straightforward, sometimes that’s all you need to get useful insights. For example, if your stakeholder said give me a summary of visit 56, the following query gives you the answer:
MATCH (v:Visit)
WHERE v.id = 56
RETURN v;
This query matches Visit nodes that have an id of 56, specified by WHERE v.id = 56. You can filter on arbitrary node and relationship properties in WHERE clauses. The results of this query look like this:
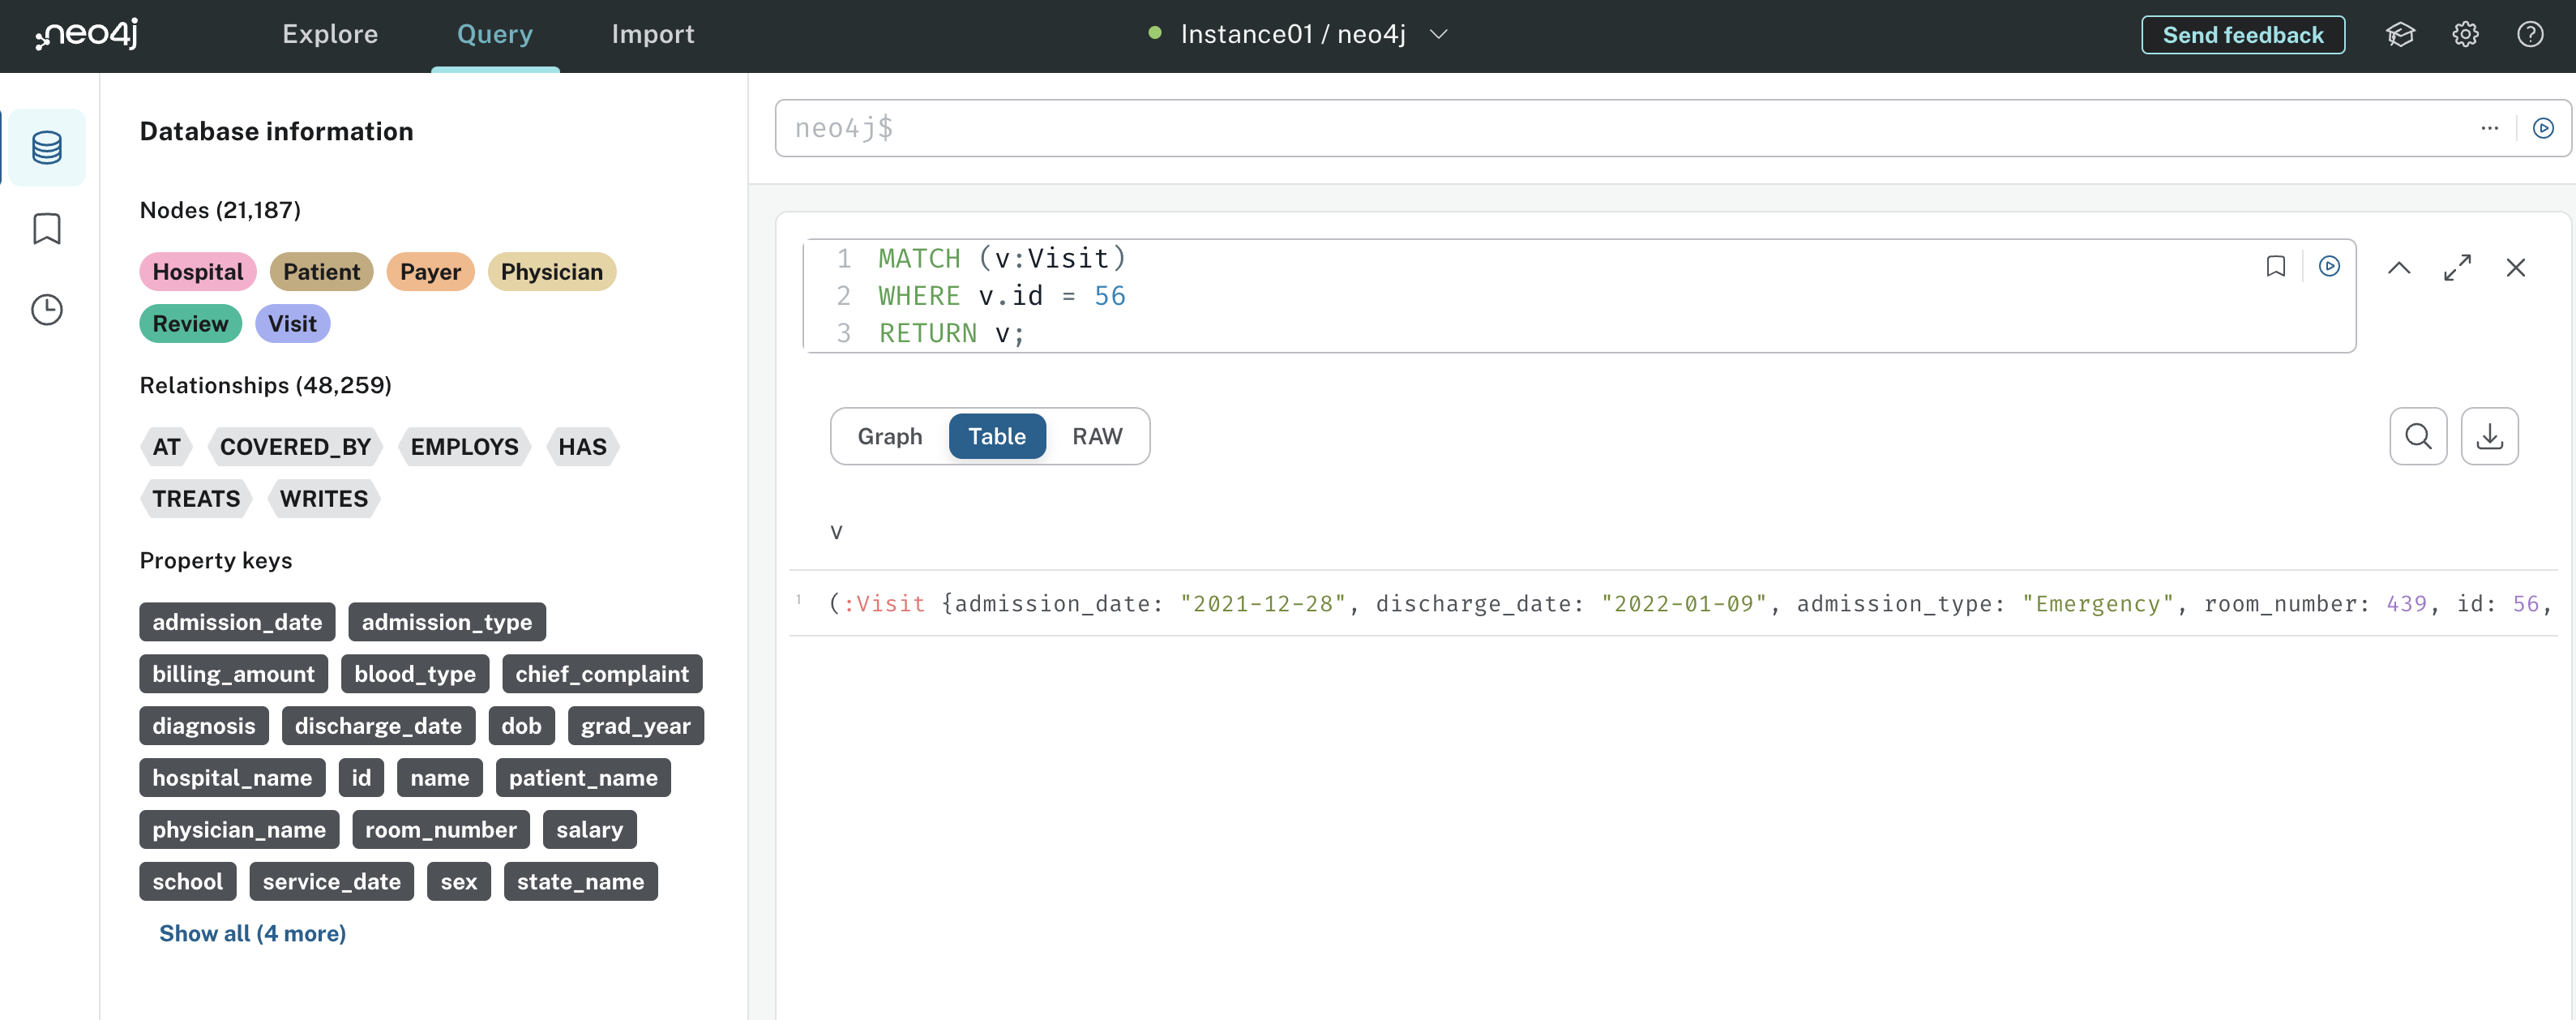
From the query output, you can see the returned Visit indeed has id 56. You could then look at all of the visit properties to come up with a verbal summary of the visit—this is what your Cypher chain will do.
Matching on nodes is great, but the real power of Cypher comes from its ability to match on relationship patterns. This gives you insight into sophisticated relationships, exploiting the power of graph databases. Continuing with the Visit query, you probably want to know which Patient the Visit belongs to. You can get this from the HAS relationship:
MATCH (p:Patient)-[h:HAS]->(v:Visit)
WHERE v.id = 56
RETURN v,h,p;
This Cypher query searches for the Patient that has a Visit with id 56. You’ll notice that the relationship HAS is surrounded by square brackets instead of parentheses, and its directionality is indicated by an arrow. If you tried MATCH (p:Patient)<-[h:HAS]-(v:Visit), the query would return nothing because the direction of HAS relationship is incorrect.
The query results look like this:

Notice the output includes data for the Visit, HAS relationship, and Patient. This gives you more insight than if you only match on Visit nodes. If you wanted to see which physicians treated the patient during the Visit, you could add the following relationship to the query:
MATCH (p:Patient)-[h:HAS]->(v:Visit)<-[t:TREATS]-(ph:Physician)
WHERE v.id = 56
RETURN v,p,ph
This statement (p:Patient)-[h:HAS]->(v:Visit)<-[t:TREATS]-(ph:Physician) tells Neo4j to find all patterns where a Patient has a Visit that’s treated by a Physician. If you wanted to match all relationships going in and out of the Visit node, you could run this query:
MATCH (v:Visit)-[r]-(n)
WHERE v.id = 56
RETURN r,n;
Notice now that the relationship [r], has no direction with respect to (v:Visit) or (n). In essence, this match statement will look for all relationships that go in and out of Visit 56, along with the nodes connected to those relationships. Here’s the results:
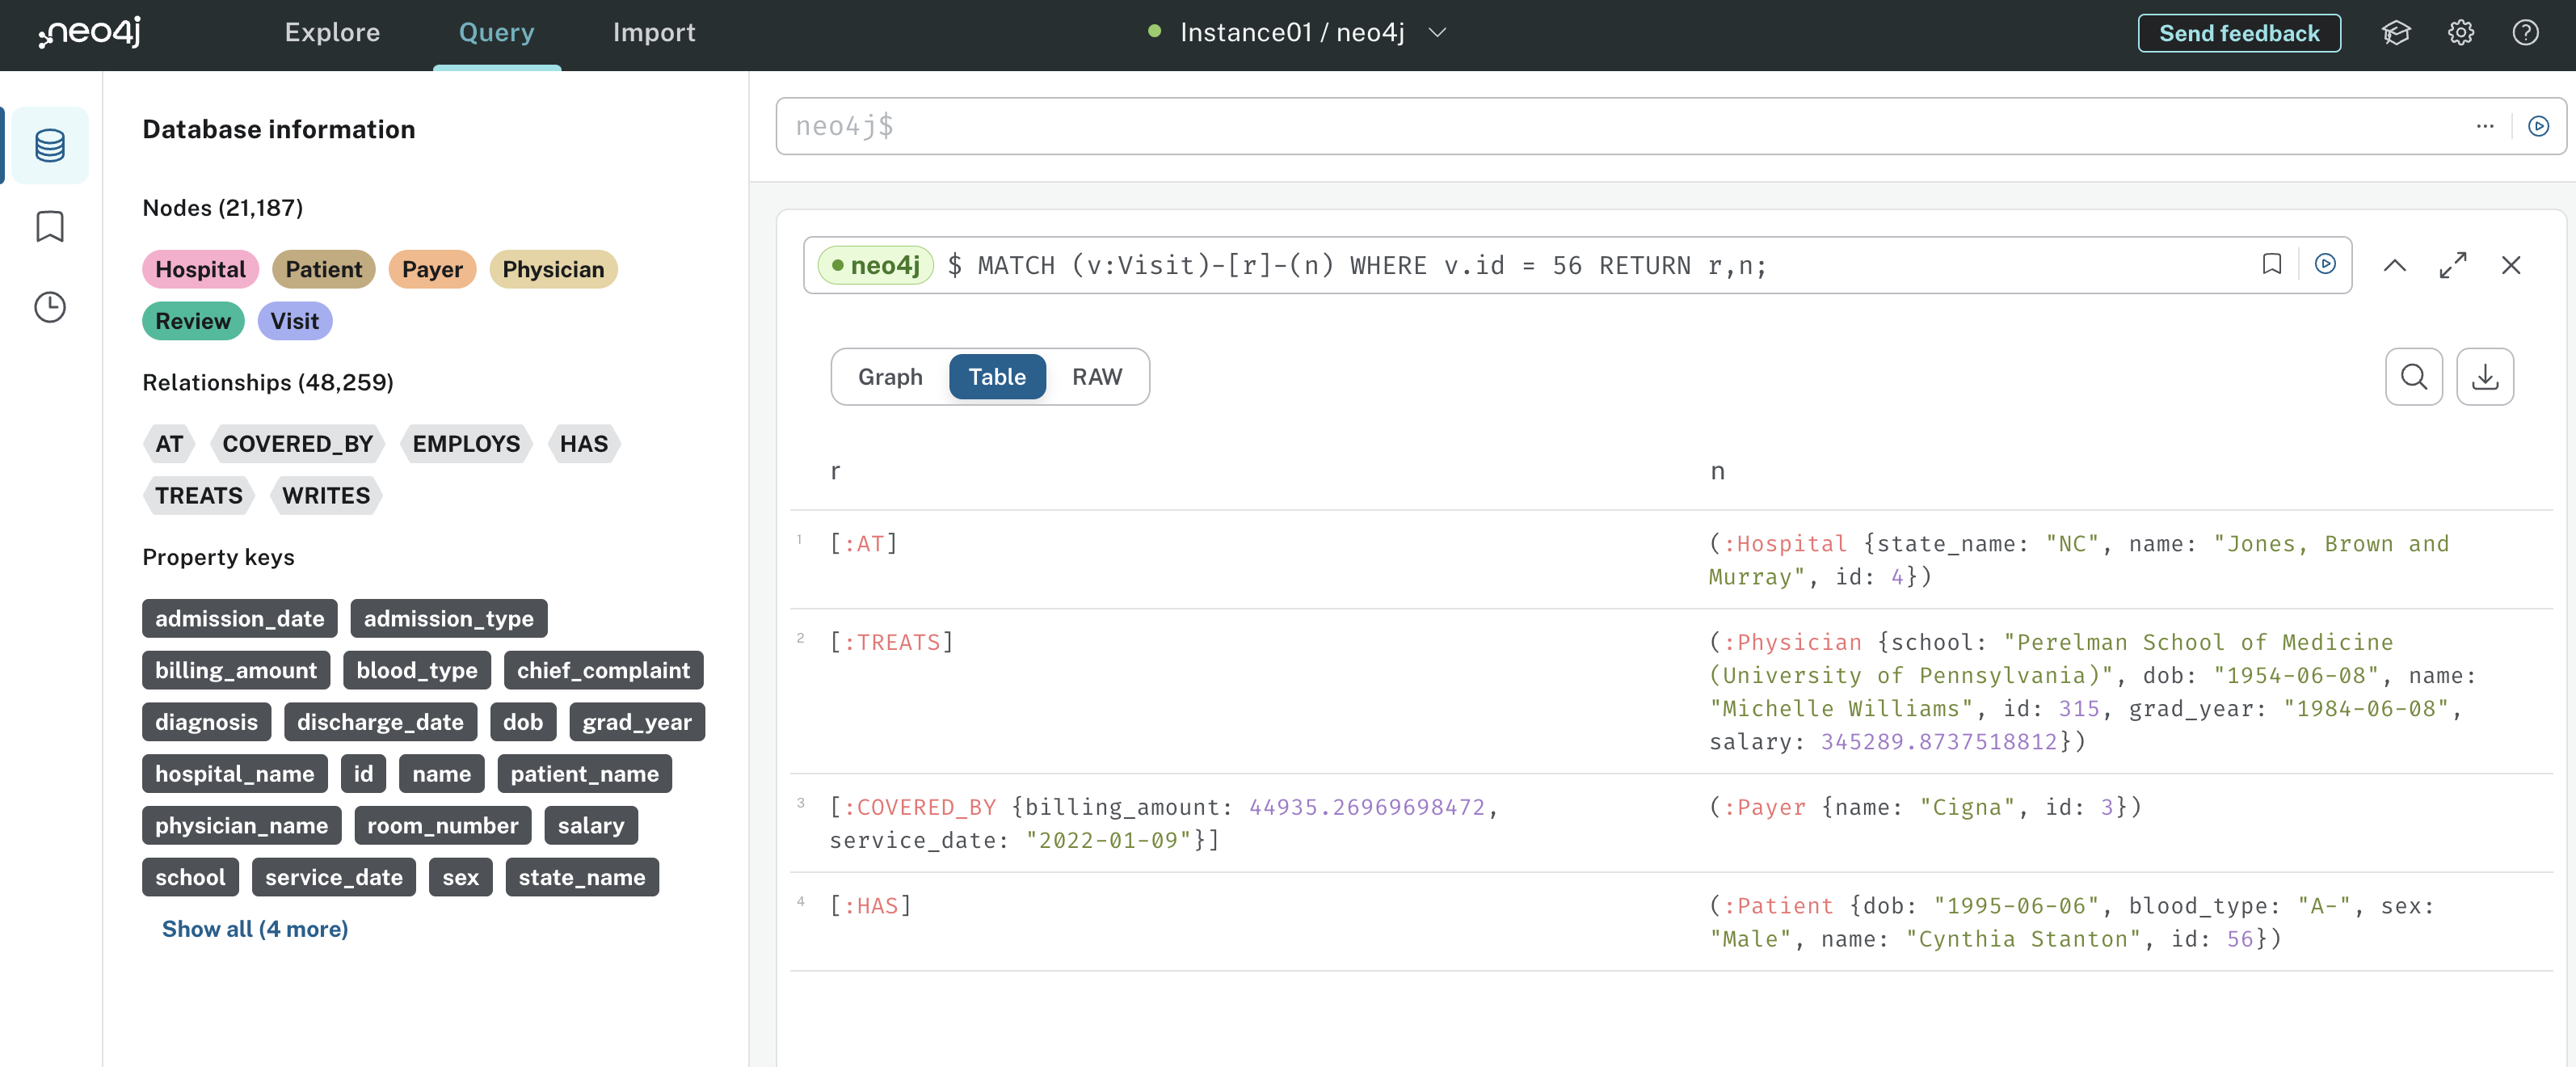
This gives you a nice view of all the relationships and nodes associated with Visit 56. Think about how powerful this representation is. Instead of performing multiple SQL joins, as you’d have to do in a relational database, you get all of the information about how a Visit is connected to the entire hospital system with three short lines of Cypher.
You can imagine how much more powerful this would become as more nodes and relationships are added to the graph database. For example, you could record which nurses, pharmacies, drugs, or surgeries are associated with the Visit. Each relationship that you add would necessitate another join in SQL, but the above Cypher query about Visit 56 would remain unchanged.
The last thing you’ll cover in this section is how to perform aggregations in Cypher. So far, you’ve only queried raw data from nodes and relationships, but you can also compute aggregate statistics in Cypher.
Suppose you wanted to answer the question What is the total number of visits and total billing amount for visits covered by Aetna in Texas? Here’s the Cypher query that would answer this question:
MATCH (p:Payer)<-[c:COVERED_BY]-(v:Visit)-[:AT]->(h:Hospital)
WHERE p.name = "Aetna"
AND h.state_name = "TX"
RETURN COUNT(*) as num_visits,
SUM(c.billing_amount) as total_billing_amount;
In this query, you first match all Visits that occur at a Hospital and are covered by a Payer. You then filter to Payers with a name property of Aetna and Hospitals with a state_name of TX. Lastly, COUNT(*) counts the number of matched patterns, and SUM(c.billing_amount) gives you the total billing amount. The output looks like this:
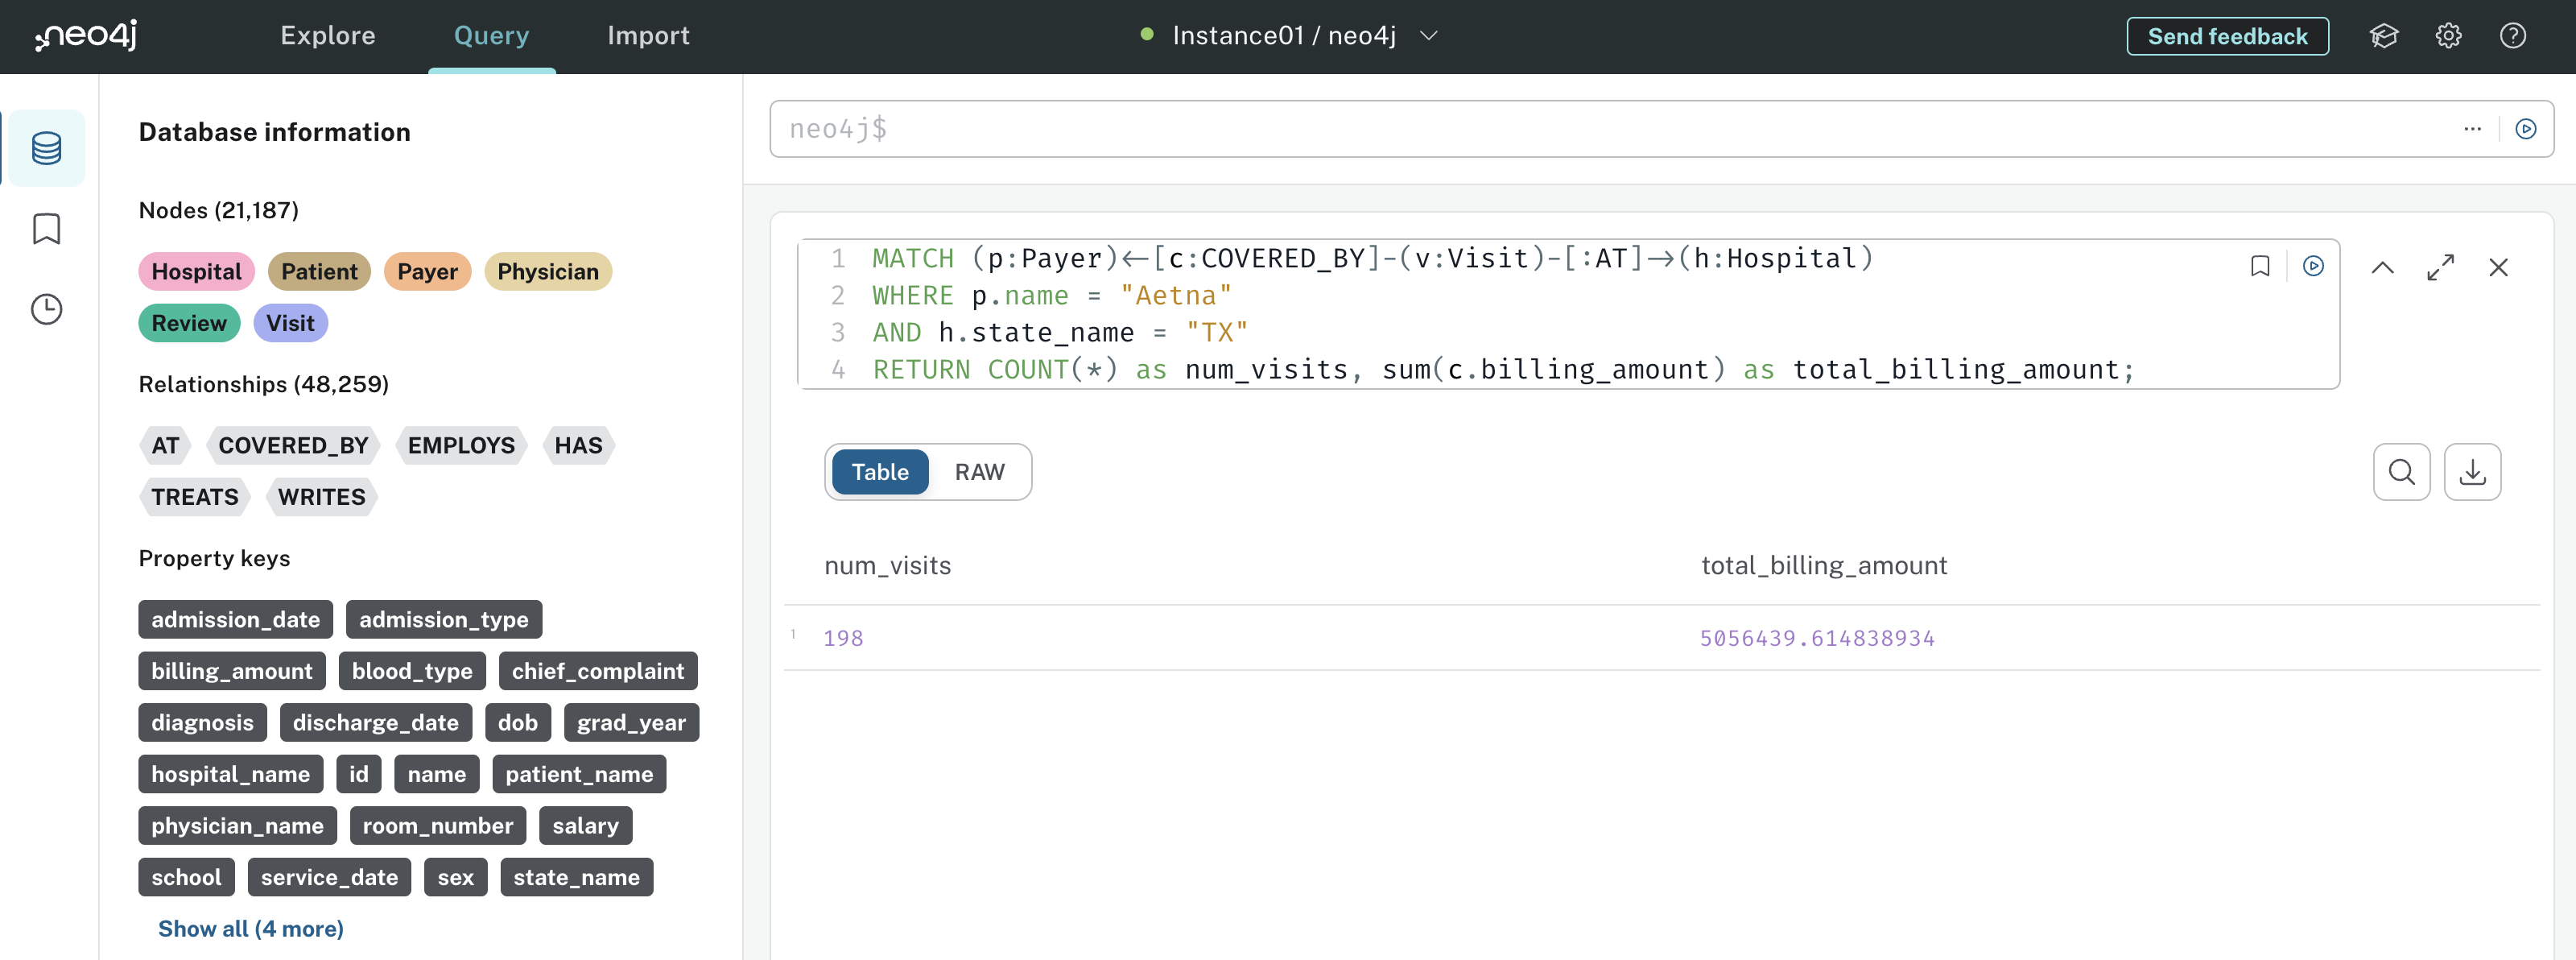
The results tell you there were 198 Visits matching this pattern with a total billing amount of about $5,056,439.
You now have a solid understanding of Cypher fundamentals, as well as the kinds of questions you can answer. In short, Cypher is great at matching complicated relationships without requiring a verbose query. There’s a lot more that you can do with Neo4j and Cypher, but the knowledge you obtained in this section is enough to start building the chatbot, and that’s what you’ll do next.
Step 4: Build a Graph RAG Chatbot in LangChain
After all the preparatory design and data work you’ve done so far, you’re finally ready to build your chatbot! You’ll likely notice that, with the hospital system data stored in Neo4j, and the power of LangChain abstractions, building your chatbot doesn’t take much work. This is a common theme in AI and ML projects—most of the work is in design, data preparation, and deployment rather than building the AI itself.
Before you jump in, add a chatbot_api/ folder to your project with the following files and folders:
./
│
├── chatbot_api/
│   │
│   ├── src/
│   │   │
│   │   ├── agents/
│   │   │   └── hospital_rag_agent.py
│   │   │
│   │   ├── chains/
│   │   │   ├── hospital_cypher_chain.py
│   │   │   └── hospital_review_chain.py
│   │   │
│   │   ├── tools/
│   │   │   └── wait_times.py
│   │
│   └── pyproject.toml
│
├── hospital_neo4j_etl/
│   │
│   ├── src/
│   │   ├── entrypoint.sh
│   │   └── hospital_bulk_csv_write.py
│   │
│   ├── Dockerfile
│   └── pyproject.toml
│
├── .env
└── docker-compose.yml
You’ll want to add a few more environment variables to your .env file as well:
OPENAI_API_KEY=<YOUR_OPENAI_API_KEY>

NEO4J_URI=<YOUR_NEO4J_URI>
NEO4J_USERNAME=<YOUR_NEO4J_URI>
NEO4J_PASSWORD=<YOUR_NEO4J_PASSWORD>

HOSPITALS_CSV_PATH=https://raw.githubusercontent.com/hfhoffman1144/langchain_neo4j_rag_app/main/data/hospitals.csv
PAYERS_CSV_PATH=https://raw.githubusercontent.com/hfhoffman1144/langchain_neo4j_rag_app/main/data/payers.csv
PHYSICIANS_CSV_PATH=https://raw.githubusercontent.com/hfhoffman1144/langchain_neo4j_rag_app/main/data/physicians.csv
PATIENTS_CSV_PATH=https://raw.githubusercontent.com/hfhoffman1144/langchain_neo4j_rag_app/main/data/patients.csv
VISITS_CSV_PATH=https://raw.githubusercontent.com/hfhoffman1144/langchain_neo4j_rag_app/main/data/visits.csv
REVIEWS_CSV_PATH=https://raw.githubusercontent.com/hfhoffman1144/langchain_neo4j_rag_app/main/data/reviews.csv

HOSPITAL_AGENT_MODEL=gpt-3.5-turbo-1106
HOSPITAL_CYPHER_MODEL=gpt-3.5-turbo-1106
HOSPITAL_QA_MODEL=gpt-3.5-turbo-0125
Your .env file now includes variables that specify which LLM you’ll use for different components of your chatbot. You’ve specified these models as environment variables so that you can easily switch between different OpenAI models without changing any code. Keep in mind, however, that each LLM might benefit from a unique prompting strategy, so you might need to modify your prompts if you plan on using a different suite of LLMs.
You should already have the hospital_neo4j_etl/ folder completed, and docker-compose.yml and .env are the same as before. Open up chatbot_api/pyproject.toml and add the following dependencies:
chatbot_api/pyproject.toml
[project]
name = "chatbot_api"
version = "0.1"
dependencies = [
    "asyncio==3.4.3",
    "fastapi==0.109.0",
    "langchain==0.1.0",
    "langchain-openai==0.0.2",
    "langchainhub==0.1.14",
    "neo4j==5.14.1",
    "numpy==1.26.2",
    "openai==1.7.2",
    "opentelemetry-api==1.22.0",
    "pydantic==2.5.1",
    "uvicorn==0.25.0"
]

[project.optional-dependencies]
dev = ["black", "flake8"]
You can certainly use more recent versions of these dependencies if they’re available, but keep in mind any features that might be deprecated. Open a terminal, activate your virtual environment, navigate into your chatbot_api/ folder, and install dependencies from the project’s pyproject.toml:
(venv) $ python -m pip install .
Once everything is installed, you’re ready to build the reviews chain!
Create a Neo4j Vector Chain
In Step 1, you got a hands-on introduction to LangChain by building a chain that answers questions about patient experiences using their reviews. In this section, you’ll build a similar chain except you’ll use Neo4j as your vector index.
Vector search indexes were released as a public beta in Neo4j 5.11. They allow you to run semantic queries directly on your graph. This is really convenient for your chatbot because you can store review embeddings in the same place as your structured hospital system data.
In LangChain, you can use Neo4jVector to create review embeddings and the retriever needed for your chain. Here’s the code to create the reviews chain:
chatbot_api/src/chains/hospital_review_chain.py
 1import os
 2from langchain.vectorstores.neo4j_vector import Neo4jVector
 3from langchain_openai import OpenAIEmbeddings
 4from langchain.chains import RetrievalQA
 5from langchain_openai import ChatOpenAI
 6from langchain.prompts import (
 7    PromptTemplate,
 8    SystemMessagePromptTemplate,
 9    HumanMessagePromptTemplate,
10    ChatPromptTemplate,
11)
12
13HOSPITAL_QA_MODEL = os.getenv("HOSPITAL_QA_MODEL")
14
15neo4j_vector_index = Neo4jVector.from_existing_graph(
16    embedding=OpenAIEmbeddings(),
17    url=os.getenv("NEO4J_URI"),
18    username=os.getenv("NEO4J_USERNAME"),
19    password=os.getenv("NEO4J_PASSWORD"),
20    index_name="reviews",
21    node_label="Review",
22    text_node_properties=[
23        "physician_name",
24        "patient_name",
25        "text",
26        "hospital_name",
27    ],
28    embedding_node_property="embedding",
29)
30
31review_template = """Your job is to use patient
32reviews to answer questions about their experience at a hospital. Use
33the following context to answer questions. Be as detailed as possible, but
34don't make up any information that's not from the context. If you don't know
35an answer, say you don't know.
36{context}
37"""
38
39review_system_prompt = SystemMessagePromptTemplate(
40    prompt=PromptTemplate(input_variables=["context"], template=review_template)
41)
42
43review_human_prompt = HumanMessagePromptTemplate(
44    prompt=PromptTemplate(input_variables=["question"], template="{question}")
45)
46messages = [review_system_prompt, review_human_prompt]
47
48review_prompt = ChatPromptTemplate(
49    input_variables=["context", "question"], messages=messages
50)
51
52reviews_vector_chain = RetrievalQA.from_chain_type(
53    llm=ChatOpenAI(model=HOSPITAL_QA_MODEL, temperature=0),
54    chain_type="stuff",
55    retriever=neo4j_vector_index.as_retriever(k=12),
56)
57reviews_vector_chain.combine_documents_chain.llm_chain.prompt = review_prompt
In lines 1 to 11, you import the dependencies needed to build your review chain with Neo4j. In line 13, you load the name of the chat model you’ll use for the review chain and store it in HOSPITAL_QA_MODEL. Lines 15 to 29 create the vector index in Neo4j. Here’s a breakdown of each parameter:
embedding: The model used to create the embeddings—you’re usingOpenAIEmeddings()in this example.url,username, andpassword: Your Neo4j instance credentials.index_name: The name given to your vector index.node_label: The node to create embeddings for.text_node_properties: The node properties to include in the embedding.embedding_node_property: The name of the embedding node property.
Once Neo4jVector.from_existing_graph() runs, you’ll see that every Review node in Neo4j has an embedding property which is a vector representation of the physician_name, patient_name, text, and hospital_name properties. This allows you to answer questions like Which hospitals have had positive reviews? It also allows the LLM to tell you which patient and physician wrote reviews matching your question.
Lines 31 to 50 create the prompt template for your review chain the same way you did in Step 1.
Lastly, lines 52 to 57 create your reviews vector chain using a Neo4j vector index retriever that returns 12 reviews embeddings from a similarity search. By setting chain_type to "stuff" in .from_chain_type(), you’re telling the chain to pass all 12 reviews to the prompt. You can explore other chain types in LangChain’s documentation on chains.
You’re ready to try out your new reviews chain. Navigate to the root directory of your project, start a Python interpreter, and run the following commands:
>>> import dotenv
>>> dotenv.load_dotenv()
True

>>> from chatbot_api.src.chains.hospital_review_chain import (
...     reviews_vector_chain
... )

>>> query = """What have patients said about hospital efficiency?
...         Mention details from specific reviews."""

>>> response = reviews_vector_chain.invoke(query)

>>> response.get("result")
"Patients have mentioned different aspects of hospital efficiency in their
reviews. In Kevin Cox's review of Wallace-Hamilton hospital, he mentioned
that the hospital staff was efficient. However, he also mentioned a lack of
personalized attention and communication, which left him feeling neglected.
This suggests that while the hospital may have been efficient in terms of
completing tasks and providing services, they may have lacked in terms of
individualized care and communication with patients.
On the other hand, Beverly Johnson's review of Brown Inc. hospital mentioned
that the hospital had a modern feel and the staff was attentive. However,
she also mentioned that the bureaucratic procedures for check-in and
discharge were cumbersome. This suggests that while the hospital may have
been efficient in terms of its facilities and staff attentiveness, the
administrative processes may have been inefficient and caused inconvenience
for patients. It is important to note that the specific reviews do not
provide a comprehensive picture of hospital efficiency, as they focus on
specific aspects of the hospital experience."
In this block, you import dotenv and load environment variables from .env. You then import reviews_vector_chain from hospital_review_chain and invoke it with a question about hospital efficiency. Your chain’s response might not be identical to this, but the LLM should return a nice detailed summary, as you’ve told it to.
In this example, notice how specific patient and hospital names are mentioned in the response. This happens because you embedded hospital and patient names along with the review text, so the LLM can use this information to answer questions.
Note: Before moving on, you should play around with reviews_vector_chain to see how it responds to different queries. Do the responses seem correct? How might you evaluate the quality of reviews_vector_chain? You won’t learn how to evaluate RAG systems in this tutorial, but you can look at this comprehensive Python example with MLFlow to get a feel for how it’s done.
Next up, you’ll create the Cypher generation chain that you’ll use to answer queries about structured hospital system data.
Create a Neo4j Cypher Chain
As you saw in Step 2, your Neo4j Cypher chain will accept a user’s natural language query, convert the natural language query to a Cypher query, run the Cypher query in Neo4j, and use the Cypher query results to respond to the user’s query. You’ll leverage LangChain’s GraphCypherQAChain for this.
Note: Any time you allow users to query a database, as you’ll do with your Cypher chain, you need to ensure they only have necessary permissions. The Neo4j credentials you’re using in this project allow users to read, write, update, and delete data from your database.
If you were building this application for a real-world project, you’d want to create credentials that restrict your user’s permissions to reads only, preventing them from writing or deleting valuable data.
Using LLMs to generate accurate Cypher queries can be challenging, especially if you have a complicated graph. Because of this, a lot of prompt engineering is required to show your graph structure and query use-cases to the LLM. Fine-tuning an LLM to generate queries is also an option, but this requires manually curated and labeled data.
To get started creating your Cypher generation chain, import dependencies and instantiate a Neo4jGraph:
chatbot_api/src/chains/hospital_cypher_chain.py
import os
from langchain_community.graphs import Neo4jGraph
from langchain.chains import GraphCypherQAChain
from langchain_openai import ChatOpenAI
from langchain.prompts import PromptTemplate

HOSPITAL_QA_MODEL = os.getenv("HOSPITAL_QA_MODEL")
HOSPITAL_CYPHER_MODEL = os.getenv("HOSPITAL_CYPHER_MODEL")

graph = Neo4jGraph(
    url=os.getenv("NEO4J_URI"),
    username=os.getenv("NEO4J_USERNAME"),
    password=os.getenv("NEO4J_PASSWORD"),
)

graph.refresh_schema()
The Neo4jGraph object is a LangChain wrapper that allows LLMs to execute queries on your Neo4j instance. You instantiate graph using your Neo4j credentials, and you call graph.refresh_schema() to sync any recent changes to your instance.
The next and most important component of your Cypher generation chain is the prompt template. Here’s what that looks like:
chatbot_api/src/chains/hospital_cypher_chain.py
# ...

cypher_generation_template = """
Task:
Generate Cypher query for a Neo4j graph database.

Instructions:
Use only the provided relationship types and properties in the schema.
Do not use any other relationship types or properties that are not provided.

Schema:
{schema}

Note:
Do not include any explanations or apologies in your responses.
Do not respond to any questions that might ask anything other than
for you to construct a Cypher statement. Do not include any text except
the generated Cypher statement. Make sure the direction of the relationship is
correct in your queries. Make sure you alias both entities and relationships
properly. Do not run any queries that would add to or delete from
the database. Make sure to alias all statements that follow as with
statement (e.g. WITH v as visit, c.billing_amount as billing_amount)
If you need to divide numbers, make sure to
filter the denominator to be non zero.

Examples:
# Who is the oldest patient and how old are they?
MATCH (p:Patient)
RETURN p.name AS oldest_patient,
       duration.between(date(p.dob), date()).years AS age
ORDER BY age DESC
LIMIT 1

# Which physician has billed the least to Cigna
MATCH (p:Payer)<-[c:COVERED_BY]-(v:Visit)-[t:TREATS]-(phy:Physician)
WHERE p.name = 'Cigna'
RETURN phy.name AS physician_name, SUM(c.billing_amount) AS total_billed
ORDER BY total_billed
LIMIT 1

# Which state had the largest percent increase in Cigna visits
# from 2022 to 2023?
MATCH (h:Hospital)<-[:AT]-(v:Visit)-[:COVERED_BY]->(p:Payer)
WHERE p.name = 'Cigna' AND v.admission_date >= '2022-01-01' AND
v.admission_date < '2024-01-01'
WITH h.state_name AS state, COUNT(v) AS visit_count,
     SUM(CASE WHEN v.admission_date >= '2022-01-01' AND
     v.admission_date < '2023-01-01' THEN 1 ELSE 0 END) AS count_2022,
     SUM(CASE WHEN v.admission_date >= '2023-01-01' AND
     v.admission_date < '2024-01-01' THEN 1 ELSE 0 END) AS count_2023
WITH state, visit_count, count_2022, count_2023,
     (toFloat(count_2023) - toFloat(count_2022)) / toFloat(count_2022) * 100
     AS percent_increase
RETURN state, percent_increase
ORDER BY percent_increase DESC
LIMIT 1

# How many non-emergency patients in North Carolina have written reviews?
MATCH (r:Review)<-[:WRITES]-(v:Visit)-[:AT]->(h:Hospital)
WHERE h.state_name = 'NC' and v.admission_type <> 'Emergency'
RETURN count(*)

String category values:
Test results are one of: 'Inconclusive', 'Normal', 'Abnormal'
Visit statuses are one of: 'OPEN', 'DISCHARGED'
Admission Types are one of: 'Elective', 'Emergency', 'Urgent'
Payer names are one of: 'Cigna', 'Blue Cross', 'UnitedHealthcare', 'Medicare',
'Aetna'

A visit is considered open if its status is 'OPEN' and the discharge date is
missing.
Use abbreviations when
filtering on hospital states (e.g. "Texas" is "TX",
"Colorado" is "CO", "North Carolina" is "NC",
"Florida" is "FL", "Georgia" is "GA", etc.)

Make sure to use IS NULL or IS NOT NULL when analyzing missing properties.
Never return embedding properties in your queries. You must never include the
statement "GROUP BY" in your query. Make sure to alias all statements that
follow as with statement (e.g. WITH v as visit, c.billing_amount as
billing_amount)
If you need to divide numbers, make sure to filter the denominator to be non
zero.

The question is:
{question}
"""

cypher_generation_prompt = PromptTemplate(
    input_variables=["schema", "question"], template=cypher_generation_template
)
Read the contents of cypher_generation_template carefully. Notice how you’re providing the LLM with very specific instructions on what it should and shouldn’t do when generating Cypher queries. Most importantly, you’re showing the LLM your graph’s structure with the schema parameter, some example queries, and the categorical values of a few node properties.
All of the detail you provide in your prompt template improves the LLM’s chance of generating a correct Cypher query for a given question. If you’re curious about how necessary all this detail is, try creating your own prompt template with as few details as possible. Then run questions through your Cypher chain and see whether it correctly generates Cypher queries.
From there, you can iteratively update your prompt template to correct for queries that the LLM struggles to generate, but make sure you’re also cognizant of the number of input tokens you’re using. As with your review chain, you’ll want a solid system for evaluating prompt templates and the correctness of your chain’s generated Cypher queries. However, as you’ll see, the template you have above is a great starting place.
Note: The above prompt template provides the LLM with four examples of valid Cypher queries for your graph. Giving the LLM a few examples and then asking it to perform a task is known as few-shot prompting, and it’s a simple yet powerful technique for improving generation accuracy.
However, few-shot prompting might not be sufficient for Cypher query generation, especially if you have a complicated graph. One way to improve this is to create a vector database that embeds example user questions/queries and stores their corresponding Cypher queries as metadata.
When a user asks a question, you inject Cypher queries from semantically similar questions into the prompt, providing the LLM with the most relevant examples needed to answer the current question.
Next, you define the prompt template for the question-answer component of your chain. This template tells the LLM to use the Cypher query results to generate a nicely-formatted answer to the user’s query:
chatbot_api/src/chains/hospital_cypher_chain.py
# ...

qa_generation_template = """You are an assistant that takes the results
from a Neo4j Cypher query and forms a human-readable response. The
query results section contains the results of a Cypher query that was
generated based on a user's natural language question. The provided
information is authoritative, you must never doubt it or try to use
your internal knowledge to correct it. Make the answer sound like a
response to the question.

Query Results:
{context}

Question:
{question}

If the provided information is empty, say you don't know the answer.
Empty information looks like this: []

If the information is not empty, you must provide an answer using the
results. If the question involves a time duration, assume the query
results are in units of days unless otherwise specified.

When names are provided in the query results, such as hospital names,
beware  of any names that have commas or other punctuation in them.
For instance, 'Jones, Brown and Murray' is a single hospital name,
not multiple hospitals. Make sure you return any list of names in
a way that isn't ambiguous and allows someone to tell what the full
names are.

Never say you don't have the right information if there is data in
the query results. Always use the data in the query results.

Helpful Answer:
"""

qa_generation_prompt = PromptTemplate(
    input_variables=["context", "question"], template=qa_generation_template
)
This template requires much less detail than your Cypher generation template, and you should only have to modify it if you want the LLM to respond differently, or if you’re noticing that it’s not using the query results how you want. The last step in creating your Cypher chain is to instantiate a GraphCypherQAChain object:
chatbot_api/src/chains/hospital_cypher_chain.py
# ...

hospital_cypher_chain = GraphCypherQAChain.from_llm(
    cypher_llm=ChatOpenAI(model=HOSPITAL_CYPHER_MODEL, temperature=0),
    qa_llm=ChatOpenAI(model=HOSPITAL_QA_MODEL, temperature=0),
    graph=graph,
    verbose=True,
    qa_prompt=qa_generation_prompt,
    cypher_prompt=cypher_generation_prompt,
    validate_cypher=True,
    top_k=100,
)
Here’s a breakdown of the parameters used in GraphCypherQAChain.from_llm():
cypher_llm: The LLM used to generate Cypher queries.qa_llm: The LLM used to generate an answer given Cypher query results.graph: TheNeo4jGraphobject that connects to your Neo4j instance.verbose: Whether intermediate steps your chain performs should be printed.qa_prompt: The prompt template for responding to questions/queries.cypher_prompt: The prompt template for generating Cypher queries.validate_cypher: If true, the Cypher query will be inspected for errors and corrected before running. Note that this doesn’t guarantee the Cypher query will be valid. Instead, it corrects simple syntax errors that are easily detectable using regular expressions.top_k: The number of query results to include inqa_prompt.
Your hospital system Cypher generation chain is ready to use! It works the same way as your reviews chain. Navigate to your project directory and start a new Python interpreter session, then give it a try:
>>> import dotenv
>>> dotenv.load_dotenv()
True

>>> from chatbot_api.src.chains.hospital_cypher_chain import (
... hospital_cypher_chain
... )

>>> question = """What is the average visit duration for
... emergency visits in North Carolina?"""
>>> response = hospital_cypher_chain.invoke(question)


> Entering new GraphCypherQAChain chain...
Generated Cypher:
MATCH (v:Visit)-[:AT]->(h:Hospital)
WHERE h.state_name = 'NC' AND v.admission_type = 'Emergency'
AND v.status = 'DISCHARGED'
WITH v, duration.between(date(v.admission_date),
date(v.discharge_date)).days AS visit_duration
RETURN AVG(visit_duration) AS average_visit_duration
Full Context:
[{'average_visit_duration': 15.072972972972991}]

> Finished chain.

>>> response.get("result")
'The average visit duration for emergency visits in North
Carolina is 15.07 days.'
After loading environment variables, importing hospital_cypher_chain, and invoking it with a question, you can see the steps your chain takes to answer the question. Take a second to appreciate a few accomplishments your chain made when generating the Cypher query:
- The Cypher generation LLM understood the relationship between visits and hospitals from the provided graph schema.
- Even though you asked it about North Carolina, the LLM knew from the prompt to use the state abbreviation NC.
- The LLM knew that admission_type properties only have the first letter capitalized, while the status properties are all caps.
- The QA generation LLM knew from your prompt that the query results were in units of days.
You can experiment with all kinds of queries about the hospital system. For example, here’s a relatively challenging question to convert to Cypher:
>>> question = """Which state had the largest percent increase
...            in Medicaid visits from 2022 to 2023?"""
>>> response = hospital_cypher_chain.invoke(question)


> Entering new GraphCypherQAChain chain...
Generated Cypher:
MATCH (h:Hospital)<-[:AT]-(v:Visit)-[:COVERED_BY]->(p:Payer)
WHERE p.name = 'Medicaid' AND v.admission_date >= '2022-01-01'
AND v.admission_date < '2024-01-01'
WITH h.state_name AS state, COUNT(v) AS visit_count,
     SUM(CASE WHEN v.admission_date >= '2022-01-01'
     AND v.admission_date < '2023-01-01' THEN 1 ELSE 0 END) AS count_2022,
     SUM(CASE WHEN v.admission_date >= '2023-01-01'
     AND v.admission_date < '2024-01-01' THEN 1 ELSE 0 END) AS count_2023
WITH state, visit_count, count_2022, count_2023,
     (toFloat(count_2023) - toFloat(count_2022)) / toFloat(count_2022) * 100
     AS percent_increase
RETURN state, percent_increase
ORDER BY percent_increase DESC
LIMIT 1
Full Context:
[{'state': 'TX', 'percent_increase': 8.823529411764707}]

> Finished chain.

>>> response.get("result")
'The state with the largest percent increase in Medicaid visits
from 2022 to 2023 is Texas (TX), with a percent increase of 8.82%.'
To answer the question Which state had the largest percent increase in Medicaid visits from 2022 to 2023?, the LLM had to generate a fairly verbose Cypher query involving multiple nodes, relationships, and filters. Nonetheless, it was able to arrive at the correct answer.
The last capability your chatbot needs is to answer questions about wait times, and that’s what you’ll cover next.
Create Wait Time Functions
This last capability your chatbot needs is to answer questions about hospital wait times. As discussed earlier, your organization doesn’t store wait time data anywhere, so your chatbot will have to fetch it from an external source. You’ll write two functions for this—one that simulates finding the current wait time at a hospital, and another that finds the hospital with the shortest wait time.
Note: The purpose of creating wait time functions is to show you that LangChain agents can run arbitrary Python code, not just chains or other LangChain methods. This capability is extremely valuable because it means, in theory, you could create an agent to do just about anything that can be expressed in code.
Start by defining functions to fetch current wait times at a hospital:
chatbot_api/src/tools/wait_times.py
import os
from typing import Any
import numpy as np
from langchain_community.graphs import Neo4jGraph

def _get_current_hospitals() -> list[str]:
    """Fetch a list of current hospital names from a Neo4j database."""
    graph = Neo4jGraph(
        url=os.getenv("NEO4J_URI"),
        username=os.getenv("NEO4J_USERNAME"),
        password=os.getenv("NEO4J_PASSWORD"),
    )

    current_hospitals = graph.query(
        """
        MATCH (h:Hospital)
        RETURN h.name AS hospital_name
        """
    )

    return [d["hospital_name"].lower() for d in current_hospitals]

def _get_current_wait_time_minutes(hospital: str) -> int:
    """Get the current wait time at a hospital in minutes."""
    current_hospitals = _get_current_hospitals()

    if hospital.lower() not in current_hospitals:
        return -1

    return np.random.randint(low=0, high=600)


def get_current_wait_times(hospital: str) -> str:
    """Get the current wait time at a hospital formatted as a string."""
    wait_time_in_minutes = _get_current_wait_time_minutes(hospital)

    if wait_time_in_minutes == -1:
        return f"Hospital '{hospital}' does not exist."

    hours, minutes = divmod(wait_time_in_minutes, 60)

    if hours > 0:
        return f"{hours} hours {minutes} minutes"
    else:
        return f"{minutes} minutes"
The first function you define is _get_current_hospitals() which returns a list of hospital names from your Neo4j database. Then, _get_current_wait_time_minutes() takes a hospital name as input. If the hospital name is invalid, _get_current_wait_time_minutes() returns -1. If the hospital name is valid, _get_current_wait_time_minutes() returns a random integer between 0 and 600 simulating a wait time in minutes.
You then define get_current_wait_times() which is a wrapper around _get_current_wait_time_minutes() that returns the wait time formatted as a string.
You can use _get_current_wait_time_minutes() to define a second function that finds the hospital with the shortest wait time:
chatbot_api/src/tools/wait_times.py
# ...

def get_most_available_hospital(_: Any) -> dict[str, float]:
    """Find the hospital with the shortest wait time."""
    current_hospitals = _get_current_hospitals()

    current_wait_times = [
        _get_current_wait_time_minutes(h) for h in current_hospitals
    ]

    best_time_idx = np.argmin(current_wait_times)
    best_hospital = current_hospitals[best_time_idx]
    best_wait_time = current_wait_times[best_time_idx]

    return {best_hospital: best_wait_time}
Here, you define get_most_available_hospital() which calls _get_current_wait_time_minutes() on each hospital and returns the hospital with the shortest wait time. Notice how get_most_available_hospital() has a throwaway input _. This will be required later on by your agent because it’s designed to pass inputs into functions.
Here’s how you use get_current_wait_times() and get_most_available_hospital():
>>> import dotenv
>>> dotenv.load_dotenv()
True

>>> from chatbot_api.src.tools.wait_times import (
...     get_current_wait_times,
...     get_most_available_hospital,
... )

>>> get_current_wait_times("Wallace-Hamilton")
'1 hours 35 minutes'

>>> get_current_wait_times("fake hospital")
"Hospital 'fake hospital' does not exist."

>>> get_most_available_hospital(None)
{'cunningham and sons': 24}
After loading environment variables, you call get_current_wait_times("Wallace-Hamilton") which returns the current wait time in minutes at Wallace-Hamilton hospital. When you try get_current_wait_times("fake hospital"), you get a string telling you fake hospital does not exist in the database.
Lastly, get_most_available_hospital() returns a dictionary storing the wait time for the hospital with the shortest wait time in minutes. Next, you’ll create an agent that uses these functions, along with the Cypher and review chain, to answer arbitrary questions about the hospital system.
Create the Chatbot Agent
Give yourself a pat on the back if you’ve made it this far. You’ve covered a lot of information, and you’re finally ready to piece it all together and assemble the agent that will serve as your chatbot. Depending on the query you give it, your agent needs to decide between your Cypher chain, reviews chain, and wait times functions.
Start by loading your agent’s dependencies, reading in the agent model name from an environment variable, and loading a prompt template from LangChain Hub:
chatbot_api/src/agents/hospital_rag_agent.py
import os
from langchain_openai import ChatOpenAI
from langchain.agents import (
    create_openai_functions_agent,
    Tool,
    AgentExecutor,
)
from langchain import hub
from chains.hospital_review_chain import reviews_vector_chain
from chains.hospital_cypher_chain import hospital_cypher_chain
from tools.wait_times import (
    get_current_wait_times,
    get_most_available_hospital,
)

HOSPITAL_AGENT_MODEL = os.getenv("HOSPITAL_AGENT_MODEL")

hospital_agent_prompt = hub.pull("hwchase17/openai-functions-agent")
Notice how you’re importing reviews_vector_chain, hospital_cypher_chain, get_current_wait_times(), and get_most_available_hospital(). Your agent will directly use these as tools. HOSPITAL_AGENT_MODEL is the LLM that will act as your agent’s brain, deciding which tools to call and what inputs to pass them.
Instead of defining your own prompt for the agent, which you can certainly do, you load a predefined prompt from LangChain Hub. LangChain hub lets you upload, browse, pull, test, and manage prompts. In this case, the default prompt for OpenAI function agents works great.
Next, you define a list of tools your agent can use:
chatbot_api/src/agents/hospital_rag_agent.py
# ...

tools = [
    Tool(
        name="Experiences",
        func=reviews_vector_chain.invoke,
        description="""Useful when you need to answer questions
        about patient experiences, feelings, or any other qualitative
        question that could be answered about a patient using semantic
        search. Not useful for answering objective questions that involve
        counting, percentages, aggregations, or listing facts. Use the
        entire prompt as input to the tool. For instance, if the prompt is
        "Are patients satisfied with their care?", the input should be
        "Are patients satisfied with their care?".
        """,
    ),
    Tool(
        name="Graph",
        func=hospital_cypher_chain.invoke,
        description="""Useful for answering questions about patients,
        physicians, hospitals, insurance payers, patient review
        statistics, and hospital visit details. Use the entire prompt as
        input to the tool. For instance, if the prompt is "How many visits
        have there been?", the input should be "How many visits have
        there been?".
        """,
    ),
    Tool(
        name="Waits",
        func=get_current_wait_times,
        description="""Use when asked about current wait times
        at a specific hospital. This tool can only get the current
        wait time at a hospital and does not have any information about
        aggregate or historical wait times. Do not pass the word "hospital"
        as input, only the hospital name itself. For example, if the prompt
        is "What is the current wait time at Jordan Inc Hospital?", the
        input should be "Jordan Inc".
        """,
    ),
    Tool(
        name="Availability",
        func=get_most_available_hospital,
        description="""
        Use when you need to find out which hospital has the shortest
        wait time. This tool does not have any information about aggregate
        or historical wait times. This tool returns a dictionary with the
        hospital name as the key and the wait time in minutes as the value.
        """,
    ),
]
Your agent has four tools available to it: Experiences, Graph, Waits, and Availability. The Experiences and Graph tools call .invoke() from their respective chains, while Waits and Availability call the wait time functions you defined. Notice that many of the tool descriptions have few-shot prompts, telling the agent when it should use the tool and providing it with an example of what inputs to pass.
As with chains, good prompt engineering is crucial for your agent’s success. You have to clearly describe each tool and how to use it so that your agent isn’t confused by a query.
The last step is to instantiate you agent:
chatbot_api/src/agents/hospital_rag_agent.py
# ...

chat_model = ChatOpenAI(
    model=HOSPITAL_AGENT_MODEL,
    temperature=0,
)

hospital_rag_agent = create_openai_functions_agent(
    llm=chat_model,
    prompt=hospital_agent_prompt,
    tools=tools,
)

hospital_rag_agent_executor = AgentExecutor(
    agent=hospital_rag_agent,
    tools=tools,
    return_intermediate_steps=True,
    verbose=True,
)
You first initialize a ChatOpenAI object using HOSPITAL_AGENT_MODEL as the LLM. You then create an OpenAI functions agent with create_openai_functions_agent(). This creates an agent that’s been designed by OpenAI to pass inputs to functions. It does this by returning JSON objects that store function inputs and their corresponding value.
To create the agent run time, you pass your agent and tools into AgentExecutor. Setting return_intermediate_steps and verbose to true allows you to see the agent’s thought process and the tools it calls.
With that, you’ve completed building the hospital system agent. To try it out, you’ll have to navigate into the chatbot_api/src/ folder and start a new REPL session from there.
Note: This is necessary because you set up relative imports in hospital_rag_agent.py that’ll later run within a Docker container. For now it means that you’ll have to start your Python interpreter only after navigating into chatbot_api/src/ for the imports to work.
You can now try out your hospital system agent on your command line:
>>> import dotenv
>>> dotenv.load_dotenv()
True

>>> from agents.hospital_rag_agent import hospital_rag_agent_executor

>>> response = hospital_rag_agent_executor.invoke(
...     {"input": "What is the wait time at Wallace-Hamilton?"}
... )

> Entering new AgentExecutor chain...

Invoking: `Waits` with `Wallace-Hamilton`

54The current wait time at Wallace-Hamilton is 54 minutes.

> Finished chain.

>>> response.get("output")
'The current wait time at Wallace-Hamilton is 54 minutes.'

>>> response = hospital_rag_agent_executor.invoke(
...     {"input": "Which hospital has the shortest wait time?"}
... )

> Entering new AgentExecutor chain...

Invoking: `Availability` with `shortest wait time`

{'smith, edwards and obrien': 2}The hospital with the shortest
wait time is Smith, Edwards and O'Brien, with a wait time of 2 minutes.

> Finished chain.

>>> response.get("output")
"The hospital with the shortest wait time is Smith, Edwards
and O'Brien, with a wait time of 2 minutes."
After loading environment variables, you ask the agent about wait times. You can see exactly what it’s doing in response to each of your queries. For instance, when you ask “What is the wait time at Wallace-Hamilton?”, it invokes the Wait tool and passes Wallace-Hamilton as input. This means the agent is calling get_current_wait_times("Wallace-Hamilton"), observing the return value, and using the return value to answer your question.
To see the agents full capabilities, you can ask it questions about patient experiences that require patient reviews to answer:
>>> response = hospital_rag_agent_executor.invoke(
...     {
...         "input": (
...             "What have patients said about their "
...             "quality of rest during their stay?"
...         )
...     }
... )

> Entering new AgentExecutor chain...

Invoking: `Experiences` with `What have patients said about their quality of
rest during their stay?`

{'query': 'What have patients said about their quality of rest during their
stay?','result': "Patients have mentioned that the constant interruptions
for routine checks and the noise level at night were disruptive and made
it difficult for them to get a good night's sleep during their stay.
Additionally, some patients have complained about uncomfortable beds
affecting their quality of rest."}Patients have mentioned that the
constant interruptions for routine checks and the noise level at night
were disruptive and made it difficult for them to get a good night's sleep
during their stay. Additionally, some patients have complained about
uncomfortable beds affecting their quality of rest.

> Finished chain.

>>> response.get("output")
"Patients have mentioned that the constant interruptions for routine checks
and the noise level at night were disruptive and made it difficult for them
to get a good night's sleep during their stay. Additionally, some patients
have complained about uncomfortable beds affecting their quality of rest."
Notice here how you never explicitly mention reviews or experiences in your question. The agent knows, based on the tool description, that it needs to invoke Experiences. Lastly, you can ask the agent a question requiring a Cypher query to answer:
>>> response = hospital_rag_agent_executor.invoke(
...     {
...         "input": (
...             "Which physician has treated the "
...             "most patients covered by Cigna?"
...         )
...     }
... )

> Entering new AgentExecutor chain...

Invoking: `Graph` with `Which physician has treated the most patients
covered by Cigna?`

> Entering new GraphCypherQAChain chain...
Generated Cypher:
MATCH (phy:Physician)-[:TREATS]->(v:Visit)-[:COVERED_BY]->(p:Payer)
WHERE p.name = 'Cigna'
WITH phy, COUNT(DISTINCT v) AS patient_count
RETURN phy.name AS physician_name, patient_count
ORDER BY patient_count DESC
LIMIT 1
Full Context:
[{'physician_name': 'Renee Brown', 'patient_count': 10}]

> Finished chain.
{'query': 'Which physician has treated the most patients covered by Cigna?',
'result': 'The physician who has treated the most patients covered by Cigna
is Dr. Renee Brown. She has treated a total of 10 patients.'}The
physician who has treated the most patients covered by Cigna is Dr. Renee
Brown. She has treated a total of 10 patients.

> Finished chain.

>>> response.get("output")
'The physician who has treated the most patients covered by
Cigna is Dr. Renee Brown.
She has treated a total of 10 patients.'
Your agent has a remarkable ability to know which tools to use and which inputs to pass based on your query. This is your fully-functioning chatbot. It has the potential to answer all the questions your stakeholders might ask based on the requirements given, and it appears to be doing a great job so far.
As you ask your chatbot more questions, you’ll almost certainly encounter situations where it calls the wrong tool or generates an incorrect answer. While modifying your prompts can help address incorrect answers, sometimes you can modify your input query to help your chatbot. Take a look at this example:
>>> response = hospital_rag_agent_executor.invoke(
...     {"input": "Show me reviews written by patient 7674."}
... )

> Entering new AgentExecutor chain...

Invoking: `Experiences` with `Show me reviews written by patient 7674.`

{'query': 'Show me reviews written by patient 7674.', 'result': 'I\'m sorry,
but there are no reviews provided by a patient with the identifier "7674" in
the context given. If you have any other questions or need information about
the reviews provided, feel free to ask.'}I'm sorry, but there are no reviews
provided by a patient with the identifier "7674" in the context given. If
you have any other questions or need information about the reviews provided,
feel free to ask.

> Finished chain.

>>> response.get("output")
'I\'m sorry, but there are no reviews provided by a patient with the identifier
"7674" in the context given. If you have any other questions or need information
about the reviews provided, feel free to ask.'
In this example, you ask the agent to show you reviews written by patient 7674. Your agent invokes Experiences and doesn’t find the answer you’re looking for. While it may be possible to find the answer using semantic vector search, you can get an exact answer by generating a Cypher query to look up reviews corresponding to patient ID 7674. To help your agent understand this, you can add additional detail to your query:
>>> response = hospital_rag_agent_executor.invoke(
...     {
...         "input": (
...             "Query the graph database to show me "
...             "the reviews written by patient 7674"
...         )
...     }
... )

> Entering new AgentExecutor chain...

Invoking: `Graph` with `Show me reviews written by patient 7674`

> Entering new GraphCypherQAChain chain...
Generated Cypher:
MATCH (p:Patient {id: 7674})-[:HAS]->(v:Visit)-[:WRITES]->(r:Review)
RETURN r.text AS review_written

Full Context:
[{'review_written': 'The hospital provided exceptional care,
but the billing process was confusing and frustrating. Clearer
communication about costs would have been appreciated.'}]

> Finished chain.
{'query': 'Show me reviews written by patient 7674', 'result': 'Here
is a review written by patient 7674: "The hospital provided exceptional
care, but the billing process was confusing and frustrating. Clearer
communication about costs would have been appreciated."'}Patient 7674
wrote the following review: "The hospital provided exceptional
care, but the billing process was confusing and frustrating.
Clearer communication about costs would have been appreciated."

> Finished chain.

>>> response.get("output")
'Patient 7674 wrote the following review: "The hospital provided exceptional
care, but the billing process was confusing and frustrating. Clearer
communication about costs would have been appreciated."'
Here, you explicitly tell your agent that you want to query the graph database, which correctly invokes Graph to find the review matching patient ID 7674. Providing more detail in your queries like this is a simple yet effective way to guide your agent when it’s clearly invoking the wrong tools.
As with your reviews and Cypher chain, before placing this in front of stakeholders, you’d want to come up with a framework for evaluating your agent. The primary functionality you’d want to evaluate is the agent’s ability to call the correct tools with the correct inputs, and its ability to understand and interpret the outputs of the tools it calls.
In the final step, you’ll learn how to deploy your hospital system agent with FastAPI and Streamlit. This will make your agent accessible to anyone who calls the API endpoint or interacts with the Streamlit UI.
Step 5: Deploy the LangChain Agent
At long last, you have a functioning LangChain agent that serves as your hospital system chatbot. The last thing you need to do is get your chatbot in front of stakeholders. For this, you’ll deploy your chatbot as a FastAPI endpoint and create a Streamlit UI to interact with the endpoint.
Before you get started, create two new folders called chatbot_frontend/ and tests/ in your project’s root directory. You’ll also need to add some additional files and folders to chatbot_api/:
./
│
├── chatbot_api/
│   │
│   ├── src/
│   │   │
│   │   ├── agents/
│   │   │   └── hospital_rag_agent.py
│   │   │
│   │   ├── chains/
│   │   │   ├── hospital_cypher_chain.py
│   │   │   └── hospital_review_chain.py
│   │   │
│   │   ├── models/
│   │   │   └── hospital_rag_query.py
│   │   │
│   │   ├── tools/
│   │   │   └── wait_times.py
│   │   │
│   │   ├── utils/
│   │   │   └── async_utils.py
│   │   │
│   │   ├── entrypoint.sh
│   │   └── main.py
│   │
│   ├── Dockerfile
│   └── pyproject.toml
│
├── chatbot_frontend/
│   │
│   ├── src/
│   │   ├── entrypoint.sh
│   │   └── main.py
│   │
│   ├── Dockerfile
│   └── pyproject.toml
│
├── hospital_neo4j_etl/
│   │
│   ├── src/
│   │   ├── entrypoint.sh
│   │   └── hospital_bulk_csv_write.py
│   │
│   ├── Dockerfile
│   └── pyproject.toml
│
├── tests/
│   ├── async_agent_requests.py
│   └── sync_agent_requests.py
│
├── .env
└── docker-compose.yml
You need the new files in chatbot_api to build your FastAPI app, and tests/ has two scripts to demonstrate the power of making asynchronous requests to your agent. Lastly, chatbot_frontend/ has the code for the Streamlit UI that’ll interface with your chatbot. You’ll start by creating a FastAPI application to serve your agent.
Serve the Agent With FastAPI
FastAPI is a modern, high-performance web framework for building APIs with Python based on standard type hints. It comes with a lot of great features including development speed, runtime speed, and great community support, making it a great choice for serving your chatbot agent.
You’ll serve your agent through a POST request, so the first step is to define what data you expect to get in the request body and what data the request returns. FastAPI does this with Pydantic:
chatbot_api/src/models/hospital_rag_query.py
from pydantic import BaseModel

class HospitalQueryInput(BaseModel):
    text: str

class HospitalQueryOutput(BaseModel):
    input: str
    output: str
    intermediate_steps: list[str]
In this script, you define Pydantic models HospitalQueryInput and HospitalQueryOutput. HospitalQueryInput is used to verify that the POST request body includes a text field, representing the query your chatbot responds to. HospitalQueryOutput verifies the response body sent back to your user includes input, output, and intermediate_step fields.
One great feature of FastAPI is its asynchronous serving capabilities. Because your agent calls OpenAI models hosted on an external server, there will always be latency while your agent waits for a response. This is a perfect opportunity for you to use asynchronous programming.
Instead of waiting for OpenAI to respond to each of your agent’s requests, you can have your agent make multiple requests in a row and store the responses as they’re received. This will save you a lot of time if you have multiple queries you need your agent to respond to.
As discussed previously, there can sometimes be intermittent connection issues with Neo4j that are usually resolved by establishing a new connection. Because of this, you’ll want to implement retry logic that works for asynchronous functions:
chatbot_api/src/utils/async_utils.py
import asyncio

def async_retry(max_retries: int=3, delay: int=1):
    def decorator(func):
        async def wrapper(*args, **kwargs):
            for attempt in range(1, max_retries + 1):
                try:
                    result = await func(*args, **kwargs)
                    return result
                except Exception as e:
                    print(f"Attempt {attempt} failed: {str(e)}")
                    await asyncio.sleep(delay)

            raise ValueError(f"Failed after {max_retries} attempts")

        return wrapper

    return decorator
Don’t worry about the details of @async_retry. All you need to know is that it will retry an asynchronous function if it fails. You’ll see where this is used next.
The driving logic for your chatbot API is in chatbot_api/src/main.py:
chatbot_api/src/main.py
from fastapi import FastAPI
from agents.hospital_rag_agent import hospital_rag_agent_executor
from models.hospital_rag_query import HospitalQueryInput, HospitalQueryOutput
from utils.async_utils import async_retry

app = FastAPI(
    title="Hospital Chatbot",
    description="Endpoints for a hospital system graph RAG chatbot",
)

@async_retry(max_retries=10, delay=1)
async def invoke_agent_with_retry(query: str):
    """Retry the agent if a tool fails to run.

    This can help when there are intermittent connection issues
    to external APIs.
    """
    return await hospital_rag_agent_executor.ainvoke({"input": query})

@app.get("/")
async def get_status():
    return {"status": "running"}

@app.post("/hospital-rag-agent")
async def query_hospital_agent(query: HospitalQueryInput) -> HospitalQueryOutput:
    query_response = await invoke_agent_with_retry(query.text)
    query_response["intermediate_steps"] = [
        str(s) for s in query_response["intermediate_steps"]
    ]

    return query_response
You import FastAPI, your agent executor, the Pydantic models you created for the POST request, and @async_retry. Then you instantiate a FastAPI object and define invoke_agent_with_retry(), a function that runs your agent asynchronously. The @async_retry decorator above invoke_agent_with_retry() ensures the function will be retried ten times with a delay of one second before failing.
Lastly, you define query_hospital_agent() which serves POST requests to your agent at /hospital-rag-agent. This function extracts the text field from the request body, passes it to the agent, and returns the agent’s response to the user.
You’ll serve this API with Docker and you’ll want to define the following entrypoint file to run inside the container:
chatbot_api/src/entrypoint.sh
#!/bin/bash

# Run any setup steps or pre-processing tasks here
echo "Starting hospital RAG FastAPI service..."

# Start the main application
uvicorn main:app --host 0.0.0.0 --port 8000
The command uvicorn main:app --host 0.0.0.0 --port 8000 runs the FastAPI application at port 8000 on your machine. The driving Dockerfile for your FastAPI app looks like this:
chatbot_api/Dockerfile
# chatbot_api/Dockerfile

FROM python:3.11-slim

WORKDIR /app
COPY ./src/ /app

COPY ./pyproject.toml /code/pyproject.toml
RUN pip install /code/.

EXPOSE 8000
CMD ["sh", "entrypoint.sh"]
This Dockerfile tells your container to use the python:3.11-slim distribution, copy the contents from chatbot_api/src/ into the /app directory within the container, install the dependencies from pyproject.toml, and run entrypoint.sh.
The last thing you’ll need to do is update the docker-compose.yml file to include your FastAPI container:
version: '3'

services:
  hospital_neo4j_etl:
    build:
      context: ./hospital_neo4j_etl
    env_file:
      - .env

  chatbot_api:
    build:
      context: ./chatbot_api
    env_file:
      - .env
    depends_on:
      - hospital_neo4j_etl
    ports:
      - "8000:8000"
Here you add the chatbot_api service which is derived from the Dockerfile in ./chatbot_api. It depends on hospital_neo4j_etl and will run on port 8000.
To run the API, along with the ETL you build earlier, open a terminal and run:
$ docker-compose up --build
If everything runs successfully, you’ll see a screen similar to the following at http://localhost:8000/docs#/:
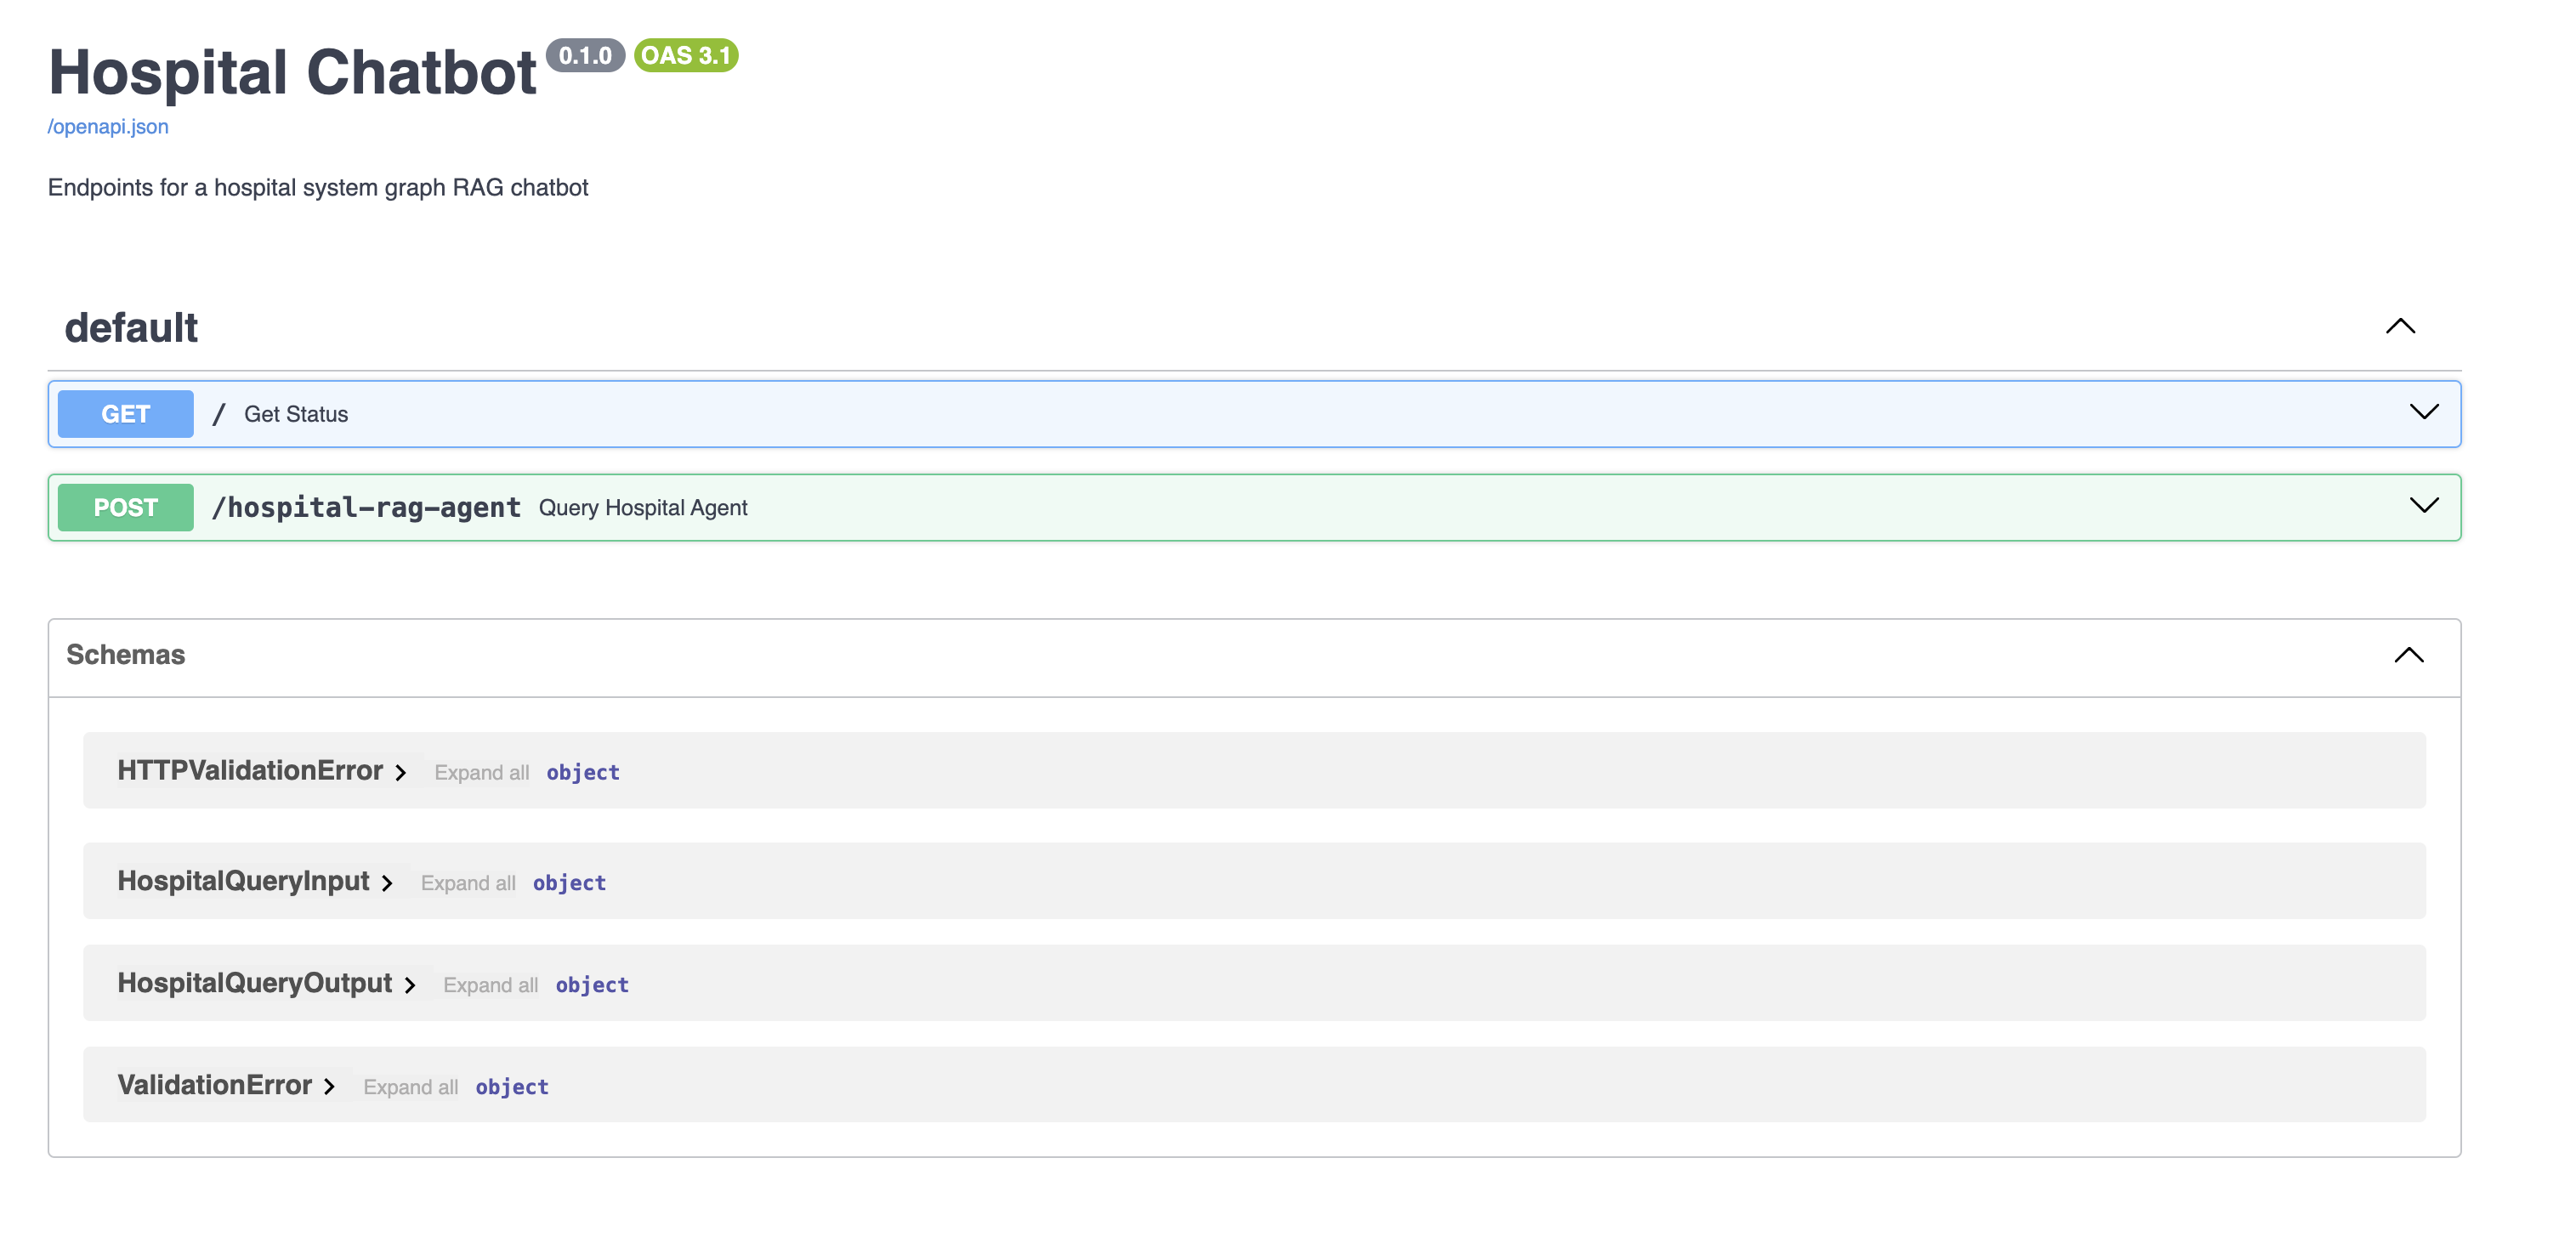
You can use the docs page to test the hospital-rag-agent endpoint, but you won’t be able to make asynchronous requests here. To see how your endpoint handles asynchronous requests, you can test it with a library like httpx.
Note: You need to install httpx into your virtual environment before running the tests below.
To see how much time asynchronous requests save you, start by establishing a benchmark using synchronous requests. Create the following script:
tests/sync_agent_requests.py
import time
import requests

CHATBOT_URL = "http://localhost:8000/hospital-rag-agent"

questions = [
   "What is the current wait time at Wallace-Hamilton hospital?",
   "Which hospital has the shortest wait time?",
   "At which hospitals are patients complaining about billing and insurance issues?",
   "What is the average duration in days for emergency visits?",
   "What are patients saying about the nursing staff at Castaneda-Hardy?",
   "What was the total billing amount charged to each payer for 2023?",
   "What is the average billing amount for Medicaid visits?",
   "How many patients has Dr. Ryan Brown treated?",
   "Which physician has the lowest average visit duration in days?",
   "How many visits are open and what is their average duration in days?",
   "Have any patients complained about noise?",
   "How much was billed for patient 789's stay?",
   "Which physician has billed the most to cigna?",
   "Which state had the largest percent increase in Medicaid visits from 2022 to 2023?",
]

request_bodies = [{"text": q} for q in questions]

start_time = time.perf_counter()
outputs = [requests.post(CHATBOT_URL, json=data) for data in request_bodies]
end_time = time.perf_counter()

print(f"Run time: {end_time - start_time} seconds")
In this script, you import requests and time, define the URL to your chatbot, create a list of questions, and record the amount of time it takes to get a response to all the questions in the list. If you open a terminal and run sync_agent_requests.py, you’ll see how long it takes to answer all 14 questions:
(venv) $ python tests/sync_agent_requests.py
Run time: 68.20339595794212 seconds
You may get slightly different results depending on your Internet speed and the availability of the chat model, but you can see this script took around 68 seconds to run. Next, you’ll get answers to the same questions asynchronously:
tests/async_agent_requests.py
import asyncio
import time
import httpx

CHATBOT_URL = "http://localhost:8000/hospital-rag-agent"

async def make_async_post(url, data):
    timeout = httpx.Timeout(timeout=120)
    async with httpx.AsyncClient() as client:
        response = await client.post(url, json=data, timeout=timeout)
        return response

async def make_bulk_requests(url, data):
    tasks = [make_async_post(url, payload) for payload in data]
    responses = await asyncio.gather(*tasks)
    outputs = [r.json()["output"] for r in responses]
    return outputs

questions = [
   "What is the current wait time at Wallace-Hamilton hospital?",
   "Which hospital has the shortest wait time?",
   "At which hospitals are patients complaining about billing and insurance issues?",
   "What is the average duration in days for emergency visits?",
   "What are patients saying about the nursing staff at Castaneda-Hardy?",
   "What was the total billing amount charged to each payer for 2023?",
   "What is the average billing amount for Medicaid visits?",
   "How many patients has Dr. Ryan Brown treated?",
   "Which physician has the lowest average visit duration in days?",
   "How many visits are open and what is their average duration in days?",
   "Have any patients complained about noise?",
   "How much was billed for patient 789's stay?",
   "Which physician has billed the most to cigna?",
   "Which state had the largest percent increase in Medicaid visits from 2022 to 2023?",
]

request_bodies = [{"text": q} for q in questions]

start_time = time.perf_counter()
outputs = asyncio.run(make_bulk_requests(CHATBOT_URL, request_bodies))
end_time = time.perf_counter()

print(f"Run time: {end_time - start_time} seconds")
In async_agent_requests.py, you make the same request you did in sync_agent_requests.py, except now you use httpx to make the requests asynchronously. Here are the results:
(venv) $ python tests/async_agent_requests.py
Run time: 17.766680584056303 seconds
Again, the exact time this takes to run may vary for you, but you can see making 14 requests asynchronously was roughly four times faster. Deploying your agent asynchronously allows you to scale to a high-request volume without having to increase your infrastructure demands. While there are always exceptions, serving REST endpoints asynchronously is usually a good idea when your code makes network-bound requests.
With this FastAPI endpoint functioning, you’ve made your agent accessible to anyone who can access the endpoint. This is great for integrating your agent into chatbot UIs, which is what you’ll do next with Streamlit.
Create a Chat UI With Streamlit
Your stakeholders need a way to interact with your agent without making manual API requests. To accommodate this, you’ll build a Streamlit app that acts as an interface between your stakeholders and your API. Here are the dependencies for the Streamlit UI:
chatbot_frontend/pyproject.toml
[project]
name = "chatbot_frontend"
version = "0.1"
dependencies = [
   "requests==2.31.0",
   "streamlit==1.29.0"
]

[project.optional-dependencies]
dev = ["black", "flake8"]
The driving code for your Streamlit app is in chatbot_frontend/src/main.py:
chatbot_frontend/src/main.py
import os
import requests
import streamlit as st

CHATBOT_URL = os.getenv("CHATBOT_URL", "http://localhost:8000/hospital-rag-agent")

with st.sidebar:
    st.header("About")
    st.markdown(
        """
        This chatbot interfaces with a
        [LangChain](https://python.langchain.com/docs/get_started/introduction)
        agent designed to answer questions about the hospitals, patients,
        visits, physicians, and insurance payers in  a fake hospital system.
        The agent uses  retrieval-augment generation (RAG) over both
        structured and unstructured data that has been synthetically generated.
        """
    )

    st.header("Example Questions")
    st.markdown("- Which hospitals are in the hospital system?")
    st.markdown("- What is the current wait time at wallace-hamilton hospital?")
    st.markdown(
        "- At which hospitals are patients complaining about billing and "
        "insurance issues?"
    )
    st.markdown("- What is the average duration in days for closed emergency visits?")
    st.markdown(
        "- What are patients saying about the nursing staff at "
        "Castaneda-Hardy?"
    )
    st.markdown("- What was the total billing amount charged to each payer for 2023?")
    st.markdown("- What is the average billing amount for medicaid visits?")
    st.markdown("- Which physician has the lowest average visit duration in days?")
    st.markdown("- How much was billed for patient 789's stay?")
    st.markdown(
        "- Which state had the largest percent increase in medicaid visits "
        "from 2022 to 2023?"
    )
    st.markdown("- What is the average billing amount per day for Aetna patients?")
    st.markdown("- How many reviews have been written from patients in Florida?")
    st.markdown(
        "- For visits that are not missing chief complaints, "
        "what percentage have reviews?"
    )
    st.markdown(
        "- What is the percentage of visits that have reviews for each hospital?"
    )
    st.markdown(
        "- Which physician has received the most reviews for this visits "
        "they've attended?"
    )
    st.markdown("- What is the ID for physician James Cooper?")
    st.markdown(
        "- List every review for visits treated by physician 270. Don't leave any out."
    )

st.title("Hospital System Chatbot")
st.info(
    "Ask me questions about patients, visits, insurance payers, hospitals, "
    "physicians, reviews, and wait times!"
)

if "messages" not in st.session_state:
    st.session_state.messages = []

for message in st.session_state.messages:
    with st.chat_message(message["role"]):
        if "output" in message.keys():
            st.markdown(message["output"])

        if "explanation" in message.keys():
            with st.status("How was this generated", state="complete"):
                st.info(message["explanation"])

if prompt := st.chat_input("What do you want to know?"):
    st.chat_message("user").markdown(prompt)

    st.session_state.messages.append({"role": "user", "output": prompt})

    data = {"text": prompt}

    with st.spinner("Searching for an answer..."):
        response = requests.post(CHATBOT_URL, json=data)

        if response.status_code == 200:
            output_text = response.json()["output"]
            explanation = response.json()["intermediate_steps"]

        else:
            output_text = """An error occurred while processing your message.
            Please try again or rephrase your message."""
            explanation = output_text

    st.chat_message("assistant").markdown(output_text)
    st.status("How was this generated", state="complete").info(explanation)

    st.session_state.messages.append(
        {
            "role": "assistant",
            "output": output_text,
            "explanation": explanation,
        }
    )
Learning Streamlit is not the focus of this tutorial, so you won’t get a detailed description of this code. However, here’s a high-level overview of what this UI does:
- The entire chat history is stored and displayed each time the user makes a new query.
- The UI takes the user’s input and makes a synchronous POST request to the agent endpoint.
- The most recent agent response is displayed at the bottom of the chat and appended to the chat history.
- An explanation of how the agent generated its response it provided to the user. This is great for auditing purposes because you can see if the agent called the right tool, and you can check if the tool worked correctly.
As you’ve done, you’ll create an entrypoint file to run the UI:
chatbot_frontend/src/entrypoint.sh
#!/bin/bash

# Run any setup steps or pre-processing tasks here
echo "Starting hospital chatbot frontend..."

# Run the ETL script
streamlit run main.py
And finally, the Docker file to create an image for the UI:
chatbot_frontend/Dockerfile
FROM python:3.11-slim

WORKDIR /app

COPY ./src/ /app

COPY ./pyproject.toml /code/pyproject.toml
RUN pip install /code/.

CMD ["sh", "entrypoint.sh"]
This Dockerfile is identical to the previous ones you’ve created. With that, you’re ready to run your entire chatbot application end-to-end.
Orchestrate the Project With Docker Compose
At this point, you’ve written all the code needed to run your chatbot. This last step is to build and run your project with docker-compose. Before doing so, make sure your have all of the following files and folders in your project directory:
./
│
├── chatbot_api/
│   │
│   │
│   ├── src/
│   │   │
│   │   ├── agents/
│   │   │   └── hospital_rag_agent.py
│   │   │
│   │   ├── chains/
│   │   │   │
│   │   │   ├── hospital_cypher_chain.py
│   │   │   └── hospital_review_chain.py
│   │   │
│   │   ├── models/
│   │   │   └── hospital_rag_query.py
│   │   │
│   │   ├── tools/
│   │   │   └── wait_times.py
│   │   │
│   │   ├── utils/
│   │   │   └── async_utils.py
│   │   │
│   │   ├── entrypoint.sh
│   │   └── main.py
│   │
│   ├── Dockerfile
│   └── pyproject.toml
│
├── chatbot_frontend/
│   │
│   ├── src/
│   │   ├── entrypoint.sh
│   │   └── main.py
│   │
│   ├── Dockerfile
│   └── pyproject.toml
│
├── hospital_neo4j_etl/
│   │
│   ├── src/
│   │   ├── entrypoint.sh
│   │   └── hospital_bulk_csv_write.py
│   │
│   ├── Dockerfile
│   └── pyproject.toml
│
├── tests/
│   ├── async_agent_requests.py
│   └── sync_agent_requests.py
│
├── .env
└── docker-compose.yml
Your .env file should have the following environment variables. Most of them you created earlier in this tutorial, but you’ll also need to add one new one for CHATBOT_URL so that your Streamlit app will be able to find your API:
OPENAI_API_KEY=<YOUR_OPENAI_API_KEY>

NEO4J_URI=<YOUR_NEO4J_URI>
NEO4J_USERNAME=<YOUR_NEO4J_USERNAME>
NEO4J_PASSWORD=<YOUR_NEO4J_PASSWORD>

HOSPITALS_CSV_PATH=https://raw.githubusercontent.com/hfhoffman1144/langchain_neo4j_rag_app/main/data/hospitals.csv
PAYERS_CSV_PATH=https://raw.githubusercontent.com/hfhoffman1144/langchain_neo4j_rag_app/main/data/payers.csv
PHYSICIANS_CSV_PATH=https://raw.githubusercontent.com/hfhoffman1144/langchain_neo4j_rag_app/main/data/physicians.csv
PATIENTS_CSV_PATH=https://raw.githubusercontent.com/hfhoffman1144/langchain_neo4j_rag_app/main/data/patients.csv
VISITS_CSV_PATH=https://raw.githubusercontent.com/hfhoffman1144/langchain_neo4j_rag_app/main/data/visits.csv
REVIEWS_CSV_PATH=https://raw.githubusercontent.com/hfhoffman1144/langchain_neo4j_rag_app/main/data/reviews.csv

HOSPITAL_AGENT_MODEL=gpt-3.5-turbo-1106
HOSPITAL_CYPHER_MODEL=gpt-3.5-turbo-1106
HOSPITAL_QA_MODEL=gpt-3.5-turbo-0125

CHATBOT_URL=http://host.docker.internal:8000/hospital-rag-agent
To complete your docker-compose.yml file, you’ll need to add a chatbot_frontend service. Your final docker-compose.yml file should look like this:
docker-compose.yml
version: '3'

services:
  hospital_neo4j_etl:
    build:
      context: ./hospital_neo4j_etl
    env_file:
      - .env

  chatbot_api:
    build:
      context: ./chatbot_api
    env_file:
      - .env
    depends_on:
      - hospital_neo4j_etl
    ports:
      - "8000:8000"

  chatbot_frontend:
    build:
      context: ./chatbot_frontend
    env_file:
      - .env
    depends_on:
      - chatbot_api
    ports:
      - "8501:8501"
Finally, open a terminal and run:
$ docker-compose up --build
Once everything builds and runs, you can access the UI at http://localhost:8501/ and begin chatting with your chatbot:
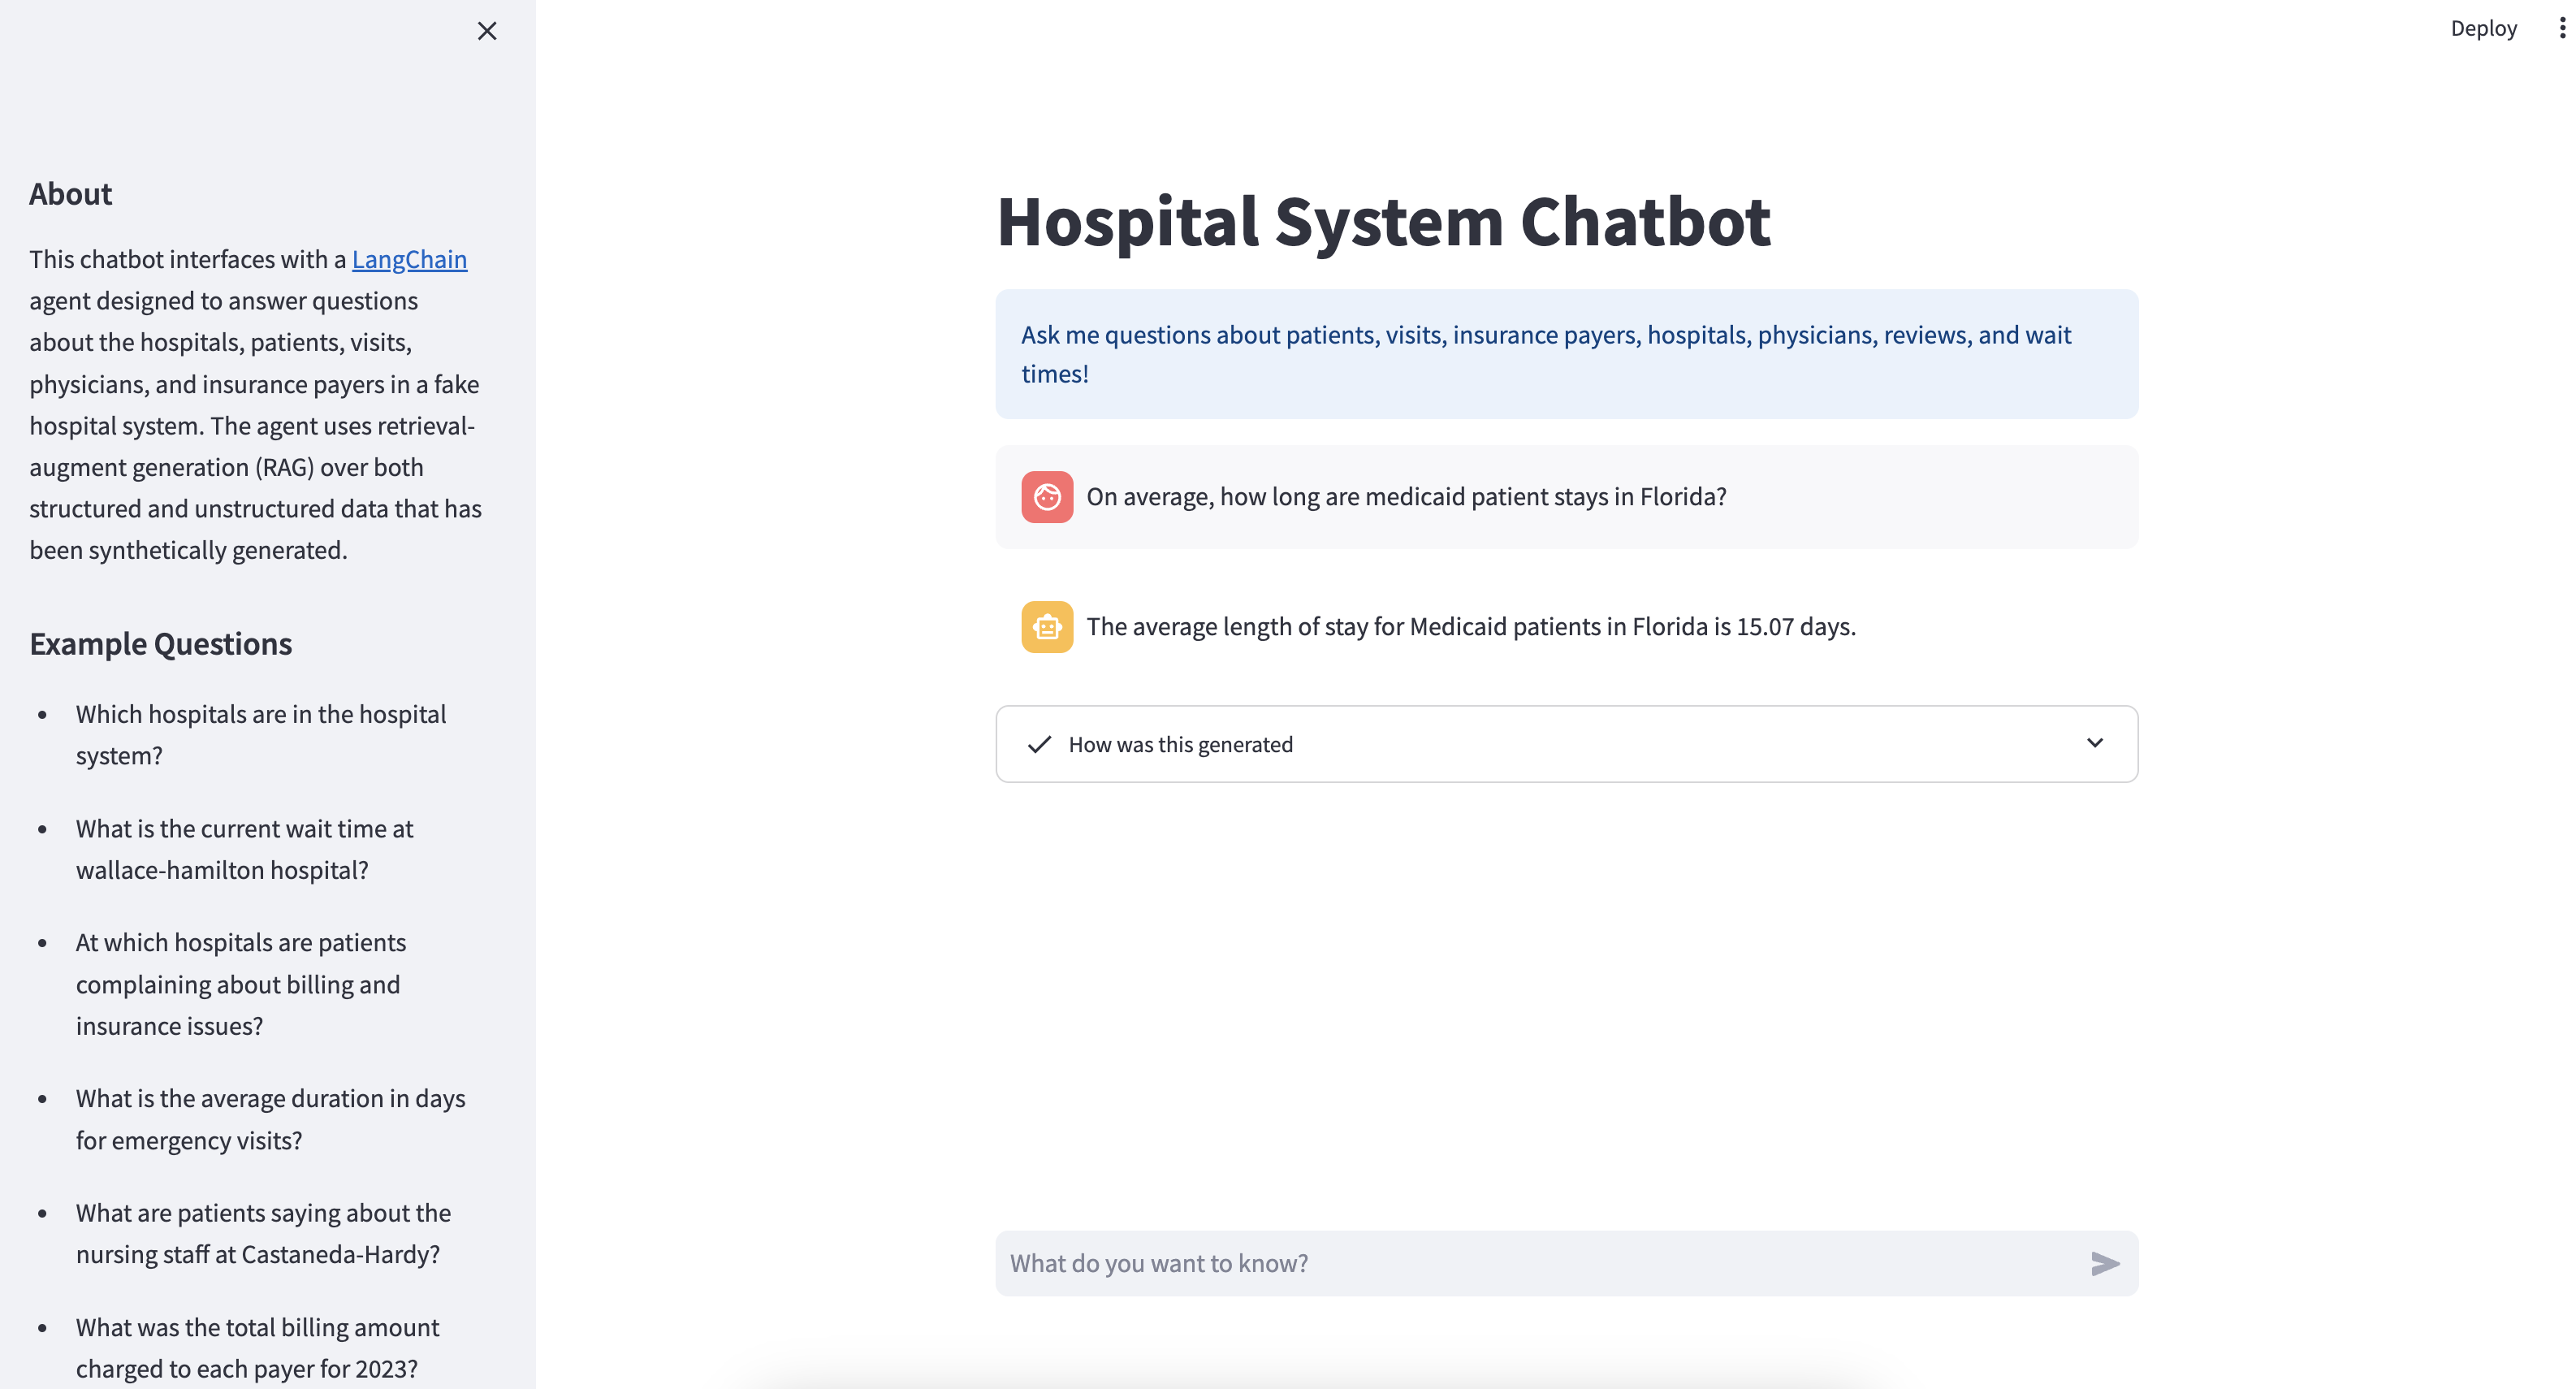
You’ve built a fully functioning hospital system chatbot end-to-end. Take some time to ask it questions, see the kinds of questions it’s good at answering, find out where it fails, and think about how you might improve it with better prompting or data. You can start by making sure the example questions in the sidebar are answered successfully.
Conclusion
Congratulations on completing this in-depth tutorial!
You’ve successfully designed, built, and served a RAG LangChain chatbot that answers questions about a fake hospital system. There are certainly many ways you can improve the chatbot you built in this tutorial, but you now have a sound understanding of how to integrate LangChain with your own data, giving you the creative freedom to build all kinds of custom chatbots.
In this tutorial, you’ve learned how to:
- Use LangChain to build personalized chatbots.
- Create a chatbot for a fake hospital system by aligning with business requirements and leveraging available data.
- Consider the implementation of graph databases in your chatbot design.
- Set up a Neo4j AuraDB instance for your project.
- Develop a RAG chatbot capable of fetching both structured and unstructured data from Neo4j.
- Deploy your chatbot using FastAPI and Streamlit.
You can find the complete source code and data for this project, in the supporting materials, which you can download using the link below:
Get Your Code: Click here to download the free source code for your LangChain chatbot.


