In this tutorial, you will learn how to create UIAlertController with two buttons and UITextField.
By the end of this tutorial, you will have a working Swift code example that you can use in your mobile application.
Step 1: Create UIAlertController
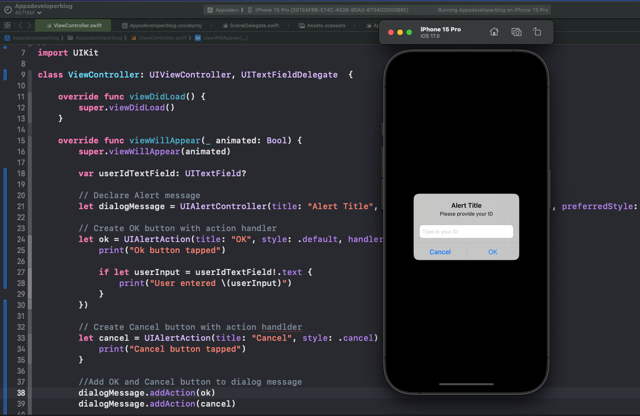
To start, you need to create an instance of UIAlertController. This object is the primary way to present alerts in iOS. You’ll specify the title, message, and style of the alert. The style should be .alert for a simple alert with a message and one or more buttons.
let dialogMessage = UIAlertController(title: "Alert Title", message: "Please provide your ID", preferredStyle: .alert)
Step 2: Create OK and Cancel buttons with Action handlers
Next, you’ll create two UIAlertAction instances for the OK and Cancel buttons. Each action requires a title, a style (.default for the OK button and .cancel for the Cancel button), and an optional handler. The handler is a closure that gets executed when the button is tapped.
let ok = UIAlertAction(title: "OK", style: .default, handler: { (action) -> Void in
    print("Ok button tapped")
})

let cancel = UIAlertAction(title: "Cancel", style: .cancel) { (action) -> Void in
    print("Cancel button tapped")
}
You can then add these two buttons to a dialog message this way:
// Add OK and Cancel button to dialog message
dialogMessage.addAction(ok)
dialogMessage.addAction(cancel)
Step 3: Add UITextField to UIAlertController
To add a text field to the alert, you use the addTextField method of UIAlertController. This method takes a closure as a parameter, which allows you to configure the text field. You can set a placeholder text to guide the user.
dialogMessage.addTextField { (textField) -> Void in
    textField.placeholder = "Type in your ID"
}
Step 4: Handle OK button action to display text user has entered into UITextField
In the OK button’s action handler, you’ll retrieve the text entered by the user into the text field. You can access the text field by referencing it from the textFields array of the UIAlertController.
if let userInput = dialogMessage.textFields?.first?.text {
    print("User entered \(userInput)")
}
Complete Code Example
Here’s how the complete code looks when pieced together:
import UIKit

class ViewController: UIViewController, UITextFieldDelegate {

    override func viewDidLoad() {
        super.viewDidLoad()
    }

    override func viewWillAppear(_ animated: Bool) {
        super.viewWillAppear(animated)

        // Declare Alert message
        let dialogMessage = UIAlertController(title: "Alert Title", message: "Please provide your ID", preferredStyle: .alert)

        // Create OK button with action handler
        let ok = UIAlertAction(title: "OK", style: .default, handler: { (action) -> Void in
            if let userInput = dialogMessage.textFields?.first?.text {
                print("User entered \(userInput)")
            }
        })

        // Create Cancel button with action handler
        let cancel = UIAlertAction(title: "Cancel", style: .cancel)

        // Add OK and Cancel button to dialog message
        dialogMessage.addAction(ok)
        dialogMessage.addAction(cancel)

        // Add Input TextField to dialog message
        dialogMessage.addTextField { (textField) -> Void in
            textField.placeholder = "Type in your ID"
        }

        // Present dialog message to user
        self.present(dialogMessage, animated: true, completion: nil)
    }
}
Conclusion
I hope this tutorial was helpful for you. There are a lot more Swift code examples on this website if you check the Swift Code Examples page.
Additionally, you might also want to check a list of recent Swift tutorials where you will also find a list of useful resources for iOS mobile app developers.