How to Install Apache Tomcat with Nginx Reverse Proxy on AlmaLinux 9
Apache Tomcat or "Tomcat" is a free and open-source Java Servlet container for Java code and applications. Originally created by Sun Microsystem, later donated the code base to Apache Software Foundation and distributed it under Apache License v2. Apache Tomcat provides a "pure Java" HTTP server environment in which Java code can run. It's also an implementation of JavaServer Pages, Java Expression Language, and WebSocket technologies.
Apache Tomcat is one of the most popular Java Servlet implementations. It supports SSL for securing sensitive data such as authentication. Also, it's lightweight in server resources and cross-platform, which can be installed on Unix-like operating systems, Windows, and macOS.
In the following guide, we'll show you the installation of Apache Tomcat with Nginx as a reverse proxy on the AlmaLinux 9 server. You will install Apache Tomcat via binary package, then install Nginx and set up server block configuration for the reverse proxy.
Prerequisites
Before you begin, ensure you have the following:
- An AlmaLinux 9 server.
- A non-root user with administrator privileges.
Installing Java OpenJDK
Before installing Tomcat, you must install the Java JDK to your AlmaLinux server. For Apache Tomcat, you can use Java JDK 11 or later. In this example, we will be using Java OpenJDK 17, which is available by default on the AlmaLinux 9 repository.
To install OpenJDK 17, run the dnf command below. When asked for confirmation, input y and press ENTER.
sudo dnf install java-17-openjdk java-17-openjdk-devel

Once Java OpenJDK is installed, run the java command below to verify your OpenJDK version.
java --version
You can see below that Java OpenJDK 17 is installed.

Downloading Apache Tomcat 10
After installing Java OpenJDK, you will download and install Apache Tomcat manually via binary package. So before starting the installation, visit the Apache Tomcat download page and grab the download link.
To get started, run the command below to create a new system user tomcat with the default home directory /opt/tomcat.
sudo groupadd tomcat
sudo adduser -r -s /usr/sbin/nologin -g tomcat -b /opt/tomcat tomcat
Now download the Apache Tomcat binary package using the wget command below. At the time of this writing, the latest Apache Tomcat is version 10.1.18. So be sure to change the VERSION variable with your current Tomcat version.
export VERSION=10.1.18
wget https://dlcdn.apache.org/tomcat/tomcat-10/v${VERSION}/bin/apache-tomcat-${VERSION}.tar.gz
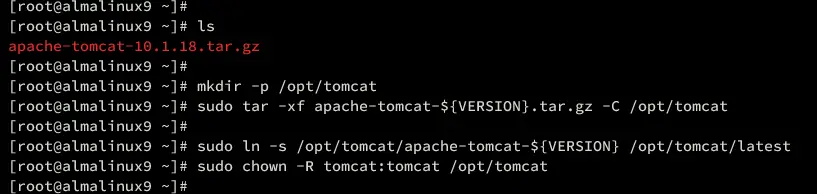
Once the download process is complete, create a new home directory for tomcat user /opt/tomcat and extract your Apache Tomcat binary package into it.
mkdir -p /opt/tomcat
sudo tar -xf apache-tomcat-${VERSION}.tar.gz -C /opt/tomcat
Lastly, run the command below to create a symlink of the Tomcat directory to /opt/tomcat/latest. Then, change the ownership of the /opt/tomcat directory user 'tomcat'.
sudo ln -s /opt/tomcat/apache-tomcat-${VERSION} /opt/tomcat/latest
sudo chown -R tomcat:tomcat /opt/tomcat
Setting Up Apache Tomcat as a Service
With the Apache Tomcat installed, the next step is to set up a new systemd service for Apache Tomcat. This way, you can easily manage Apache Tomcat via the systemctl utility. Also, this will ensure that you start the script for Tomcat in one/single place.
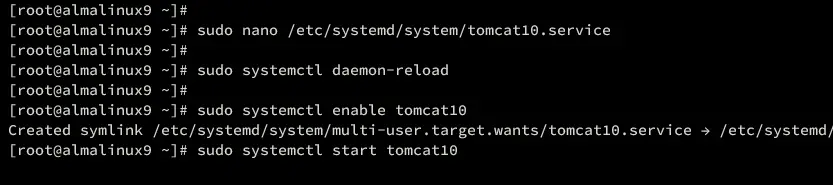
Create a new systemd service file /etc/systemd/system/tomcat10.service using the following nano editor command.
sudo nano /etc/systemd/system/tomcat10.service
Insert the following configuration as the Apache Tomcat systemd service script. In the CATALINA_OPTS parameter, be sure to adjust the max heap memory for Apache Tomcat.
[Unit]
Description=Tomcat 10 servlet container
After=network.target

[Service]
Type=forking

User=tomcat
Group=tomcat

Environment="JAVA_HOME=/usr/lib/jvm/java"
Environment="JAVA_OPTS=-Djava.security.egd=file:///dev/urandom -Djava.awt.headless=true"

Environment="CATALINA_BASE=/opt/tomcat/latest"
Environment="CATALINA_HOME=/opt/tomcat/latest"
Environment="CATALINA_PID=/opt/tomcat/latest/temp/tomcat.pid"
Environment="CATALINA_OPTS=-Xms512M -Xmx2048M -server -XX:+UseParallelGC"

ExecStart=/opt/tomcat/latest/bin/startup.sh
ExecStop=/opt/tomcat/latest/bin/shutdown.sh

[Install]
WantedBy=multi-user.target
Save the file and exit the editor after you're done.
Now run the following command to reload the systemd manager and apply your new tomcat10 service.
sudo systemctl daemon-reload
You can now start and enable Apache Tomcat service tomat10 using the following command.
sudo systemctl enable tomcat10
sudo systemctl start tomcat10
Once started, run the command below to verify the tomcat10 service. If everything goes well, you should see the tomcat10 service running.
sudo systemctl status tomcat10

With the Apache Tomcat running, execute the firewall-cmd command below to open port 8080 which is used by Apache Tomcat.
sudo firewall-cmd --add-port=8080/tcp
Lastly, launch your web browser and visit the server IP address followed by port 8080 (http://192.168.5.50:8080). If your Apache Tomcat installation is successful, you should get the default index page like the following:

Setting Up Authentication in Apache Tomcat 10
At this point, you installed Apache Tomcat and it's now running. In this section, you will explore how to set up and enable password authentication on Apache Tomcat.
Firstly, run the nano editor command below to open the file /opt/tomcat/latest/conf/tomcat-users.xml.
sudo nano /opt/tomcat/latest/conf/tomcat-users.xml
Add the following configuration to the '<tomcat-users> ... </tomcat-users>' section. And be sure to change the default username admin and password tomcatadmin with new credentials.
<tomcat-users>

<!--
user: admin pass: tomcatadmin
-->
<role rolename="manager-gui"/>
<role rolename="manager-script"/>
<role rolename="manager-jmx"/>
<role rolename="manager-status"/>
<role rolename="admin-gui"/>
<role rolename="admin-script"/>
<user username="admin" password="tomcatadmin" roles="manager-gui, manager-script, manager-jmx, manager-status, admin-gui, admin-script"/>

</tomcat-users>
Save and exit the file when you're finished.
Now open the configuration for Apache Tomcat Manager and Host Manager using the nano editor command below.
sudo nano /opt/tomcat/latest/webapps/host-manager/META-INF/context.xml
sudo nano /opt/tomcat/latest/webapps/manager/META-INF/context.xml
Put a comment '<!-- ... -->' on the 'className="org.apache.catalina.valves.RemoteAddrValve"' to allow access to both Apache Tomcat Manager and Host Manager from anywhere. See the configuration below.
<!--
<Valve className="org.apache.catalina.valves.RemoteAddrValve"
allow="127\.\d+\.\d+\.\d+|::1|0:0:0:0:0:0:0:1" />
-->
(Optional) You can also specify IP addresses that allow you to access Tomcat Manager and Host Manager by adding your IP address like the following:
<Valve className="org.apache.catalina.valves.RemoteAddrValve"
allow="127\.\d+\.\d+\.\d+|::1|0:0:0:0:0:0:0:1|CLIENT-IP-ADDRESS" />
Save the file and exit the editor when finished.
With everything complete, you can now restart the tomcat10 service using the command below to take effect. Once executed, your Apache Tomcat Manager and Host Manager will be running with password authentication.
sudo systemctl restart tomcat10
Back to your browser and visit the Apache Tomcat Manager URL at http://192.168.5.50:8080/manager/. When prompted for password basic authentication, input your Apache Tomcat admin user and password, then click Sign In.

If you have the correct admin user and password, you should see the Apache Tomcat Manager dashboard like this:

Lastly, visit the Apache Tomcat Host Manager URL via http://192.168.5.50:8080/host-manager/ and log in with the Tomcat admin user and password when prompted for authentication. You will see the Host Manager dashboard like the following:

Setup Nginx as a Reverse Proxy
At this point, you have finished the Apache Tomcat installation. The next step you will do is install and configure Nginx as a reverse proxy for Apache Tomcat.
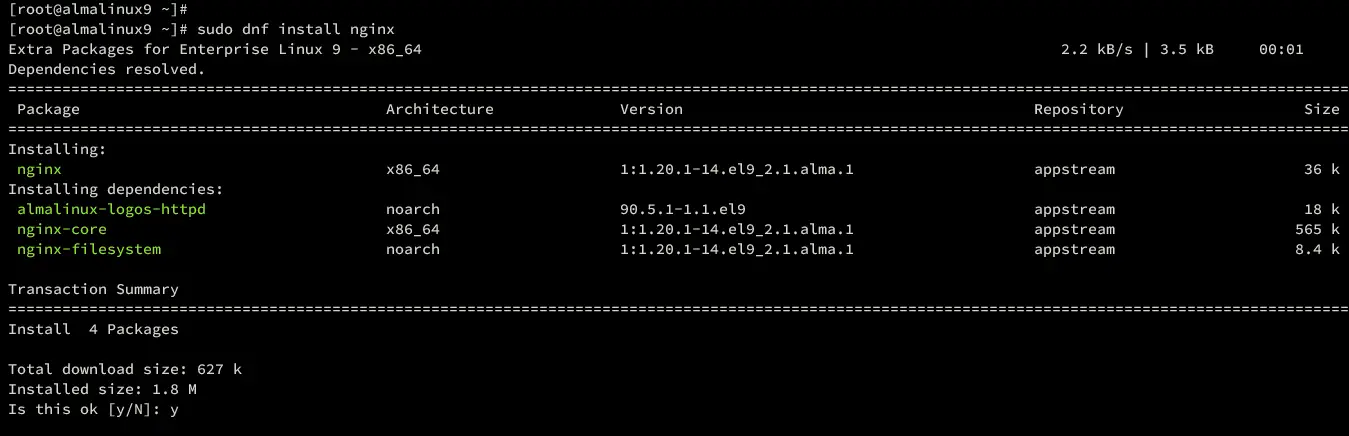
To install Nginx on your AlmaLinux server, run the dnf command below. Type Y to confirm and proceed with the installation.
sudo dnf install nginx
After Nginx is installed, create a new server block configuration /etc/nginx/conf.d/tomcat.conf using the nano editor command.
sudo nano /etc/nginx/conf.d/tomcat.conf
Add the following server block to set up Nginx as a reverse proxy for Apache Tomcat that running on port 8080.
server {
listen 80;

server_name tomcat.hwdomain.io;
access_log /var/log/nginx/tomcat-access.log;
error_log /var/log/nginx/tomcat-error.log;

location / {
proxy_set_header X-Forwarded-Host $host;
proxy_set_header X-Forwarded-Server $host;
proxy_set_header X-Forwarded-For $proxy_add_x_forwarded_for;
proxy_pass http://127.0.0.1:8080/;
}
}
Save the file and exit the editor.
Now run the command below to verify your Nginx configuration and ensure that you've proper syntax.
sudo nginx -t

Next, run the systemctl command below to start and enable the Nginx web server.
sudo systemctl start nginx
sudo systemctl enable nginx
Once Nginx starts, run the following command to verify the Nginx service. If running, you will see an output active (running).
sudo systemctl status nginx
You can see below Nginx is enabled and running on your AlmaLinux server.

Configuring Firewalld
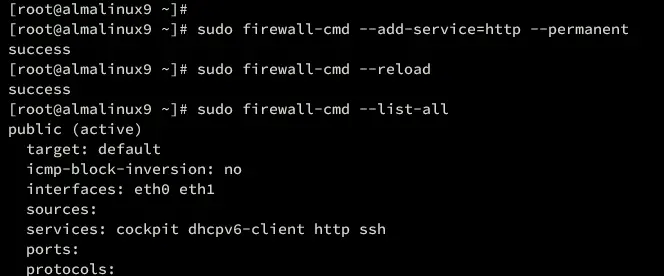
With Apache Tomcat running under Nginx, you must open HTTP port 0 on your firewalld configuration.
Run the following command to open the HTTP service and reload firewalld in your AlmaLinux service.
sudo firewall-cmd --add-service=http --permanent
sudo firewall-cmd --reload
Now verify the list of firewalld rules using the command below.
sudo firewall-cmd --list-all
Be sure that the HTTP service for the Nginx web server is enabled.
Now back to your web browser and visit the local domain name of your Nginx server block, such as http://tomcat.hwdomain.io/. If your Nginx reverse proxy configuration is successful, you will see the default index page of Apache Tomcat.

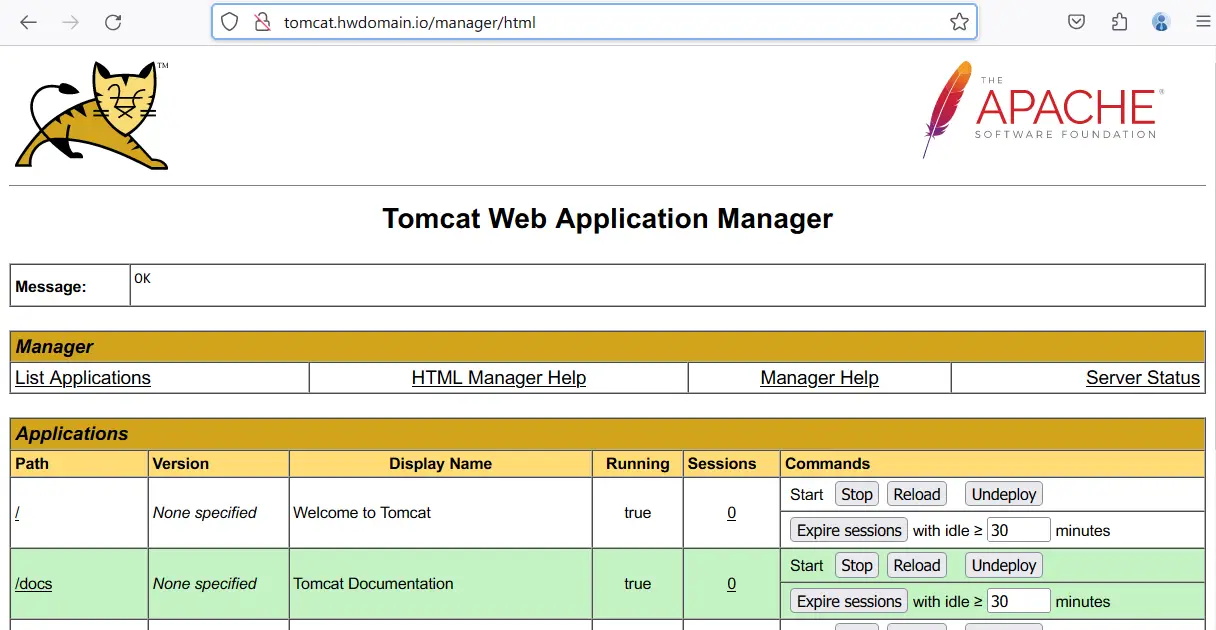
Now navigate to the Tomcat Manager URL via http://tomcat.hwdomain.io/manager. When prompted for authentication, input your Apache Tomcat username and password, then click Sign In.
If you have the correct user and password, you will see the Apache Tomcat Manager dashboard like the following:
Lastly, navigate to the Apache Tomcat Host Manager URL http://tomcat.hwdomain.io/host-manager/ and you will see the Apache Tomcat Host Manager dashboard like the following:

Conclusion
Congratulations! You have successfully installed Apache Tomcat on an AlmaLinux 9 server. You've installed Apache Tomcat 10 manually via a binary package on the AlmaLinux server. In addition to that, you have also configured Nginx as a reverse proxy for your Apache Tomcat installation. And also configured firewalld to open the HTTP port.

