Last September, I gave a talk at my local Ruby meetup titled "Intro To Ruby in the Browser" about how to use Ruby for Frontend Development in Rails as a complete replacement for JavaScript as per Matz's RubyConf 2022 Keynote Speech. If you have not had a chance to watch the talk's video, please do so now: https://andymaleh.blogspot.com/2023/09/montrealrb-sep-2023-intro-to-ruby-in.html
In essence, I gave an introductory tutorial of how to use Ruby in the Browser using 2 options: Ruby WASM and Opal Ruby, walking attendees step by step through introductory examples, including how to share Ruby code between the Backend and Frontend. I concluded the talk by mentioning advanced techniques for using Ruby in the Browser including a then upcoming project called Glimmer DSL for Web that would make Ruby in the Browser the simplest, most intuitive, most straight-forward, and most productive Software Engineering experience in Frontend Development in any Programming Language or Technology.
Well, The future is now! Glimmer DSL for Web (Ruby in the Browser Web GUI Frontend Library) just had its 0.2.2 Beta Release, and is nearly feature-complete for a 1.0.0 release. In fact, I will present it in person at the March 6, 2024 Montreal.rb Ruby Meetup: https://www.meetup.com/montrealrb/events/298445180/. I will let you discover it and learn more about it through the code examples and usage instructions included below straight out of the project's README. Happy Glimmering on the Web!!!

(Based on Original Glimmer Library Handling World’s Ruby GUI Needs Since 2007. Beware of Imitators!)
Glimmer DSL for Web enables building Web Frontends using Ruby in the Browser, as per Matz's recommendation in his RubyConf 2022 keynote speech to replace JavaScript with Ruby. It aims at providing the simplest, most intuitive, most straight-forward, and most productive frontend library in existence. The library follows the Ruby way (with DSLs and TIMTOWTDI) and the Rails way (Convention over Configuration) in building Isomorphic Ruby on Rails Applications. It provides a Ruby HTML DSL, which uniquely enables writing both structure code and logic code in one language. It supports both Unidirectional (One-Way) Data-Binding (using <=) and Bidirectional (Two-Way) Data-Binding (using <=>). Dynamic rendering (and re-rendering) of HTML content is also supported via Content Data-Binding. Modular design is supported with Glimmer Web Components. And, a Ruby CSS DSL is supported with the included Glimmer DSL for CSS. Many samples are demonstrated in the Rails sample app (there is a very minimal Standalone [No Rails] sample app too). You can finally live in pure Rubyland on the Web in both the frontend and backend with Glimmer DSL for Web!
Hello, World! Sample
Glimmer HTML DSL Ruby code in the frontend:
require 'glimmer-dsl-web'

include Glimmer

Document.ready? do
  div {
    'Hello, World!'
  }
end
That produces the following under <body></body>:
<div data-parent="body" class="element element-1">
  Hello, World!
</div>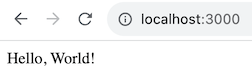
You can also mount the div elsewhere by passing the parent: parent_css_selector option (e.g. div(parent: 'div#app-container') { 'Hello, World!' }).
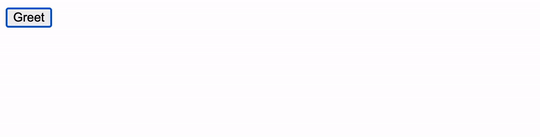
Hello, Button!
Event listeners can be setup on any element using the same event names used in HTML (e.g. onclick) while passing in a standard Ruby block to handle behavior. $$ gives access to JS global scope from Ruby to invoke functions like alert.
Glimmer HTML DSL Ruby code in the frontend:
require 'glimmer-dsl-web'

include Glimmer

Document.ready? do
  div {
    button('Greet') {
      onclick do
        $$.alert('Hello, Button!')
      end
    }
  }
end
That produces the following under <body></body>:
<div data-parent="body" class="element element-1">
  <button class="element element-2">Greet</button>
</div>
Screenshot:
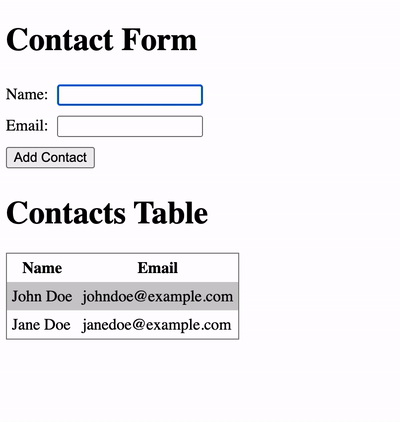
Hello, Form!
Glimmer DSL for Web gives access to all Web Browser built-in features like HTML form validations, input focus, events, and element functions from a very terse and productive Ruby HTML DSL.
Glimmer HTML DSL Ruby code in the frontend:
require 'glimmer-dsl-web'

include Glimmer

Document.ready? do
  div {
    h1('Contact Form')

    form {
      div {
        label('Name: ', for: 'name-field')
        @name_input = input(type: 'text', id: 'name-field', required: true, autofocus: true)
      }

      div {
        label('Email: ', for: 'email-field')
        @email_input = input(type: 'email', id: 'email-field', required: true)
      }

      div {
        input(type: 'submit', value: 'Add Contact') {
          onclick do |event|
            if ([@name_input, @email_input].all? {|input| input.check_validity })
              # re-open table content and add row
              @table.content {
                tr {
                  td { @name_input.value }
                  td { @email_input.value }
                }
              }
              @email_input.value = @name_input.value = ''
              @name_input.focus
            end
          end
        }
      }
    }

    h1('Contacts Table')

    @table = table {
      tr {
        th('Name')
        th('Email')
      }

      tr {
        td('John Doe')
        td('johndoe@example.com')
      }

      tr {
        td('Jane Doe')
        td('janedoe@example.com')
      }
    }

    # CSS Styles
    style {
      # CSS can be included as a String as done below, or as Glimmer DSL for CSS syntax (Ruby code) as done in other samples
      <<~CSS
        input {
          margin: 5px;
        }
        input[type=submit] {
          margin: 5px 0;
        }
        table {
          border:1px solid grey;
          border-spacing: 0;
        }
        table tr td, table tr th {
          padding: 5px;
        }
        table tr:nth-child(even) {
          background: #ccc;
        }
      CSS
    }
  }
end
That produces the following under <body></body>:
<div data-parent="body" class="element element-1">
  <h1 class="element element-2">Contact Form</h1>

  <form class="element element-3">
    <div class="element element-4">
      <label for="name-field" class="element element-5">Name: </label>
      <input type="text" id="name-field" required="true" autofocus="true" class="element element-6">
    </div>

    <div class="element element-7">
      <label for="email-field" class="element element-8">Email: </label>
      <input type="email" id="email-field" required="true" class="element element-9">
    </div>

    <div class="element element-10">
      <input type="submit" value="Add Contact" class="element element-11">
    </div>
  </form>

  <h1 class="element element-12">Contacts Table</h1>

  <table class="element element-13">
    <tr class="element element-14">
      <th class="element element-15">Name</th>
      <th class="element element-16">Email</th>
    </tr>

    <tr class="element element-17">
      <td class="element element-18">John Doe</td>
      <td class="element element-19">johndoe@example.com</td>
    </tr>

    <tr class="element element-20">
      <td class="element element-21">Jane Doe</td>
      <td class="element element-22">janedoe@example.com</td>
    </tr>
  </table>

  <style class="element element-23">
    input {
      margin: 5px;
    }
    input[type=submit] {
      margin: 5px 0;
    }
    table {
      border:1px solid grey;
      border-spacing: 0;
    }
    table tr td, table tr th {
      padding: 5px;
    }
    table tr:nth-child(even) {
      background: #ccc;
    }
  </style>
</div>
Screenshot:
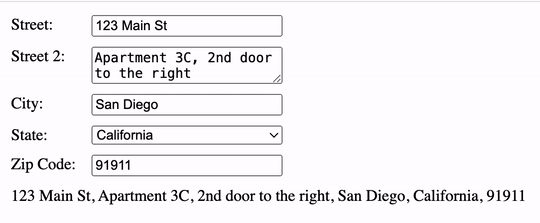
Hello, Data-Binding!
Glimmer DSL for Web intuitively supports both Unidirectional (One-Way) Data-Binding via the <= operator and Bidirectional (Two-Way) Data-Binding via the <=> operator, incredibly simplifying how to sync View properties with Model attributes with the simplest code to reason about.
Glimmer HTML DSL Ruby code in the frontend:
require 'glimmer-dsl-web'

Address = Struct.new(:street, :street2, :city, :state, :zip_code, keyword_init: true) do
  STATES = {...} # contains US States

  def state_code
    STATES.invert[state]
  end

  def state_code=(value)
    self.state = STATES[value]
  end

  def summary
    string_attributes = to_h.except(:billing_and_shipping)
    summary = string_attributes.values.map(&:to_s).reject(&:empty?).join(', ')
    summary += " (Billing & Shipping)" if billing_and_shipping
    summary
  end
end

@address = Address.new(
  street: '123 Main St',
  street2: 'Apartment 3C, 2nd door to the right',
  city: 'San Diego',
  state: 'California',
  zip_code: '91911',
  billing_and_shipping: true,
)

include Glimmer

Document.ready? do
  div {
    div(style: 'display: grid; grid-auto-columns: 80px 260px;') { |address_div|
      label('Street: ', for: 'street-field')
      input(id: 'street-field') {
        # Bidirectional Data-Binding with <=> ensures input.value and @address.street
        # automatically stay in sync when either side changes
        value <=> [@address, :street]
      }

      label('Street 2: ', for: 'street2-field')
      textarea(id: 'street2-field') {
        value <=> [@address, :street2]
      }

      label('City: ', for: 'city-field')
      input(id: 'city-field') {
        value <=> [@address, :city]
      }

      label('State: ', for: 'state-field')
      select(id: 'state-field') {
        Address::STATES.each do |state_code, state|
          option(value: state_code) { state }
        end

        value <=> [@address, :state_code]
      }

      label('Zip Code: ', for: 'zip-code-field')
      input(id: 'zip-code-field', type: 'number', min: '0', max: '99999') {
        # Bidirectional Data-Binding with <=> ensures input.value and @address.zip_code
        # automatically stay in sync when either side changes
        # on_write option specifies :to_s method to invoke on value before writing to model attribute
        # to ensure the numeric zip code value is stored as a String
        value <=> [@address, :zip_code,
                    on_write: :to_s,
                  ]
      }

      div(style: 'grid-column: 1 / span 2') {
        input(id: 'billing-and-shipping-field', type: 'checkbox') {
          checked <=> [@address, :billing_and_shipping]
        }
        label(for: 'billing-and-shipping-field') {
          'Use this address for both Billing & Shipping'
        }
      }

      # Programmable CSS using Glimmer DSL for CSS
      style {
        # `r` is an alias for `rule`, generating a CSS rule
        r("#{address_div.selector} *") {
          margin '5px'
        }
        r("#{address_div.selector} input, #{address_div.selector} select") {
          grid_column '2'
        }
      }
    }

    div(style: 'margin: 5px') {
      # Unidirectional Data-Binding is done with <= to ensure @address.summary changes
      # automatically update div.inner_text
      # (computed by changes to address attributes, meaning if street changes,
      # @address.summary is automatically recomputed.)
      inner_text <= [@address, :summary,
                      computed_by: @address.members + ['state_code'],
                    ]
    }
  }
end
Screenshot:
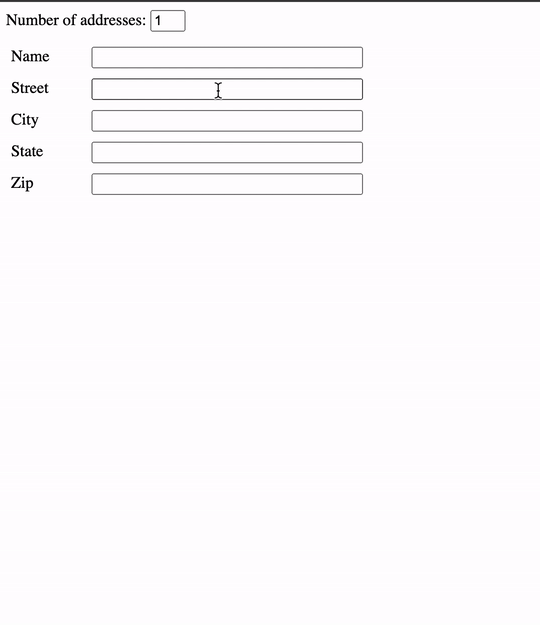
Hello, Content Data-Binding!
If you need to regenerate HTML element content dynamically, you can use Content Data-Binding to effortlessly rebuild HTML elements based on changes in a Model attribute that provides the source data. In this example, we generate multiple address forms based on the number of addresses the user has.
Glimmer HTML DSL Ruby code in the frontend:
require 'glimmer-dsl-web'

class Address
  attr_accessor :text
  attr_reader :name, :street, :city, :state, :zip

  def name=(value)
    @name = value
    update_text
  end

  def street=(value)
    @street = value
    update_text
  end

  def city=(value)
    @city = value
    update_text
  end

  def state=(value)
    @state = value
    update_text
  end

  def zip=(value)
    @zip = value
    update_text
  end

  private

  def update_text
    self.text = [name, street, city, state, zip].compact.reject(&:empty?).join(', ')
  end
end

class User
  attr_accessor :addresses
  attr_reader :address_count

  def initialize
    @address_count = 1
    @addresses = []
    update_addresses
  end

  def address_count=(value)
    value = [[1, value.to_i].max, 3].min
    @address_count = value
    update_addresses
  end

  private

  def update_addresses
    address_count_change = address_count - addresses.size
    if address_count_change > 0
      address_count_change.times { addresses << Address.new }
    else
      address_count_change.abs.times { addresses.pop }
    end
  end
end

@user = User.new

include Glimmer

Document.ready? do
  div {
    div {
      label('Number of addresses: ', for: 'address-count-field')
      input(id: 'address-count-field', type: 'number', min: 1, max: 3) {
        value <=> [@user, :address_count]
      }
    }

    div {
      # Content Data-Binding is used to dynamically (re)generate content of div
      # based on changes to @user.addresses, replacing older content on every change
      content(@user, :addresses) do
        @user.addresses.each do |address|
          div {
            div(style: 'display: grid; grid-auto-columns: 80px 280px;') { |address_div|
              [:name, :street, :city, :state, :zip].each do |attribute|
                label(attribute.to_s.capitalize, for: "#{attribute}-field")
                input(id: "#{attribute}-field", type: 'text') {
                  value <=> [address, attribute]
                }
              end

              div(style: 'grid-column: 1 / span 2;') {
                inner_text <= [address, :text]
              }

              style {
                r(address_div.selector) {
                  margin '10px 0'
                }
                r("#{address_div.selector} *") {
                  margin '5px'
                }
                r("#{address_div.selector} label") {
                  grid_column '1'
                }
                r("#{address_div.selector} input, #{address_div.selector} select") {
                  grid_column '2'
                }
              }
            }
          }
        end
      end
    }
  }
end
Screenshot:
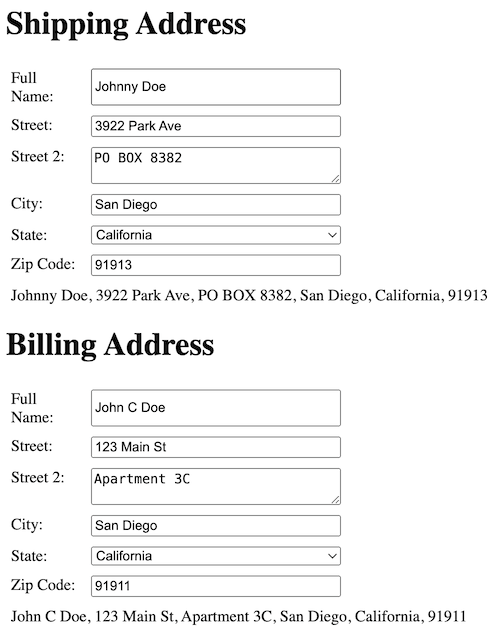
Hello, Component!
You can define Glimmer web components (View components) to reuse visual concepts to your heart's content,
by simply defining a class with include Glimmer::Web::Component and encasing the reusable markup inside
a markup {...} block. Glimmer web components automatically extend the Glimmer HTML DSL with new keywords
that match the underscored versions of the component class names (e.g. an OrderSummary class yields
the order_summary keyword for reusing that component within the Glimmer HTML DSL).
You may insert a Glimmer component anywhere into a Rails View using glimmer_component(component_path, *args)
Rails helper (more about it in Hello, glimmer_component Rails Helper!).
Below, we define an AddressForm component that generates an address_form keyword, and then we
reuse it twice inside an AddressPage component displaying a Shipping Address and a Billing Address.
Glimmer HTML DSL Ruby code in the frontend:
require 'glimmer-dsl-web'

Address = Struct.new(:full_name, :street, :street2, :city, :state, :zip_code, keyword_init: true) do
  STATES = {
    "AK"=>"Alaska",
    "AL"=>"Alabama",
    "AR"=>"Arkansas",
    "AS"=>"American Samoa",
    "AZ"=>"Arizona",
    "CA"=>"California",
    "CO"=>"Colorado",
    "CT"=>"Connecticut",
    "DC"=>"District of Columbia",
    "DE"=>"Delaware",
    "FL"=>"Florida",
    "GA"=>"Georgia",
    "GU"=>"Guam",
    "HI"=>"Hawaii",
    "IA"=>"Iowa",
    "ID"=>"Idaho",
    "IL"=>"Illinois",
    "IN"=>"Indiana",
    "KS"=>"Kansas",
    "KY"=>"Kentucky",
    "LA"=>"Louisiana",
    "MA"=>"Massachusetts",
    "MD"=>"Maryland",
    "ME"=>"Maine",
    "MI"=>"Michigan",
    "MN"=>"Minnesota",
    "MO"=>"Missouri",
    "MS"=>"Mississippi",
    "MT"=>"Montana",
    "NC"=>"North Carolina",
    "ND"=>"North Dakota",
    "NE"=>"Nebraska",
    "NH"=>"New Hampshire",
    "NJ"=>"New Jersey",
    "NM"=>"New Mexico",
    "NV"=>"Nevada",
    "NY"=>"New York",
    "OH"=>"Ohio",
    "OK"=>"Oklahoma",
    "OR"=>"Oregon",
    "PA"=>"Pennsylvania",
    "PR"=>"Puerto Rico",
    "RI"=>"Rhode Island",
    "SC"=>"South Carolina",
    "SD"=>"South Dakota",
    "TN"=>"Tennessee",
    "TX"=>"Texas",
    "UT"=>"Utah",
    "VA"=>"Virginia",
    "VI"=>"Virgin Islands",
    "VT"=>"Vermont",
    "WA"=>"Washington",
    "WI"=>"Wisconsin",
    "WV"=>"West Virginia",
    "WY"=>"Wyoming"
  }

  def state_code
    STATES.invert[state]
  end

  def state_code=(value)
    self.state = STATES[value]
  end

  def summary
    to_h.values.map(&:to_s).reject(&:empty?).join(', ')
  end
end

# AddressForm Glimmer Web Component (View component)
#
# Including Glimmer::Web::Component makes this class a View component and automatically
# generates a new Glimmer HTML DSL keyword that matches the lowercase underscored version
# of the name of the class. AddressForm generates address_form keyword, which can be used
# elsewhere in Glimmer HTML DSL code as done inside AddressPage below.
class AddressForm
  include Glimmer::Web::Component

  option :address

  # Optionally, you can execute code before rendering markup.
  # This is useful for pre-setup of variables (e.g. Models) that you would use in the markup.
  #
  # before_render do
  # end

  # Optionally, you can execute code after rendering markup.
  # This is useful for post-setup of extra Model listeners that would interact with the
  # markup elements and expect them to be rendered already.
  #
  # after_render do
  # end

  # markup block provides the content of the
  markup {
    div {
      div(style: 'display: grid; grid-auto-columns: 80px 260px;') { |address_div|
        label('Full Name: ', for: 'full-name-field')
        input(id: 'full-name-field') {
          value <=> [address, :full_name]
        }

        @somelabel = label('Street: ', for: 'street-field')
        input(id: 'street-field') {
          value <=> [address, :street]
        }

        label('Street 2: ', for: 'street2-field')
        textarea(id: 'street2-field') {
          value <=> [address, :street2]
        }

        label('City: ', for: 'city-field')
        input(id: 'city-field') {
          value <=> [address, :city]
        }

        label('State: ', for: 'state-field')
        select(id: 'state-field') {
          Address::STATES.each do |state_code, state|
            option(value: state_code) { state }
          end

          value <=> [address, :state_code]
        }

        label('Zip Code: ', for: 'zip-code-field')
        input(id: 'zip-code-field', type: 'number', min: '0', max: '99999') {
          value <=> [address, :zip_code,
                      on_write: :to_s,
                    ]
        }

        style {
          r("#{address_div.selector} *") {
            margin '5px'
          }
          r("#{address_div.selector} input, #{address_div.selector} select") {
            grid_column '2'
          }
        }
      }

      div(style: 'margin: 5px') {
        inner_text <= [address, :summary,
                        computed_by: address.members + ['state_code'],
                      ]
      }
    }
  }
end

# AddressPage Glimmer Web Component (View component)
#
# This View component represents the main page being rendered,
# as done by its `render` class method below
class AddressPage
  include Glimmer::Web::Component

  before_render do
    @shipping_address = Address.new(
      full_name: 'Johnny Doe',
      street: '3922 Park Ave',
      street2: 'PO BOX 8382',
      city: 'San Diego',
      state: 'California',
      zip_code: '91913',
    )
    @billing_address = Address.new(
      full_name: 'John C Doe',
      street: '123 Main St',
      street2: 'Apartment 3C',
      city: 'San Diego',
      state: 'California',
      zip_code: '91911',
    )
  end

  markup {
    div {
      h1('Shipping Address')

      address_form(address: @shipping_address)

      h1('Billing Address')

      address_form(address: @billing_address)
    }
  }
end

Document.ready? do
  # renders a top-level (root) AddressPage component
  AddressPage.render
end
Screenshot:
Hello, glimmer_component Rails Helper!
You may insert a Glimmer component anywhere into a Rails View using
glimmer_component(component_path, *args) Rails helper. Add include GlimmerHelper to ApplicationHelper
or another Rails helper, and use <%= glimmer_component("path/to/component", *args) %> in Views.
Rails ApplicationHelper setup code:
require 'glimmer/helpers/glimmer_helper'

module ApplicationHelper
  # ...
  include GlimmerHelper
  # ...
end
Rails View code:
<div id="address-container">
<h1>Shipping Address </h1>
<legend>Please enter your shipping address information (Zip Code must be a valid 5 digit number)</legend>
<!-- This sample demonstrates use of glimmer_component helper with arguments -->
<%= glimmer_component('address_form',
full_name: params[:full_name],
street: params[:street],
street2: params[:street2],
city: params[:city],
state: params[:state],
zip_code: params[:zip_code]
)
%>
<div>
<a href="/"><< Back Home</a>
</div>
</div>Glimmer HTML DSL Ruby code in the frontend (app/assets/opal/address_form.rb):
require 'glimmer-dsl-web'

class AddressForm
  Address = Struct.new(:full_name, :street, :street2, :city, :state, :zip_code, keyword_init: true) do
    def state_code
      STATES.invert[state]
    end

    def state_code=(value)
      self.state = STATES[value]
    end

    def summary
      to_h.values.map(&:to_s).reject(&:empty?).join(', ')
    end
  end

  STATES = {
    "AK"=>"Alaska",
    "AL"=>"Alabama",
    "AR"=>"Arkansas",
    "AS"=>"American Samoa",
    "AZ"=>"Arizona",
    "CA"=>"California",
    "CO"=>"Colorado",
    "CT"=>"Connecticut",
    "DC"=>"District of Columbia",
    "DE"=>"Delaware",
    "FL"=>"Florida",
    "GA"=>"Georgia",
    "GU"=>"Guam",
    "HI"=>"Hawaii",
    "IA"=>"Iowa",
    "ID"=>"Idaho",
    "IL"=>"Illinois",
    "IN"=>"Indiana",
    "KS"=>"Kansas",
    "KY"=>"Kentucky",
    "LA"=>"Louisiana",
    "MA"=>"Massachusetts",
    "MD"=>"Maryland",
    "ME"=>"Maine",
    "MI"=>"Michigan",
    "MN"=>"Minnesota",
    "MO"=>"Missouri",
    "MS"=>"Mississippi",
    "MT"=>"Montana",
    "NC"=>"North Carolina",
    "ND"=>"North Dakota",
    "NE"=>"Nebraska",
    "NH"=>"New Hampshire",
    "NJ"=>"New Jersey",
    "NM"=>"New Mexico",
    "NV"=>"Nevada",
    "NY"=>"New York",
    "OH"=>"Ohio",
    "OK"=>"Oklahoma",
    "OR"=>"Oregon",
    "PA"=>"Pennsylvania",
    "PR"=>"Puerto Rico",
    "RI"=>"Rhode Island",
    "SC"=>"South Carolina",
    "SD"=>"South Dakota",
    "TN"=>"Tennessee",
    "TX"=>"Texas",
    "UT"=>"Utah",
    "VA"=>"Virginia",
    "VI"=>"Virgin Islands",
    "VT"=>"Vermont",
    "WA"=>"Washington",
    "WI"=>"Wisconsin",
    "WV"=>"West Virginia",
    "WY"=>"Wyoming"
  }

  include Glimmer::Web::Component

  option :full_name
  option :street
  option :street2
  option :city
  option :state
  option :zip_code

  attr_reader :address

  before_render do
    @address = Address.new(
      full_name: full_name,
      street: street,
      street2: street2,
      city: city,
      state: state,
      zip_code: zip_code,
    )
  end

  markup {
    div {
      div(style: 'display: grid; grid-auto-columns: 80px 260px;') { |address_div|
        label('Full Name: ', for: 'full-name-field')
        input(id: 'full-name-field') {
          value <=> [address, :full_name]
        }

        @somelabel = label('Street: ', for: 'street-field')
        input(id: 'street-field') {
          value <=> [address, :street]
        }

        label('Street 2: ', for: 'street2-field')
        textarea(id: 'street2-field') {
          value <=> [address, :street2]
        }

        label('City: ', for: 'city-field')
        input(id: 'city-field') {
          value <=> [address, :city]
        }

        label('State: ', for: 'state-field')
        select(id: 'state-field') {
          STATES.each do |state_code, state|
            option(value: state_code) { state }
          end

          value <=> [address, :state_code]
        }

        label('Zip Code: ', for: 'zip-code-field')
        input(id: 'zip-code-field', type: 'number', min: '0', max: '99999') {
          value <=> [address, :zip_code,
                      on_write: :to_s,
                    ]
        }

        style {
          r("#{address_div.selector} *") {
            margin '5px'
          }
          r("#{address_div.selector} input, #{address_div.selector} select") {
            grid_column '2'
          }
        }
      }

      div(style: 'margin: 5px') {
        inner_text <= [address, :summary,
                        computed_by: address.members + ['state_code'],
                      ]
      }
    }
  }
end
Screenshot:
Hello, Paragraph!
To facilitate building formatted textual paragraphs in Ruby, thanks to Glimmer, the most advanced DSL engine in Ruby, the Glimmer HTML DSL is advanced enough to intelligently behave differently under different situations, like when using HTML formatting elements: <br>, <strong>, <em>, <br>, <i>, <sub>, <sup>, <del>, <ins>, <small>, <mark>
Instead of returning Ruby objects that are nested as children within their parent, the Glimmer HTML DSL returns String objects directly that can be concatenated to or embedded within other String objects via interpolation.
This enables writing code like:
p {"#{strong('Yesterday, ')}Robert suggested adding a new #{em('feature')} to our software product.#{br}}
That is close to how it is written in HTML, albeit briefer in Ruby:
<p><strong>Yesterday, </strong>Robert suggested adding a new <em>feature</em> to our software product.<br></p>
Formatting elements just like regular elements can accept text content as their first argument or as their block return value. So, the code above could equally be written as follows:
p {"#{strong{'Yesterday, '}}Robert suggested adding a new #{em{'feature'}} to our software product.#{br}}
This enables seggregating formatting element attributes if desired, as in this example:
p {"#{strong(class: 'very-string'){'Yesterday, '}}Robert suggested adding a new #{em(class: 'very-emphasized'){'feature'}} to our software product.#{br}}
Another way of writing the same code is to pass the text content as the first argument, before attributes:
p {"#{strong('Yesterday, ', class: 'very-string')}Robert suggested adding a new #{em('feature', class: 'very-emphasized')} to our software product.#{br}}
One last bit of info to keep in mind is that <span> generally generates a normal element, except when used inside a <p>'s content block, in which case it is assumed to be used for formatting, so
it returns a String to enable code like this:
p {"#{span('Yesterday, ', style: 'text-decoration: underline;')}Robert suggested adding a new #{em('feature', class: 'very-emphasized')} to our software product.#{br}}
In any case, below is a full example leveraging the Glimmer HTML DSL alternative approach when utilizing formatting elements underneath a paragraph.
Glimmer HTML DSL Ruby code in the frontend:
require 'glimmer-dsl-web'

class HelloParagraph
  include Glimmer::Web::Component

  markup {
    div {
      h1(class: 'title') {
        'Flying Cars Become 100% Safe with AI Powered Balance!'
      }

      p(class: 'intro') {"
        In the early 2030's, #{em('flying cars')} became affordable after their prices dropped
        below #{small(del('$100,000'))}#{ins('$80,000')} as a result of the innovations of #{strong('Travel-X')}. Still, that did not
        make #{em('flying cars')} any popular due to the extreme difficulty in piloting such flying vehicles for the average
        person, making it very tough to pass the tests for getting a piloting license given the learning curve.
      "}

      p {"
        That said, #{b('Travel-X')} has recently come up with a new feature for their flagship #{i('flying car')},
        the Ptero#{sub(1)}#{sup('TM')}, which relies on AI#{sub(2)} to automatically balance the flying cars in mid-air,
        thus significantly facilitating their piloting by the average consumer.
      "}

      p(class: 'conclusion') {"
        That Ptero#{sup('TM')} will be so stable and well balanced while flying that the consumer will be able to drive
        as if it is a plain old car, with the only difference being vertical elevation, the control of which will be handled
        automatically by AI. The Ptero#{sup('TM')} will debut for #{span(style: 'text-decoration: underline dashed;'){'$79,000'}}.
      "}

      h2(class: 'legend-title') {
        mark('Legend:')
      }

      p(class: 'legend') {"
        #{strong("1- Ptero:")} Pterosaur is flying dinosaur species#{br}
        #{strong("2- AI:")} Artificial Intelligence#{br}
      "}

    }
  }
end

Document.ready? do
  HelloParagraph.render
end
Screenshot:
--

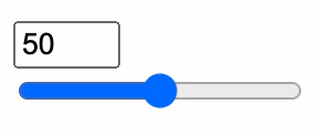
Hello, Observer!
Glimmer DSL for Web provides the observe(model, attribute) { ... } keyword to employ the Observer Design Pattern as per MVC (Model View Controller), enabling Views to observe Models and update themselves in response to changes. If the observe keyword is used from inside a Component, when the Component is removed or its top-level element is removed, the observer is automatically cleaned up. The need for such explicit observers is significantly diminished by the availablility of the more advanced Unidirectional Data-Binding Support and Bidirectional Data-Binding Support.
Glimmer HTML DSL Ruby code in the frontend:
require 'glimmer-dsl-web'

class NumberHolder
  attr_accessor :number

  def initialize
    self.number = 50
  end
end

class HelloObserver
  include Glimmer::Web::Component

  before_render do
    @number_holder = NumberHolder.new
  end

  after_render do
    @number_input.value = @number_holder.number
    @range_input.value = @number_holder.number
    # Observe Model attribute @number_holder.number for changes and update View
    # Observer is automatically cleaned up if remove method is called on rendered HelloObserver
    # or its top-level element
    observe(@number_holder, :number) do
      number_string = @number_holder.number.to_s
      @number_input.value = number_string unless @number_input.value == number_string
      @range_input.value = number_string unless @range_input.value == number_string
    end
    # Bidirectional Data-Binding does the same thing automatically
    # Just disable the observe block above as well as the oninput listeners below
    # and enable the `value <=> [@number_holder, :number]` lines to try the data-binding version
    # Learn more about Bidirectional and Unidirectional Data-Binding in hello_data_binding.rb
  end

  markup {
    div {
      div {
        @number_input = input(type: 'number', min: 0, max: 100) {
          # oninput listener updates Model attribute @number_holder.number
          oninput do
            @number_holder.number = @number_input.value.to_i
          end

          # Bidirectional Data-Binding simplifies the implementation significantly
          # by enabling the following line and disabling oninput listeners as well
          # as the after_body observe block observer
          # Learn more about Bidirectional and Unidirectional Data-Binding in hello_data_binding.rb
#           value <=> [@number_holder, :number]
        }
      }
      div {
        @range_input = input(type: 'range', min: 0, max: 100) {
          # oninput listener updates Model attribute @number_holder.number
          oninput do
            @number_holder.number = @range_input.value.to_i
          end

          # Bidirectional Data-Binding simplifies the implementation significantly
          # by enabling the following line and disabling oninput listeners as well
          # as the after_body observe block observer
          # Learn more about Bidirectional and Unidirectional Data-Binding in hello_data_binding.rb
#           value <=> [@number_holder, :number]
        }
      }
    }
  }
end

Document.ready? do
  HelloObserver.render
end
Screenshot:
Glimmer DSL for Web offers a HTML DSL (Graphical User Interface Domain Specific Language) for building HTML Web User Interfaces declaratively in Ruby.
1- Keywords (HTML Elements)
You can declare any HTML element by simply using the lowercase version of its name (Ruby convention for method names) like div, span, form, input, button, table, tr, th, and td.
Under the hood, HTML element DSL keywords are invoked as Ruby methods.
2- Arguments (HTML Attributes + Text Content)
You can set any HTML element attributes by passing as keyword arguments to element methods like div(id: 'container', class: 'stack') or input(type: 'email', required: true)
Also, if the element has a little bit of text content that can fit in one line, it can be passed as the 1st argument like label('Name: ', for: 'name_field'), button('Calculate', class: 'round-button'), or span('Mr')
3- Content Block (Properties + Listeners + Nested Elements + Text Content)
Element methods can accept a Ruby content block. It intentionally has a {...} style even as a multi-line block to indicate that the code is declarative HTML DSL structure code (intentionally breaking away from Ruby imperative code conventions given this is a declarative HTML DSL (Domain Specific Language), meaning a different language that has its own conventions, embedded within Ruby).
You can nest HTML element properties under an element like:
input(type: 'text') {
  content_editable false
}
You can nest HTML event listeners under an element by using the HTML event listener name (e.g. onclick, onchange, onblur):
button('Add') {
  onclick do
    @model.add_selected_element
  end
}
Given that listener code is imperative, it uses a do; end style for Ruby blocks to separate it from declarative HTML DSL structure code and enable quicker readability of the code.
You can nest other HTML elements under an HTML element the same way you do so in HTML, like:
form {
  div(class: 'field-row') {
    label('Name: ', for: 'name-field')
    input(id: 'name-field', class: 'field', type: 'text', required: true)
  }
  div(class: 'field-row') {
    label('Email: ', for: 'email-field')
    input(id: 'email-field', class: 'field', type: 'email', required: true)
  }
  button('Add Contact', class: 'submit-button') {
    onclick do
      ...
    end
  }
}
You can nest text content underneath an element's Ruby block provided it is the return value of the block (last declared value), like:
p(class: 'summary') {
  'This text content is going into the body of the span element'
}
4- Operations (Properties + Functions)
You can get/set any element property or invoke any element function by simply calling the lowercase underscored version of their name in Ruby like input.check_validity, input.value, and input.id.
To get started, Setup Ruby gem and check out more Samples.
Learn more at the Glimmer DSL for Web project page:
No comments:
Post a Comment