
This guide will help you create or integrate live video streaming into your iOS and Android apps using React Native to allow people to interact, chat, and watch events together. You will discover how to effortlessly add in-app live streams like Facebook Live to your existing app or build it as a stand-alone app like Twitch. This tutorial's knowledge will help you quickly implement unlimited live event broadcasts in gaming, music, sports, and talk show apps.
Test the Sample App
Get the App.tsx sample code for establishing a connection and live video rendering from GitHub, configure your React Native development environment, and test the app on actual Android and iOS devices. If you need help setting up React Native to run iOS and Android apps, check out our Getting Started article.
Required Technologies and Tools
To follow along with the tutorial, you will install Xcode, VS Code, Android Studio, and a command line tool like Terminal. In addition, broadcasting live conversations in our React Native app will require the installation of the Stream's React Native Video SDK. It helps developers build cross-platform virtual event streaming apps to create shared connections and experiences.
- Xcode 15 or later: To configure the app to run on iOS.
- VS Code: For developing the livestreaming app.
- Android Studio Giraffe or later: To set up the app for running on Android devices.
- Terminal: For initiating a new React Native project.
Step 1: Create a New React Native App
Launch Terminal or your favorite command line tool and enter the following command to create a new React Native project.
npx react-native@latest init Livestream
The above command uses the latest React Native template to generate a new project named Livestream.
Step 2: Install the Stream’s Video SDK and Peer Dependencies
Launch VS Code, drag the project’s folder Livestream, you created in Step 1 above, and drop it on the empty VS Code window to open it. Now, we have an empty React Native project in VS Code. Let's install the React Native Video SDK. The React Native SDK is part of the Stream's JavaScript Video SDK, allowing developers to create unique VoIP calling experiences such as video/voice calling, livestreaming and audio-only chats.
To install the video SDK, open Terminal -> New Terminal in VS Code and add the command below.
yarn add @stream-io/video-react-native-sdk @stream-io/react-native-webrtc
The above command installs the core React Native Video SDK and its reusable VoIP calling components. The video SDK establishes the calling functionality using WebRTC.
Install Peer Dependencies
The video SDK uses the following peer libraries:
- React Native In-Call Manager: To provide information about call-related actions such as muting and incoming or outgoing calls.
- React Native SVG: To provide Scalable Vector Graphics support.
- NetInfo: To provide information about a call’s connection status on iOS and Android.
- Notifee: To handle VoIP push notifications.
Use the following commands to fetch and install the above peer dependencies.
yarn add react-native-incall-manager@4.1.0
yarn add react-native-svg
yarn add @react-native-community/netinfo@9.3.9
yarn add @notifee/react-native@7.7.1
Step 3: Configure iOS and Android Specific Settings
We should comply with platform-specific requirements to run our livestreaming app on iOS and Android. These include setting up camera and microphone usage permissions and specifying Java SDK versions to use.
Declare Permissions For iOS AppDelegate.mm
Open the iOS folder in VS Code. Find the Objective C file AppDelegate.mm and add the following code snippet to make the video SDK available for iOS.
#import "StreamVideoReactNative.h"
Also, add the SDK’s setup method [StreamVideoReactNative setup]; in the body of the launchOptions closure.
Add Keys and Values For iOS Permissions: Info.plist
Still in the iOS folder, open Info.plist, locate the following key and string tags under the dict tag.
<key>CFBundleName</key>
<string>$(PRODUCT_NAME)</string>
Append the following key-value pairs below the tags above.
<key>NSCameraUsageDescription</key>
<string>$(PRODUCT_NAME) would like to use your camera</string>
<key>NSMicrophoneUsageDescription</key>
<string>$(PRODUCT_NAME) would like to use your microphone</string>
In summary, when people launch the app for the first time, they will get the above message prompts to allow or disallow the use of their camera and microphone on iOS.
Declare Permissions For Android: MainApplication.kt
- Open
MainApplication.kt, and addimport com.streamvideo.reactnative.StreamVideoReactNative;. - Below the
super.onCreate()method, addStreamVideoReactNative.setup();
Add Keys and Values For Android Permissions: AndroidManifest.xml
Open AndroidManifest.xml and add the following in the manifest tag above the application section to set camera, microphone, and Bluetooth permissions.
  <uses-feature android:name="android.hardware.camera" />
  <uses-feature android:name="android.hardware.camera.autofocus" />
  <uses-feature android:name="android.hardware.audio.output" />
  <uses-feature android:name="android.hardware.microphone" />

  <uses-permission android:name="android.permission.CAMERA" />
  <uses-permission android:name="android.permission.RECORD_AUDIO" />
  <uses-permission android:name="android.permission.ACCESS_NETWORK_STATE" />
  <uses-permission android:name="android.permission.CHANGE_NETWORK_STATE" />
  <uses-permission android:name="android.permission.MODIFY_AUDIO_SETTINGS" />
  <uses-permission android:name="android.permission.INTERNET" />

  <uses-permission android:name="android.permission.BLUETOOTH"   android:maxSdkVersion="30" />
  <uses-permission android:name="android.permission.BLUETOOTH_ADMIN"  android:maxSdkVersion="30" />
  <uses-permission android:name="android.permission.BLUETOOTH_CONNECT" />
Android-Only Setting: Compile Options /app/build.gradle
In the Android folder, open /app/build.gradle and add the code snippet in the body of the android` section to set source and target Java compatibility versions.
compileOptions {
    sourceCompatibility JavaVersion.VERSION_1_8
    targetCompatibility JavaVersion.VERSION_17
}Note: The required Java versions may differ, so refer to the official React Native CLI setup to install the latest version required.
Android-Only Setting: Desugaring gradle.properties
In the file android/gradle.properties, we can turn off the use of newer language features by setting desugaring to false android.enableDexingArtifactTransform.desugaring=false. Turning off this feature helps to prevent incompatibilities.
Step 4: Broadcast a Livestream From an iOS/Android Device:

In the previous steps, we configured permissions for the livestreaming app to run it on iOS and Android. In this section, we dive into using an iOS or Android device to publish livestreams. Open App.tsx and replace its content with the following sample code. We follow the steps below to broadcast a livestream from an iOS or Android device.
- Import the Stream Video React Native SDK.
- Create and initialize a user object.
- Create a video client with an API key, user, and token. When you create a Stream account, you will get an API key. You can sign up for free if you do not have an account. The user should be generated from your server-side in a production environment. For testing, you can use your API key and our token-generator service to create random users. To make this tutorial simple, you can obtain user credentials from Step 3 of the livestreaming tutorial in our documentation to test the sample app.
- Create and join a livestream call.
Read the comments in the sample code below for more details. Also, check out our documentation to learn more about joining and creating a call.
import React from "react";
import {
  StreamCall,
  StreamVideo,
  StreamVideoClient,
  User,
} from "@stream-io/video-react-native-sdk";
import { SafeAreaView, Text, StyleSheet, View, Image } from "react-native";

const apiKey = ""; // The API key can be found in the "Credentials" section
const token = ""; // The token can be found in the "Credentials" section
const userId = ""; // The user id can be found in the "Credentials" section
const callId = ""; // The call id can be found in the "Credentials" section

// Initialize the user object. The user can be anonymous, guest, or authenticatedFrom the sample code above, when the call connection is successful, we display an image and the text <Text style={styles.text}>✅ TODO: How To Render a Live Video</Text> at the center of the screen.
Step 5: Render the Host’s Video

Now that our call connection is successful, we will render and watch the host's (streamer) video in this section. The underlying livestreaming technology uses a Selective Forwarding Unit (SFU) to replicate livestreams over different servers worldwide.

The SFU helps scale the livestream to unlimited users in real-time.
To do the local video rendering implementation, substitute the content of App.tsx with the following sample code. We replace the previous LivestreamUI component in the code below with the SDK's videoRenderer. Check out our documentation to learn more about the videoRenderer UI component.
import React from "react";
import {
  StreamCall,
  StreamVideo,
  StreamVideoClient,
  User,
} from "@stream-io/video-react-native-sdk";
//import { SafeAreaView, Text, StyleSheet, View, Image } from 'react-native';
import {
  useCall,
  useCallStateHooks,
  useIncallManager,
  VideoRenderer,
} from "@stream-io/video-react-native-sdk";
import { Button, Text, View, StyleSheet, SafeAreaView } from "react-native";We utilize the following hooks to get information about the call state in the code above const { useParticipantCount, useLocalParticipant, useIsCallLive } = useCallStateHooks();.
useParticipantCount: Displays the number of participants watching the livestream.useLocalParticipant: Displays the streamer's video.useIsCallLive: Shows whether the livestream is in the backstage (pre-join screen).
Check out our documentation to read more about the call and participant state.
Step 6: Run the App on an iOS or Android Device
When you set up the React Native Command Line Interface correctly, you should be able to run the livestreaming app successfully on iOS and Android devices. If you need a step-by-step guide on setting up the React Native CLI, check out our getting started tutorial.
Note: The official React Native CLI setup changes a lot, so it is recommended to refer to it for versions of dependencies to install, especially for Android.
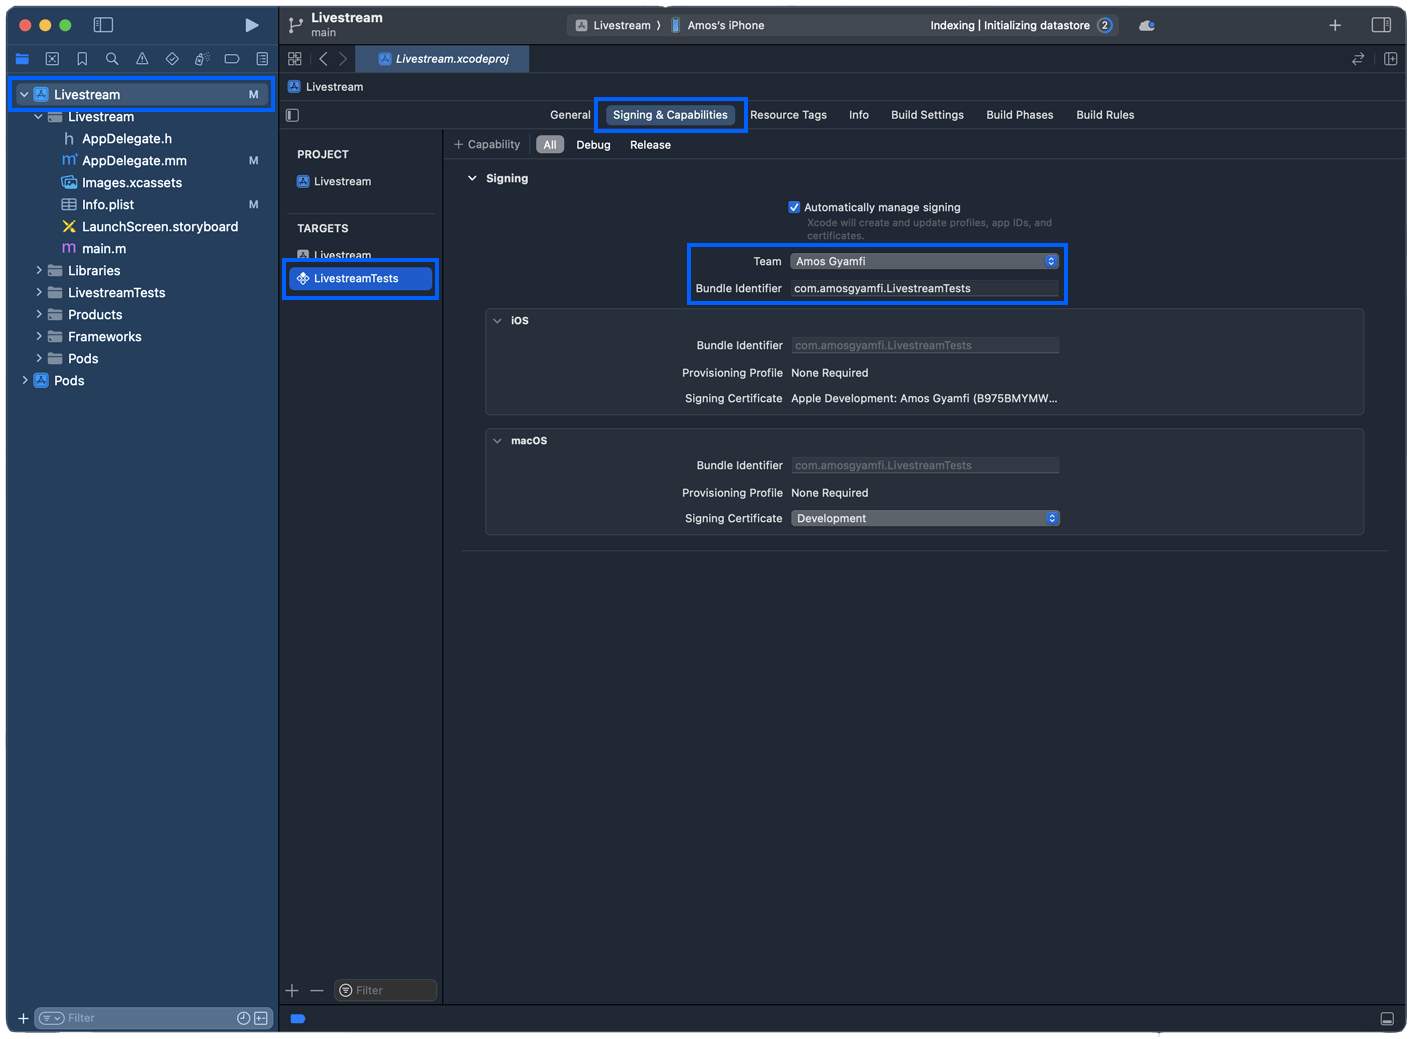
To run the app with an iOS device, go to the iOS folder and open the .xcworkspace file in Xcode. In the context of this app, we have Livestream.xcworkspace. As the images below demonstrate, set your team and bundle identifiers for the main and test targets.

After following the steps above, you can now attach an iOS device and click the Run button in Xcode. The video below demonstrates an iPhone version of the app.
You noticed from the video above that multiple viewers are watching the livestream. You can use the Stream Video web app to join numerous people to watch a livestream.
Running the app on Android requires installing the Android 13 Tiramisu SDK. To install it, Open Android Studio, click the menu button on the top-right (3 dots) and select SDK Manager.

Please select all the options shown in the image below to install it. Read our article on setting up React Native Without Expo if you encounter problems.

Attach an Android device to Android Studio and click the Run button in the toolbar. The video below demonstrates an Android preview of the app with viewers watching via the companion Stream Video web app.
What's Next?
In this tutorial, we created a live activity streaming app that supports an in-app streaming experience like Facebook Live and a stand-alone virtual live event streaming app like Twitch. We covered only the fundamentals of building a live video streaming experience for iOS and Android using React Native.
Head to our documentation to learn more about advanced features and use cases, such as adding Notifications, managing co-hosts, and integrating screen recording, chat, and custom events.
