Booting the Raspberry Pi 5 from NVMe
Here's my workflow for setting up the Raspberry Pi 5 to boot from NVMe for headless use. I'll also give my thoughts on the initial generation of PCIe breakout boards and some experiences trying to get the Google Coral Edge TPU ML accelerator to work.
A quick note on first-generation NVMe breakout boards
I found the first-generation of NVMe boards fiddly to connect, and quite often during setup the cable would partially dislodge, but not enough that it was obvious. The result was that the SD card would boot instead, or the NVMe wouldn't show up on lsblk.
I'm not sure if there's a better approach to connecting to the new PCIe breakout cable, without a design change to the Raspberry Pi 5 itself.
It's also not obviously which way the cable should be plugged in, so if you've tried everything, it might be worth reversing or flipping your cable around.
I tested the Pineberry Pi "Bottom" and the Pimoroni NVMe Base HAT.
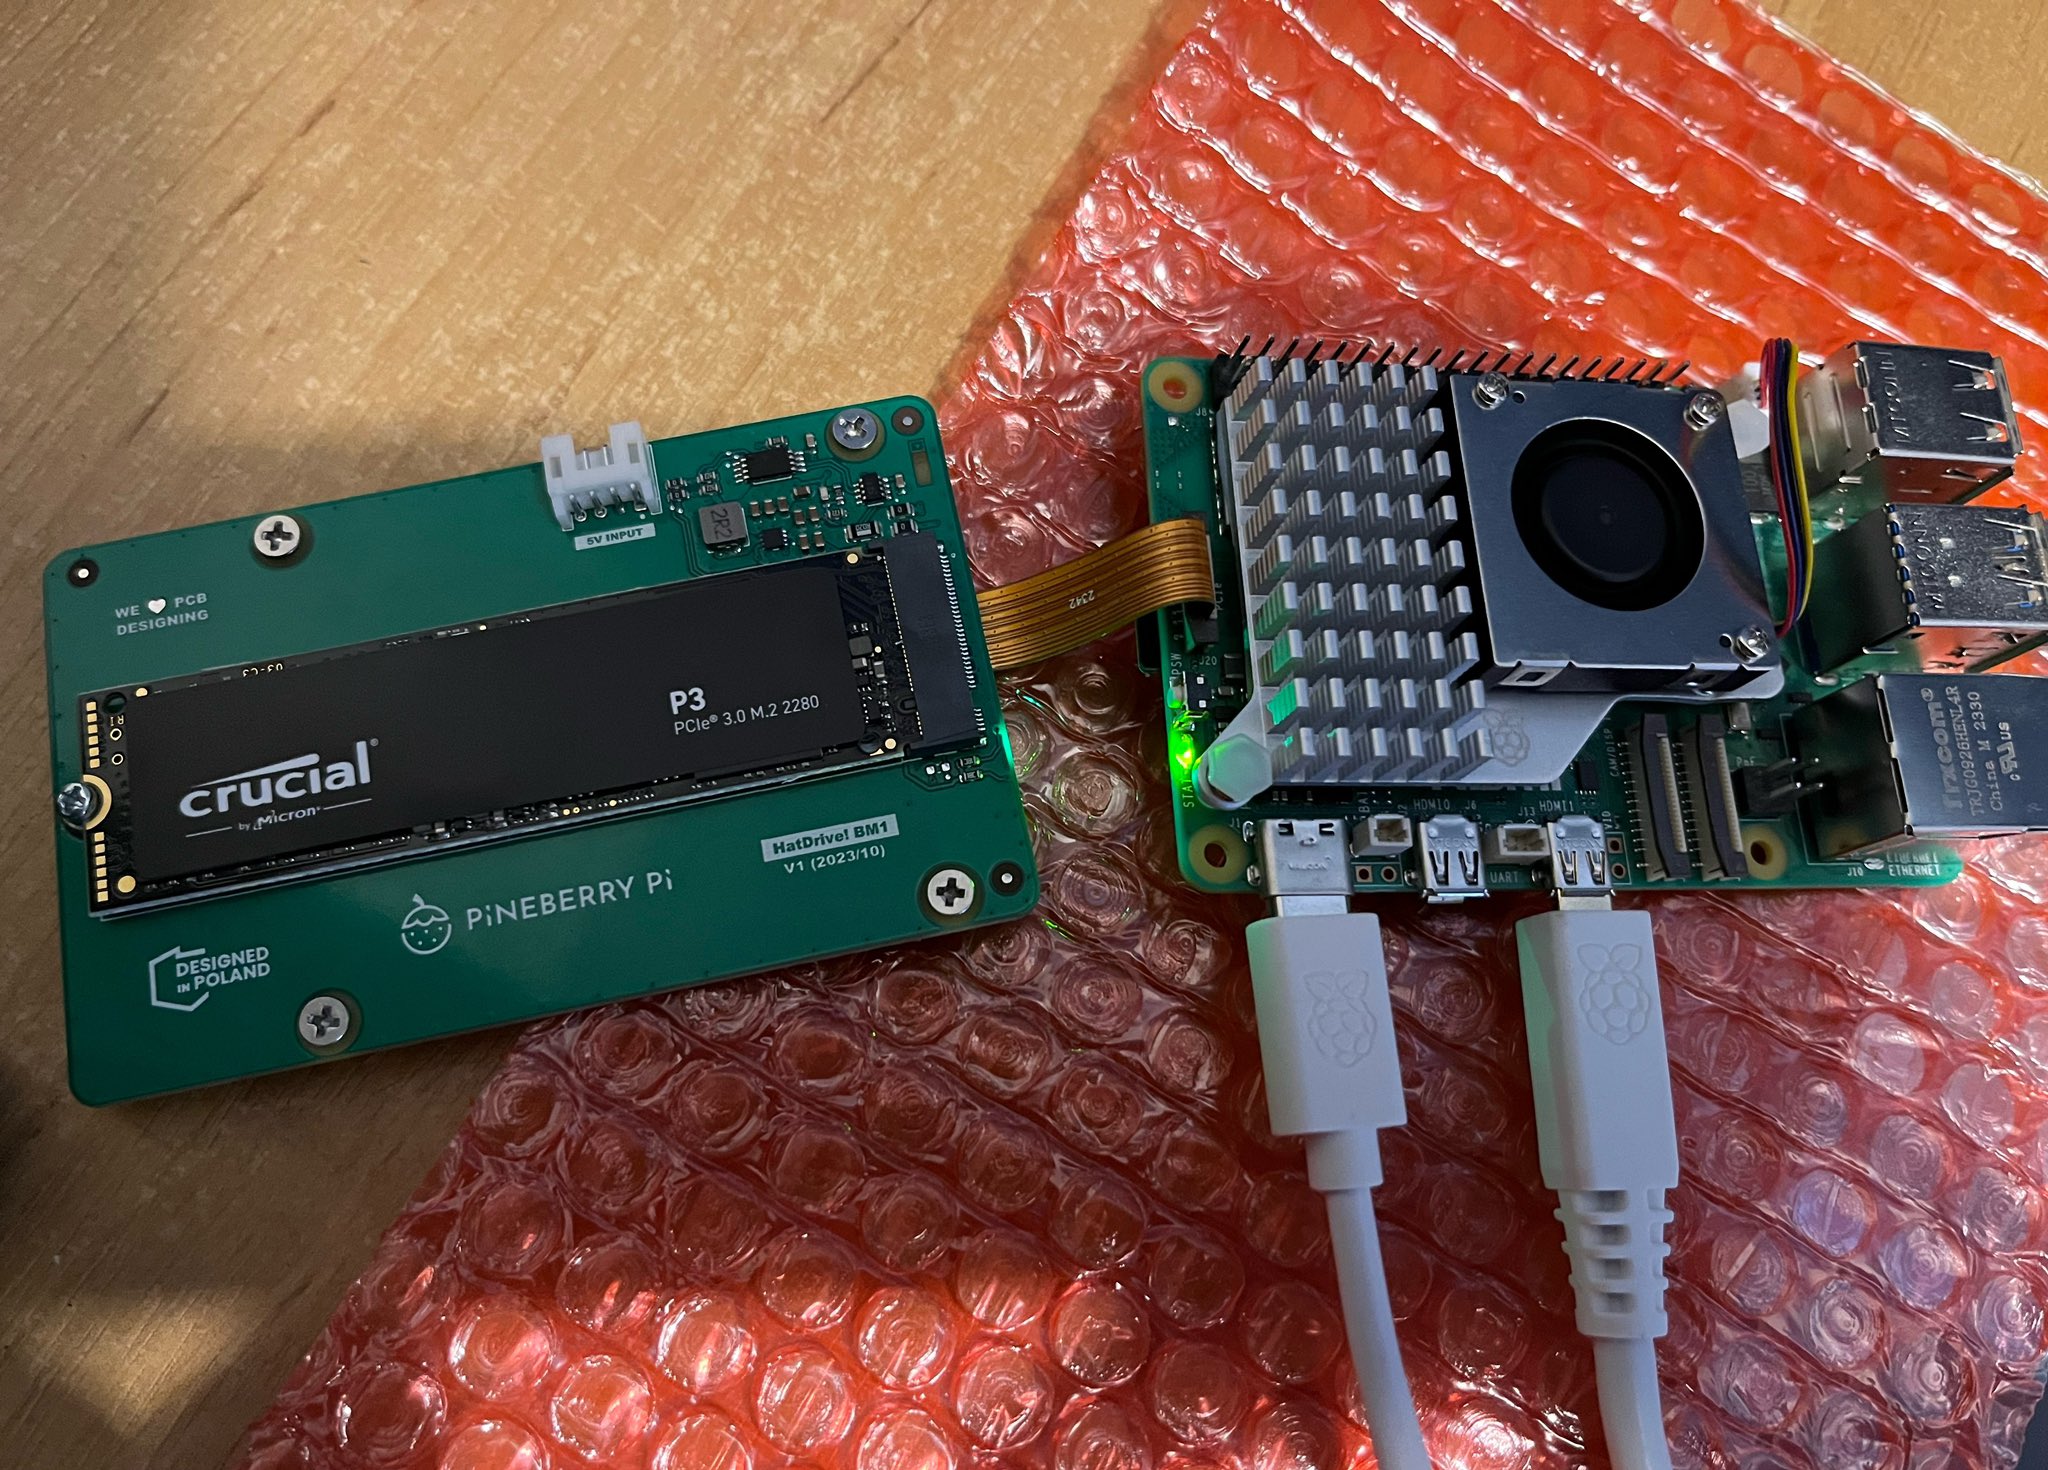
Pictured: Pineberry Pi
Step by step
There are other ways to go about this, and you're free to adapt these steps as necessary. But I highly recommend that you do not clone a booted SD card to an NVMe, and instead flash the image fresh each time.
I don't tend to use WiFi on my devices because they need a wired link for server workloads, so we'll be assuming Ethernet here. Even if want to use WiFi, I'd suggest using Ethernet to keep things simple until all of your devices are fully configured.
Step 1 - Flash an SD card
Flash Raspberry Pi OS Lite 64-bit to an SD card.
I use a Linux PC as my main workstation, so use dd.
Use lsblk to find out which device name you have for the SD card writer on your PC.
Alternatively, the Raspberry Pi has its own flashing tool now, and there is also Etcher which I've used from a Windows and MacOS computer in the past.
Step 2 - Setup the SD card for headless boot
Mount the boot partition.
Edit the config.txt file to enable the NVMe to be accessed:
dtparam=nvme
Create a text file named ssh, use touch or nano, i.e. touch ssh.
Now create a userconf.txt file:
HASH=$(openssl passwd -6 -stdin)

# Type the password, hit enter, then Control + D

echo alex:$HASH > userconf.txt
When setting up multiple devices, it makes sense to copy the userconf.txt file back to your main workstation. Then, as you set up each additional device, you can use scp to transfer that file back to each Raspberry Pi.
Step 3 - Boot up and get a console
To find the Raspberry Pi, either plug in an HDMI screen, or use nmap to perform a network scan, before and after boot.
Here's my scan.sh file, run it as sudo for more verbose information.
#!/bin/bash

nmap -sP 192.168.1.0/24
At least on my devices, I saw the output (Raspberry Pi Foundation) next to each.
If you happen to be connected over a HDMI cable, you can run ip addr at any time to get the IP address of the Raspebrry Pi.
Step 4 - Change the boot order
Change the boot order so that the NVMe comes first, with the SD card as a fall-back, in case of failure or misconfiguration.
sudo rpi-eeprom-config --edit
Change BOOT_ORDER to BOOT_ORDER=0xf416 - it's the 6 which represents NVMe boot mode.
Add a line PCIE_PROBE=1
Save and exit with Control + O and Control + X.
Reboot.
Step 5 - Flash the Raspberry Pi OS image to the NVMe
This step could be done using a USB-C Caddy and your main workstation, which would a more efficient workflow.
But, let's do it from the Raspberry Pi directly.
Use scp to copy the OS image i.e. 2023-12-11-raspios-bookworm-arm64-lite.img from your main workstation to the Raspberry Pi.
For me, that'd be scp ~/Downloads/2023-12-11-raspios-bookworm-arm64-lite.img alex@192.168.1.104:~/.
Then on the Raspberry Pi, run lsblk to check that the NVMe is showing up, it should show as /dev/nvme0n1.
Double check that you're running this command on the Raspberry Pi over SSH or by using a keyboard and monitor.
time sudo dd if=./2023-12-11-raspios-bookworm-arm64-lite.img of=/dev/nvme0n1
It should take a minute or two. Then you need to repeat the steps above but to /boot/ on the copy of the OS on the NVMe itself, with exception of the step to change the boot order, which is persistent in the EEPROM.
sudo mount /dev/nvme0n1 /mnt
sudo touch /mnt/ssh
echo "dtparam=nvme" | sudo tee /mnt/config.txt
Generate a hash of your password like we did earlier so that you can log in:
Now create a userconf.txt file:
HASH=$(openssl passwd -6 -stdin)

# Type the password, hit enter, then Control + D

echo alex:$HASH > /mnt/userconf.txt
The the OS image version will change after I've written up these steps, so adjust the filename accordingly. Make sure the OS image has "-arm64-" in the name, you do not want to flash the older 32-bit OS for use as a headless server.
Step 6 - Initial boot from the NVMe
You don't need to remove the NVMe to boot from it because of the order we set earlier. I found that removing the SD card could dislodge the NVMe cable and cause confusing problems.
Once the Raspberry Pi has booted up again, run lsblk to check that the root partition is mounted from /dev/nvme0n1p1 instead of /dev/mmcblk0p1.
Now, set the hostname only on the OS on the NVMe and not on the SD card, so that you can tell easily when you're on the right system.
sudo hostnamectl set-hostname rp5-1
Rinse and repeat
I took me a couple of hours to setup 3x Raspberry Pi 5s in this way, each with their own external drive.
Don't forget to run the change on-device to edit the boot order, this is saved in the EEPROM on each Raspberry Pi.
The whole process is very tedious, and is made a bit worse by SSH being disabled by default, and there being no default user out of the box. One potential workaround is to mount the original OS image, and to make the necessary changes to re-enable SSH, and to create a default user, before then flashing the updated image to each Raspberry Pi.
I kept a copy of the OS image and userconf.txt on my main workstation, and used scp to transfer it to each device.
What am I doing with PCIe?
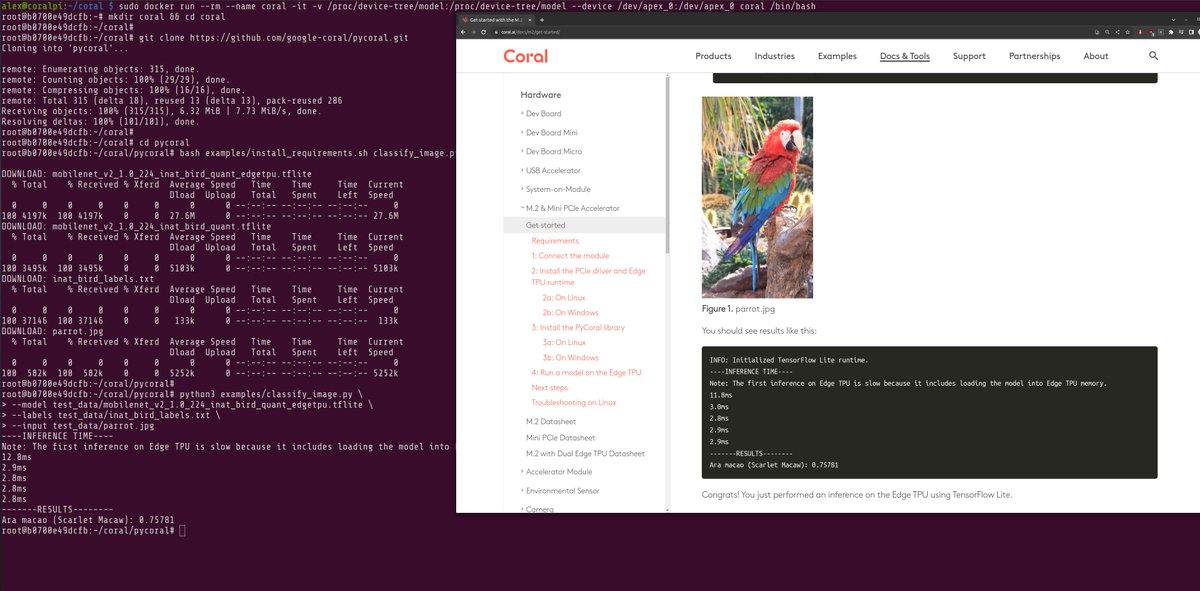
Shortly, I'll be setting up a K3s cluster using K3sup.dev, but I've also tried out a Google Coral sent to me by Pimoroni for testing, along with a link to various blog posts from Jeff Geerling who'd had even earlier access than me to PCIe on the RPi 5.
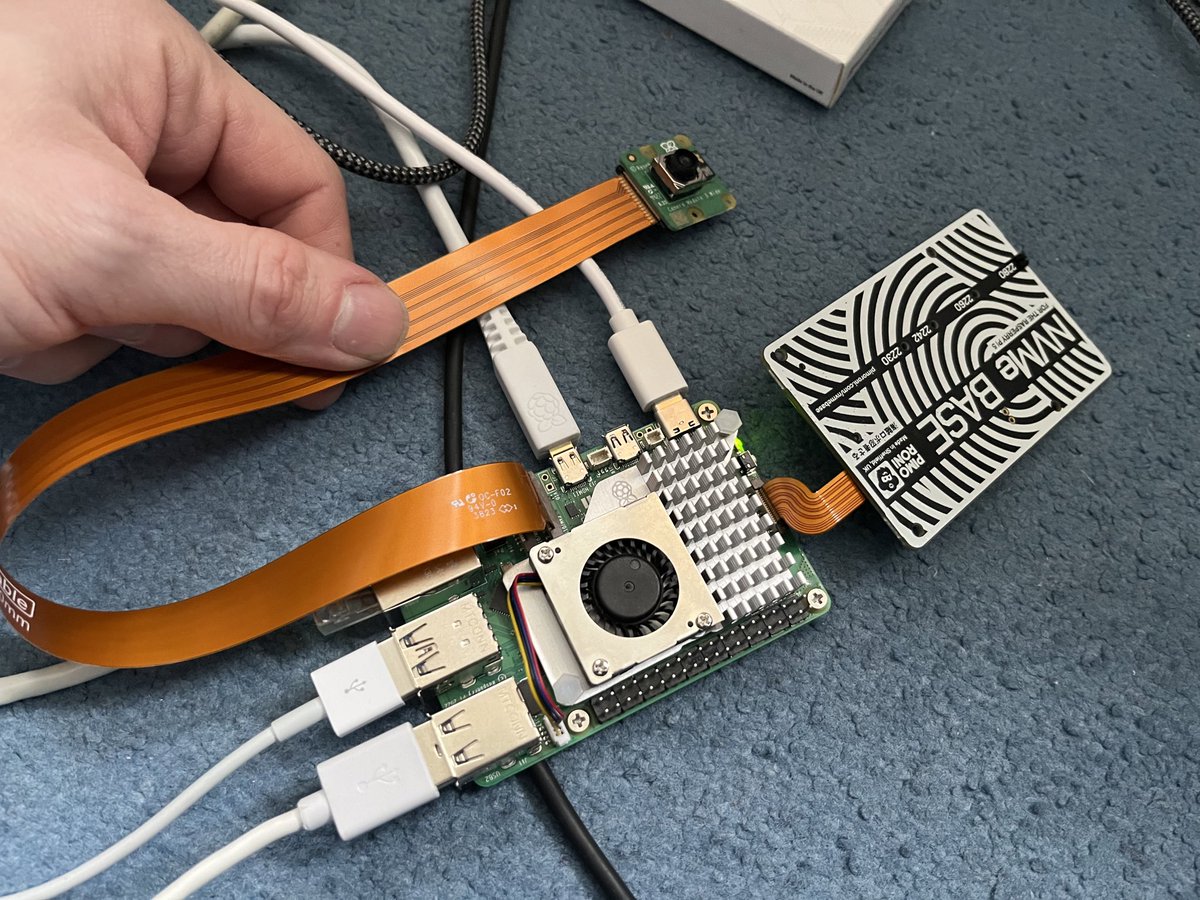
The Google Coral for PCIe with the NVMe Base from Pimoroni
The model that I tried worked, and was very quick once loaded into memory, but there are a host of issues that make it very difficult to use, even for seasoned developers and Raspberry Pi users like myself.
There's an unfortunate issue with the Coral ecosystem. Debian has moved on to Python 3.11, and the Coral maintainers have not yet added support for anything newer than Python 3.8. So the packages do not install, or work, unless installed in a Docker container, and with some other workarounds to change the address space.
A workaround to get the Google Coral to work in a container, with an old version of Python.
Guess what? Python 3.11 is needed for picamera to work, so it cannot be used alongside Python 3.8 with the Coral, ruling out a host of interesting projects.
This is mainly on Google - see: Python 3.10 and 3.11 support? #85 August 2022, not Raspberry Pi. We who tinker, live in hope that they will provide updated drivers and packages that work with modern versions of Python.
My camera also stopped working with libcamera on the host OS, after reconfiguring the Kernel mode for the Coral to work. I checked the camera cable, and tried reverting the Kernel mode, however I think that something changed with the Kernel when the Coral driver was built from source as a DKMS. So using the Raspberry Pi camera with the Coral, could be a tragic combination that was never meant to be?
A complex workaround would be to build a HTTP server into the Python container for inference, to take photos on a second Raspberry Pi, and to send them continually over the network.