How to Install DokuWiki with Nginx and Let's Encrypt SSL on Alma Linux
DokuWiki is an open-source, web-based wiki software designed primarily for Linux systems. It enables collaborative documentation and knowledge management by allowing users to create and edit content through a simple and intuitive web interface. DokuWiki stands out for its lightweight and easy-to-install nature, as it does not require a database, making it well-suited for smaller organizations or projects. Its robust text formatting capabilities, version control, and extensive plugin ecosystem make it a versatile tool for creating and maintaining documentation, knowledge bases, and websites within a Linux environment.
This tutorial will show you how to install DokuWiki with Nginx on Alma Linux.
Prerequisites
- A server running Alma Linux 8.
- A valid domain name pointed with your server IP.
- A root password is configured on the server.
Install Nginx and PHP
By default, the latest version of PHP is not included in the Alma Linux 8 default repo. So you will need to install the EPEL and Remi repository on your system.
You can install both by running the following command:
dnf install epel-release -y
dnf install https://rpms.remirepo.net/enterprise/remi-release-8.rpm -y
Once both packages are installed, enable the PHP Remi repository with the following command:
dnf module enable php:remi-7.4 -y
You should see the following output:
Dependencies resolved.
==============================================================================================================================================
 Package                           Architecture                     Version                           Repository                         Size
==============================================================================================================================================
Enabling module streams:
 php                                                                remi-7.4

Transaction Summary
==============================================================================================================================================

Complete!
Next, install the Nginx web server, PHP, and other required extensions using the following command:
dnf install nginx php php-cli php-fpm php-gd php-xml php-zip -y
Once all the packages are installed, edit the PHP-FPM configuration file and change the listen, user and group:
nano /etc/php-fpm.d/www.conf
Change the following lines:
user = nginx
group = nginx
Save and close the file then start and enable the Nginx and PHP-FPM service using the following command:
systemctl start nginx php-fpm
systemctl enable nginx php-fpm
You can also verify the PHP version with the following command:
php --version
You will get the following output:
PHP 7.4.28 (cli) (built: Feb 15 2022 13:23:10) ( NTS )
Copyright (c) The PHP Group
Zend Engine v3.4.0, Copyright (c) Zend Technologies
    with Zend OPcache v7.4.28, Copyright (c), by Zend Technologies
Install DokuWiki on Alma Linux 8
Next, you will need to download the latest version of DokuWiki from their official website. You can download it with the following command:
wget https://download.dokuwiki.org/src/dokuwiki/dokuwiki-stable.tgz
Once the download is completed, create a directory for DokuWiki inside the Nginx web root:
mkdir /var/www/html/dokuwiki
Next, extract the downloaded file with the following command:
tar xvf dokuwiki-stable.tgz
Next, move the extracted directory to the DokuWiki directory:
mv dokuwiki-2020-07-29/* /var/www/html/dokuwiki/
Next, change the ownership of the DokuWiki directory to Nginx:
chown -R nginx:nginx /var/www/html/dokuwiki
Once you are finished, you can proceed to the next step.
Create an Nginx Virtual Host for DokuWiki
Next, create an Nginx configuration file for DokuWiki using the following command:
nano /etc/nginx/conf.d/dokuwiki.conf
Add the following lines:
server {
    listen 80;
    server_name wiki.example.com;
    root /var/www/html/dokuwiki;
    index index.html index.htm index.php doku.php;

    client_max_body_size 15M;
    client_body_buffer_size 128K;

    location / {
        try_files $uri $uri/ @dokuwiki;
    }

    location ^~ /conf/ { return 403; }
    location ^~ /data/ { return 403; }
    location ~ /\.ht { deny all; }

    location @dokuwiki {
        rewrite ^/_media/(.*) /lib/exe/fetch.php?media=$1 last;
        rewrite ^/_detail/(.*) /lib/exe/detail.php?media=$1 last;
        rewrite ^/_export/([^/]+)/(.*) /doku.php?do=export_$1&id=$2 last;
        rewrite ^/(.*) /doku.php?id=$1 last;
    }
    location ~ \.php$ {
        try_files $uri =404;
        fastcgi_pass unix:/run/php-fpm/www.sock;
        fastcgi_index index.php;
        include fastcgi_params;
        fastcgi_param SCRIPT_FILENAME $document_root$fastcgi_script_name;
    }
}
Save and close the file then verify the Nginx for any syntax error with the following command:
nginx -t
You will get the following output:
nginx: the configuration file /etc/nginx/nginx.conf syntax is ok
nginx: configuration file /etc/nginx/nginx.conf test is successful
Finally, restart the Nginx service to apply the changes:
systemctl restart nginx
You can also check the status of the Nginx using the following command:
systemctl status nginx
You will get the following output:
? nginx.service - The nginx HTTP and reverse proxy server
   Loaded: loaded (/usr/lib/systemd/system/nginx.service; disabled; vendor preset: disabled)
  Drop-In: /usr/lib/systemd/system/nginx.service.d
           ??php-fpm.conf
   Active: active (running) since Sat 2022-03-26 04:26:32 UTC; 4s ago
  Process: 5020 ExecStart=/usr/sbin/nginx (code=exited, status=0/SUCCESS)
  Process: 5018 ExecStartPre=/usr/sbin/nginx -t (code=exited, status=0/SUCCESS)
  Process: 5017 ExecStartPre=/usr/bin/rm -f /run/nginx.pid (code=exited, status=0/SUCCESS)
 Main PID: 5022 (nginx)
    Tasks: 2 (limit: 11412)
   Memory: 3.8M
   CGroup: /system.slice/nginx.service
           ??5022 nginx: master process /usr/sbin/nginx
           ??5023 nginx: worker process

Mar 26 04:26:32 linux systemd[1]: nginx.service: Succeeded.
Mar 26 04:26:32 linux systemd[1]: Stopped The nginx HTTP and reverse proxy server.
Mar 26 04:26:32 linux systemd[1]: Starting The nginx HTTP and reverse proxy server...
Mar 26 04:26:32 linux nginx[5018]: nginx: the configuration file /etc/nginx/nginx.conf syntax is ok
Mar 26 04:26:32 linux nginx[5018]: nginx: configuration file /etc/nginx/nginx.conf test is successful
Mar 26 04:26:32 linux systemd[1]: nginx.service: Failed to parse PID from file /run/nginx.pid: Invalid argument
Mar 26 04:26:32 linux systemd[1]: Started The nginx HTTP and reverse proxy server.
Access DokuWiki Web Interface
Now, open your web browser and access the DokuWiki web installation wizard using the URL http://wiki.example.com/install.php. You will get the following page:
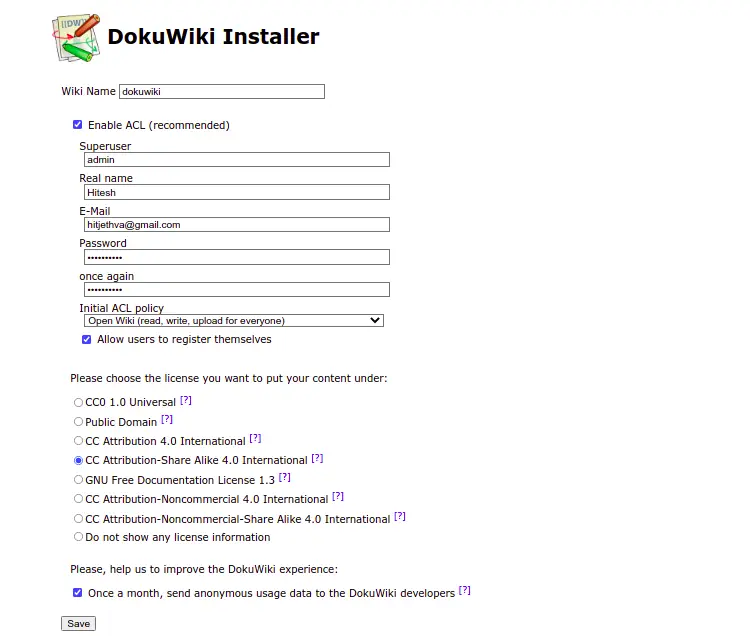
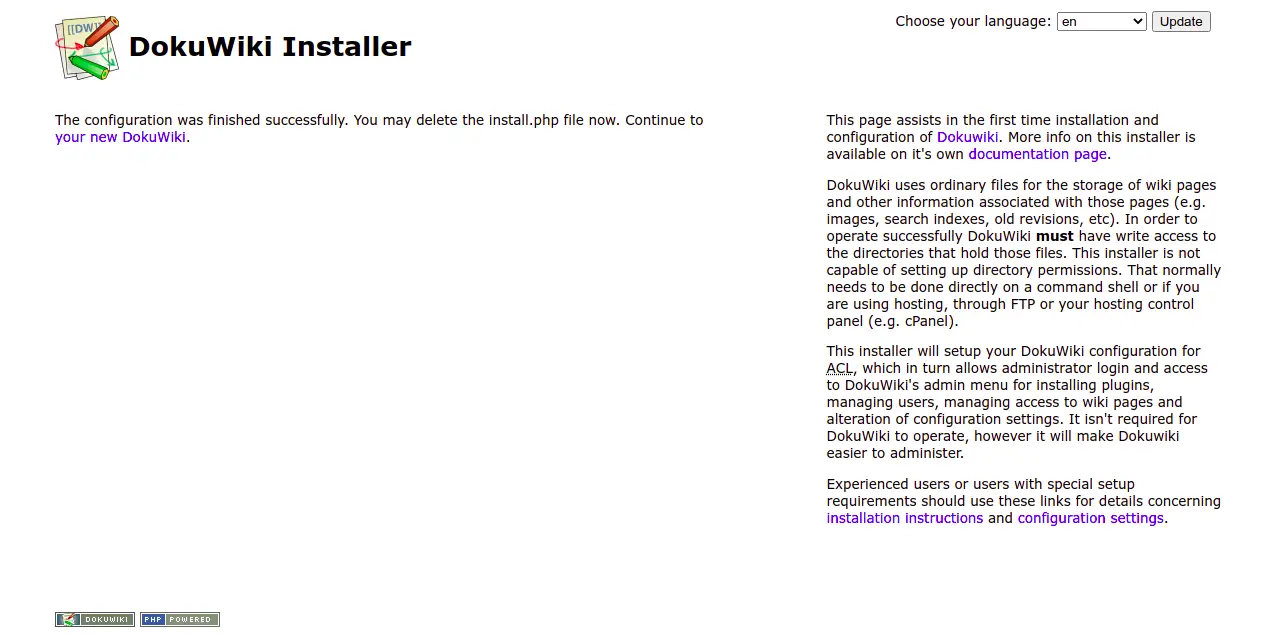
Provide all the required information like superuser name, email, password. Then, click on the Save button. Once the installation has been completed successfully, you should see the following page:
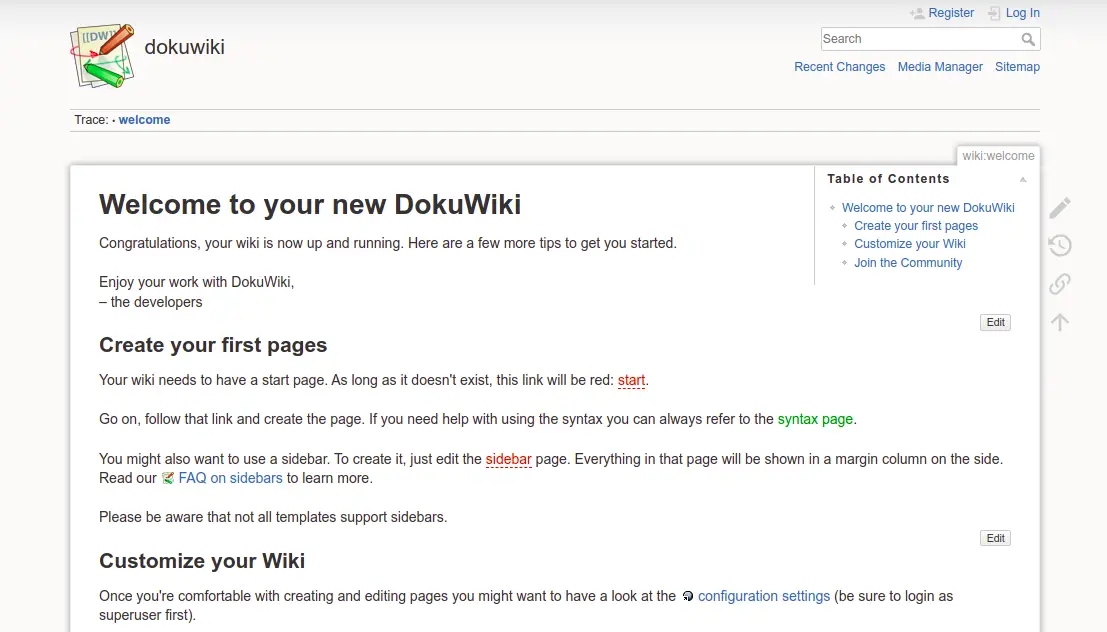
Now, click on your new DokuWiki. You should see the following page:
Now, click on the login button. You will be redirected to the following page:
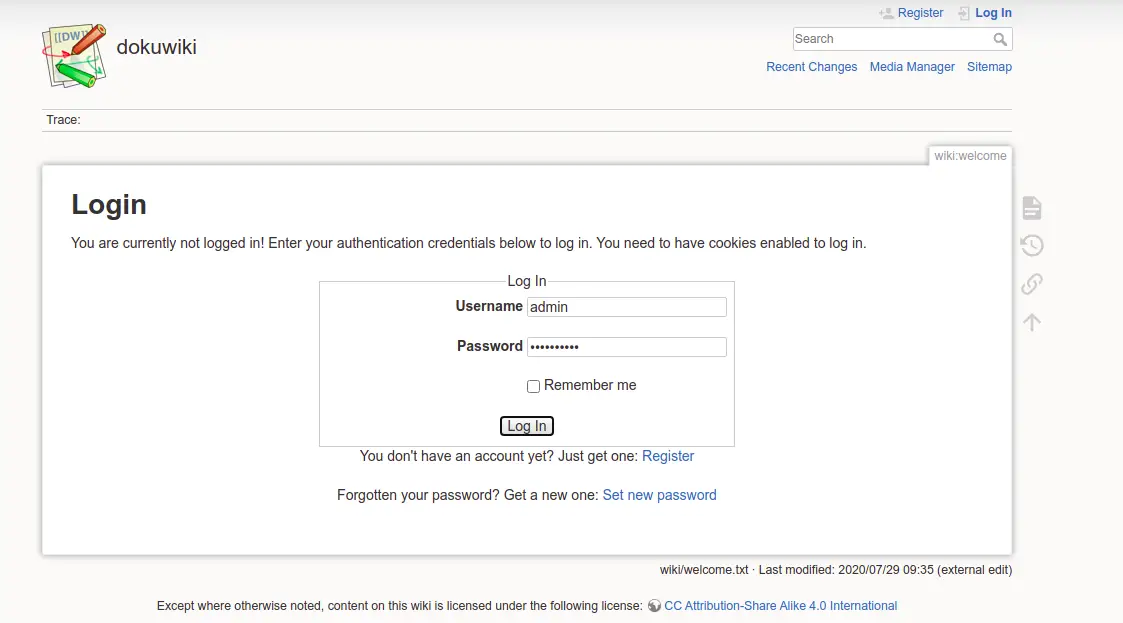
Now, provide your Admin username and password. Then, click on the Log In button. You should see the DokuWiki dashboard on the following page:

After a successful configuration, delete the install.php file from the DokuWiki root directory:
rm -rf /var/www/html/dokuwiki/install.php
Secure DokuWiki with Let's Encrypt
It is a good idea to secure the wiki website with Let's Encrypt. To do so, you will need to install the Certbot package on your server. You can install it by running the following command:
dnf install epel-release -y
dnf install certbot -y
Next, run the following command to install the Let's Encrypt SSL on your website:
certbot --nginx -d wiki.example.com
You will be asked to provide your email address and accept the term of service:
Saving debug log to /var/log/letsencrypt/letsencrypt.log
Plugins selected: Authenticator apache, Installer apache
Enter email address (used for urgent renewal and security notices)
 (Enter 'c' to cancel): [email protected]

- - - - - - - - - - - - - - - - - - - - - - - - - - - - - - - - - - - - - - - -
Please read the Terms of Service at
https://letsencrypt.org/documents/LE-SA-v1.2-November-15-2017.pdf. You must
agree in order to register with the ACME server. Do you agree?
- - - - - - - - - - - - - - - - - - - - - - - - - - - - - - - - - - - - - - - -
(Y)es/(N)o: Y

- - - - - - - - - - - - - - - - - - - - - - - - - - - - - - - - - - - - - - - -
Would you be willing, once your first certificate is successfully issued, to
share your email address with the Electronic Frontier Foundation, a founding
partner of the Let's Encrypt project and the non-profit organization that
develops Certbot? We'd like to send you email about our work encrypting the web,
EFF news, campaigns, and ways to support digital freedom.
- - - - - - - - - - - - - - - - - - - - - - - - - - - - - - - - - - - - - - - -
(Y)es/(N)o: Y
Account registered.
Requesting a certificate for wiki.example.com
Performing the following challenges:
http-01 challenge for wiki.example.com
Waiting for verification.
Cleaning up challenges
Deploying Certificate to VirtualHost /etc/nginx/conf.d/dokuwiki.conf
Redirecting all traffic on port 80 to ssl in /etc/nginx/conf.d/dokuwiki.conf

- - - - - - - - - - - - - - - - - - - - - - - - - - - - - - - - - - - - - - - -
Congratulations! You have successfully enabled https://wiki.example.com
- - - - - - - - - - - - - - - - - - - - - - - - - - - - - - - - - - - - - - - -
Subscribe to the EFF mailing list (email: [email protected]).


IMPORTANT NOTES:
 - Congratulations! Your certificate and chain have been saved at:
   /etc/letsencrypt/live/wiki.example.com/fullchain.pem
   Your key file has been saved at:
   /etc/letsencrypt/live/wiki.example.com/privkey.pem
   Your certificate will expire on 2022-04-09. To obtain a new or
   tweaked version of this certificate in the future, simply run
   certbot again with the "certonly" option. To non-interactively
   renew *all* of your certificates, run "certbot renew"
 - If you like Certbot, please consider supporting our work by:

   Donating to ISRG / Let's Encrypt:   https://letsencrypt.org/donate
   Donating to EFF:                    https://eff.org/donate-le
You can now access your website securely using the URL https://wiki.example.com.
Conclusion
Congratulations! You have successfully installed and configured DokuWiki on Alma Linux 8 server. You can now create your own wiki site easily using DokuWiki. Feel free to ask me if you have any questions.

