How to Install Gitea DevOps Platform using Docker on Debian 12
This tutorial exists for these OS versions
- Debian 12 (Bookworm)
- Debian 11 (Bullseye)
- Debian 10 (Buster)
On this page
- Prerequisites
- Step 1 - Configure Firewall
- Step 2 - Install Docker and Docker Compose
- Step 3 - Create a Git user
- Step 4 - Configure and Install Gitea
- Step 5 - Install Nginx
- Step 6 - Install SSL
- Step 7 - Configure Nginx
- Step 8 - Access and Set up Gitea
- Step 8 - Create First Repository
- Step 9 - Set up SSH
- Step 10 - Clone Repository using SSH
- Step 11 - Testing First Commit
- Step 12 - Backup and Restore Gitea
- Step 13 - Upgrade Gitea
- Conclusion
Gitea is an open-source code-hosting solution based on the Git platform. It is written in the Go language and can be installed on multiple operating systems, including Linux, macOS, Windows, and architectures like amd64, i386, ARM, and others. It includes a repository file editor, issue tracking, pull requests, user management, notifications, built-in wiki, LFS Support, Git hooks, and much more.
It is a lightweight application. Therefore, it can be installed on low-powered systems. If you are looking for a self-hosted Git platform with a smaller memory platform, you should check out Gitea.
This article will cover installing and configuring Gitea on a Debian 12 server and setting up your first Git repository. Gitea can be installed from source, binary, a docker package, or a package. For our tutorial, we will install it using Docker.
Prerequisites
-
A server running Debian 12.
-
A non-root user with sudo privileges.
-
A Fully Qualified Domain Name (FQDN) like
gitea.example.compointing to your server. -
Make sure your server has swap storage enabled if you are on a server with 1GB RAM.
-
Make sure everything is updated.
$ sudo apt update && sudo apt upgrade
-
A few essential packages are required before we proceed ahead. Some of these will already be installed on your server.
$ sudo apt install curl wget nano software-properties-common dirmngr apt-transport-https ca-certificates lsb-release debian-archive-keyring gnupg2 ufw unzip -y
Step 1 - Configure Firewall
The first step is to configure the firewall. Debian comes with ufw (Uncomplicated Firewall) by default.
Check if the firewall is running.
$ sudo ufw status
You will get the following output.
Status: inactive
Allow SSH port so that the firewall doesn't break the current connection upon enabling it.
$ sudo ufw allow OpenSSH
Allow HTTP and HTTPS ports as well.
$ sudo ufw allow http
$ sudo ufw allow https
Enable the Firewall
$ sudo ufw enable
Command may disrupt existing ssh connections. Proceed with operation (y|n)? y
Firewall is active and enabled on system startup
Check the status of the firewall again.
$ sudo ufw status
You should see a similar output.
Status: active

To                         Action      From
--                         ------      ----
OpenSSH                    ALLOW       Anywhere
80/tcp                     ALLOW       Anywhere
443                        ALLOW       Anywhere
OpenSSH (v6)               ALLOW       Anywhere (v6)
80/tcp (v6)                ALLOW       Anywhere (v6)
443 (v6)                   ALLOW       Anywhere (v6)
Step 2 - Install Docker and Docker Compose
Debian 12 ships with an older version of Docker. To install the latest version, first, import the Docker GPG key.
$ curl -fsSL https://download.docker.com/linux/debian/gpg | sudo gpg --dearmor -o /usr/share/keyrings/docker.gpg
Create a Docker repository file.
$ echo \
  "deb [arch="$(dpkg --print-architecture)" signed-by=/usr/share/keyrings/docker.gpg] https://download.docker.com/linux/debian \
  "$(. /etc/os-release && echo "$VERSION_CODENAME")" stable" | \
  sudo tee /etc/apt/sources.list.d/docker.list > /dev/null
Update the system repository list.
$ sudo apt update
Install the latest version of Docker.
$ sudo apt install docker-ce docker-ce-cli containerd.io docker-buildx-plugin docker-compose-plugin
Verify that it is running.
$ sudo systemctl status docker
? docker.service - Docker Application Container Engine
     Loaded: loaded (/lib/systemd/system/docker.service; enabled; preset: enabled)
     Active: active (running) since Sat 2023-11-18 07:13:39 UTC; 10s ago
TriggeredBy: ? docker.socket
       Docs: https://docs.docker.com
   Main PID: 1891 (dockerd)
      Tasks: 8
     Memory: 27.2M
        CPU: 338ms
     CGroup: /system.slice/docker.service
             ??1891 /usr/bin/dockerd -H fd:// --containerd=/run/containerd/containerd.sock
By default, Docker requires root privileges. If you want to avoid using sudo every time you run the docker command, add your username to the docker group.
$ sudo usermod -aG docker $(whoami)
You will need to log out of the server and back in as the same user to enable this change or use the following command.
$ su - ${USER}
Confirm that your user is added to the Docker group.
$ groups
navjot sudo users docker
Step 3 - Create a Git user
In order for the users to be able to access the host via SSH, you will need to create a separate git user on the host. Run the following command to create the git user.
$ sudo adduser --system --shell /bin/bash --gecos 'Git Version Control' --group --disabled-password --home /home/git git
Let us go through all the options and flags in the above command for a better understanding.
--system- creates a system user instead of a regular user. System users are for running system services and cannot be used for interactive logins.--shell /bin/bash- sets the login shell for the system user to the Bash shell.--gecos 'Git Version Control'- sets a descriptive field for the user. It is optional and can be skipped but is useful if your system has a lot of users.--group- creates a group with the same name as the user.--disabled-password- disables password-based login for the user which helps secure the account.--home /home/git- sets the home directory for the user to/home/gitwhich stores the user's files and configuration.git- specifies the username. Here we are usinggitas the username for the account.
You will get the following output once you run the command.
Adding system user `git' (UID 105) ...
Adding new group `git' (GID 111) ...
Adding new user `git' (UID 105) with group `git' ...
Creating home directory `/home/git' ...
Note the values of the variables UID and GID which we will need in the next step. In our case, UID is 105 and GID is 111.
Step 4 - Configure and Install Gitea
Configure System Timezone
You can check your system's current time zone by the following command.
$ timedatectl
               Local time: Sat 2023-11-18 07:15:53 UTC
           Universal time: Sat 2023-11-18 07:15:53 UTC
                 RTC time: Sat 2023-11-18 07:15:53
                Time zone: Etc/UTC (UTC, +0000)
System clock synchronized: yes
              NTP service: active
          RTC in local TZ: no
You can see that the system is set to GMT or UTC timezone. If you live in an area with a different timezone or want to change it, use the following command to do that.
$ sudo timedatectl set-timezone Asia/Kolkata
Check the timezone again.
$ timedatectl
               Local time: Sat 2023-11-18 12:46:29 IST
           Universal time: Sat 2023-11-18 07:16:29 UTC
                 RTC time: Sat 2023-11-18 07:16:29
                Time zone: Asia/Kolkata (IST, +0530)
System clock synchronized: yes
              NTP service: active
          RTC in local TZ: no
You can see that the timezone has been updated to IST, which is GMT+5:30.
Create Gitea Directories
Create the directory for Gitea.
$ mkdir ~/gitea-docker
Switch to the Gitea directory.
$ cd ~/gitea-docker
Create directories for storing Gitea data and PostgreSQL databases.
$ mkdir {gitea,postgres}
Configure Gitea Docker Compose File
Create and open the Docker Compose file for editing.
$ nano docker-compose.yml
Paste the following code in it. Paste the UID and GID values generated earlier.
services:
  server:
    image: gitea/gitea:1.21.0
    container_name: gitea
    environment:
      - USER_UID=105
      - USER_GID=111
      - GITEA__database__DB_TYPE=postgres
      - GITEA__database__HOST=db:5432
      - GITEA__database__NAME=gitea
      - GITEA__database__USER=gitea
      - GITEA__database__PASSWD=gitea
    restart: always
    networks:
      - gitea
    volumes:
      - ./gitea:/data
      - /home/git/.ssh/:/data/git/.ssh
      - /etc/timezone:/etc/timezone:ro
      - /etc/localtime:/etc/localtime:ro
    ports:
      - "3000:3000"
      - "2221:22"
    depends_on:
      - db

  db:
    image: postgres:15
    restart: always
    environment:
      - POSTGRES_USER=gitea
      - POSTGRES_PASSWORD=gitea
      - POSTGRES_DB=gitea
    networks:
      - gitea
    volumes:
      - ./postgres:/var/lib/postgresql/data

networks:
  gitea:
    external: false
Save the file by pressing Ctrl + X and entering Y when prompted.
We are using the UID (User Identifier) and GID (Group Identifier) values for the user we created in the previous step.
The above Docker Compose file deploys two containers - one for Gitea and one for PostgreSQL. We have added a few environment variables to configure the database details. To connect the PostgreSQL database to the Gitea container, we have specified the host as the name of the PostgreSQL service in the file.
The port parameters "3000:3000" and "2221:22" specifies the port mapping where the left port denotes the host port and the right port denotes the container port. Gitea uses port 3000 for its web service, which is what we have exposed to the server too. For SSH, our system is already using port 22 for logging purposes. Therefore, we specify a custom port to perform SSH operations. In our case, we are using port 2221. This port also needs to be opened via your firewall, which we already did in step 1 of this tutorial.
Both, Gitea and the PostgreSQL containers are connected via a common internal Docker network named gitea. The volume mounts will automatically create gitea and postgres directories in the current folder when you start your Docker installation. The user ID specified in the compose file is what the Gitea container will use to create the gitea directory. On the other hand, the PostgreSQL container will be managed by the user systemd-coredump which is the default behavior. You can change that behavior, but it is not necessary.
Customize your Gitea Installation
You can customize your Gitea installation by adding an app.ini file to the ~/gitea-docker/gitea/gitea/conf directory. After the installation, this file can be edited from inside the container from the /data/gitea/conf/app.ini location. You can use the sample ini file from Gitea's Github repository for reference.
Install Gitea
Run the following command to launch Gitea containers.
$ docker compose up -d
Check the status of the containers to ensure they are running properly.
$ docker ps
CONTAINER ID   IMAGE                COMMAND                  CREATED          STATUS          PORTS                                                                              NAMES
3b5ce50a04fe   gitea/gitea:1.21.0   "/usr/bin/entrypoint…"   43 seconds ago   Up 42 seconds   0.0.0.0:3000->3000/tcp, :::3000->3000/tcp, 0.0.0.0:2221->22/tcp, :::2221->22/tcp   gitea
0908cb9ec3b7   postgres:15          "docker-entrypoint.s…"   43 seconds ago   Up 42 seconds   5432/tcp                                                                           gitea-docker-db-1
You can also use the following command to check the status.
$ docker compose ps
NAME                IMAGE                COMMAND                                        SERVICE   CREATED              STATUS              PORTS
gitea               gitea/gitea:1.21.0   "/usr/bin/entrypoint /bin/s6-svscan /etc/s6"   server    About a minute ago   Up About a minute   0.0.0.0:3000->3000/tcp, :::3000->3000/tcp, 0.0.0.0:2221->22/tcp, :::2221->22/tcp
gitea-docker-db-1   postgres:15          "docker-entrypoint.sh postgres"                db        About a minute ago   Up About a minute   5432/tcp
Step 5 - Install Nginx
Debian 12 ships with an older version of Nginx. To install the latest version, you need to download the official Nginx repository.
Import Nginx's signing key.
$ curl https://nginx.org/keys/nginx_signing.key | gpg --dearmor \
    | sudo tee /usr/share/keyrings/nginx-archive-keyring.gpg >/dev/null
Add the repository for Nginx's stable version.
$ echo "deb [signed-by=/usr/share/keyrings/nginx-archive-keyring.gpg] \
http://nginx.org/packages/debian `lsb_release -cs` nginx" \
    | sudo tee /etc/apt/sources.list.d/nginx.list
Update the system repositories.
$ sudo apt update
Install Nginx.
$ sudo apt install nginx
Verify the installation. On Debian systems, the following command will only work with sudo.
$ sudo nginx -v
nginx version: nginx/1.24.0
Start the Nginx server.
$ sudo systemctl start nginx
Check the service status.
$ sudo systemctl status nginx
? nginx.service - nginx - high performance web server
     Loaded: loaded (/lib/systemd/system/nginx.service; enabled; preset: enabled)
     Active: active (running) since Sat 2023-11-18 15:47:20 IST; 1s ago
       Docs: https://nginx.org/en/docs/
    Process: 4225 ExecStart=/usr/sbin/nginx -c /etc/nginx/nginx.conf (code=exited, status=0/SUCCESS)
   Main PID: 4226 (nginx)
      Tasks: 2 (limit: 2315)
     Memory: 1.8M
        CPU: 7ms
     CGroup: /system.slice/nginx.service
             ??4226 "nginx: master process /usr/sbin/nginx -c /etc/nginx/nginx.conf"
             ??4227 "nginx: worker process"
Open your server's IP address in your web browser. You should see the following page which means your server is up and running.

Step 6 - Install SSL
We need to install Certbot to generate the SSL certificate. You can either install Certbot using Debian's repository or grab the latest version using the Snapd tool. We will be using the Snapd version.
Debian 12 comes doesn't come with Snapd installed. Install Snapd package.
$ sudo apt install snapd
Run the following commands to ensure that your version of Snapd is up to date.
$ sudo snap install core && sudo snap refresh core
Install Certbot.
$ sudo snap install --classic certbot
Use the following command to ensure that the Certbot command can be run by creating a symbolic link to the /usr/bin directory.
$ sudo ln -s /snap/bin/certbot /usr/bin/certbot
Verify if Certbot is functioning correctly.
$ certbot --version
certbot 2.7.4
Generate the SSL certificate.
$ sudo certbot certonly --nginx --agree-tos --no-eff-email --staple-ocsp --preferred-challenges http -m [email protected] -d gitea.example.com
The above command will download a certificate to the /etc/letsencrypt/live/gitea.example.com directory on your server.
Generate a Diffie-Hellman group certificate.
$ sudo openssl dhparam -dsaparam -out /etc/ssl/certs/dhparam.pem 4096
Check the Certbot renewal scheduler service.
$ sudo systemctl list-timers
You will find snap.certbot.renew.service as one of the services scheduled to run.
NEXT                        LEFT           LAST                        PASSED      UNIT                      ACTIVATES
---------------------------------------------------------------------------------------------------------------------------
Sat 2023-11-18 18:41:45 IST 2h 49min left Sat 2023-11-18 12:22:34 IST 3h 29min ago apt-daily.timer           apt-daily.service
Sat 2023-11-18 20:40:00 IST 4h 47min left -                           -            snap.certbot.renew.timer  snap.certbot.renew.service
Sun 2023-11-19 00:00:00 IST 8h left       -                           -            dpkg-db-backup.timer      dpkg-db-backup.service
Do a dry run of the process to check whether the SSL renewal is working fine.
$ sudo certbot renew --dry-run
If you see no errors, you are all set. Your certificate will renew automatically.
Step 7 - Configure Nginx
Run the following command to add a configuration file for your site.
$ sudo nano /etc/nginx/conf.d/gitea.conf
Paste the following code in the editor.
# Connection header for WebSocket reverse proxy
map $http_upgrade $connection_upgrade {
    default upgrade;
    ""      close;
}

map $remote_addr $proxy_forwarded_elem {

    # IPv4 addresses can be sent as-is
    ~^[0-9.]+$ "for=$remote_addr";

    # IPv6 addresses need to be bracketed and quoted
    ~^[0-9A-Fa-f:.]+$ "for=\"[$remote_addr]\"";

    # Unix domain socket names cannot be represented in RFC 7239 syntax
    default "for=unknown";
}

map $http_forwarded $proxy_add_forwarded {

   # If the incoming Forwarded header is syntactically valid, append to it
    "~^(,[ \\t]*)*([!#$%&'*+.^_`|~0-9A-Za-z-]+=([!#$%&'*+.^_`|~0-9A-Za-z-]+|\"([\\t \\x21\\x23-\\x5B\\x5D-\\x7E\\x80-\\xFF]|\\\\[\\t \\x21-\\x7E\\x80-\\xFF])*\"))?(;([!#$%&'*+.^_`|~0-9A-Za-z-]+=([!#$%&'*+.^_`|~0-9A-Za-z-]+|\"([\\t \\x21\\x23-\\x5B\\x5D-\\x7E\\x80-\\xFF]|\\\\[\\t \\x21-\\x7E\\x80-\\xFF])*\"))?)*([ \\t]*,([ \\t]*([!#$%&'*+.^_`|~0-9A-Za-z-]+=([!#$%&'*+.^_`|~0-9A-Za-z-]+|\"([\\t \\x21\\x23-\\x5B\\x5D-\\x7E\\x80-\\xFF]|\\\\[\\t \\x21-\\x7E\\x80-\\xFF])*\"))?(;([!#$%&'*+.^_`|~0-9A-Za-z-]+=([!#$%&'*+.^_`|~0-9A-Za-z-]+|\"([\\t \\x21\\x23-\\x5B\\x5D-\\x7E\\x80-\\xFF]|\\\\[\\t \\x21-\\x7E\\x80-\\xFF])*\"))?)*)?)*$" "$http_forwarded, $proxy_forwarded_elem";

    # Otherwise, replace it
    default "$proxy_forwarded_elem";
}

# Redirect all non-encrypted to encrypted
server {
    listen 80;
    listen [::]:80;
    server_name gitea.example.com;
    return 301 https://$host$request_uri;
}

server {
    listen 443 ssl http2;
    listen [::]:443 ssl http2;

    server_name gitea.example.com;

    ssl_certificate     /etc/letsencrypt/live/gitea.example.com/fullchain.pem;
    ssl_certificate_key /etc/letsencrypt/live/gitea.example.com/privkey.pem;
    ssl_trusted_certificate /etc/letsencrypt/live/gitea.example.com/chain.pem;
    ssl_session_timeout 1d;
    ssl_session_cache shared:MozSSL:10m;
    ssl_session_tickets off;
    ssl_stapling on;
    ssl_stapling_verify on;
    ssl_dhparam /etc/ssl/certs/dhparam.pem;
    resolver 1.1.1.1 1.0.0.1 [2606:4700:4700::1111] [2606:4700:4700::1001] 8.8.8.8 8.8.4.4 [2001:4860:4860::8888] [2001:4860:4860::8844] valid=60s;
    resolver_timeout 2s;

    ssl_protocols TLSv1.2 TLSv1.3;
    ssl_ciphers ECDHE-ECDSA-AES128-GCM-SHA256:ECDHE-RSA-AES128-GCM-SHA256:ECDHE-ECDSA-AES256-GCM-SHA384:ECDHE-RSA-AES256-GCM-SHA384:ECDHE-ECDSA-CHACHA20-POLY1305:ECDHE-RSA-CHACHA20-POLY1305:DHE-RSA-AES128-GCM-SHA256:DHE-RSA-AES256-GCM-SHA384;

    access_log /var/log/nginx/gitea.access.log main;
    error_log  /var/log/nginx/gitea.error.log;

    tcp_nopush on;

    # security headers
    add_header X-XSS-Protection "1; mode=block" always;
    add_header X-Content-Type-Options "nosniff" always;
    add_header Referrer-Policy "no-referrer-when-downgrade" always;
    add_header Content-Security-Policy "default-src 'self' http: https: ws: wss: data: blob: 'unsafe-inline'; frame-ancestors 'self';" always;
    add_header Permissions-Policy "interest-cohort=()" always;

    # . files
    location ~ /\.(?!well-known) {
        deny all;
    }

    location / {
        client_max_body_size 100M;
        proxy_pass  http://localhost:3000;
        proxy_http_version 1.1;
        proxy_cache_bypass $http_upgrade;
        proxy_set_header Upgrade $http_upgrade;
        proxy_set_header Connection $connection_upgrade;
        proxy_set_header Host $host;
        proxy_set_header X-Real-IP $remote_addr;
        proxy_set_header X-Forwarded-For $proxy_add_x_forwarded_for;
        proxy_set_header X-Forwarded-Proto $scheme;
        proxy_set_header X-Forwarded-Port $server_port;
        proxy_set_header Forwarded $proxy_add_forwarded;
        proxy_connect_timeout 60s;
        proxy_send_timeout 60s;
        proxy_read_timeout 60s;
    }
}
Once finished, press Ctrl + X to close the editor and press Y when prompted to save the file.
Open the file /etc/nginx/nginx.conf for editing.
$ sudo nano /etc/nginx/nginx.conf
Add the following line before the line include /etc/nginx/conf.d/*.conf;.
server_names_hash_bucket_size 64;
Save the file by pressing Ctrl + X and entering Y when prompted. Test the Nginx configuration.
$ sudo nginx -t
You should see the following output indicating your configuration is correct.
nginx: the configuration file /etc/nginx/nginx.conf syntax is ok
nginx: configuration file /etc/nginx/nginx.conf test is successful
Reload the Nginx service.
$ sudo systemctl reload nginx
Step 8 - Access and Set up Gitea
Visit the URL https://gitea.example.com in your browser, and the following installation screen shall appear.
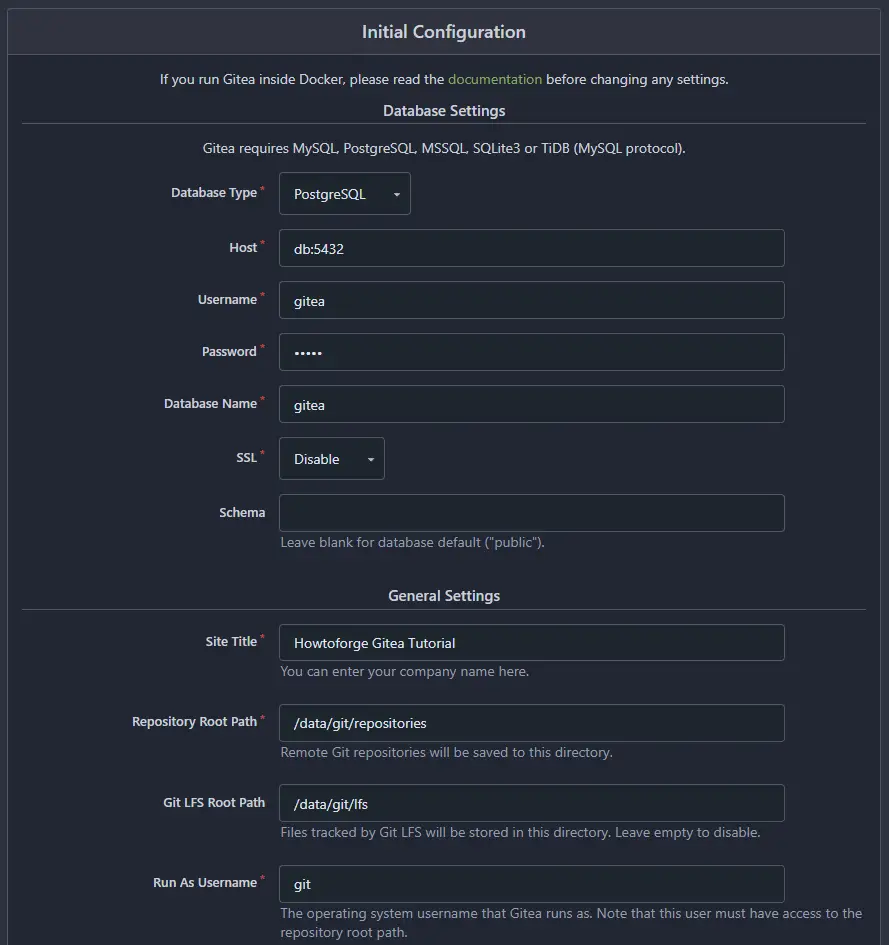
Most of the fields will be pre-filled for you based on the values from the Docker compose file.

Enter gitea.example.com as the Server Domain and https://gitea.example.com as the Gitea Base URL. Change the value for the SSH Server Port from 22 to 2221. Leave the remaining settings as it is.
If you want to use mail features, you can add your SMTP server details. Expand the Email Settings section of the page and enter values as shown in the screenshot. Make sure to include your SMTP port with the hostname as shown. For our tutorial, we are using the Amazon SES service. You can use any SMTP service of your choice.

There are a few more settings you should check out before installing. To change them, expand the Server and Third-Party Service Settings section of the page.

Change the settings as per your requirement. We have enabled the option Hide Email Addresses by Default to ensure greater privacy and Require Sign-in to View Pages to keep our Git site private. If you don't want people to register an account, enable the Disable Self-Registration option.
Last but not least, set up your administrator account. Expand the Administrator Account Settings section of the page and fill in the required values.

Click the Install Gitea button when finished to complete the installation. You will be redirected to the Gitea dashboard. If, for some reason, you get a 502 error, refresh the page.
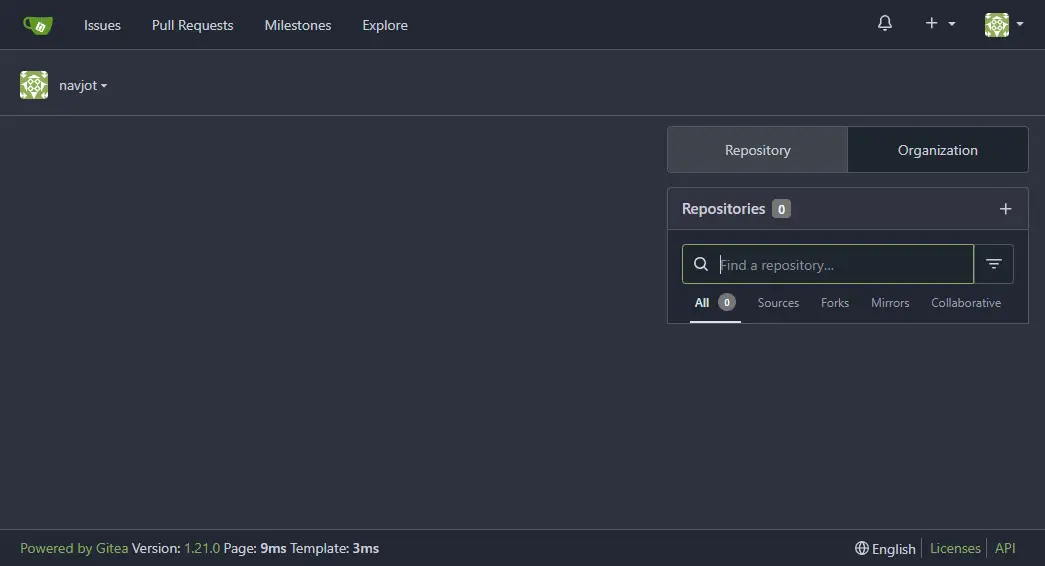
Step 8 - Create First Repository
Let us create our first repository. To do that, click the + sign on the dashboard.

Enter the repository details. Select the Default Issue label by choosing from the dropdown menu. Select an appropriate license for your repository.
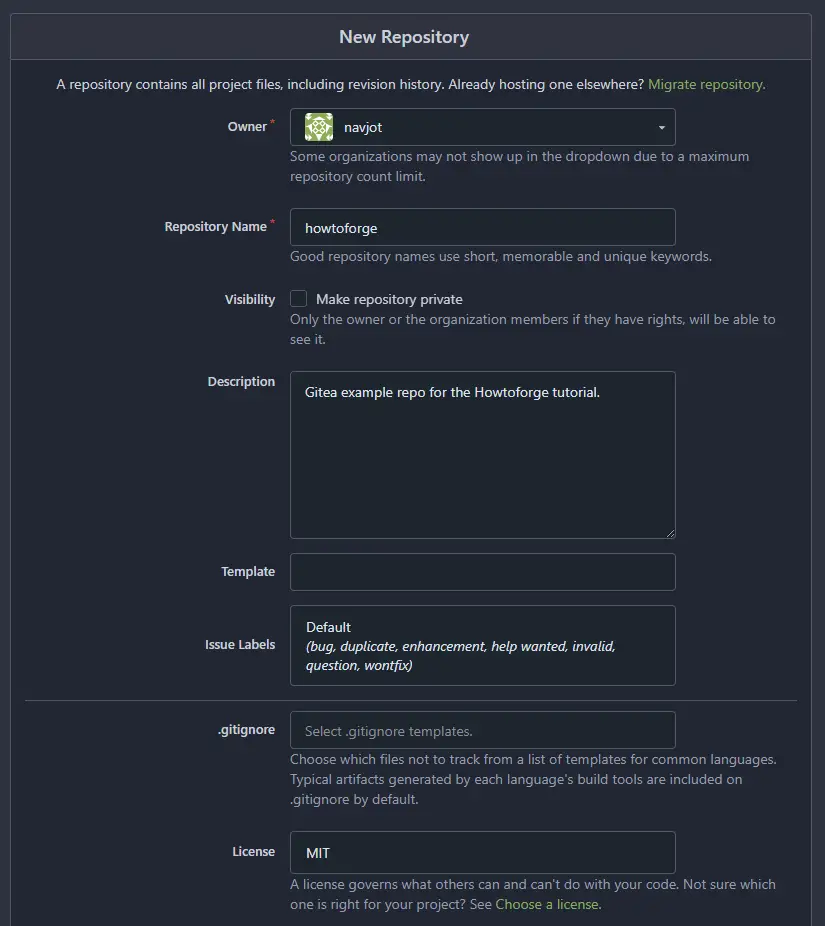
Select the default branch for your repository.
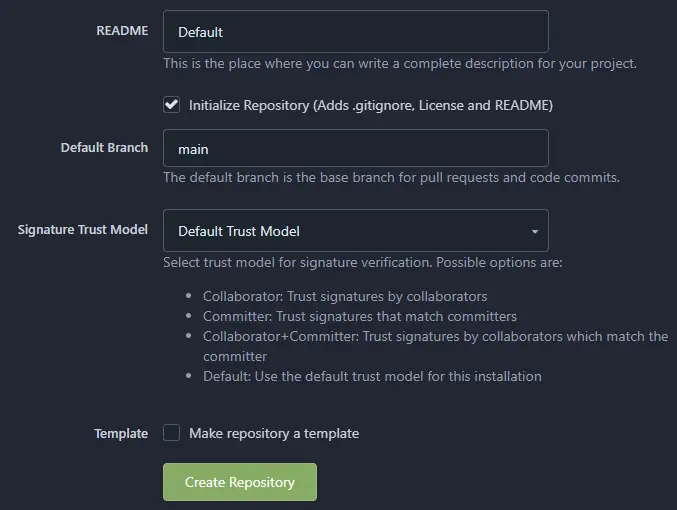
Once satisfied, click the Create repository button to create your first repository on your Gitea installation. You will be redirected to your repository home.

Step 9 - Set up SSH
Let us set up SSH to use with our newly created repository.
For our tutorial, we will use a local PC with Ubuntu pre-installed. However, the commands should work on any OS terminal without much change.
Create a new SSH key to use with Gitea on your local PC.
$ ssh-keygen -f ~/.ssh/gitea-demo -t rsa -b 4096 -C "HowtoForge Gitea Demo" -q -N "yourpassphrase"
Enter a strong passphrase in place of the placeholder in the command above. This will create an SSH key at ~/.ssh/gitea-demo location.
Next, open your Gitea profile settings as shown by clicking the dropdown menu on your profile image and selecting the Settings option.

Next, switch to the SSH/GPG Keys tab on the page.
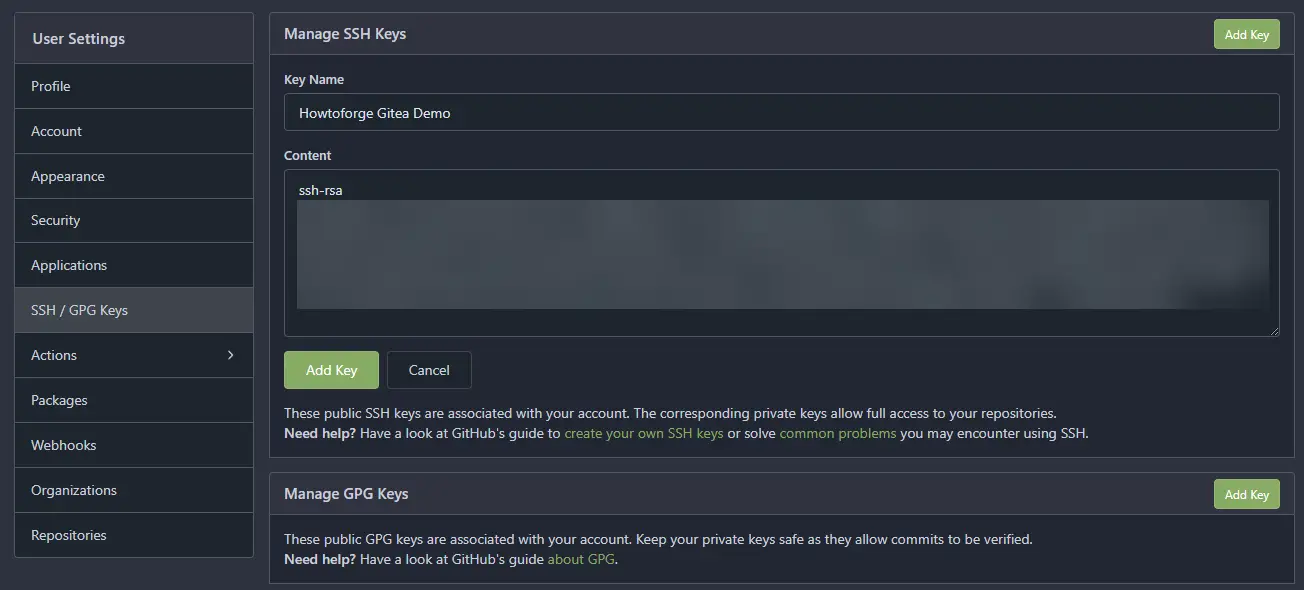
Add a name for your SSH key. Go back to the terminal on your local PC and run the following command to output the public key for Gitea.
$ cat ~/.ssh/gitea-demo.pub
Copy the resulting output and paste it back into the Content box on the SSH keys page of Gitea.
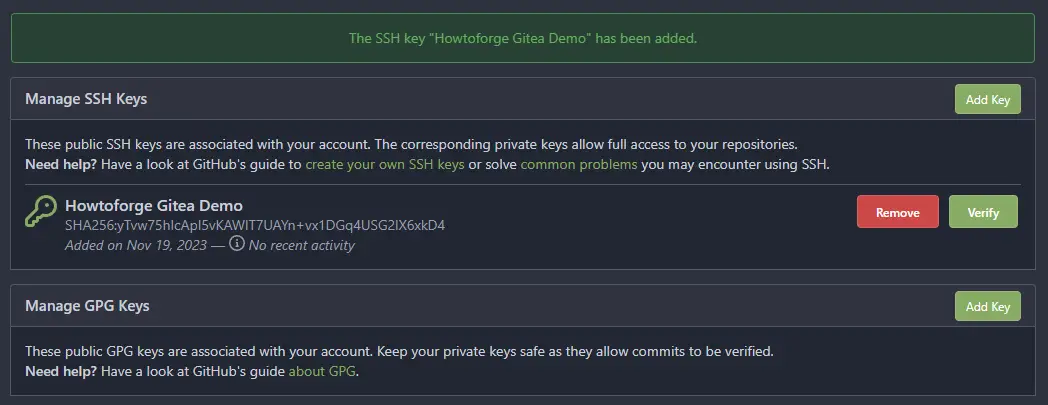
Click the Add Key button to finish adding the key.
Go back to your local PC and set up the SSH agent to remain active for 1 hour.
$ eval $(ssh-agent -t 3600)
Add the newly created SSH key to the SSH agent.
$ ssh-add ~/.ssh/gitea-demo
Enter passphrase for /home/navjot/.ssh/gitea-demo:
Identity added: /home/navjot/.ssh/gitea-demo (HowtoForge Gitea Demo)
You will be prompted for your passphrase.
Step 10 - Clone Repository using SSH
Let us clone the newly created repository using SSH. Visit the repository page again and copy the SSH URL after selecting the SSH option.

It should look like the following.
ssh://[email protected]:2221/navjot/howtoforge.git
Run the following command on your local PC to clone the repository using SSH.
$ git clone ssh://[email protected]:2221/navjot/howtoforge.git
Cloning into 'howtoforge'...
The authenticity of host '[gitea.example.com]:2221 ([128.199.48.13]:2221)' can't be established.
ED25519 key fingerprint is SHA256:H7t5hNmEpZkYC9u3sXbA1mnGXCnoqaUZGL+gpAG9uNs.
This key is not known by any other names
Are you sure you want to continue connecting (yes/no/[fingerprint])? yes
Warning: Permanently added '[gitea.example.com]:2221' (ED25519) to the list of known hosts.
remote: Enumerating objects: 4, done.
remote: Counting objects: 100% (4/4), done.
remote: Compressing objects: 100% (4/4), done.
remote: Total 4 (delta 0), reused 0 (delta 0), pack-reused 0
Receiving objects: 100% (4/4), done.
You will be prompted to add the host credentials. Enter yes to proceed with cloning the repository.
You will see the cloned repository on your system.
$ ls
howtoforge
Switch to the directory.
$ cd howtoforge
Check the Git status of the newly cloned repository. For this, you should have Git installed on your local PC.
$ git status
On branch main
Your branch is up to date with 'origin/main'.

nothing to commit, working tree clean
This concludes that SSH is working perfectly.
Step 11 - Testing First Commit
Now that we have set up our first repository, it's time to make some changes and commit them back.
Let us update the README.md file. On your local PC, open the readme file for editing.
$ nano README.md
Edit the file and when finished, save it by pressing Ctrl + X and entering Y when prompted.
Check the Git status again.
$ git status
On branch main
Your branch is up to date with 'origin/main'.

Changes not staged for commit:
  (use "git add <file>..." to update what will be committed)
  (use "git restore <file>..." to discard changes in working directory)
        modified:   README.md

no changes added to commit (use "git add" and/or "git commit -a")
This shows that the Readme file has been edited but not committed. Add the file to prepare it for commit.
$ git add README.md
Commit the file.
$ git commit -m "Update the Readme file for Gitea tutorial."
[main bb2956f] Update the Readme file for Gitea tutorial.
 1 file changed, 3 insertions(+), 1 deletion(-)
Push the file to your Gitea Server.
$ git push origin main
Enumerating objects: 5, done.
Counting objects: 100% (5/5), done.
Delta compression using up to 4 threads
Compressing objects: 100% (3/3), done.
Writing objects: 100% (3/3), 378 bytes | 378.00 KiB/s, done.
Total 3 (delta 0), reused 0 (delta 0), pack-reused 0
remote: . Processing 1 references
remote: Processed 1 references in total
To ssh://gitea.example.com:2221/navjot/howtoforge.git
   bd1248f..bb2956f  main -> main
To confirm, go back to the Gitea repository page.
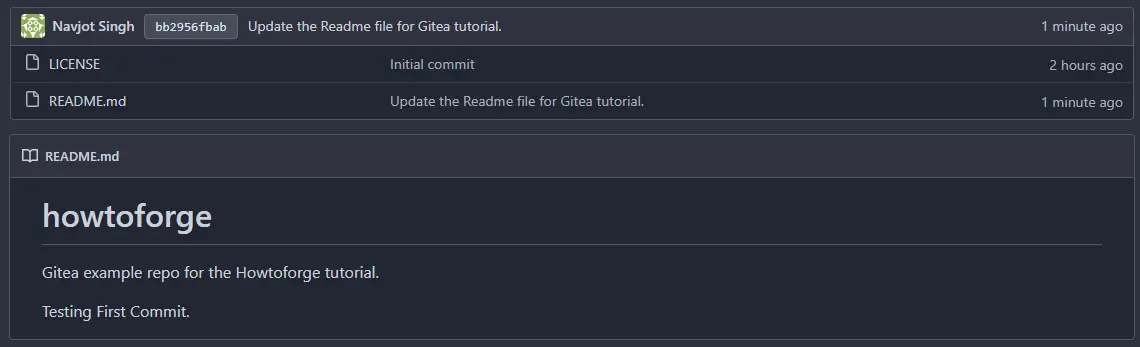
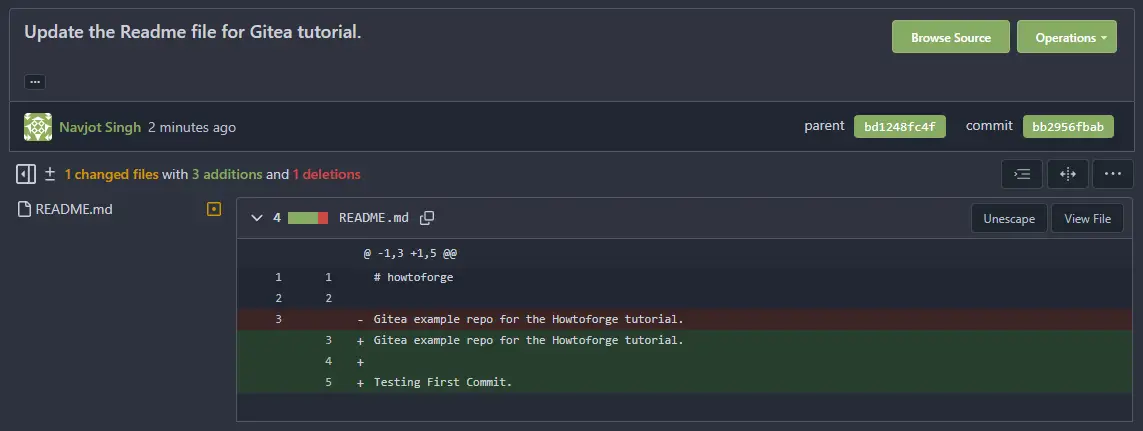
You can notice that the Readme file has been updated, and the latest commit message is also shown. To view the changes, click on the commit message, and you can view the following page with differences.
This concludes our first commit for our repository. You can start working on your Gitea installation for your projects.
Step 12 - Backup and Restore Gitea
Gitea ships with a command line tool that can perform backup using a single command. To run the command line tool inside the docker container to perform the backup, run the following command.
$ docker exec -u git -it -w /app/gitea gitea bash -c '/usr/local/bin/gitea dump -c /data/gitea/conf/app.ini'
We are running the command as the same user as we created in step 3 and configured during the installation by using the flag -u git in the above command. The flag -w /app/gitea defines the folder inside the docker container where the backup file will be stored. The backup folder has to be chosen such that the git user has permission to write on it. Inside the docker container, there are only two such folders. One is the /data folder and the other one is the /app/gitea folder. We can't use the /data folder because the command line tool backs the entire data folder which goes into an indefinite loop if we use it as the destination which can fill your server space. Therefore, we can only store the backup in the /app/gitea folder.
The next thing in the command is the container name, gitea. After that, we specify the type of Linux shell that is used to execute the command inside the container. The flag -c specifies the command you need to run inside the container. And the command to be run is /usr/local/bin/gitea dump -c /data/gitea/conf/app.ini which runs the command line tool and specifies the location of the configuration file to go with it.
Once the command is run, you will see the following output.
2023/11/20 06:21:41 ...les/setting/cache.go:75:loadCacheFrom() [I] Cache Service Enabled
2023/11/20 06:21:41 ...les/setting/cache.go:90:loadCacheFrom() [I] Last Commit Cache Service Enabled
2023/11/20 06:21:41 ...s/setting/session.go:74:loadSessionFrom() [I] Session Service Enabled
2023/11/20 06:21:41 ...es/setting/mailer.go:237:loadMailerFrom() [I] Mail Service Enabled
2023/11/20 06:21:41 ...es/setting/mailer.go:259:loadNotifyMailFrom() [I] Notify Mail Service Enabled
2023/11/20 06:21:41 ...s/storage/storage.go:176:initAttachments() [I] Initialising Attachment storage with type: local
2023/11/20 06:21:41 ...les/storage/local.go:33:NewLocalStorage() [I] Creating new Local Storage at /data/gitea/attachments
2023/11/20 06:21:41 ...s/storage/storage.go:166:initAvatars() [I] Initialising Avatar storage with type: local
2023/11/20 06:21:41 ...les/storage/local.go:33:NewLocalStorage() [I] Creating new Local Storage at /data/gitea/avatars
2023/11/20 06:21:41 ...s/storage/storage.go:192:initRepoAvatars() [I] Initialising Repository Avatar storage with type: local
2023/11/20 06:21:41 ...les/storage/local.go:33:NewLocalStorage() [I] Creating new Local Storage at /data/gitea/repo-avatars
2023/11/20 06:21:41 ...s/storage/storage.go:186:initLFS() [I] Initialising LFS storage with type: local
2023/11/20 06:21:41 ...les/storage/local.go:33:NewLocalStorage() [I] Creating new Local Storage at /data/git/lfs
2023/11/20 06:21:41 ...s/storage/storage.go:198:initRepoArchives() [I] Initialising Repository Archive storage with type: local
2023/11/20 06:21:41 ...les/storage/local.go:33:NewLocalStorage() [I] Creating new Local Storage at /data/gitea/repo-archive
2023/11/20 06:21:41 ...s/storage/storage.go:208:initPackages() [I] Initialising Packages storage with type: local
2023/11/20 06:21:41 ...les/storage/local.go:33:NewLocalStorage() [I] Creating new Local Storage at /data/gitea/packages
2023/11/20 06:21:41 ...s/storage/storage.go:219:initActions() [I] Initialising Actions storage with type: local
2023/11/20 06:21:41 ...les/storage/local.go:33:NewLocalStorage() [I] Creating new Local Storage at /data/gitea/actions_log
2023/11/20 06:21:41 ...s/storage/storage.go:223:initActions() [I] Initialising ActionsArtifacts storage with type: local
2023/11/20 06:21:41 ...les/storage/local.go:33:NewLocalStorage() [I] Creating new Local Storage at /data/gitea/actions_artifacts
2023/11/20 06:21:41 cmd/dump.go:265:runDump() [I] Dumping local repositories... /data/git/repositories
2023/11/20 06:21:41 cmd/dump.go:306:runDump() [I] Dumping database...
2023/11/20 06:21:41 cmd/dump.go:318:runDump() [I] Adding custom configuration file from /data/gitea/conf/app.ini
2023/11/20 06:21:41 cmd/dump.go:334:runDump() [I] Custom dir /data/gitea is inside data dir /data/gitea, skipped
2023/11/20 06:21:41 cmd/dump.go:346:runDump() [I] Packing data directory.../data/gitea
2023/11/20 06:21:41 cmd/dump.go:430:runDump() [I] Finish dumping in file gitea-dump-1700441501.zip
Now, let's go through the restoration process. You should have a fresh new Docker installation of Gitea running. But don't go through the install process.
Log in to the Docker shell.
$ docker exec --user git -it gitea bash
Switch to the app/gitea directory.
$ cd app/gitea
Unzip the backup file.
$ unzip gitea-dump-1700441501.zip
Switch to the extracted directory.
$ cd gitea-dump-1700441501
Restore the /data/gitea folder.
$ mv data/* /data/gitea
Restore the repositories.
$ mv repos/* /data/git/gitea-repositories/
Correct the file permissions.
$ chown -R git:git /data
Regenerate the Git Hooks.
$ /usr/local/bin/gitea -c '/data/gitea/conf/app.ini' admin regenerate hooks
Exit the docker shell.
$ exit
Step 13 - Upgrade Gitea
Upgrading Gitea is a simple process.
Shut down and remove the existing containers. Since the data is saved outside the containers on the host, it will be retained.
$ cd ~/gitea-docker
$ docker compose down --remove-orphans
Open the docker-compose.yml file and change the version of the Gitea container. Next, pull the new Gitea image.
$ docker pull
Start the new containers.
$ docker compose up -d
Check the status.
$ docker ps
Conclusion
This concludes our tutorial where we installed Gitea Code Hosting Service using Docker on a Debian 12 server. We also installed the Nginx server to act as a proxy and exposed Gitea via a public URL using SSL. If you have any questions, post them in the comments below.

