Importing is a feature that most databases and language frameworks provide. This is done to make data exported from other sources usable in different forms by other programs, applications, or languages.
In MongoDB, we can import data from a variety of files which provides a way to interact with datasets stored somewhere other than the MongoDB database. Common file types imported for use in MongoDB databases are TSV, CSV, BSON, and JSON.
MongoDB allows developers to achieve this import feature with the help of mongoimport tool. The mongoimport tool must be executed outside the Mongo Shell as it may not work there. It is a system command-line tool.
Normally, this tool resides in the bin folder of MongoDB. However, if you don’t find it there, you can follow the steps below in the mongoimport installation section to proceed.
This tutorial will highlight how we can import data from CSV (Comma Separated Value) and Extended JSON file types into MongoDB using the mongoimport CLI tool. Let’s first briefly learn about the mongoimport tool.
Also Read: JSON.parse() – Convert JSON String To Object Using NodeJS
Introduction to mongoimport
The mongoimport tool helps in importing data. It allows developers to import data from a JSON, TSV, or CSV file type. Since the MongoDB 4.4 launch, mongoimport tool is being offered separately from the MongoDB Server. It hence uses its own versioning.
The mongoimport version that we will use in this article is 100.5.0. The first released version of the mongoimport tool used to import data in MongoDB was 100.0.0. It was then released together with the MongoDB Server and adopted a similar versioning.
The mongoimport CLI tool version 100.5.0 supports the below versions of MongoDB:
- MongoDB 5.0
- MongoDB 4.4
- MongoDB 4.2
- MongoDB 4.0
Let us now proceed with installing the mongoimport tool.
Installing mongoimport Tool
Follow the steps below to install mongoimport tool:
1. Go to “https://www.mongodb.com/try/download/database-tools” where you will find lots of MongoDB tools for different purposes. The one we want is “MongoDB Command Line Database Tools Download”.
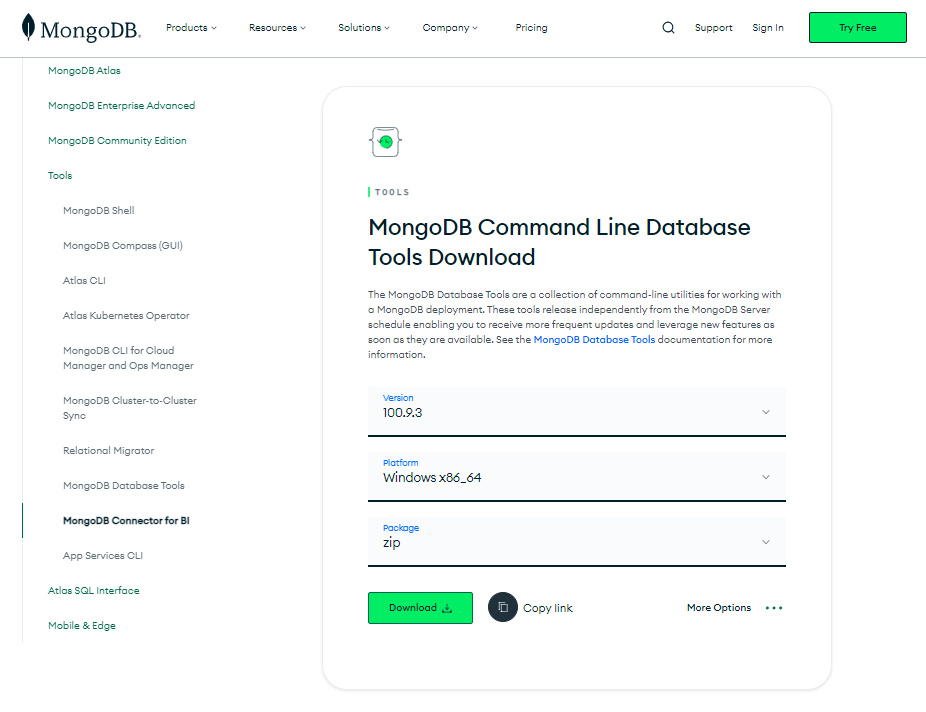
2. Choose the version, platform, and package. We recommend you go with the latest version, then choose the OS in which you want to use the tool, just make sure to choose the correct architecture, then choose zip for downloading, it is much easier to go with. Finally, click on the download button.
3. After the file is downloaded, extract it and open the bin folder where you get different .exe files containing tools.
4. Copy all of the .exe files and paste them into the “C:\Program Files\MongoDB\Server\4.4\bin” folder. This is the path where MongoDB is installed.
After all of the above steps, you can now able to use the tools you just copied and pasted. You may notice a tool named “mongoimport.exe”, this is the mongoimport tool we will be using for import.
Importing JSON Data into MongoDB
JSON stands for JavaScript Object Notation, it is a widely used format for storing data in the form of key-value pairs, similar to an object in JavaScript. It is language-independent making it easier to exchange data throughout various programming languages.
JSON is based on JavaScript but due to its capability, it is implemented by many other programming languages like C, PHP, Python, etc.
Due to this, it may be possible that by using some other programming language and some other database someone exports the data into a JSON file, and now we want it to be imported into the MongoDB database for further working independently or maybe with some integration in other languages like Node.js.
Import Syntax:
mongoimport –jsonArray –db database_name –collection collection_name –file file_location
Here you have to specify a file location from where to import the data, a collection name and a database name into which you want to import.
Follow the steps below to import JSON data into a MongoDB database:
1. Start up the MongoDB server by using the below command.
mongod
By default, the MongoDB instance runs on port 27017.
2. Open the Mongo shell by running the below command.
mongo
This lets us interact with the MongoDB server.
3. Open another command prompt tab and provide the absolute path of the bin folder of MongoDB where MongoDB tools are present.
C:\Program Files\MongoDB\Server\4.4\bin
4. Create a JSON file containing the data to be imported into a Mongo database. The file path of the JSON file we created for this example is “C:\locations.json”.
locations.json
[
    {
        "city": "Delhi",
        "latitude": 28.6600,
        "longitude": 77.2300,
        "country": "India",
        "iso2": "IN",
        "state": "Delhi",
        "capital": "admin",
        "population": "29617000",
        "population_proper": "16753235"
    },
    {
        "city": "Mumbai",
        "latitude": 18.9667,
        "longitude": 72.8333,
        "country": "India",
        "iso2": "IN",
        "state": "Maharashtra",
        "capital": "admin",
        "population": "23355000",
        "population_proper": "12478447"
    },
    {
        "city": "Kolkata",
        "latitude": 22.5411,
        "longitude": 88.3378,
        "country": "India",
        "iso2": "IN",
        "state": "West Bengal",
        "capital": "admin",
        "population": "17560000",
        "population_proper": "4496694"
    },
    {
        "city": "Bangalore",
        "latitude": 12.9699,
        "longitude": 77.5980,
        "country": "India",
        "iso2": "IN",
        "state": "Karnataka",
        "capital": "admin",
        "population": "13707000",
        "population_proper": "8443675"
    },
    {
        "city": "Chennai",
        "latitude": 13.0825,
        "longitude": 80.2750,
        "country": "India",
        "iso2": "IN",
        "state": "Tamil Nadu",
        "capital": "admin",
        "population": "11324000",
        "population_proper": "6727000"
    }
]
5. Let’s now import data in MongoDB using the mongoimport tool. To do so, simply pass the below command as per your requirements.
mongoimport --jsonArray --db heathersTerrarium --collection locations --file C:\locations.json
This will import the data from the file “locations.json” to the database “heathersTerrarium” and collection “locations”.
Verifying the Import
Follow the below steps to check if the JSON data is imported successfully:
1. Move into the database you have imported data into.
show dbs
use heathersTerrarium
2. Use the below command to print all the existing documents from a collection that we have specified while importing.
db.locations.find({}).pretty()
{
        "_id" : ObjectId("6054f5397c7f6b1274b80765"),
        "city": "Delhi",
        "latitude": 28.6600,
        "longitude": 77.2300,
        "country": "India",
        "iso2": "IN",
        "state": "Delhi",
        "capital": "admin",
        "population": "29617000",
        "population_proper": "16753235"
    },
    {
        "_id" : ObjectId("6054f5397c7f6b1274b874839"),
        "city": "Mumbai",
        "latitude": 18.9667,
        "longitude": 72.8333,
        "country": "India",
        "iso2": "IN",
        "state": "Maharashtra",
        "capital": "admin",
        "population": "23355000",
        "population_proper": "12478447"
    },
    {
        "_id" : ObjectId("6054f5397c7f6b1274b85352e9"),
        "city": "Kolkata",
        "latitude": 22.5411,
        "longitude": 88.3378,
        "country": "India",
        "iso2": "IN",
        "state": "West Bengal",
        "capital": "admin",
        "population": "17560000",
        "population_proper": "4496694"
    },
    {
        "_id" : ObjectId("6054f5397c7f6b1274b86732b45"),
        "city": "Bangalore",
        "latitude": 12.9699,
        "longitude": 77.5980,
        "country": "India",
        "iso2": "IN",
        "state": "Karnataka",
        "capital": "admin",
        "population": "13707000",
        "population_proper": "8443675"
    },
    {
        "_id" : ObjectId("6054f5397c7f6b1274b8625d63"),
        "city": "Chennai",
        "latitude": 13.0825,
        "longitude": 80.2750,
        "country": "India",
        "iso2": "IN",
        "state": "Tamil Nadu",
        "capital": "admin",
        "population": "11324000",
        "population_proper": "6727000"
    }
We can see that the data from the JSON file is present here, which means we have successfully used the mongoimport tool to import JSON data into MongoDB.
Importing CSV Data into MongoDB
The steps to import CSV data are quite similar.
Import Syntax:
mongoimport –db database_name –collection collection_name –type csv –fields field_names –file file_location
Example:
Given below is a CSV file we will demonstrate importing.
locations.csv
city,country
Mumbai,India
Phuket,Thailand
Moscow,Russia
Dubai,UAE
NYC,USA
Pass the below command for importing the above CSV data to the Mongo database using mongoimport.
mongoimport –db heathersTerrarium –collection locations –type csv –fields city,country –file C:\locations.csv
Again, you can simply print out the existing document in the database in the Mongo shell like before to check if the CSV data is imported.
If you want to import data with a header row, you can use “–headerline” instead of “–fields”. This sets the first line of the file as the header.
Read More: Quick Guide to Export All Collections in MongoDB
Summary
In this article, we learned how to import data in MongoDB using the mongoimport CLI tool by MongoDB. The steps we saw are very simple, you just have to install mongoimport tool, run the MongoDB server, and then execute the “mongoimport –jsonArray –db database_name –collection collection_name –file file_location” command to import the JSON file. Similarly for importing a CSV file, execute the “mongoimport –db database_name –collection collection_name –type csv –fields field_names –file file_location” command. Hope you enjoyed reading the content.
Reference
https://docs.mongodb.com/database-tools/mongoimport/