
An Introduction to Azure Functions

Microsoft's Azure Functions is a modern serverless architecture, offering event-driven cloud computing that is easy for developers to use. This article provides an overview of what they are and how they work.
Serverless computing is all the hype these days—glad that you and I started talking all things serverless during our flight to a developer conference! We talked about different types of cloud computing, what exactly serverless is and some scenarios you could use it for. We took a break for the beverage service, but now with our coffees in hand, we can start the conversation again. This time however, I want to dive into the details and talk about Microsoft's serverless cloud computing offering, Azure Functions.
Since we're cruising at 35,000 feet, let me first give you the 35K foot overview of what exactly Azure Functions are, and what they can do for you. Then we'll quickly build an Azure Function to see it in action. Yeah, that's right—we'll be able to build, test and run an Azure Function all on terrible airplane Wi-Fi!
What Are Azure Functions?

Microsoft's Azure Functions is a modern serverless architecture, offering event-driven cloud computing that is easy for developers to use. It provides a way to run small pieces of code or Functions in the cloud without developers having to worry themselves about the infrastructure or platform the Function is running on.
That means we're only concerned about writing the logic of the Function. And we can write that logic in our choice of languages: JavaScript, C#, F# or Java. We are also able to add dependencies/packages from npm or NuGet to Azure Functions—this way, we don't have to reinvent the wheel and can use well-tested libraries.
And of course, I'm obligated to mention the pricing model of Azure Functions—you only pay for what you use. With Azure Functions being a serverless offering, you're only charged when your Function is actually running—not while it is sitting idle waiting for something to happen. This means no more hosting Virtual Machines or running apps in the cloud—Azure will figure out as much or as little infrastructure that is needed to run your Function on demand. You literally pay for only the compute time to execute your Function in the cloud—the cost savings can be substantial.
Now, let's talk about how an Azure Function gets invoked.
Triggers and Bindings
An Azure Function is a self-contained piece of code that waits to be executed. What starts that execution? Something called a trigger. A trigger simply listens to external services for certain events to occur, then fires up the hooked-up Functions in response. Azure Functions can be started by numerous triggers, such as an HTTP request, a BLOB being inserted into a container or a timer being lapsed.
That's not all though, Azure Functions can also be bound to external services as well. These bindings are effectively input parameters and return values from your Function. An example of an input parameter could be a specific record in an Azure Cosmos DB database. An output binding could be an Azure Storage Queue message. Azure Functions even support third-party bindings—your Function can have Twilio send a text message! After configuring Twilio, all you need to do is return the appropriate type of object from your Function.
Here's the kicker: the Function runtime handles the connection to the binding for you. That means you don't have to new up or worry about disposing objects that the Function is bound to. You set up some one-time configuration settings and then place attributes on parameters (as you'll see below), and the Functions runtime will take care of the rest!
Enough talk! Let's break out the laptop and code up a simple Function, shall we?
Let's Build an Azure Function!
Don't worry about having an Azure subscription or even being connected to the internet—we can develop and debug Azure Functions locally using either Visual Studio or Visual Studio Code! See, I told you we didn't need to worry about the Wi-Fi on this flight!
For this example, I'm going to use Visual Studio Code to build up a Function that responds to an HTTP trigger and then writes a message to an Azure Storage Queue.
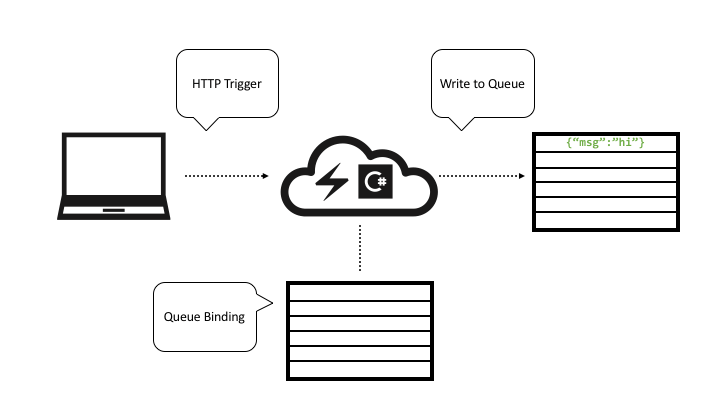
The incoming HTTP call is the trigger and the message queue the Function writes to is an output binding. Let's have at it!
You do need to have some tools downloaded and installed to get started. First and foremost, you'll need to install the Azure Function Core Tools, which is a local version of the actual Azure Functions runtime. Then you'll need Visual Studio Code with the Azure Functions extension installed to do the development with. Finally, you'll need the Azure Storage Emulator installed as well—this will allow us to write to a message queue locally.
Now with all of the tooling out of the way, let's write a Function!
First, fire up Visual Studio Code. Then, from the command palette, type: Azure Functions: Create New Project
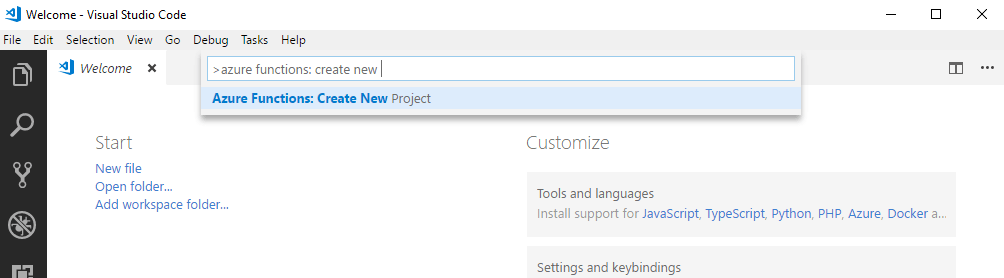
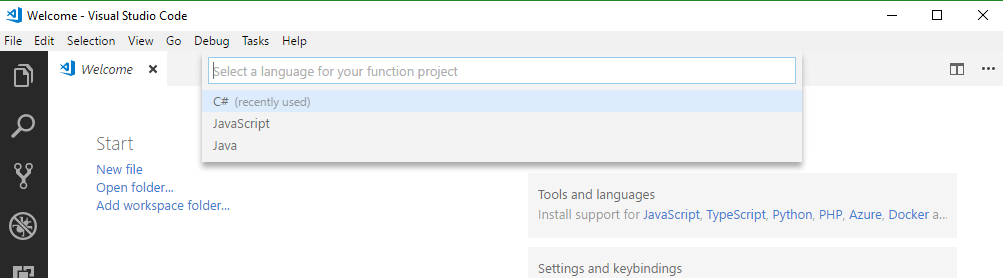
Then follow the steps as to which directory you want to create the project in and which language you want to use.
After the templates have finished installing, you may get a prompt to download additional components—these are NuGet packages. Go ahead and do that.
Now we have a Function project, but no Functions! Let's fix that. From the command palette again, type: Azure Functions: Create Function
It will then prompt you to pick the folder in which your Function app resides and then select a template.
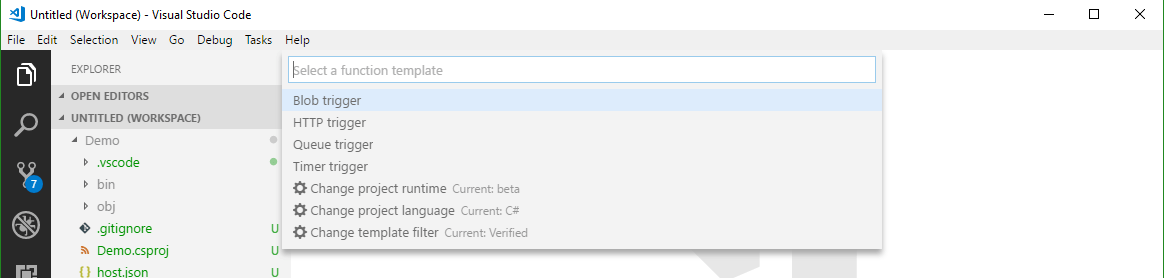
Pick the HTTPTrigger and name it PostToAQueue. After giving it a namespace, it prompts for an authorization level—pick Anonymous.
Now we have a Function! Let's go ahead and hit F5 and see it run!
After it starts, you'll see the Azure Functions logo appear in the Terminal window and then URL the Function is located at.

In a web browser, we'll type in: http://localhost:7071/api/PostToAQueue?name=Matt and the Function will respond. You can even set breakpoints in Visual Studio Code and step through the code!
Writing to a Queue
Next, we'll get this HTTP trigger Function to write to a local Azure Storage Queue.
First thing we want to do is set a configuration setting to tell the Function runtime where to find the Storage. Open up local.settings.json and set "AzureWebJobsStorage" to "UseDevelopmentStorage=true". The full file will look like:
{
  "IsEncrypted": false,
  "Values": {
    "AzureWebJobsStorage": "UseDevelopmentStorage=true",
    "AzureWebJobsDashboard": ""
  }
}
Then create a new class within your project. This class will hold nothing but properties. Call it whatever you want and add whatever properties you want to it. I called mine TheMessage and added an Id and Name properties to it.
Finally, change your PostToAQueue Function, so it looks like the following:
[StorageAccount("AzureWebJobsStorage")]
public static class PostToAQueue
{
  [FunctionName("PostToAQueue")]
  [return: Queue("demo-queue")]
  public static TheMessage Run([HttpTrigger(AuthorizationLevel.Anonymous, "get", "post", Route = null)]HttpRequest req, TraceWriter log)
  {
    string name = req.Query["name"];

    var msg = new TheMessage { Id = Guid.NewGuid(), Name = name};

    return msg;
  }
}
Note the addition of the StorageAccount class-level attribute. This is telling the Function to use the storage connection we specified before. Then there's one more attribute at the Function level: [return: Queue("demo-queue")]. This is specifying which queue to use in that storage account.
Finally, we changed the return type to TheMessage (and it could be any class at all here).
Then, by returning the function, that class is written into the queue. And that's it. We don't have to handle new'ing up anything specific to the storage account or the queue—the Azure Functions runtime takes care of all of that for us!
Before running it again, start the Microsoft Storage Emulator (find it via the Windows start menu). Then hit F5, and issue the same HTTP GET as before.
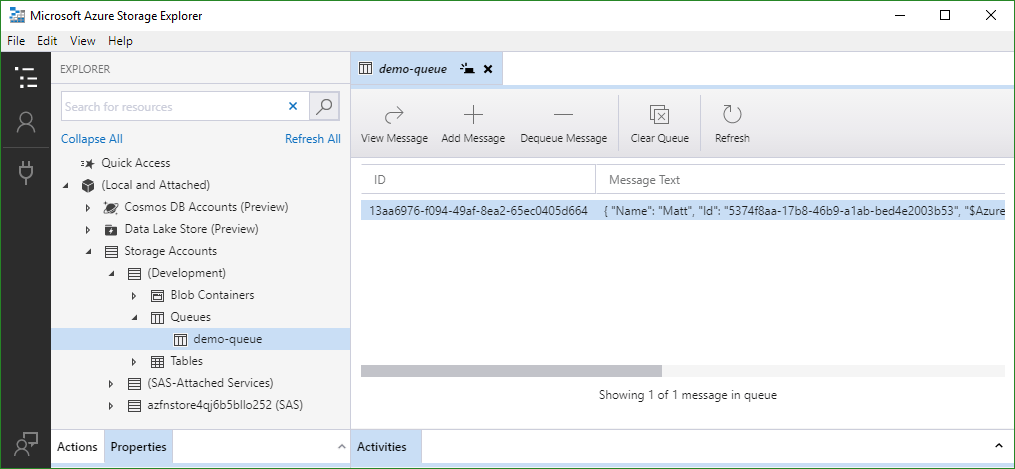
If you have the Azure Storage Explorer installed, you can browse your local Queue and see the new message in there!
Summing Up
We had a quick look at what Microsoft's serverless offering, Azure Functions, is comprised of. It's a full-featured FaaS offering that enables you to write functions in your language of choice, including reusing packages such as those from NuGet or npm!
A highlight of Azure Functions is the way they are triggered and bound. The triggers define how a Function starts, and bindings are akin to input and output parameters on it that correspond to external services. The best part is that the Azure Function runtime takes care of maintaining the connection to the external services so you don't have to worry about new'ing up or disposing of the connections yourself. We then wrote a quick Function that gets triggered off an HTTP request and then writes a query string parameters from that request into a local Azure Storage Queue.
The flight is about to land now—but let's meet up at the conference and I'll show you a fully featured Azure Function that makes use of a couple different bindings to do some amazing things. Down from actual clouds, but off to the clouds with our code!

Matt Soucoup
Matthew Soucoup is a Senior Cloud Developer Advocate at Microsoft spreading the love of integrating Azure with Xamarin. Matt is also a Pluralsight author, a Telerik Developer Expert and prior to joining Microsoft a founder of a successful consulting firm targeting .NET and web development. Follow Matt on Twitter at @codemillmatt and his personal blog at codemillmatt.com.
Comments
All articles
Topics
Latest Stories
in Your Inbox
Subscribe to be the first to get our expert-written articles and tutorials for developers!
All fields are required