
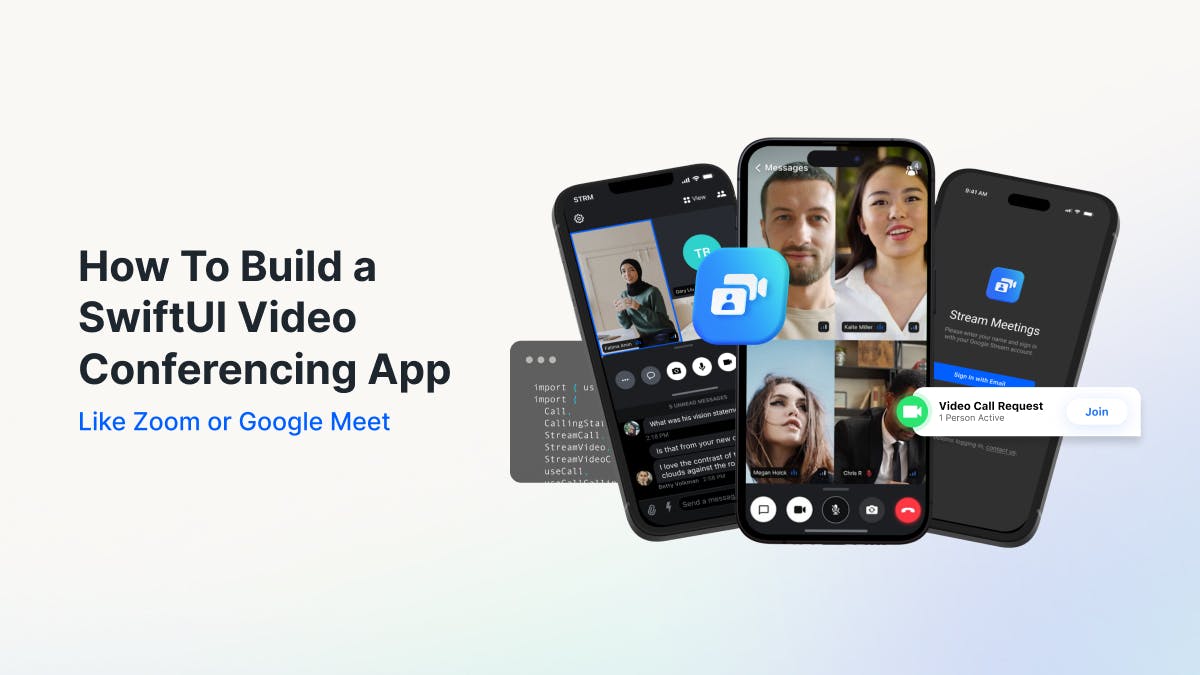
The sample SwiftUI project we will create has video conferencing features such as live broadcasting, custom reactions, screen recording, and sharing using Apple's ReplayKit framework.
The meeting features help teams connect and collaborate in a safe and secure environment, whether in the office or at home. By the end of this tutorial, you will have a fully working iOS video meeting app similar to Zoom, capable of screen recording and sharing.
Why Build a Video Conferencing App?
Real-time video meeting calls have become crucial to remote and hybrid team collaboration, allowing meeting participants to join video calls from any device. For example, Figma recently announced its (Figma and Figjam) gapless integration with Google Meet. The aim is to help teams jam on ideas and provide real-time feedback without leaving their Google Meet video and audio calls. Read the following blog post to learn more about how to increase meeting app engagement.
Get Started
Before diving into Xcode to create a new SwiftUI project, you may create a dashboard account if you are new to Stream. Signing up for an account is optional in completing this tutorial. You can start the project using Xcode 14. However, it is recommended to use Xcode 15, the latest version.
- Install Xcode 15.
- Install the official iOS/SwiftUI SDK.
- Get help on core concepts and UI components.
Key Features of the App
The following are the main features of the app designed to augment how remote and hybrid teams connect, communicate, and collaborate through in-app calling and stand-alone video meeting apps.
- All meeting calls run on Stream's global edge Network, which secures the calls and ensures reliability and scalability.
- Screen recording: The recording feature helps team members not present in a meeting watch later what the team members discussed.
- Screen sharing: It enables meeting participants to share what is on their screen from any device.
- Unlimited meeting participants' support: The Video SDK supports large and small meeting calls. There should be no fear about how reliable a meeting is when many participants join it.
- Custom Reactions: Similar to Zoom or Google Meet, participants can send emoji reactions during an ongoing meeting to fully express themselves about what is happening at the meeting.
Explore Final SwiftUI Project
Download and explore the completed demo SwiftUI project on an iOS device.
The image below represents the main screens of the SwiftUI video conferencing app. It consists of a screen to initiate a new meeting, a UI for configuring microphone and video inputs, and an ongoing meeting screen.

Configure Your SwiftUI Project
Create a new SwiftUI project and install the SDK with Swift Package Manager using the Video SDK's GitHub URL https://github.com/GetStream/stream-video-swift.
We are building a video conferencing app that requires meeting participants to use their microphones and their devices' cameras. Let's set the required privacy configurations for the camera and microphone in Xcode.
- Select the root app's folder in the Xcode Navigator.
- Head to the Info tab and click the + icon near any Key value.
- Add Privacy - Camera Usage Description and Privacy - Microphone Usage Description.
Setup the Video SDK
The configuration process involves initializing, creating, and joining a meeting room call. The video client's initialization should be done in the App conformer's declaration so that the SDK becomes immediately available when the app launches.
- Initialize the Video Client
self.client = StreamVideo(
            apiKey: apiKey,
            user: user,
            token: .init(stringLiteral: token)
)- Create and Join a Meeting Room
VStack {
                if callCreated {
                    Text("Meeting Call \(call.callId) has \(call.state.participants.count) participant")
                        .font(.system(size: 30))
                        .foregroundColor(.blue)
                } else {
                    Text("loading...")
                }
            }.onAppear {
                Task {
                    guard !callCreated else { return }
                    try await call.join(create: true)
                    callCreated = true
                }
            }
}- To confirm everything is working fine, display
Text("Meeting Call \(call.callId) has \(call.state.participants.count) participant")on the screen when you run the app in a new file VideoClientSetup.swift and replace its content with this GitHub Gist. Remember to replace the following placeholders.
private let apiKey: String = "" // The API key can be found in the Credentials section
private let userId: String = "REPLACE_WITH_USER_ID" // The User Id can be found in the Credentials section
private let token: String = "REPLACE_WITH_TOKEN" // The Token can be found in the Credentials section
private let callId: String = "REPLACE_WITH_CALL_ID" // The CallId can be found in the Credentials section
Find user credentials for the placeholders above in the video calling tutorial under Step 3 in our documentation. Running the app will display a screen similar to the one below.

Design the Layout and Composition

The app's main sections include:
- MeetingOptionsView.swift: Join a new meeting.
- PreJoinScreen.swift: Configure audio and video usage.
- ParticipantsView.swift: A view that displays the local and remote participants.
- FloatingParticipantView.swift: Local participant view.
- AroundMeetingControlsView.swift: Buttons for performing meeting call operations.
- AroundMeetingTopView.swift: A view for displaying a meeting's title, number of joined members, and a button for leaving a meeting.
Get all the above files on GitHub in the final project.
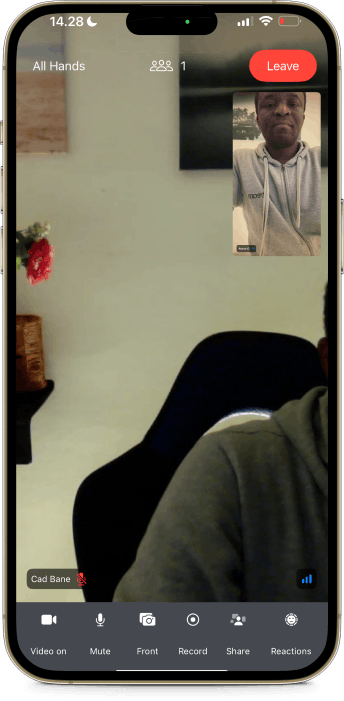
Running the app presents the start view for initiating a new meeting. The backstage screen affords turning audio and camera inputs on and off. The active/ongoing meeting screen is a built-in UI component from the Video SDK. Additionally, the active meeting screen uses a custom-made top view AroundMeetingTopView.swift and call controls AroundMeetingControlsView.swift implemented with a custom view factory. Check out SwiftUI Video Calling by Stream: Color, Image, Font, and Sound Theming Guide to learn more about personalizing the Video SDK.
Add Local and Remote Meeting Participant Views
Create a new ParticipantsView.swift file and replace its content with the following code.
//
//  ParticipantsView.swift
//  VideoConferencingSwiftUI

import SwiftUI
import StreamVideo
import StreamVideoSwiftUI

struct ParticipantsView: View {

    var call: Call
    var participants: [CallParticipant]
    var onChangeTrackVisibility: (CallParticipant?, Bool) -> Void

var body: some View {Add another file FloatingParticipantView.swift for the implementation of the local participant. Substitute the content with the following sample code.
//
//  FloatingParticipantView.swift
//  VideoConferencingSwiftUI

import Foundation
import SwiftUI
import StreamVideo
import StreamVideoSwiftUI

struct FloatingParticipantView: View {

    var participant: CallParticipant?
    var size: CGSize = .init(width: 140, height: 180)

var body: some View {Check out our documentation to learn more about the different call participants.
Display Participants Count: Number of People in a Meeting

One common feature of a meeting app like Zoom or Teams is displaying the number of people `Text("\(viewModel.participants.count)") in a meeting. We will display the information in the principal section of the top navigation to show the meeting attendees count. You can display the number of meeting attendees using the SDK's CallViewModel, which contains information about a particular call. In our documentation, please learn more about the view model. Also, check the implementation in AroundMeetingTopView.swift.
Implement Custom Meeting Controls

The SDK provides built-in call controls for general-purpose video calling. We can tailor the call controls UI to build one suited for meetings using its advanced customization. Using the built-in methods the SDK provides, we can override several UI components by placing custom ones in their slots.
For instance, to replace the default call controls, add a new file, CustomUIFactory.swift and implement the makeCallControlsView method.
import SwiftUI
import StreamVideo
import StreamVideoSwiftUI

class CustomViewFactory: ViewFactory {
    // 1. Custom Call Controls
    public func makeCallControlsView(viewModel: CallViewModel) -> some View {
        AroundMeetingControlsView(viewModel: viewModel)
            .padding(.bottom)
    }

    // 2. Custom CallTopView
    public func makeCallTopView(viewModel: CallViewModel) -> some View {
        AroundMeetingTopView(viewModel: viewModel, participants: [])
            .padding(.bottom, 42)
    }
}Note: AroundMeetingControlsView(viewModel: viewModel) contains the custom controls in AroundMeetingControlsView.swift.
Render Participants' Videos With Meeting Controls
Using the SDK's CallContainer, we can create different audio and video calling screens. For example, we can use it to build incoming, outgoing, and active call screens. Add a new file CallContainerSetup.swift and substitute its content with the code below.
//
//  CallContainerSetup.swift
//  VideoConferencingSwiftUI

import SwiftUI
import StreamVideo
import StreamVideoSwiftUI

struct CallContainerSetup: View {
    @ObservedObject var viewModel: CallViewModel

  private var client: StreamVideo
 private let apiKey: String = "" // The API key can be found in the Credentials section
 private let userId: String = "REPLACE_WITH_USER_ID" // The User Id can be found in the Credentials section
private let token: String = "REPLACE_WITH_TOKEN" // The Token can be found in the Credentials sectionThe summary of the code above is as follows. We create and initialize the video client and use CallContainer(viewFactory: CustomViewFactory(), viewModel: viewModel) to implement custom UIs by overriding the default view factory implementation CallContainer(viewFactory: DefaultViewFactory.shared, viewModel: viewModel). Finally, we create and join the call by specifying the callType and callId.
 Task {
                    guard viewModel.call == nil else { return }
                    viewModel.joinCall(callType: .default, callId: callId)
                }
How To Implement Screen Sharing on an iPhone
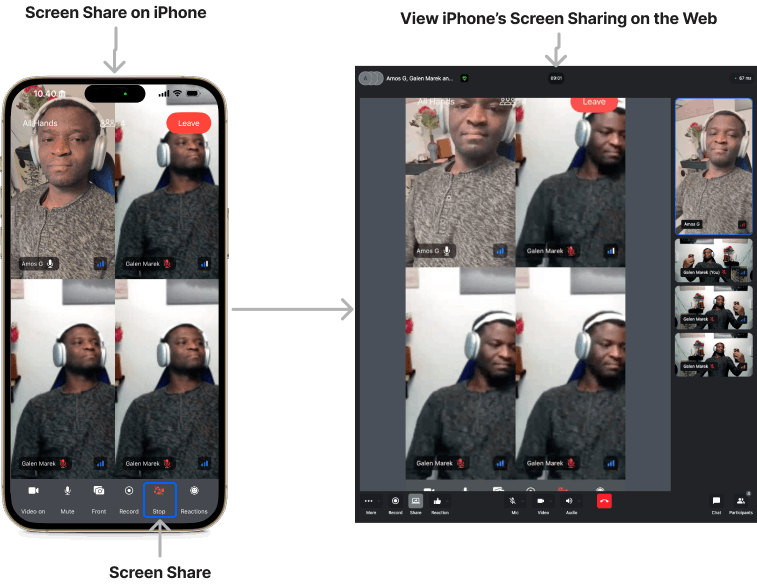
Using the SDK's screen-sharing capabilities, we can display the iPhone screen on the devices of other meeting attendees of our app. Alternatively, meeting participants can show the content of their screens to all other meeting members. The image above demonstrates screen sharing from an iPhone and viewing it with the Stream Video web app.
The underlying screen-sharing technology of the SwiftUI Video SDK uses Apple's ReplayKit framework, allowing users to broadcast live video and microphone input and live share with other users of an app. Let us follow the steps below to implement the screen-sharing functionality for the app.
-
Define the following properties.
swift@ObservedObject var viewModel: CallViewModel @State private var isScreenSharing = falseWe create an instance
viewModelof the SDK’sCallViewModeland a boolean propertyisScreenSharing.
` - Add a button to start and stop the screen sharing.
Button {
                isScreenSharing ? viewModel.stopScreensharing() : viewModel.startScreensharing(type: .inApp)
                isScreenSharing.toggle()
            } label: {
                VStack(spacing: 12) {
                    Image(systemName: isScreenSharing ? "shared.with.you.slash": "shared.with.you")
                    .foregroundStyle(isScreenSharing ? .red : .white)
                        .contentTransition(.symbolEffect(.replace))
                        .frame(height: 48)

                    withAnimation {
                        Text(isScreenSharing ? "Stop" : "Share")
                            .font(.caption)
                            .contentTransition(.interpolate)
                    }
                }
            }
            .buttonStyle(.plain)
            .frame(width: 42)
Tapping the button, we call the viewModels startScreensharing and stopScreensharing methods by toggling the boolean state variable isScreenSharing between true and false. Find the full implementation in AroundMeetingControlsView.swift. The video below illustrates an ongoing screen sharing with an iPhone.
Screen Sharing Content With the Companion Stream Video Web App

By running the sample meeting app we created in this tutorial in Xcode, we establish a connected call for the caller. The above means the app serves as the call initiator. To join multiple participants (callees) in a call or have a group call, we can use the Stream Video web app. Let's look at how to use it to share web content after joining a call.
To screen share web content using the companion Stream Video web app:
- Run Xcode project on an iPhone.
- Using the same meeting
callId, join the meeting with the web app as described under the previous section Setup the Video SDK. - Click the Share button on the meeting control bar to begin sharing content on the screen.
The image above illustrates screen sharing from the web app and displaying it with the iPhone app.
Summary
Bravo on completing this tutorial! We built a video conferencing app with SwiftUI that allows small and large groups and teams to connect seamlessly and work together. You now have a reliable meeting app that supports excellent collaboration and screen sharing. We’ve only covered the basics, so proceed to the next sections to learn more.
What’s Next
Explore the following links to discover more about our video SDK and its possibilities for your development team in building iOS video calling, audio calling, and audio room apps.
