How to Install Fleet Osquery Manager on Rocky Linux 9
On this page
- Prerequisites
- Installing MySQL Server
- Installing Redis Server
- Setting up MySQL Database and User
- Downloading Fleet Osquery Manager
- Configuring Fleet Osquery Manager
- Configuring Firewalld
- Configuring Fleet Osquery Manager
- Adding Hosts via Orbit Osquery Runtime
- Setting Up Fleetctl for Managing Fleet
- Conclusion
Fleet is an open-source osquery manager that can be used to maintain secure workstations and servers and keep an accurate inventory of all your devices. Fleet enables programmable live queries, streaming logs, and real-time visibility of servers, containers, and devices such as laptops and local computers.
With fleet, you can identify vulnerabilities on your devices. This means that fleet will automatically identify outdated, vulnerable, or compromised software, apps, and packages. Also, fleet will identify misconfigurations of devices and MDM enrollment issues. Fleet can be useful for IT industries, security, or any compliance monitoring devices.
Fleet also enables and automates security workflows in a single application. You can collect events using osquery/agent from multiple servers and devices. Then store gathered data in a single place that can be accessed via Fleet dashboards or using a terminal via fleetctl.
In this tutorial, you will deploy Fleet Osquery Manager to an Ubuntu 22.04 server. This guide includes the installation of MySQL server, Redis server, and the secure deployment of MySQL database server. In the end, you will have secured Fleet Osquery Manager which allows you to monitor hosts, identify vulnerabilities on hosts, verify changes made with other systems, and also set up custom queries for your host's monitoring.
Prerequisites
To complete this tutorial, you must have the following requirements:
- A Linux server running Rocky Linux 9.
- A non-root user with sudo/root administrator privileges.
- An SELinux running on permissive mode.
- A domain name pointed to the server IP address.
- Generated and verified SSL/TLS certificates.
When all requirements are in place, you're ready to start Fleet Osquery Manager installation.
Installing MySQL Server
In this section, you'll install the MySQL server, start and enable MySQL service, set up MySQL root password, and also configure the secure deployment of MySQL server via 'mysql_secure_installation'.
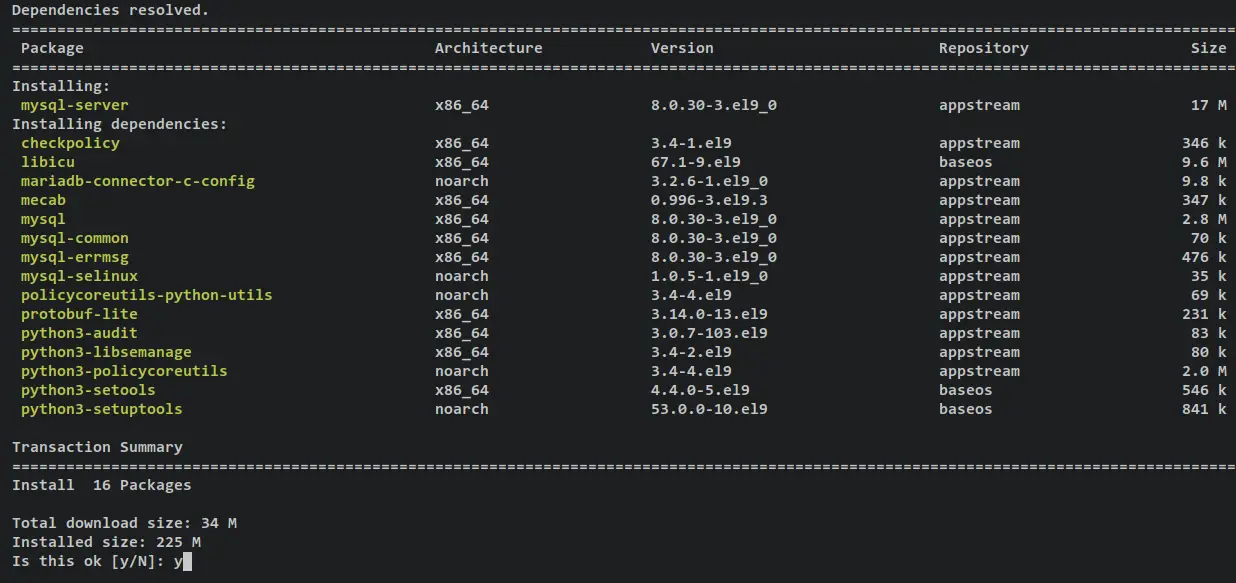
For this tutorial, the MySQL server will be used to store data and information of the Fleet manager. You will be installing MySQL server from the official Rocky Linux repository. Install it by running the following dnf command.
sudo dnf install mysql-server
Input y when prompted for confirmation and press ENTER to proceed.
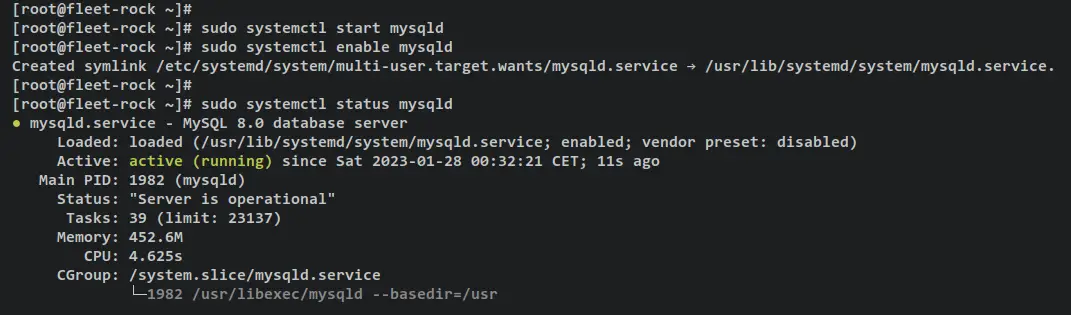
You've now installed the MySQL server, which will be used as the database backend for fleet. Before configuring the MySQL server, start and enable the MySQL service the following systemctl command utility.
sudo systemctl start mysqld
sudo systemctl enable mysqld
After that, verify the MySQL server to ensure that the service is running.
sudo systemctl status mysqld
You should receive an output similar to this - An output 'active (running)' confirms that the MySQL server is running. And the output '...; enabled; ...' confirms that the MySQL server will start automatically upon the system startup.
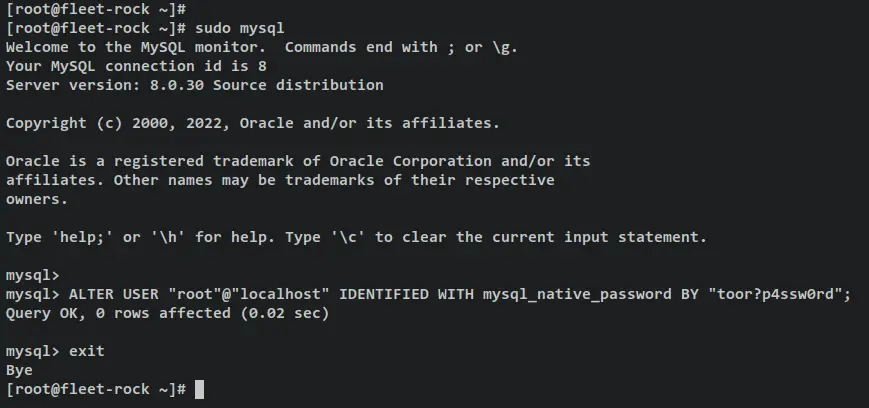
With the MySQL server running, you can set up the MySQL server root password. Log in to MySQL shell using the 'mysql' command below.
sudo mysql
Run the following query to set up a password for the MySQL root user, then log out from the MySQL shell. Be sure to change the password in the following query.
ALTER USER "root"@"localhost" IDENTIFIED WITH mysql_native_password BY "toor?p4ssw0rd";
exit
Next, run the following 'mysql_secure_installation' command to secure your MySQL server deployment.
sudo mysql_secure_installation
When prompted, input your MySQL root password. Then, you'll also be asked about the following MySQL configurations:
- Set up VALIDATE PASSWORD component on MySQL? Input Y to confirm.
- Input the number password policy that you want to use. Select your preferred choice policy for your MySQL server.
- Change the MySQL root password? Input n for No.
- Remove default MySQL anonymous user? Input Y.
- Disable remote login for MySQL root user? Input Y.
- Remove default database test from MySQL server? Input Y.
- Reload table privileges to apply changes? Input Y to confirm.
You have now installed the MySQL server, configured the MySQL root password, and secured the MySQL deployment. Next, you will install Redis that will be used to queue of distributed queries and cache data for fleet osquery manager.
Installing Redis Server
In this section, you will install the Redis server to Rocky Linux 9, start and enable Redis, the verify the status of the Redis server to ensure it's running. Redis will be used to ingest and queue the results of distributed queries, cache data, etc.
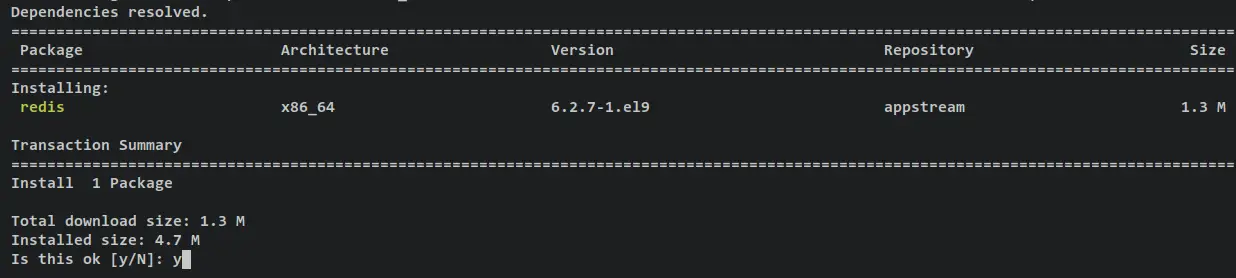
Enter the following command to install Redis to your Rocky Linux server.
sudo dnf install redis
Confirm the installation by typing y and pressing ENTER to proceed.
After Redis is installed, run the following systemctl command to start and enable the Redis server.
sudo systemctl start redis
sudo systemctl enable redis
Then, verify the Redis service by entering the following command. This will ensure that the Redis service is running and enabled.
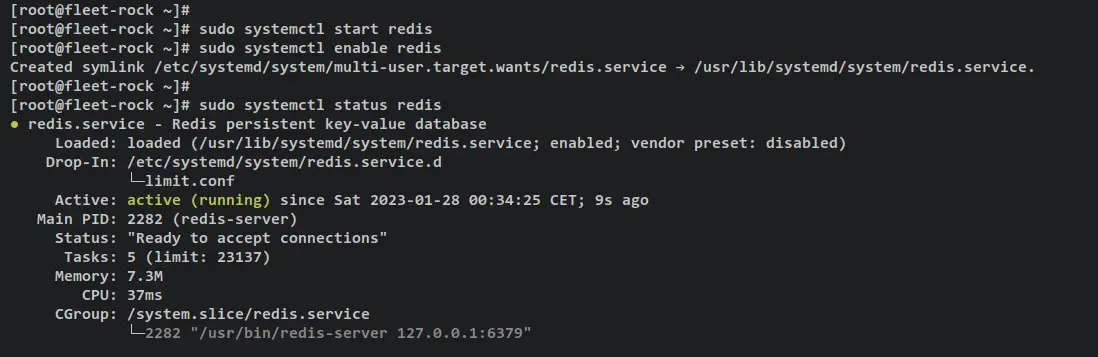
sudo systemctl status redis
You will get an output like this - An output 'active (running)' confirms that the Redis server is running. The output '...; enabled;...' confirms that the Redis server is enabled and will be run automatically upon system startup.
Setting up MySQL Database and User
In this section, you will create a new MySQL database and user that will be used by fleet osquery manager. You'll create a new database and user via MySQL shell, then verify the list of users and privileges for the new MySQL user.
Log in to MySQL shell via the mysql command below. Be sure to input your MySQL root password when prompted.
sudo mysql -u root -p
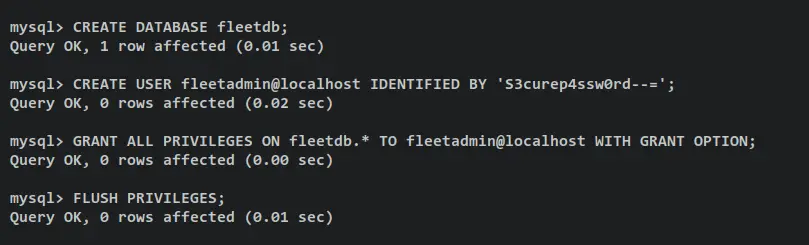
To create a new MySQL database and user, execute the following MySQL queries. In this example, you will create the database fleetdb and the user fleetadmin. Also, be sure to change the password in the following query.
CREATE DATABASE fleetdb;
CREATE USER fleetadmin@localhost IDENTIFIED BY 'S3curep4ssw0rd--=';
GRANT ALL PRIVILEGES ON fleetdb.* TO fleetadmin@localhost WITH GRANT OPTION;
FLUSH PRIVILEGES;
Output:
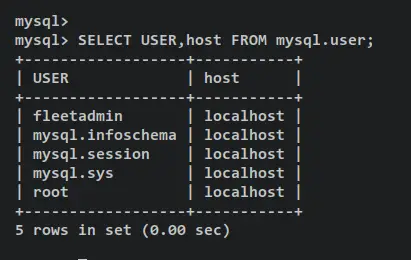
Verify the list of MySQL users using the following query. And you should see the new MySQL user fleetadmin added and the available MySQL server.
SELECT USER,host FROM mysql.user;
Output:
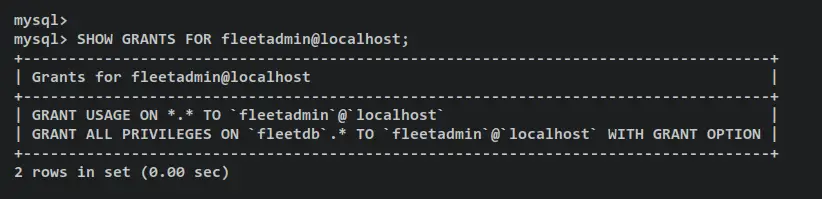
Now verify privileges for the MySQL user fleetadmin. You should see that the fleetadmin user has privileges to access the fleetdb database.
SHOW GRANTS FOR fleetadmin@localhost;
Output:
Type 'quit' to exit from the MySQL shell.
With the MySQL database and Redis server installed, the new database and user also created, you can now start the fleet osquery manager installation.
Downloading Fleet Osquery Manager
Fleet osquery manager is available as a single binary file that provides the following:
- The Fleet TLS web server (no external web server is required but it supports a proxy if desired)
- The Fleet web interface
- The Fleet application management REST API
- The Fleet osquery API endpoints
As for the fleetctl, it's the command-line interface of the fleet that allows you to manage fleet deployment, configurations, integration, and reporting from the command line.
In this step, you'll download the fleet and fleetctl binary package from the official GitHub page. At the time of this writing, the latest version of fleet and fleetctl is v4.26.
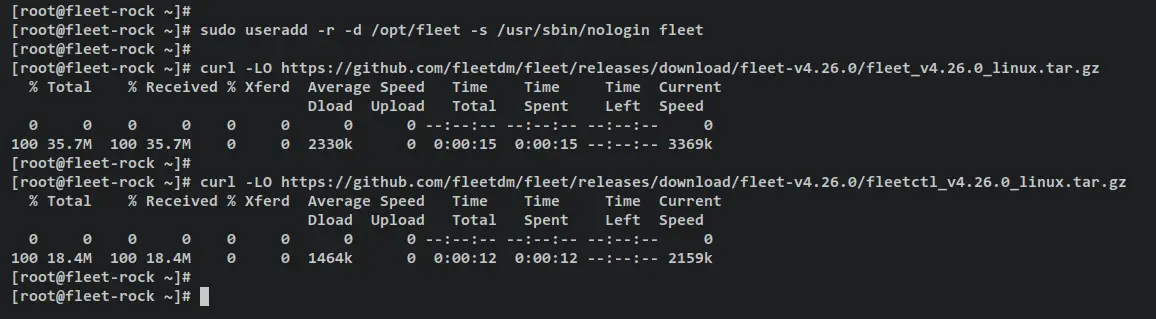
First, add the new system user 'fleet' by entering the following command.
sudo useradd -r -d /opt/fleet -s /usr/sbin/nologin fleet
Download the fleet and fleetctl package via the curl command below. At the time of this writing, the latest version of fleet is v4.26.
curl -LO https://github.com/fleetdm/fleet/releases/download/fleet-v4.26.0/fleet_v4.26.0_linux.tar.gz
curl -LO https://github.com/fleetdm/fleet/releases/download/fleet-v4.26.0/fleetctl_v4.26.0_linux.tar.gz
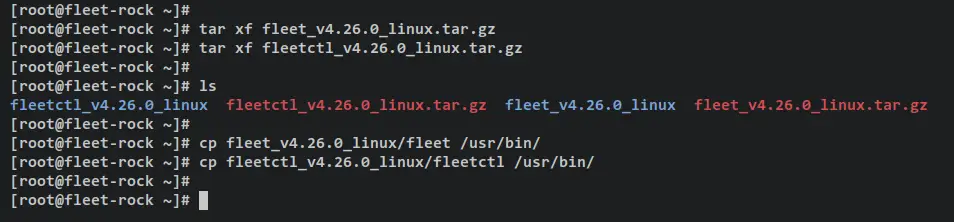
Once downloaded, extract the fleet and fleetctl package via the tar command below.
tar xf fleet_v4.26.0_linux.tar.gz
tar xf fleetctl_v4.26.0_linux.tar.gz
Next, copy the binary file of fleet and fleetctl to the '/usr/bin' directory. With this, you can now run the fleet and fleetctl command from your terminal.
cp fleet_v4.26.0_linux/fleet /usr/bin/
cp fleetctl_v4.26.0_linux/fleetctl /usr/bin/
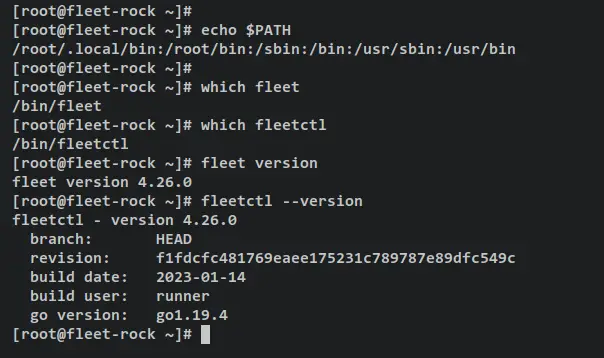
Now run the following command to ensure that the '/usr/bin' directory is available on the PATH environment variable. When available, you can now run both fleet and fleetctl commands with sudo.
echo $PATH
Verify the full binary path of fleet and fleetctl command. Both binary files are available in the '/usr/bin' directory.
which fleet
which fleetctl
Verify the fleet and fleetctl version using the following command.
fleet version
fleetctl --version
You should receive an output like this - The fleet osquery manager and fleetctl v4.26 is installed and added to your Rocky Linux system.
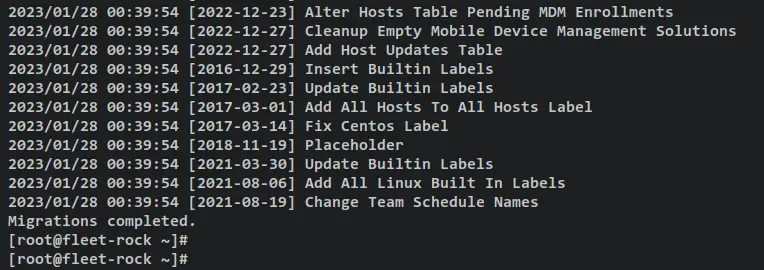
Now run the following fleet command to initialize the database for your fleet deployment. Be sure to change the details of the MySQL database and user in the following command.
fleet prepare db \
--mysql_address=127.0.0.1:3306 --mysql_database=fleetdb --mysql_username=fleetadmin --mysql_password=S3curep4ssw0rd--=
Below is an output during the initialization.
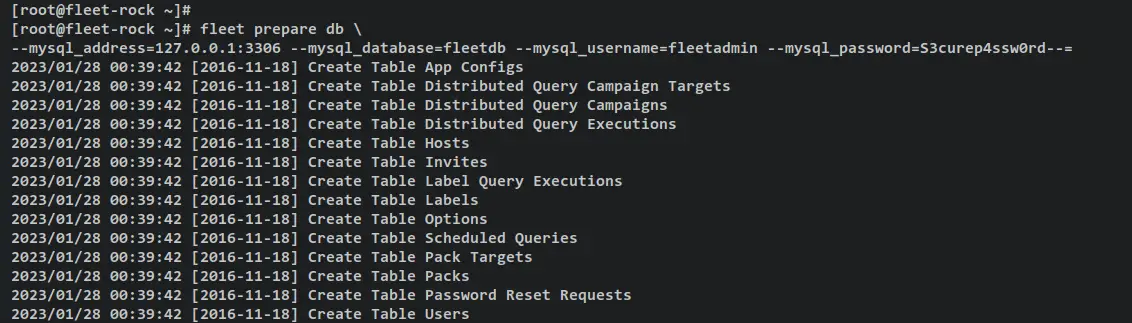
When initialization is finished, you should get an output such as 'Migrations completed'.
With the fleet database initialized and migrated, you're ready to set up your Fleet Osquery Manager installation and run Fleet in the background as a systemd service.
Configuring Fleet Osquery Manager
In this step, you create a new configuration directory for the fleet, add and modify the fleet config file that will be located at '/etc/fleet/fleet.yml', then you will set up the systemd service file '/etc/systemd/system/fleet.service' for fleet osquery manager.
At the end of this step, you'll have fleet running as a systemd service, and will be enabled and run automatically upon system startup.
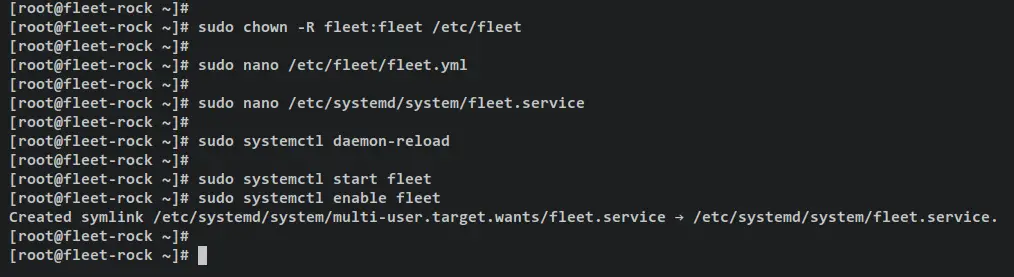
First, create a new directory '/etc/fleet/certs' that will be used to store your fleet configuration and TLS certificate files. Then, create a new config file '/etc/fleet/fleet.yml' and systemd service file '/etc/systemd/system/fleet.service'.
mkdir -p /etc/fleet/certs
touch /etc/fleet/fleet.yml /etc/systemd/system/fleet.service
Next, copy your generated TLS certificates to the '/etc/fleet/certs' directory and change the ownership of the fleet configuration directory to the user and group 'fleet'.
cp /etc/letsencrypt/live/fleet.hwdomain.io/fullchain.pem /etc/fleet/certs/
cp /etc/letsencrypt/live/fleet.hwdomain.io/privkey.pem /etc/fleet/certs/
sudo chown -R fleet:fleet /etc/fleet
Open the fleet config file '/etc/fleet/fleet.yml' using the following nano editor command.
nano /etc/fleet/fleet.yml
Add the following lines to the file and be sure to change the details MySQL database and user and the path of SSL/TLS certificate files.
With this, you'll run fleet with MySQL database server, Redis, secured deployment via TLS certificates, and enable logging to json format.
mysql:
  address: 127.0.0.1:3306
  database: fleetdb
  username: fleetadmin
  password: S3curep4ssw0rd--=
redis:
  address: 127.0.0.1:6379
server:
  cert: /etc/fleet/certs/fullchain.pem
  key: /etc/fleet/certs/privkey.pem
logging:
  json: true
# auth:
# jwt_key: 0iXLJRKhB77puDm13G6ehgkClK0kff6N
Save and exit the file '/etc/fleet/fleet.yml' when finished.
Next, open the fleet systemd service file '/etc/systemd/system/fleet.service' using the following nano editor command.
sudo nano /etc/systemd/system/fleet.service
Add the following lines to the file. With this, you'll run fleet as a systemd service, with the config file '/etc/fleet/fleet.yml', and this service will be run as a user and group 'fleet'.
[Unit]
Description=Fleet Osquery Fleet Manager
After=network.target

[Service]
User=fleet
Group=fleet
LimitNOFILE=8192
ExecStart=/usr/bin/fleet serve -c /etc/fleet/fleet.yml
ExecStop=/bin/kill -15 $(ps aux | grep "fleet serve" | grep -v grep | awk '{print$2}')

[Install]
WantedBy=multi-user.target
Save the file '/etc/systemd/system/fleet.service' and exit the editor when finished.
Now run the following systemctl command utility to reload the systemd manager and apply the changes.
sudo systemctl daemon-reload
Then, start and enable the fleet service using the below systemctl command utility.
sudo systemctl start fleet
sudo systemctl enable fleet
Now verify the fleet service using the below command to ensure that the service is running.
sudo systemctl status fleet
You have now the fleet running as a systemd service. Also, it's now enabled and will start automatically upon the system's startup.
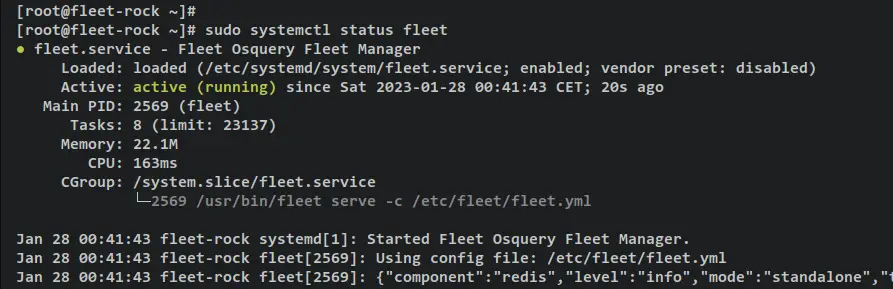
With that, the fleet osquery manage is now running as a systemd service with the default config file '/etc/fleet/fleet.yml' on TCP port 8080. Before accessing your fleet installation, you must open port 8080 on firewalld.
Configuring Firewalld
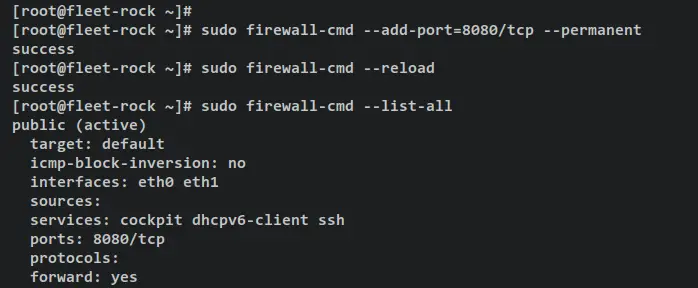
In this section, you will open port 8080 (used by fleet) on your system via the firewalld. On default Rocky Linux, the firewalld is installed and running.
Run the following firewall-cmd command to add port 8080 to the firewalld. Then, reload firewalld rules to apply the changes.
sudo firewall-cmd --add-port=8080/tcp --permanent
sudo firewall-cmd --reload
Now verify the list of firewalld rules and ensure that port 8080 is added and available on firewalld.
sudo firewall-cmd --list-all
On the 'ports' section, you should see the port '8080/tcp'. This confirms that the fleet port 8080 was added to the firewalld.
Configuring Fleet Osquery Manager
If you following this tutorial so far, the fleet osquery manager is running and port 8080 added to firewalld. In this section, you will set up the fleet osquery manager deployment. You will be setting up the first user and setting up the deployment via a web browser.
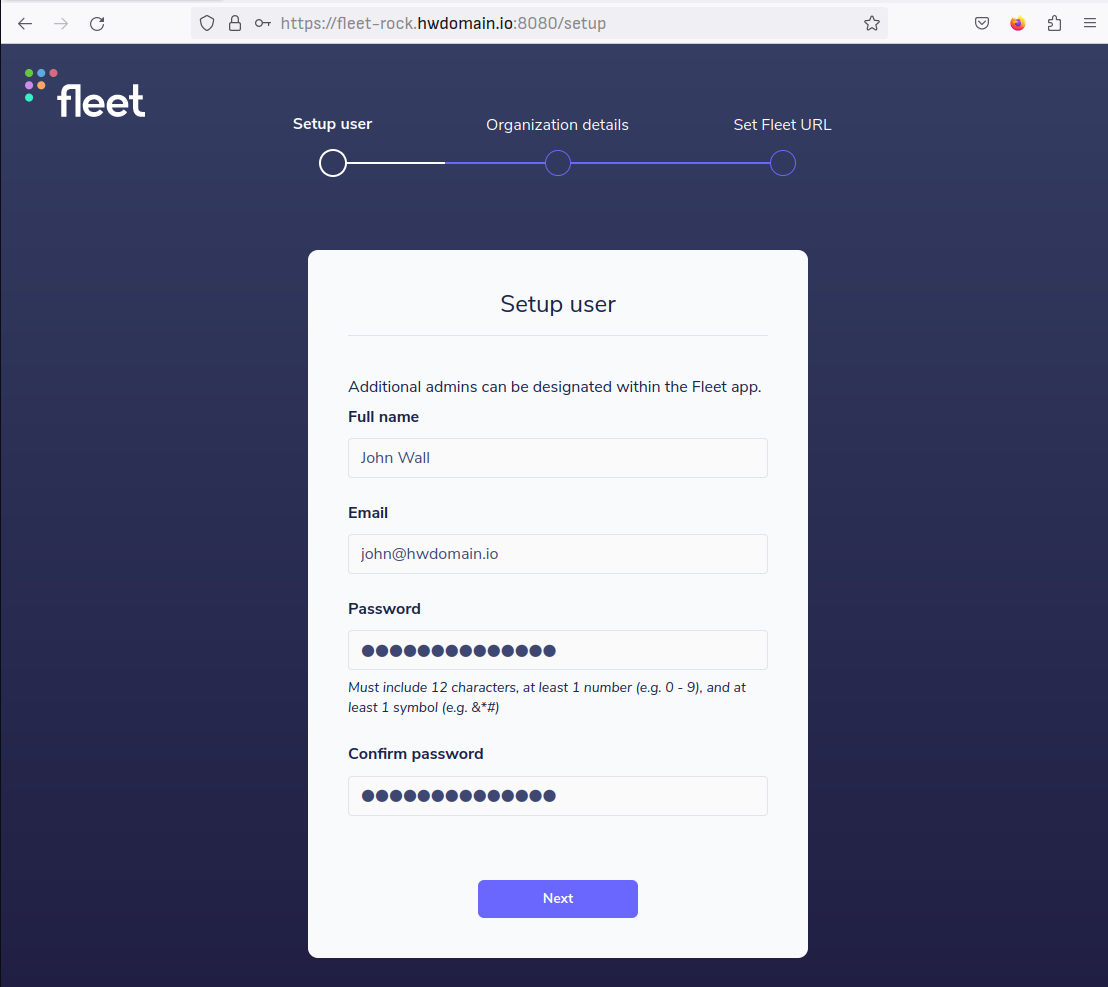
Open your web browser and visit the domain of your fleet osquery manager installation with TCP port 8080 (i.e: https://fleet-rock.hwdomain.io:8080/).
In the first step, you will be asked to set up the first user for your fleet deployment. Input your full name, email address, and password, then click Next.
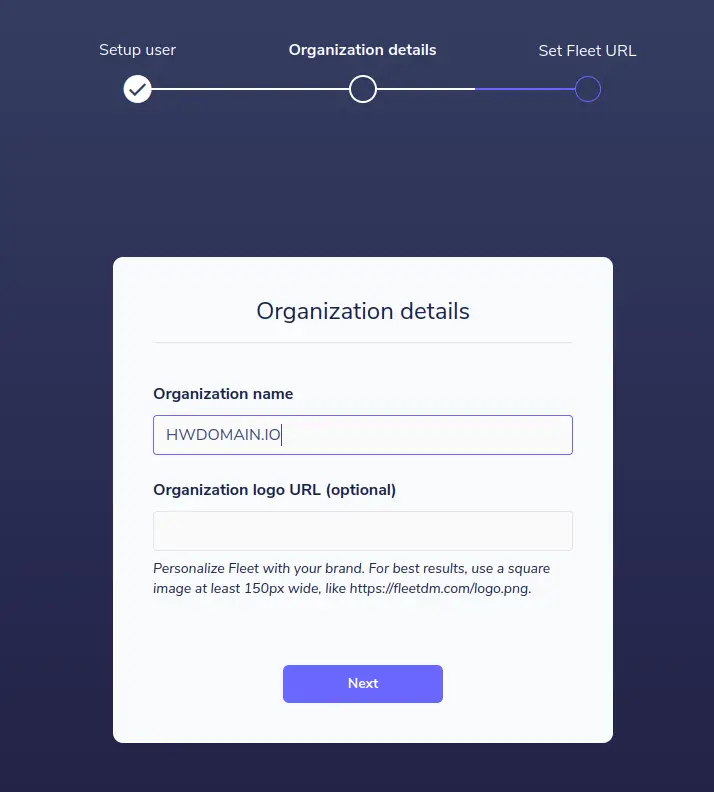
Input details organization, then click Next again.
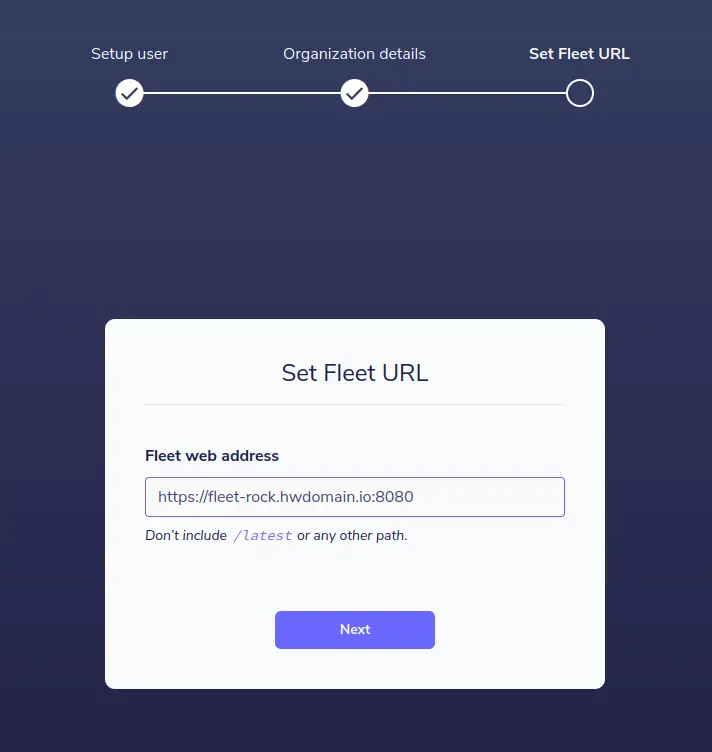
For the fleet URL, you can leave it as default and click Next.
Recheck your fleet configurations and click Confirm to complete the deployment.
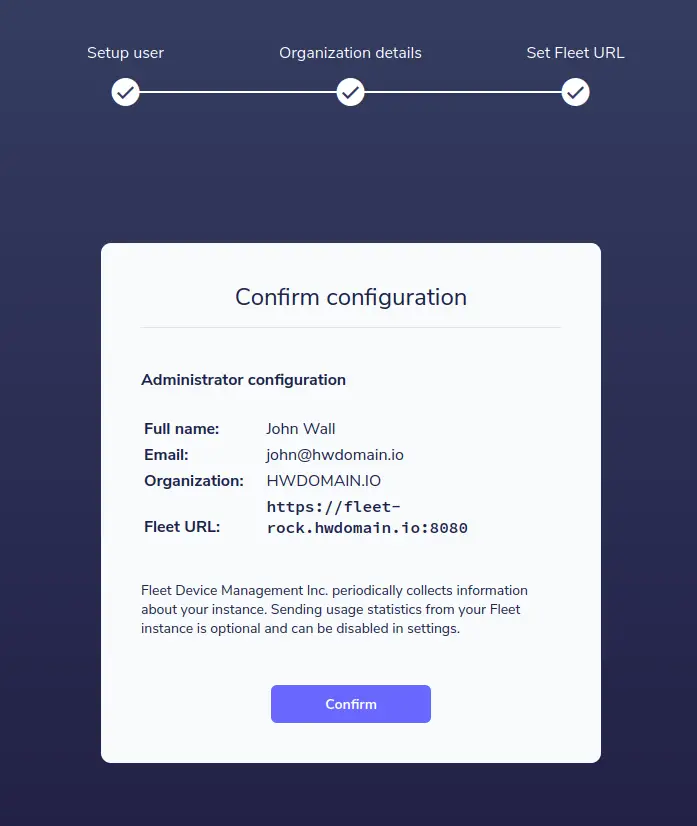
When successful, you should get the fleet administration dashboard.
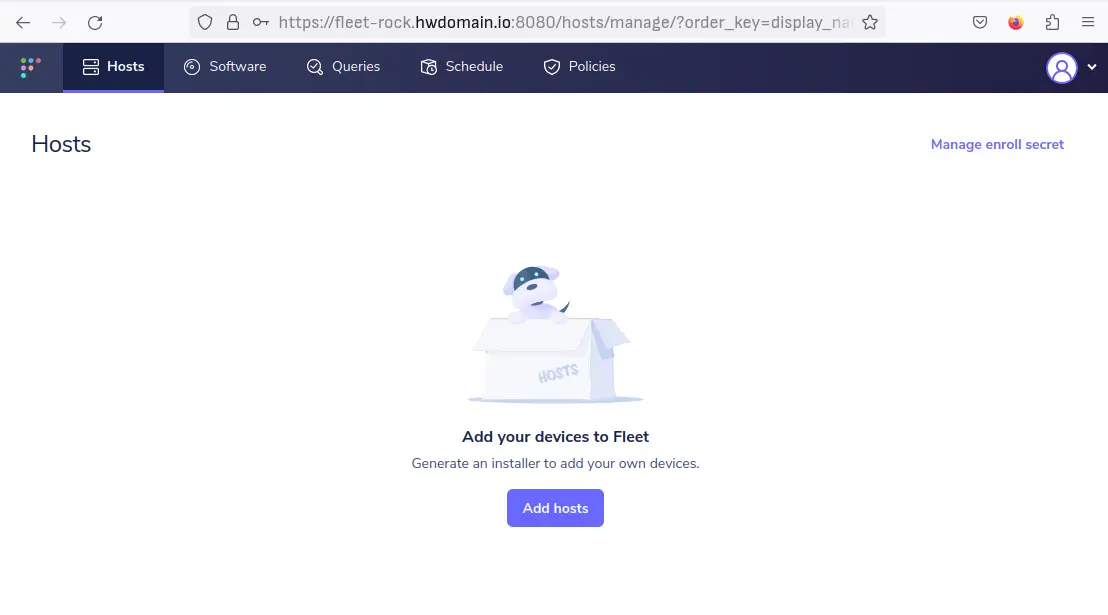
Now the fleet osquery manager installation is finished. With this, you can add new hosts to fleet via multiple ways such as using Orbit (osquery runtime), fleet Desktop for hosts with the desktop environment (including Windows and macOS), or manually by generating fleet secret and TLS certificate.
Adding Hosts via Orbit Osquery Runtime
Orbit is an osquery runtime and auto-updater that allows you easily deploy osquery and manage configurations. Orbit is an agent for fleet, it can be used with or without Fleet, and Fleet can be used with or without Orbit.
In this step, you'll learn how to generate Orbit package installer for RHEL-based distributions. Then, you will learn how to add a new host to fleet via Orbit.
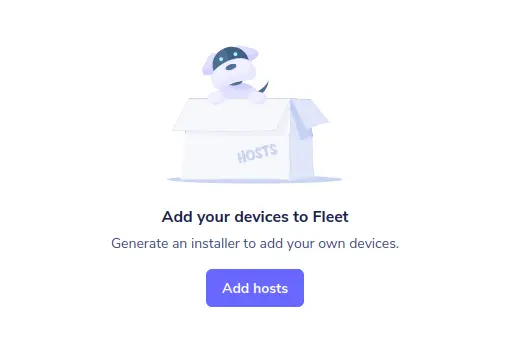
To start, move back to the fleet dashboard and click 'Add Hosts'.
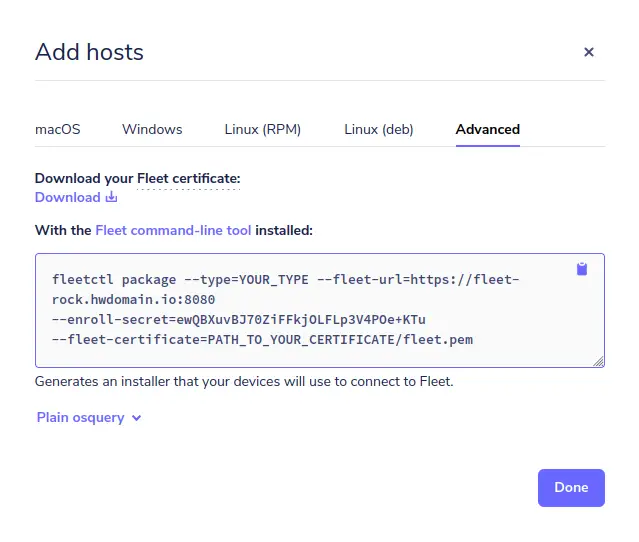
Select the 'Advanced' tab, download the fleet certificate 'fleet.pem', then copy the command that will be used to create an orbit package for specific distributions. You can generate an orbit installer for RPM, DEB, and pkg (for macOS).
Next, upload the fleet certificate that you have downloaded to the fleet server. In this example, you will be using the 'scp' to upload the 'fleet.pem' file to the fleet server.
scp fleet.pem [email protected]:/opt/
After the fleet.pem certificate is uploaded, run the command line that will be used to generate the orbit installer package. Be sure to change the parameter '--type' to your preferred package.
In this example, you'll generate an orbit package for RHEL-based distribution. For Debian-based distribution, you can change the parameter '--type' to 'deb', and you can use the 'pkg' package for generating an orbit installer for macOS.
fleetctl package --type=rpm --fleet-url=https://fleet-rock.hwdomain.io:8080 \
--enroll-secret=ewQBXuvBJ70ZiFFkjOLFLp3V4POe+KTu \
--fleet-certificate=/opt/fleet.pem
Output:
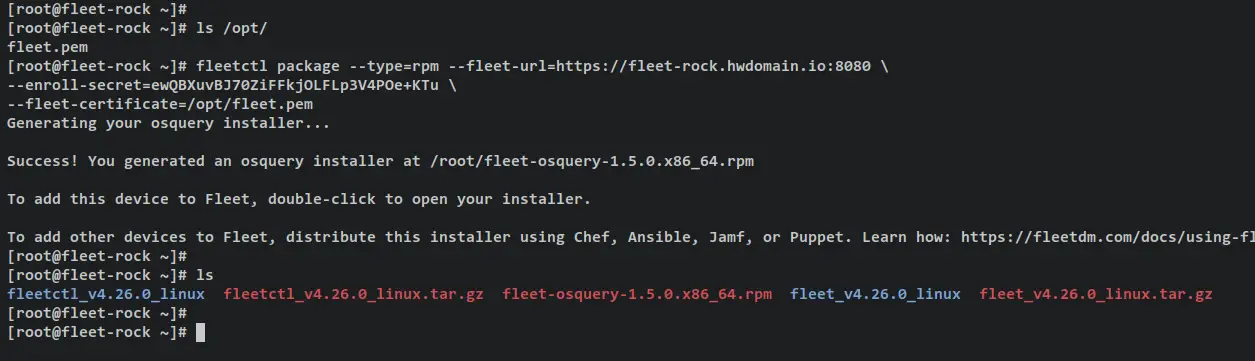
Once the process is finished, you can see the file 'fleet-osquery_version.rpm' in your current working directory.
Next, install the generated orbit package via the rpm command below. Once installed, the orbit package will create a new service file 'orbit.service' that allows you to manage orbit via systemctl.
sudo rpm -Uvh fleet-osquery_version.rpm
Output:

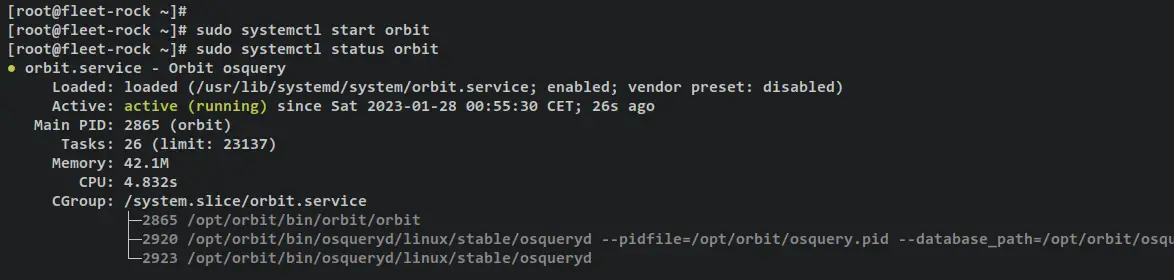
After orbit installed, run the below systemctl command to start the orbit service. Then, verify the status to ensure that the orbit service is running.
sudo systemctl start orbit
sudo systemctl status orbit
You should receive an output like this - The orbit service is 'active (running)' and it's enabled and will be run automatically upon the system startup.
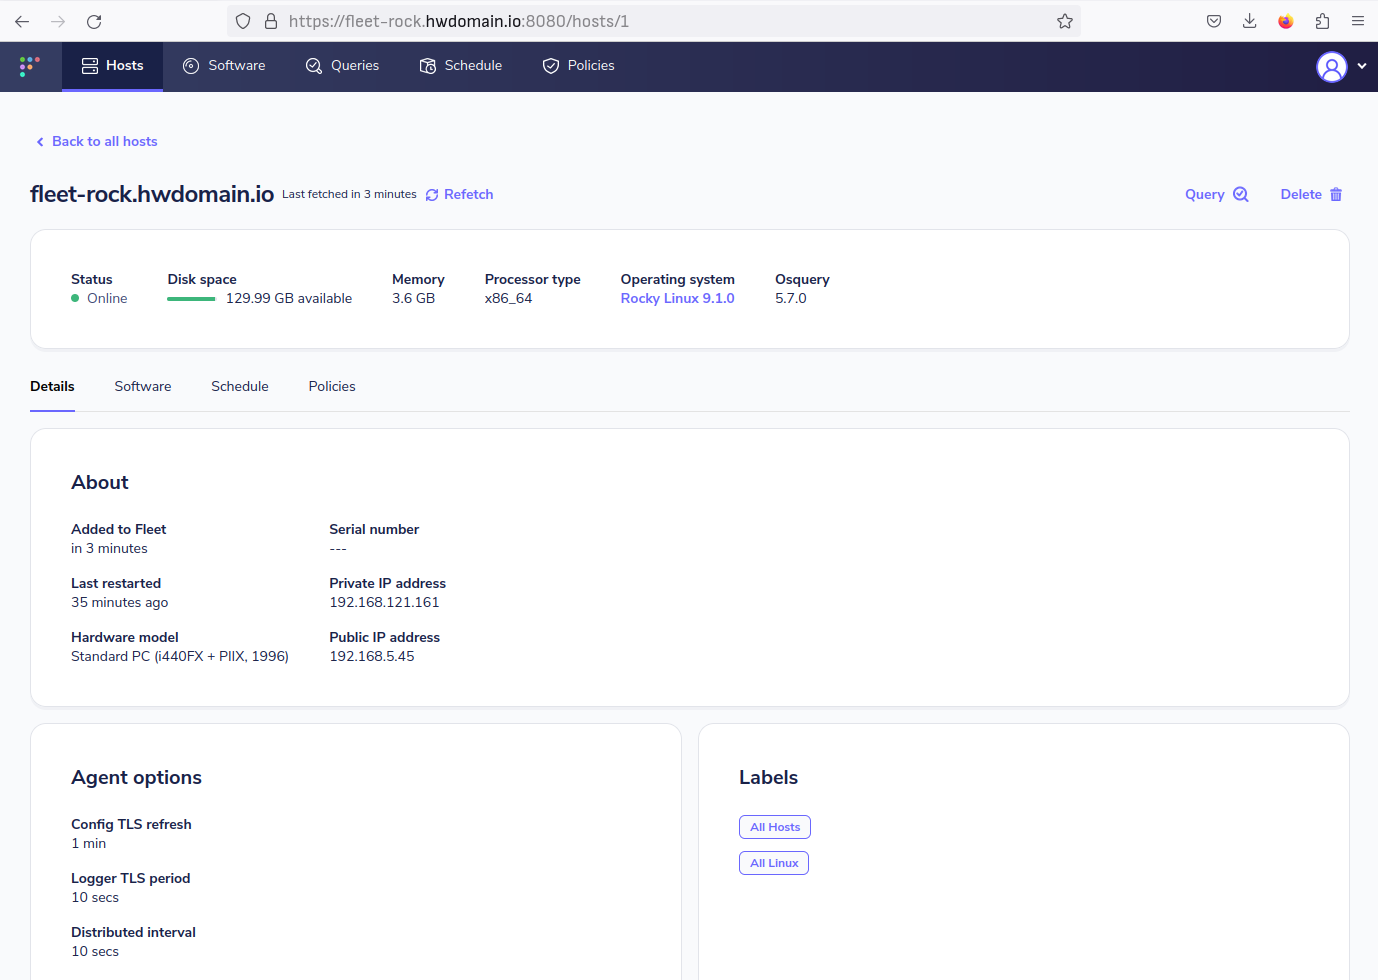
Now back to the fleet dashboard and you should see the new host 'fleet-rock.hwdomain.io' added to fleet osquery manager.
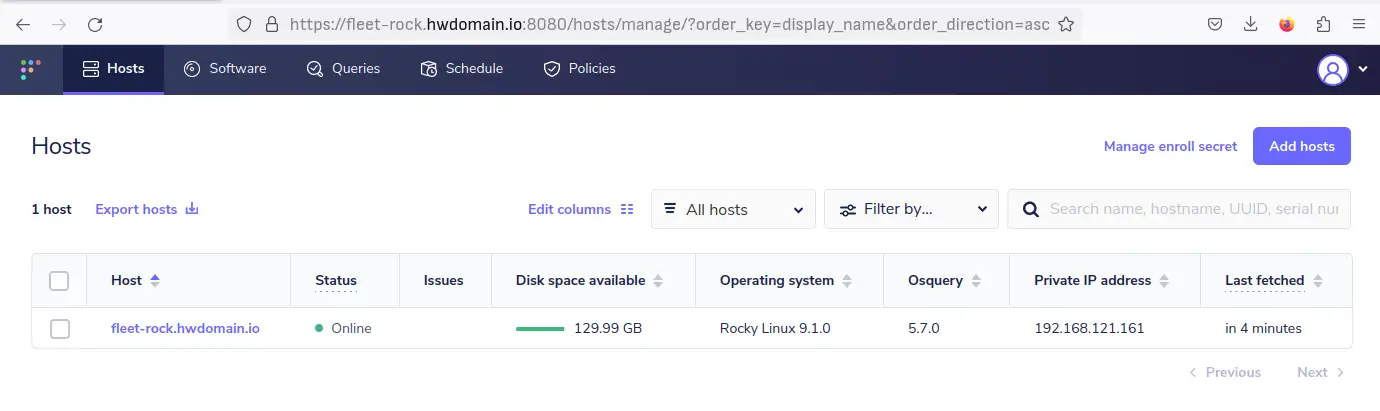
Click on the hostname 'fleet-rock.hwdomain.io' to get details information about the host.
With this, you've now added a host to fleet osquery manager via Orbit osquery runtime. You've also generated an installer of orbit for RHEL-based distributions.
In the next step, you will learn how to set up fleetctl to connect to fleet server and manage your fleet deployment via the terminal.
Setting Up Fleetctl for Managing Fleet
Fleetctl or Fleet control is a command line for managing fleet deployment from the terminal. Fleetctl allows you to manage configurations, and queries, generate an osquery installer and enable GitOps workflow with fleet.
In this step, you'll set up fleetctl and connect to the fleet osquery manager that you've installed.
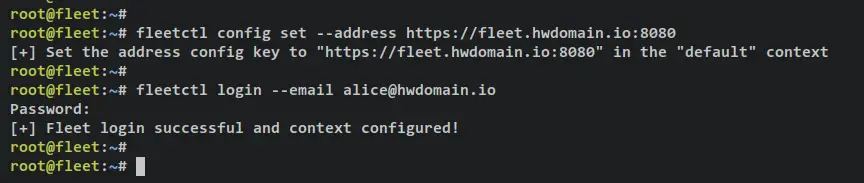
First, run the following command to set up the default fleet URL. Be sure to change the domain name and ensure that you're using an HTTPS secure connection. With this, you'll set up fleet connection in the 'default' context/profile.
fleetctl config set --address https://fleet-rock.hwdomain.io:8080
Log in to your fleet osquery manager using the command below. Be sure to change the email address in the below command.
fleetctl login --email [email protected]
Now input the password that you're using to log in to fleet dashboard. After successful, you should receive an output such as 'Fleet login successful and context configured!'.
After logging in to fleet, run the following fleetctl command to verify your configurations.
Checking the list of available hosts on fleet.
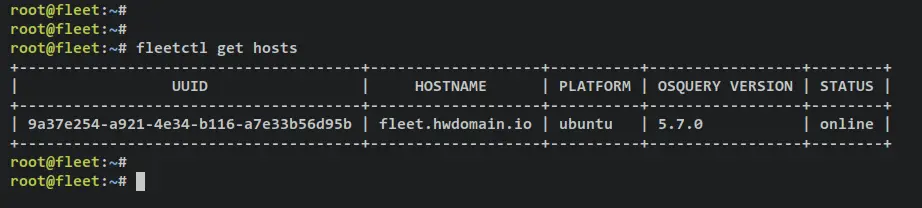
fleetctl get hosts
Output - You should see the host 'fleet-rock.hwdomain.io' is available on fleet with the osquery v5.7.0.
Checking the list of available users on fleet.
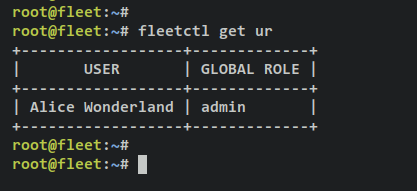
fleetctl get ur
Output - You should see the fleet user that you've created.
With this, you've now configured fleetctl and connected to your fleet deployment. You can now set up hosts, and queries, manage updates, running live queries, from your terminal server.
Conclusion
In this tutorial, you've installed Fleet Osquery Manager on a Rocky Linux 9 server. You've installed Fleet with MySQL as the database backend and Redis for ingesting queue and cache data. In addition, you've secured Fleet with SSL/TLS certificates and running Fleet as a systemd service that allows you to easily manage Fleet with the systemctl command utility.
Lastly, you've also added a host to Fleet via Orbit (osquery runtime) and generated a package installer for RHEL-based distributions. Also, you've configured fleetctl and logged in to Fleet so you can manage and configure hosts from your terminal server.
With this in mind, you can now add new hosts to Fleet osquery manage via orbit or using manually via plain osqueryd service. Also, you can define new queries for monitoring your hosts, set up vulnerability processing that allows you to detect CVEs via Fleet, and many more. Learn more about Fleet from the Fleet's official documentation.

