 Keyboard handling code is something you’ll use and reuse across your project. There’s a very simple way that you can do this using interface builder objects. It’s as simple as dropping an object and connecting two outlets. In this short post we’ll create a class that will handle the keyboard on a scrollview for us and we’ll do it using interface builder objects.
Interface Builder Object
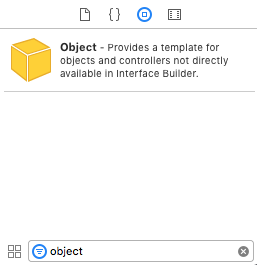
If you ever scrolled through the object library in interface builder where all your standard UI components are, you might have wondered what is that yellow ‘Object’ thing. What is an object template? Well, to put it simply, it’s a placeholder for any class that you might have.
If you need to instantiate a class you could do it from the code, there’s no magic there. Let’s say your class needs some info from the nib file (outlets, actions…), things can get pretty messy, with a lot of boilerplate code. With interface builder object template you can treat the instance of your class like any other interface builder object. I’ll show you how to do this on an example below.
All that being said, I have to say that in my years as an iOS developer I have seen only a handful of cases where I found interface builder objects to be useful. Keyboard handling is one of them and maybe you’ll get inspired and find some cool new usages for it 🙂
Code First
Scroll a textfield above the keyboard when a user taps into it. Simple and very repetitive. You would think it would be a part of the framework by now 🙂 Let’s start by writing our keyboard handling class. It will be a pretty simple class that will register to receive keyboard notifications in the initialiser and mop up in the deinitialiser:
Methods that handle these notifications are going to be the meat of the class, but we need a couple of things first.
First we need our outlets, because we want to be able to use this class from interface builder. Let’s add them:
Our ‘bottomConstraint’ will be the constraint that will be moved when the keyboard is on the screen. Usually this will be your scroll view bottom constraint. We need an outlet to the scroll view so we can animate the selected text field into view. And we have an IBInspectable that we can use to add a bit of padding between the selected text field and the keyboard. If you don’t know what IBInspectable is, long story short, it’s a variable that you can set from interface builder (don’t flame on me, I said long story short 🙂 )
One more thing that we’ll need is to know which text field has been selected. Or, to be more technical, we’ll need to figure out who is the first responder. There’s a great little extension written by Jakob Egger on stackoverlow, I don’t feel like re-inventing the wheel, so here it is:
Now we have all we need and we can handle the keyboard…
Keyboard Handling
In the keyboard handling code all we’ll do is manipulate the bottom constraint of the scroll view. It’s nothing you’re not used to:
We’re keeping the original constraint constant se we can revert back to the original constant in the ‘keyboardWillHide’ function and we’re getting the keyboard height and animation duration from the notification object. In the ‘keyboardWillShow’ function, when the animation is finished, we’re getting the current responder in order to get the frame of the selected text field. Then we’re scrolling that text field into view. That’s it for the code. You could easily reuse this class across all your projects. Now let’s see how to hook all this up in interface builder.
Using The Class
From here on you can do everything from interface builder. I’ll assume that you have a view controller with a scroll view and at least one text field. Go in the object library and drag the ‘Object’ to the top of your view controller:
Drag it here:

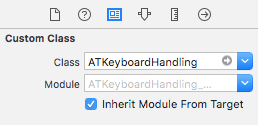
Select it, as shown on the screenshot, and go to the identity inspector on the right to set the class of the object:
Now every time interface builder loads the view controller our class will get initialised. All that’s left is to hook up the outlets. So go to the connections inspector and connect the two outlets:
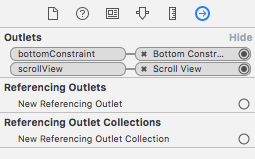
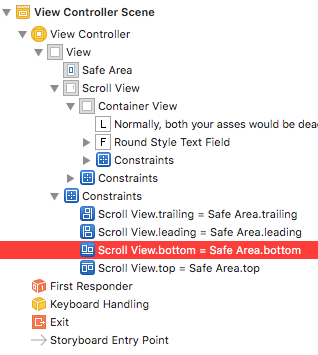
Don’t forget your bottom scroll view constraint:
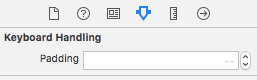
If you remember we had an ‘IBInspectable’ variable in our class. What this means is that we can assign a value to this variable directly from interface builder. You can find it in the attributes inspector:
That’s pretty much it. Let’s test it out…
Test Drive
Build and run…

And that’s it. Every time we need to use the class all we have to do is replace the steps involved in setting up the object in interface builder. Which is only a couple of clicks. Don’t mind the text I was using for testing 🙂 I’m using a service called slipsum for it, check it out 🙂
Conclusion
In this short article we saw a way how to use objects in interface builder and we created a simple class that will save us some time in the future. Interface builder objects are not that commonly used, in my experience. And I can see the argument against using them… It’s not easy to debug, you can forget to connect the outlets, you don’t have exclusive control over object creation, and so on… But in some cases they can be useful. Keyboard handling, for example. I’m sure you’ll find some great use cases for them in your projects.
I hope you’ve enjoyed the article and that you have learned something new today. There’s a very small demo app along with the complete class for keyboard handling in the GitLab repo, you can also find all the code snippets from the article there as well.
Have a nice day 🙂
~D;