Today the Raspberry Pi Foundation announced the long awaited release of the Raspberry Pi 5. The first retail devices will be shipping to customers at the end of October. I got my hands on one and have been doing some early testing.
So what's it like? What's new? And should you consider spending about 100 GBP to upgrade? Let's find out.
The kind people at the Raspberry Pi Foundation sent out a number of tester units to the community, who in turn provide feedback. I received one, as did Jeff Geerling and a number of other people. I'll provide links to their articles at the end of this post.
Here's the new Raspberry Pi 5 compared to the previous generation. We can see that things have moved around a little, and that we've gained a PCIe port. But the most important changes are not just on the surface, they lie deep within the silicon and are the most exciting change for me.

Raspberry Pi 5 compared to the Raspberry Pi 4
A power button hides next to the new PCIe adapter. And there's a very convenient indicator of the amount of RAM included on the top of the board. I can finally put that Sharpie away.
What do I use Raspberry Pis for?
In the past I've also used the Raspberry Pi for controlling robots, reading from sensors, taking timelapses and making portable cameras.
But if you've read anything I've written on the Raspberry Pi in the recent past, you'll know that I use them primarily headless. My main interest is in making this tiny device into a self-hosted server, a power efficient, pocket-sized cloud if you like. For things like serverless functions with OpenFaaS and securely isolated CI runners.
A really popular use-case for these devices, is to build a homelab, a cluster, most likely with the K3s flavour of Kubernetes. Kubernetes is notoriously complex, so I wrote an open source installer called k3sup (ketchup) to make that easier.
Another way that I've been using Raspberry Pis recently is to run native Arm builds for projects on GitHub using the self-hosted GitHub Actions runner. Now GitHub says this is not secure to use as it comes, so I founded a product called actuated that wraps it within a Firecracker VM, along with the root filesystem required to do a build with Docker or any other toolchain available on the hosted runners.
QEMU is often used as a substitute for bare-metal Arm servers, but even the original Raspberry Pi 4 is much quicker than using emulation on fast x86_64 servers.
Real world numbers
So many people ask what the real world use-case is for a Raspberry Pi. The example with QEMU takes a 40 minute emulated build and takes it down to single digits.
But how do native Arm devices and servers stack up to this newcomer?
One of the reasons I like Geekbench over other benchmarking tools is that it does run real-world software like Chrome and SQLite to calculate its scores.

Various Arm devices and servers compared
You can see that the RPi5 is around 3x faster for single-core tasks, and 2x quicker for multi-core tasks. That's an impressive improvement, but it's not the whole story.
A new RP1 chip takes over I/O meaning you now have: 2x USB3 at 5 Gbps (simultaneously) and 1x PCIe channel to run an NVMe. In the past, these shared the same bandwidth, limiting what kind of throughput you could get if you used disk and network together.
For people wanting dual Ethernet, I think two separate RJ45 adapters is unlikely outside of a custom board based upon a future compute module, but you could get a very good speed through the USB bus.
Testing an Amazon Basics USB3 Gigabit ethernet adapter with iperf3 vs the built-in Ethernet port:

USB3 vs internal Gigabit comparison: Both performed identically
If you need more bandwidth, you could potentially connect a 2.5GBps card over PCIe 2.0, but beware that the performance may be limited since it only has a single lane available, vs the usual 4x-16x.
Building a Linux Kernel
One of the fastest boards in the results was the Mac Mini M1 with Asahi Linux installed. In my testing with actuated, I regularly see it beat Ampere's 80-core Q80 server, due to its much quicker processor. But when a task like building a Linux Kernel can be accelerated by adding more cores, the Q80 will always win.
Here's the results of my build job running within Firecracker:

You can see that the RPi 4 took over 10 minutes, and the RPi 5 finished in less than 4 minutes. That's a huge difference, and one that I had to check several times, because I couldn't believe how much quicker it was.
I'm including an abbridged version of the GitHub Actions workflow here for anyone who's interested:
name: Benchmark Kernel Build on Arm

jobs:
  build_kernel:
    name: Build
    strategy:
      matrix:
        variant:
          - actuated-rpi5
          - actuated-rpi4
          - actuated-q80
          - actuated-ampere
          - actuated-m1
    runs-on: [actuated-arm64, "${{ matrix.variant }}"]

    steps:
      - name: Clone linux
        run: |
          time git clone https://github.com/torvalds/linux.git linux.git --depth=1 --branch v6.0
      - name: Make config
        run: ....
      - name: Make Image
        run: |
          cd linux.git
          make Image -j$(nproc)
You can learn more about actuated for native Arm builds from the Fluent Open Source project: Scaling Arm builds with Actuated
Clustering and Kubernetes
It goes without saying that the Raspberry Pi 5 is much better suited to running a cluster using something like Kubernetes. The I/O requirements of Kubernetes are very high, especially when running in high availability with etcd. etcd is a key value store responsible for coordinating the state of workloads, the status of network endpoints and membership of nodes.
It requires a very low write-latency and you'll often see errors and warnings from K3s saying things like "Write took too long 800ms".
There's a few things to keep in mind if you're thinking of building a cluster today with the RPi 5.
You'll need a different cluster chassis due to the cooling requirements, power distribution and layout of the board.
USB multi-chargers are likely not going to cut it, so separate 27W adapters are probably the way to go.
For the RPi 4 I currently use a USB-C enclosure with an NVMe inside for Kubernetes and actuated, using USB boot. When I tested this setup vs the PCIe breakout on the CM4, they looked very similar when using dd to test straight read/write speed. But - the native bus performed much better with random reads/writes and with latency.
Here's the results of dd for a 1000MB empty file, with very similar USB-C enclosures and NVMes:
ubuntu@actuated-rpi4-8gb:~$ dd if=/dev/zero of=./1000mb bs=1M count=1000
1000+0 records in
1000+0 records out
1048576000 bytes (1.0 GB, 1000 MiB) copied, 3.96508 s, 264 MB/s

alex@actuated-rpi5-8gb:~ $ dd if=/dev/zero of=./1000mb bs=1M count=1000
1000+0 records in
1000+0 records out
1048576000 bytes (1.0 GB, 1000 MiB) copied, 3.57312 s, 293 MB/s
And for a buffered read test with hdparm:
ubuntu@actuated-rpi4-8gb:~$ sudo hdparm -tT /dev/sda

/dev/sda:
 Timing cached reads:   1622 MB in  2.00 seconds = 811.44 MB/sec
 Timing buffered disk reads: 866 MB in  3.01 seconds = 288.14 MB/sec

alex@actuated-rpi5-8gb:~ $ sudo hdparm -tT /dev/sda

/dev/sda:
 Timing cached reads:   3414 MB in  2.00 seconds = 1709.34 MB/sec
 Timing buffered disk reads: 1030 MB in  3.00 seconds = 342.87 MB/sec
Being able to connect over PCIe should make a big difference in throughput and latency. So, I would say unless you already have the USB-C enclosures and NVMes and can re-use them, don't build an RPi5 Kubernetes cluster until the PCIe breakout is released and made available.
From what I hear, we're likely to see a 16GB model at some point in the future, but for something like Kubernetes, the 8GB model makes the most sense. More RAM means more Pods, and fewer hosts being required.
See also: The Past, Present, and Future of Kubernetes on Raspberry Pi - Alex Ellis, OpenFaaS Ltd
Power, cooling and a new enclosure
The first thing I saw when I booted up the RPi 5 with an external NVMe via USB was that it didn't have enough power. A new 27W USB-C Power Supply is advised for using external devices and for anything intensive.
"Raspberry Pi 5 consumes significantly less power, and runs significantly cooler, than Raspberry Pi 4 when running an identical workload. However, the much higher performance ceiling means that for the most intensive workloads, and in particular for pathological “power virus” workloads, peak power consumption increases to around 12W, versus 8W for Raspberry Pi 4."
Active cooling will delay or postpone the need for throttling of the CPU.
There's a new official case with a tiny fan, or an "active cooler" which includes a large heatsink. I think I prefer the look of the latter:

The fan is attached to a fan header, which means you won't need to use up any of the GPIO pins.
The new case should also give you access to the power button, which was apparently one of the most requested features for the new version.
Wrapping up
We have a new Raspberry Pi that tests 2-3x quicker in Geekbench, and in my testing with GitHub Actions and actuated, at least 3x quicker for most things I've built, like the Linux Kernel.
Not only is the CPU quicker, but there's a 1-lane PCIe port ready for an NVMe or PCI device. The I/O is now handled by a new "Raspberry Pi Silicon" chip, meaning you can have full bandwidth from a disk, the network and USB at the same time.
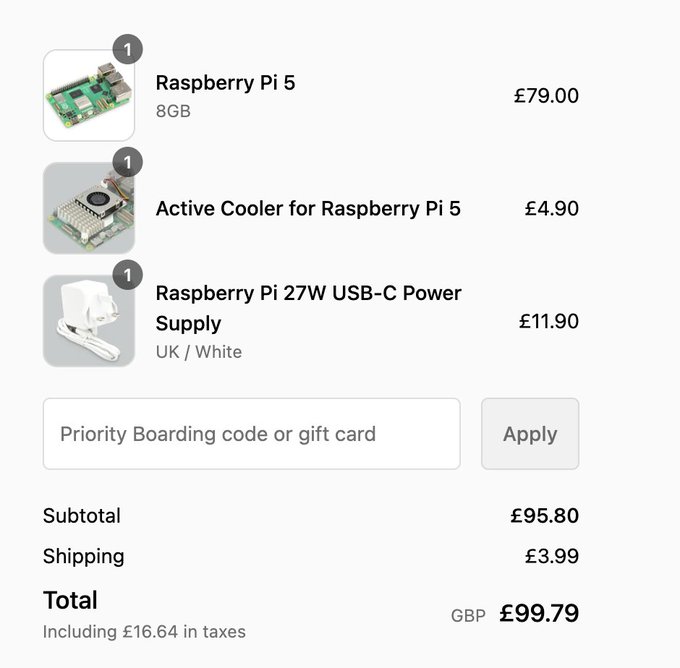
The bill for an 8GB model
The first Raspberry Pi devices were truly "25 USD" devices, they also had very poor I/O and 512MB of RAM - 1GB. We've come so far from there now, and for way more performance, the total cost is around 4x at 100 GBP for a case, PSU and the 8GB model.
The Pi Hut and Pimoroni both have them available for pre-order shipping on 23 October 2023.
You may also like:
- Official release blog post
- Phoronix benchmarks
- Jeff Geerling's PCI testing
- Calyptia case-study: Scaling Arm builds with Actuated
The Raspberry Pi Zero W 2 is appearing back in stock again, here's what you can do with it, including running OpenFaaS: