
You can apply this tutorial's techniques, tips, and tricks to personalize the audio room and live-streaming iOS apps you build with Stream Video. Take advantage of the Stream Swift Video SDK's simple and flexible theming options to build rich and custom audio/video calling, live streaming, and audio room experiences.
Getting Started
Use Xcode 14 or 15 beta to create a new SwiftUI app, configure privacies for camera and microphone usage, install the video SDK, and configure it to be ready for calling. If you are new to Stream Video, explore the links below to prepare your working environment for the basic theming.
- Stream Video and available SDKs
- Create a new SwiftUI calling app, install, and set up the iOS SDK
- Download and explore the final project
- Explore the iOS Video SDK on GitHub
Get a Free Free-Trial Stream Account
Although you do not require a Stream account to complete the project in this article, you should get a dashboard account if you plan to build production iOS audio/video calling, audio chat room, and live streaming apps using our SwiftUI SDK.
Basics of Simple Theming
The Video SDK's basic theming capabilities can help you change colors, typography, symbols (icons), and audio notifications, ready-built to be used for video calling apps powered by Stream. You can access the SDK's basic theming options using the 'Appearance' class.
The Appearance class is built around four pillars: colors, images, fonts, and sounds.
- Colors Struct
Colors: With thisstructyou can modify the tint and accent colors for UI elements and backgrounds (active call background, call controls background) of the video calling experience. - Images Class
Images: Using the 'Images' class, you can swap all the SDK-provided SF Symbols used for your app. - Fonts Struct
Fonts: Thisstructsupports all the Dynamic System Fonts Apple provides for iOS devices. You can use it to, for example, swap the headline font with another. Additionally, its flexible support allows you to implement a custom font for your apps. - Sounds class
Sounds: Sound notifications, such as incoming and outgoing call notifications, are implemented using this class. Later in this article, we will use it to swap the outgoing call’s ringtone the SDK provides with a custom sound implementation.
Configure the
You can add the optional Appearance class when you create and initialize the StreamVideo object in your video calling app. Check out our documentation for more information about initializing and authenticating, the video client.
First, create the StreamVideo client as early as possible in your app's location where life cycle events occur. For this demo, we implement it in the app's conformer file BasicAdvancedThemingApp.swift, but yours may be different.
private var client: StreamVideo
self.client = StreamVideo(
      apiKey: apiKey,
      user: user,
      token: .init(stringLiteral: token)
    )
Then, create an instance of StreamVideoUI by passing the video client (object) and your custom appearance property.
//Create an instance of the appearance class
    let customAppearance = Appearance(colors: customColor, images: customImage, fonts:    customFont, sounds: customSound)

let streamVideoUI = StreamVideoUI(streamVideo: client, appearance: customAppearance)
The appearance class is optional and not added by default when you install and set up the video SDK. In the subsequent sections, you will use the appearance class to change colors, images, font, and ringtone the SDK provides.
Make a Simple Change Not Requiring the Appearance Class
The first simple thing to change in your video app is the local user avatar and its background blur when you turn off the camera. The avatar is a parameter of the user object, and it is a URL representing an async image.
Note: This simple replacement does not need the appearance class.
let user = User(
      id: userId,
      name: "Martin", // name and imageURL are used in the UI
      imageURL: .init(string: "https://getstream.io/static/2796a305dd07651fcceb4721a94f4505/a3911/martin-mitrevski.webp")
    )
This article's demo defined the user object in BasicAdvancedThemingApp.swift. Use an async image to replace the avatar or load an image from your network. The example image used in this article loads an async image from Picsum.
Replacing the image URL imageURL: .init(string: "https://getstream.io/static/2796a305dd07651fcceb4721a94f4505/a3911/martin-mitrevski.webp" with imageURL: .init(string: "https://picsum.photos/id/64/200/200") shows the image below.
let user = User(
      id: userId,
      name: "Martin", // name and imageURL are used in the UI
      imageURL: .init(string: "https://picsum.photos/id/64/200/200")
    )
Use Your Brand’s Color
With the Video SDK's Appearance class, you can modify the calling experience's default colors with custom colors to enhance the brand's identity and recognition. Whether you are creating an audio/video calling app, an audio room app, or a live streaming app, changing the colors the SwiftUI SDK supports involves the following steps.
- Create an instance of the Colors struct:
var customColor = Colors() - Define the custom color you want to use:
let pineGreen = Color(red: 0.0, green: 0.408, blue: 0.28) - Swap the standard built-in colors with your custom brand's colors: In the comments of the code snippet below, you will find colors of the various UI elements and backgrounds you can modify in your app.
    // Color for xmark (close icon), invite button, cancel search, and remote participant's avatar
    customColor.tintColor = pineGreen

    // Slashed icons: Microphone and video
    customColor.accentRed = .orange

    // Mute/unmute me button
    customColor.secondaryButton = pineGreen

    // Call controls background
    customColor.callControlsBackground = pineGreen

    // Online indicator icon
    customColor.onlineIndicatorColor = pineGreen

     // Background of an active call
    customColor.callBackground = UIColor(pineGreen.opacity(0.5))

     // Color for the reject call icon
customColor.hangUpIconColor = .orange - Create an instance of the SDK's
Appearanceclass and pass thecolorsproperty. As shown below, thecustomColorproperty defined in step 1 above replaces different colors for UI elements and backgrounds.
let customAppearance = Appearance(colors: customColor, images: customImage, fonts: customFont, sounds: customSound)Note: The code snippet above includes images, fonts, and sounds properties.
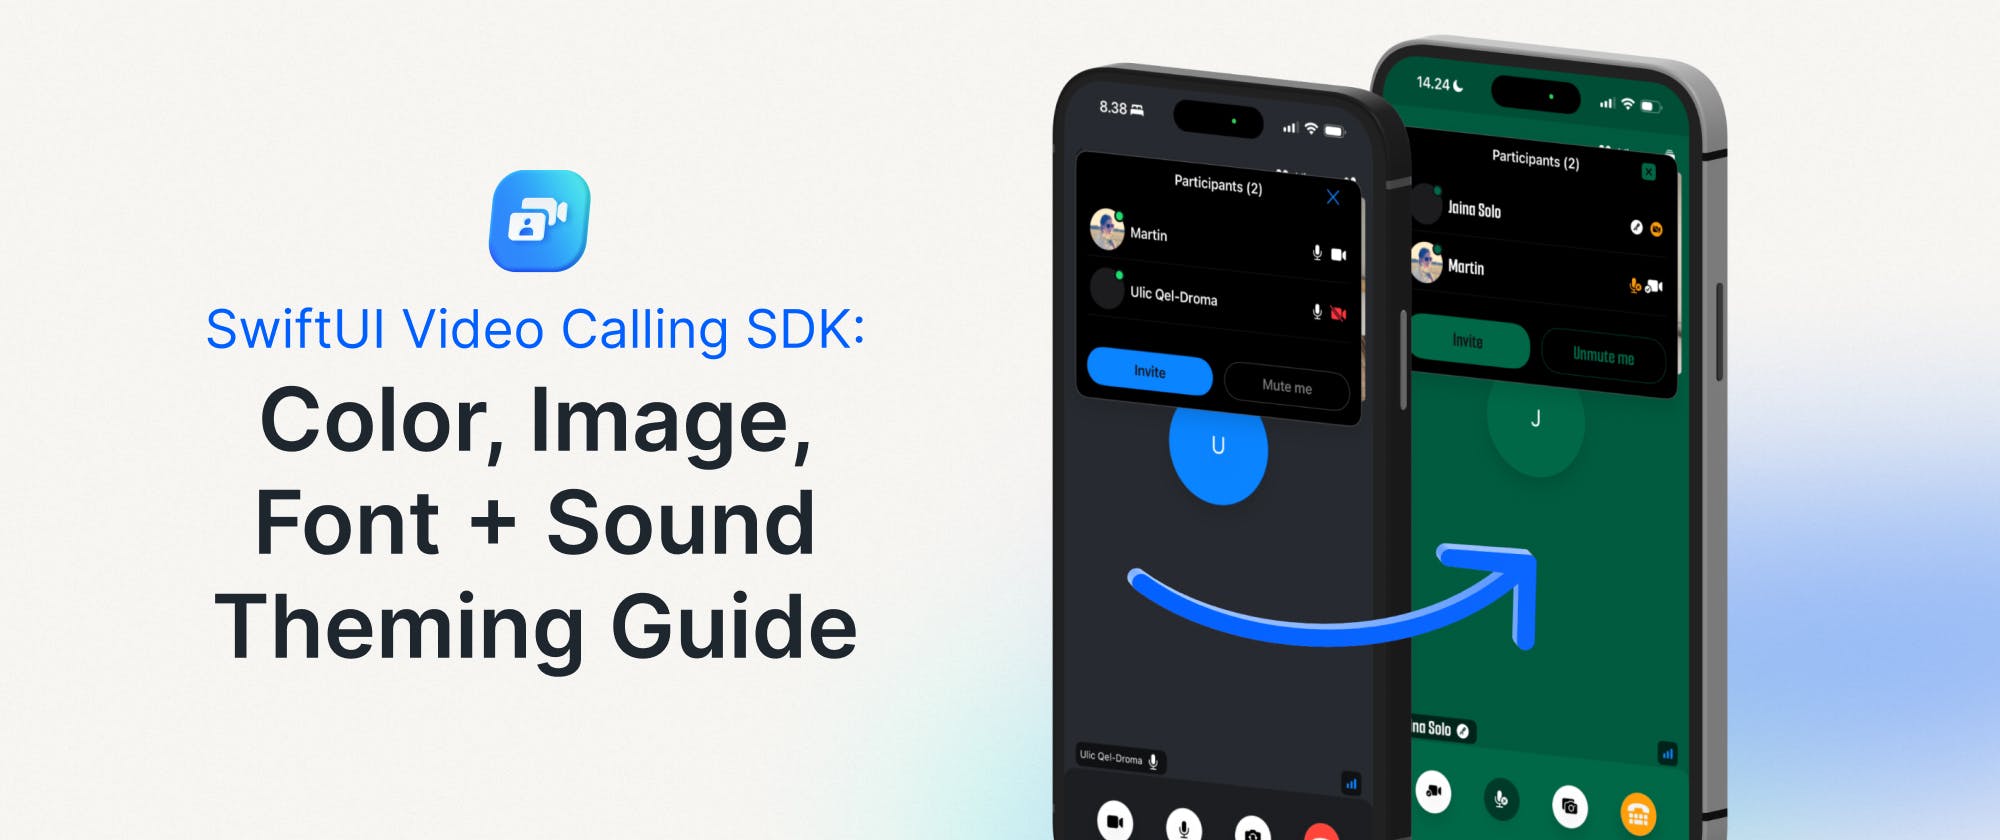
The colors of the before and after states of the app look like this:

You can see all the changes above when you run the app and tap the person.2.fill symbol on the top-right of the screen to see the number of participants in the call. You can apply the steps outlined above to modify the form's background and search field provided by the SDK customColor.background1 = UIColor(pineGreen.opacity(0.25)).

Change Icons/Symbols
The SwiftUI Video SDK uses SF Symbols for excellent readability, scalability, and alignment with text. It supports all nine different weights, the three scales of SF Symbols, and even animations, such as variable color, bounce, scale, and replacement. Although you can swap the default symbols with custom-made ones, we recommend using Google Material Symbols or replacing them with icons from the SF Symbols library.
Replacing the default icons follows a similar procedure we used to modify the SDK colors in the app.
The code snippet below shows the various symbols you can swap in the SDK to provide unique audio/video calling experiences.
    // MARK: Create an instance of the Images class
    let customImage = Images()
    customImage.acceptCall = Image(systemName: "teletype.answer.circle.fill")
    // Reject call icon
    customImage.hangup = Image(systemName: "teletype.circle.fill")
    customImage.micTurnOn = Image(systemName: "music.mic.circle.fill")
    customImage.micTurnOff = Image(systemName: "mic.fill.badge.xmark")
    // An icon for viewing the call participants
    customImage.participants = Image(systemName: "person.2.crop.square.stack.fill")
    customImage.searchIcon = Image(systemName: "sparkle.magnifyingglass")
    // Clear search icon
    customImage.searchCloseIcon = Image(systemName: "person.fill.xmark")
    customImage.speakerOn = Image(systemName: "speaker.wave.2.circle")
    customImage.speakerOff = Image(systemName: "speaker.slash.circle")
    customImage.videoTurnOn = Image(systemName: "video.fill.badge.checkmark")
    customImage.videoTurnOff = Image(systemName: "video.slash.circle.fill")
    // Cancel icon
    customImage.xmark = Image(systemName: "xmark.app.fill")
customImage.toggleCamera = Image(systemName: "camera.on.rectangle.fill")Note: After specifying the images you want to swap, register your customImage property in the SDK by passing it as a parameter in the customAppearance instance’s definition.
let customAppearance = Appearance(colors: customColor, images: customImage, fonts: customFont, sounds: customSound)Adding the code snippets above to your implementation, the symbols in the app will look and feel like the icons in the image below.

Use Dynamic System Type
The SDK uses Dynamic System Fonts on iOS to ensure the clarity and legibility of texts used in the app and alignment when placed beside SF Symbols.
Follow the previously outlined steps for changing colors and images to swap fonts in the SDK. You can replace the fonts with other system fonts or use a custom font from services like Google Fonts.
Swapping With System Fonts
The label for the remote participant uses .caption1 as default. If it looks small, you can replace this with a system .headline font.
// Create a instance of Fonts struct
 var customFont = Fonts()
 // Remote participant's label
 customFont.caption1 = .headline.bold
Use a Custom Brand Font
Although we recommend using system-provided dynamic fonts through the app for excellent legibility, you can install and use a custom font from your favorite font provider like Google Fonts. Follow the steps below to install and use a custom font from Google Fonts.
- Download the font you prefer from Google Fonts or any other font service. This demo uses SmoochSans-Bold.
- Open the folder containing the downloaded font and drag the font file to anywhere in the Xcode Project navigator. The font file name for this demo is SmoochSans-Bold.ttf.

- Make sure to check the following, as demonstrated in the image below. The custom font will not work if you do not check the "Add to targets” option.

- Next, you should register the custom font in Xcode so that SwiftUI recognizes it. Select the root folder of the app in the Xcode Project navigator. Head to the info tab and add the Key item Fonts provided by application. Put the custom font's name, including the extension, as the value SmoochSans-Bold.ttf

Use the code snippet below to change the text for the remote participant, participants' names, labels for the invite, and mute buttons to SmoochSans-Bold at 24 points.
    // Create an instance of the Fonts struct
    var customFont = Fonts()
    // Remote participant's label
    customFont.caption1 = .custom("SmoochSans-Bold", size: 24)
    // Participants' names
    customFont.bodyBold = .custom("SmoochSans-Bold", size: 24)
    // Invite and mute button labels
customFont.headline = .custom("SmoochSans-Bold", size: 24)Note: Remember to add the customFont property you defined as a parameter of the appearance object.
let customAppearance = Appearance(colors: customColor, images: customImage, fonts: customFont, sounds: customSound)Check out the text in the screens below for the before and after font replacement states.

Explore the full implementation of the colors, images, and fonts theming in BasicAdvancedTheming.swift shown below.
import SwiftUI
import StreamVideo
import StreamVideoSwiftUI
@main
struct BasicAdvancedThemingApp: App {
  @ObservedObject var viewModel: CallViewModel
  private var client: StreamVideo
  private let apiKey: String = "mmhfdzb5evj2" // The API key can be found in the Credentials section
  private let userId: String = "REPLACE_WITH_USER_ID" // The User Id can be found in the Credentials section
  private let token: String = "REPLACE_WITH_TOKEN" // The Token can be found in the Credentials section
  private let callId: String = "REPLACE_WITH_CALL_ID" // The CallId can be found in the Credentials sectio

  init() {
    // Simple theming: Change the local user avatar
let user = User(Ringing Overview
With the SDK's Call object, you can use the ringing feature to notify local and remote participants about the state of incoming and outgoing calls. This feature is only possible when you create a call. If the call has not been already created, you should create it and add the boolean parameter ring: true to the create() method. Setting ring: true will send a VoIP notification to the local participant during an outgoing call. Similarly, the remote participant receives an incoming VoIP notification when ring is true. The system will fail to send push notifications when `ring is false.
We have created and set up the call in this article's demo. Therefore, we can add and set ring: true in the startCall() method using an instance of the SDK’s viewModel.
`viewModel.startCall(callType: .default, callId: callId, members: [], ring: true).
Check out Sound kit for prototypes from Design at Meta and Google Material Sound resources to download and test with different sounds.
Another way to notify the call participants without the ringing feature is to use the notify() method.
let call = streamVideo.call(callType: "default", callId: callId)
let callResponse = try await call.notify()
For further information, check out the ringing section of our documentation.
Add a Custom Sound to Replace the SDK-provided Outgoing Call’s Ringtone
Play the video below to hear the default ringtone from the Video SDK.
Adding and playing a custom ringtone involves four steps.
- Add a sound to the project in Xcode: Drag your sound file anywhere in the Project navigator, as shown below. This demo uses ringing.mp3 for the custom sound.

- Ensure to select the following checkboxes and click finish. The custom ringtone will not play during an outgoing or incoming call if you do not check the option “Add to targets”.
- Finally, you should create an instance of the SDK’s
Soundsclass and instruct the system to pick the custom sound you added to the project instead of the one the SDK provides using the code snippet below.
         // Create an instance of the Sounds class
      let customSound = Sounds()

      // Tell the SDK to pick the custom ring tone
         customSound.bundle = Bundle.main

      // Swap the outgoing call sound with the custom one
         customSound.outgoingCallSound = "ringing.mp3"

      // Create an instance of the appearance class
         let customAppearance = Appearance(colors: customColor,
         images: customImage,
         fonts: customFont, sounds: customSound)
You can find the full implementation in BasicAdvancedThemingApp.swift.
Note: Using our documentation, you should replace the user credential placeholders in the code below with the credentials from the SwiftUI video call tutorial.
import SwiftUI
import StreamVideo
import StreamVideoSwiftUI
@main
struct BasicAdvancedThemingApp: App {
  @ObservedObject var viewModel: CallViewModel
  private var client: StreamVideo
  private let apiKey: String = "mmhfdzb5evj2" // The API key can be found in the Credentials section
  private let userId: String = "REPLACE_WITH_USER_ID" // The User Id can be found in the Credentials section
  private let token: String = "REPLACE_WITH_TOKEN" // The Token can be found in the Credentials section
  private let callId: String = "REPLACE_WITH_CALL_ID" // The CallId can be found in the Credentials sectio

  init() {
    // Simple theming: Change the local user avatar
let user = User(Play the video below to hear the custom outgoing call ringtone.
Next Steps
This article showed you the foundations of modifying an audio/video calling app you create using Stream's SwiftUI Video SDK. We dived into the SDK's basic theming techniques, and you have now discovered how to replace colors, call symbols (icons), and typography and how to add a custom ringtone. Part two of this tutorial will be about injecting standard and custom SwiftUI views to swap the reusable components of the SDK in building complex calling UIs for different use cases.
For step-by-step guides on getting started with the iOS Video SDK, check our SwiftUI video calling, audio room, and livestreaming tutorials.
