How to Set up PostgreSQL Replication on Debian 11
PostgreSQL is a free and open-source database management system focusing on extensibility and SQL compliance. PostgreSQL is an advanced and enterprise-class RDBMS (Relational Database Management System) that supports both SQL (relational) and JSON (non-relational) querying.
It's a highly stable and enterprise-grade database management system that provides different solutions that enables you to set up high availability and failover. PostgreSQL is used as a primary database for web applications, mobile applications, and analytic applications. It has a strong reputation for its reliability, flexibility, feature robustness, and performance.
In this tutorial, I will install and set up the Logical Replication of the PostgreSQL database server via pglogical2 on two Debian 11 servers. You will install the PostgreSQL server with the pglogical extension package, then set up the replication between two or more PostgreSQL servers.
pglogical is an extension of PostgreSQL that enables you to set up logical streaming replication at the database level. It's using the publish/subscribe model for replication. With pglogical extension, instead, replicate available data on PostgreSQL, you will replicate and sync specific tables on your available database to other PostgreSQL servers.
Prerequisites
To complete this guide, you must have the following requirements:
- Two or more Debian 11 servers.
- A non-root user with sudo/root administrator privileges.
This example uses two Debian servers with the following detail:
Hostname    IP Address      Used as
------------------------------------------
pgdg01      192.168.5.25    Publisher Node
pgdg02      192.168.5.26    Subscriber Node
When servers are ready, you can now start the installation and configuration of PostgreSQL Replication via pglogical.
Set Up /etc/hosts and PostgreSQL Repository
This example will assume that you're using fresh Debian 11 servers, so the first thing you will do is set up the PostgreSQL repository and install PostgreSQL to all of your Debian systems.
You must run the following steps on all of your Debian servers.
To start, open the config file '/etc/hosts' using the following nano editor command.
sudo nano /etc/hosts
Add the following lines to the file and be sure to change the detail of IP addresses and hostnames.
192.168.5.25    pgdg01
192.168.5.26    pgdg02
Save and close the '/etc/hosts' file when finished.
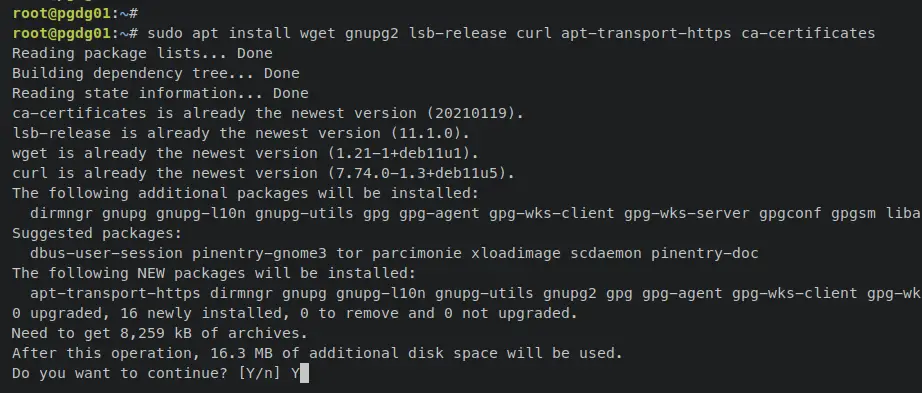
Next, enter the following apt command to install some basic dependencies. Input y when prompted and press ENTER to proceed.
sudo apt install wget gnupg2 lsb-release curl apt-transport-https ca-certificates
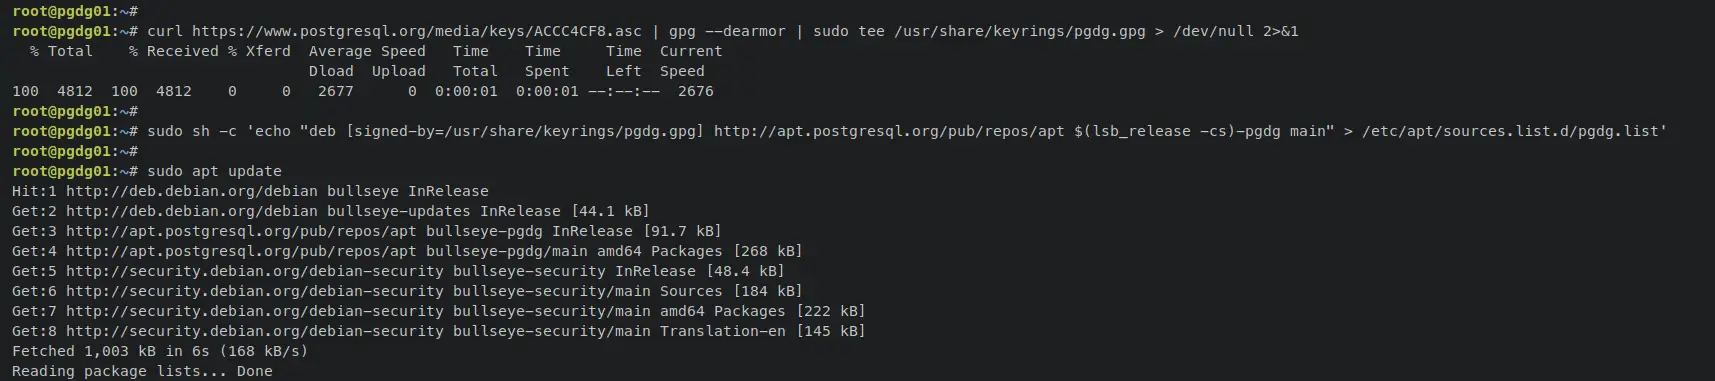
Now run the following command to add the PostgreSQL GPG key and repository for Debian servers.
curl https://www.postgresql.org/media/keys/ACCC4CF8.asc | gpg --dearmor | sudo tee /usr/share/keyrings/pgdg.gpg > /dev/null 2>&1
sudo sh -c 'echo "deb [signed-by=/usr/share/keyrings/pgdg.gpg] http://apt.postgresql.org/pub/repos/apt $(lsb_release -cs)-pgdg main" > /etc/apt/sources.list.d/pgdg.list'
Then, update and refresh your package index to apply the changes.
sudo apt update
When added, you should see the PostgreSQL repository on the list.
With the PostgreSQL repository added, you're next will install the PostgreSQL server and pglogical extension.
Installing PostgreSQL and pglogical Extension
By default, the official PostgreSQL repository provides multiple versions of PostgreSQL such as PostgreSQL 13, 14, and 15. for this example, you will install and set up PostgreSQL replication with the latest version of PostgreSQL 15.
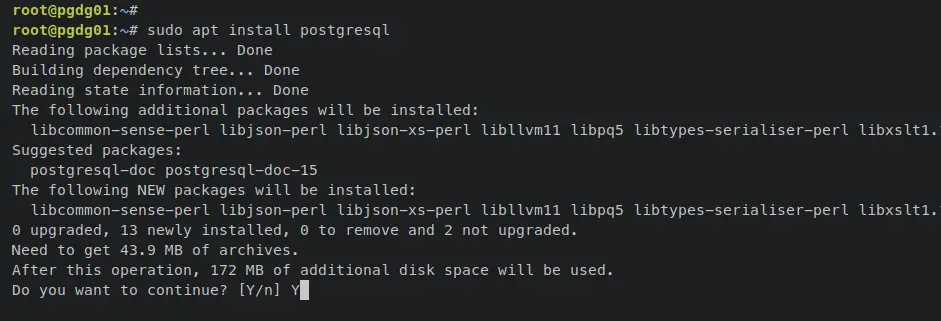
Enter the following 'apt install' command to install the PostgreSQL server. Input y to confirm the installation and press ENTER to proceed.
sudo apt install postgresql
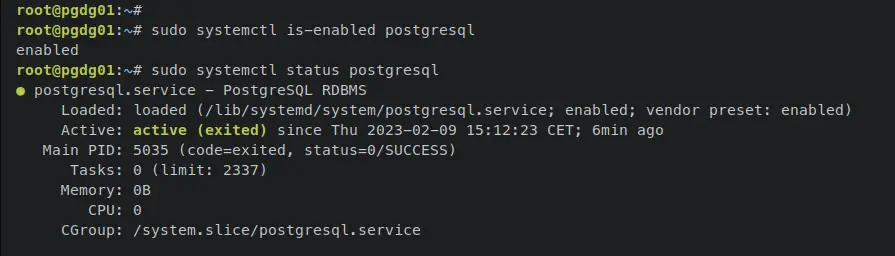
When the installation is finished, enter the following systemctl command utility to verify the PostgreSQL server and ensure that the service is enabled and running.
sudo systemctl is-enabled postgresql
sudo systemctl status postgresql
An output 'enabled' confirms that the PostgreSQL service is enabled and will start automatically upon the system's startup. And the output 'active (running)' confirms that the current PostgreSQL service is running.
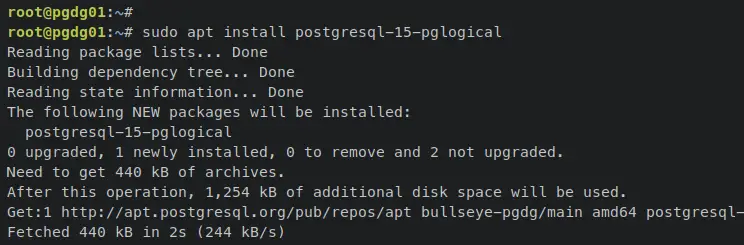
Next, enter the following apt command to install the pglogical extension package. If you're using a different version of PostgreSQL, you should replace the pacakge number such as 'postgresql-version-pglogical'.
sudo apt install postgresql-15-pglogical
Input y when prompted and press ENTER to proceed.
With the PostgreSQL up and running, and the pglogical extension installed. You're ready to start the configuration of logical streaming replication with pglogical.
Setting up UFW Firewall
Before configuring PostgreSQL servers, you must now set up the ufw firewall that will secure and limits the connection to your PostgreSQL server. With this, you will only have a connection from your trusted networks, which is secured by your PostgreSQL deployment.
To install ufw, enter the following apt command. When prompted, input y to confirm and press ENTER to proceed.
sudo apt install ufw
Next, enter the following ufw command to open the OpenSSH service. And output 'Rule added' confirms that the new rule is added to ufw.
sudo ufw allow OpenSSH
Now enter the following ufw command to allow your trusted networks for accessing PostgreSQL server 5432. Be sure to change the IP address in the following command.
sudo ufw allow from 192.168.5.0/24 to any port 5432
Next, enter the following command to start and enable the ufw firewall. When prompted for confirmation, input y and press ENTER to proceed.
sudo ufw enable
An output 'Firewall is running and enabled' confirms that the ufw is running and also enabled, which means the ufw firewall will start automatically upon the system startup.
You can now verify the status and the list of enabled ports on ufw by entering the following command.
sudo ufw status
You should see the ufw firewall 'Status: Active' with the OpenSSH service and the PostgreSQL server port '5432' added and available on the ufw firewall.
Configuring PostgreSQL to Enable Replication
WAL or Write-Ahead Logging is a method that ensures data integrity on the PostgreSQL server. Any changes to tables and indexes must be written only after those changes have been logged.
In PostgreSQL, there are three WAL methods that you can use to enable replication.
- The default WAL setting is 'replica', which allows you to set up archiving, and replication, and allows you to run read-only queries on the standby server.
- Minimal that allows you to remove all logging except some important information that will be to recover from a crash or immediate shutdown.
- The logical method allows you to add some information to the WAL that supports logical decoding.
In this section, you will set up PostgreSQL to run on the local network IP address, set up the 'logical' wal level via the 'pglogical' extension, then enable replication users via pg_hba.conf file.
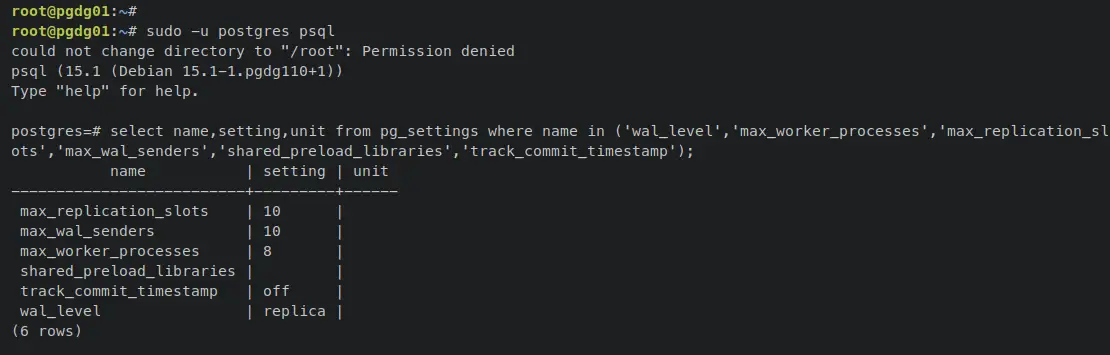
To start, log in to the PostgreSQL shell by entering the following command.
sudo -u postgres psql
Then, verify the default 'wal_level' configuration on the PostgreSQL server.
select name,setting,unit from pg_settings where name in ('wal_level','max_worker_processes','max_replication_slots','max_wal_senders','shared_preload_libraries','track_commit_timestamp');
An output below confirms that the default wal level on the PostgreSQL server is 'replica', which is standard for nowadays PostgreSQL versions.
Now type '\q' to exit from the PostgreSQL shell.
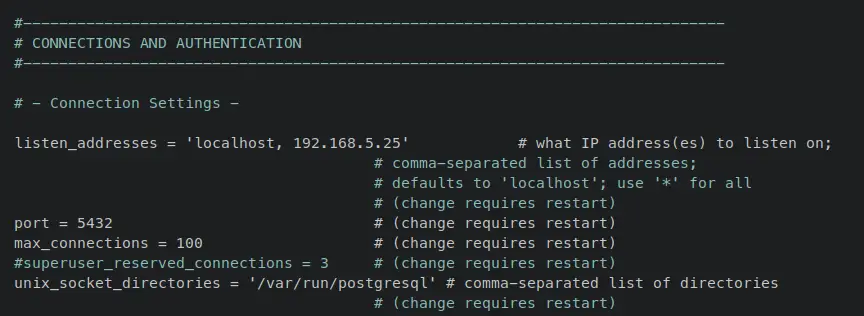
Next, open the default PostgreSQL config file '/etc/postgresql/15/main/postgresql.conf' using the following nano editor command.
sudo nano /etc/postgresql/15/main/postgresql.conf
Uncomment the 'listen_addresses' parameter and add your internal server IP address to it.
Below is the configuration that will be used on the 'pgdg01' server.
listen_addresses = 'localhost, 192.168.5.25'
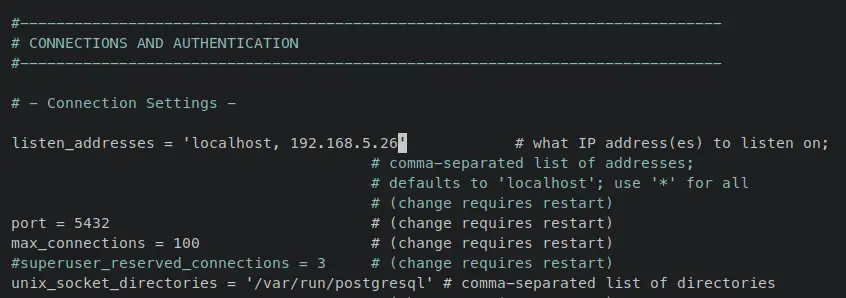
And below is the configuration that will be used on the 'pgdg02' server.
listen_addresses = 'localhost, 192.168.5.26'
Now add the following parameters to enable the 'logical' wal level via the 'pglogical' extension. Both servers have a similar configuration for the wal level settings. The parameter 'shared_preload_libraries = 'pglogical'' will enable logical wal level via 'pglogical' extension.
max_worker_processes = 10
shared_preload_libraries = 'pglogical'
track_commit_timestamp = 'on'
wal_level = 'logical'
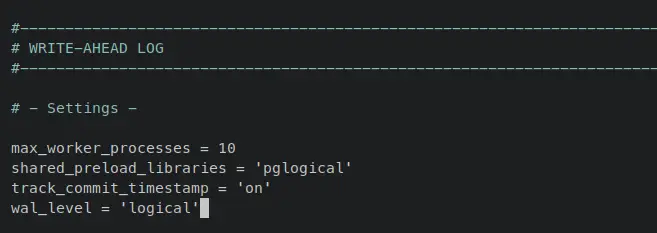
Save and close the '/etc/postgresql/15/main/postgresql.conf' file when finished.
Next, open the PostgreSQL authentication file '/etc/postgresql/15/main/pg_hba.conf' using the following nano editor command.
sudo nano /etc/postgresql/15/main/pg_hba.conf
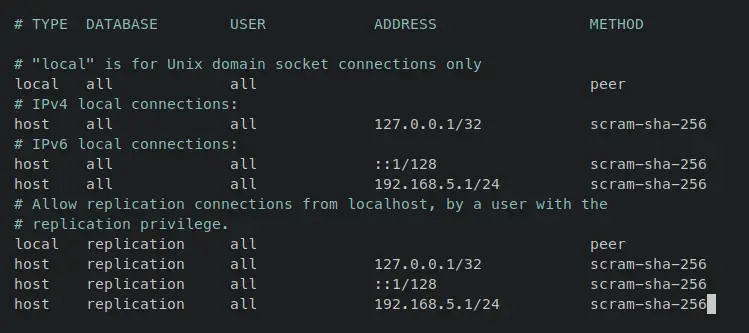
Add the following lines to the end of the line. This will allow authentication for any users from host '192.168.5.1/24' for both normal PostgreSQL users and replication users.
# IPv4 local connections:
host    all             all             192.168.5.1/24          scram-sha-256
# replication privilege.
host    replication     all             192.168.5.1/24          scram-sha-256
Save and close the file '/etc/postgresql/15/main/pg_hba.conf' when finished.
When the configuration of '/etc/postgresql/15/main/postgresql.conf' and '/etc/postgresql/15/main/pg_hba.conf' is finished, enter the following systemctl command utility to restart the PostgreSQL service and apply the changes.
sudo systemctl restart postgresql
Now enter the following ss command to ensure that the PostgreSQL is running on your local IP address.
ss -tulpn | grep 5432
You should receive an output like this - On the pgdg01 server, the PostgreSQL server should be running at '192.168.5.25:5432'. On the pgdg02 server, the PostgreSQL server should be running at '192.168.5.26:5432'.

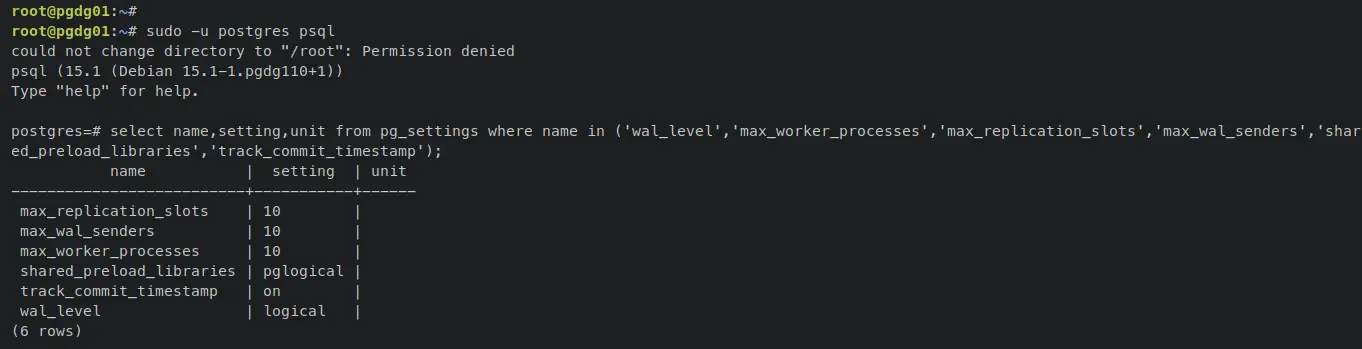
Lastly, enter the following command to log in to the PostgreSQL shell and verify the enabled wal level on your PostgreSQL server.
sudo -u postgres psql
Enter the following PostgreSQL query to verify the enabled wal level on your PostgreSQL server.
select name,setting,unit from pg_settings where name in ('wal_level','max_worker_processes','max_replication_slots','max_wal_senders','shared_preload_libraries','track_commit_timestamp');
An output 'wal_level - logical' confirms that the wal level 'logical' is enabled, which is via 'shared_preload_library - pglogical'.
At this point, you have configured PostgreSQL servers with wal level 'logical' for logical streaming replication via 'pglogical'. Also, both PostgreSQL servers are running on internal network IP addresses. In the next step, you'll create a new PostgreSQL user and database, then enable the 'pglogical' extension.
Setup User and Database
pglogical is a PostgreSQL extension that works on the database level. With this, you're not replicating the whole PostgreSQL system, but instead, you replicate specific tables or databases that are available on PostgreSQL.
To set up pglogical, you must have the PostgreSQL with SUPERUSER privilege/role. Also, you must enable the 'pglogical' extension on the target database that you want to replicate.
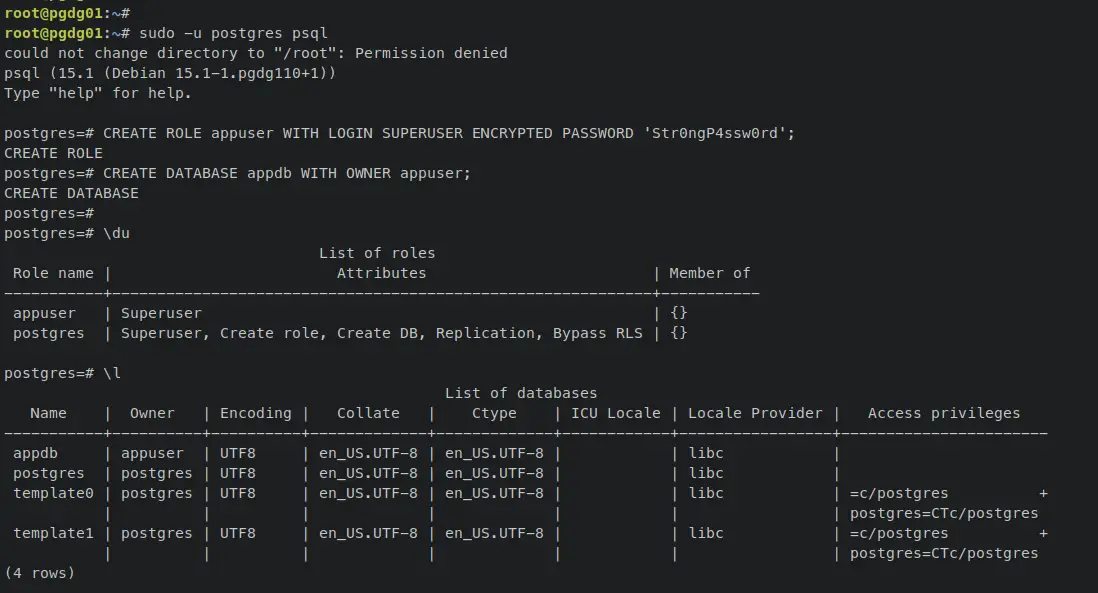
Log in to the PostgreSQL shell by entering the following command.
sudo -u postgres psql
Create a new user and database using the following PostgreSQL queries.
In this example, you will create a new user 'appuser' with the 'SUPERUSER' privilege. At the time of this writing, the pglogical required SUPER user privilege to make it works. You will also create a new database 'appdb', which is the target database that you want to enable replication on top of it.
CREATE ROLE appuser WITH LOGIN SUPERUSER ENCRYPTED PASSWORD 'Str0ngP4ssw0rd';
CREATE DATABASE appdb WITH OWNER appuser;
Verify the list of user and databases on your PostgreSQL server using the following queries. You should get the new user 'appuser' with SUPERUSER privilege and the new database 'appdb'.
\du
\l
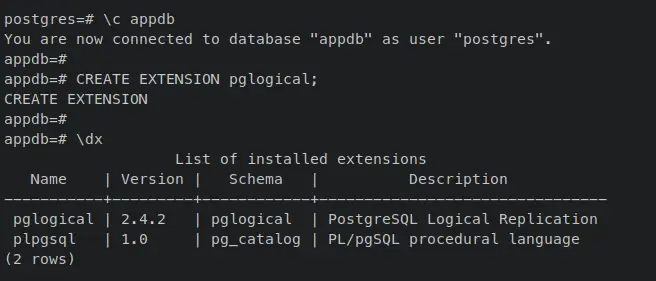
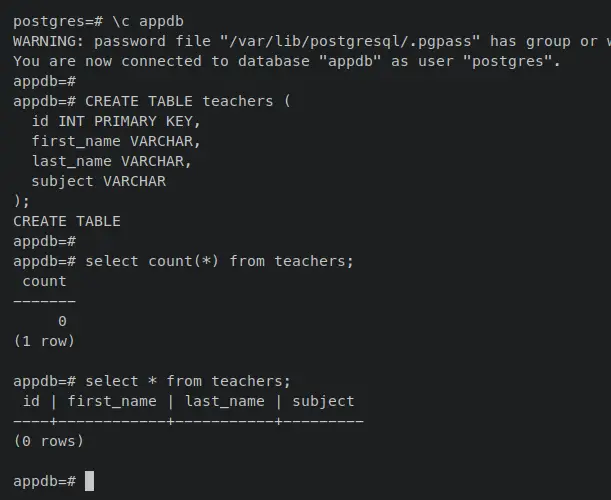
Next, connect to the new database 'appdb' using the '\c' or '\connect' query. When connected, your PostgreSQL shell prompt will become such as 'appdb=#'
\c appdb
Enter the following query to enable the 'pglogical' extension on the 'appdb' database.
CREATE EXTENSION pglogical;
Then verify the list of enabled extensions on the current 'appdb' database using the following query. You should see the 'pglogical' extension is enabled on the 'appdb' database.
\dx
With the user and database created and the pglogical enabled, you will next start configuring the pglogical to enable database replication between two PostgreSQL servers.
Enable Table Replication via pglogical
In section, you will enable logical replication on the specific table that you will be creating on the 'appdb' database
### Set up pgdg01 as Publisher Node
Enter the following PostgreSQL queries on the 'publisher node' - 'pgdg01 server' to create a new table called 'teachers'.
CREATE TABLE teachers (
  id INT PRIMARY KEY,
  first_name VARCHAR,
  last_name VARCHAR,
  subject VARCHAR
);
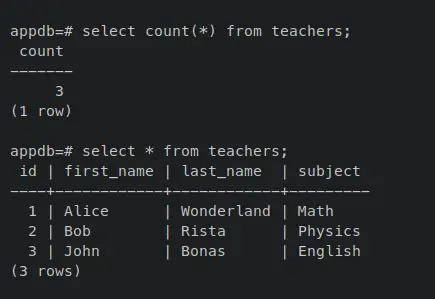
Insert new data to the table 'teachers' by entering the following queries.
INSERT INTO teachers(id, first_name, last_name, subject)
VALUES
(1, 'Alice', 'Wonderland', 'Math'),
(2, 'Bob', 'Rista', 'Physics'),
(3, 'John', 'Bonas', 'English');
Then retrieve your new data to ensure that it's available on the publisher node pgdg01 server.
select count(*) from teachers;
select * from teachers;
The output below confirms that new data was added to the table 'teachers'.
Next, to set up replication on the PostgreSQL database/table via pglogical, you must follow these steps:
- Create provider node on Publisher server pgdg01.
- Create a replication set that allows you to control which tables in the database will be replicated.
- Add tables to the replica set.
Enter the following command to create a new provider node called 'provider1'. Be sure to change the details of PostgreSQL with the pgdg01 server.
select pglogical.create_node(node_name := 'provider1', dsn := 'host=pgdg01 port=5432 dbname=appdb user=appuser');
Next, enter the following query to create a new replica set called 'replication_set'.
select pglogical.create_replication_set('replication_set');
Then, add the table 'teachers' to the replica set 'replication_set' by entering the following query.
select pglogical.replication_set_add_table(set_name := 'replication_set', relation := 'teachers', synchronize_data := true);
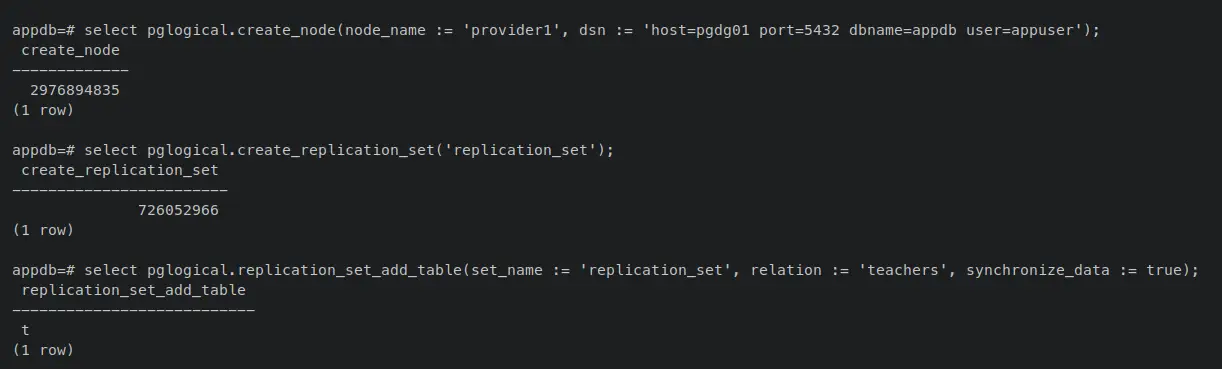
Now that you have created the provider node with the pgdg01 PostgreSQL server, created the replica set 'replication_set', and added the table 'teachers' to the 'replication_set'. Next, you will create and set up a subscriber node on the 'pgdg02' server.
Set up pgdg02 as Subsciber Node
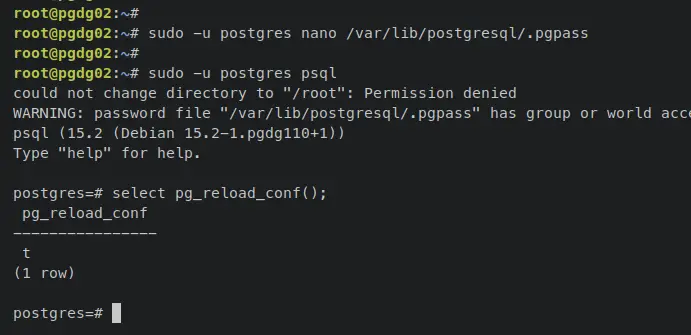
Move to the 'pgdg02' server and enter the following nano editor command to create a new PostgreSQL password file '/var/lib/postgresql/.pgpass'. This password file will be used for your
sudo -u postgres nano /var/lib/postgresql/.pgpass
Add the following lines to the file and be sure to change the username and password with your details.
pgdg01:5432:appdb:appuser:Str0ngP4ssw0rd
pgdg01:5432:replication:appuser:Str0ngP4ssw0rd
pgdg02:5432:appdb:appuser:Str0ngP4ssw0rd
pgdg02:5432:replication:appuser:Str0ngP4ssw0rd
Save and close the file when finished.
Now enter the following command to change the permission of the file '/var/lib/postgresql/.pgpass' to read-only.
sudo chmod 0600 /var/lib/postgresql/.pgpass
Next, log in to PostgreSQL using the following command.
sudo -u postgres psql
After logging in, enter the following query to reload your PostgreSQL server configuration, then exit to ensure that the changes are applied.
select pg_reload_conf();
\q
Now log in again to the PostgreSQL shell on the pgdg02 server.
sudo -u postgres psql
Connect to the database 'appdb' that you have created.
\c appdb
Then enter the following PostgreSQL query to create a new table 'teachers', which must be matched with the table that you have on the provider node 'pgdg01'.
CREATE TABLE teachers (
  id INT PRIMARY KEY,
  first_name VARCHAR,
  last_name VARCHAR,
  subject VARCHAR
);
If you check the available data, you should get an empty table.
select count(*) from teachers;
select * from teachers;
With the PostgreSQL password file and the table 'teachers' created, you will next set up the PostgreSQL on the 'pgdg02' server as a subscriber with the following steps:
- Create a Subscriber node on the pgdg02 server.
- Create the subscription which will start the synchronization and replication process in the background.
- Verify the replication process.
Enter the following query to create a new subscriber node with PostgreSQL server pgdg02. Be sure to change the details hostname, database name, and user.
select pglogical.create_node(node_name := 'subscriber1', dsn := 'host=pgdg02 port=5432 dbname=appdb user=appuser');

Next, create a new subscription called 'subscription1'. Be sure to input the replica set named 'replication_set' and the provider is the PostgreSQL on the pgdg01 server. With this, the replication of table 'teachers' will be started and running in the background.
select pglogical.create_subscription(subscription_name := 'subscription1', replication_sets := array['replication_set'], provider_dsn := 'host=pgdg01 port=5432 dbname=appdb user=appuser' );

Enter the following query to verify the subscription status.
select * FROM pglogical.show_subscription_status();
You should receive an output like this - The status of 'subscription1' is replicating to the provider 'provider1' and the replica set 'replication_set'.

Now enter the following query to wait for the subscription to asynchronously start replicating and the data to sync.
SELECT pglogical.wait_for_subscription_sync_complete('subscription1');

Lastly, you can verify the data on the table 'teachers' that is available on the pgdg2 PostgreSQL server.
select count(*) from teachers;
select * from teachers;
If replication is successful, your data should now be available and replicated to the PostgreSQL pgdg02 server.
Testing Replication
In this section, you will verify the replication on the PostgreSQL server by inserting new data from the Publisher node pgdg01. Then, you will verify the data from the Subscriber node to ensure the data is replicated.
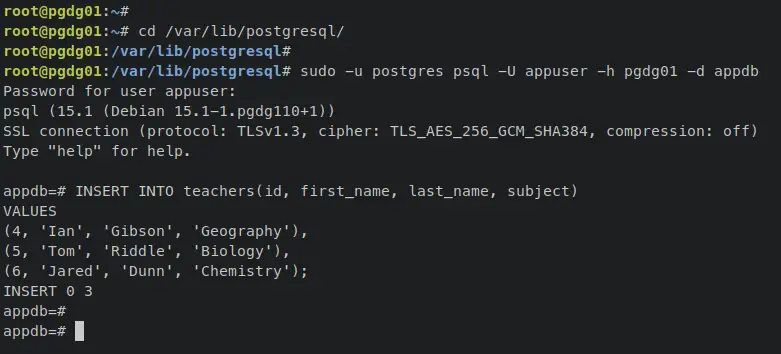
First, connect to the database 'appdb' on the pgdg01 server by entering the following command.
sudo -u postgres psql -U appuser -h pgdg01 -d appdb
Enter the following queries to insert new data to the table 'teachers'.
INSERT INTO teachers(id, first_name, last_name, subject)
VALUES
(4, 'Ian', 'Gibson', 'Geography'),
(5, 'Tom', 'Riddle', 'Biology'),
(6, 'Jared', 'Dunn', 'Chemistry');
Verify the 'teachers' table to ensure that the new data is added.
select count(*) from teachers;
select * from teachers;
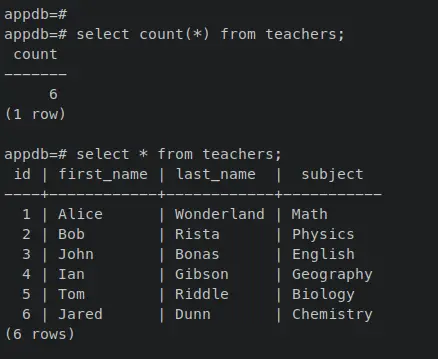
Next, move to the pgdg02 server and enter the following command to connect to the database 'appdb'.
sudo -u postgres psql -U appuser -h pgdg02 -d appdb
Enter the following query to verify available data on the table 'teachers'. If the replication is successful, you should see the newly updated data available on the pgdg02 server.
select count(*) from teachers;
select * from teachers;
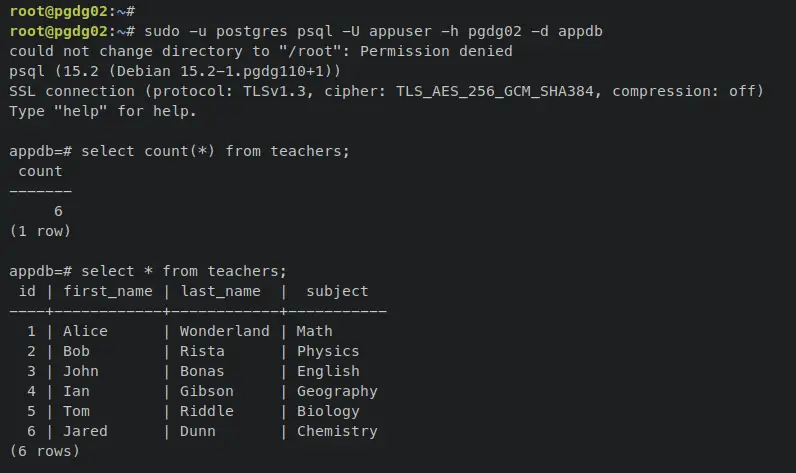
With this, you have now finished the configuration of logical stream replication via pglogical on PostgreSQL servers.
Conclusion
In this tutorial, you have installed and configured the logical stream replication via pglogical on Debian 11 servers. With this, you have also learned the basic usage of pglogical extension for creating and managing PostgreSQL replication on the database level.
In addition to that, you have also finished the installation of the latest PostgreSQL 15 on the Debian server via the official PostgreSQL repository and secured the PostgreSQL server via the UFW firewall.
With this, you can now add another PostgreSQL server and set up the pglogical extension to enable replication to multiple servers. You can also set up load balancing via HAPROXY, or set up failover of PostgreSQL servers. To get details information, visit PostgreSQL's official documentation.

