How to Set up a Bastion Server with Warpgate on Debian
A Bastion Server refers to a computer/machine/server that is designed and configured specifically to withstand attacks on computer networks. The functionality of the Bastion Server is similar to a proxy or load balancer for applications. It allows you to access computers or servers that are located in DMZ networks.
Warpgate is a modern solution that can be used as a Bastion server. It's written in Rust and provides a web-based administration dashboard. You can install it on a specific node, then you can easily add target nodes or servers that are located on your private infrastructure. Warpgate currently can be used as a Bastion Server for SSH, MySQL/MariaDB, and HTTP.
In this tutorial, you will set up a Bastion server for SSH and MySQL/MariaDB connections on a Debian 11 server using Warpgate. You will install and configure Warpgate on the Debian server, then add the SSH target server and the MySQL server to Warpgate. In the end, you will ensure that the Warpgate Bastion server is working by connecting to the target host SSH server and MySQL server.
Prerequisites
You will need the following requirements to complete this tutorial:
- A Linux server running Debian 11 - This example uses a server with a hostname 'warpgate-debian' and IP address '192.168.5.10'.
- A non-root user with sudo/root administrator privileges.
Download Warpgate Binary File
In this section, you will download the Warpgate binary file manually from GitHub, then move it to the system 'bin' directory. Another way to install Warpgate is by compiling from the source code or using the Warpgate Docker version.
To start, run the following wget command to download the Warpgate binary file. Visit the official GitHub download page for the latest version of Warpgate.
wget -q https://github.com/warp-tech/warpgate/releases/download/v0.7.0/warpgate-v0.7.0-x86_64-linux
Once downloaded, move the Warpgate binary file to '/usr/local/bin/warpgate'. Then, make it executable by using the 'chmod +x' command.
mv warpgate-v0.7.0-x86_64-linux /usr/local/bin/warpgate
sudo chmod +x /usr/local/bin/warpgate

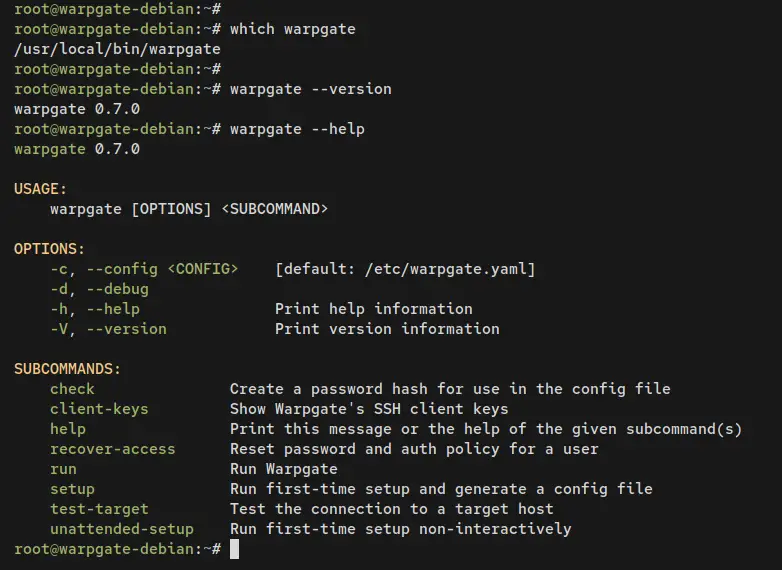
Next, run the following command to locate the 'warpgate' binary file on your system.
which warpgate
Now verify the Warpgate version and list available parameters of the 'warpgate' command.
warpgate version
warpgate --help
You should receive an output like this.
Configuring Warpgate as Bastion Server
With the Warpgate binary file downloaded, you will now set up and configure your Warpgate installation. This can be done interactively via the 'warpgate' command.
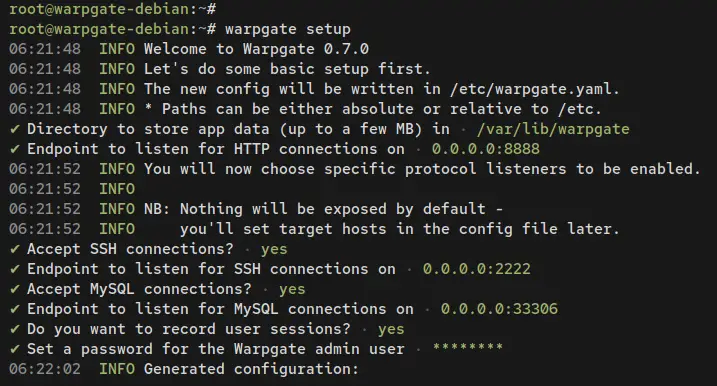
Execute the following command to configure Warpgate as the bastion server.
warpgate setup
After the command is executed, you will be asked about the following configurations:
- Where do you want to store the Warpgate data? Leave it as default to the '/var/lib/warpgate' directory.
- The endpoint of the Warpgate web administration dashboard? Leave it as default to run Warpgate on your internal/public IP address with port 8888.
- Accept SSH connections? Input yes to enable Warpgate as the SSH bastion server.
- The endpoint of the SSH bastion server? Leave it as default to run SSH bastion server on internal/public IP address with port 2222.
- Accept MySQL connections? Input yes to enable Warpgate as a MySQL bastion server.
- The endpoint of the MySQL bastion server? Leave it as default with port 33306.
- Record user sessions? Input yes to enable it.
- Set up a password for the default user admin. Input the password for your Warpgate installation.
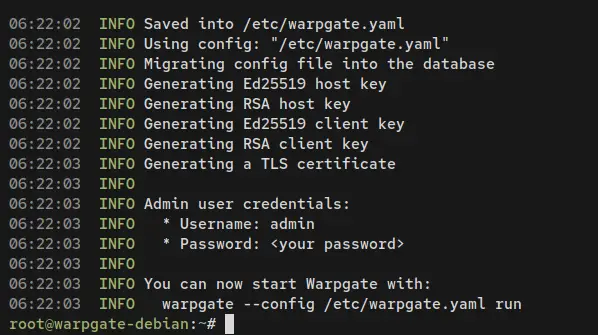
Once the setup process is finished, you should receive an output like this. You will also see the Warpgate config file '/etc/warpgate.yaml' and the data directory '/var/lib/warpgate' created during the process.
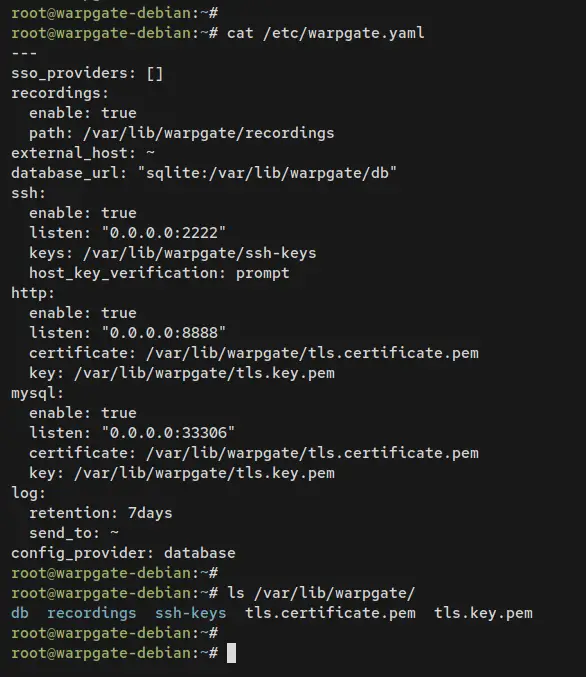
Now run the following command to show the content of the file '/etc/warpgate.yaml' and the list of available files and directories on the '/var/lib/warpgate'.
cat /etc/warpgate.yaml
ls /var/lib/warpgate
Below is the output that will be printed out on your terminal.
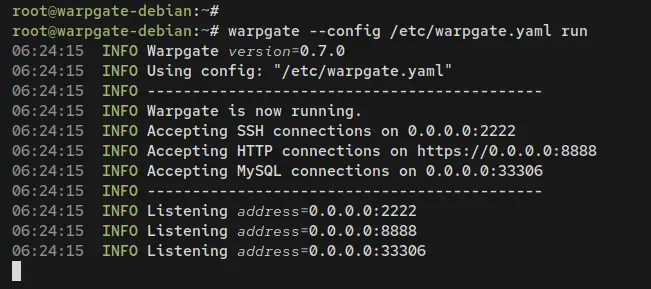
Now execute the following command to run Warpgate. You will see the output 'Warpgate is now running' and open TCP ports for SSH, MySQL, and HTTP connections.
warpgate --config /etc/warpgate.yaml run
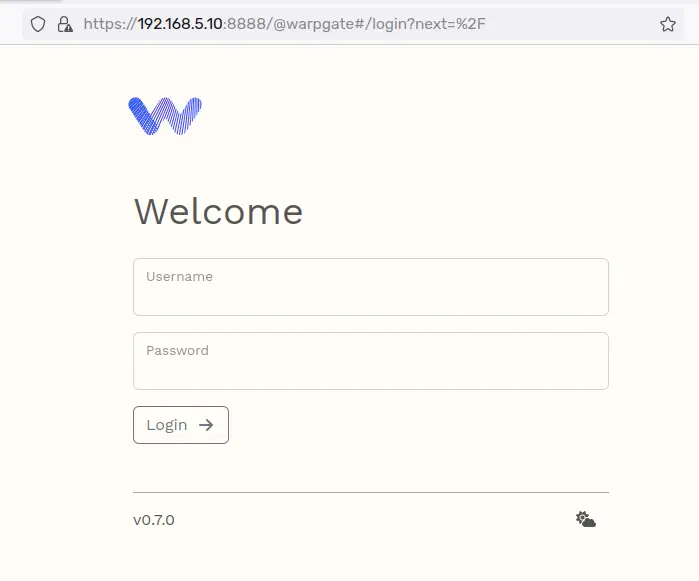
Open your web browser and visit the Warpgate IP address with port 8888 (i.e: https://192.168.5.10:8888/). When successful, you should get the login page of Warpgate.
Back to your terminal and press Ctrl+c to terminate the Warpgate process.
Running Warpgate as a Systemd Service
In this section, you will set up and configure Warpgate to run with Systemd. This allows you to run Warpgate in the background and is easier to manage via the systemctl command utility.
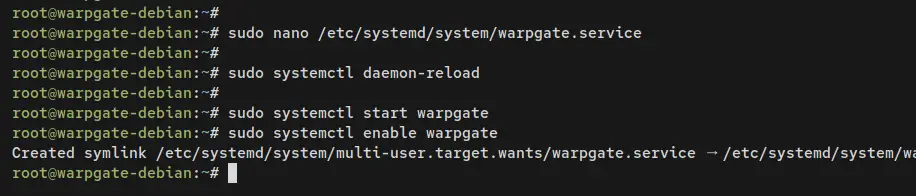
Create a new systemd unit file '/etc/systemd/system/warpgate.service' using the following nano editor command.
sudo nano /etc/systemd/system/warpgate.service
Add the following systemd unit configurations to the file.
[Unit]
Description=Warpgate
After=network.target
StartLimitIntervalSec=0

[Service]
Type=notify
Restart=always
RestartSec=5
ExecStart=/usr/local/bin/warpgate --config /etc/warpgate.yaml run

[Install]
WantedBy=multi-user.target
Save the file and exit the editor when finished.
Run the following command to reload the systemd manager and apply the changes.
sudo systemctl daemon-reload
Then start and enable the Warpgate service using the following systemctl command utility.
sudo systemctl start warpgate
sudo systemctl enable warpgate
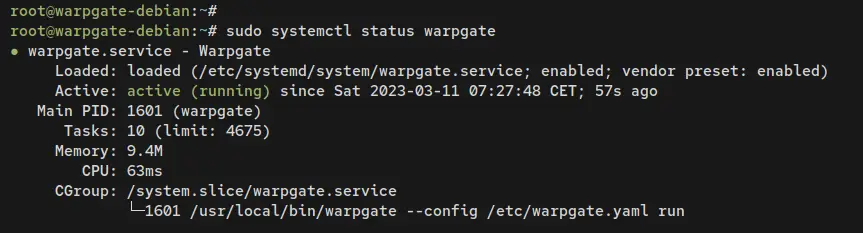
After that, verify the Warpgate service status to ensure that the service is running.
sudo systemctl status warpgate
The output below confirms that the Warpgate service is running.
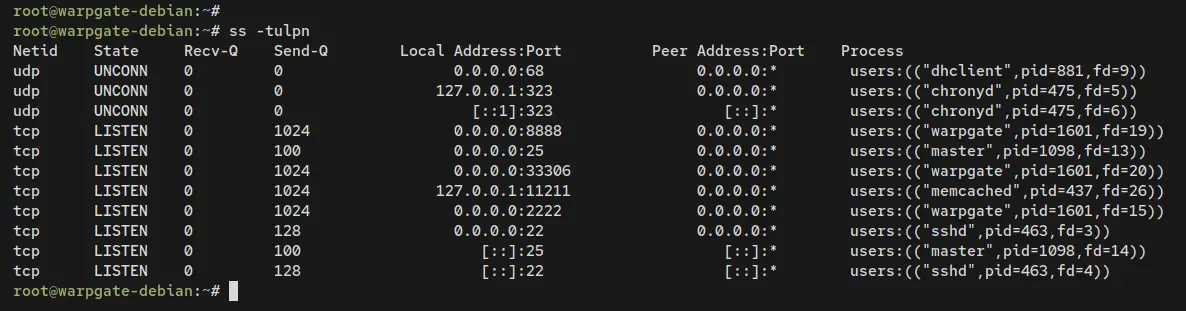
If you check the list of open ports on your server, you will see multiple ports 2222, 8888, and 33306 in the LISTEN state. Run the ss command below.
ss -tulpn
Output:
Setting up UFW
In this section, you will install, run, and enable UFW on your Debian server. You will also open ports that are used by Warpgate.
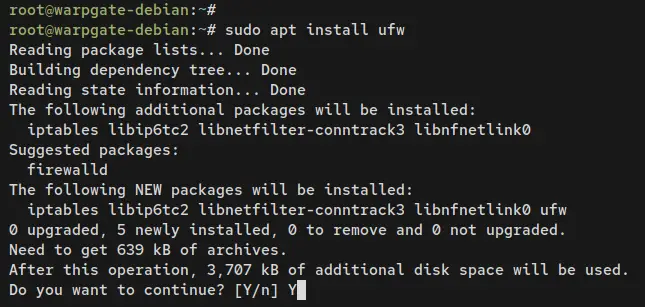
Install UFW by running the following apt command.
sudo apt install ufw
When prompted, input y to confirm and press ENTER.
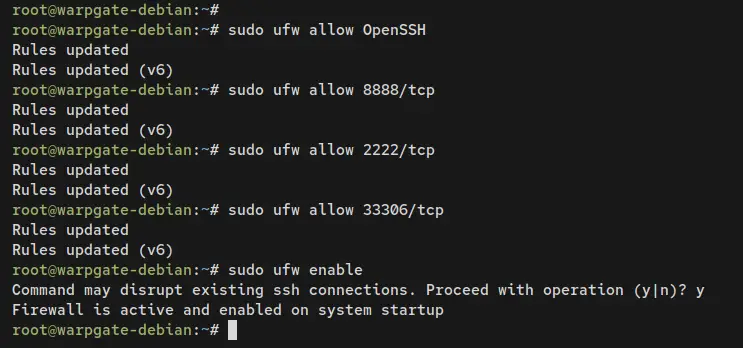
Once UFW is installed, run the following command to open the OpenSSH service and Warpgate ports 2222, 8888, and 33306.
sudo ufw allow OpenSSH
sudo ufw allow 8888/tcp
sudo ufw allow 2222/tcp
sudo ufw allow 33306/tcp
Then, start and enable UFW using the command below. Input y when prompted and press ENTER to proceed.
sudo ufw enable
After the following command is executed, the UFW should be running and enabled, which means the UFW will run automatically at system startup.
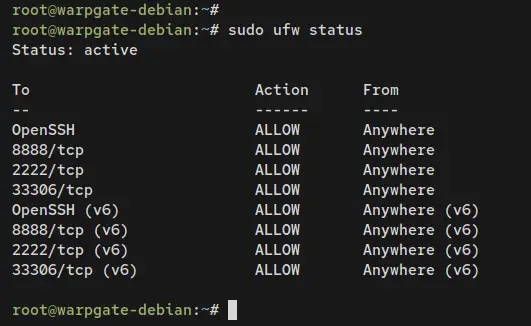
Now enter the following command to verify UFW status. You should see the UFW is 'Status: Active' with the OpenSSH service, ports 2222, 8888, and 33306 added.
sudo ufw status
Output:
Logging into Warpgate
With the Warpgate running as a systemd service and the UFW running, you will now access the Warpgate installation.
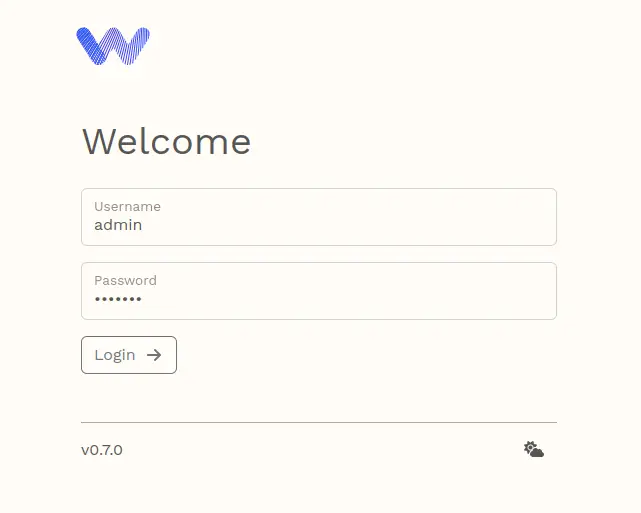
Open your web browser and visit the server IP address followed by port 8888 (i.e: https://192.168.5.20:8888/) and you will see the Warpgate login page.
Input the default user 'admin' and the password that you've configured. Then click Login to continue.
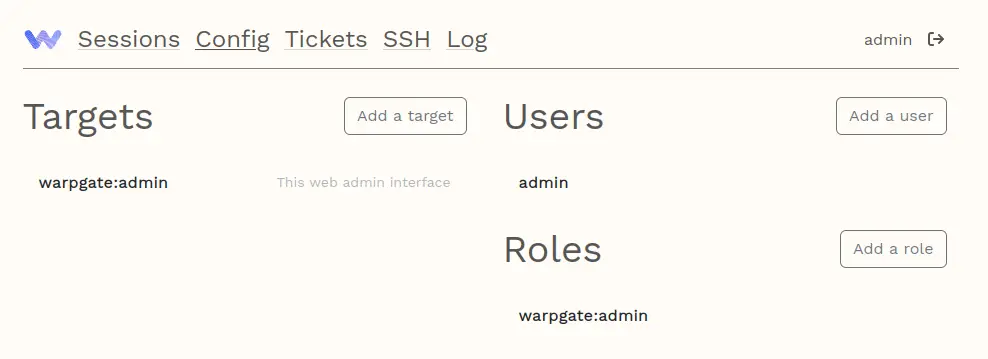
Once logged in as 'admin', click on the menu 'Manage Warpgate'.
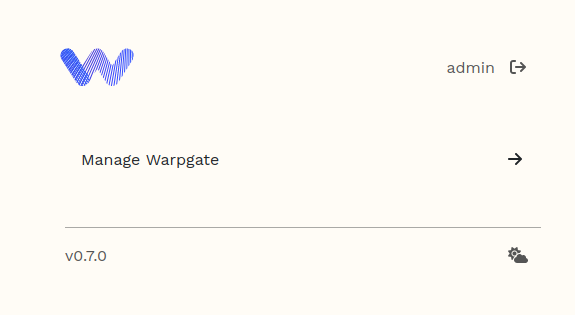
You should now see the Warpgate user dashboard.
At this point, you have finished Warpgate installation as SSH and MySQL Bastion server on the Debian server. You're now ready to add your server and MySQL server to Warpgate.
Adding SSH Target Server
In this section, you will add the Linux server with IP address 192.168.5.25 and hostname 'node1' to the Warpgate Bastion server. To do that, you must add the Warpgate SSH public key to your target server.
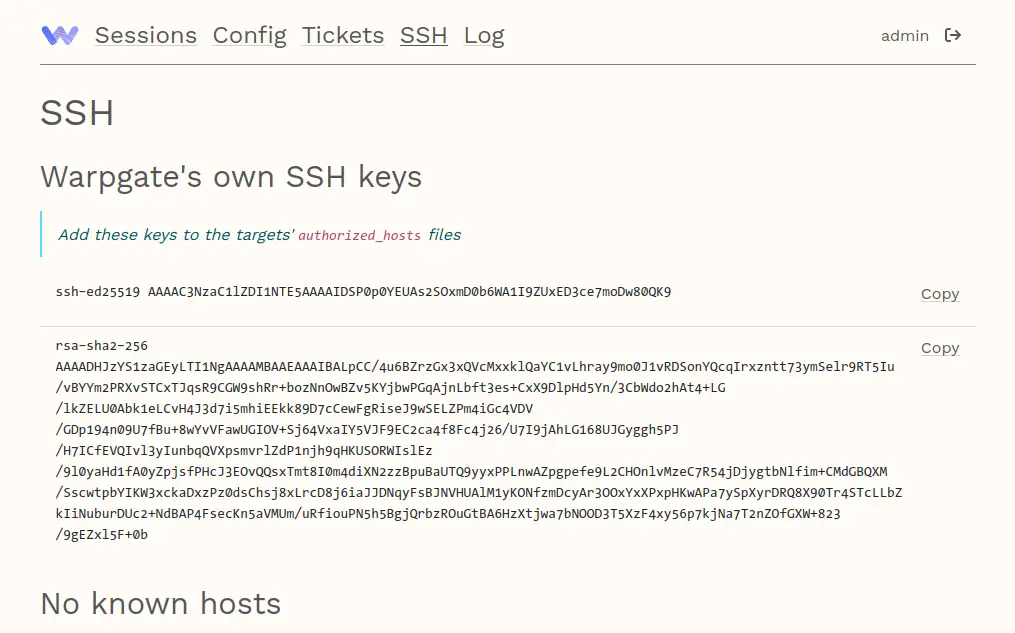
On the Warpgate dashboard, click the SSH menu and you will see the Warpgate SSH public and private keys that will be used to log in to the target server.
Copy the SSH public key to your note.
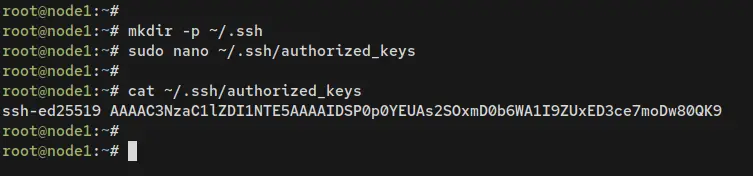
Now log in to the target server, create a new directory '~/.ssh', then create the file 'authorized_keys' using the following nano editor command.
mkdir -p ~/.ssh/
nano ~/.ssh/authorized_keys
Add the Warpgate SSH public key into it.
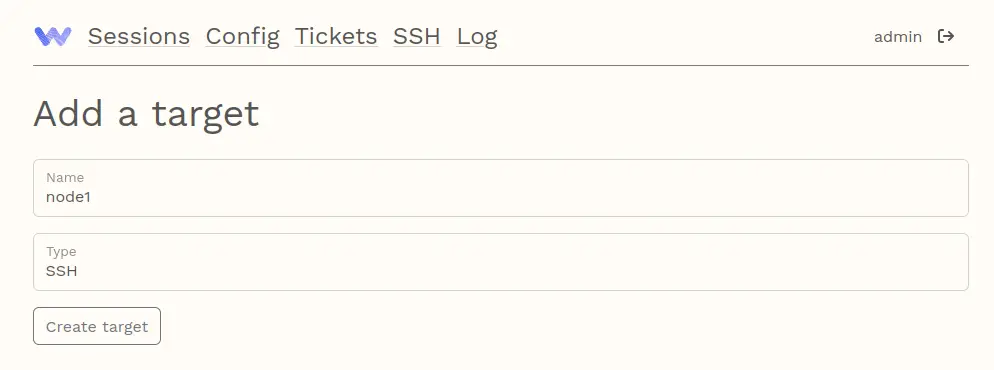
Next, move to the Warpgate dashboard and click the Config menu, then click 'Add a target'.
Input the hostname of the target server, select the type as SSH, then click Create target.
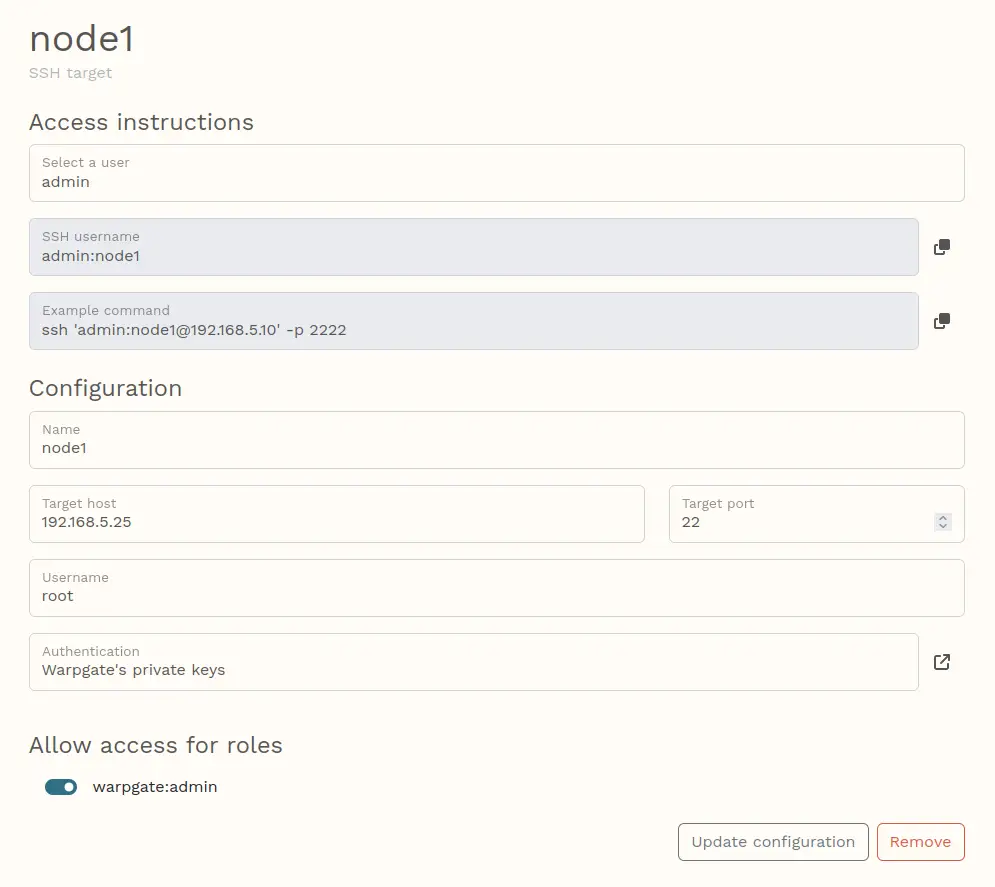
Change the target server IP address and the user that will be used to log in to the server. As for the authentication, select 'Warpgate's private keys'. Then, you must enable the 'warpgate:admin' role on the 'Allow access for roles' section.
When complete, click 'Update configurations'.
With this, the target server 'node1' is added to Warpgate. You can now connect to 'node1' via the Warpgate bastion server.
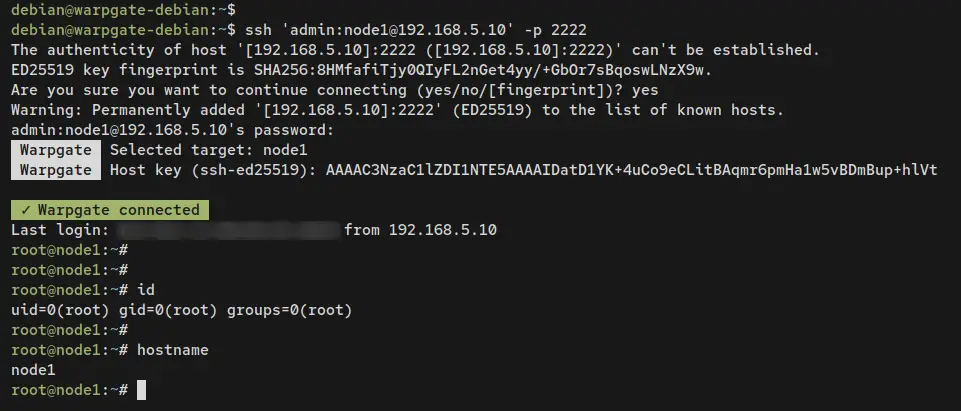
Run the following ssh command to connect to the 'node1' via the Warpgate bastion server. In this command, the format used is 'role: server-name' with the bastion server IP address 192.168.5.10 and port 2222.
ssh 'admin:[email protected]' -p 2222
Input yes to confirm and add the SSH fingerprint of the target. When prompted for the password, input the password of the bastion 'admin' user.
When the connection is successful, you should get an output such as 'Warpgate connected'. And you will be logged in to the target server 'node1'.
Enter the following command to verify the current server that you're logged in to. You will see that you've logged in to the 'node1' server via the Warpgate SSH bastion server.
id
hostname
Output:
If you check on the Warpgate web administration dashboard, you should see the fingerprint of your SSH target server.

Adding MySQL/MariaDB Target Server
In this section, you will add a MariaDB server to the Warpgate bastion server. Before that, you will set up the MariaDB server to run on a private/internal IP address, and also create a new MariaDB user for remote connections.
Log in to the MariaDB server and open the config file '/etc/mysql/mariadb.conf.d/50-server.cnf' using the following nano editor command.
sudo nano /etc/mysql/mariadb.conf.d/50-server.cnf
Uncomment the 'bind-address' parameter and change the value to your internal IP address. in this example, the MariaDB server will be run at the private IP address '192.168.5.25'.
bind-address = 192.168.5.25
Save the file, then edit the editor.
Enter the following command to restart the MariaDB service and apply the changes. When restarted, the MariaDB should be running on the IP address '192.168.5.25' instead of the default localhost.
sudo systemctl restart mariadb
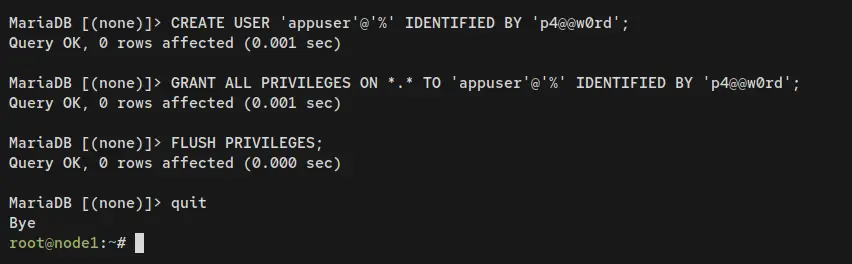
Next, log in to the MariaDB shell as the root user to set up and create a new user.
sudo mariadb -u root -p
Enter the following queries to create a new MariaDB user 'appuser' and allow the user to access all databases on the MariaDB server. Also, be sure to change the password in the following query.
CREATE USER 'appuser'@'%' IDENTIFIED BY 'p4@@w0rd';
GRANT ALL PRIVILEGES ON *.* TO 'appuser'@'%' IDENTIFIED BY 'p4@@w0rd';
FLUSH PRIVILEGES;
EXIT;
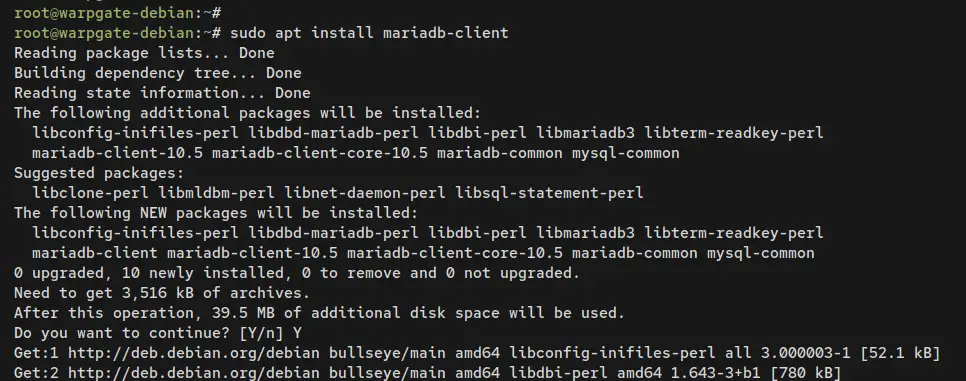
Next, you will set up the MariaDB client package on the machine that will be used to connect to the MariaDB server.
Install the 'mariadb-client' package via the following command. Input y when prompted and press ENTER to proceed.
sudo apt install mariadb-client
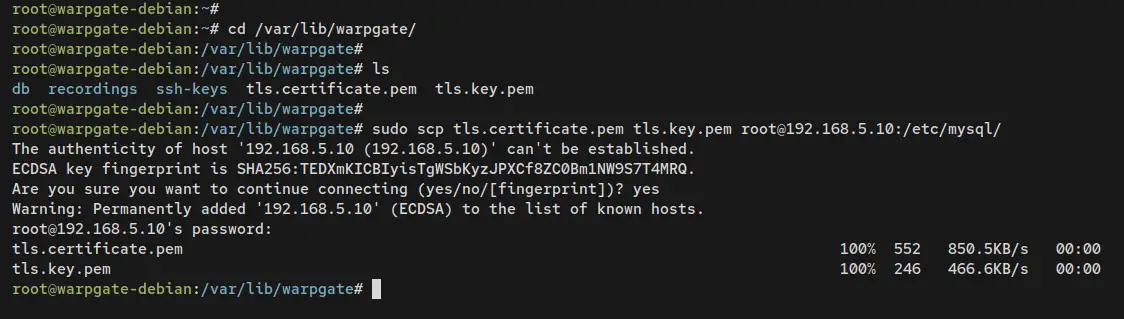
Now move to the Warpgate server, change the working directory to '/var/lib/warpgate', then copy Warpgate TLS certificates to your MariaDB client machine.
cd /var/lib/warpgate/
sudo scp tls.certificate.pem tls.key.pem [email protected]:/etc/mysql/
Now back to the client machine and open the MariaDB client configuration '/etc/mysql/mariadb.conf.d/50-client.cnf' using the following nano editor command.
sudo nano /etc/mysql/mariadb.conf.d/50-client.cnf
Add the following configurations to the '[client]' section to enable a secure client connection.
[client]
....
ssl-cert=/etc/mysql/tls.certificate.pem
ssl-key=/etc/mysql/tls.key.pem
Save the file, then edit the editor when finished.
Now on the Warpgate dashboard, click the 'Config' menu, then click 'Add a target'.
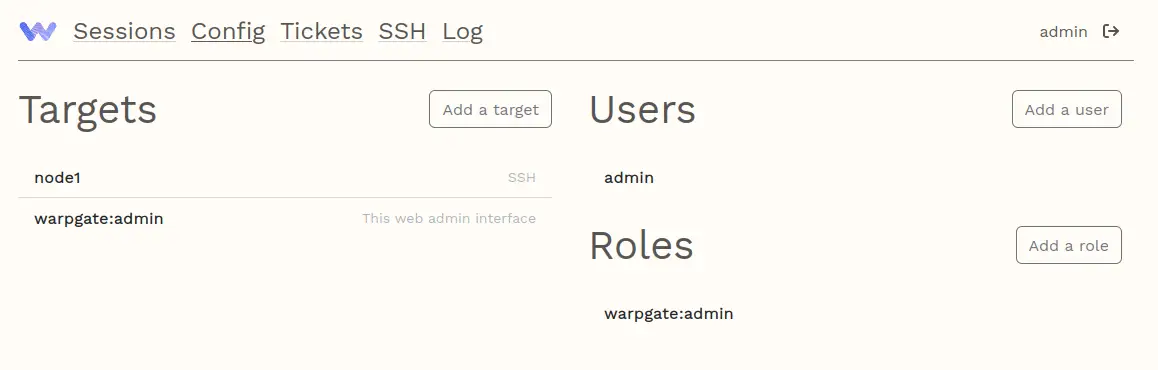
Input the MariaDB server name, select the type as 'MySQL', then click Create target.

Change details host, user, and password with your MariaDB user details. Be sure to turn off the 'Verify certificate' option if you have default TLS certificates, then enable the 'warpgate:admin' role on the 'Allow access for roles' section.
Click 'Update configuration' when finished.

With the MariaDB server added to Warpgate, you can now access the MariaDB server via the Warpgate MySQL Bastion server.
From the MariaDB client machine, enter the following command to connect to the MariaDB server. When prompted, input the password of the Warpgate admin user.
mysql -u 'admin#mysql1' --host '192.168.5.10' --port 33306 --ssl -p
When connected, you should see the MariaDB shell prompt such as 'MySQL [(dbname)]>'. Enter the following queries to ensure that the user you're using is available on the MariaDB server.
SELECT host, user, plugin, authentication_string from mysql.user;
SHOW GRANTS FOR appuser@'%';
Output:
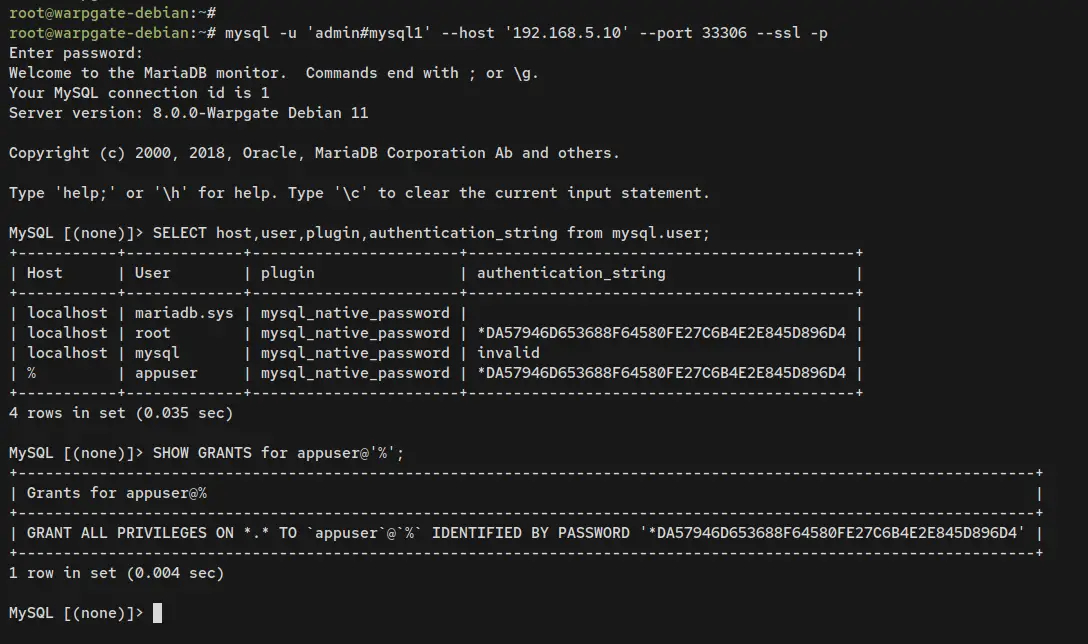
With this, you have now connected to the MariaDB server via Warpgate MySQL/MariaDB Bastion server.
Conclusion
In this tutorial, you have installed and configured the Warpgate Bastion server on Debian 11. You've configured Warpgate to run with systemd and UFW firewall. In addition to that, you have configured Warpgate as SSH and MySQL/MariaDB Bastion server, added the SSH target server, and also added the MySQL/MariaDB target server.
With this in mind, you can now set up new users, roles, and add new connections to your Warpgate Bastion Server. And you can centralize user connections and accesses via a single centralized Bastion server. To find the details about Warpgate, visit the Warpgate official documentation.

