Step-by-Step Guide: Installing PostgreSQL on AlmaLinux 9
On this page
- Prerequisites
- Adding PostgreSQL Repository
- Installing PostgreSQL
- Basic PostgreSQL Authentication
- Changing Password postgres User
- Creating User and Database on PostgreSQL
- Creating Table
- Inserting Data into Table
- Retrieving Data on PostgreSQL
- Updating Data on PostgreSQL
- Delete Database and User
- Conclusion
PostgreSQL is a free, open-source database management system focusing on extensibility and SQL compliance. PostgreSQL is an advanced and enterprise-class RDBMS (Relational Database Management System) that supports both SQL (relational) and JSON (non-relational) querying.
It's a highly stable database management system backed by more than 20 years of development by the open-source community and has a strong reputation among developers and system admins for its reliability, flexibility, feature robustness, and performance.
PostgreSQL is used as a primary database for web, mobile, and analytic applications. Some notable PostgreSQL users around the globe are Reddit, Skype, Instagram, Disqus, The Guardian, Yandex, Bloomberg, Nokia, BMW, etc.
In his tutorial, you will learn how to install PostgreSQL on AlmaLinux 9. In addition, you will also learn how to set up PostgreSQL authentication, the basic usage of PostgreSQL for creating database and user, and some basic queries for creating tables, inserting and retrieving data, updating and deleting.
Prerequisites
To begin, you must have the following requirements:
- An AlmaLinux 9 Server.
- A non-root user with sudo/root administrator privileges.
Adding PostgreSQL Repository
By default, the AlamLinux repository provides PostgreSQL packages. But, to get most of PostgreSQL, you can install PostgreSQL from the PostgreSQL repository. This will ensure that you can also install the latest version of PostgreSQL.
In the first step, you will add the PostgreSQL repository to your AlmaLinux 9 server. You can select PostgreSQL rpository from the PostgreSQL download page.
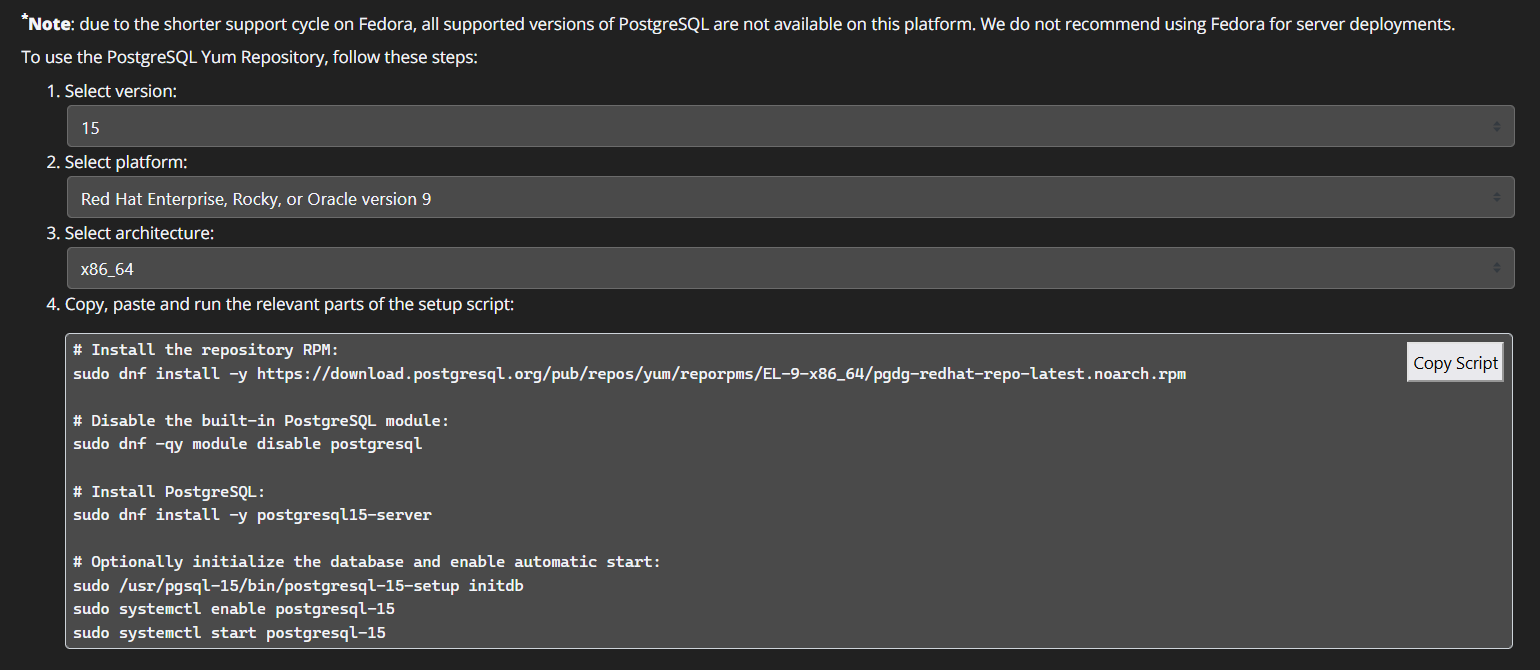
Add the PostgreSQL repository for RHEL 9 using the following command. This repository can be used for Linux distributions derived from RHEL 9, including CentOS 9 and AlmaLinux 9.
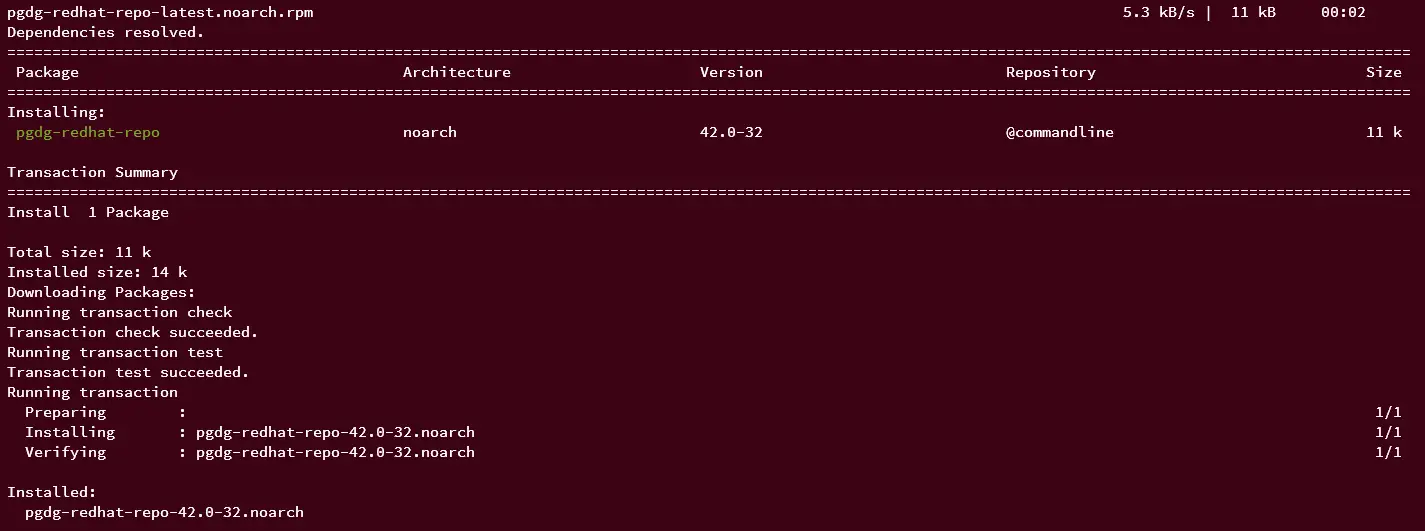
sudo dnf install -y https://download.postgresql.org/pub/repos/yum/reporpms/EL-9-x86_64/pgdg-redhat-repo-latest.noarch.rpm
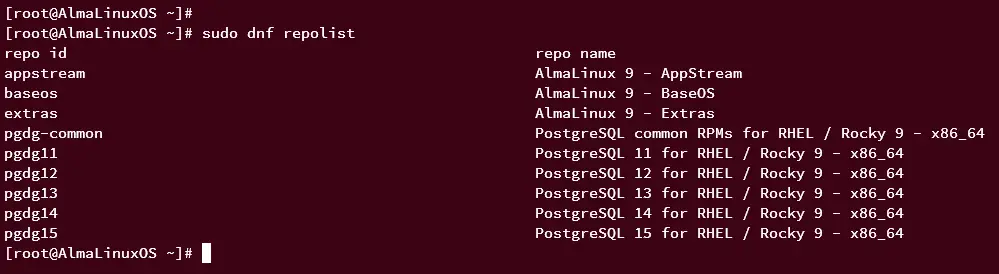
Once the repository is added, run the following command to verify the list of available repositories on your system. You should get multiple PostgreSQL for different versions of PostgreSQL packages if successful.
sudo dnf repolist
Now, run the following command to refresh AlmaLinux repositories and get the latest version of package cache information.
sudo dnf makecache -y
Installing PostgreSQL
After adding the PostgreSQL repository, you can install PostgreSQL server packages. You can install PostgreSQL 11, 12, 13, 14, and the latest version 15 via the official PostgreSQL.
The second step here is installing the latest version of PostgreSQL 15 to the AlmaLinux 9 server.
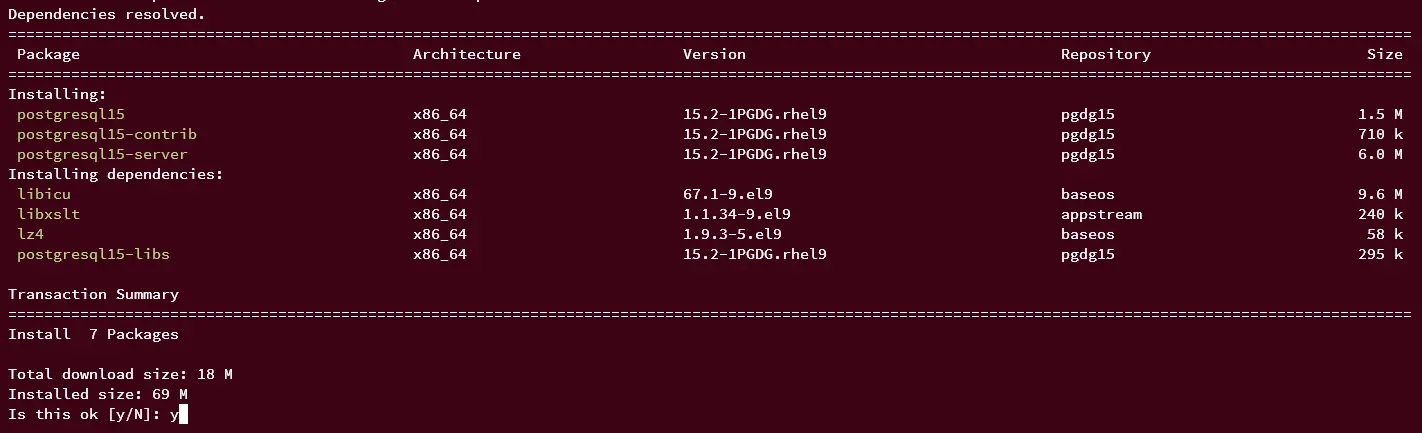
Run the following dnf command to install PostgreSQL 15 to your AlmaLinux server. Input y when prompted and press ENTER to proceed to the installation.
sudo dnf install postgresql15 postgresql15-server postgresql15-contrib
After installing PostgreSQL, run the following command to initialize PostgreSQL data and configurations.
sudo /usr/pgsql-15/bin/postgresql-15-setup initdb

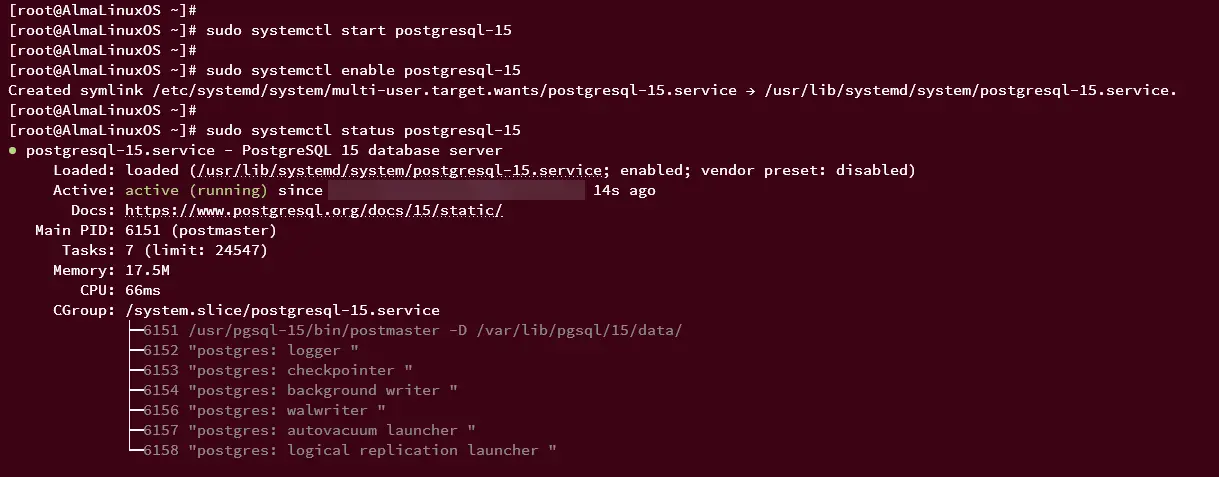
Now, run the systemctl command below to start and enable the PostgreSQL 15 service. This will start the PostgreSQL service at the default port 5432 and enable the PostgreSQL service to run automatically upon the system startup.
sudo systemctl start postgresql-15
sudo systemctl enable postgresql-15
Lastly, run the following command to verify the PostgreSQL service and ensure that the service is running.
sudo systemctl status postgresql-15
If running, you should see an output such as 'active (running)'.
Basic PostgreSQL Authentication
It's essential to know about PostgreSQL authentication so you can ensure that your PostgreSQL users for application can log in and access the database. Multiple PostgreSQL authentication methods exist, including peer, trust, md5, and scram-sha-256. And you can set up and adjust the PostgreSQL authentication via the configuration 'pg_hba.conf' that is located in the '/var/lib/pgsql/VERSION/data/' directory.
Run the cat command below to show the default 'pg_hba.conf' file.
cat /var/lib/pgsql/15/data/pg_hba.conf
At the bottom line, you should have the default configuration like this:
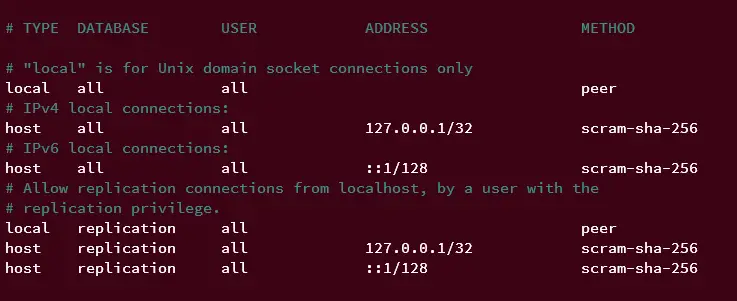
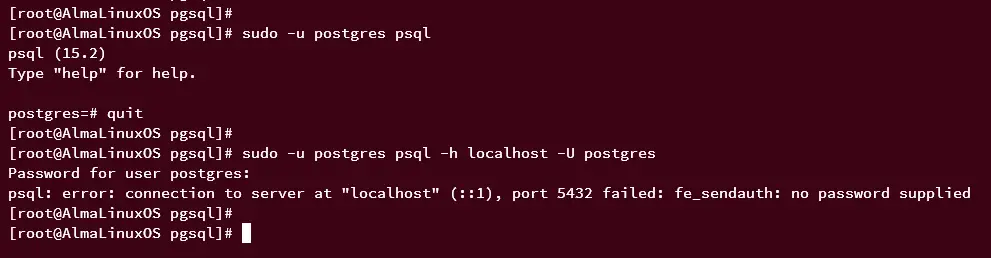
This means that for every local connection, the peer authentication method will be used, which is using a Unix socket. If you connect to PostgreSQL using the following command, this will perform the local connection via the peer authentication method and Unix socket.
sudo -u postgres psql
But, if you specify the host of the PostgreSQL server such as '-h localhost' and the user '-U postgres', you will be connecting via the scram-sha-256 password authentication, like the following command.
sudo -u postgres psql -h localhost -U postgres
Because you do not have the password for the default postgres user, you will an error like this:
Changing Password postgres User
In this section, you will set up and change the password for the default PostgreSQL user 'postgres'.
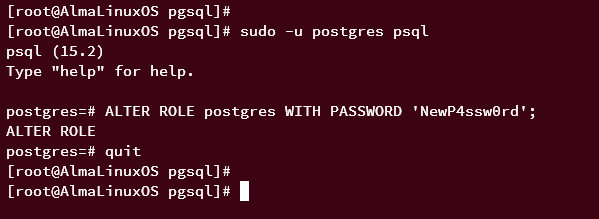
First, log in to the PostgreSQL server via local authentication.
sudo -u postgres psql
Now, run the following query to set up the password for the default 'postgres' user, then type 'quit' to exit. Also, be sure to change the following password with your password.
ALTER ROLE postgres WITH PASSWORD 'NewP4ssw0rd';
quit
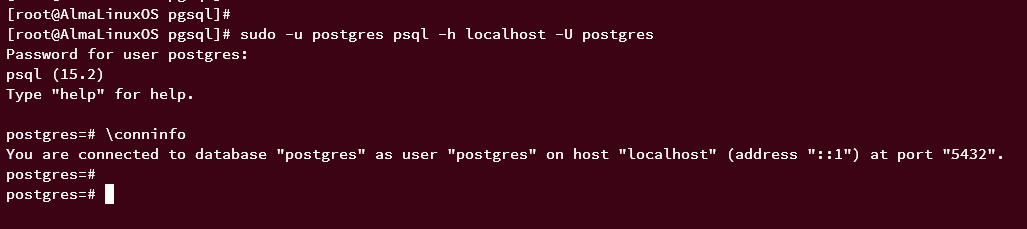
With the password changed for the 'postgres' user, run the following command to verify your password. When prompted, input your password for the 'postgres' user.
sudo -u postgres psql -h localhost -U postgres
When logged in, run the following query to check the detailed connection. You should see that you've connected to the PostgreSQL server 'localhost' with the user 'postgres' to the target database 'postgres'.
\conninfo
Creating User and Database on PostgreSQL
In this section, you will learn how to create a new user and database on PostgreSQL, so let's get started.
You must ensure that you've logged in to PostgreSQL via the 'psql' client. You can log in using the following command.
sudo -u postgres psql -h localhost -U postgres
Now, run the following query to create a new PostgreSQL called 'appuser' with the password 'p4ssAppuser'. When successful, you should get an output such as 'CREATE ROLE'.
CREATE USER appuser LOGIN CREATEDB PASSWORD 'p4ssAppuser';
Run the following query to verify the list of users on PostgreSQL. If successful, you should see the new user 'appuser' available on the user list.
\du
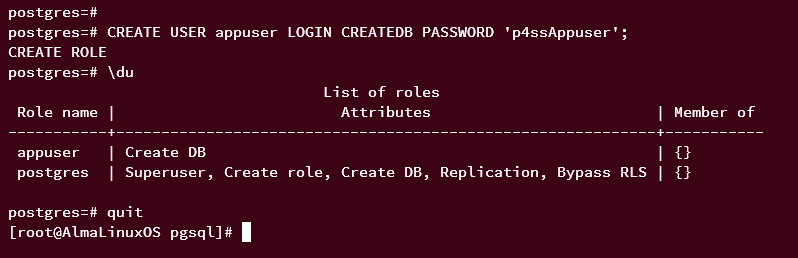
Type 'quit' to exit from the PostgreSQL server.
quit
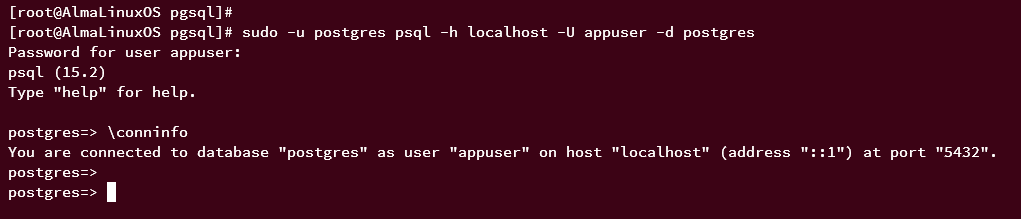
Next, run the following command to connect to the PostgreSQL server using the new user 'appuser' to the target database 'postgres'. When prompted, input the password for the user 'appuser'.
sudo -u postgres psql -h localhost -U appuser -d postgres
Once logged in, run the following query to verify the current connection. You should see that you've logged in to PostgreSQL via a new user 'appuser' to the database 'postgres'.
\conninfo
Now, run the following query to create a new database 'appdb' with the default owner 'appuser'.
CREATE DATABASE appdb OWNER appuser;
Then, verify the list of available databases on your PostgreSQL server. If successful, you should see the database 'appdb' available on PostgreSQL with the owner 'appuser'.
\l

You can now switch from the 'postgres' database to the new database 'appdb' using the '\connect' query. Then, verify your current connection.
\connect appdb;
\conninfo
At this point, you should now be switched to the new database 'appdb'.

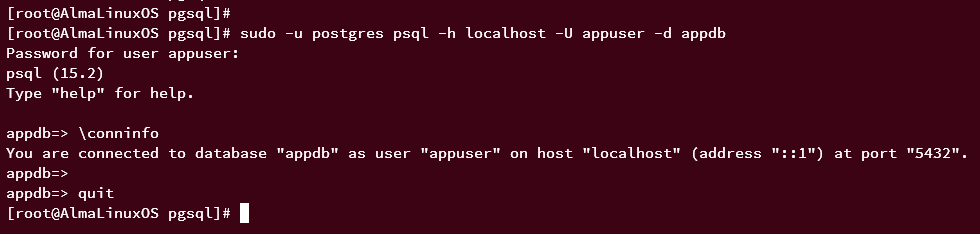
Type 'quit' to exit from the PostgreSQL server, then verify the connection to the new database 'appdb' via user 'appuser' using the following command.
sudo -u postgres psql -h localhost -U appuser -d appdb
Input your password for 'appuser' when prompted. After logging in, check the connection status.
\conninfo
You should see that you have connected to the new database 'appdb' via user 'appuser'.
At this point, you have created a database and user on PostgreSQL that is ready for your application. Moreover, you will also learn how to create a table, insert and retrieve data on PostgreSQL in the next section.
Creating Table
After creating a new database, you will learn how to create tables on PostgreSQL.
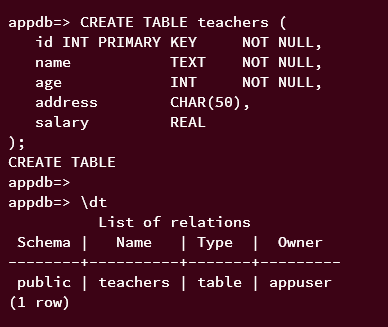
With the database 'appdb', run the following query to create a new table 'teachers' with columns 'name', 'age', 'address', and 'salary'.
CREATE TABLE teachers (
   id INT PRIMARY KEY     NOT NULL,
   name           TEXT    NOT NULL,
   age            INT     NOT NULL,
   address        CHAR(50),
   salary         REAL
);
Now, run the following query to display all available tables on the database 'appdb', and you should see the table 'teachers' that you have created.
\dt
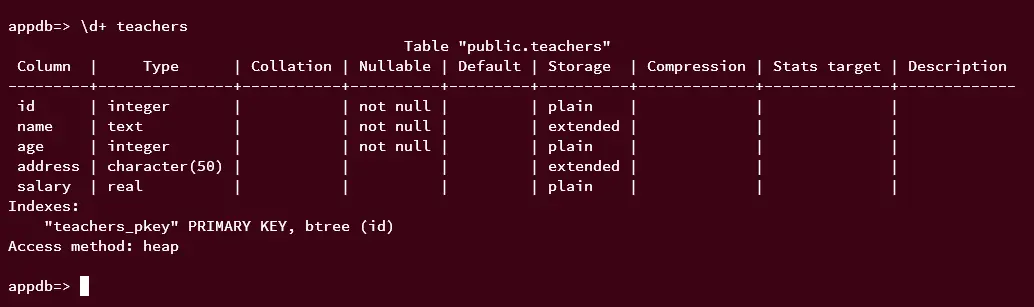
Lastly, check available columns on the table 'teachers' using the following query. You should see columns such as id, name, age, address, and salary.
\d+ teachers
Inserting Data into Table
With the table 'teachers' created, you will now learn how to insert data on PostgreSQL.
Run the following queries to insert new data to the table 'teachers'. When successful, you should get an output such as INSERT 0 1.
INSERT INTO teachers (id,name,age,address,salary) VALUES (1, 'Lea', 25, 'California', 20000.00);
INSERT INTO teachers (id,name,age,address,salary) VALUES (2, 'Lin', 35, 'Germany', 30000.00);
INSERT INTO teachers (id,name,age,address,salary) VALUES (3, 'Lisa', 27, 'Canada', 40000.00);

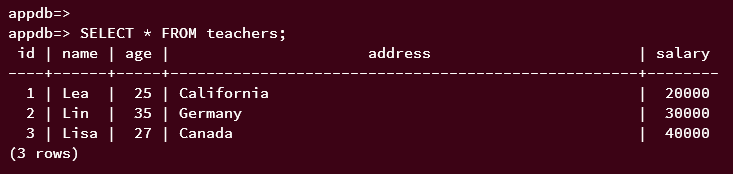
Retrieving Data on PostgreSQL
Next, run the SELECT query to retrieve data from the table 'teachers'. This will retrieve all available data from available columns on the table.
SELECT * FROM teachers;
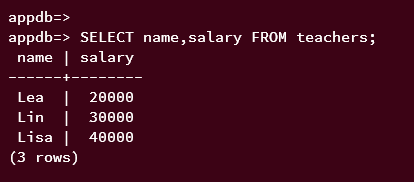
You can also use SELECT to retrieve data from specific columns like this. You will retrieve data from the column name and salary in the following example.
SELECT name,salary FROM teachers;
Updating Data on PostgreSQL
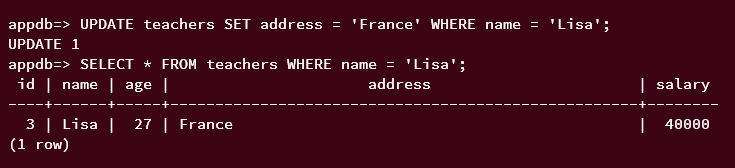
Run the following query to update the current data on the table 'teachers'. This will update the column 'address', where the column 'name' is 'Lisa'. When successful, you should get an output such as UPDATE 1.
UPDATE teachers SET address = 'France' WHERE name = 'Lisa';
Now run the following query to verify the newly updated data. And you should see the column 'address' is changed to 'France' for the name 'Lisa'.
SELECT * FROM teachers WHERE name = 'Lisa';
Delete Database and User
To clean up your environment, you will delete the database and user you created. You will be deleting the database 'appdb' and the user 'appuser' from your PostgreSQL server.
First, you must switch to the database 'postgres' using the following query.
\connect postgres
Run the following query to delete the database 'appdb', then verify the list of databases on your PostgreSQL server, and the database 'appdb' should be removed.
DROP DATABASE appdb
\l

Now type 'quit' to exit from your current session as 'appuser'. This is needed before deleting the user 'appuser' from PostgreSQL.
quit
Next, log in as the default PostgreSQL user 'postgres' using the following command.
sudo -u postgres psql
Once logged in, delete the user 'appuser' using the following query. If successful, you should get an output such as DROP ROLE.
DROP user appuser;
Now verify the list of available users on PostgreSQL using the query below. The user 'appuser' should be deleted from PostgreSQL.
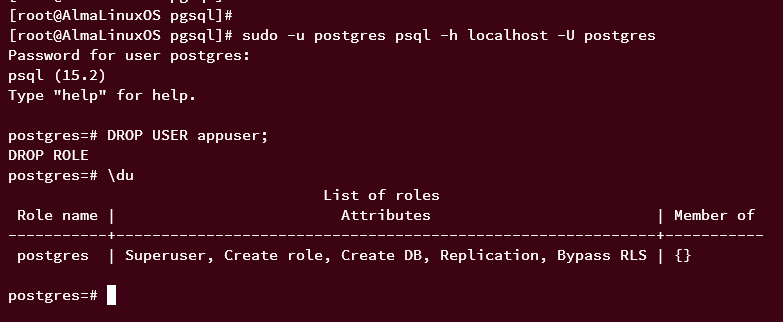
With this, you have clean up your PostgreSQL server installation.
Conclusion
Congratulations! With this tutorial, you have now installed PostgreSQL on AlmaLinux 9. You have installed the latest version of PostgreSQL 15 on AlmaLinux 9 from the official PostgreSQL repository. In addition to that, you have also learned the basic authentication method on PostgreSQL, how to connect to PostgreSQL via psql PostgreSQL client command line, and how to set up a password for the default PostgreSQL user 'postgres'. Last and not least, you have also learned some basic queries on PostgreSQL for creating databases, users, and tables, inserting and retrieving data, and updating and deleting data.

