

Identity is a complex domain, and beyond a set of foundational functions, every business has unique needs. But with finite resources (likely already stretched thin by other demands), how can developers build custom solutions that extend and integrate with core identity functions?
Or — put another way — how can development teams do more with less?
To help answer that question, we will explore Okta Customer Identity Cloud (Auth0) Redirect Actions capability with progressive profiling and coupon promotions as two example use cases.
Actions and Actions Integrations
Actions are secure, tenant-specific, versioned functions written in Node.js that execute at specific points in identity flows. Actions are used to customize and extend Auth0's capabilities with custom logic, providing developers with the versatility needed to achieve a wide variety of use cases.
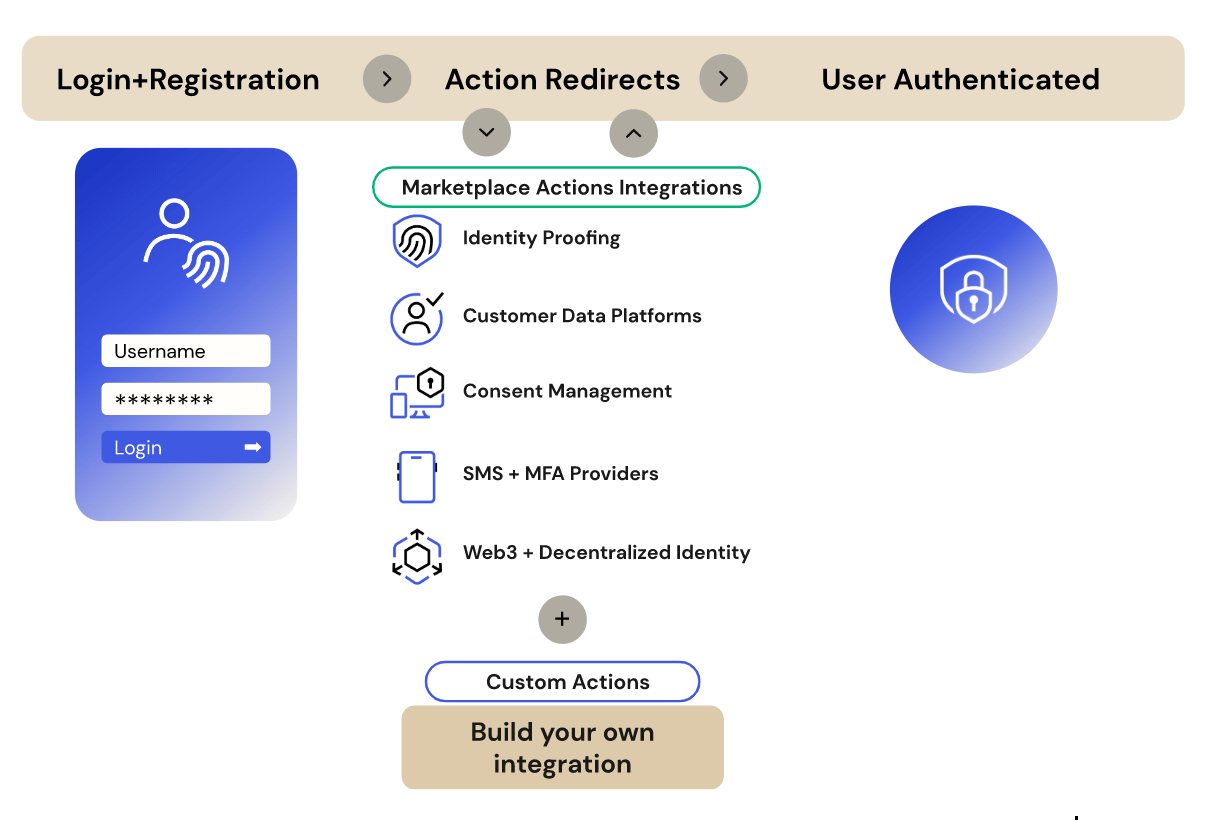
To accelerate your Identity innovations, the Auth0 Marketplace includes a long (and ever-growing) list of Actions Integrations — partner-built solutions that can be quickly added to extend your identity flow with no-code ease. We recommend looking at the Marketplace before embarking on any custom Actions development because there’s a good chance what you need is already waiting for you.
But, as identity continues to evolve, developers will also have new use cases. And we want to illustrate how Actions can do a lot of heavy lifting as you implement new use cases.
Implementing Progressive Profiling with Redirect
Progressive profiling is the process of incrementally collecting additional information about your users as they engage with your website or application. For example, you could collect the user's name, email, and password during sign-up, then ask for their company’s name and job title the next time they log in. This bite-sized approach helps you avoid long sign-up forms that can negatively impact the customer experience (or maybe turn them off your service entirely).
Auth0 introduced progressive profiling flows in 2020, and we’re happy to see this approach used by modern applications more frequently. But the platform has evolved since the feature debuted, so it’s time to revisit some details on setting up progressive profiling with Actions (versus the original implementation using Rules).
More than that, we also want to highlight how the Redirect flow can apply to more than just onboarding users. Or, put another way, the Redirect feature is powerful, and the progressive profiling use case will help us to illustrate some of its capabilities that developers may have overlooked.
General approach
Redirects occur during login and allow you to take your user to an external page before granting access to the application. This technique can be useful for progressive profiling because, at this point of authentication, the user has already entered their proper credentials, they have a purpose for visiting the site, and they likely have the intrinsic motivation to answer questions presented to them so they can proceed.
The Redirect with Actions documentation goes over this process in detail and discusses the various ways to pass data with this flow. For our purposes, we will use the front channel approach that roughly follows this sequence:
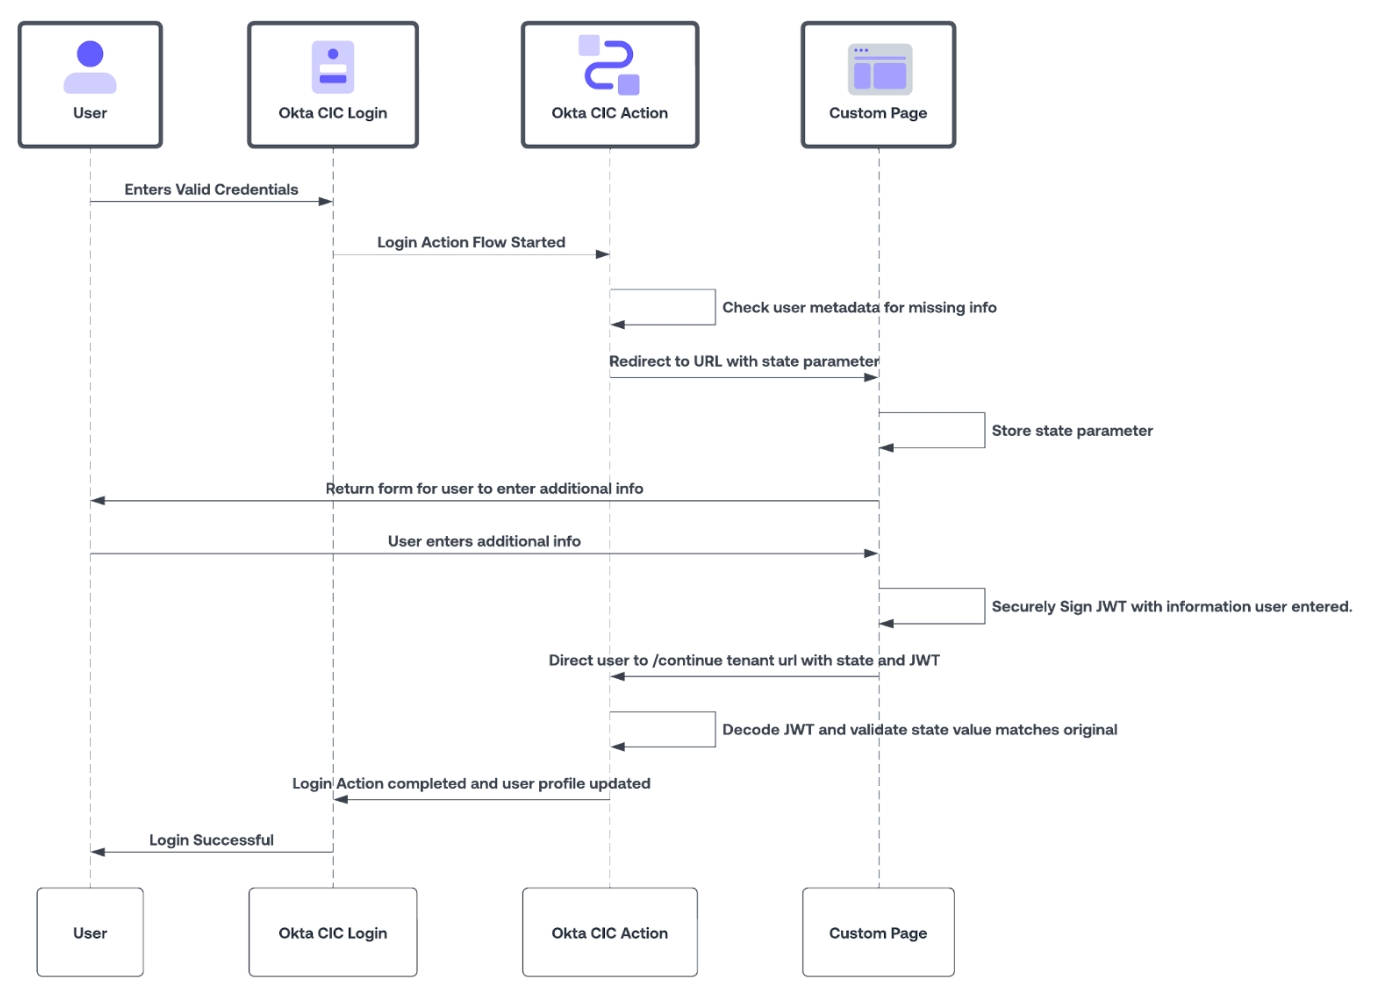
Within this overall process, the Action flow itself has three main steps:
- Determining if the Action should execute
- Preparing, passing, and receiving the data
- Utilizing the received data
Action step #1: Determining if the Action should execute
We don’t want to use Redirect every time users access our application, so we need to make sure we have criteria at the start of our Action that will result in it only triggering when appropriate.
The criteria can come in many forms, giving developers precise control over Redirects. Examples include the number of times the user has logged in previously, the last time they received a prompt via a redirect, or the current state of their profile information.
Action step #2: Preparing, passing, and receiving the data
To ensure data is exchanged securely with our Redirect application, we first pass over an auto-generated state value and a signed JSON Web Token (JWT).
The signed JWT will use a shared secret to allow the Action to send over additional context to the URL and for the URL to do the same with the data the user has entered.
Action step #3: Utilizing the received data
When the user has finished interacting with the Redirect application and is brought back to complete their authentication journey, the Auth0 Action will first validate the state value and inspect the signed JWT.
If everything is valid, the Action can use the newly received data to update the user profile. Next, the Action can determine and flag if additional Redirects are required, after which the login flow proceeds to the next Action or completes the authentication.
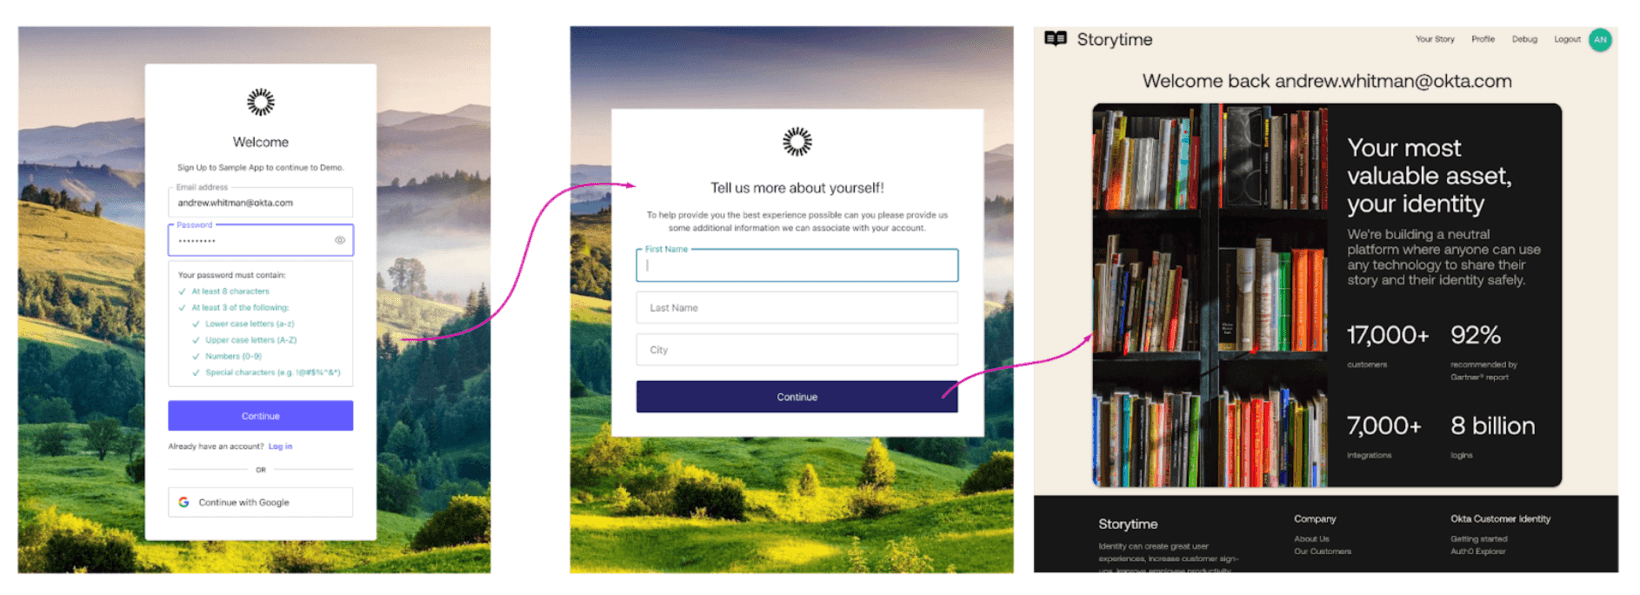
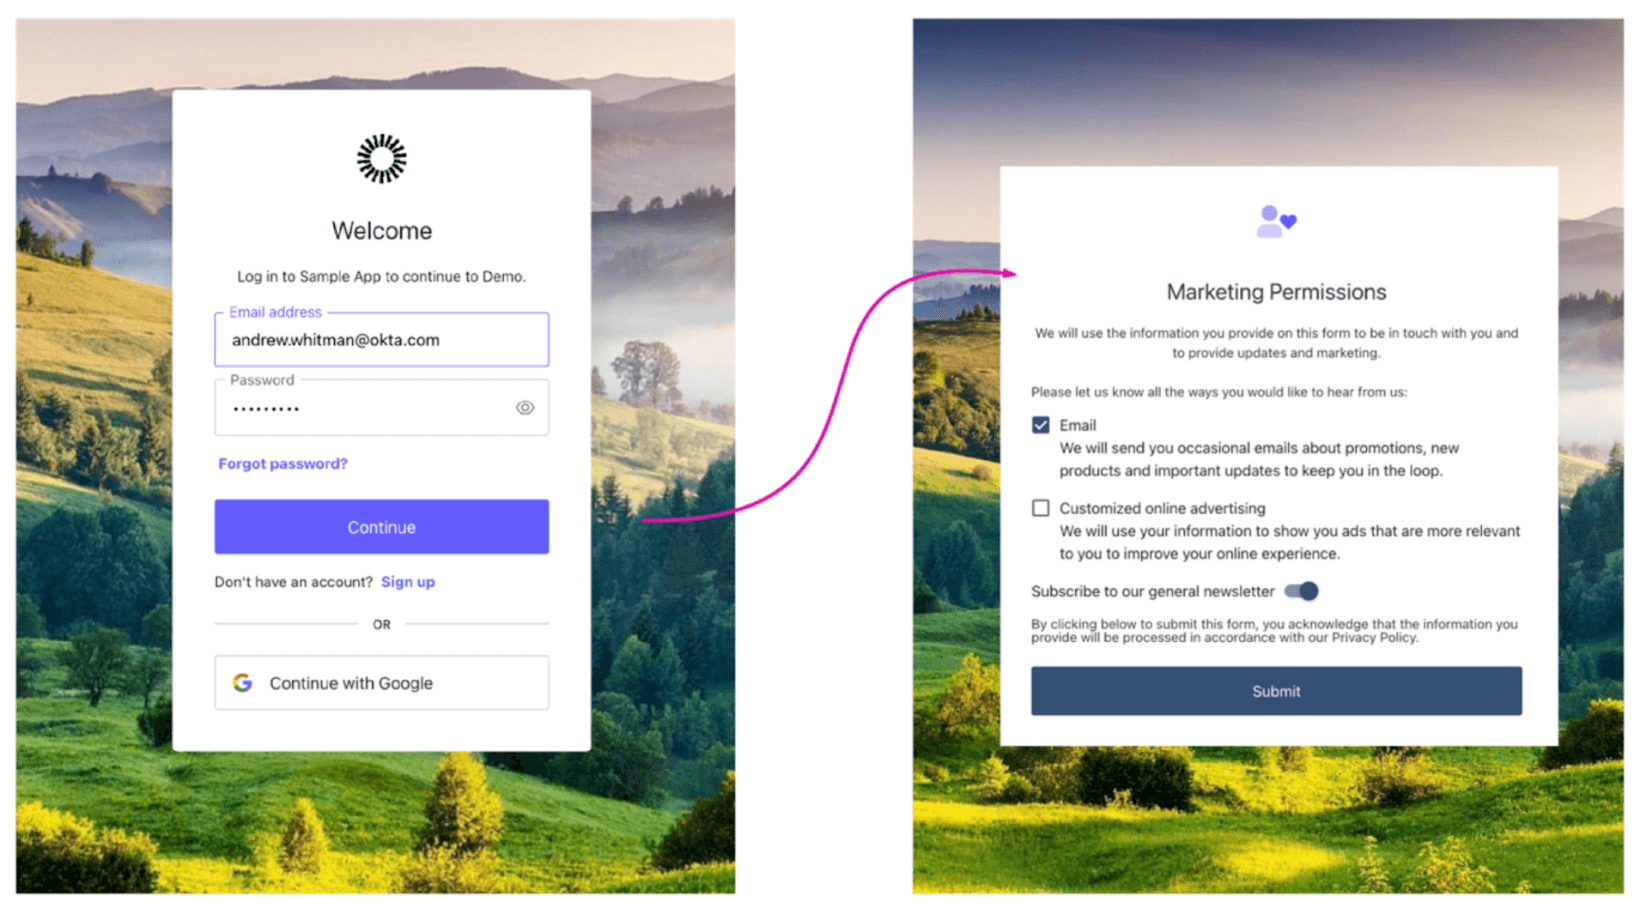
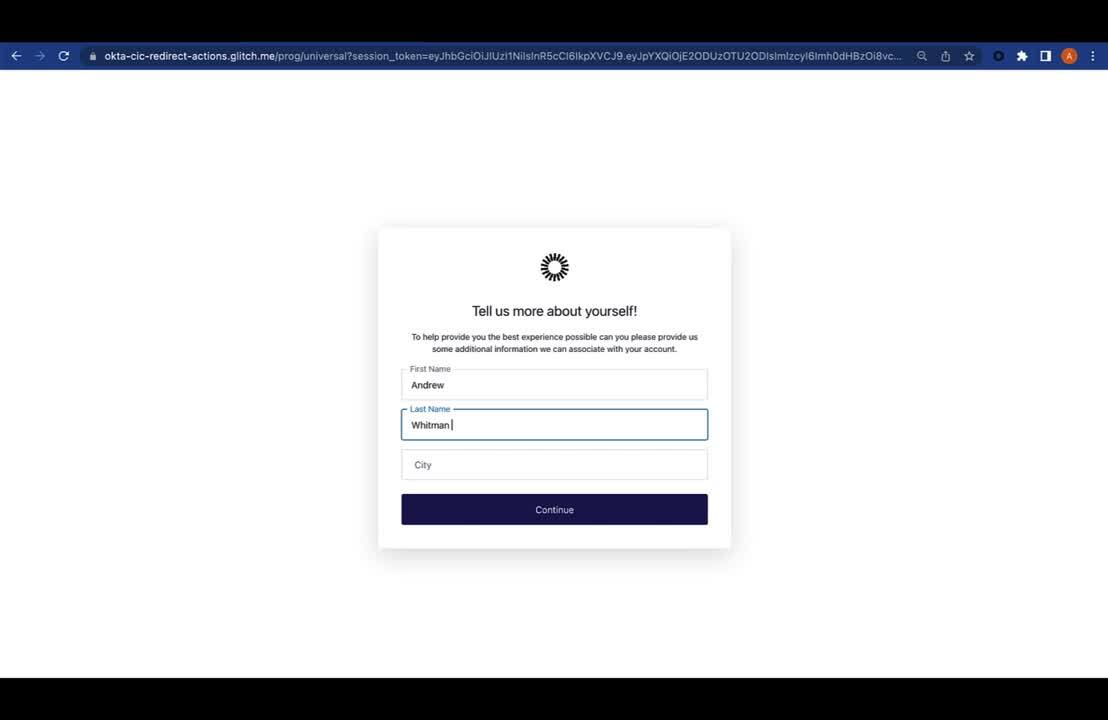
The user experience
Actions can be used to implement anything from simple flows to extraordinarily complex ones, but any complexity takes place behind the scenes. Here’s what the three-step flow above looks like to the end user.
Redirects to improve cart transactions
In addition to acquiring customer information and preferences, e-commerce sites can also utilize Redirect to help drive conversions — for example, by adding a coupon incentive when a user logs in for the first time and verifies their email.
Since Actions has context on the authenticating user and session, we can redirect to additional pages (e.g., a coupon code alert) to ensure the user is aware of the promotion and to encourage them to complete their first transaction.
And importantly, Actions can store (within a user’s profile) data that is exchanged during these Redirects, enabling other applications functions to interact with it.

Let’s Dive In
Now, let’s build our own Redirect Action in our tenant.
This demo requires the following:
- An Auth0 tenant (sign up and create one here)
- A remixed copy of this Glitch App
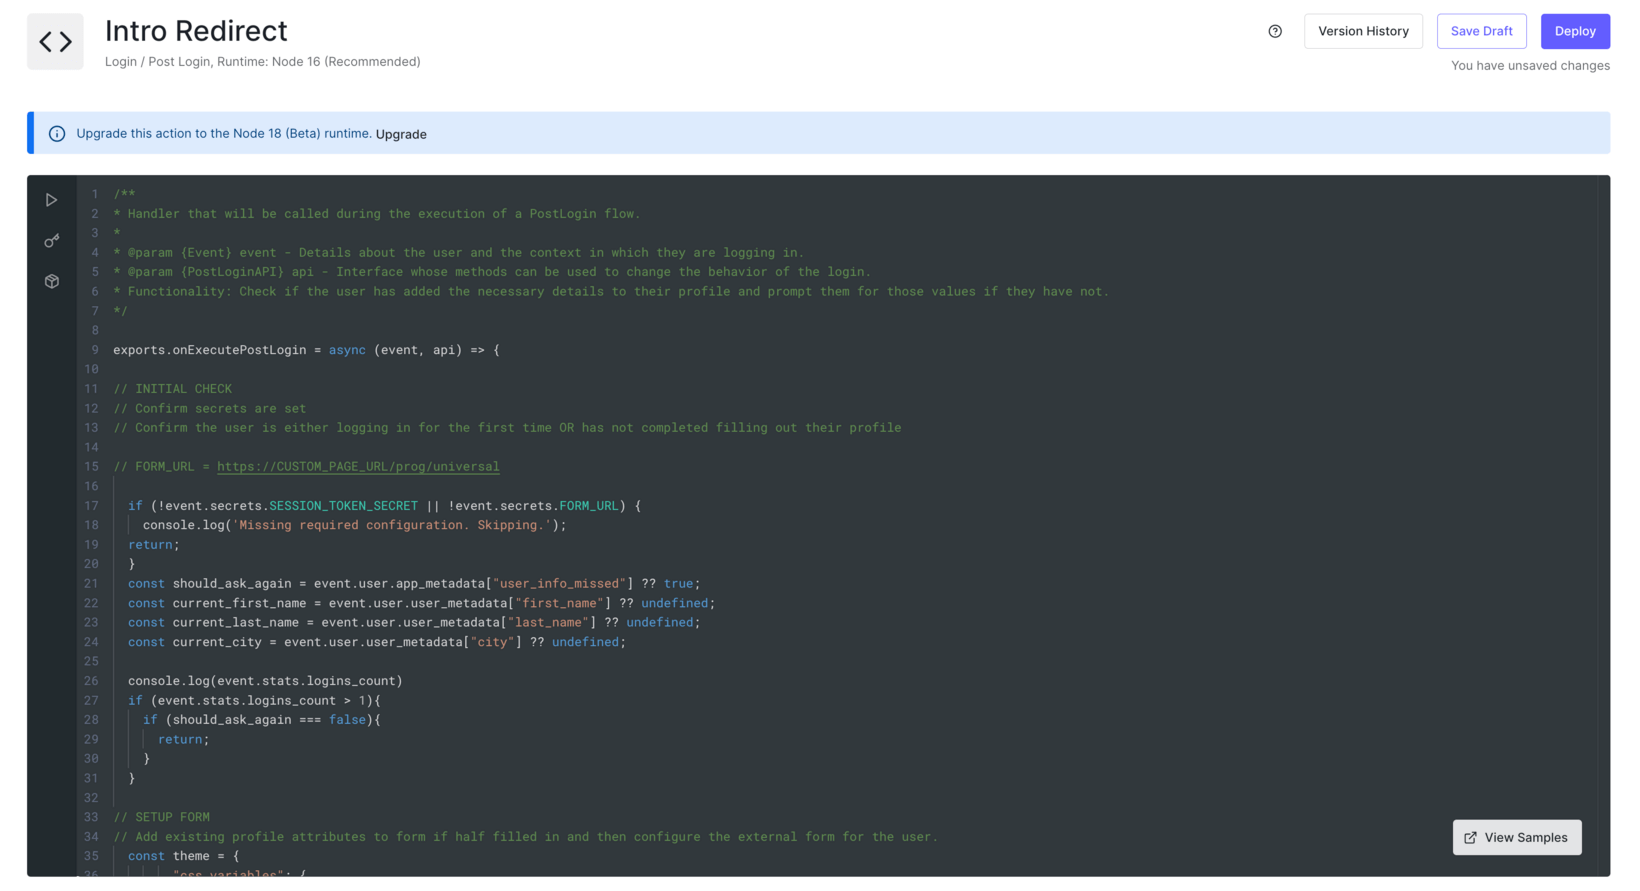
- The following Login Action code:
Instructions
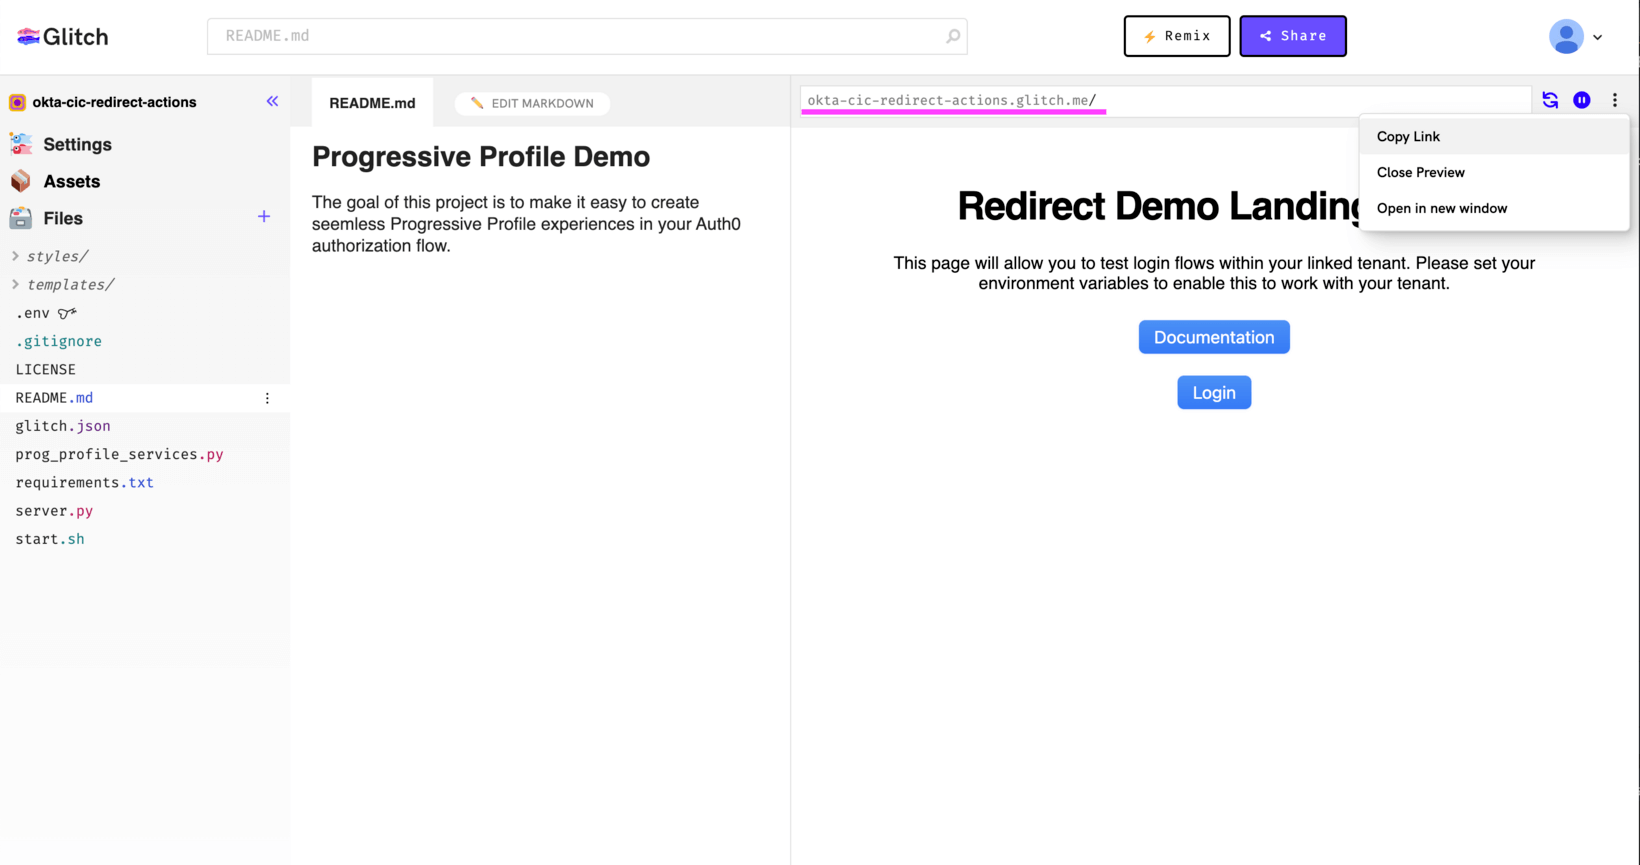
- Go to https://glitch.com/edit/#!/okta-cic-redirect-actions and remix the app. Copy your remixed URL so we can add it to our Action.
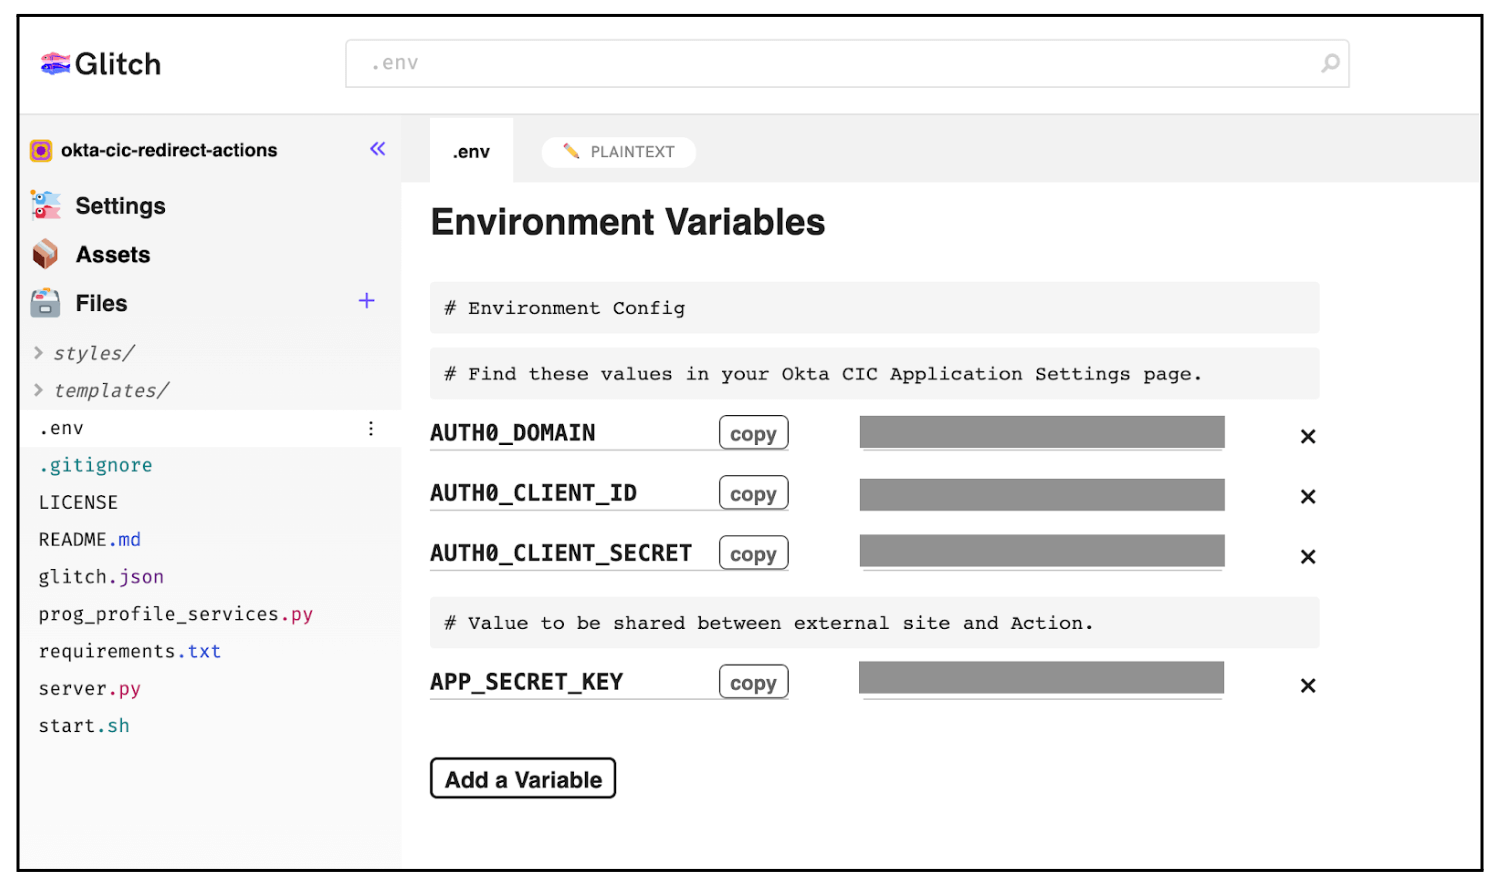
- We will use environment variables to configure this template to work with our application.
- Shared secret: You will need to generate your own secured shared secret that only your app and tenant can access. Generate a string for
APP_SECRET_KEYusing openssl rand -hex 32 from your shell. Take note of this value so we can add that to our Action and redirect page. - Auth0 Application domain, secret, client ID: These can be found in your Auth0 tenant settings and will be set under
AUTH0_DOMAIN,AUTH0_CLIENT_SECRET,AUTH0_CLIENT_IDrespectively. (Note: If you are linking from an existing app, you can ignore this step.)
- Shared secret: You will need to generate your own secured shared secret that only your app and tenant can access. Generate a string for
- Copy the Action code from the starting section.
- Create a new custom login flow Action in your Auth0 tenant.
- Paste the code copied in step 3 into your new login flow Action.
- Create two new secrets:
FORM_URLandSESSION_TOKEN_SECRET.
SetFORM_URL=https://NEW-GLITCH-URL/prog/universal
SetSESSION_TOKEN_SECRET= secret created in step 2a - Save and deploy the Action and add it to your login flow.
- COMPLETE: Test your new login Redirect flow by signing up a new user!
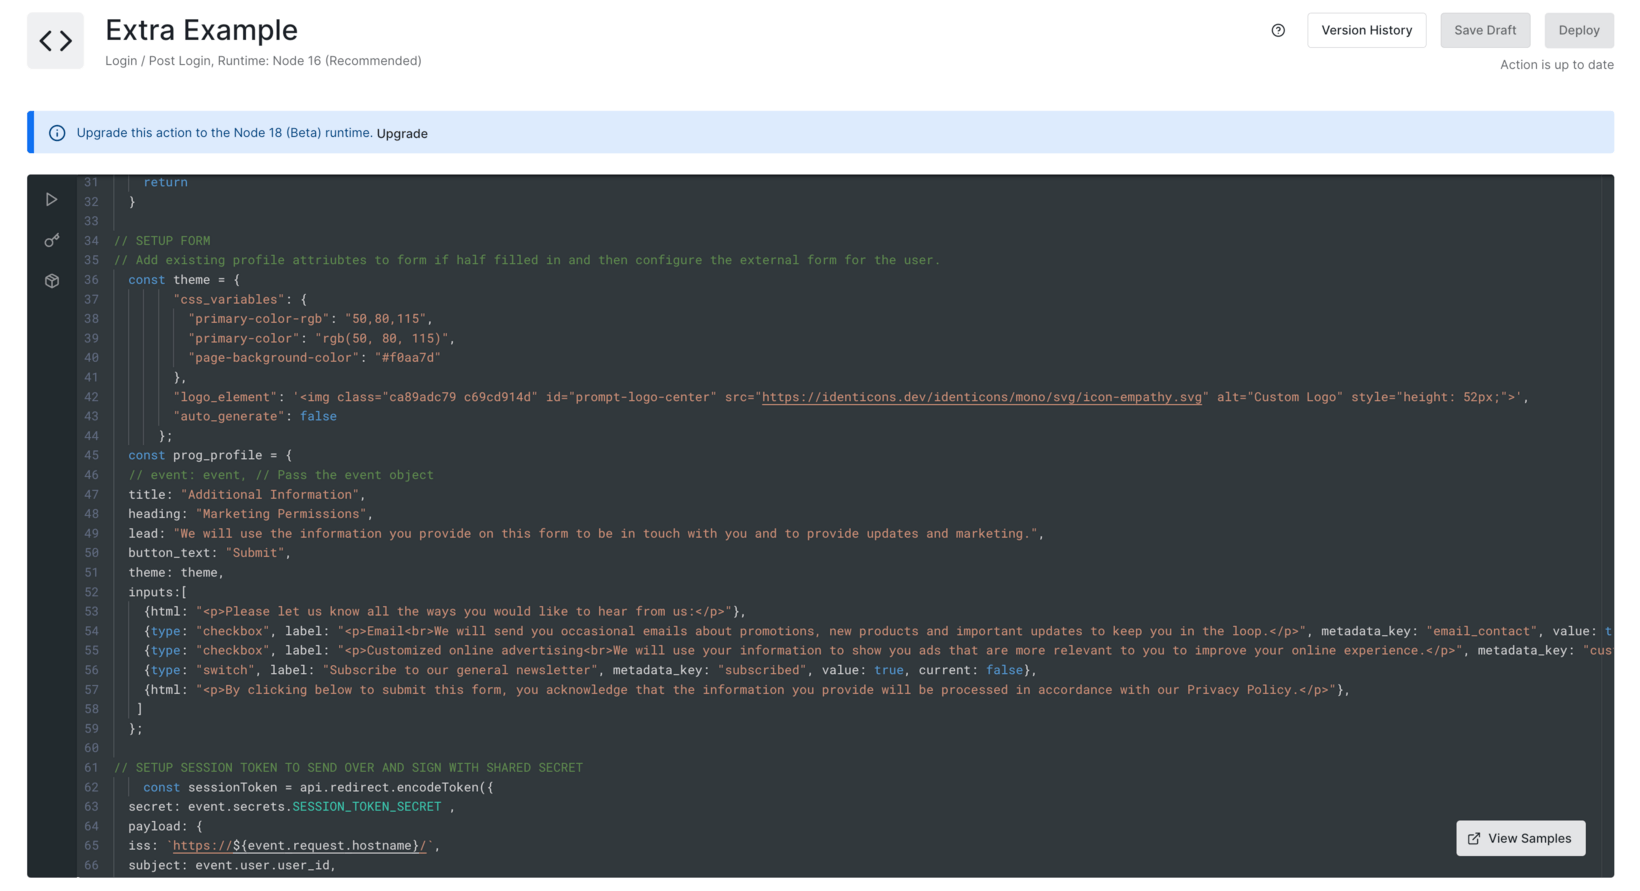
Extending the Flow: Checking Marketing Preferences
Since Actions are composed of code, we can build more complex use cases in our Auth0 environment.
This sample Action is set up to be extremely flexible and to let the receiving URL act as an empty vessel to display forms, and the configuration and theming of the page can all occur within the Action itself. In practical terms, this means that you can use the same URL with multiple different Actions to achieve different functionality.
For example, by slightly modifying the original Action, we can easily create a “marketing preferences check” that only triggers on the third login:
Use the following Action code.
Only the Beginning...
The examples above represent only a fraction of what’s possible, as the Redirect capability can enable much more functionality that you may wish to leverage during a user’s authentication flow. For example, the same pattern can be used to:
- Require Identity proofing;
- Implement consent management;
- Integrate with customer data platforms;
- Trigger MFA protections; and
- Enable Web3 and decentralized identity
- Plugin data to the underlying connected system
- Prevent fraudulent user access
- Enrich uUser profiles
- and more
And Redirects are themselves only a small part of the larger set of Actions capabilities. Auth0 Actions open a large possibility of very sophisticated identity workflows that can be powered, hosted, and protected by Auth0. In addition, Auth0 Actions help to achieve many possible use cases throughout the sign-in flow; before, during, and after sign-in.
By design, the Auth0 platform is built so you can use Actions to solve a variety of problems that are unique — whether broadly or in the smallest details — to you.
Identity as a domain may be hard, but extending the Customer Identity Cloud’s core functions to meet your application’s specific needs is easy.
Integrate with Auth0
Learn everything you need to know about our extensibility features, build your own solution, plus understand the process all the way to publishing. We’ve got you covered with helpful docs and resources. Visit auth0.com/integrate to learn more.


