
Transform a WPF App to Cross-Platform with .NET MAUI

Your WPF app can gain more users if you make it cross-platform, but what’s the best way to do that—with .NET MAUI or Blazor Hybrid? Take a quick test, and learn the steps involved if the results show .NET MAUI.
If you have a great WPF app, perhaps your main target users are those using Windows OS. However, the usage of Android, iOS and macOS devices continues to increase and they are now a very important part of our ecosystem.
For reference, we can take a look at the data in Wikipedia: Usage share of operating systems - Wikipedia.
Until recently, to reach all these users was not easy—you would write four different apps if you needed to rely on a native look and feel for the user experience or to choose the web stack and access the users via browsers. Let’s be honest, all of these options required learning different technologies and going outside the .NET world.
But now, the .NET family is so big and we can use it to extend and modernize our desktop application to reach the sky (or, in other words, Linux, iOS, macOS and Android 😊).
How? Let’s take a look at the most modern children in the family—.NET MAUI and .NET Blazor. Both are a great choice to consider when thinking how to bring our desktop app to new territories.
Which One to Use?
Please take this simple test and choose the technology stack for your needs:
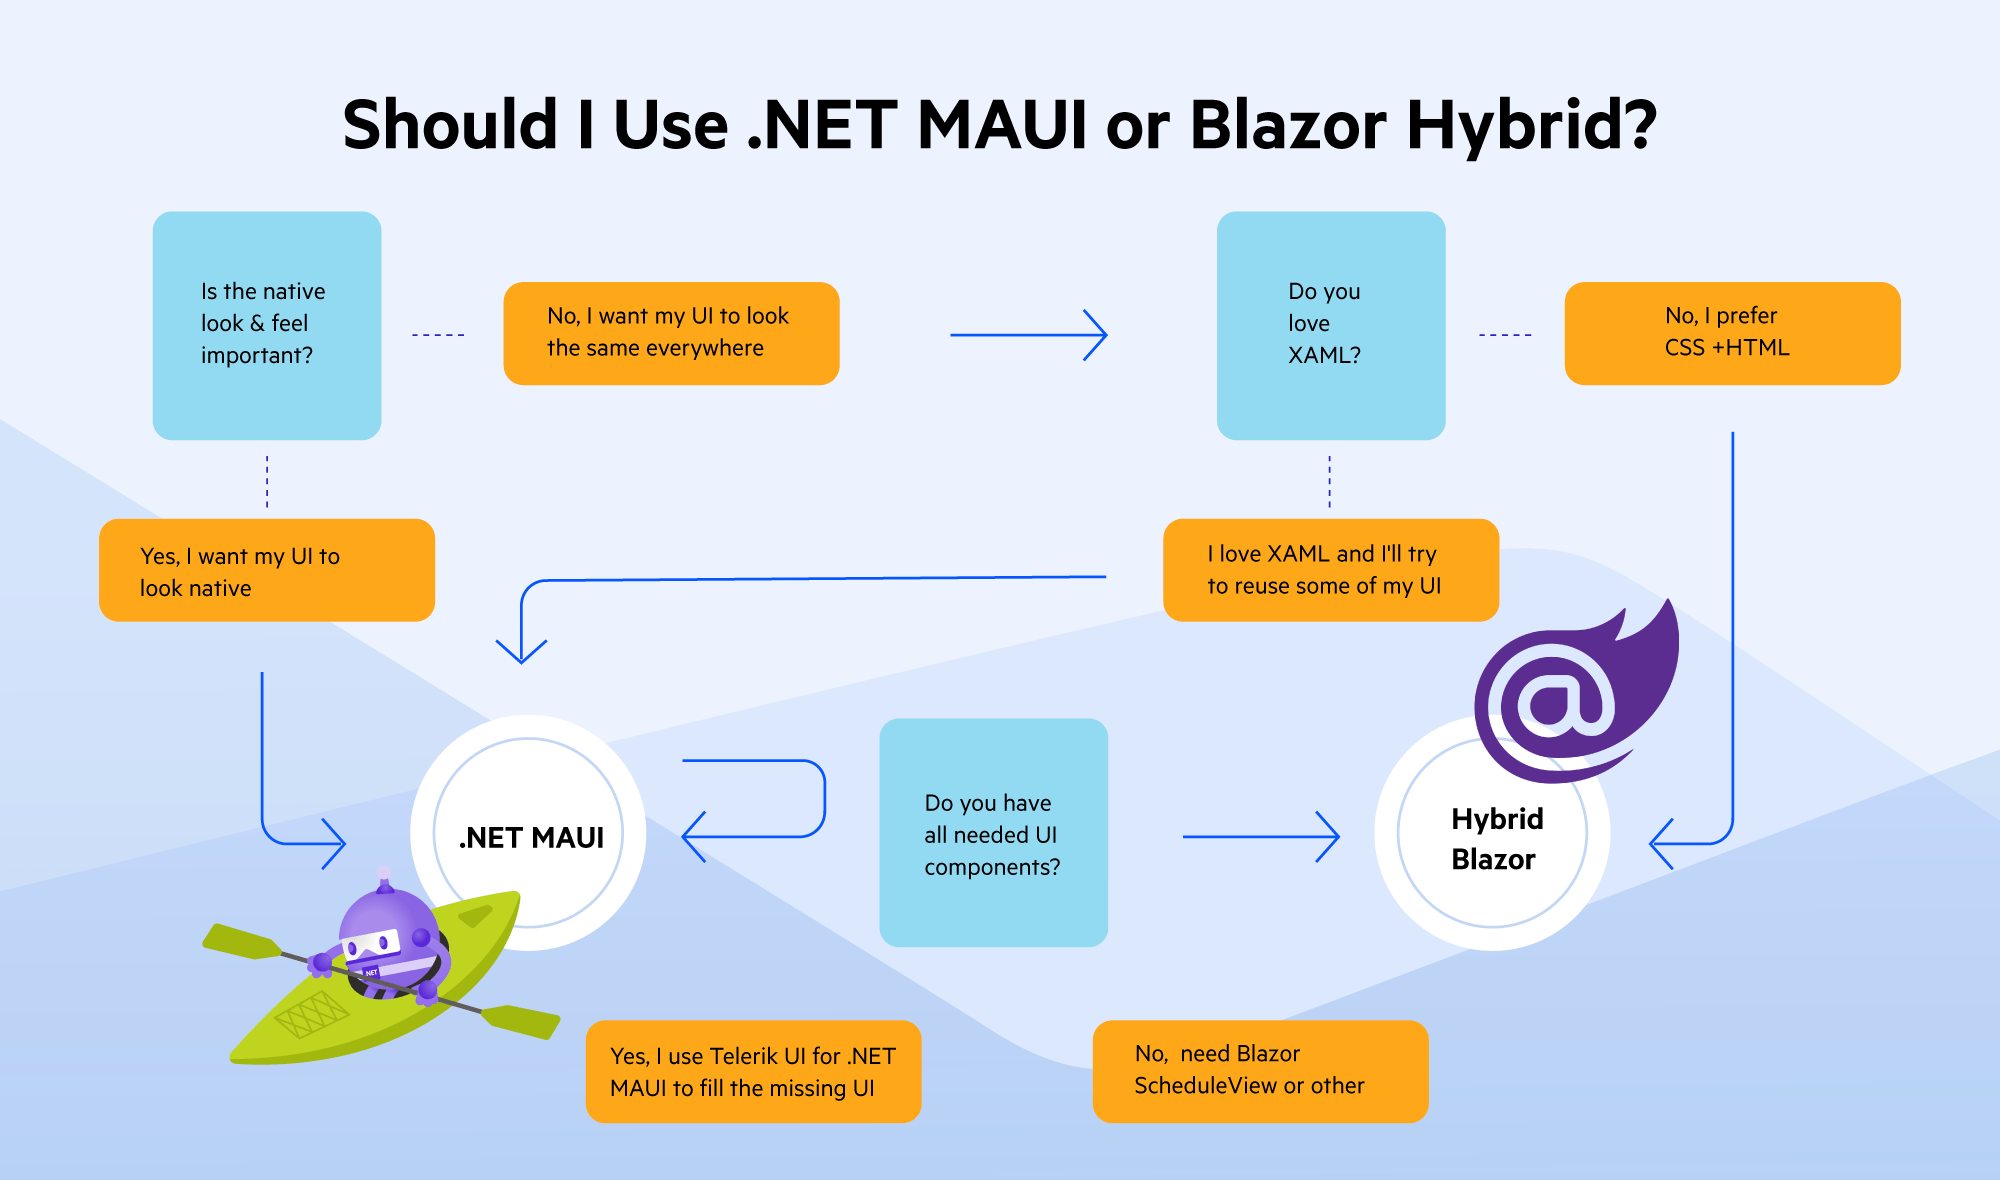
So, if the result led you to using .NET MAUI, keep reading to the end of this post. If the results led you to using a Blazor Hybrid app, this is a great option too and we will look into it in the next post. 😊
.NET MAUI XAML vs. WPF XAML
.NET MAUI is a cross-platform XAML-based technology, so if you have a strong WPF experience, you will have a quick learning process, but still prepare to meet some differences.
XAML is a great invention and I personally like it a lot. However, still there is no XAML standard, which makes things complicated when we are talking about unification and migration.
With .NET MAUI, we can reuse our XAML and C# skillset and bring our Windows desktop app to more devices by moving it piece by piece.
.NET MAUI XAML is actually the 2009 XAML Specification, the same as another member of .NET family—WinUI. So if you are already familiar with WinUI, you are familiar with big part of MAUI XAML. However, if your experience is with Silverlight/WPF XAML, which follows 2006 XAML Specification, you will meet some differences. I listed below the most interesting to start with:
Using Text
Here the well-known Label still exists, but not the TextBox component. In .NET MAUI, we use Entry for short text and the Editor component for multiple lines. Progress Telerik UI for .NET MAUI’s RadEntry is also a great component when we are talking about text with some features that you may need, such as built-in Validation.
Foreground is also replaced with the TextColor property.
Using Borders
While in WPF, we have built-in properties of the FrameworkElement objects Buttons, Labels, TextBox, etc. to use the BorderThickness, CornerRadius. In .NET MAUI, we have to use a container control that draws a border, background or both around another control. Here we can use the .NET MAUI Border component, where we need to use its StokeShape property to define the shape and corner radius or Telerik Border component which exposes directly the well-known properties for a WPF dev—CornerRadius and BorderThickness.
Height/Width vs. RequestHeight/RequestWidth
In WPF we can rely on Height and Width properties of the FrameWorkElement class, while in .NET MAUI the framework offers us HeightRequest and WidthRequest instead, which are properties of the VisualElement class. These properties will call the GetSizeRequest, which will in turn modify the final size the element receives during a layout cycle.
Layouts
The base layouts in .NET MAUI are also different from WPF and I suggest you take a look at the .NET MAUI documentation before porting the code directly: Layouts - .NET MAUI | Microsoft Learn.
Note that every .NET Multi-platform App UI control that derives from View (this includes views and layouts) has HorizontalOptions and VerticalOptions properties, of type LayoutOptions, and these are your new best friends when positioning the elements.
For example, use it to position a Label inside a StackPanel:
<HorizontalStackLayout  HorizontalOptions="Center"
  Margin="0, 20, 0, 20">
    <Label  Text="Searching... "
    FontSize="16"
    TextColor="#8E8E93"/>
</HorizontalStackLayout/>
I am listing here the common alternatives of the most used layouts from WPF:
| WPF | .NET MAUI |
|---|---|
| Canvas | X |
| DockPanel | Telerik DockLayout: .NET MAUI DockLayout Documentation - Overview - Telerik UI for .NET MAUI |
| Grid | Grid – some properties are different |
| StackPanel | StackPanel, VerticalStackPanel, HorizontalStackPanel |
| VirtualizingPanel | X – not a direct alternative for now |
| WrapPanel | FlexLayout/ Telerik WrapLayout: .NET MAUI WrapLayout Documentation - RadWrapLayout Overview - Telerik UI for .NET MAUI |
The ScrollViewer component is also not available, but you can rely on ScrollView to achieve scrolling functionality. Read more about its API in the documentation: ScrollView - .NET MAUI | Microsoft Learn.
Using Windows
.NET MAUI is a successor of the mobile Xamarin framework where windows are not very used. That is why, by default, the base class of the XAML pages is not Window, but ContentPage. ContentPages are used to achieve the navigation in a .NET MAUI app, so the root window of the app uses them to change its content. So when you migrate WPF pages, change the base class to ContentPage.
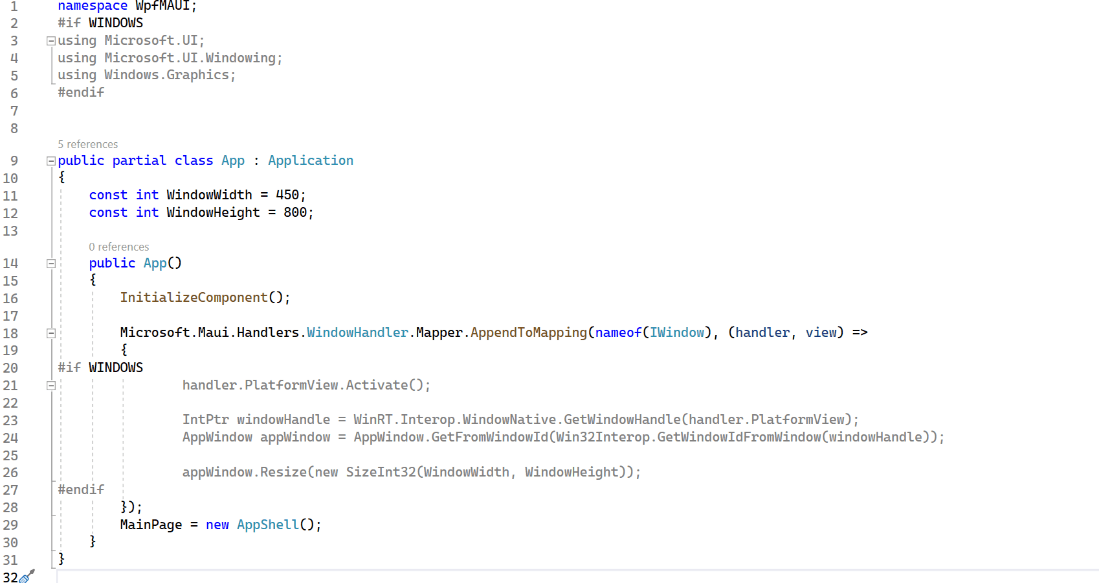
Also, there are some “tricky” moments when we want to manipulate the window. For example, to change its size. Here is simple code for how to do that in App.xaml:
public partial class App : Application
{
    const int WindowWidth = 450;
    const int WindowHeight = 800;

    public App()
    {
        InitializeComponent();

        Microsoft.Maui.Handlers.WindowHandler.Mapper.AppendToMapping(nameof(IWindow), (handler, view) =>
        {
#if WINDOWS
                handler.PlatformView.Activate();

                IntPtr windowHandle = WinRT.Interop.WindowNative.GetWindowHandle(handler.PlatformView);
                AppWindow appWindow = AppWindow.GetFromWindowId(Win32Interop.GetWindowIdFromWindow(windowHandle));

                appWindow.Resize(new SizeInt32(WindowWidth, WindowHeight));
#endif
        });
        MainPage = new AppShell();
}
}
Another way is to override the App’s CreateWindow method, but only with versions .NET 7 and above.
protected override Window CreateWindow(IActivationState activationState)
      {
        var window = base.CreateWindow(activationState);
        window.MinimumHeight = 600; // set minimal window height
        window.MinimumWidth = 800; // set minimal window width
        return window;
      }
With .NET 7, we can use multi windows. This can be achieved by creating a Window object and opening it using the OpenWindow method on the Application object.
Window secondWindow = new Window(new MyPage());
Application.Current.OpenWindow(secondWindow);
Note that multi-window support works on Android and Windows without additional configuration. However, additional configuration is required on iPadOS and Mac Catalyst. Read more about how to set it up in the Microsoft documentation here: .NET MAUI windows - .NET MAUI | Microsoft Learn.
Events
The naming convention for events is also a little bit different. But basically adding “ed” to the existing WPF events should do the trick.
Example: Button.Click is now Button.Clicked.
Another interesting thing to point out are the key-events. They are not exposed directly. However, most of the UI components have their events that fire when the focus is lost or the text is changed, and you can subscribe to them to do your job.
For example, you can subscribe to Completed event which is fired when Enter is read into the Entry:
MyEntry.Completed += MyEntry_Completed;

private void MyEntry_Completed(object sender, EventArgs e)
{
  /// your code here
}
Another way is to access the native windows component and attach the event:
To do that, you can obtain the UIElement on which the key-press events should be detected from Handler.PlatformView. And then you can hook up the native events.
var handler = mauiView.Handler;

UIElement? nativeView = handler?.PlatformView as UIElement;
if (nativeView != null)
{
  nativeView.KeyDown += this.PlatformView_KeyDown;
  nativeView.KeyUp += this.PlatformView_KeyUp;
  nativeView.PreviewKeyDown += this.PlatformView_PreviewKeyDown;
}
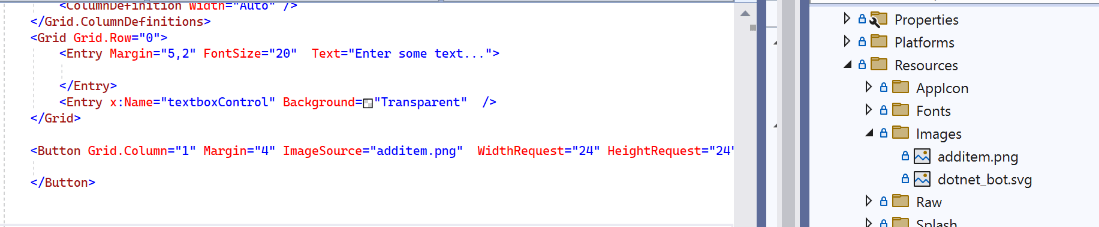
Images & Resources
This is one of the great features of .NET MAUI—a common shared folder where you can put the images, use the MAUIImage build action and directly access them in the code without worrying about where exactly they are:
For example, if you place add.png to the image folder, you can access it from a button by its short name:
Customization
Another important thing that you should know is how to customize UI or behavior per platform. You can use two major approaches:
- Write platform-specific code and use the
#ifdirectives in C#:
#if ANDROID  using Android.Content;
using Android.Views;
  using Android.Runtime;
#elif IOS  using UIKit;
  #endif
For more information, see.NET MAUI invoking platform code - .NET MAUI | Microsoft Learn.
Or the OnPlatform property in XAML:
<ContentPage xmlns="http://schemas.microsoft.com/dotnet/2021/maui"  xmlns:x="http://schemas.microsoft.com/winfx/2009/xaml"  x:Class="...">
  <ContentPage.Padding>
    <OnPlatform x:TypeArguments="Thickness">
      <On Platform="iOS, Android"  Value="10, 20, 20, 10" />
    </OnPlatform>
  </ContentPage.Padding>
</ContentPage>
For more information, see OnPlatform Markup Extension.
- Use the new mechanism in .NET MAUI—handlers. For handlers, you can read more in one of our previous posts.
Accessibility
Another very important topic for modern apps is accessibility. In WPF, we have a lot of tools to achieve that. One of them is the AutomationPeer class. In .NET MAUI, we will use semantic properties to make our app accessible. Read more about semantic properties here: Build accessible apps with semantic properties - .NET MAUI | Microsoft Learn.
Conclusion
Migration of a WPF application is not a trivial task, but it is worth it as .NET MAUI gives us a lot of possibilities and supported platforms.
The framework is rich with resources and functionality, but if you are missing something no matter whether it is a resource or a component, Telerik is here to help. Browse the Telerik UI for .NET MAUI documentation and download Telerik UI for .NET MAUI to boost your development process.
And if our small test above showed you that Hybrid Blazor app is better for your need—check out the next post: What to Know When Porting a WPF App to .NET MAUI Blazor Hybrid.

Rossitza Fakalieva
Rossitza Fakalieva is a Technical Manager, Microsoft MVP in Developer Technologies and a Director of the Bulgarian chapter of the global Women Who Code organization. She previously worked on the Telerik engineering team and defines herself as .NET enthusiast. She loves to empower others to grow in their career and in the tech field—by teaching, by delivering courses and presentations, and as part of her daily job.
Related Posts
Comments
All articles
Topics

Latest Stories
in Your Inbox
Subscribe to be the first to get our expert-written articles and tutorials for developers!
All fields are required